18. Wildcard week
This weeks assignment is a wild card, we’re free to try out different techniques and to make our own assignment. As long as we design and produce something with a digital fabrication process (incorporating computer-aided design and manufacturing) not covered in another assignment. We have to document the requirements that our assignment meets, and including everything necessary to reproduce it. Possibilities include (but are not limited to) composites, textiles, biotechnology, robotics, folding, and cooking. For this week our lab works with composites.
Files, planning and tools
Files
- STL file - Branch
- STL file - Branch
- STL file - Branch
- Fushion 360 Slicer file for Branch mold
- EPS files - slicer Lasercut Mold 1
- EPS files - slicer Lasercut Mold 2
- ExactFlat exports SVG for Branch mold
Planning
- Do tests for composites
- Design the parts for the composite mold
- Mill or laser cut the parts for the mold
- Design the patterns for the composites
- Laser cut the canvas to use for the composite
- Laser cut the veneer parts for the marquetry
- Place everything together
- Vacuum bagging and drying the design.
Tools and materials used
- Fushion 360
- Slicer for Fushion 360
- ExactFlat for Fushion 360
- Laser cutter
- Epoxy
- Canvas
Link with final project
Because this week is a free to choose assignment I want to start working on the frame of my final project. As mentioned before I want to create an artificial tree. And I think that composites will be a good way to produce the branches and twigs for my tree. I want to see if I can somehow create a more modular system. So for this week I want to create the branch or twig of my tree including holes that can be used to connect leafs to it.
Research and inspiration
This week my research was mainly about how composites and how to use molds and different production techniques for creating the shapes want. I looked for inspiring projects and came across the very intriguing Giant Tree Sculpture from a 140-year-old Hemlock by John Grade
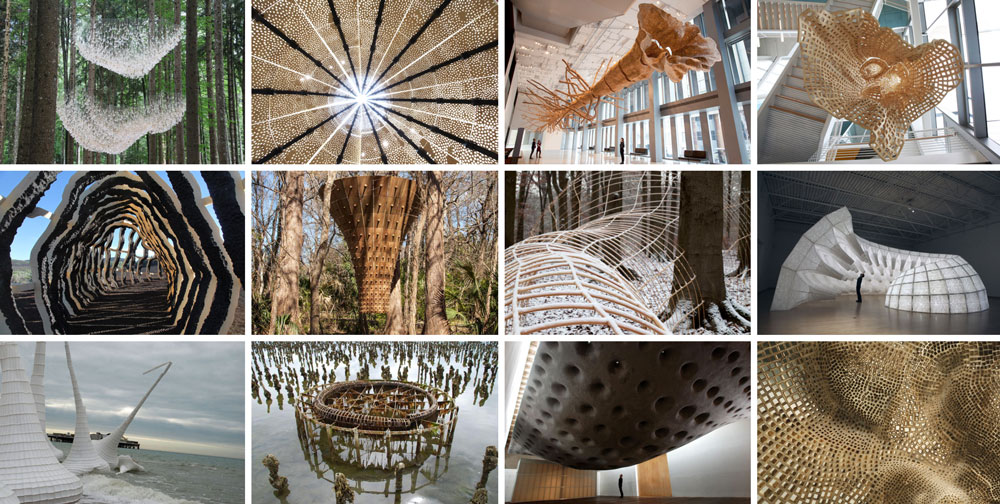 Inspiration: work by John Grade
Links used for inspiration
Links used for pattern design
- Youtube: Fusion 360: Turn a 3D model into a 2D Pattern (Flattening)
- Autodesk store: Exact flat
- ExactFlat Online
Links used for more information about composites
- Youtube: Carbon Fiber Kit - Fabrication - Eastbay Composites=
- Youtube: Making a large composite mold of complex shape. Part 2: Covering the plug.
- Youtube: Channel by Andrés Chavarría
Links to safety sheets epoxy used
- Polyestershoppen:Safety sheet Winter Epoxy Resin - A (dutch)
- Polyestershoppen: Safety sheet Winter Epoxy Hardener - B (dutch)
- Smooth-on: Safety data sheet Tarbender - Part A and Part B
- Entropy resins: Safety data sheet Super Sap Epoxy - Part A
- Entropy resins: Safety data sheet Super Sap Hardener - Part B
What we did – Group assignment step-by-step
We did a small group assignment, we looked at the datasheet for the two expoxy resins we had available at the Waag. These were the Tarbender by Smooth-on and the Super Sap by Entropy Resins. Epoxy is reallly hazardous, it can cause skin irritation, skin sensitization and eye irritation. Therefore it’s really important to always use the right protection when using epoxy; wear protective gloves, protective clothing, eye protection and face protection. Also make sure you’re in a space that’s well ventilated. After we made sure we took all the safety measurements we prepared a couple of tests.
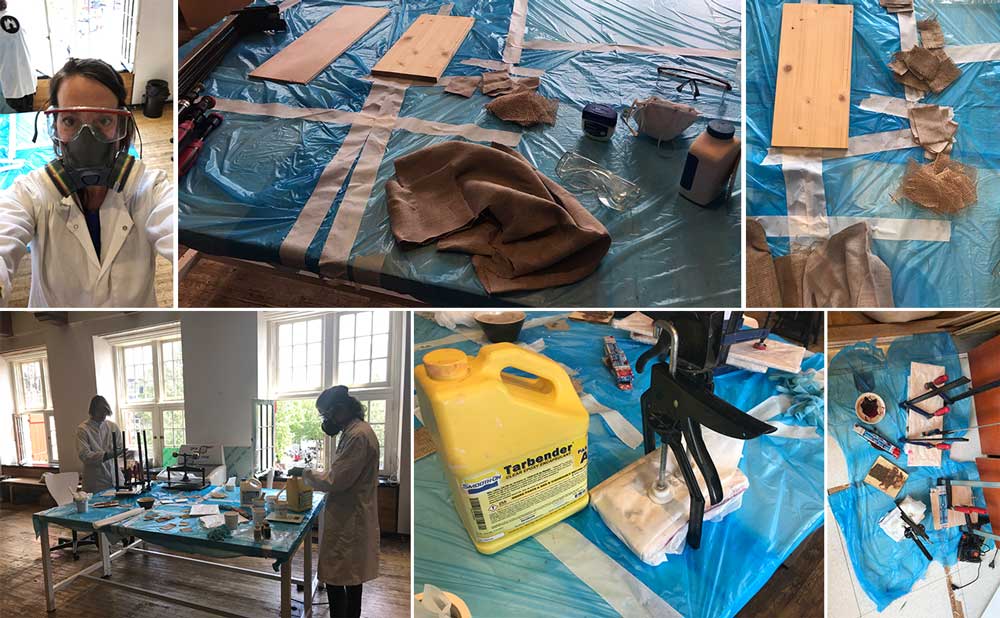 Group Assignment: preparing and testing two Epoxy resins
We mainly wanted to test what the effect would be of using different materials for fibers and what the results will be using different combination of materials.
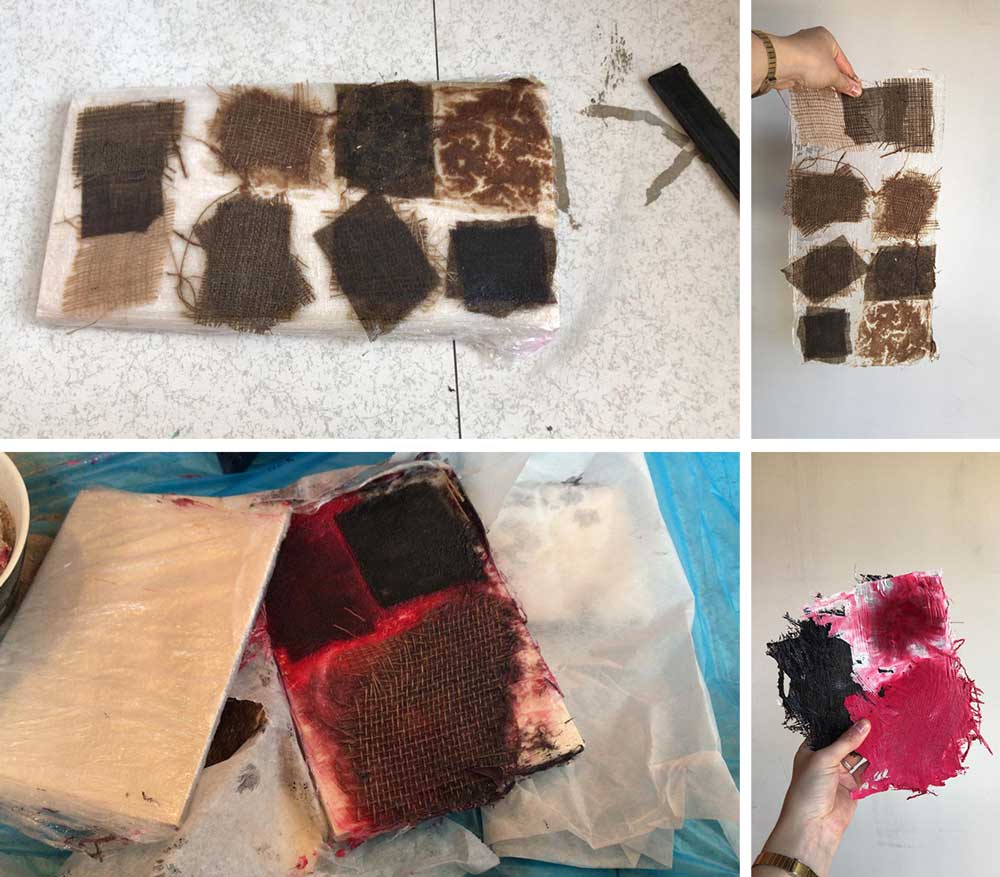 Group Assignment: test results with two Epoxy resins
The picture above shows the end result of our test. Anne showed and described the results, more details on these can also be found at her documentation. The thickness is comparibly to a credit card stiffness. Based on these tests I’m not sure if I could use this for my final project.
What I did – step-by-step
For this week I wanted to do a lot of tests to see if I could use composites for my final project. I thought this would be useful for connecting the leaves and for the framework of my final project.
Step 1: Testing samples
My first step was to do some extra tests for my own project. I wanted to test four different things.
- How do different materials works, and can I use paper as a finishing material
- How do different types of leaves work out, real ones and fake ones
- How do composite work to create a branch or trunk, using a round surface.
- Can I include optic fibers in my leaves?
To be able to test these four elements I set up different test, as can be seen in the image below.
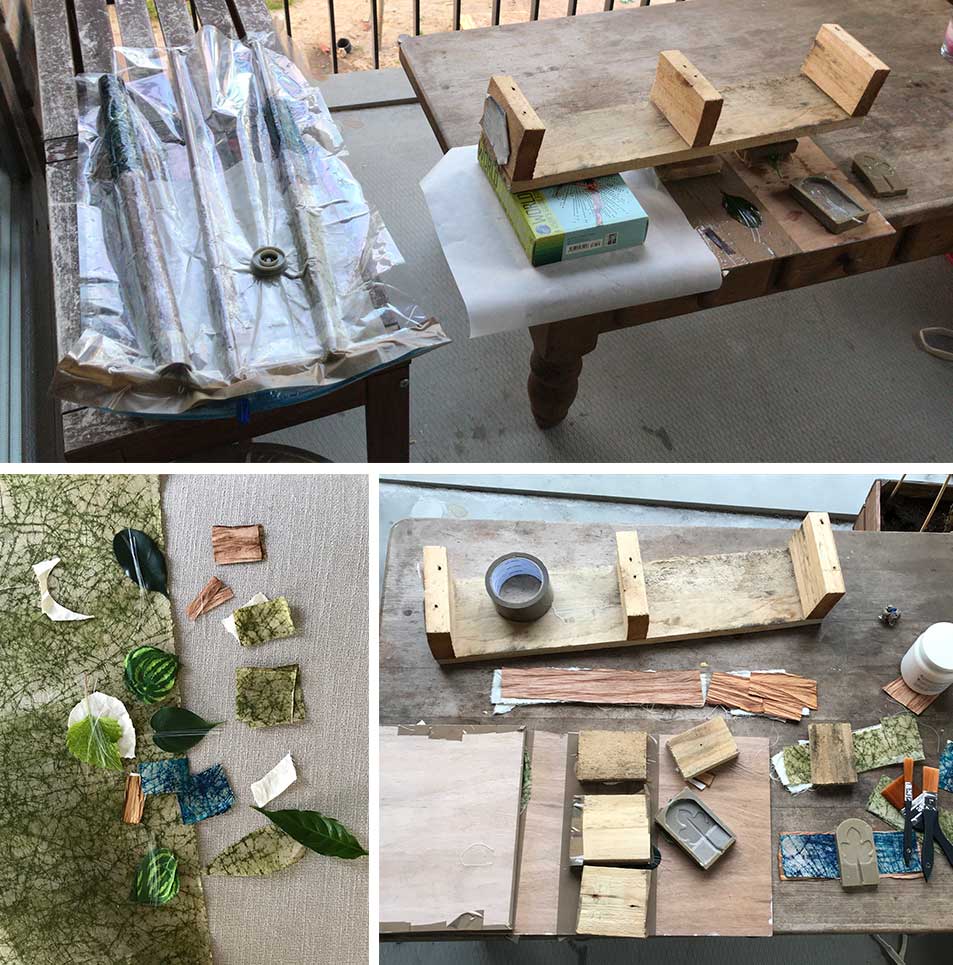 Testing composites with epoxy at home
1. different materials
I used canvas, cloth and paper as materials. For the thickness of the leaves the combination of to layer of paper or two layers of think fabric would fit the best. Because it still needs to be flexible. The other versions are too stiff. For the frame the stiffness is better. For the branch it’s therefore best to use more layers of canvas or cloth.
2. creating leaves
For my leaf-test I used two real leaves and two ‘fake’ leaves made from fabric.
- The real leaves don’t work with the epoxy composite the way I wanted, I think that’s because the ones I used still included water. I think therefore the epoxy doesn’t stick to the leaves.
- For the ‘fake’ leaves: one of them is made from artificial silk and the other one from nylon. I wanted to see how these two materials would work in combination with epoxy. For the nylon version this works really nice when I connect the two, it’s has the right stiffness. For the artificial silk the end result is too stiff to get a realistic leaf-effect.
 Test results leaves and branches composites
4. using a round surface
For testing how the composites will work with round surfaces I used ciliders of three different sizes to see how this would work. In combination with different materials.
- 2 layers of cloth with paper: this gives the best result for the frame. It’s thick and stiff enough.
- one layer of cloth and paper: this can work for the frame but I prefer the first version as this gives more stability.
- two layers of paper: this is too thin for the frame. I used a vacuum bag for the round surfaces. This worked really well.
4. using optic fibers
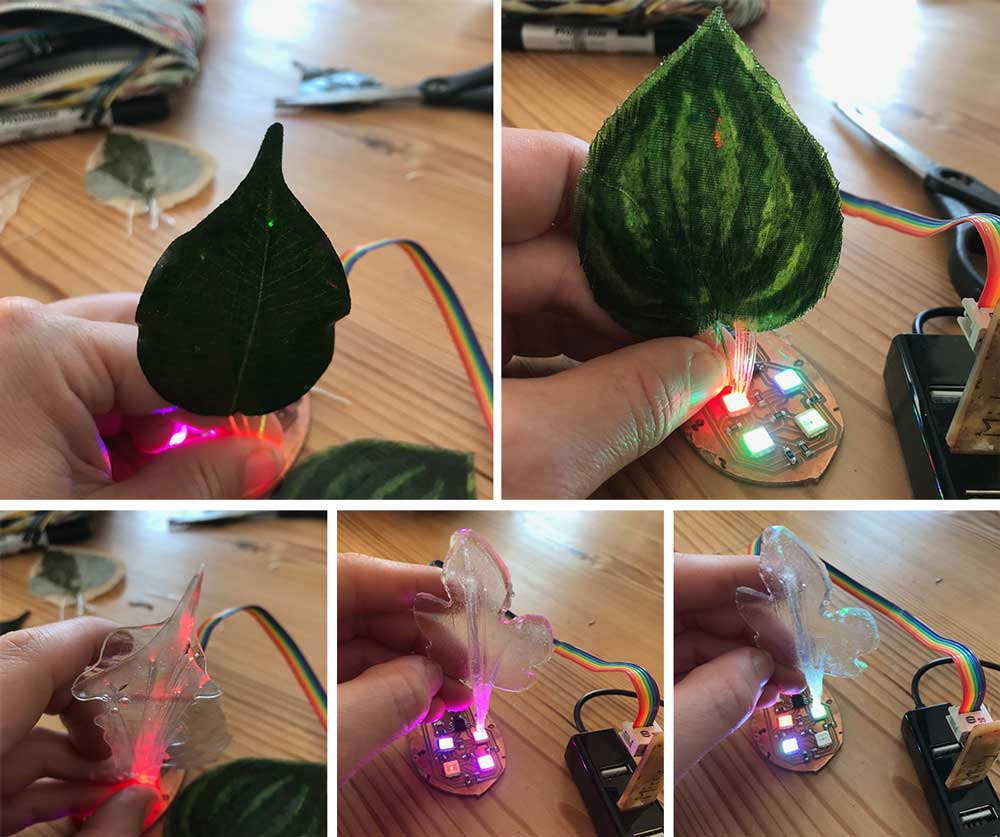
I wanted to test if my idea, if it would work to include optic fibers in the leaves. Before I added the PMMA optic fibers, I sanded them so it would shine from the sides not only from the top.
- I used my mold from the molding and casting week and added optic fibers to see if this would work. I tested it and this version has the best result. It has the best shine from the side.
- I also added optic fibers to my test with the leaves. For the fabric leaves, the top shine is slightly visible but the side glow isn’t. Overall the result of the leaves with the optic fibers are too stiff. The fibers work really well for the composites so they make the structure really strong. Which is nice however for the leaves in my final project I would like them to be more flexible.
 Test results leaves with light and optic fiber
Step 2: Designing the mold - using Slicer for Fushion 360
All the tests I did are with given material and molds. The next step is to incorporating computer-aided design and manufacturing, as this is one of the main requirements for this weeks wild card.
Making a quick branch like design
For this week, I didn’t want to spend too much of my time on the 3D design. So I made a quick version of a branch in Fushion 360. My main goals was for this week was to test how I could create holes for connecting side branches. Therefore designed a very rough version of a branch.
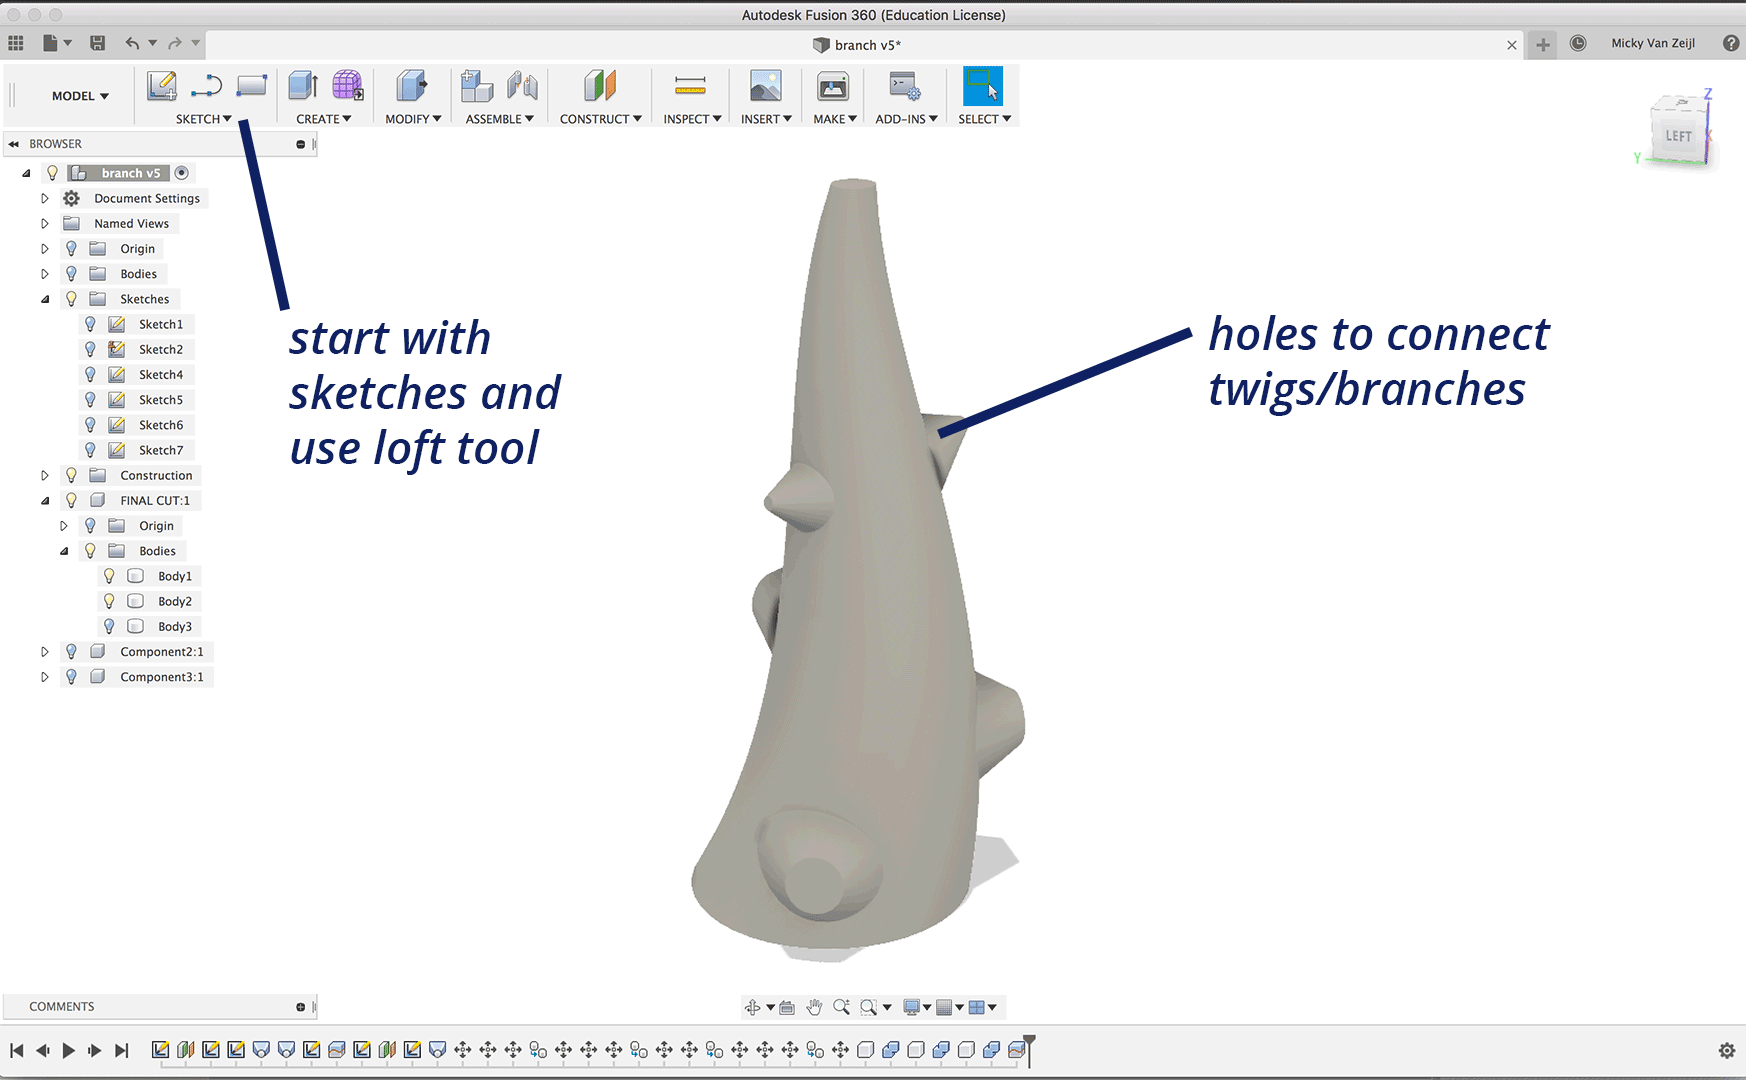 Fushion 360 Branch design
Using Slicer for Fushion 360
To create a mold for the composite, I wanted to used the Slicer for Fushion 360. First of all because I wanted to experiment with the slicer. And secondly because I wanted to use the laser cutter in stead of the Shopbot to create a mold. I wanted to use the laser also because time wise this would be faster.
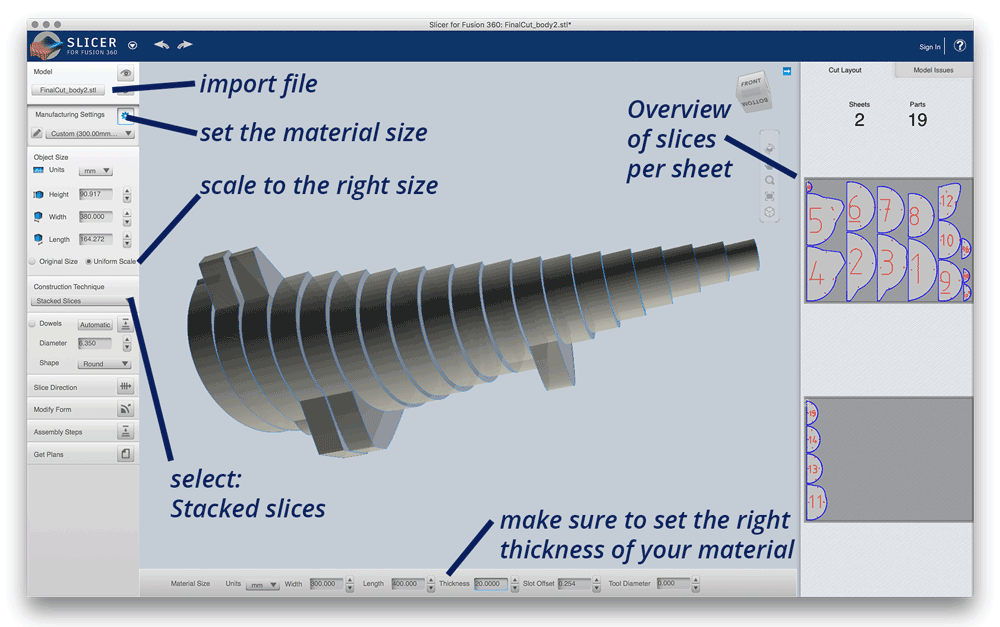 Slicer for Fushion 360 mold design
Step 3: Making the mold
After slicing my design I could laser cut and make my mold. I used the vacuum former to make sure the mold is stable enough.
Laser cutting foam
I went to the Makerslab of my University to laser cut the foam. As I knew they had enough in stock to use. And because they have a vacuum form machine that I really wanted to use.
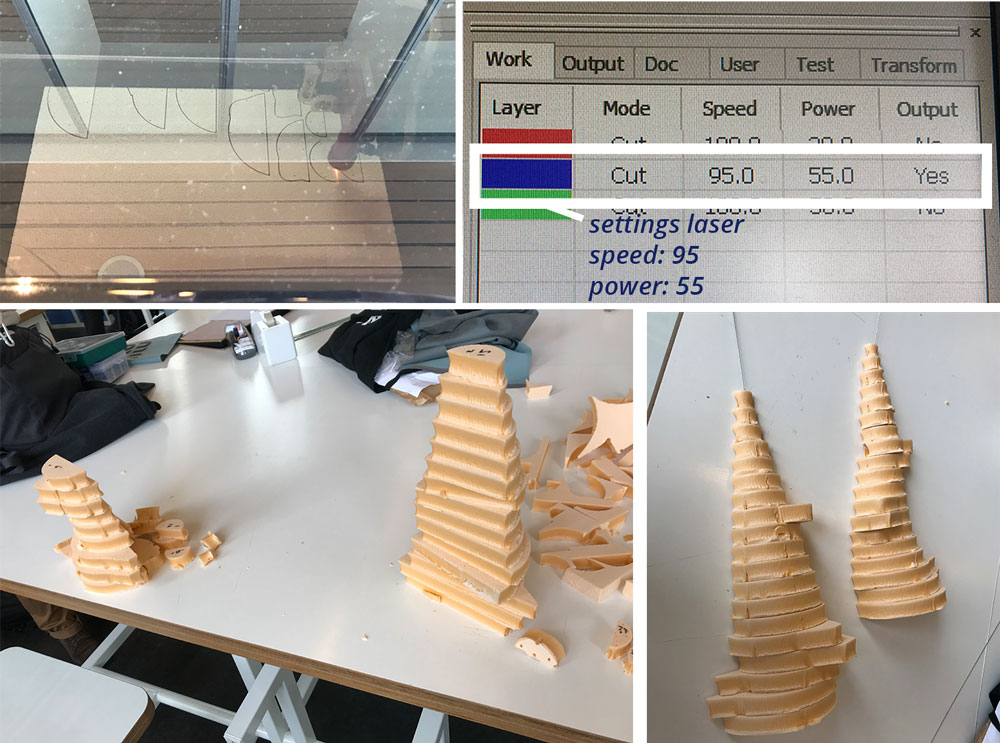 Laser cutting and putting together the mold
The laser cutting went really fast. The next step was to collect each part. I used an iron wire and glue without solvents to connect the parts.
Using the vacuum former
The mold was still a bit wibbly-wobbly as the glue didn’t have enough time to set. So I used the vacuum form machine to make sure all the parts stay connected. And I thought the polystyrene would be useful as epoxy doesn’t adhere to it.
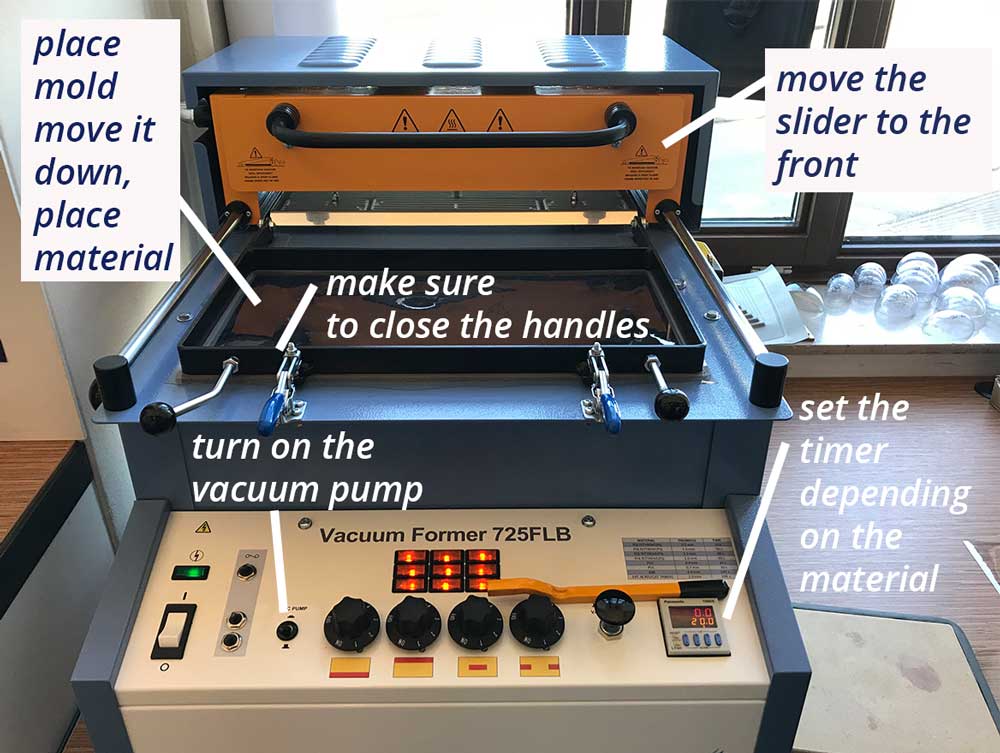 Instructions for the vacuum former
This worked really well, it’s always fun and addictive to use the vacuum machine. I enclosed my foam mold inside to make a stable mold for the composite.
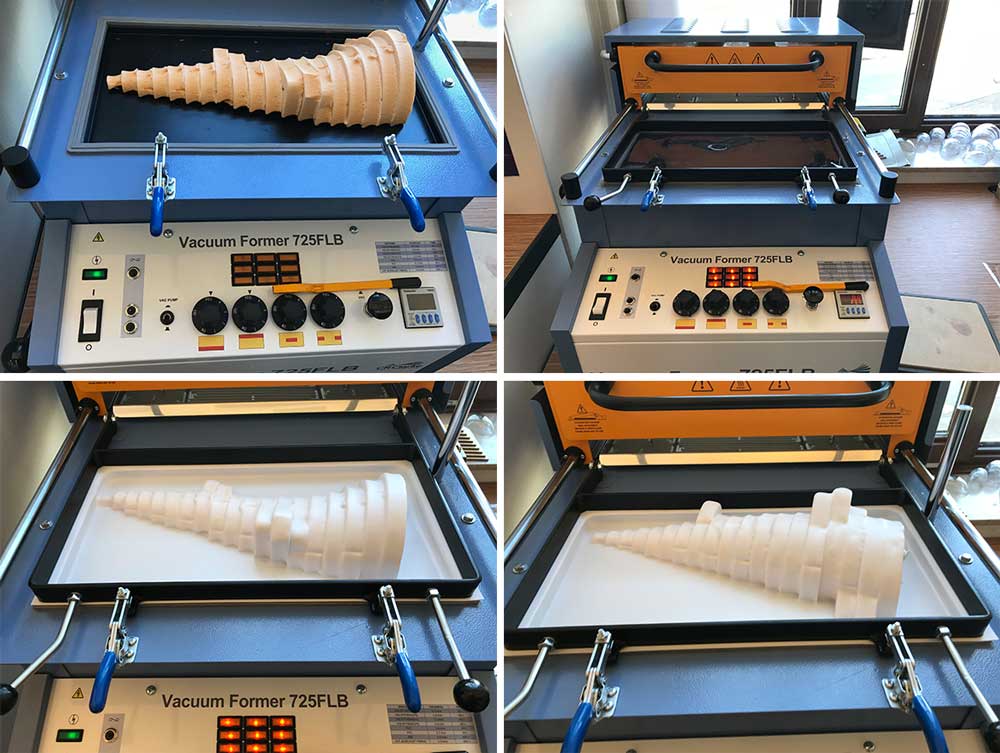 Vacuum forming the mold
Step 4: Using ExactFlat
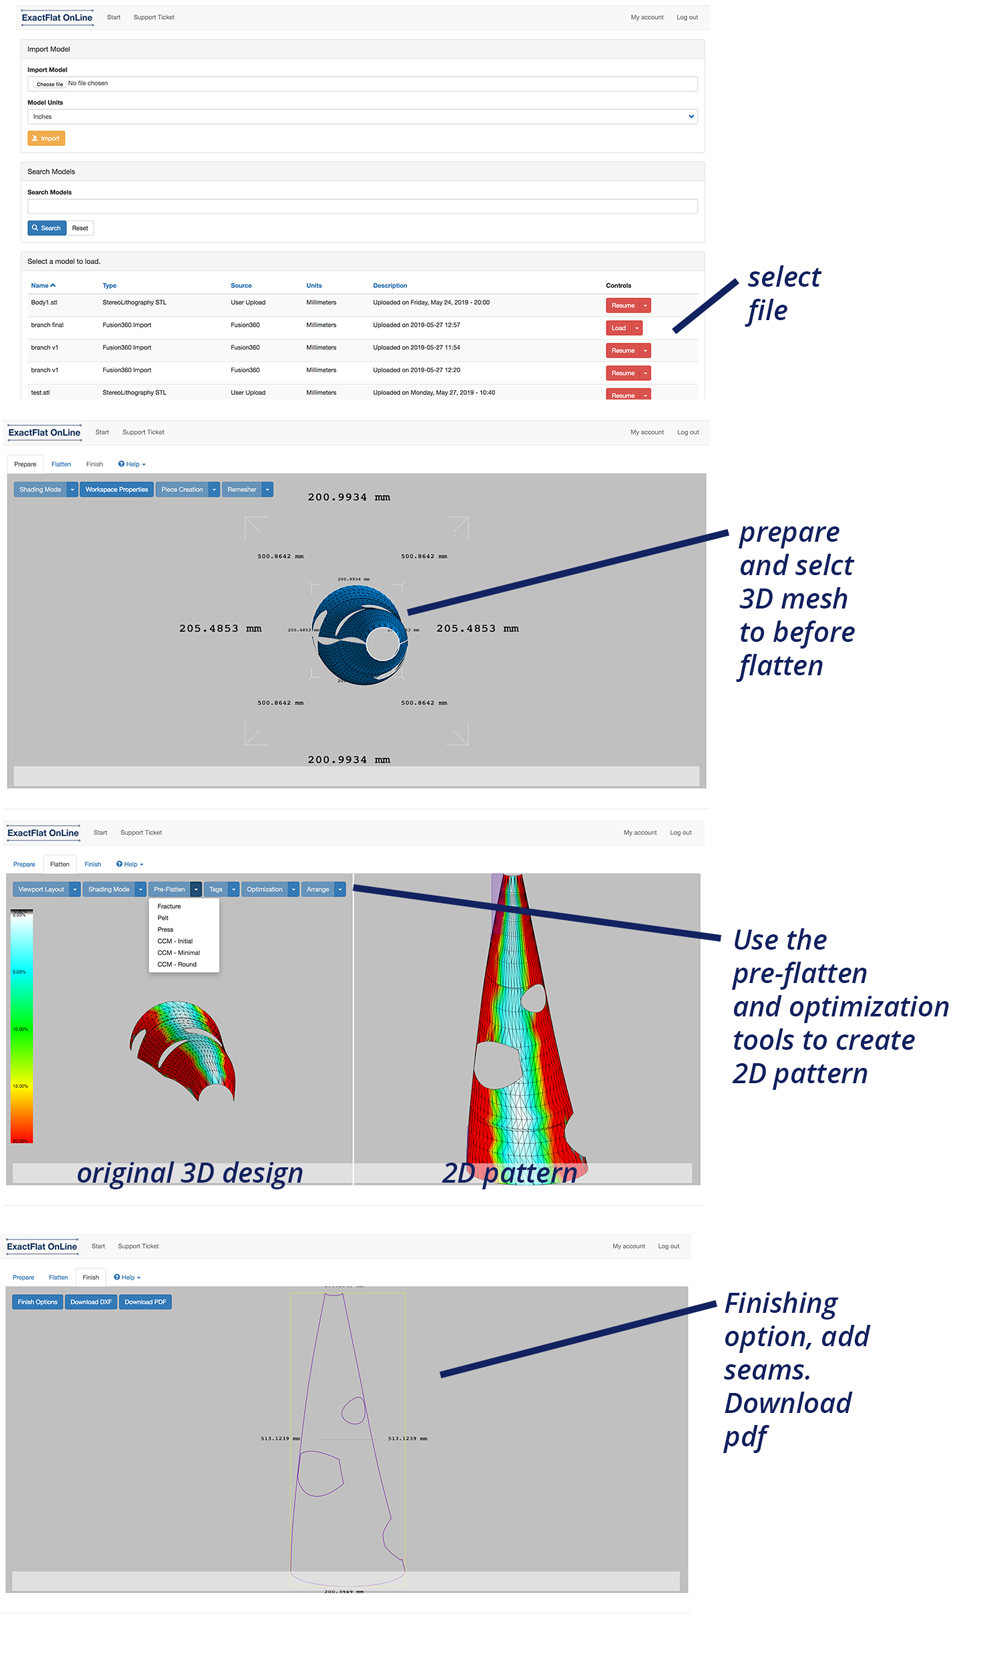
After all the tests I looked into ways how to create a 2D pattern that can be used for textiles from a 3D design. I found that there’s a nice plug-in for Fushion 360named ExactFlat Online.
Preparing the file in Fushion 360
- Install ExactFlat: this is easy when using Windows. I had a lot of difficulties installing the ExactFlat plug-in on my Macbook. In the end I used the home computer which has Windows installed. This was really easy to do, just follow the installing instructions.
- Once installed it will show an extra option in the menu bar.
- You first select the left icon of exactFlat.
- This option gives you to possibility to select faces to create a pieces. It’s possible to select more than one face for one piece.
- Once I selected both my pieces, I exported it from Fushion 360 to ExactFlat online.
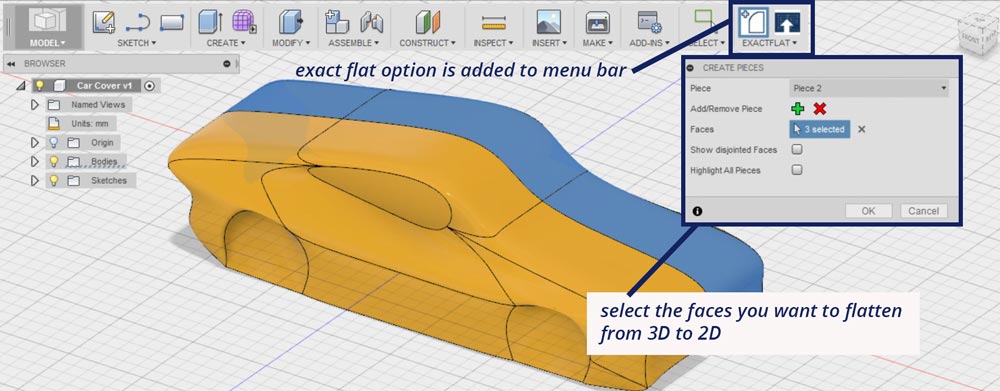 ExactFlat Plugin, picture from Autodesk
Flattening the 3D design
Once I selected and published the pieces in Fushion 360 I could open them in Exact online. The image below shows the basic interface elements of the plug-in. ExactFlat has a very detailed tutorial.
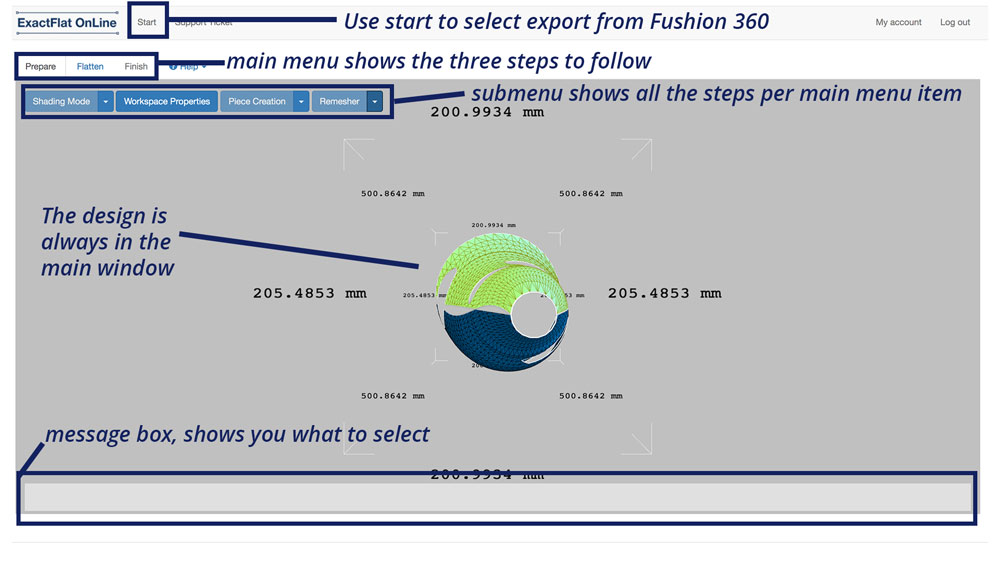 Using Exact Flat
For this week I did a very quick and fast version because I didn’t have time to figure out all the detailed possibilities with the plug-in. Exact Flat provides an online editor which leads you through three steps. Each main menu part has different sub menu parts that show you all the steps for each main item.
 Steps for using Exact Flat
Step 1 Prepare
First you have to prepare the piece you loaded from Fushion 360. Select the piece you want to make a pattern from. Use the re-mesh option to reduce the amount of meshes. I selected the pieces one by one, it’s also possible to select them both in one go. But somehow this made it more difficult for me.
Step 2: Flatten
Once you have prepared the piece, the next step is to flatten the 3D model into a 2D pattern. Exact Flat has several options to do this in the pre-flatten menu item, like fracture and press. More details on what each of these do can be found in the tutorial above.
- In the flatten menu you see the 3D model on the left and the result of the 2D pattern on the right.
- It shows a color scheme. The more red, the tighter the fabric will be. The more white the more loose the fabric will be.
- To get a good and useful pattern for this week. I used the Fracture mode. This gave the best results for flattening the 3D design.
- Click on optimization. This optimizes the pattern and prepares it for the finish.
Sadly, I didn’t have time to totally figure out how each of the pre-flatten options works. But the steps I took, did work to create a nice pattern for textiles.
Step 3: Finish
The next and final step is the finish menu. This menu item gives the option to add margins and seams. When everything looks good and the seams are added, you’re able to download the files as PDF and DXF file. Somehow I couldn’t use the DXF version in Illustrator so in the end I used the PDF downloads of the pattern. I used this pattern to laser cut my textiles for the composites.
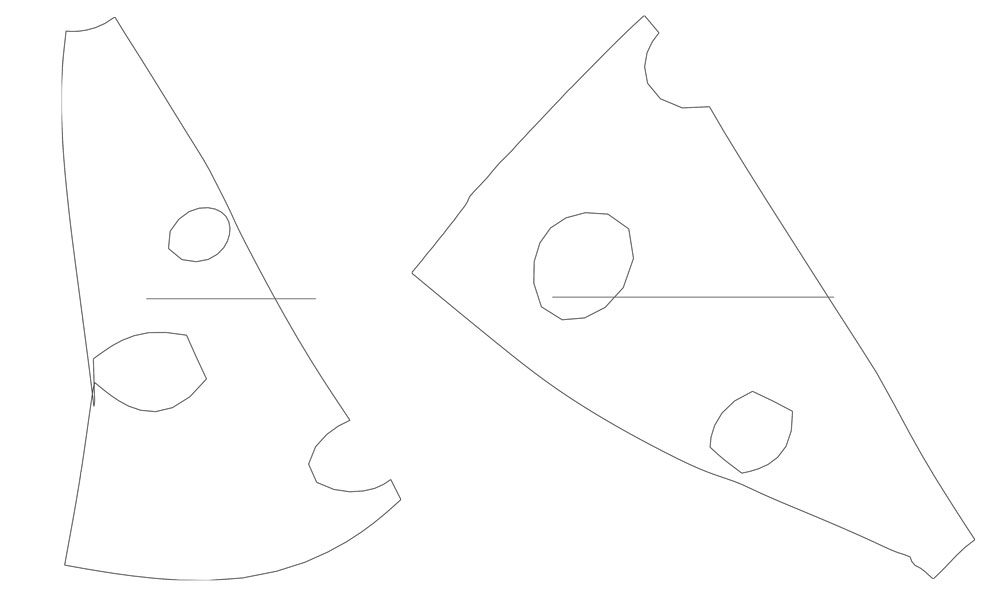 2D pattern for textiles
Step 5: Using my mold to create composite
With the 2D patterns I got from ExactFlat, I could laser cut the cotton and burlap textiles that I will use as matrix for my composites. As you can see in the images bollow, the cotton as well as the burlap, turned out really nice and fitted the mold almost perfectly.
 Using my mold to create composite
The steps I took to create the composite:
- To be totally sure epoxy would adhere to my mold, I used boxing tape to cover it.
- I used winter epoxy by Resion the composite
- I layered the matrix with two pieces of burlap, with each a layer of cotton in between. I finished with three layers cotton for a nice finish.
- I used a vacuum bag, to form the composite around the mold.
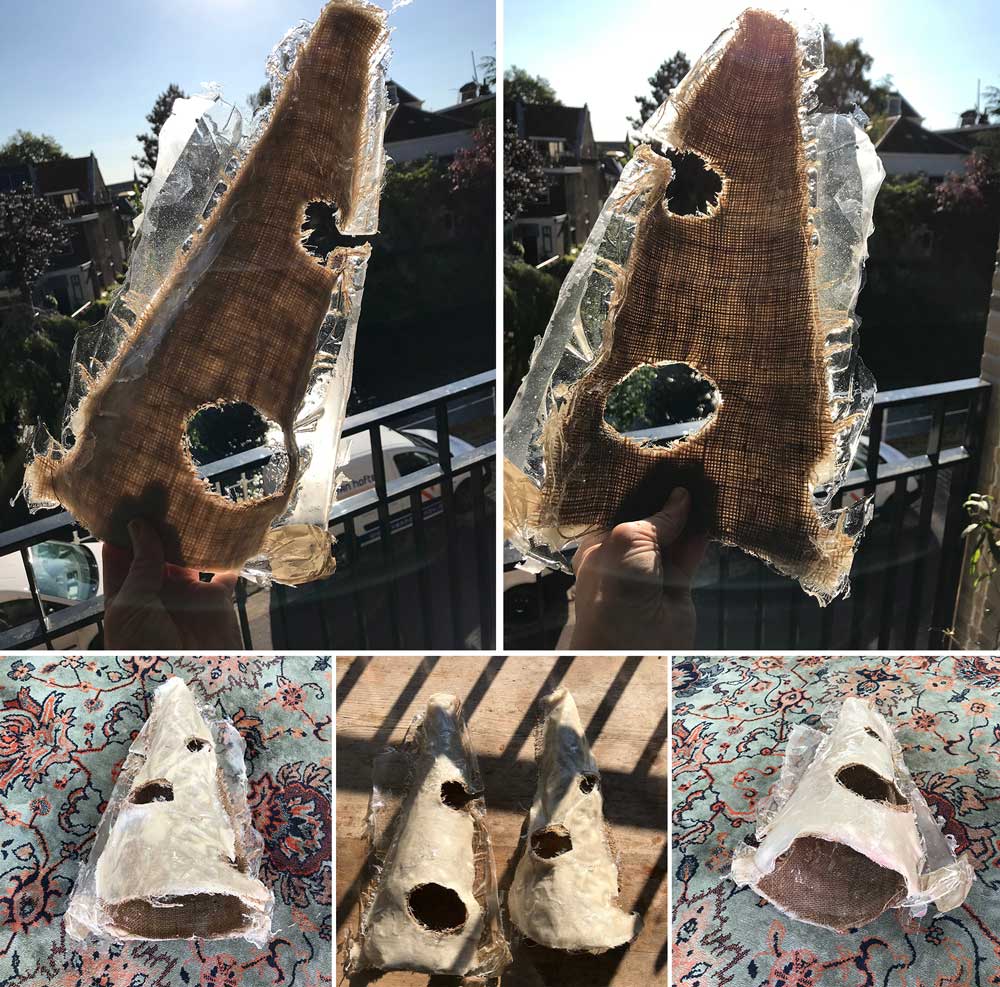 End result
The end result was ok. I’m not totally happy with how it turned out, I think the end result can be a lot nicer with practice.
What I did wrong – and how I solved it
I did a lot of tests and experiments this week related to my final project, so the things that went wrong are really good insights for me what to do and what not to do or use for my final project.
Creating the mold with slices
The biggest mistake in my thinking process was slicing the 3D design and laser cutting the foam. This was so much a big mistake, but the foam I used turned out was not useful with solvents. For the epoxy this wouldn’t necessary be a problem but I didn’t want to take a change. How I solved it? I decided to add an extra step with using the vacuum former. This also helped with keeping the sliced stuck to each other. To be able to add this step, my mold should be able to fit in the vacuum former machine. So I had to scale my design and make sure the sliced version would fit in the machine. For this week, that’s not a problem because it’s still a test. However for my final project, I have to think of another solution. I decided I won’t use composites for my final project because I can’t get the result I want in the time I have.
Using a cheap vacuum bag
The vacuum bag I used was a cheap version. The first one worked perfectly. However, the bigger version didn’t work nice at all. In the end I did get it to work. But I’m not totally happy with how it did. For next time I will use a vacuum bag of better quality. And if possible I will use pressure in combination with a mold made with the Shopbot as this can be very precise.
What I learned
This week helped me a lot to get a good idea about the possibility of using composites for my final project. For me I notice that I need a lot more practice with handling epoxy to get the end result I want. Things I learned this week in relation to my final project and decisions I will make based on them:
- For the leaves: using composites will probably give a too stiff end result, which makes it more difficult to move them. So I will try to see if I can use fabrics and a different way to connect them together.
- For the optic fibers: I would love to include these inside the leaves. But then again when using composites, it will turn out too stiff.
- For the optic fibers: I need to find a way for placing the optic fibers in the shape of the veins of the leaf. This was more difficult than I thought
- For the optic fibers: I also need to find a way to make sure to bundle the ends together so they can be placed in the right angle.
- For the branch/frame: The technique I used with the composites is not detailed enough. I know this should be possible but I think with my skills and the time we have this isn’t be the best option for me to use for the frame.
What made me proud!
I’m most proud that I managed to use and learn ExactFlat in a short time span and that it actually worked. It was nice to have 2D pattern for my 3D design.
Credits and references
I used all the epoxy of my boyfriend so he deserves some credits :)