3. Computer Aided design
The assignment of this week is to model (raster, vector, 2D, 3D, render, animate, simulate, …) a possible final project, and post it on my class page. My experience and skills needed for this weeks assignment is in the 2D modeling part. I know my way around in Illustrator and Photoshop. 3D modeling will be a bigger challenge for me because I never really grasped the concept of a 3D program. I did try to work with ThinkerCad and Sketch but I never managed to make something the way I wanted.
Files, planning and tools
Files
- GIMP files: zip folder with leaves, branches and tree
- Photoshop file: overview
- Photoshop file: branch with leaves
- Illustrator file: image trace leaf
- Fushion 360 file: tree 1
- Fushion 360 file: tree 2
- Fushion 360 file: lesson by Mauro
Planning
- learn how to work with a 3D program
- try different programs than Adobe for 2D modeling
- make sketches and drawing of my final project
- digitalizes these drawings in vector and raster format
- model my idea in 3D
Tools
- Zotero for references
- Sublime text
- Gimp
- Abobe Illustrator
- Adobe Photoshop
- Fushion 360
Link with final project
This week I will create sketches, 2D and 3D models of my final project. I will mainly experiment with possible shapes and forms it can have. My tree can be realistic or more an abstract form, during the following weeks I want to experiment with different forms and shapes. This makes me think of Piet Mondrian and his abstraction of a tree.
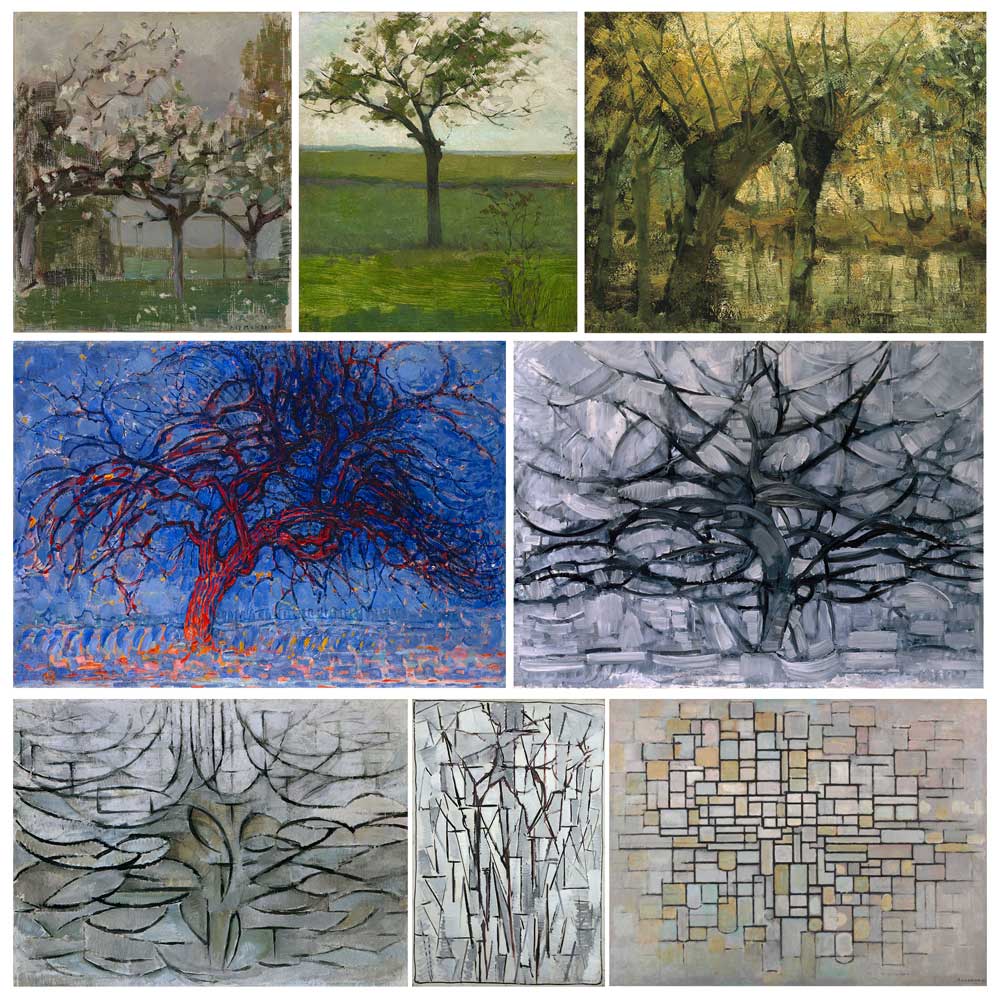 Piet Mondriaan’s development towards abstraction based on trees
Research and inspiration
This weeks inspiration mainly came from Mondriaan and from the books Minibijbel Bomen: een rijkgeïllustreerde gids over bomen uit de hele wereld written by Tony Russel and Catherine Cutler (2014) and the book The Hidden Life of Trees: What They Fell, How They Communicate - Discoveries from a Secret World written by Peter Wohlleben (2016)
What I did – step-by-step
My starting point is always paper, I can better organize my thoughts on paper than on screen. So I started with sketches, followed by 2D cut outs and a 2D collage and I finished with my first 3D-model. I mentioned before I do have experience with 2D design but none with 3D. I wanted to incorporate the spiral project development within this development. For me this is from a leaf to a branch, to multiple leaves on multiple branches, toward a tree.
In the end I only used Fushion 360 as 3D program and I didn’t look into other 3D programs this week because I found using different 3D modeling modes within Fushion 360 already overwhelming. Time wise I therefore didn’t manage to try out other 3D-programs. My goal is to try out different programs later on in the Fab Academy. In week 6 I looked into Blender as extra 3D-program as Rutger mentioned that it’s more useful when designing organic forms. More information on this part can be found in my documentation of week 6.
Sketches
As mentioned I like to start with sketch on paper. In the mindset of Fab Academy I tried a different, for me new technique, namely pastels. Normally I use pencils, oil wax or acrylic. I still find the coloring of the pastels a bit dull I added water to get a more intense effect, however I’m not really satisfied. It’s messy and I dull. But this is OK because I’m going to edit it digitally anyway. So I scanned them to be able to edit them.
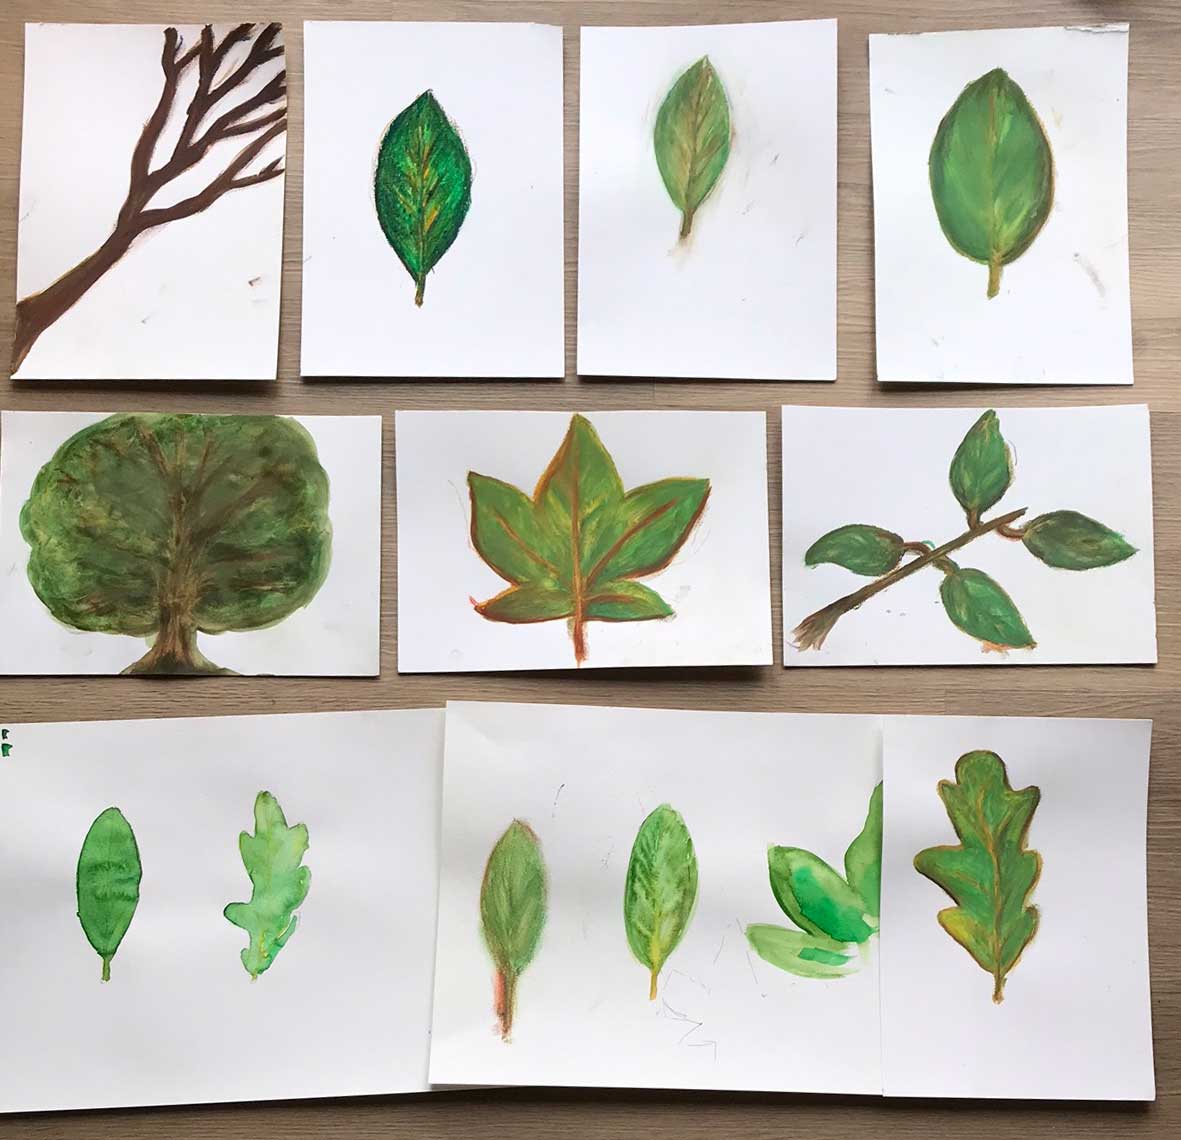 Sketches of my final project
Raster vs Vector
The difference between Raster and Vector 2D modeling is that vector uses paths and raster uses pixels. As mentioned on Wikipedia “Vector graphics are computer graphics images that are defined in terms of 2D points, which are connected by lines and curves to form polygons and other shapes. Each of these points has a definite position on the x- and y-axis of the work plane and determines the direction of the path; further, each path may have various properties including values for stroke color, shape, curve, thickness, and fill” (Vector graphics) and a “raster graphics or bitmap image is a dot matrix data structure that represents a generally rectangular grid of pixels (points of color), viewable via a monitor, paper, or other display medium. Raster images are stored in image files with varying formats. A bitmap is a rectangular grid of pixels, with each pixel’s color being specified by a number of bits” (Raster graphics).
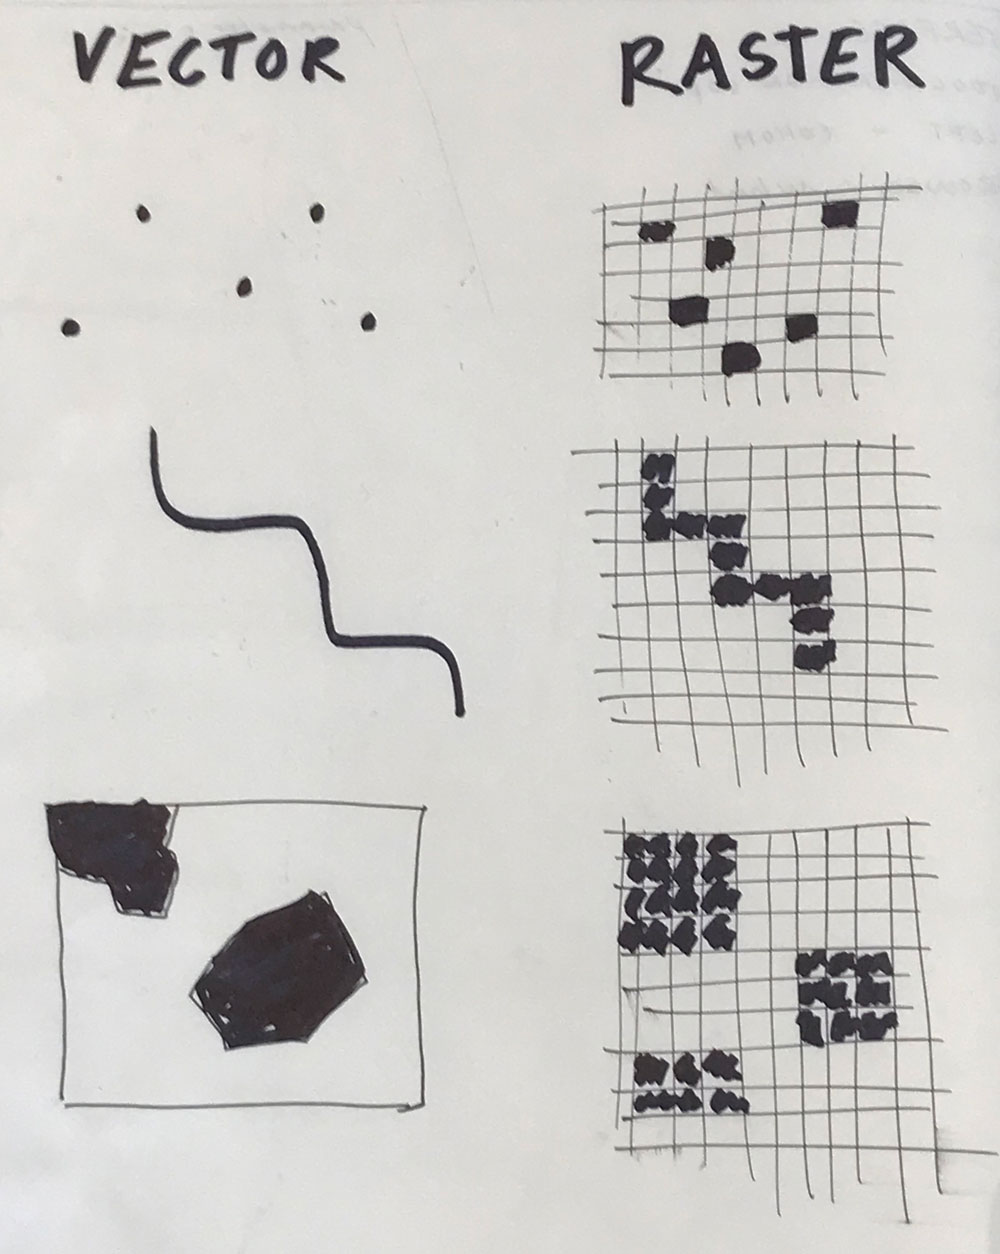 Vector vs Raster
How to use Gimp to cut out images.
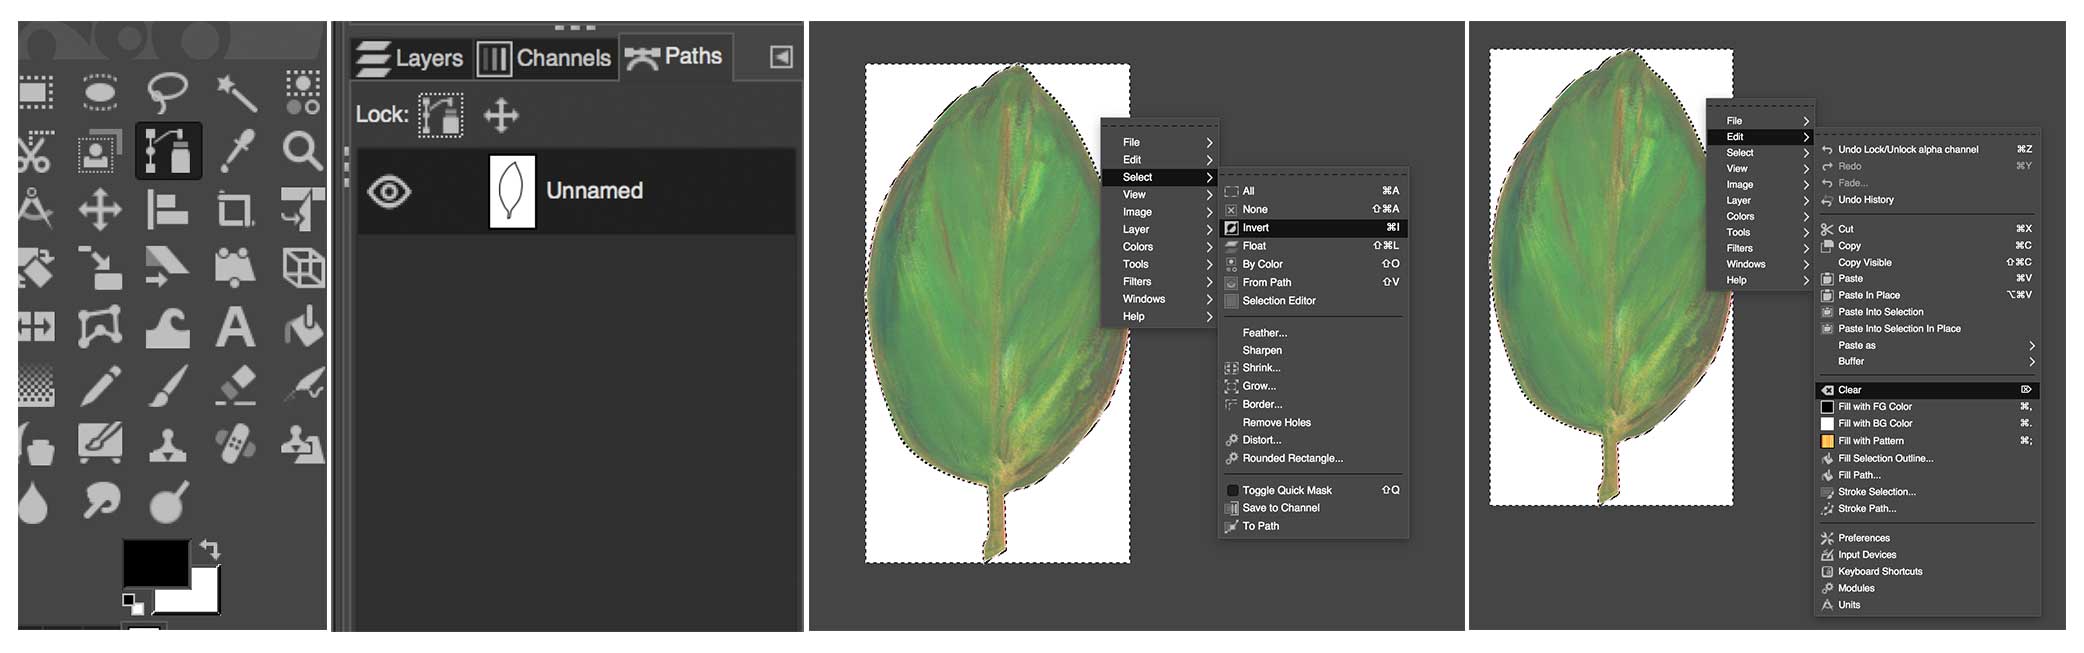
I have some experience with Adobe Photoshop. Therefore I tried Gimp to see how a different image editing program would work. I used Gimp for cutting out my sketches by hand. I exported it to ‘png-files’, with a transparent background. And I used Photoshop to create a collage from these images. And to adjust the colors.
I used Gimp for the first time. As I prefer to work with paths I used it to create a path and cut out each item and export it as png-file without a transparent background.
 Sketches of my final project
- File > Open image
- Menu left: choose the Path Tool (B)
- Trace the shape with the path tool by clicking on the place
- If you don’t want a straight line hold the mouse after the click and move it for the right curve.
- Follow the whole object this way.
- When finished right click: select > from path (shift + V)
- Right click: select > invert (cmd + i )
- Right click: edit > clear
- Go to layer > right click: add alpha
- Go to path > unclick the eye
- Right click: edit > clear.
- Go to File > export as > nameFile.png
- Click export
 Overview of Final Project elements with auto color Photoshop - GIMP + Photoshop edited files
How to use Photoshop to create a collage and use auto color
I used the images that I edited in GIMP for my collage. The first one provides an overview of all the possible elements of my final project. The second collage is a branch with leaves, which can be all possible shapes. But for now I created a basic tree like shape.
- Create new file: file > new > custom > 20 x 30 > create
- Go to folder on finder > select all images
- Drag the images from finder folder to your Photoshop canvas
- For each images you need to change sizes > dragging the corner + shift
- Press Enter: the image size is set and a layer is created
- Continue this for all images
- Right click on the layers > rasterize layer
- Move the images around the way you want by clicking on them and moving your mouse
- Select all layers except background
- Go to Image > auto color
- Want some more personal changes go to image > adjustments > Hue/Saturation and Brightness/Contrast
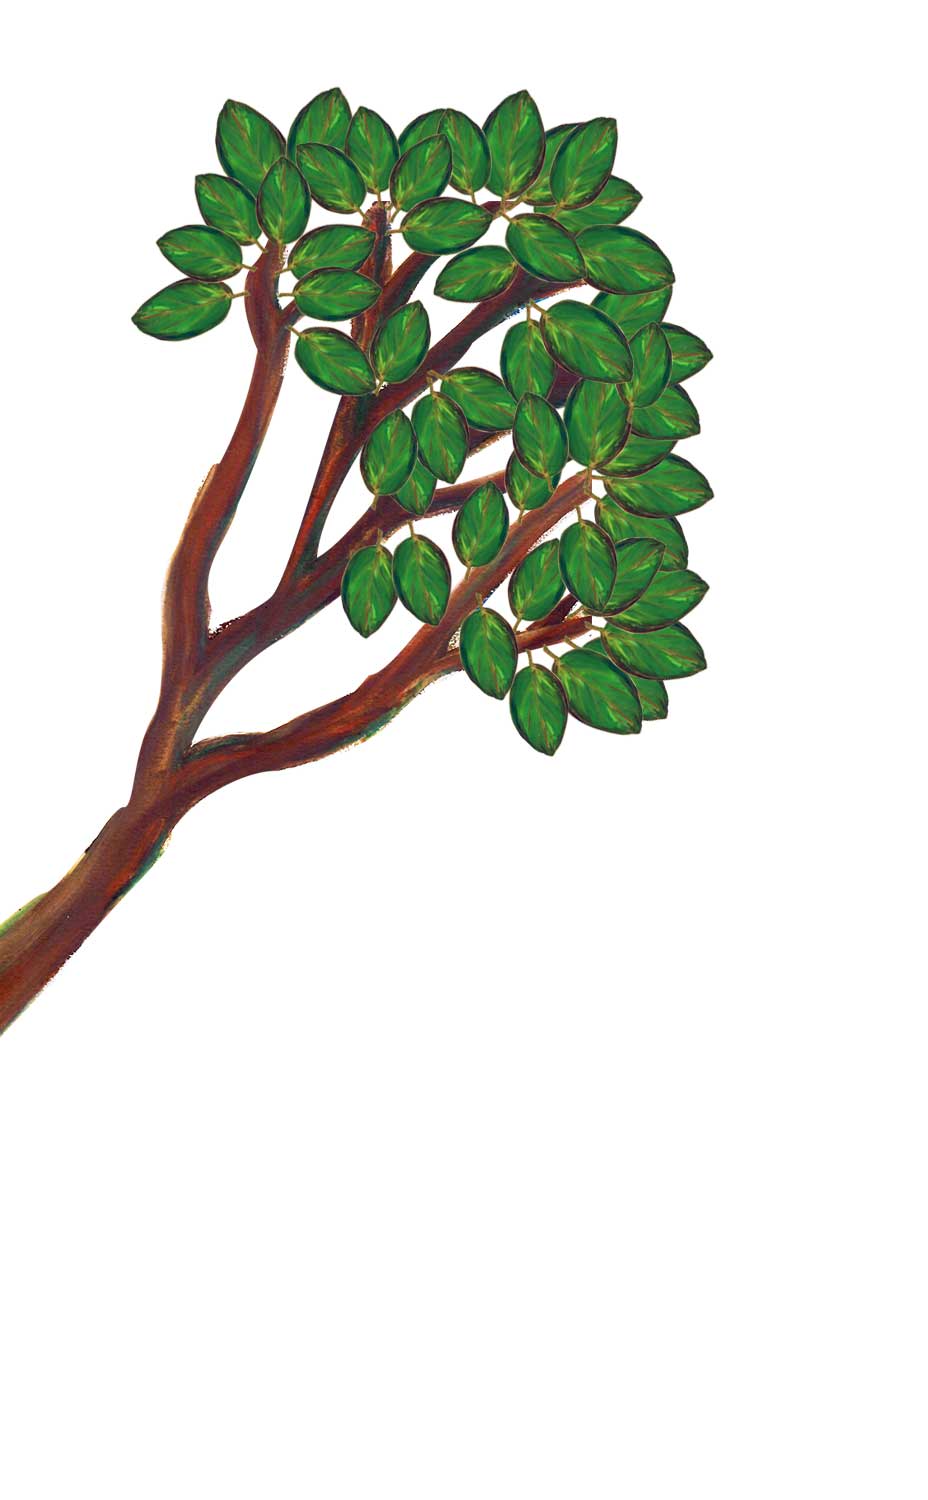 Collage of leaves on branch - Photoshop edited
How to use Illustrator to trace an image and make a vector model
I used Illustrator to trace the leaf I made and create a digital 2D vector model.
 Vector leaf made from image trace raster file
- Open image in Illustrator. Go to layers and lock this layer
- Add an extra layer, this is the layer where I will create my trace.
- Go to to line and fill selection on the menu on the right, make sure the fill is deselected and the line has a color that has a good contrast with the background image.
- Select the pen tool (hotkey: P), this is my favorite tool in illustrator.
- Trace the outlines of the image with the P tool by clicking on outside line. Make sure than whenever the line is not straight to move the move while pressing down. This creates a curve.
- Use Alt-click to make the line straight again.
- Follow outside of the image of image this way. After that do the same for the inside.
- Whenever I want to combine the paths from the inside line with the outside one, or the nerves with the backbone, I will use the Pathfinder. You can find this under: window - pathfinder. Use the pathfinder toolset to combine or subtract shapes.
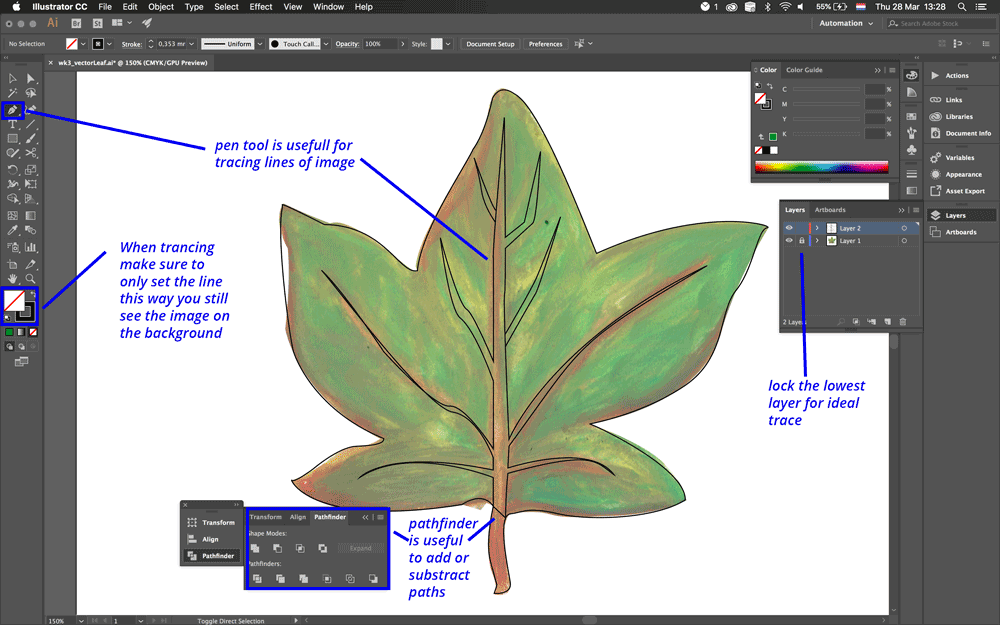 Image trace of leaf on illustrator
3D-Model
The Waag FabLab organized a full day workshop for Fushion 360 taught by Mauro Jannone from the Rome FabLab. He is an amazing teacher and he learned us all the basics and a lot more all in one day. This workshop really helped me to get an understanding of how 3D drawing are build up, and what possibilities there are.
After Thursday I did my own attempt to create a representation of my final project. I’m not totally satisfied yet about the result but I’m very happy that I managed to create two version of tree with two different techniques. You can find the details about the ‘how to’ in the Fushion 360 lesson section. I will first describe a short explanation of my process to create each tree.
Tree 1
This first tree is created in the ‘model workspace’. The steps and parts I used to create this are:
- a sketch with the ground shape
- a sketch with the trunk spline
- an offset plane to create to top of the tree
- with an loft I create the trunk
- I used these steps over and over again to create each branch.
The more details of each step can be found in the Fushion 360 lesson tutorial.
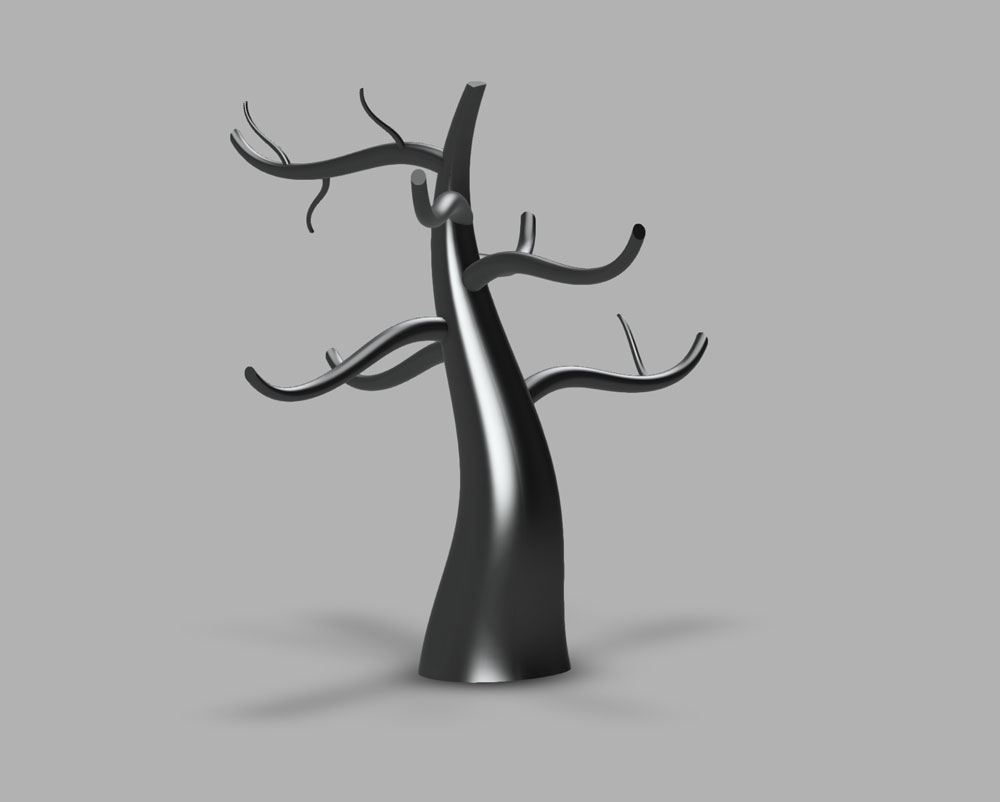 Tree 1 - made in the model workspace
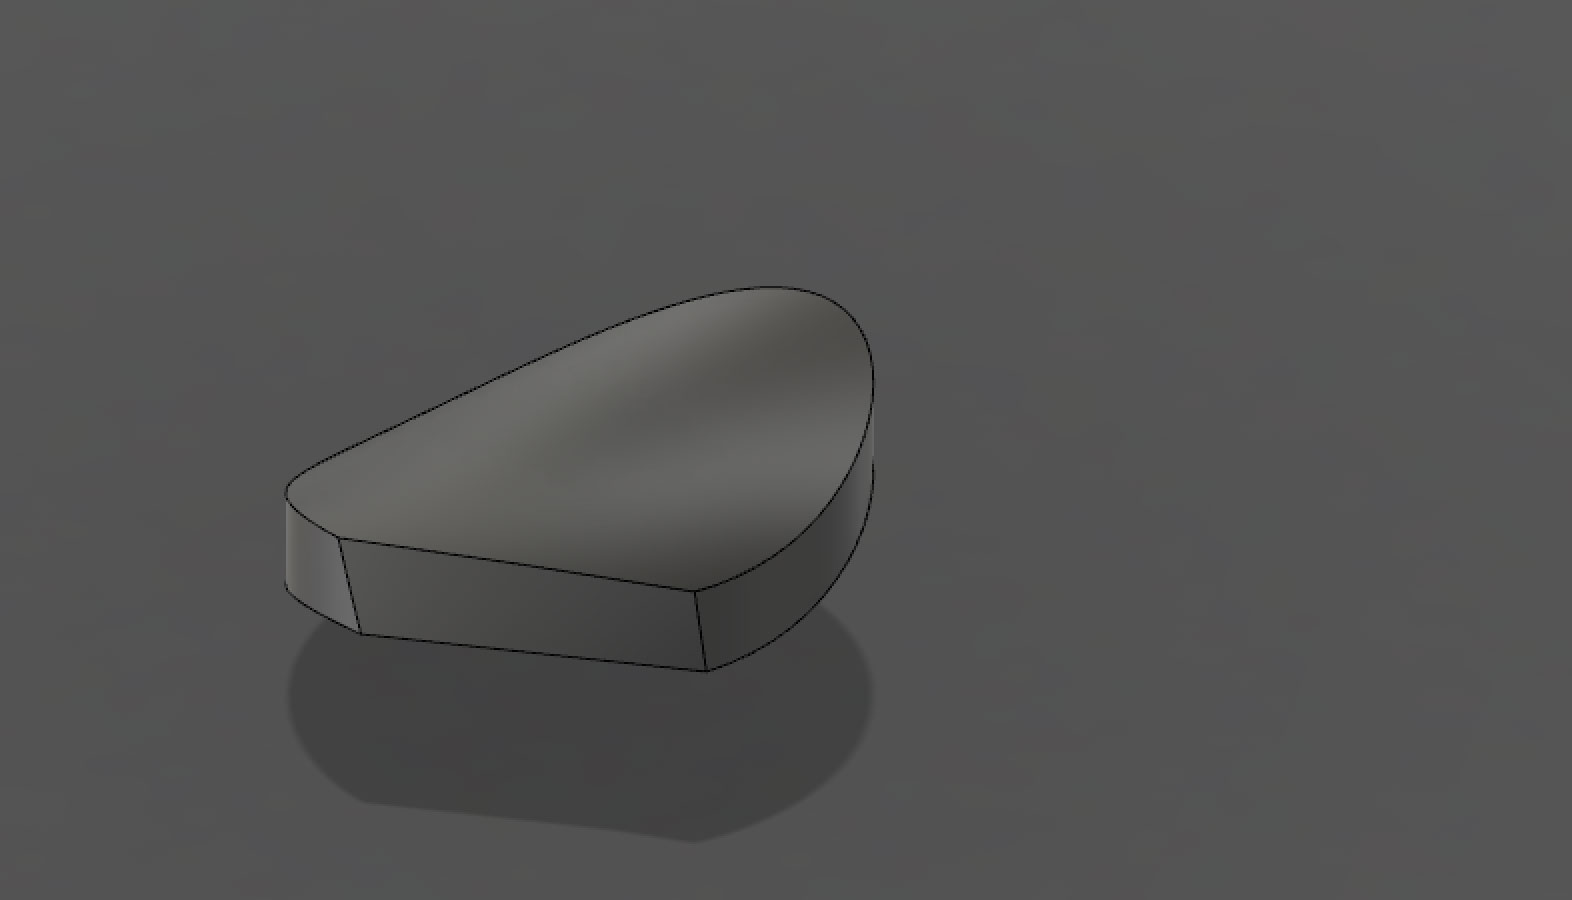
Tree 2
The second tree is created in the ‘sculpt workspace’. So I started with create > form.
- create a box
- edit shape
- ctrl + 1 –> I started in the polygon view to edit by moving the paths around
- ctrl + 3 –> I moved around the object dot by dot, like clay, till I had something that sort of looked like a tree.
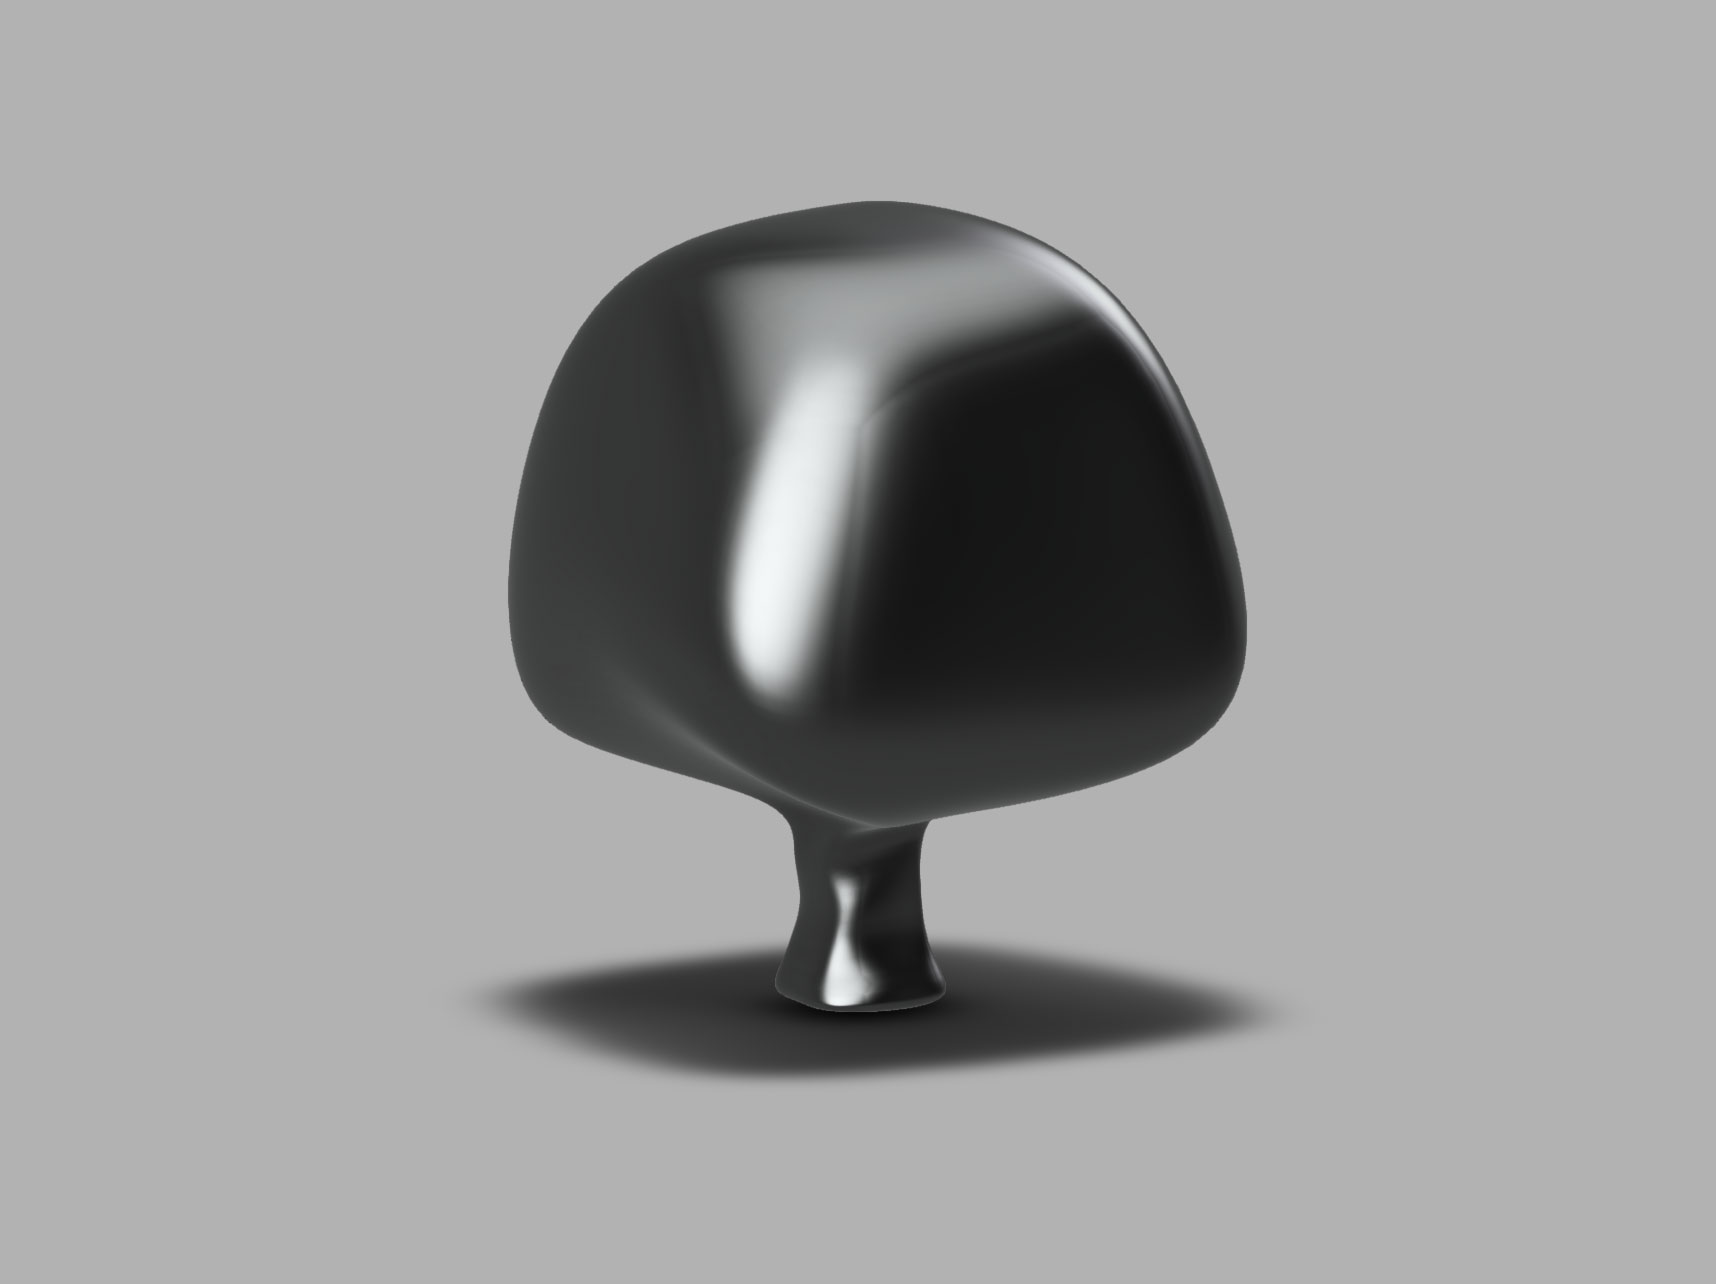 Tree 2 - made in the sculpt workspace
Fushion 360 lesson
These are my notes from the lesson by Mauro Jannone on Thursday. It went really fast so some might be a bit basic.
Overall general notes about Mauro’s lesson to my self
- Project –> defines the folder
- Design –> is a single file
- Put z-axis up in preferences (see in you account/profile)
- Scroll = zoom in and zoom out
- Pressing scroll = move around
- Press scroll + shift = pan
- esc = leave mode and/or tool you’re in.
- Each menu item, uses it’s on sub menu on the left.
- Never switch of the lamps of the folder. You can switch off the lamp of a single object.
- Typical mistake in the beginning: each sketch is like a different type of paper. Creating a new sketch is taking a new paper. So it’s good to remember where the object are. And change the sketch, you don’t have to create a new one each time . you can use the time line to get back and forth in ‘time’ - its not about how, but WHEN did I it.
- Make use of the time line with masters: you can edit this master late
- You can change parameters back and forth – for example to change sizes afterwards.
- you can invite my people with the people tab and their email address
- You work with sketch, adding details later.
INTERFACE ITEMS
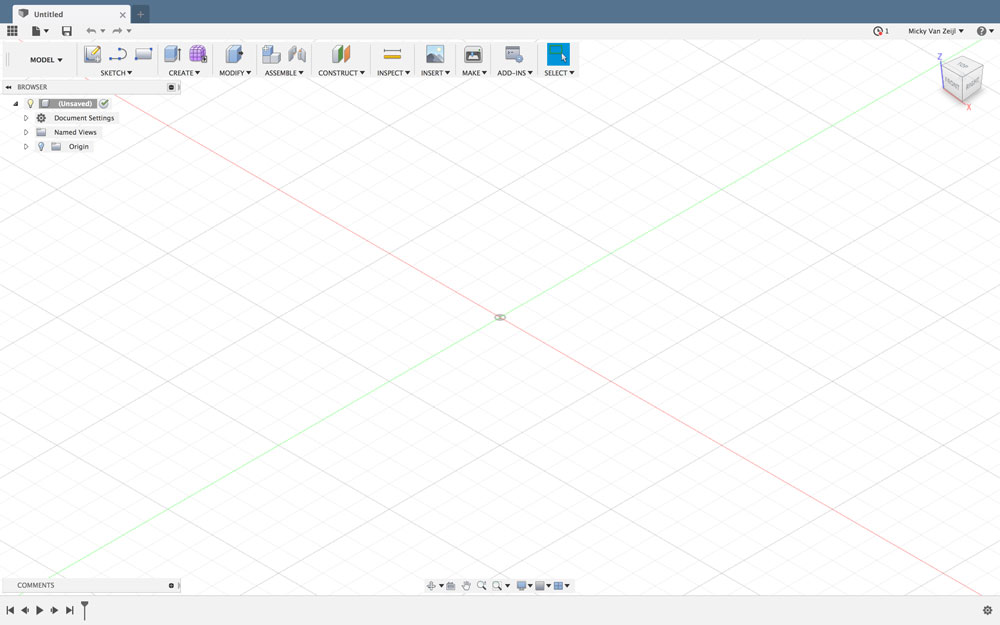 Interface of Fushion 360
What’s on the menu?
- Browser: the objects I created
- Lower menu bar: the history of comments of what I did –> Fushion 360 works with a time line
- In the middle lower part: view comments to modify and customize the view experience like the environment, wire frame mode
- Right top navigation cube: always in perspective mode but you can change this and customize it. Put z-axis up.
- Navigation tube settings: perspective with Ortho Faces –> This way you can understand the alignments of parts better. When it is in 3D its perspective, it can change by itself without perspective.
- Home icon: set you back to home-view
- set background - lower menu
How to save
- With save it keeps track of changes and versions
- Cmd + s: every new save prompts you to save new version. Just click enter. If I change name it creates other object
- On left you see your version in the project
- Click on version: you can go to your Webhub of Fushion 360
- It automatically saves your design in the cloud
- With share you can set the sharing settings like: allowed to download, allowed to share.
How to combine designs and project
- Right click on the left menu for project
- Insert into other design
- If you work on both files (example with the glasses)
- Linked object you need to update in the other file
- You can work with different designs, add them together in het project
- Right click on the object file: break link ==> unlinks the design
History – time line Comments
- In the menu bellow you see the history of your steps.
- You can go back in time to change you features e.g. the dimensions or the shape.
- Try to optimize your time line.
- Use this wise, you can design masters and
- To select a history item –> right click edit
 Use the time line Fushion 360 to go back and forth
Different workspaces
There are different working spaces, which represent different ways to work with 3D. You know in which workspace you are by looking at the top left.
- Model is the default –> work with sketches and build up
- Patch
- Sheet Metal
- Render
- Animation –> not cinema effect
- Simulation –> testing and stressing your design, more engineering
- manufacture workspace –> you can communicate directly with your CNC & laser
- drawing
SKETCH: menu item
I didn’t know this but you can start you 3D design with a 2D sketch. I will first explain the steps how to use this sketch option in Fushion 360. Followed by the other menu items on the top bar.
how to create a sketch
- gives you a cube with 3 sides and you can choose which one
- we choose bottom one
- new sketch palette –> menu on the right
- new icon on top bar –> stop sketch
- only need palette menu on the right this gives you all the tools
How to draw?
- select line
- simple left click with the mouse
- move mouse
- click sets point
- continues in this mode
- line-mode stays connected. If you want to leave the “line mode” click esc
- continue but on different part, click on check mark
- closed form get different color –> orange
How to use the line tool?
- to set exact sizes for your lines type dimensions while setting line, don’t click.
- use tab to go to the degrees of the line
- enter sets the figures. don’t forget use TAB! and then press enter.
- press x –> or sketch palette option: construction line: this makes it a dotted construction line
- there are two types of lines the normal line and the functional construction line
- you can use the construction lines for the alignment of objects
How to use items on the sketch palette
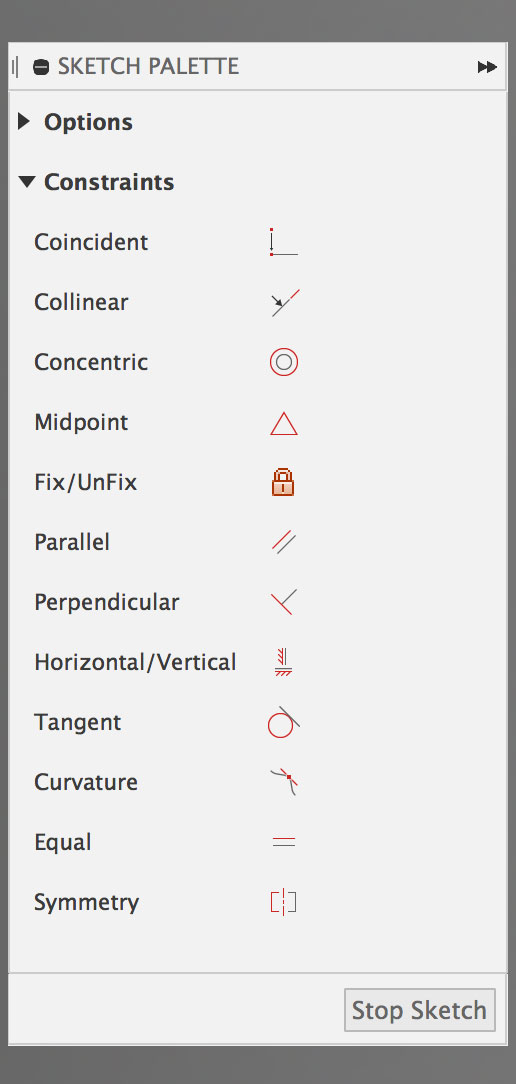 Sketch palette of Fushion 360
constrains
- this connects the lines. You can select the lines and give them a constrain.
- The more constrains you manage the more parametric your design will be.
- parallel: click lines you want to be parallel, they are always connected.
- to remove right click delete.
- rectangle: you can modify each line part add and subtract constrains.
- horizontal/vertical added to palette
- delete dimensions (click d + delete)
equal
- you can choose the objects or lines you want to be equal in size.
How to stop your sketch
- when you’re finished with your sketch press on the menu top right: stop sketch
- now you moves away from 2D and you are in different view
- the sketch you created is added to the folder on the left.
- to change something go to your time line and right click edit sketch.
How to work with projection
- to to sketch > select project include > project
- select object
- click on circle
- red dot/line
- close the lamp of the sketch you projected
- you still see projection, you see the silhouette of the sketch
- useful if you want to combine sketches and to see where the other sketch is placed.
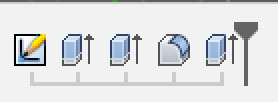
CREATE: menu item
The next step is to create a 3D body from the sketch you just made. There are different tools and techniques to create this. This are some of them, they can be found under the create menu item.
How to use extrude
- go to create on menu bar
- select add extrude
- gives you a new menu on right
- select plane - this changes in a different color
- use the arrow to ‘get it up’ - extrude
- every time you do an extrusion of the object hide the sketch, it doesn’t remove it you just don’t see it.
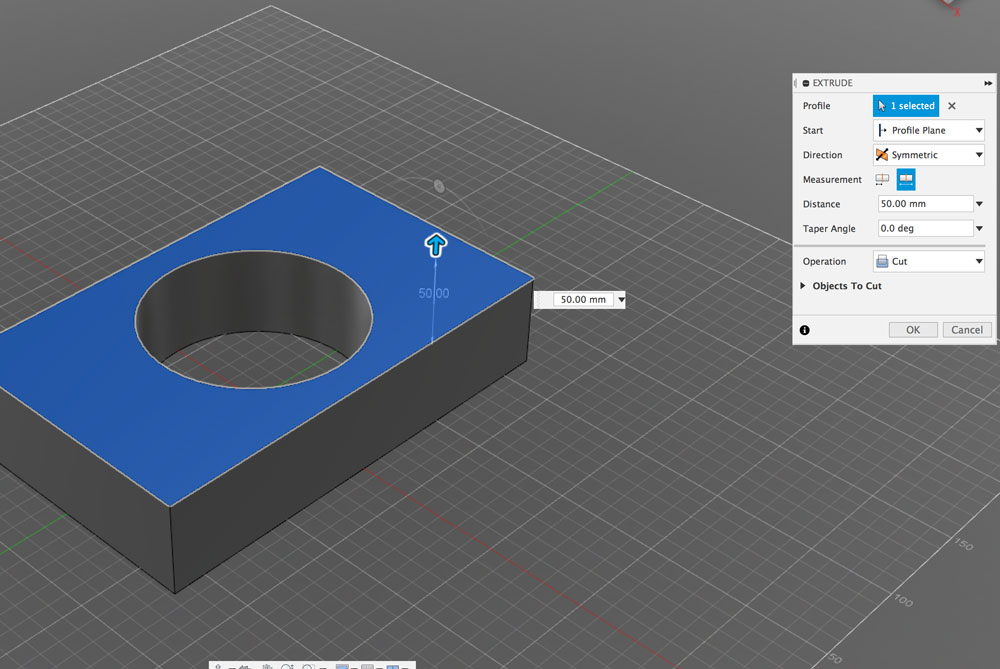 Extrusion in Fushion 360
How to use revolve
- go to create on menu bar
- select revolve
- select profile –> select the circle
- select axis –> select line
- combine circle with line it creates a donut.
- you can move around with the line in your sketch to change shapes and dimension of the donut.
How to use sweep
- create sketch: draw one circle
- this circle is the profile
- patch: select spline line
- perpendicular doesn’t work but parallel does work
- You need a plane to let the spline “grow” to make it 3D.
- the profile needs a line from where it builds, ‘grows’ to make it 3D
- you build up an object with sweep so you first need a good foundation/basic shape.
MODIFY: menu item
How to use fillet
- go to modify > fillet
- arrow: to select manually the fillet
- blue: to fill in the precise measurements
How to add parameters
- go to modify > parameters
- set parameters
- you can use this in the sketch file (go to your history and click edit sketch)
- you can use the parameters in the dimension part
- you can use formula like “long / 2” (don’t forget the spaces otherwise it won’t work)
- this way you always keep the same dimension. However if you want a bit of freedom you can delete the parameter go to offset
- add offset you can select chain selection - selects all object // without chain selection only one part
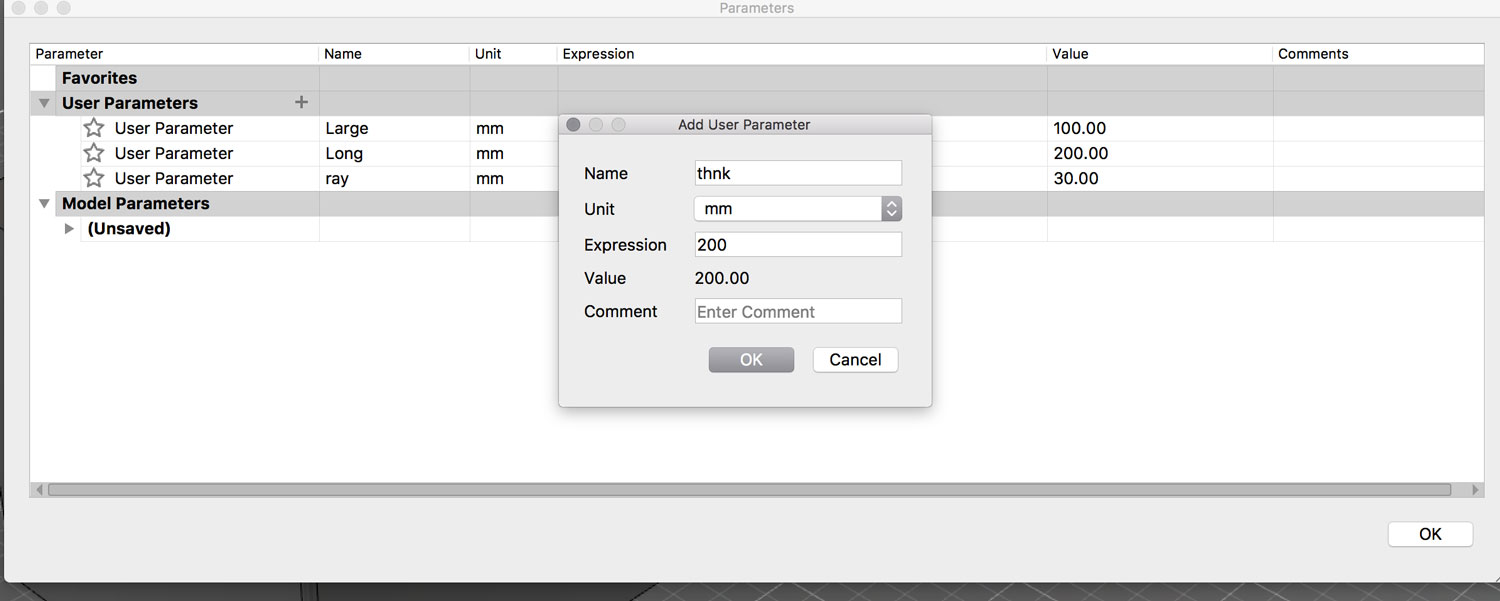 Adding of parameters in Fushion 360
CONSTRUCT: menu item
How to use offset plane
- create a circle in sketch
- to to offset plane
- lick circle
- move with arrow or fill in the dimensions
- enter
- it goes up (like standing on a building looking down)
- select new plane
- create sketch
- make square
- go to create > loft
- click the circle
- click the square
- It automatically creates shape
How to use tangent
- select tangent icon
- click first object
- click second object
PATCH WORKSPACE
The process within this workspace is similar to the Model workspace however the extrude is not solid. Patches are surfaces, you can design more complex and smooth shapes.
How to use patches - practice assignment
- create sketch
- make square
- go to extrude
- go back to sketch
- select move
- pick a corner –> now your drawing in ‘space’
- go to create - patch
- patch creates a surface
- go to to create –> thicken
- now you can thicken the object (extrusion only goes up, thicken comments can extrude all the normals).
- go back to the Model workspace
- create new sketch
- draw an circle
- stop sketch
- to to create > extrude
- combine the patch of previous steps with the cylinder
- click on intersect
- now you have something that looks like a Pringles
 Patch assignment 1 - looks a bit like a Pringles
SCULPT WORKSPACE - NURB
The previous steps are all very geometric or parametric shapes. But you can also work with NURBs - no uniform rational bodies This is more an organic way, it’s a bit clay like. To work with this in Fushion 360 you need to go to the Sculpt workspace. This is what I used to create my second tree.
- Go to CREATE > FORM
- you first get a warning message, press OK
- now you enter the SCULPT environment
- you can see the top menu changes in order in color
- going from left to right you’ll find the most important parts needed in this workspace
- on the right you see the menu item - ‘finish form’ (similar to finish sketch)
- Use the different views from polygon to box to shape to see what you’re doing while you’re in edit shape.
- ctrl +1 –> polygon
- ctrl +2 –> box
- ctrl +3 –> shape
- like in the other workspaces on the left you get a menu for all the options
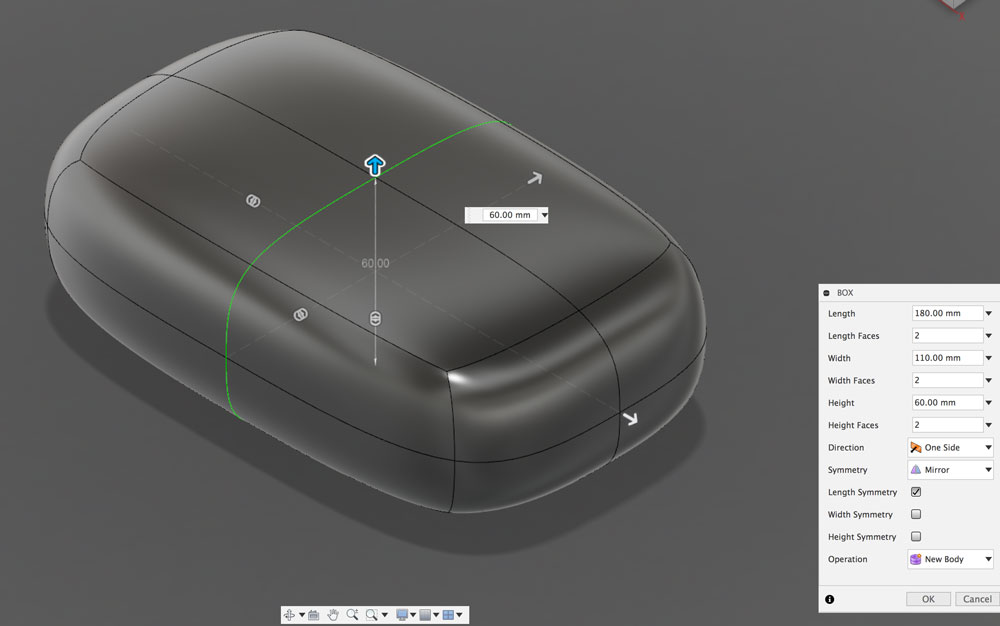 Build a box - start in sculpt workspace
How draw from an image
You can also replicate an object you’ve seen, e.g. from an image. You can take measures and construct it or you can draw and sculpt it and use the image as a basis.
- go to insert > attach canvas
- select the image you want to attach
- draw over it with create form
- or use faces and draw the basic shape with squares
- extrude your drawing to make in 3D
- use edit form to change and mold the shape
Videos from Youtube and Vimeo in the right size with HTML.
This week I had to catch up with last weeks documentation and dive deep into the 3D-modeling. So I didn’t have that much time to explore the video editing part. However I did do something video-related I used HTML to get the video on my site (on the ‘about’ and ‘my final project’ page) in the right sizes, because they were really small when I use markdown.
tutorial I used:
I used the net-informations Youtube for the HTML-code.
- Copy the HTML
- Add it to your markdown
- change the ‘src= …’ part with your video link - you have to use the embed link
- that’s it.
<html>
<head>
<style type="text/css">
.responsiveRapper {
	overflow:hidden;
	padding-bottom:56.25%;
	padding-top:30px;
	height:0;
	position:relative;
}
.responsiveRapper iframe,
.responsiveRapper object,
.responsiveRapper embed {
	top:0;
	left:0;
	width:100%;
	height:100%;
	position:absolute;
}
</style>
</head>
<body>
<div class="responsiveRapper">
	<iframe width="560" height="315"
	src="https://player.vimeo.com/video/119427248">
	</iframe>
</div>
</body>
</html>
What I did wrong – and how I solved it
Installing Mypaint and Inktscape
Because I’m quite used to Adobe Illustrator and Photoshop, I thought of trying out Gimp, Mypaint and Inktscape. I managed to install the first one but the second two gave me a headache to install. I had to install Macports and X11 and it still wouldn’t work for Mypaint and Inktscape. My solution: I gave up, because I didn’t have enough time.
What I learned
3D is really 3D
This sounds weird, but while I was working on my own 3D tree designs I realized I was still working 2D, creating a leilinde as we call it in Dutch (I couldn’t find an English word, the picture below shows you the idea). I suddenly realized that I could create something in 3D, so walk around it. Make branches all around the trunk. This really changed the basic idea of 3D in my head.
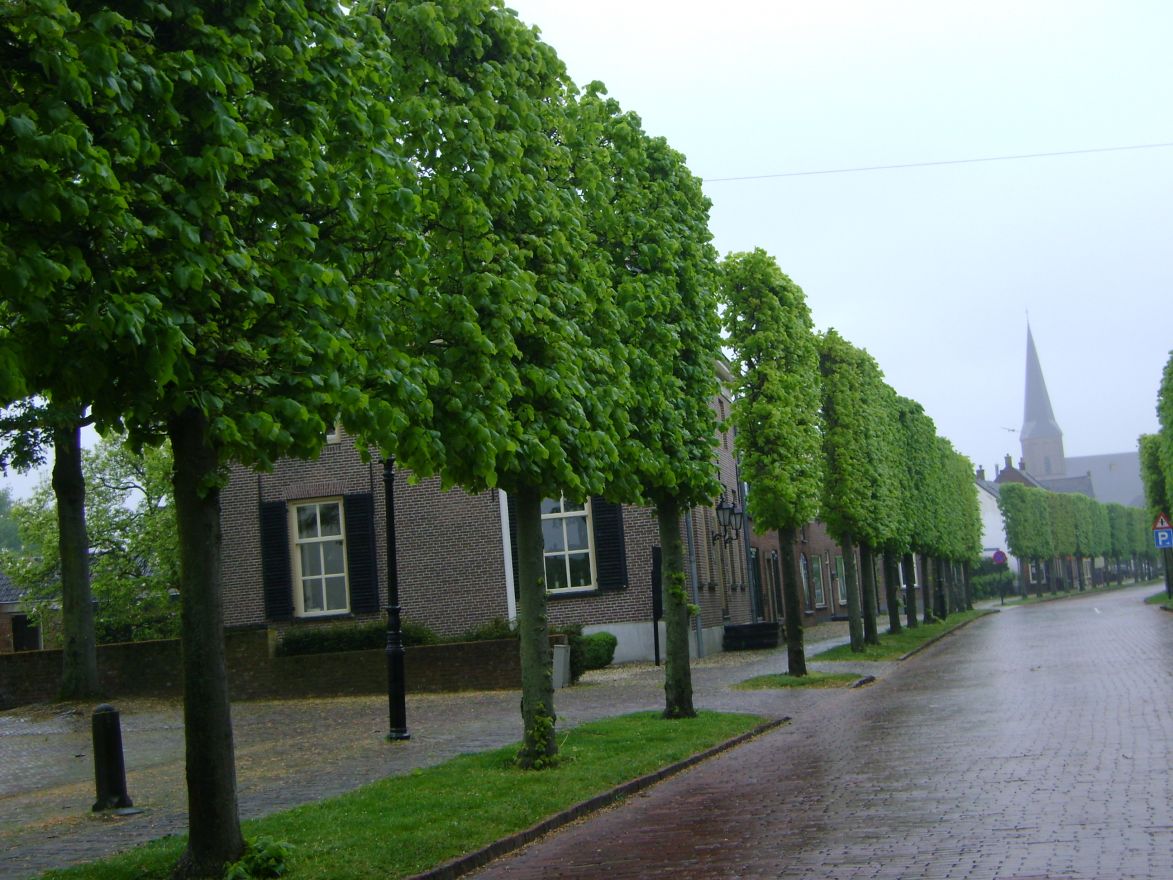 Example of Leilindes, a real life 2D version of a tree
Fushion 360 works with time, not layers
This is still really difficult to live by. I understand the concept but I still find it really hard to use it. In Fushion 360, you move around the timeline to change sketches, bodies, actions etc. This is very different concept than I’m used to with other editing software. This really basic idea I learned that helps me to get a grip on 3D-modeling.
What made me proud!
The steps I made with understanding how a 3D-program works. Even though I still find it difficult to create what’s in my head using a 3D-program, I proud of the development I made this week. Especially the realization that I’m really working in 3D instead of creating a 3D effect in 2D.
Credits and references
The lesson by Mauro really helped me this week, in addition Rutger helped me and explained some tricks in Fushion 360.
References
- Tony Russel, & Catherine Cutler. (n.d.). Minibijbel Bomen. Retrieved February 5, 2019, from
- Wohlleben, P. (2016). The Hidden Life of Trees: What They Feel, How They Communicate—Discoveries from A Secret World. Greystone Books.
Image references
Image on the left: My own notes of lesson 02: Computer Aided Design (2019).
Images in the overview of painting by Piet Mondriaan
- Piet Mondriaan, ‘Bloeiende bomen’, 1902-05 or 1916-18. Gemeentemuseum, Den Haag
- Piet Mondriaan, ‘Polder Landscape with Silhouetted Young Tree’, 1900–01 (detail). Private collection, London
- Piet Mondriaan, ‘Willow grove: impression of light and shadow’, 1904-06. Dallas Museum of Art, Dallas (Texas)
- Piet Mondriaan, ‘Avond; De Rode Boom’, 1908-10. Gemeentemuseum, Den Haag
- Piet Mondriaan, ‘De grijze boom’, 1911. Gemeentemuseum, Den Haag
- Piet Mondriaan, ‘Flowering Apple Tree’, 1912. Gemeentemuseum, Den Haag
- Piet Mondriaan, ‘Compositie bomen 2’, 1912-13. Gemeentemuseum, Den Haag
- Piet Mondriaan, ‘Compositie 2’, 1913. Kröller-Müller Museum, Otterlo