6. 3D Scanning and printing#
The objectives for this week:
Group Assignment:
- Test the design rules for your 3D printer(s)
Individual Assignment:
- Design and 3D print an object (small, few cm3, limited by printer time) that could not be made subtractively. In other words, can't make it from a milling machine. Needs to have geometrical complexity.
- 3D scan an object (and optionally print it)
This week's outline and assignment page See the class video below
Individual assignment:
-
Design an object that can't be made subtractively. In other words, can't make it from a milling machine. Needs to have geometrical complexity. Will need a tool like Meshlab, Netfabb, MeshMixer.. all variants of tools to deal with meshes. All really handy to fix problems in file. Then will need a slicer that takes design and turns it into the path. ReplicatorG, cura, slicer, skeinforge. They all do efficient paths, decide where you need supports. Good ability to pull filament over free space for supports. Octoprint is neat- builds an interface to the printer. Octoprint takes raspberry pi that lets you send jobs to it, control the printer, monitor progress. Neil has these at mit lab. Sketchfab- can add models to sketchfab, plugin lets you view model. Thingverse lets you share models.
-
Scanning: Scan an object. How do you bring a physical object into a computer? Typically, you get a point-cloud. It's not yet meshable. you need a tool to texture it, color, make shape, etc. Number of steps to go from scan to printing.
Group Assignment: Testing the design rules for our 3D Printer(s)#
Anne, Joey, and I tried out the Ultimaker 2+. We used Filagher PLA filament in green. The label on the spool said 2.85mm, but we measured it to be 3mm. We found a simple design (need to get link for design file) file online to print. We downloaded the file, opened it in cura, selected 0.4 version, set the printer at Ultimaker 2, set the filament type, and pressed prepare.
Unfortunately, using the default settings gave us an estimation of 2.13 hours print time. We wanted to make it shorter, so we increased the layer height from the default of 0.1 to 0.15mm and click prepare again. This halved the print time.
After pluggin in the SD card, the cura software save button changed to 'Save to removable drive'. If the save was successful, a popup will be shown. (need to add screenshots)
Ultimaker 2+. Filagher green material. 2.85mm.
- downloaded file
- selected 0.4 version
- checked printer -> ultimaker 2+
- checked filament: PLA Filagehr 2.85mm green
- Pressed prepare, default settings showed 2.13 hours
- Increased layer hieight from 0.1 to 0.155 mm and pressed prepair again. This halved the print time.
- After plugging in SD card, cura save button changed to 'Save to removable drive'
- If successful, it will show a success pop up.
- We calibrated the machine plate at least 6 times, but we could not get the material to stick to the plate
- We increased the heat, cleaned the plate, lowered the speed, but this did not resolve the issue.
- Anne noticed that our extruder tip was very old and needed to be replaced.
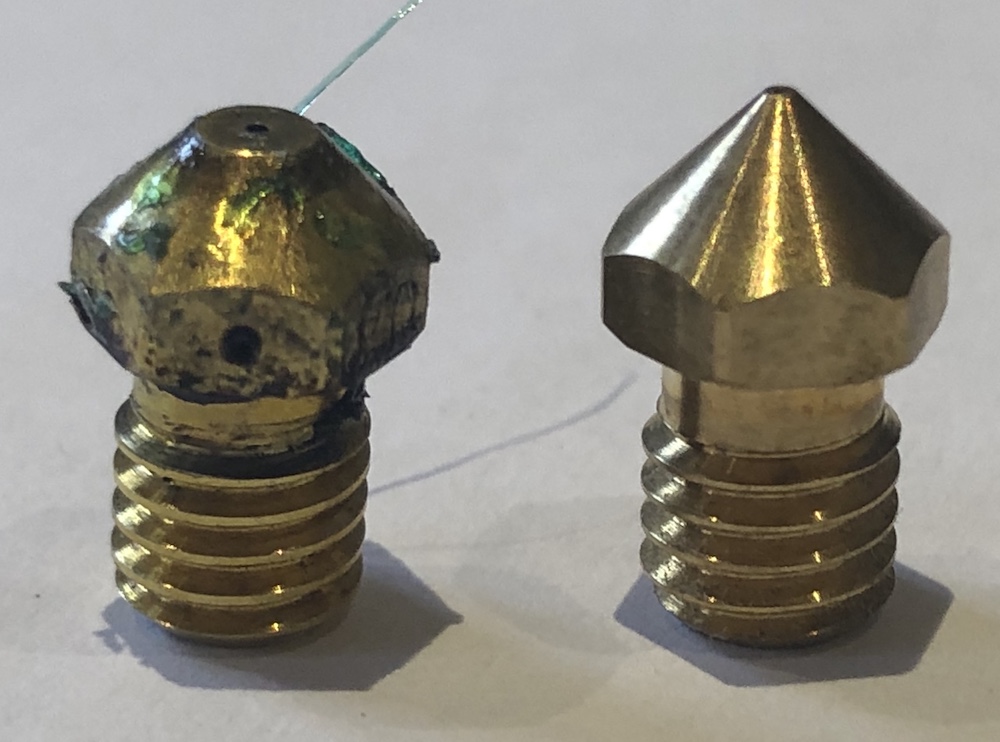 - Anne recalibrated the machine again, then added an adhesive material to make it stick better, and then it worked
- She said painters tape helps, hair spray, stick glue, pva wood glue disollved with a little bit of water (that's her favorite)
- It might not adhere because you have fingerprints on the baseplate, it's not calibrated, plate is not warm enough, tip is old and dull, machine is moving too fast, pla is too old (supposed to be stored in the dark)
- General rule is to not have height be higher than half the extruder diameter, so if extruder is 0.4, then height should not be above 0.2 - Connor.
Individual assignment#
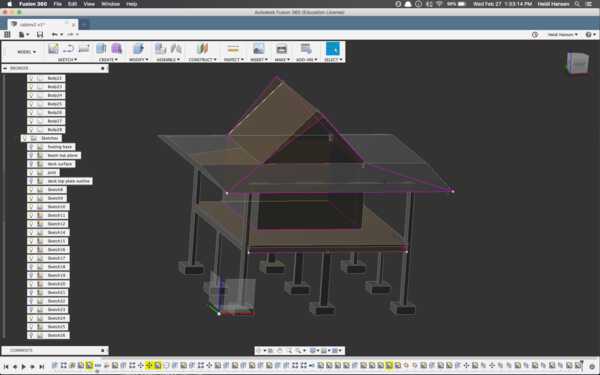
I decided to design a model of the house I built. I Chose to do this because I wanted to get better at using Fusion 360 and I know all the dimensions. I had trouble with creating the planes for the roof. I did not have enough time to print it because of the issues I had with Fusion. I will print this soon.

3D Scanning:#
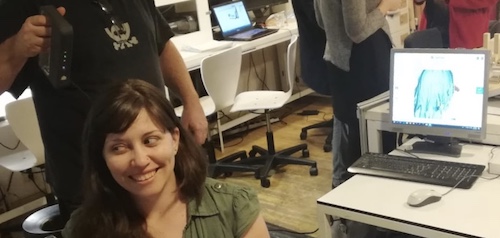
We're using the SENSE (not the iSense) Software is called Real sense '3d systems'
Henk did a scan of my head.
Useful links#
Fab Academy week 6, 3D scanning and printing topics
Videos#
3D Printing and Scanning(1:17:40) February 20th, 2019 from Academany on Vimeo.
Recitation on Tools(1:09:39) February 25th, 2019 from Academany on Vimeo.
Lecture takeaways#
-
Printing is very slow and extremely difficult to speed up.
-
There's an angle below which you can't print without supports. Printing needs a platform to build on.
-
There can be a lot of post processing.
-
For resins, there's a post cure
-
As a wall gets thinner, there are fewer and fewer passes over it and a wall will fall apart. There is a minimum thickness for each kind of material
-
It is important to have a facet or curve on an edge because there is a minimum thickness you can have
-
There can be a significant difference in the dimensions of the cured material because of the thermal properties.. when it cools, it will shrink.
-
There is a minimum gap beyond which parts will stick together. Need to define min gap for each material
-
Most printing processes are add-isotropic. Filaments are strong in the layer but they don't bond well between layers
-
Don't make the parts solid. You fill the interior with a pattern of voids that lets you print faster and use less material, then you'll have a continuous surface around that.
-
You need to learn the design rules and processes of your printer before you can design for that. Rules can also depend on an specific ndividual printer. You may not be able to read tips online for an ultimaker and be able to use this advice on any ultimaker.
-
Original 3d printing process was 3d lithography. vat of resin, shine light on resin, light cures resin. pull away build plate. It's still the highest resolution and best surface quality process. Used in a tool called the nanoscribe printer, does printing down to nano scale. The limitation is that it's 'infused resin'. It's messy and there's a post-cure time for it. Historically, it was limited to parts for how they looked and not how they function. Broadly, stl was for high resolution printing.
-
Stratasys invented high resolution molding where you have a filmanet that goes into a heated nozzle that comes out just above temperature where it sets.
-
FDM type printing with clays and ceramics Emerging object
-
Concrete printing, can set the angle at which it sets Contour Crafting This process was developed at MIT, bought by Zcorp. Uses binders and powders. Nice process for printing color. It's a powdered bed.. you don't need supports. Where powder didn't get fused, it is just powder. Not structurally strong.
-
Polyjet is like inkjet, but it's drops of a polymer that get fused. High precision, expensive materials and machines. Polyjet
-
Mcor: prints images on sheets of paper and cuts them out and sticks them together. Lovely but weak mechanical properties.
-
Huge expensive rooms for these Eos machines use a powerful laser to melt pool of metal powder, can use complex geometry to make metal parts. Coming down in price.
-
Carbon3D Uses quick and slow drying parts.. much more affordable and fast.
-
Most likely, you'll use a mix of STL and STM.
-
For machines, check out make magazine printer comparisons. Entry level printers all do almost the same thing, many options.
-
RepRap Original goal was self replication. 'How many parts of a machine could be made on a machine to make new parts for another machine'. Out of that came many open design iterations
-
Josef Prusa created an improved version of reprap. It heats the bed plus the filament. Also, the bed is stiff but flexible. You can flex the bed to remove the part. This is a nice high performance entry level printer.
-
Ultimaker from The Netherlands wanted to speed up printing speed. You can actually put printers on moving gantry to print things bigger than the printer itself.
-
Makerbot became part of stratasys for fdm printing.
-
Sindoh has a new generation of machines. Leading producer of print engines for compiers. Around €1000. They do nice things. Filament is in a cartridge in controlled environment. Some filaments are sensitive to moisture. Some cartridge feeds are proprietary. Charge a lot for the cartridge. New one lets you add your own material. Entirely controlled envrionment. Very robust. Neil has 10 of these at his lab in MIT. Fantastic for 1000. Temp and moisture in lab don't matter.
-
Formlab is highest resolution of any printer in an entry level machine. Pretty messy. First machine prints. 2nd machine gets rid of resin. 3rd one cures it. They've been agressive about materials for STL. They have a number of resins for stl. Clear, opaque, melt away for casting. Nice entry level machine for high res printing. They're just bringing on the market a laser sinter for nylon. A great example of what you can do with that is Nervous Systems dress.
-
'Sintering': is the process of compacting and forming a solid mass of material by heat or pressure without melting it to the point of liquefaction'
-
The machines that make: MIT 3d printers
-
Movie about making FormLabs happenPrint the legend
-
HP is leading maker of inkjet. They're masters of MEMs. Neil hasn't used an HP. Similar price to polyjet. material price is cheaper but post processing is more expensive. HP 3D Printers
Resources:#
-
Add ultimaker, printerbot, sindoh, and formlab links
Materials:#
- Matter hackers NinjaTek ProtoPlus
all have basic filaments. some have translucent filaments. some releasing filaments that look like metal. some have conductors in them that aren't great but do have conductive properties. colors. Wide range of types of printing you can do by experiementing with filaments for fdm. You can print parts of a motor.. not a superb motor, but one that odes work.
- if you use one that has carbon fiber or metal, make sure your extruder has cermaic otherwise it will destroy it.
- lubricate the feed path. these filaments can be tough on your machine.
Service Bureaus#
Instead of you having the printer, you send jobs to them shapeways is a good one that has a wide range of options moog works with materials for space. You send them the job. Very complex. Powders are very hazardous. Breathing them is a hazard.. environmental risk. Moog
--
- When we print layer on layer, we use support material for certain kinds of structures. most important when using fdm is the infill part. you can define how it should look like inside. unlike substractive when you know exactly how your material looks and you subtract the material out of that.
- In additive, you can define interiors. Speaker loves grabcad. Can define which parts will be stronger and less storng, etc.
ASTM define additive manufacturing into seven categories.
'Binder jetting' is easiest and most interesting to use.
Try to get a link to that powerpoint from Cihad meyuhas speaker.
We need to know clearance of machines, tolerance, calibration, accuracy. You have a different accuracy by machine and by material you're using. create calibration to specific material and machine you're using.
Important to ensure repeatability. Average is 45-60% success. In the most advanced technologies, we get 90% success and above. You can only do fully functioning parts in additive manufacturing.
If you use solidworks, you can put a texture and export that as an stl.
- nesting considerations. how to put your part within your tray. In one orientation, your object will need less support. It will effect the airflow of the extruder, it will effect the strength of the material.
There are some recipes and advice of how to make things that work right out of the printer.
There are calibration prints that you can use to see how your tool works.