_stage 5
Interface & application
App design
The idea of the app I wanted to design is that the pet owner can control the opening of the flap door
from the inside and outside as well, but for me the most important was to offer an opening system from
the inside.
And I was very curious on how to build a simple app and I thought this could be a great excercise to try
it.
Also, this app could potentially improve and have more advanced functions like receiveing notifications when the cat goes in/out, weather warnings or others, leaving the door open for improvements to the system.
Building the app
The two important tools to use in this case are:
1_ an MCU
2_ a bluetooth module (HC05 or HC06 work both well)
3_ app platform to develop it, in my case I used MIT APP INVENTOR
_STEP 1 (bluetooth set up)
If you are using a bluetooth module HC05 you can set the following AT COMMANDS to set it up, is useful as you can change the name of the module and password, but if you don't change the password normally it is 1234 by default.
AT commands:
AT+NAME="the name you want"
AT+UART=115200 (baud rate)
AT+CMODE=0 (if you choose 0=slave 1=master)
AT+ROLE=0
Here you can find a tutorial about setting up the AT command to your HC05 module Arduino with HC-05 (ZS-040) Bluetooth module – AT MODE. Also inside assignment week 14 I have further information about this set up.
If you are using an HC06 module instead the AT command is not necessary, you simply have to connect the module to your MCU, but this module can only act as a slave.
As I've probably mentioned in other stages, the pin out of the module is important, the bluetooth module
pins RX and TX can't be used at the same time if you are using an FTDI cable while programing it, as it
works also with RX/TX to tranfer-receive information.
You need to either disconnect and re-connect the bluetooth module while programming it or you can
connect as well to pin 10 and 11, but as I am using pin 11 (MOSI) for the RFID pin out, I had to find
another solution. You can use the following pin out:
RX (pin PD7)
TX (pin PD6)
VCC (5V)
GND
_ARDUINO CODE
It is not enough to connect the bluetooth module to your MCU and write the app blocks, you need to adapt
your Arduino code to establish an exchange of communication between the bluetooth, app and MCU. You will
need to add several integers, add some functions inside void setup and void loop.
Inside
stage 2 I explain a bit more about the arduino code I used.
I found this useful
RANDOM NERD TUTORIALS that helped me understand better how I had to adapt my
existing code.
And thanks to the patience and time of Kirk for explaining me a bit more about how to integrate the bluetooth module into my project, xiexie ni!
The new functions I integrated into the code are:
//INCLUDE inside INITIAL SETUP//
//For Bluetooth communication//
#include SoftwareSerial BT(6,7); //TXD,RXD pin for Bluetooth module
int state; //the current state
int i;
int flag=0; //makes sure that the serial only prints once the state
------
//INCLUDE inside VOID SETUP//
BT.begin(115200); //enable bluetooth communication
delay(3000);
------
//INCLUDE inside VOID LOOP//
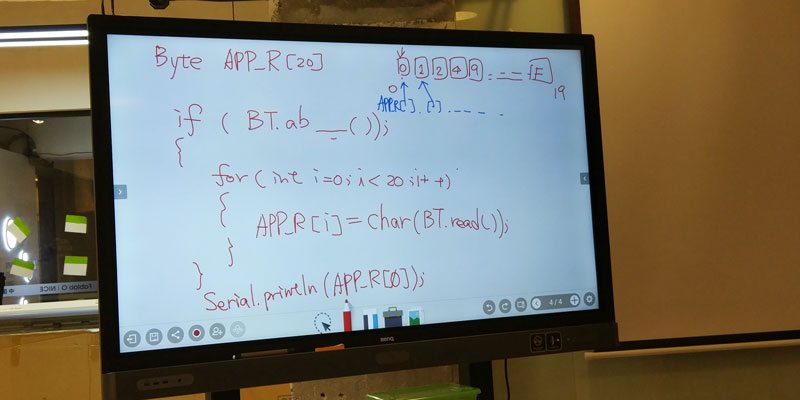
if (BT.available())//condition to find and read BT device //if the bluetooth is available functions
{
state= BT.read(); //initialize reading
flag=0;
}
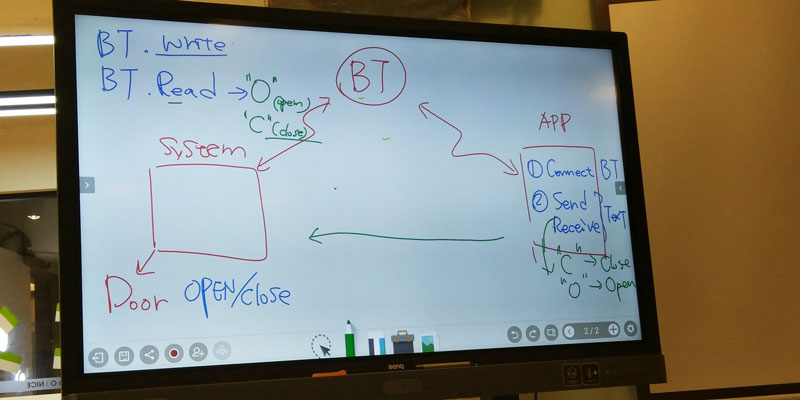
if(state=='O'){ //this is the message that will be sent to the bluetooth that will enable the
opening
myservo.write(0);
}
else if(state=='C'){ //this is the message that will be sent to the bluetooth that will enable the
closing
myservo.write(90);
}
delay(200);//delay between pressing open/close button
_BUILDING THE APP
MIT APP INVENTOR is an open source web application. It has an interface that is very clear and intuitive,
and this makes it easy to use and understand if is your first time building an app just like me.
The only small drawback is that the applications you can create are only for Android operating system,
which for me is not an issue because I have an Android, but for others may be.
Inside MIT app inventor website you can find a few tutorials, besides that I found a useful video that explains clearly how to create your first app app inventor tutorial, it's in spanish though, but there is no audio so you can follow it up easily.
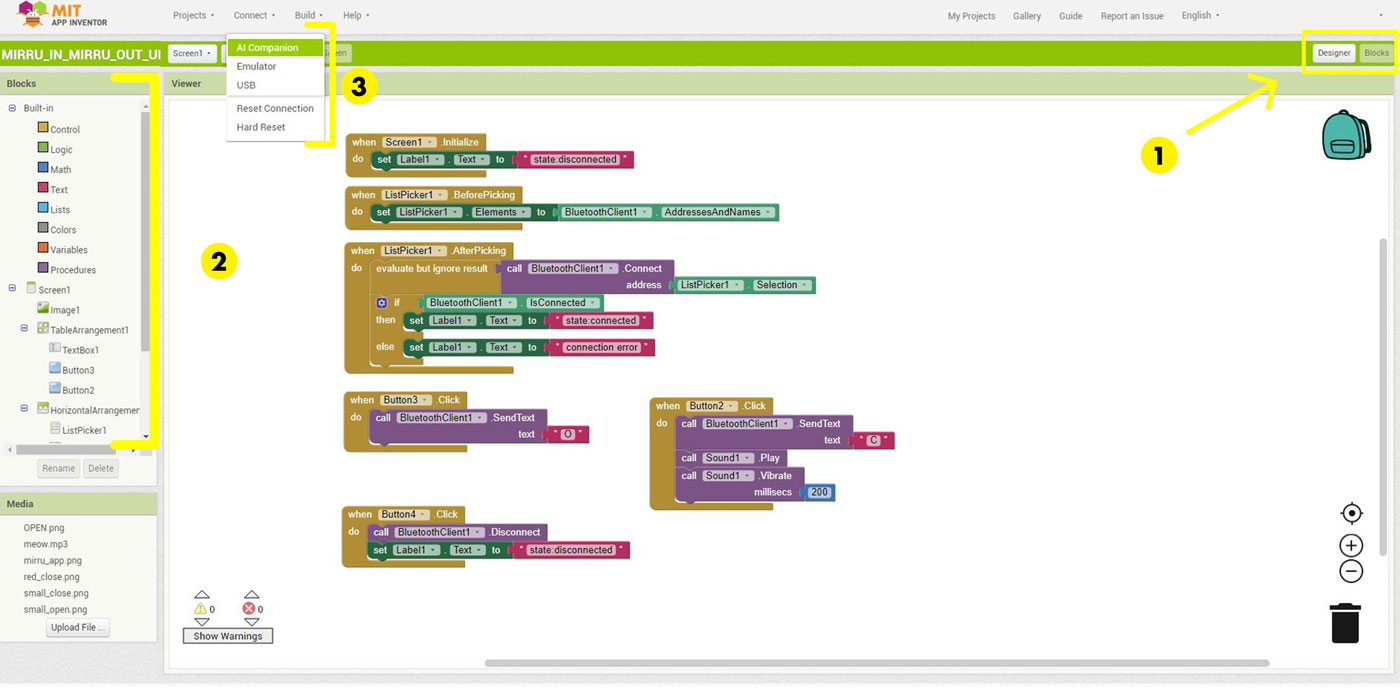
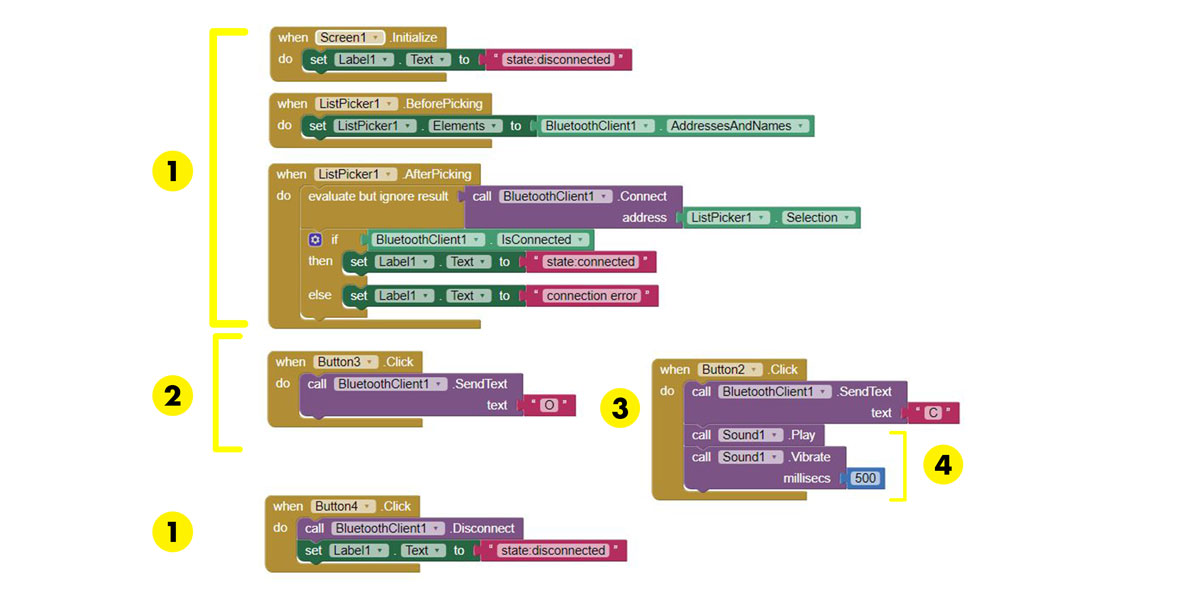
The main thing you need to understand when using app inventor is that you have the "behind the curtains"
which are the blocks (n 1) that are the structure of the app and they define
functions/variables
when an action happens.
And you have the GUI (graphic user interface) inside designer (n 1) part.
And the third and most useful thing is the emulator (n 3), which helps to run a preview of
the app you are developing, it emulate (or imitate) the actions designed.
Each task has its own submenu with the variables/functions (n 3):
_SET UP APP INVENTOR
It is super easy to set up app inventor, this are the steps:
_1 Set up an account (just need connection to internet and an email for this step), you will be working
directly from your browser.
_2 Choose the type of installation for the emulator. I choose installing the APP directly into my phone,
but you can choose other options HERE.
_UNDERSTANDING THE FUNCTIONS
In my case I need to define the following functions:
_1 Connect and disconnect the bluetooth module and choose the bluetooth port (n1)
_2 when a button is pressed the door will open (n2)
_3 when a second button is pressed the door will close (n3)
_4 when pressing the closing button a sound will come out (meow)(n4)
You need to assign buttons or other functions you may need inside the designer mode so that you can start building the blocks.
_GUI
My idea for the GUI was to make something very simple, as I am using a couple of buttons I decided to
make my own and then import them into app inventor platform.
It is simple you have to save your .jpg or .png and inside the option MEDIA
you can import any files and then assign them to buttons or just as part of the layout design.

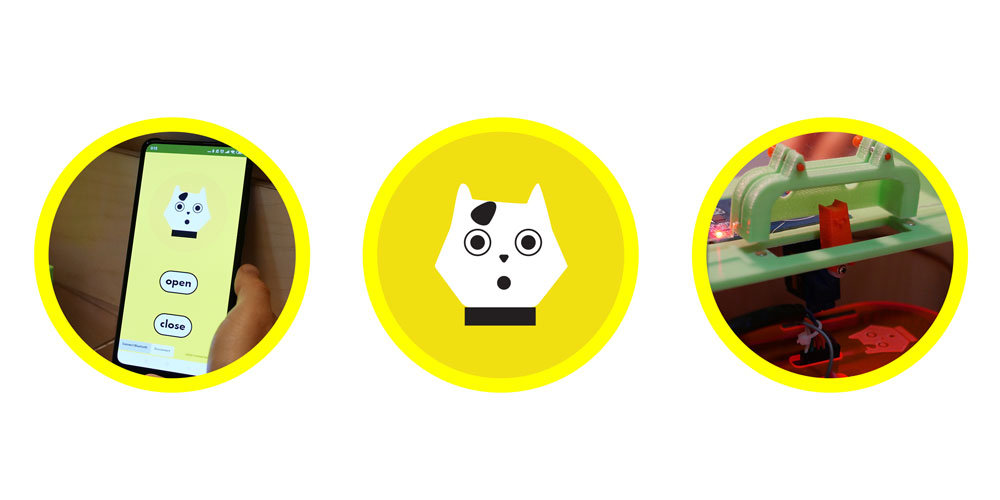
This is the layout of the app I wanted to design, an icon of Mirru, two simple buttons and a sound effect whenever you press close button.
So after drawing my icons, I uploaded them to app inventor platform and started working on the interface
design.
Once you have both the blocks and the design you have to press AI COMPANION inside
CONNECT on the top menu, to preview the interface and to see that all is working.
_APP WORKING
This is a short video showing how the app works integrated into the system:
IMPROVEMENTS
_1 the app works fine but the connection with the bluetooth module is not very stable, it keeps
disconnecting it shows this error "Error 516:Unable to write:Broken pipe", if i connect
and re connect the bluetooth it works again.
I would like to figure out this issue, could be connection issue or maybe related to voltage?
_2 In the future I would like to add a notification for weather, like a warning if it will rain so that
I can decide if i open or close the lock that day.
_3 Would be cool to receive a notification as well when the cat goes in or out.
TASKS COMPLETED
_INTERFACE AND APPLICATION PROGRAMMING ✔