Input devices
This week's assignment is about using and programming any kind of input device with a fab made board.
Just out of curiosity and not with the intent to put it in my final project, I decided to use a RFID sensor. I wanted to create a locking mechanism, that only opens when the two matching RFID-tags are recognized in a timespan of 5 seconds. And then closes again, after some time.
For that I made a quick and simple ATMega328p-based board, that had all the necessary i/o pins and a voltage regulator for the sensor, since it has to be powered with 3.3V. The process of making it will not be evaluated further in this assignment, for more information on the topic, just visit my electronics design and production weeks.
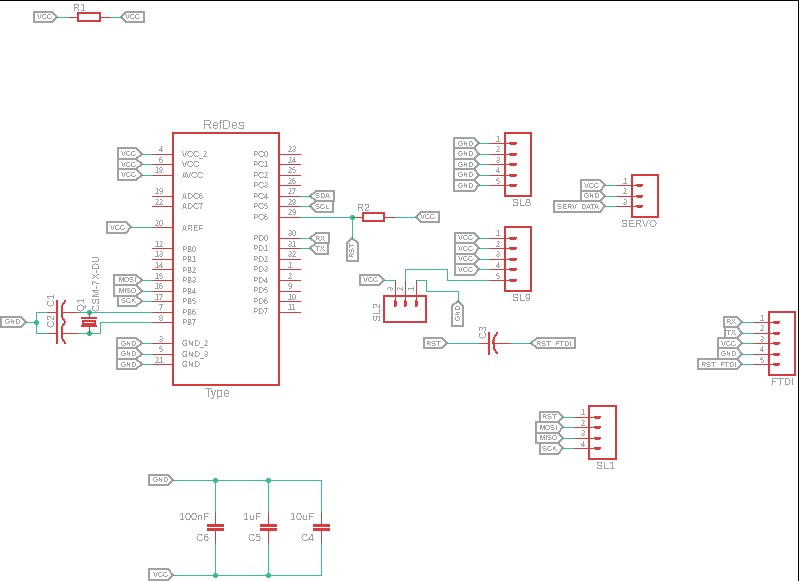
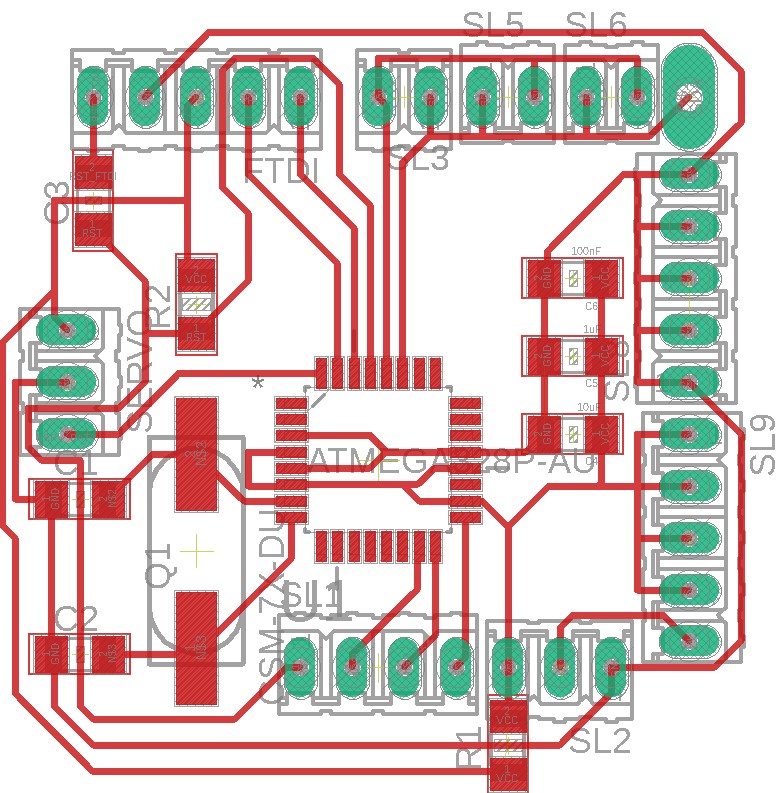
The pins to connect on the "RFID-RC522" are SDA, SCK, MOSI, MISO, GND, RST and finally 3.3V. There is one pin that doesn't have to be connected and it's called IRQ, this is used for interrupts, which I'm not going to utilize.
So once everything is hooked up, it's time to start up the arduino IDE to code for it. First though you have to download the right Library and import it into your project. The library I used is the "MFRC522" and it's example sketch access control. And then it's just a matter of coding whatever you want. Since my code is well commented, I am not going to explain it in depth, but it basically gets the ID of the tag and compares it to saved ones, if the IDs match, it waits for the second tag and opens for 5 seconds, if it doesn't it denies the access.
So here you can see it working, whenever only one of the tags is present and a 5 second timeframe is exceeded, the serial monitor prints "close" (some function could be implemented right here, to handle actual access control). However once the teo tags are recognized in that timeframe, the monitor prints "open", which is where another real function could be implemented.
download the code
Just out of curiosity and not with the intent to put it in my final project, I decided to use a RFID sensor. I wanted to create a locking mechanism, that only opens when the two matching RFID-tags are recognized in a timespan of 5 seconds. And then closes again, after some time.
For that I made a quick and simple ATMega328p-based board, that had all the necessary i/o pins and a voltage regulator for the sensor, since it has to be powered with 3.3V. The process of making it will not be evaluated further in this assignment, for more information on the topic, just visit my electronics design and production weeks.
The pins to connect on the "RFID-RC522" are SDA, SCK, MOSI, MISO, GND, RST and finally 3.3V. There is one pin that doesn't have to be connected and it's called IRQ, this is used for interrupts, which I'm not going to utilize.
So once everything is hooked up, it's time to start up the arduino IDE to code for it. First though you have to download the right Library and import it into your project. The library I used is the "MFRC522" and it's example sketch access control. And then it's just a matter of coding whatever you want. Since my code is well commented, I am not going to explain it in depth, but it basically gets the ID of the tag and compares it to saved ones, if the IDs match, it waits for the second tag and opens for 5 seconds, if it doesn't it denies the access.
Servo myservo;

constexpr uint8_t RST_PIN = 9;     // Configurable, see typical pin layout above
constexpr uint8_t SS_PIN = 10;  // Configurable, see typical pin layout above


boolean chris = false;
boolean markus = false;

int goal;
int opened;


MFRC522 rfid(SS_PIN, RST_PIN); // Instance of the class

MFRC522::MIFARE_Key key;

// Init array that will store new NUID
byte nuidPICC[4];

void setup() {
  Serial.begin(9600);
  SPI.begin(); // Init SPI bus
  rfid.PCD_Init(); // Init MFRC522

  for (byte i = 0; i < 6; i++) {
    key.keyByte[i] = 0xFF;
  }
}

void loop() {
if(goal == millis()/1000 && ( markus || chris )){
  markus = false;
  chris = false;
  Serial.println("close");
}
  // Look for new cards
  if ( ! rfid.PICC_IsNewCardPresent())
    return;

  // Verify if the NUID has been readed
  if ( ! rfid.PICC_ReadCardSerial())
    return;

  //Serial.print(F("PICC type: "));
  MFRC522::PICC_Type piccType = rfid.PICC_GetType(rfid.uid.sak);
  //Serial.println(rfid.PICC_GetTypeName(piccType));

  // Check is the PICC of Classic MIFARE type
  if (piccType != MFRC522::PICC_TYPE_MIFARE_MINI &&
    piccType != MFRC522::PICC_TYPE_MIFARE_1K &&
    piccType != MFRC522::PICC_TYPE_MIFARE_4K) {
    Serial.println(F("Your tag is not of type MIFARE Classic."));
    return;
  }

if (rfid.uid.uidByte[0] == 25 &&
    rfid.uid.uidByte[1] == 12 &&
    rfid.uid.uidByte[2] == 114 &&
    rfid.uid.uidByte[3] == 91 ) {
      Serial.println("Chris!");
      if(markus){
      Serial.println("open!");
      markus = false;
      chris = false;
      }else{
      chris = true;
      goal = millis()/1000 +5  ;
      }


      }
  if (rfid.uid.uidByte[0] == 253 &&
    rfid.uid.uidByte[1] == 227 &&
    rfid.uid.uidByte[2] == 149 &&
    rfid.uid.uidByte[3] == 187 ) {
      Serial.println("Markus!");
     if(chris){
      Serial.println("open!");
      markus = false;
      chris = false;
      }else{
      markus = true;
      goal = millis()/1000 +5;
      }
      }


  if (rfid.uid.uidByte[0] != nuidPICC[0] ||
    rfid.uid.uidByte[1] != nuidPICC[1] ||
    rfid.uid.uidByte[2] != nuidPICC[2] ||
    rfid.uid.uidByte[3] != nuidPICC[3] ) {


    // Store NUID into nuidPICC array
    for (byte i = 0; i < 4; i++) {
      nuidPICC[i] = rfid.uid.uidByte[i];
    }

  }

  // Halt PICC
  rfid.PICC_HaltA();

  // Stop encryption on PCD
  rfid.PCD_StopCrypto1();

}


/**
 * Helper routine to dump a byte array as hex values to Serial.
 */
void printHex(byte *buffer, byte bufferSize) {
  for (byte i = 0; i < bufferSize; i++) {
    Serial.print(buffer[i] < 0x10 ? " 0" : " ");
    Serial.print(buffer[i], HEX);
  }
}

/**
 * Helper routine to dump a byte array as dec values to Serial.
 */

void printDec(byte *buffer, byte bufferSize) {
  for (byte i = 0; i < bufferSize; i++) {
    Serial.print(buffer[i] < 0x10 ? " 0" : " ");
    Serial.print(buffer[i], DEC);
  }
}
So here you can see it working, whenever only one of the tags is present and a 5 second timeframe is exceeded, the serial monitor prints "close" (some function could be implemented right here, to handle actual access control). However once the teo tags are recognized in that timeframe, the monitor prints "open", which is where another real function could be implemented.
Group Assignment
Here you can find this week's group assignment.download the code