INTERFACE AND APPLICATION PROGRAMMING
The learning outcomes:
Interpret and implement design and programming protocols to create a graphical user interface (GUI).
Individual assignment
Write an application that interfaces with an input &/or output device that you made
Create the application for my mobile
I decided to make a request for my cell phone, the interface will be displayed on my mobile screen.Well, first my mobile phone has an Android operating system, I had to find how to make applications, there are two ways to make applications for Android, one of them is the application of the inventor 2 developed by MIT and the second is with ANDROID STUDIO software. There are other ways, but these two are the most important.
.png)
.png)
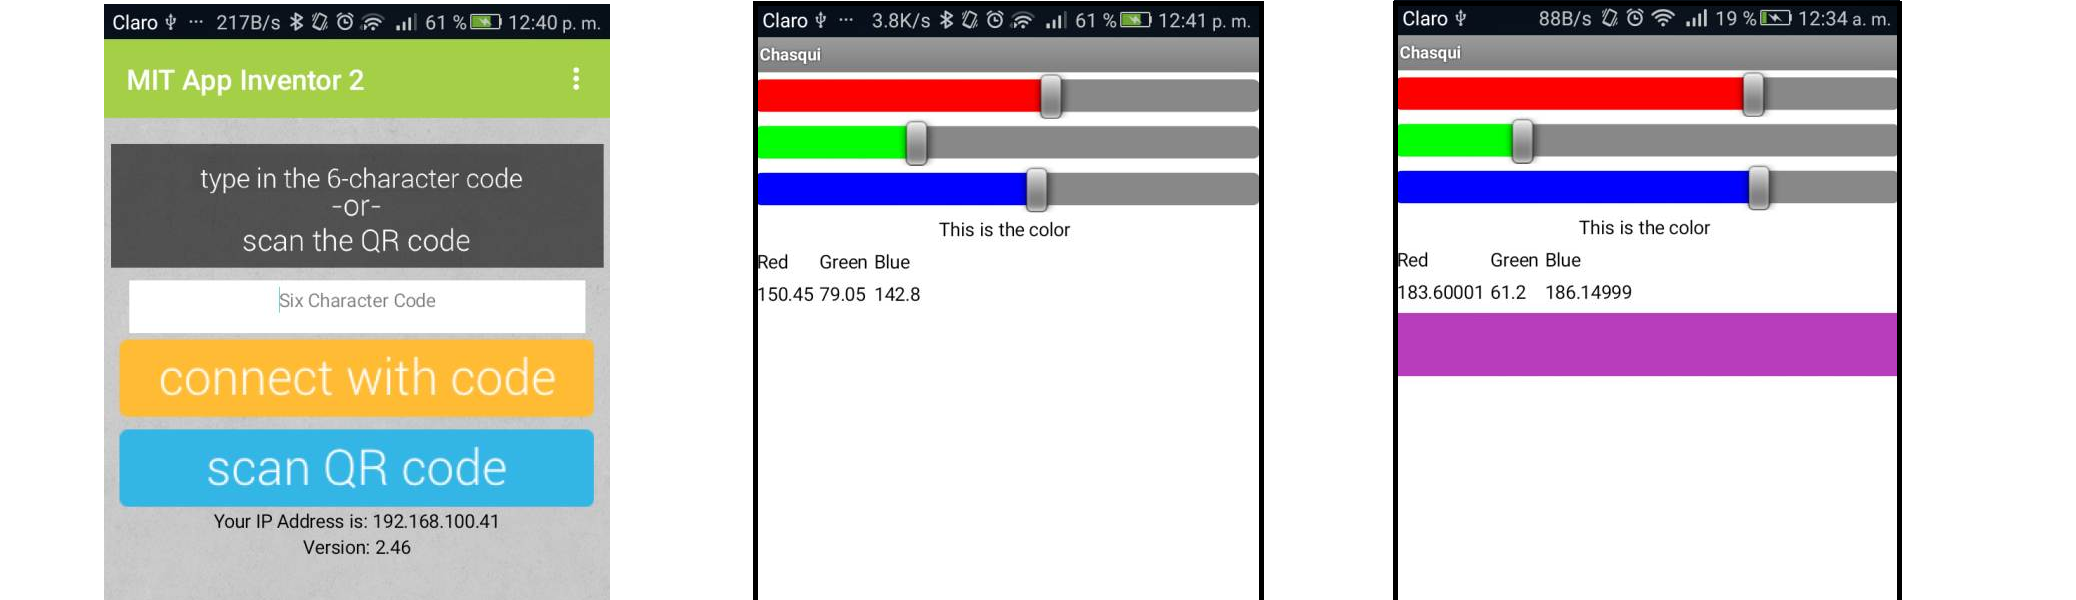
I decided to create the application with Appinventor. I will create an application where you can change the colors with a slider. With the following assignments, I will make the communication from my application to my input and output board. Or I can make a new app that allows me to make a connection via bluetooth.
Let's add the horizontal arrangement this is util for the organization.
We are going to add the slider within the horizontal arrangement, this tool is useful to control the color, in my case the color is shown in the other horizontal arrangement.
I changed the parameters of the horizontal layout, the slider and the orientation of the screen. Why change the parameters? I like my application to play with the people.
I changed the max and min value for the slider, I also changed the color for the slider.
I added the label for each of the colors and the box where it is possible to change the color of the interior
Block programming
This type of programming is very different compared to another system, in this type of system each block has a job and joins another, in addition in this system we can not include a different component or that does not go with is correct.
At the end of the programming, I create the application. Something very useful and very fast is the generation of the application through the QR, the application on the mobile next to the QR reader allows a very fast and safe installation.
And finally the application is as follows after several corrections.
To control an input or output device with Android it is necessary to connect a bluetooth, an emitter and a receiver. But I want to try a faster interface to do, for this case I use processing that is very simple and very quick to understand
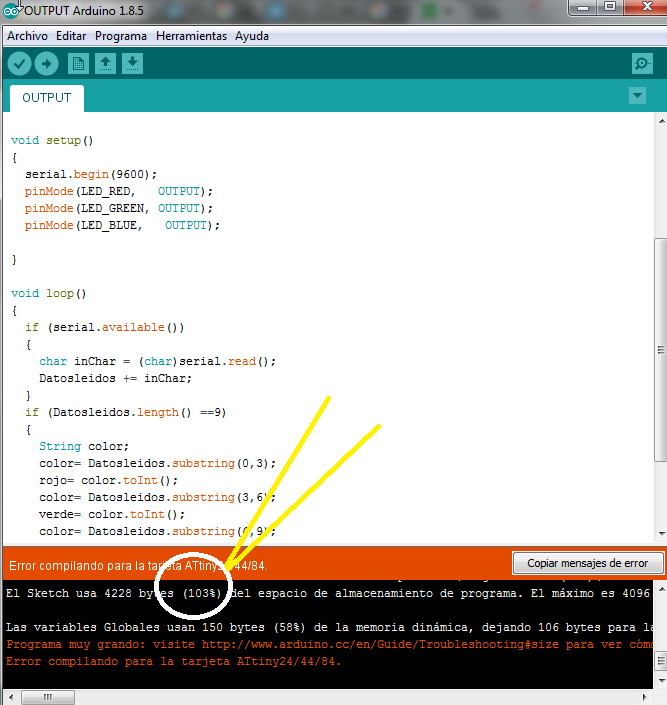
For this application I use the bluetooth and I also program the microcontroller to control the colors but I had problems in generating the code, according to the message shown exceeds 100% of the memory, so I decided to make a program that does not exceed 100% of memory and in the same way change to a new application.
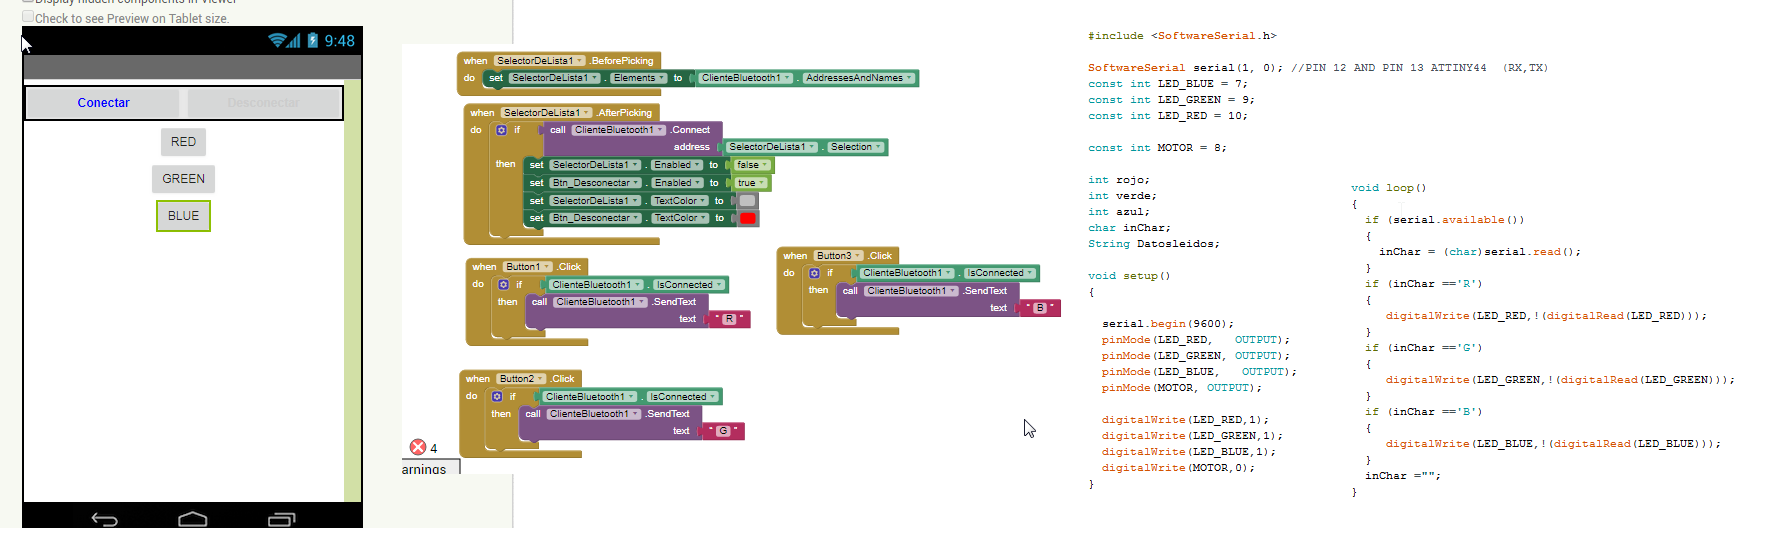
Change the application and the microcontroller program now I have left as follows. In this code I can control the turning on and off of the LEDs, in this way I get several combinations
The Test with my Output Board
After making the connection with the bluetooth module I can see that the code and the application communicate correctly and that I can combine colors. Something that I have to comment is that the bluetooth module was configured in 9600 bauds and in the same way I have to communicate my board to 9600 if this does not happen the 2 will not understand.
Processing
The first download procesing the link is Processing
I will try to use processing and interpret the programming protocols necessary for this software. Understanding a programmed logic vs a logic that works in blocks is something totally different.
In a GUI the most important thing is to first have a window or screen display, give the user information through text, as well as interact with the graphic elements, it's more fun. As in other systems in the "GUI" we need a type of input data and a type of output data. The input data is sent to the interface by the user while the output data allows to interact with the user
When I started this task I was having a hard time dealing with processing and my output board. After a few readings I achieve it. The first important thing is to import a library called "serial" from the sketch menu. That is to allow Processing to read from my serial port and add a first line to the code: "import processing.serial. *;".
I included the library and created the variables
import processing.serial.*;

Serial myPort;
int val;
After that, you have to create global variables to receive or send data. In the setup (), first we create a screen of the size that we like the most. The code was orienting to find the serial port within a list, I had to change according to the number assigned to it. It is important that both the Arduino code and the processing code communicate at the same speed of 9600 this to avoid communication problems.
Setup parameters
void setup()
{
  size(500, 500);
  String portName = Serial.list()[0];
  myPort = new Serial(this, portName, 9600);
}
In the draw (), it is expected that there is a communication data to perform the reading and it is stored in a variable. I create a background inside the white screen. The code interprets the input data if this equals 0 places the filling to a square otherwise it fills it leaves empty.
Void Draw () Programming
void draw()
{
  if ( myPort.available() > 0)
  {
    val = myPort.read();
  }
  background(255);
  if (val == 0)
  {
    fill(0);
  }
  else
  {
    fill(204);
  }
  rect(50, 50, 100, 100);
}
Results.
Explained the the GUI that you made and how you did it
.png)
* The size of the interface window is 500 x 500pixels.
* The interface allows to obtain the serial port data.
* The interface allows to graphically visualize the variations of the signal by changing the color of the filling of the small box.
How to add a button in processing?
It is very easy to use the mouse buttons to perform an action. I started looking for information and found out how to know when the right mouse button has been pressed. This is a big step forward now I want to link these two codes to my output board.
int x=320;
int y=240;
int r=255;
int g=0;
int b=0;
color fondo;

void setup()
{
  size(640,480);
}

void draw()
{
  background(255);
  fill(r,g,b);
  ellipse(x, y, 40, 40);
}

void mousePressed()
{
  if (mouseButton == LEFT)
  {
    x=mouseX;
    y=mouseY;
    r=int(random(255));
    g=int(random(255));
    b=int(random(255));
  }
}
.png)
How to add a slider in processing?
This search was more complex but I managed it although I am still modifying the code I will soon have my slider ready, my button and my communication with full arduino.
.png)
Group assignment
Compare as many tool options as possible
At this point we decided to try several options, as for the case of my partner he always likes to see free software, the experiment by scratch, I have a lot of experience in app inventor 2 for android, and also processing good here we also have to use arduino ide to try to communicate with the PCB board.
We also have several programs that I personally would like to do example java, javascript and python.
What is the good and the bad about each of these software?
AppInventor good personally I do not know if it can be programmed in this program without being connected to the internet network. I would like to be able to download the program and work directly from the computer. The initial visual interface is very intuitive and the programming is done in blocks.
Processing this program I love is free and several people contribute to its development is not very heavy just have to look for the information and bookstores suitable for the project we are doing.
Python is one of the most excellent software I have tried but this time I wanted to experience others, the good thing is that it is very easy to program using textual code, how difficult it is to add the libraries, personally I use windows and it is very complex I do not know if It is for my cimputador. I would like to test the potential of python in UNIX.
Another very different software that I liked at first glance was scratch since its programming is based on blocks almost similar to appinventor and since many children use this program to make games that surprised me a lot.
Conclusions:
- In a graphical interface it is better to use buttons than texts, it is more useful for the user.
- There are design softwares for mobile applications and also for PC applications, although its platform is different the logic remains the same, it will have buttons, sliders, check boxes, labels etc.
- There is software that allows a more advanced development such is the case of python that has improved your entire system.
- Graphic programming is very useful, but if you want to create a new add-on it is very difficult to create it, a user with more experience can do it.
- The advantages of creating GUI by code to create it per block is very edivente blocks is much easier to change, but through code can make more advanced modifications.