
Juan Ranera
Fab Academy 2013 Participant
Embedded programming
The assignment for this week is to read a microcontroller datasheet and to program the Hello Button + LED board
Electronics design to do something,
with many different programming languages and programming environments as much as possible.
I've followed the tutorial Kaziunas Anna and
this page.
ATtiny Embedded Programming with the Arduino IDE
I've downloaded the Arduino IDE software version 1.0.3 and the ATtiny support file for Arduino. I've installed the Arduino environment with Attiny complement to the following steps.Installing ATtiny support in Arduino:
- If you haven�t already, download the Arduino software, version 1.0.3 (or 1.0.1 but not 1.0.2). Install the Arduino software, following the instructions for Windows or for Mac OS X.
- Download the ATiny master.zip file from the link above.
- Unzip the attiny master.zip file. It should contain an �attiny-master� folder that contains an �attiny� folder.
- Locate your Arduino sketchbook folder (you can find its location in the preferences dialog in the Arduino software)
- Create a new sub-folder called �hardware� in the sketchbook folder, if it doesn�t exist already.
- Copy the �attiny� folder (not the attiny-master folder) from the unzipped ATtiny master.zip to the �hardware� folder. You should end up with folder structure like Documents > Arduino > hardware > attiny that contains the file boards.txt and another folder called variants.
- Restart the Arduino development environment.
- You should see ATtiny entries in the Tools > Board menu.

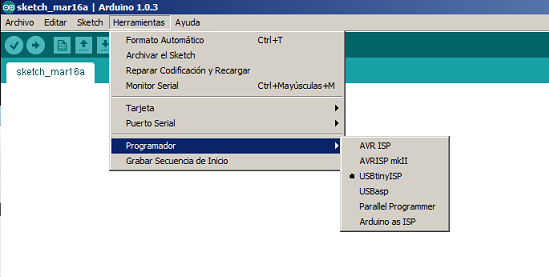
and the programmer that I've used.
The program I have done is very simple. When you start the power the LED flashes three times to verify that the program is correctly loaded. Every time we make a pulse, the LED goes on and off and then it blinks again the number of pulses you have made until the moment, actually it counts five times and starts again.
In my board's layout I've used PA3 as input to connect the button and to connect the LED I've used PA7 as output. I've followed this table.
ATtiny 44A vs. Arduino Pin-Out Numbering
| ATtiny 44A Pin Number |
Corresponding Arduino Pin Number |
Details |
| 1 | No number, no access? | VCC (+) |
| 2 | Pin 10 | PB0 |
| 3 | Pin 9 | PB1 |
| 4 | No number, no access? | PB3,Reset |
| 5 | Pin 8 | PB2, PWM |
| 6 | Pin 7 | PA7, PWM, Analog Input 7 |
| 7 | Pin 6 | PA6, MOSI, PWM, Analog Input 6 |
| 8 | Pin 5 | PA5, Analog Input 5, PWM, MISO |
| 9 | Pin 4 | PA4, Analog Input 4, SCK |
| 10 | Pin 3 | PA3, Analog Input 3 |
| 11 | Pin 2 | PA2, Analog Input 2 |
| 12 | Pin 1 | PA1, Analog Input 1 |
| 13 | Pin 0 | PA0, Analog Input 0, AREF |
| 14 | No number, no access? | GND (-) |
This is my Arduino program:
/*
 Created March 2013
 by Juan Ranera


 Turns on and off a light emitting diode(LED) connected to digital
 pin 7, when pressing a pushbutton attached to pin 3 and then flashes
the number
 of times you've pressed the button (limit 5 and starts)

 The circuit:
 * LED attached from pin 7 to 10K resistor from ground
 * pushbutton attached to pin 3 from +5V
 * 10K resistor attached to pin 3 from ground


 This example code is in the public domain.
 */

// constants won't change. They're used here to
// set pin numbers:
const int buttonPin = 3;    // the number
of the pushbutton pin
const int ledPin = 7;      // the number of the LED pin

// variables will change:
int buttonState = 0;         // variable for reading the pushbutton status
int startBlink = 0;
int TimeBlink = 0;

void setup() {
  // initialize the LED pin as an output:
  pinMode(ledPin, OUTPUT);
  // initialize the pushbutton pin as an input:
  pinMode(buttonPin, INPUT);

  // initialization with 3 flashes to verify the program is loaded correctly
  while(startBlink < 3){
    digitalWrite(ledPin, HIGH);
    delay(5);
    digitalWrite(ledPin, LOW);
    delay(5);
    startBlink++;
  }
  startBlink = 0;
}


void PulsationDetected(void){
static char state;
static char number_of_pulses;
  buttonState = digitalRead(buttonPin);

  switch (state){
    case 0:
          if (buttonState == HIGH){
            digitalWrite(ledPin, HIGH);
            state=1;
          }
    break;

    case 1:

          if (buttonState == LOW){
            digitalWrite(ledPin, LOW);
            state=2;
            number_of_pulses++;
            if(number_of_pulses>5) number_of_pulses=0;
          }
    break;

    case 2:
            while(startBlink <= number_of_pulses){
              digitalWrite(ledPin, HIGH);
              delay(10);
              digitalWrite(ledPin, LOW);
              delay(10);
              startBlink++;
            }
            state=0;
            startBlink=0;
    break;
  }
}

void loop(){
  PulsationDetected();
}
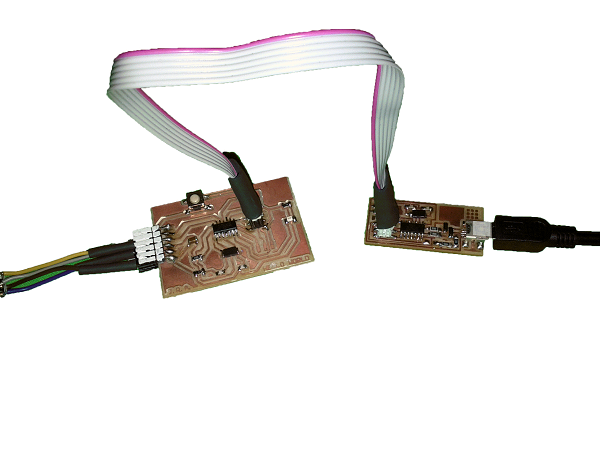
Programming connection image:
Final result: