Classes and Final Project
week1 : principles and practices, project management
week3 : computer-controlled cutting
week4 : electronics production
week5 : 3D scanning and printing
week8 : computer-controlled machining
week13 : networking and communications
week14 : interface and application
week15 : applications and implications
week16 : Machine design
Assignment : Making machine including end effector. (Group Assignment)
This week assignment is a group work, I'm belonging in the A-Team( Jani, Lina, Mery and me) which will make a Form Cutter.My role is programmer.
Before doing our own works, first we discussed basic stuctures and systems. Using two steppermotors, cutting the form from upside and the data is based on G code. The program was written by Python and I'm most familiar person to Python, so I programmed the python application. This page, first I gonna describe my work.
Programming part (my work)
First I downloaded the pyGestalt from the website and tried the example. Thanks Jani, he made a board for the connection between USB and nodes, I could forcus on only the python code. The example worked well and it's easy to change the data for controling stepper motors. However, ofcourse we didn't want to send the data manually, so I would like to make the code from g code. I looked up the examples, but I couldn't find any example, so I made the converter from g code to the stepper format.
Bacially G code consisted of three functions. MovingXY, extruding(it depends on what it is) and Moving Z axis. So my code first load the g code, then sprit it to each lines, find the G01X~~~Y~~~Z~~~line and sprit it to two (X value and Y value). G01 means moveing and our machines only move XY, so it's enough. After that, it converted the values to arrays for stepper motors format.
Fortunately I could make this program for only two days,but it was still boring program because of no GUI, I made the GUI. To use wxPython was first time for me and it is the event driven programming. Usually I use Java and C++, so it was little bit confusing for me, but I could manage it. The interface is this.

When I push the "load" button, then the window appears and I can choose the g code file. After selecting it, it shows the drawings from G-code. There is still a problem that a G code has two different movements in G01. One is a movement during milling (or extruding) and the other is a movement without milling (movement between a part of milling and an unpart of milling). Now it loads both of movements so as you can see, the result is not what I want to cut exactly. To avoid that, I think I need to distinguish both movements and for non milling movement, I need to fix the g code in program to avoid it goes across.
--26/5--
I asked Ferdi for this problem, but we actually cannot avoid it because of feature of FormCutter. Therefore in stead of programming, I add some black line in png file and escape holes and conenct all of components in drawing. It's like this.


Yay! Now it makes good lines!
Other works
Other guys made two stages(one is still under construction) with laser cutter and it works well. Also They designed the structure of Form Cutter. Thanks guys!

17th week progress
First, our team would like to make a form cutter machine, but we realized if it is able to change its header to pen, brush and other thing, it can draw everythin with whatever. So we changed the design little bit and we made an attachment for header with magnets.
My work in this week
Mainly my work was already finished in previous week, so I helped other member's work. And they want to have a "Go Home" button and a "Go first point"button to avoid the movements that cut inside of the design.
To make these buttons, first I put the buttons in UI with wxPython and make functions, then I move the definition to the class member (It was private function member before). Actually the UI was not unuser friendly, so I changed little bit as well. This is the result.

Group Works
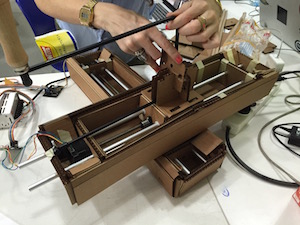

Thanks guys, they cut the cardboard and assemble the machine, we got the machine. We put the stepper motors inside of that and test how it moves. The result is here.
And after that, We tried to attach one stage to the other stage. There is not any description in MtM sites, but Jani made it! Jani connected thoes with bolts and nuts, and Lina and Mery cut the stands for stages. And eventually we got our machine "A Team"!


We just attached the pen to make sure it works well, and yes, it worked well. In above video, you can see it drew "A Team" from the mac. Actually the pen was not stable, so it didn't draw exactly. After that Jani made the attachement for header.

After that, finally we tried to make the Form cutter. We made the the FormCutter cable and attached it to the header. The wire should pass through a form and to do that, we need to make the stand for putting the form. Here is the result and you can see it cut the Form and follow the design "A Team". Thanks A Team! It's best team ever!
Here is the code. You need to get PyGestalt liblary and pySerial first.