
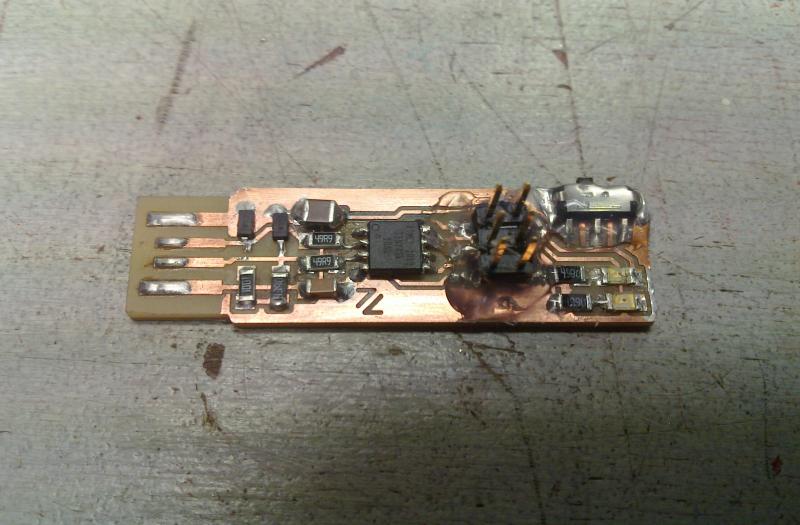
This basically started out as a 100% fab-able version of the vusbtiny programmer from simpleavr with a few minor additions, namely a switch and indicator LED for target-power and a LED on the SCK line (just like a real arduino). It was inspired by David Mellis' FabISP and Andy Bardagjy's FabISPKey although it doesn't feature any solder jumpers or zero-ohm resistors ;). I used to call it FabTinyISP, but since it has so many other uses, I have decided to change the name to FabTiny* (aka. FabTinyStar) where the asterisks symbolizes a wildcard denoting the endless possibilities. Or as Bas Withagen put it: a Fab-Tiny-Anything.
If you put an ATtiny85 on it instead, then you should be able to flash it with the Micronucleus bootloader (the 45 just doesn't have enough memory for that to be realy useful, but it can be done) and it will be almost completely compatible with the LittleWire and somewhat compatible with the the DigiSpark. The earlier (now obsolete) versions had the USB lines wired differently, so for them the micronucleus bootloader had to be reconfigured. Nowadays the vanilla firmware for the vusbtiny programmer has to be adjusted instead, which was already done in the downloads below.
And of course you can always write your own firmware for it with vusb, I found the following tutorials very useful to get started (especially the last part):
There is a tutorial on how to make your own ISP using verson 0.3 (Bas) in the fabacademy archive. Adam Harris wrote a nice HowTo on the SheekGeek website here: How to: FabTinyStar Programmer, it has some valuable information for using it with windows. Brian Mayton has gone a little further and made a more minimal revision which he very nicely documented here: Building the FabTinyISP
The design notes became big enough for their britches and hence have been moved to their very own page where the different models are discussed.

| MISO (Brown) | 1 | 2 | (Red) Vcc | |
| SCK (Orange) | 3 | 4 | (Yellow) MOSI | |
| Reset (Green) | 5 | 6 | (Blue) Ground | |
| USB D+ (Purple) | 7 | 8 | (Gray) USB D- | |
| Wire | Color | ISP | Digital | Analog | Serial | I2C | 1Wire | Chip | |
|---|---|---|---|---|---|---|---|---|---|
| 1 | Brown | MISO | (PB)1* | - | TxD | - | - | 6 | |
| 2 | Red | Vcc | Power | 8 | |||||
| 3 | Orange | SCK | (PB)2 | A1 | - | SCL | Data | 7 | LED |
| 4 | Yellow | MOSI | (PB)0* | - | RxD | SDA | - | 5 | |
| 5 | Green | RESET | (PB)5 | A0 | - | - | - | 1 | Button |
| 6 | Blue | Ground | Common | 4 | |||||
| 7 | Purple | N/C | (PB)4* | A2 | - | - | - | 3 | |
| 8 | Gray | N/C | (PB)3 | A3 | - | - | - | 2 | PullUp |
The indicated wire colors are when using a piece of flat "rainbow" ribbon cable with an IDC (Insulation-Displacement Connector). Just setting a suggested standard here, it's obviously not mandatory. Gray or other colors will work just fine too as fortunately electrons are color-blind (just don't say that out loud, they can be rather sensitive about it).
The green LED is connected to SCK indicating active communication. The push button can be used to reset the connected programming target board or chip. The slide switch controls whether the ISP provides power to the target. The red LED indicates whether the target is powered (either by the ISP or on its own).
Before connecting the ISP (to the target) you should turn the slideswitch off so that the red LED is off when (only) plugged into USB. After connecting the ISP to the target, the red LED will now indicate whether the target has its own power or needs to be supplied by the ISP. In the latter case the switch can be turned on to make it so.
In a nutshell, upload the firmware from the tv-b-gone_firmware package below, and connect an infra-red led between VCC and D0, guess where the anode goes? There's a 50% you get it right if you gamble randomly. ;)
Works nicely with one of them portable mobile phone chargers. The range is rather limited, but you could always add some transistors and more leds. Or buy a real one, they have a range of about 100 meters (~100 yards). Great fun for the whole family, definitely recommended! As a bonus you'll be sponsoring the inventor, Mitch Altman, who is traveling the world on his mission to teach (almost) everyone soldering with his workshops (also highly recommended).
Describe how to install hardware support for the arduino environment here, when it is complete and working.
Here are some of the issues concerning the FabTinyStar.
There have been reports of problems with certain USB-3 ports due to the stricter timing USB-3 requires, from what I've understood all FabISPs seem to be suffering from this. The workaround is to try another USB port or even an USB-2 (or lower) hub. As I don't have any USB-3 ports (yet), I cannot really test this myself.
According to the datasheet the power switch (slide switch from the fablab inventory) is rated: "MAX. SWITCHING CURRENT: 100 mA" (= 0.1 Amp) while USB ports should be able to deliver at least 500 mA (= 0.5 Amp). So if you have a target which draws more then a little current it would be advisable to only flip the switch when there is no power (the target or USB is disconnected). Using the switch above the rated current is not advised, please use you common sense (which unfortunately appears not to be so common anymore). In an extremely rare worst case scenario you may even be able to start a fire and burn your house down if you really try (just note that there are way more efficient ways to do that) however under no circumstances will I take responsibility for your actions. If you need more current and want to be sure this doesn't become a problem then you can always put a zero Ohm resistor in place of the switch.
Personally I put 500mA PTC resistors on my board to guard the USB port from overload in case of a short-circuit, you may want to use a 100mA one instead to guard the switch as well, which would be the safest option. The zero Ohm resistor which is the Fab-inventory alternative equivalent of the PTC will offer NO such protection at all.
I usually like to put ATtiny85s on my own boards, however the Fab-inventory only has the ATtiny45V-10SUR available. Running them at 16.5MHz is actually a bit outside of it's specifications (10 MHz) but I have yet to encounter one that cannot handle this overclocking (and I have made more then a few by now). As they are specifically intended for low power applications, and therefore a little more expensive then the regular ATtiny85 (at least the last time I checked). So if you need to order them anyway, I'd recommend getting the ATtiny85 instead as it also has twice the memory and the low power feature is not utilized in this specific application anyway.

Clock speed in megahertz versus Vcc voltage.
The Yellow dot represents version 0.3.3 (Dave), the green dot represents the other models.
In the future there might be an effort to try to get them to run them on 12.8MHz as well, which will be only borderline out of spec for the low power (ATtinyX5V) versions and bring version 0.3.3 (Dave) in spec on the regular tinies.
Unless you absolutely need to be running at 3.3 Volt, I strongly recommend using the 5 Volt version 0.3 (Bas)! And eventhough version 0.4 (Emma) is now the latest version, it is also double sided. So if you're not completely bored with milling single sided (or looking for a challenge) I would still recommend sticking to version 0.3 "Bas" which is much easier to make.
| File | Version | Size | md5sum | |
|---|---|---|---|---|
| | ||||
| fabTinyStar-017.tar.bz2 | 0.4 (Emma) | 210.00 KiB | Flagship model, doublesided so not that easy to make. | |
| fabTinyStar-013.tar.bz2 | 0.3.3 (Dave) | 196.33 KiB | Special 3.3 Volt version | |
| fabTinyStar-012.tar.bz2 | 0.3 (Bas) | 74.65 KiB | <-- Unless you know better, use this one! | |
| fabTinyStar-009.tar.bz2 | 0.2 (BWE) | 166.32 KiB | Obsolete | |
| fabTinyStar-007.tar.bz2 | 0.1.1 | 173.4 KiB | Obsolete | |
| fabTinyIsp-006.tar.bz2 | 0.1 | 338.33 KiB | Obsolete | |
| | ||||
| vusbtiny_firmware_fabtinystar.tar.bz2 | 200.60 KiB | Modified ISP firmware (+source) for version 0.2 onward. | ||
| tv-b-gone_firmware-1.2a_fabtinystar.tar.bz2 | 216.89 KiB | Modified TV-B-Gone firmware (+source). | ||
| | ||||
Please note that the number in the filenames above is how I track my files, and not the actual version number.
This project uses/is based on/inspired by the work of numerous people, including:
 This work is licensed under a Attribution Non-commercial Share Alike Creative Commons license