WEEK 7 | Embedded Programming
ATtiny44 Datasheet
Some vocabulary:
- bit (binary digit): the smallest unit of data in a computer, it has a single binary value, either 0 or 1;
- AVR device (Automatic Voltage Regulator): programmable watchdog timer with internal oscillator;
- GPRS (General Purpose Registors): can store both data & adresses;
- Status register: informations about the result of most recently executed arithmetic instruction, can be used for altering program flow, perform conditional operations;
- Stack pointer: store temporary data, local data and return adresses
- CPU (Central Processing Unit): architecture, ensure a correct program execution;
- ALU (Arithmetic Logic Unit);
- ADC (Analog to Digital converter);
- SRAM (Static Random Access Memory);
- EEPROM (Electrically Arasable Programmable Read-Only Memory).
About the pins:
- VCC receives the voltage;
- PB0|PB3: 4-bit bidirectional Input/Output ports, PB3 has a restet capability;
- PA7|PA0: 8-bit bidirectional Input/Output ports.
AVR Architecture:
- Memories:
SRAM Data Memory;
Flash Program Memory which is reprogrammable: LPM (Load Program Memory) & SPM (Store Program Memory);
EEPROM: memory for data storage.
- Clock system:
Clock subsystem: CPU Clock, I/O clock (ex: timer/counter), Flash clock, ADC clock.
Clock sources: external clock to run the device from an external source & internal oscillator that provides an approximate 8 MHz clock.
Installing ATtiny support on Arduino
This is how you connect everything together:
- Connect the ISP board to the Hello Board through their 2x3 headers; make sure the right pins are connected together (VCC with VCC, GND with GND, MISO with MISO, etc.)
- With a micro-USB cable connect ypur computer (i.e. the programmer: Arduino) to the ISP board
- Provide power to the Hello board through an FTDI cable.
At the end, I runned the "Burn Bootloader" and it worked!
Warning: this tutorial is adapted to old Arduino versions (until Arduino 1.0.3).
- To find the program: File -> Examples -> 02.Digital -> Button
- There is another thing to do before uploading the program to your board: Attiny44 pin numbering is different from the Arduino pin numbering.
I used this file to find to right pin numbers.
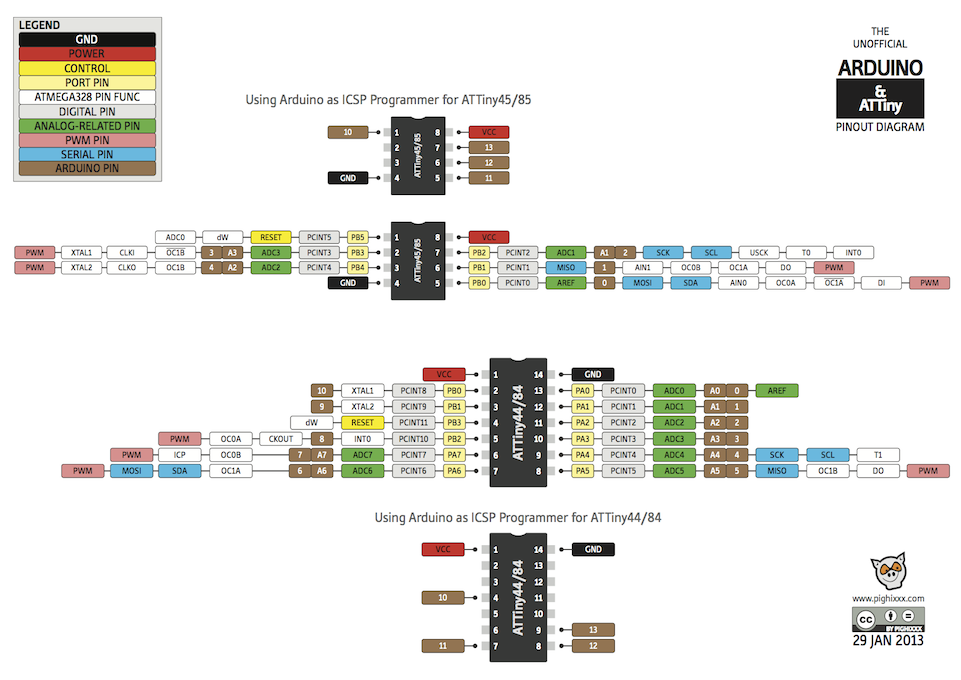
- Write the right pin number on your program. My LED is connected to the pin 6 on the ATtiny which is the pin 7 on arduino and my button is connected on the pin 10 which correspond to the pin 3.
It is so exciting when your LED lights up!
Using a too big resistor:
My Hello Board LED wasn't bright enough, it was because of the resistor value (way too big). So I checked my LED data sheet in order to find:
- Forward Voltage Vf = 3.2V;
- DC Forward Current If=20mAI
And I used the Ohm law to calculate the tight resistor value : R = (Vr - Vf) / If = (5 - 3.2) / 0,020 = 90 Ω
That meant that I had to use a 100 Ω resistor.
Arduino programming
This example was very helpful and you can also find my program file by downloading the files through the link at the bottom of this page.
You can find my program by downloading the files through the link at the bottom of this page.
C programming
I also tried to program on C but it's so complicated! I used Scott Zitek's code from Fab Academy 2014. My C program switches off the LEDs while the button is pushed. Otherwise the LEDs light up one after the other.
Click here to download the programs.