Decisions
This page reflects the list of decisions I made related to my final project RoboDuck 3000. Although I made some decision in earlier weeks I'll start listing my decisions from week 09.
Concept
I started with a Swim Monitor vs Open Water Buddy and choose the latter. Why? Because it's more challenging / unknown which should give me a better learning opportunity. Also, I live near water so it is easier to experiment when I want.
The name of the concept evolved from Open Water Buddy into UWO, into RoboQuack 3000 and finally into RoboDuck 3000. In short it will be autonomous swimming companion that support different operational modes like: Game / Swim / Wildlife.
DIY versus off-the-shelf
I know the FabAcademy is all about DIY but I decided to use an existing yellow duck my son gave me for my birthday. The whole idea that my son had was that it could swim with me when I was exercising for longer distances in the water; as a nice effect of a duck that swims behind me attached by a rope. Using an existing duck will also influence my scope but it will contribute to reuse what's already there; not waste plastic on 3D prints of a big duck
I'll buy electronics (like micro controllers, servo, location sensor, camera, wires) and I'll buy the waterjet propulsion (see below).
Regarding other work, I will DIM (do-it-myself) and reuse materials that are needed for this as much as possible; otherwise buy it.
Form factor / design
So the shape of RoboDuck (RD) is a given and I'll not alter it's layout and/or destroy it if I can help it. So in order to make it move/ interact I'll make a platform beneath it on which the duck will be mounted. This platform:
- holds the battery, propulsion and electronics
- makes the duck more stable; prevents it from flipping over
The location sensor and camera will be attached to the outside of the duck. My idea now is to make a helmet like RoboCop and hide the camera and GPS sensor in there.
Note
I first thought about opening up the duck to attach the camera and location sensor. But that also means that I have to make some kind of attachments mechanisme for the inside and it would mean I have to open up the duck's head; or at least somewhere around it's neck. I don't want to do that. I would be creating some kind of Frankenstein.
Latest
Week 14: decided to put GPS sensor inside the lower hull; camera will remain outside. For this I bought a longer wire to attach the camera to the electronics inside
Week 16: I probably will open the head of RD a little bit to attach the camera from the inside. Also need it to attach a small speaker. Wiring will go all the way down and the opening kept to a minimum and sealed to prevent water from coming in.
Propulsion
In an early stage I decided to use water jet propulsion which means no propeller. Alternative ideas like peristaltic movement? Just not fast enough.
I did find some 3D printable models on websites but as I'm looking at it, it contains complex curves and I'm hesitant because of my 3D skills. Also I also just want to make sure that the propulsion works. And I'm not sure how much pressure will be generated inside the tube of the jet so I think that a pre-fabricated one is a safe bet for now.
Eventually I or someone else can replace it with a 3D printed version themselves. For this I refer to possible designs that are I did not try myself (just to give an idea):
Note
In earlier discussions at our FabLab it was also confirmed by Bas, one of the turtors, that creating my own pump is tricky
Note
Week 16: I decided to go for 2 waterjets
Waterproofing
Big question is how to make everything waterproof?
Choosing an existing duck that part is taken care off. If there's no need to open up the duck then it pretty waterproof. Yes I do need to attach it somehow to the platform.
So what about the base platform itself? Tip from Henk/Take: consider molding and casting; avoid relying solely on 3D prints. Also based on input from my 3rd week this could mean that I use a piece of foam, use it to create a mold (CNC) then use epoxy and vacuum it.
Based on a tip from Irja (intern at our FabLab) I it is possible to treat 3D printed material with Dichtol. Some people tried this and it really seems to work.
Latest
- Week 14: it appears that the 3D printed test hull concept does not let water through even without the
Dichtol. The thickness of this hull is 5mm. - Week 16: I want to make the platform as light as possible starting with thinner walls. This means that water might come in now and I need to process it with Dichtol after all. Also because on the bottle it says between 0 and 0.2 mm.
- Week 18:
- I'll use PLA (2mm thick; printed at 0.2mm; 15% infill) and the
Dichtolactually works. - Optional: Use PETG for the lid as it is more flexible and I can see a bit what's going on inside.
- Use
insertsto attach the lid to the hull
- I'll use PLA (2mm thick; printed at 0.2mm; 15% infill) and the
- Week 19:
- I'll use vaseline between the lid and the hull; this is not a final solution but for now a practical one. Most futureproof would be to make a layer of soft silicon from a mold.
- I'll use Acrylate Silicon to close any gaps that don't need reopening again afterwards
Control and interaction
I don't want to open the duck. So no buttons on top of it; stuff like that. This automatically means the duck will be controlled by a remote connection.
Ideas sofar:
- use existing RC equipment I have to test the basic duck with thrust and steering
- replace the RC; use the EPS32S3 as Bluetooth server instead and send commands to it using a
serial connection over BLEusing a computer
No decision yet:
- What about safety if it goes out of range?
- How does it let the user know something is wrong? This requires 2-way communication
Latest
Week 15:
- RoboDuck will act as WiFi
serverto which a computer or phone with a Chrome browser can attach. RoboDuck will host a webpage that provides the code for UI and 2-way communication - Idea is that the duck will go
homewhen it looses connection after 5 minutes.
Week 16:
- Hard-coded geofence for now
- Create a device that can be used in water and supports limited functionality; at least to start and stop a certain mode. It should be small, light and unsinkable and a swimmer should be able to put it around his/her neck on a chord.
Week 18/19: - No seperate device just the web-based UI via my phone (or computer that doesn't matter)
UX
Adhere to some rules like:
- Make it clear to the user how to select a mode and what it means
- (POLS) Surprise the user as little as possible; they should be able to operate it in a flow they expect
Thinking about global class comments about
let users see what mode it's inI think it is a good idea to put a big neo pixel in the top of the duck's head. I can probably use this to show modes of operation using different colors(?)
Intelligence
Earlier experiments have shown the power of a ESP32S3-Sense. It was able to run an AI model lby itself. However impressive it was slower than the Grove Vision AI module v2 to which I attached a Raspberry Pi 5 compatible camera. So assuming AI detection will be part of RoboDuck; this will be the module I'll use.
No decision yet:
- what model to use?
- do I train my own model?
- will I use special attributes to recognize swimmers?
Latest
Week 15: According to my findings in week15 there is another way to create a model from scratch and convert it so it can be uploaded via SenseCraft. See this article.
Week 16: Sensecraft also allows me to train my own model. I could use an existing dataset of people in the water for instance, or people with swimming caps on and train a model myself.
Power
Originally I decided to use a USB power bank I already had but in week 14 I discovered that it just might be too big for my platform. So I'll try to find smaller power packs that can deliver 12V (or a combination that can do that).
Latest
Week 16: Yes I did order them earlier on but I'll keep the existing one for now. I'll use a USB-C converter to extract 12V for the motor(s) and use a normal entry of the powerbank to extract power for the micro-controllers and attach those via USB-C.
Week 18: After experiments I decided to use the powerbank for the brain/wifi microcontroller and use a different 12V power source for the motors --> Finally switched to 1 12v power source BUT use the current battery holder design
System design
During week 16 I looked at some options --> 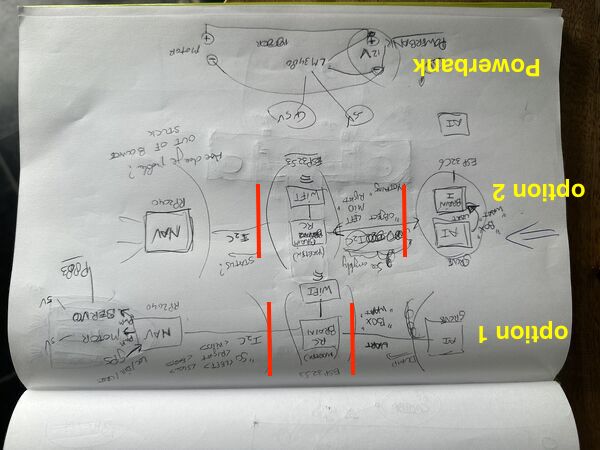 . I'll go for option 2 meaning that object recognisition is done by a seperate MC; not the brain. The brain will then be able to take care of Wifi and all control tasks that are necessary.
Note
Week 16: As I've written down in my weekly assignment: My plan was to have the AI module talk to a ESP32C6 and connect that one to the ESP32S3. But why not link the Grove AI module directly to the ESP32S3? It will only do Wifi with some user interaction and ask questions/ send commands to the navigation moduel. It saves me a PCB, soldering and space inside the platform.