Assignment 14:- Interface and Application Programming
Learning Outcome
In this week’s assignment, I learned how to interface with the XIAO module. During this week, I worked on displaying my project-related sensor data on a webpage. I also learned how to control the system operation through the webpage.
This week assignment task
Group assignment:
Compare as many tool options as possible.
Document your work on the group work page and reflect on your individual page what you learned.
Individual assignment
Write an application for the embedded board that you made. that interfaces a user with an input and/or output device(s)
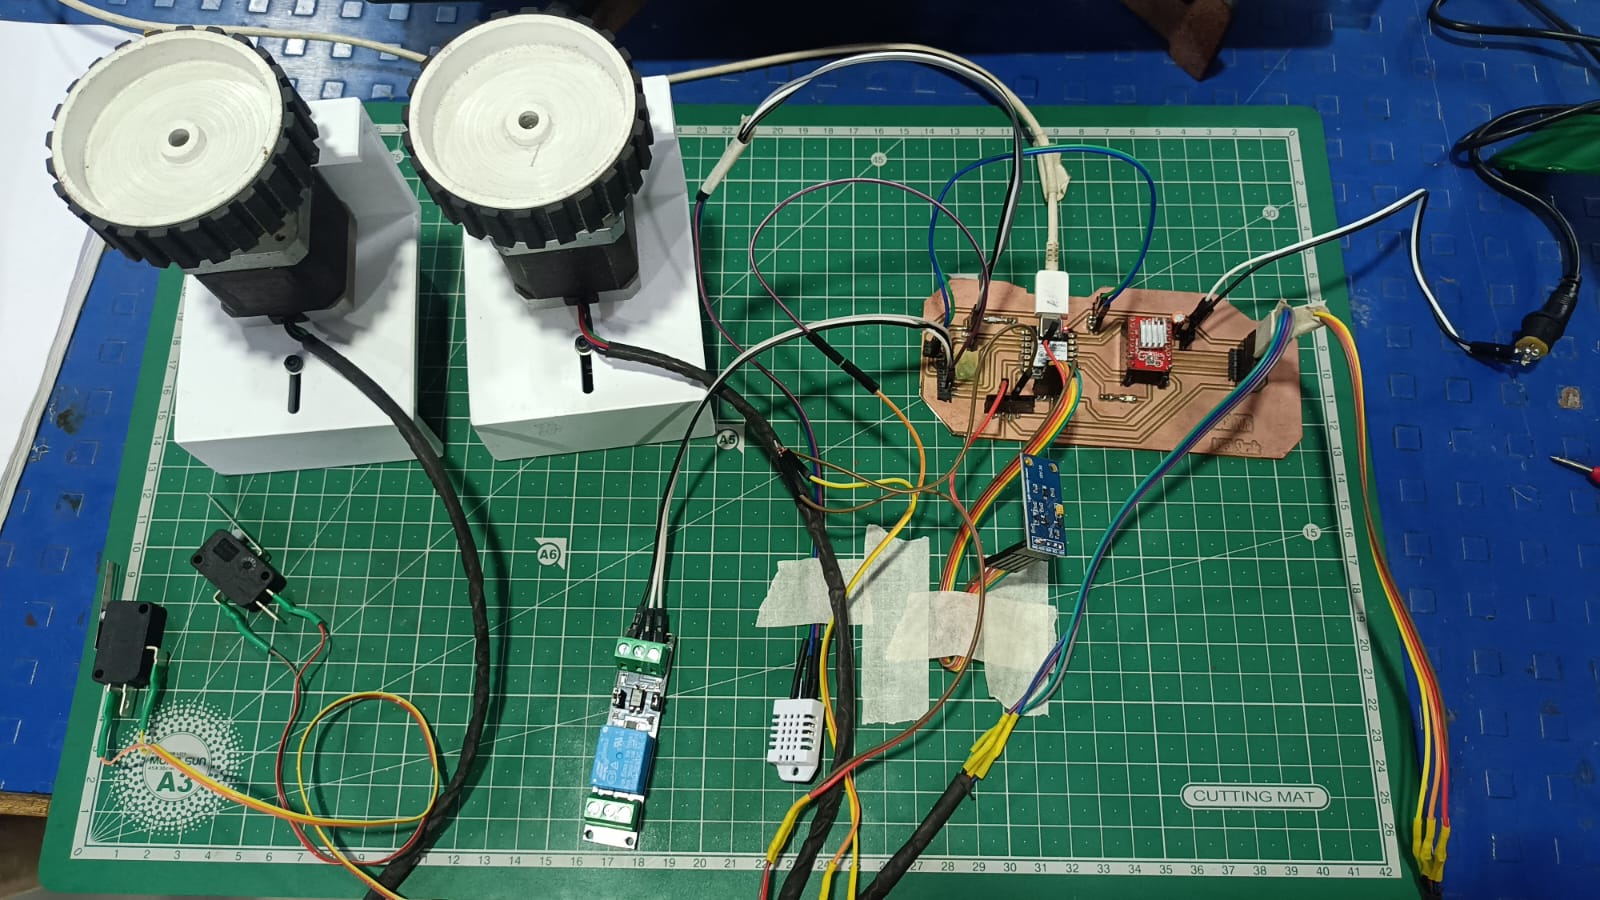
Hero shot
Group assignment:
For the group assignment this week I worked on web development and interface programming. I created a web page to track and control my project. I managed to get the stepper motor working through the web interface with the ESP32-C3 module and the stepper motor can be remotely started and stopped.
Code Explanationbr
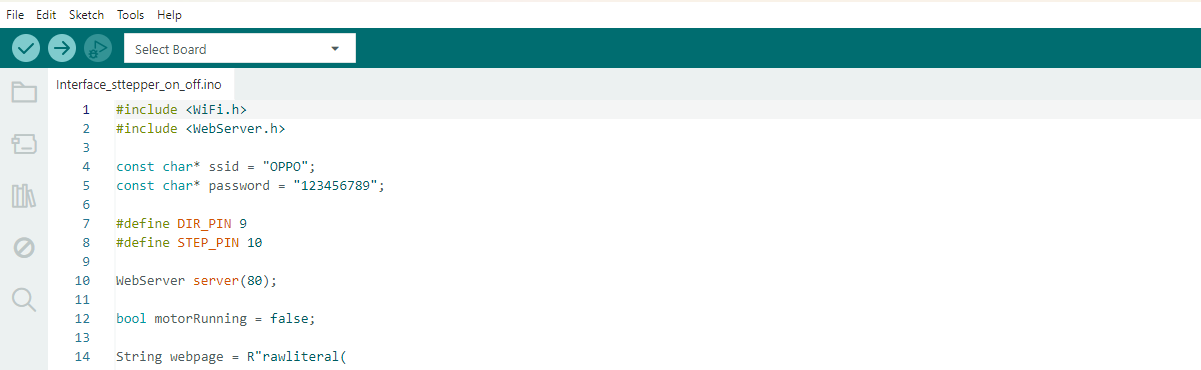
The code uses the WiFi and WebServer libraries to connect the XIAO ESP32-C3 to a Wi-Fi network and create a web server. SSID and password are used to connect the board to the wireless network. DIR_PIN determines the direction of the stepper motor, and the STEP_PIN generates the pulses to turn the motor. The web server listens on port 80, which is the default port that web browsers use. A boolean variable stores the status of the motor. If the motor is running then it is true and if it is stopped then it is false. The String webpage = R”rawliteral( command saves the HTML code inside the ESP32 memory. This webpage has buttons to allow the user to start and stop the stepper motor remotely using a web browser.

This section contains the HTML and CSS code for the web page hosted on the ESP32-C3. It defines the page structure, styling and UI components like buttons that are used to control the stepper motor through a web browser.
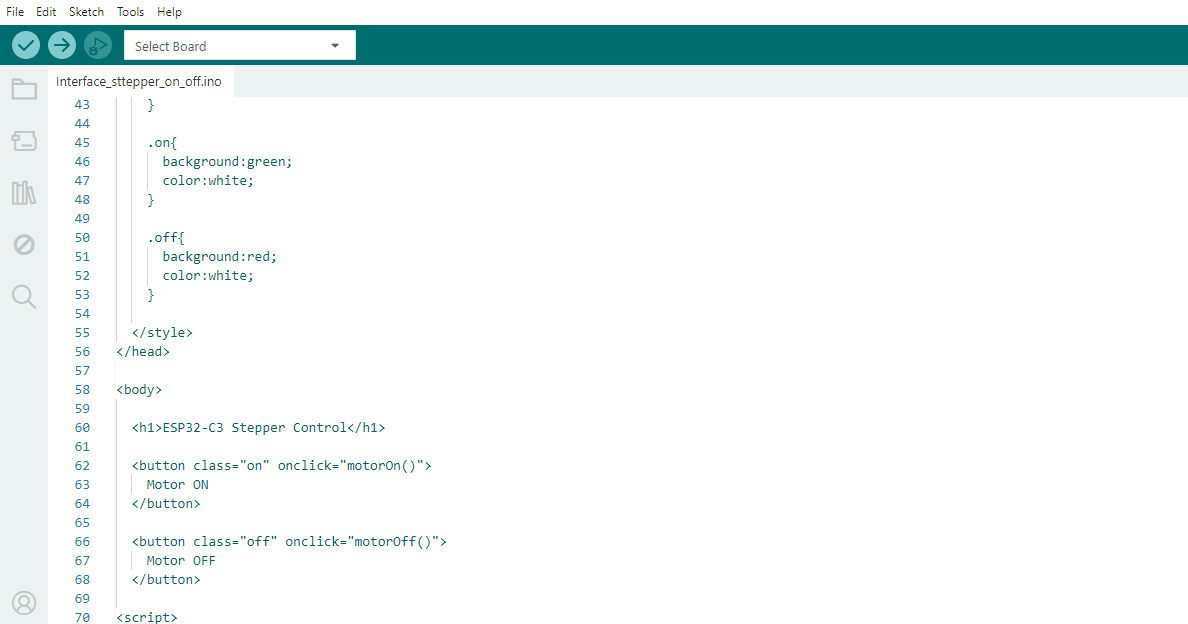
This section defines the web page interface to control the step motor. It creates two buttons, Motor ON and Motor OFF with green and red styles. On clicking the buttons, it calls the javascript functions which sends commands to the ESP32-C3.
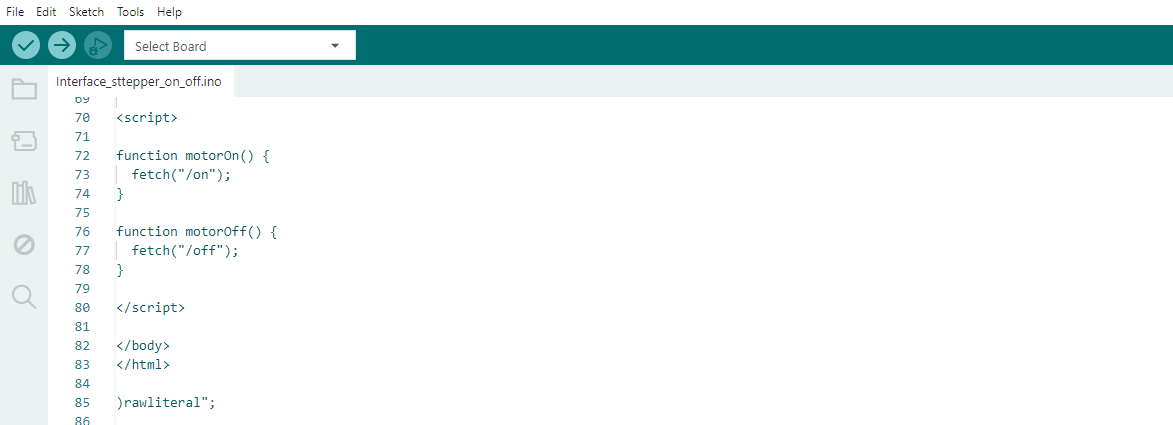
When the user clicks the Motor ON or Motor OFF button, this JavaScript code sends ON and OFF commands to the ESP32-C3 web server so you can control the stepper motor remotely via the web interface.
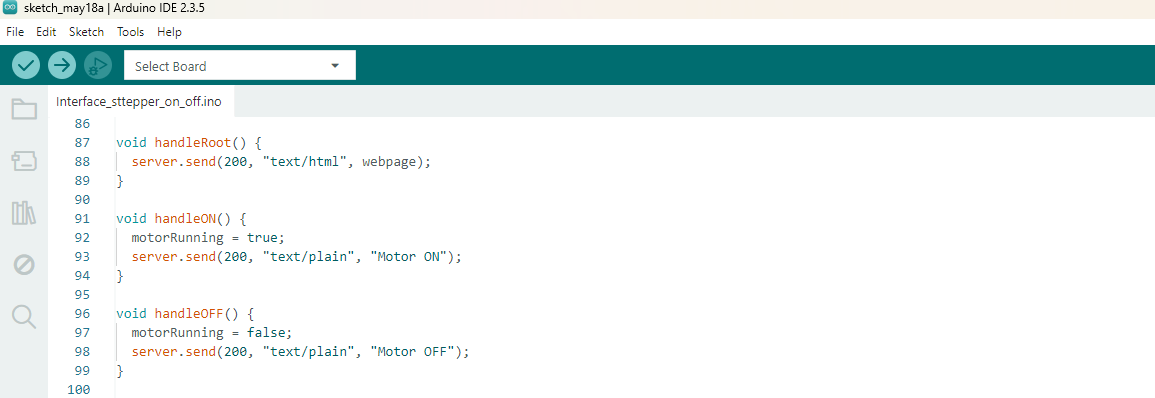
Once you access the ESP32-C3 IP address, the handleRoot() function sends the HTML webpage to the user’s browser. The handleON() and handleOFF() functions update the motor status variable and respond to the web page requests, so the stepper motor can be remotely turned ON or OFF.
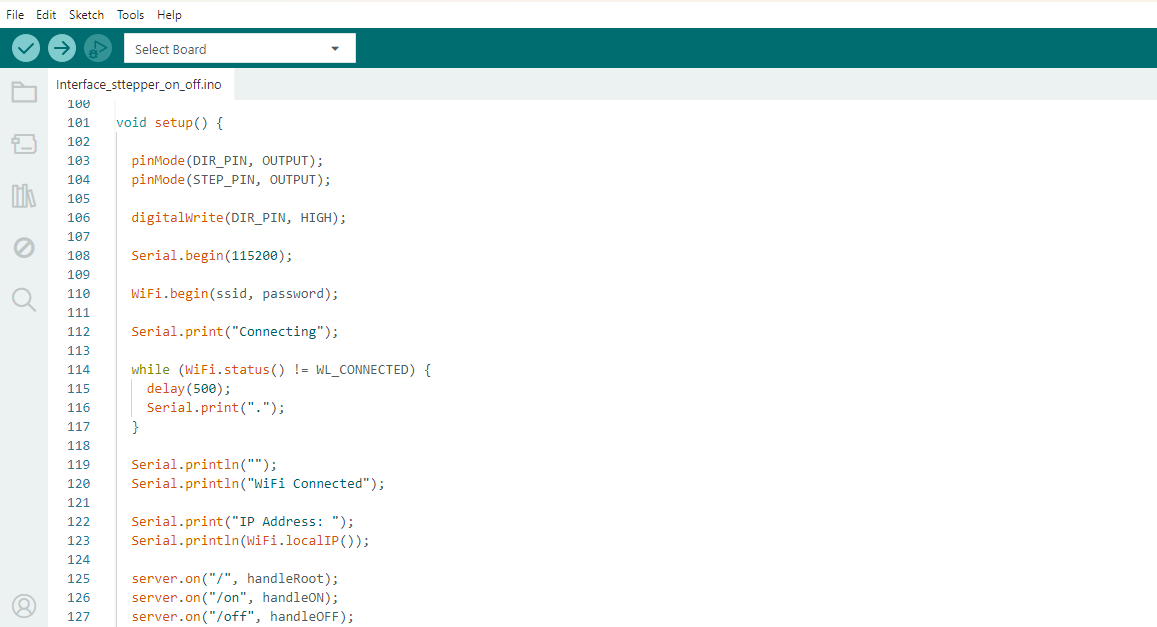
In the setup() function, the ESP32-C3 sets up the motor control pins, starts serial communication, and connects to the defined Wi-Fi network. On a successful connection it prints the IP address and sets the web server routes for the home page and motor control commands.
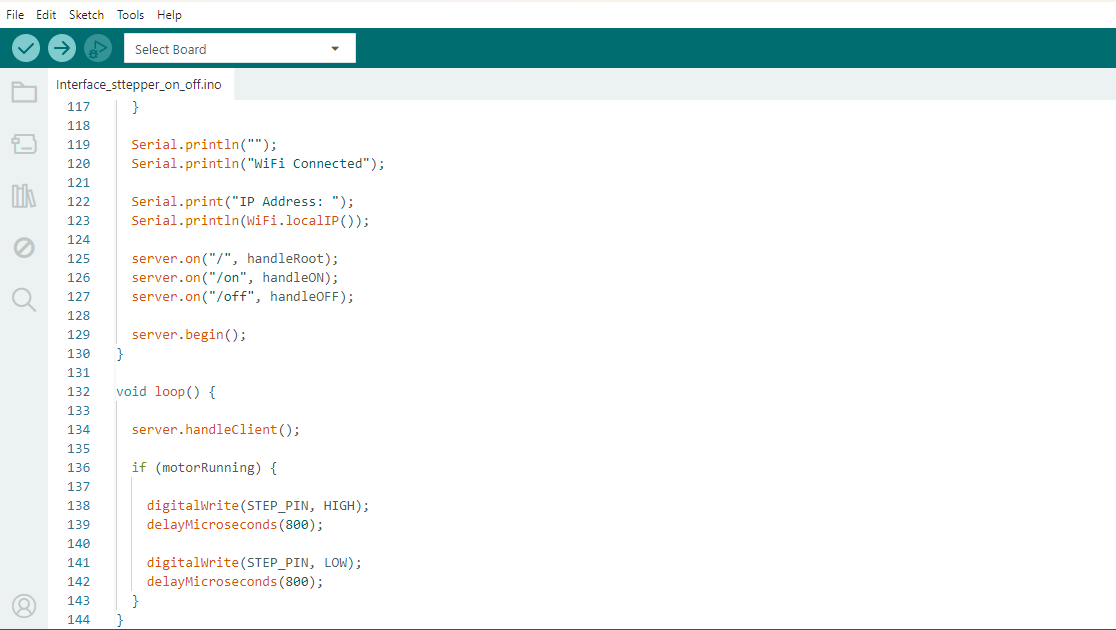
The server.begin() function starts the webserver and makes the webpage available via the ESP32-C3 IP address. Inside the loop() function, server.handleClient() waits for any web requests and the stepper motor spins by producing pulses on the STEP pin when the motorRunning variable is equal to true. This allows to control the motor remotely via the web interface.
The code for the web interface was generated by ChatGPT. It was used as a support tool for programming, debugging and understanding communication of ESP32-C3 web server.
Click here to see more about the group assignment Group Assignment
Individual assignment:
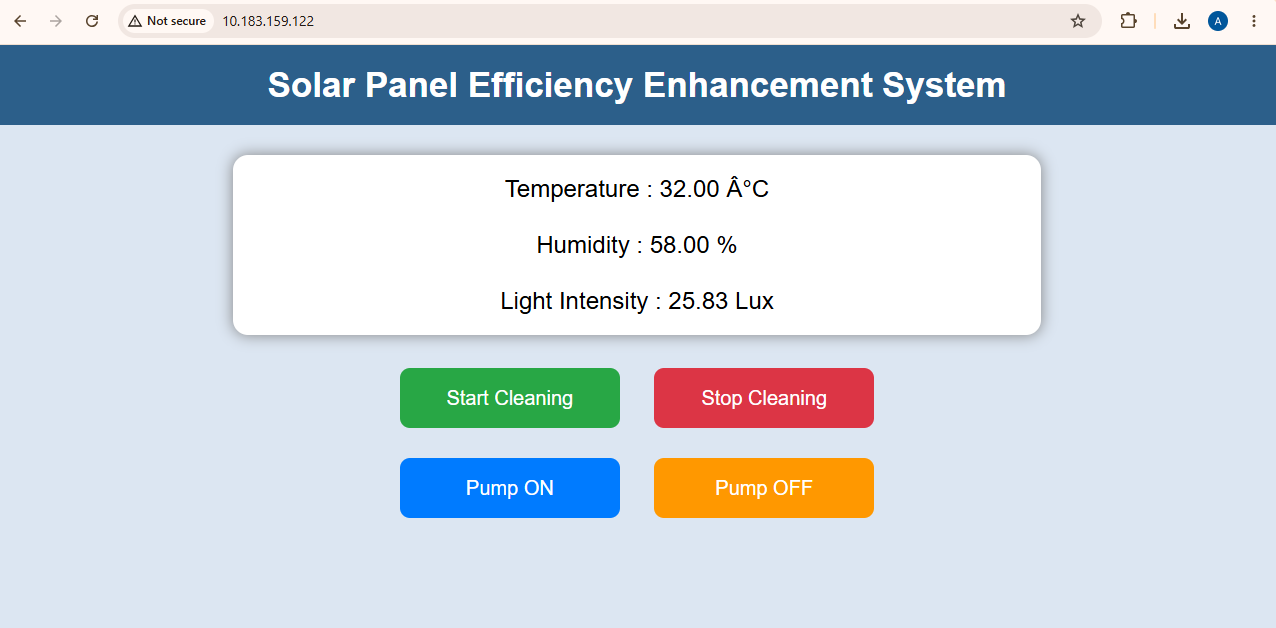
For the individual assignment I built a web-based interface for my final project with the XIAO ESP32-C3. The web page shows the current sensor readings like temperature, humidity and light intensity. It also has control buttons to run the cleaning system for example start and stop the stepper motor and control the water pump. This interface allows you to view and control the system remotely using a web browser.
Code Explanation
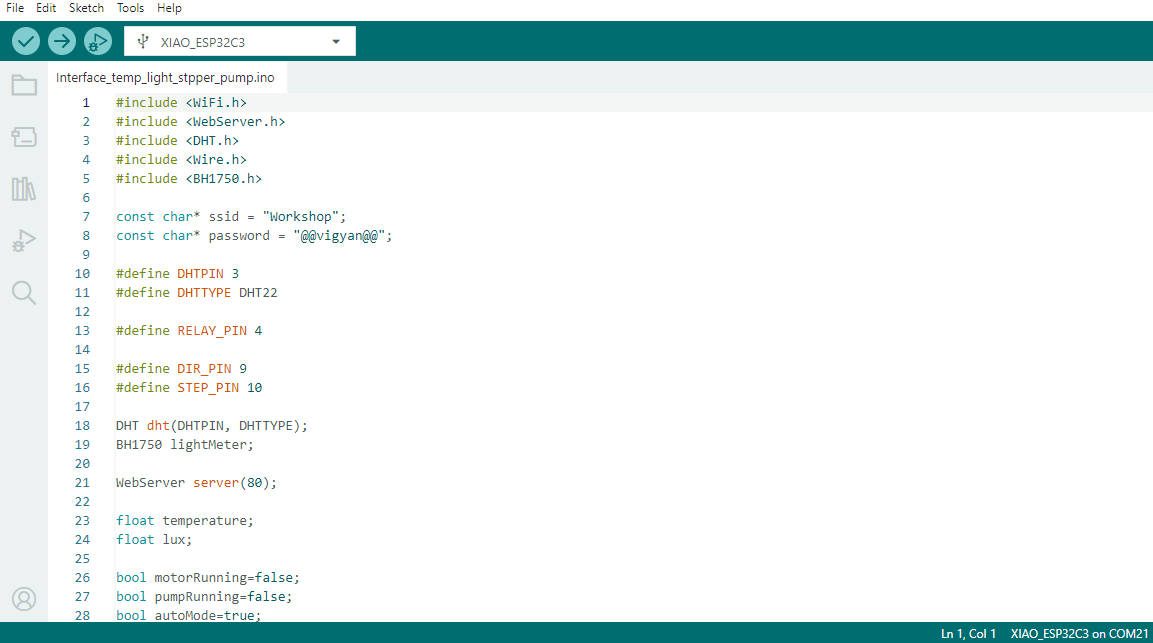
This code implements the XIAO ESP32-C3 as a web server to monitor and control an overheating solar panel cooling and cleaning system. The equipment comprises a DHT22 sensor for temperature measurement, a BH1750 sensor for light intensity measurement, a relay-controlled water pump and a stepper motor for the cleaning mechanism. The ESP32 connects to the Wi-Fi network and serves a web interface, where sensor data is displayed and the user can control the motor, pump and automatic operating mode remotely.
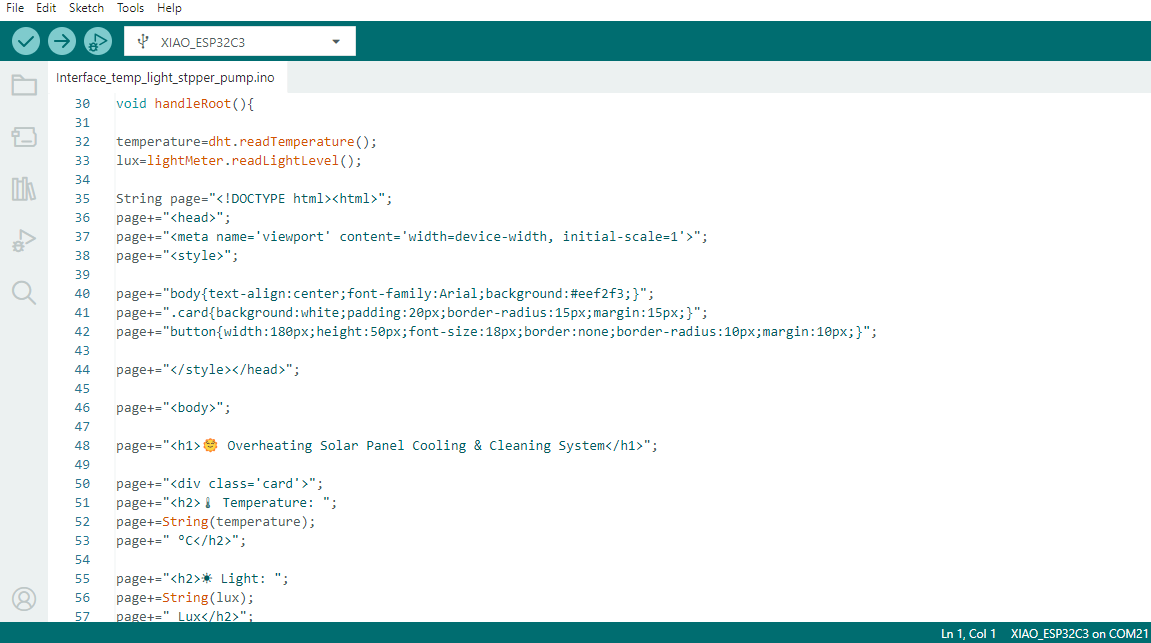
This section of the code reads temperature from the DHT22 and light intensity from the BH1750 sensor. Then it dynamically creates an HTML page with CSS styling to present the sensor values in a user-friendly manner. The webpage works as a dashboard for the Overheating Solar Panel Cooling and Cleaning System and enables real time monitoring through a web browser.
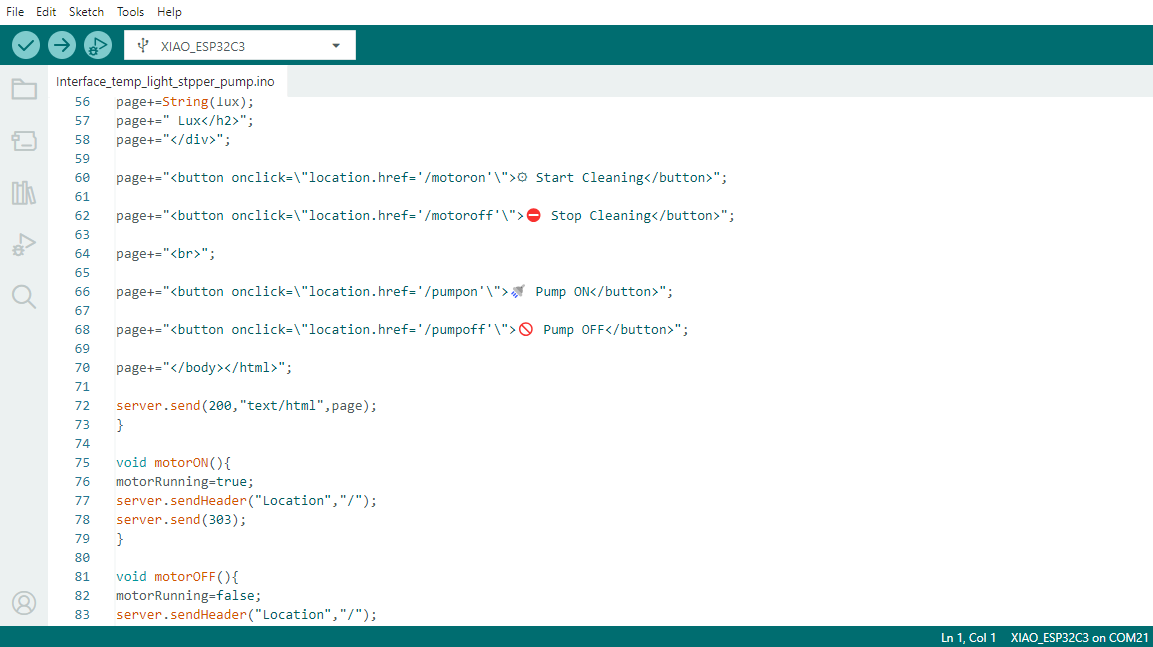
This section creates the control buttons on the webpage to initiate/stop the cleaning motor and switch ON/OFF the water pump. When a button is pressed, the corresponding command is sent to the ESP32-C3, which updates the status of the motor or pump and redirects the user back to the main dashboard page.
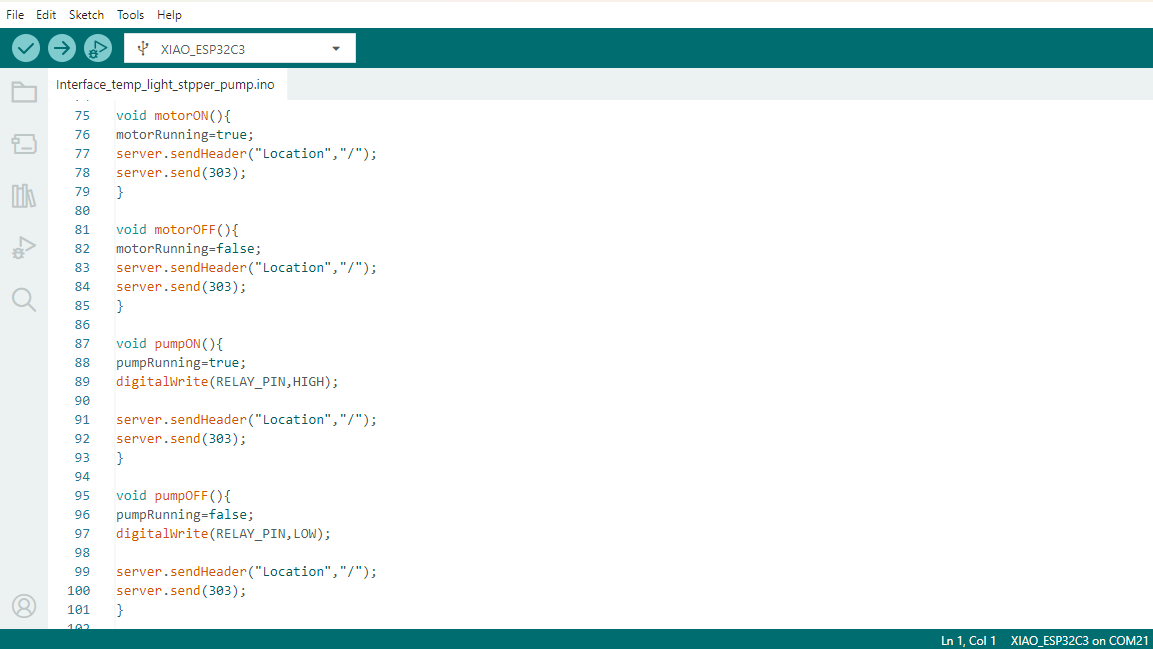
This section defines the functions to control the cleaning motor and water pump through the web interface. The motorON() and motorOFF() functions set the motorRunning variable to start and stop the stepper motor. Similarly, the functions pumpON ( ) and pumpOFF ( ) control the relay connected to the water pump by setting the relay pin to HIGH or LOW . The ESP32-C3 responds with a redirect (303) back to the user to go back to the main dashboard page. This enables remote control of the motor and the pump from a web browser.
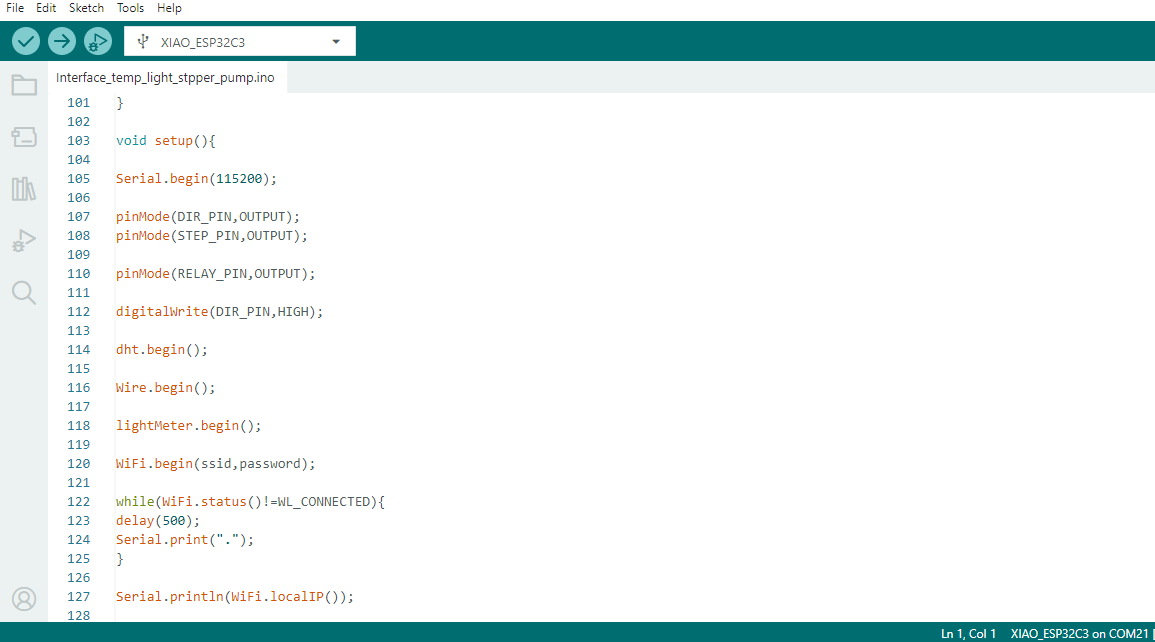
The setup() function is used to initialize all the hardware and communication modules in the project. It begins serial communication for debugging, sets the stepper and relay control pins as outputs, and the motor direction pin. The DHT22 Temperature Sensor and BH1750 Light Sensor are initialized using the DHT and I2C Libraries, respectively. The ESP32-C3 then connects to the specified Wi-Fi network and waits for connection. Finally it prints the assigned IP address to the Serial Monitor, which is used to access the web interface from browser.
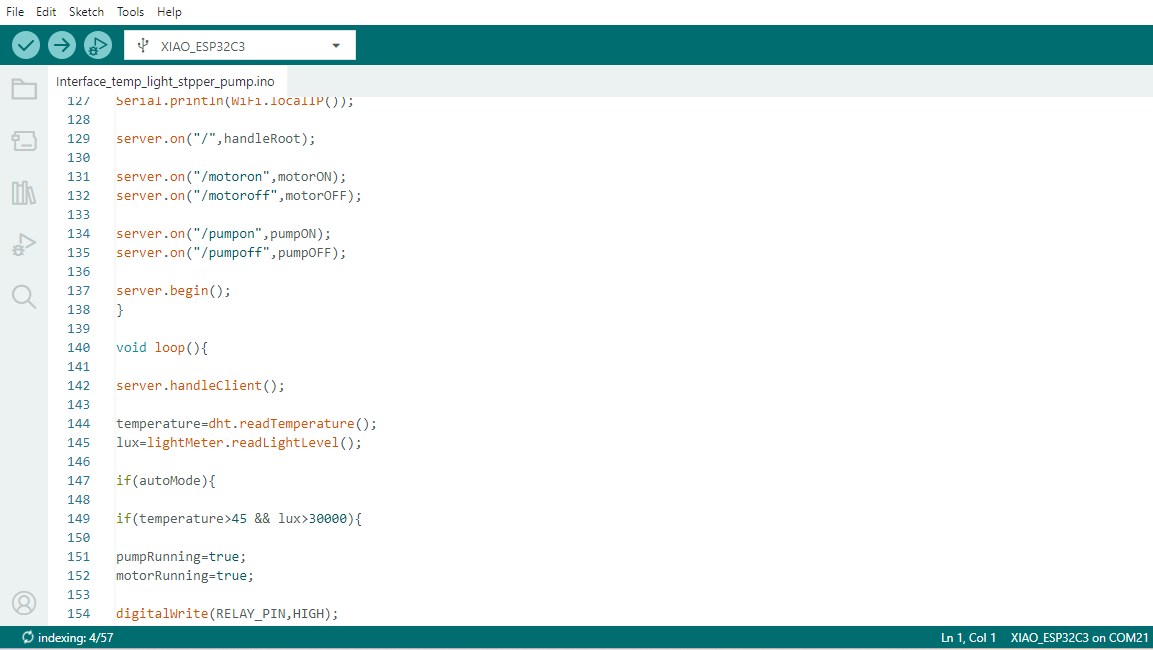
This section of code defines the routes for the web server to control the motor and pump from the web interface and then starts the web server. In the loop() function, the ESP32 continuously takes care of incoming web requests and reads the temperature and light intensity data from the sensors. If the automatic mode is on, the system checks the sensor values and automatically turns on the water pump and cleaning motor if the temperature is greater than 45 °C and the light intensity is more than 30,000 lux. This allows the cooling and cleaning system of the solar panel to operate automatically according to the environmental conditions.
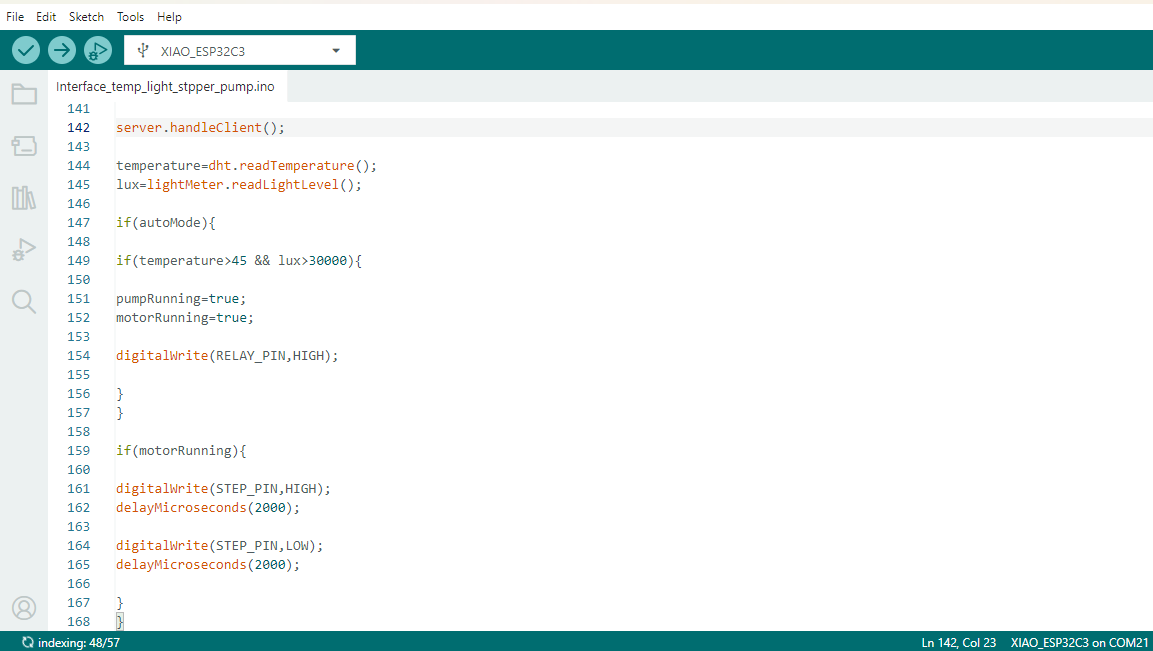
This part continuously reads the temperature and light intensity values from the sensors and takes care of web requests from the user interface. The system checks if the automatic mode is on and if so it checks for temperature greater than 45 degree Celsius and light intensity greater than 30000 lux. When both conditions are met, the relay turns on the water pump and the stepper motor starts the cleaning process automatically. The motor is controlled by sending HIGH and LOW pulses to the STEP pin with a controlled delay between them. This allows for smooth movement of the cleaning mechanism.
This code was written with the help of ChatGPT for programming assistance and debugging. The generated code was tested, modified and integrated in my final project requirements.
Issue Faced
1) I had some problems when implementing and testing.
2) I was working on the web interface and ran into a bunch of technical issues and was troubleshooting those.
3) Connecting the sensors, web server and motor control system was a challenge.
Download all code files from here