Week 18 Applications and Implications
This week we were charged with the following assignments:
- Plan a final project masterpiece that integrates the range of units covered, answering:
- What will it do?
- Who's done what beforehand?
- What sources will you use?
- What will you design?
- What materials and components will be used?
- Where will they come from?
- How much will they cost?
- What parts and systems will be made?
- What processes will be used?
- What questions need to be answered?
- How will it be evaluated?
- Your project should incorporate:
- 2D and 3D design
- Additive and subtractive fabrication processes
- Electronics design and production
- Embedded microcontroller design, interfacing, and programming
- System integration and packaging
- Where possible, you should make rather than buy the parts of your project.
- Projects can be separate or joint, but need to show individual mastery of the skills and be independently operable.
In addition, we were asked to complete the following:
- Prepare drafts of your final project summary slide:
presentation.png, 1920 × 1080presentation.mp4, 1080p HTML5, < ~1 minute, < ~25 MB
- Put them in your root directory.
- Check that they are linked in the final presentation schedule. (they are).
In order to make use of my commute, I had used the following prompt in chatgpt:
I want you to ask me the following questions regarding my final project for fab academy and record my responses. Where appropriate, ask me follow up questions that might likely be asked of me- or to clarify my intent. You are to record what I say and then formulate my responses into answers to these questions, being careful NOT to change or amend my answers other than to clean up grammatical or errors or to clarify ambiguities. When clarifying ambiguities, you are to ask me -- not craft the clarification on your own. The intended outcome is an HTML formatted response to these questions that I can place on my fab academy page. What will it do? Who's done what beforehand? What sources will you use? What will you design? What materials and components will be used? Where will come from? How much will they cost? What parts and systems will be made? What processes will be used? What questions need to be answered? How will it be evaluated? Your project should incorporate 2D and 3D design, additive and subtractive fabrication processes, electronics design and production, embedded microcontroller design, interfacing, and programming, system integration and packaging Where possible, you should make rather than buy the parts of your project Projects can be separate or joint, but need to show individual mastery of the skills, and be independently operable
I then worked through and edited the transcript of what was provided- which was incomplete.
Final Project title (tentative): PXL
PXL: A Spatially Aware Interactive Light Exhibit
What will it do?
PXL is a spatially aware interactive light exhibit intended to engage, entertain, and create a sense of wonder. I will develop a single wall-mounted interactive exhibit that uses a time of flight sensor, 960 NeoPixels, along with the Jeff-Uino, which is based off of the ESP32C3 Xiao board. The project is designed to grab users’ attention and shape their behavior through responsive light-based interactions. As users walk by the exhibit, approach it, stand in front of it, or walk away, the exhibit responds through animated addressable NeoPixel lighting patterns. If there is time, a second spiral would be to use a mini MP3 player.
The project is intended to signal to a passersby that it is interactive and to demonstrate how movement maps to visual output.
The animations are designed not only to react to movement, but also to encourage movement. For example, animations that move from the outer perimeter of the matrix toward the center are intended to encourage users to move closer to the exhibit.
The project was intended to be installed as a semi-permanent wall-mounted exhibit in the mezzanine exhibit space of the Design, Media, and Technology department at Lebanon Valley College. Intended audiences include students, faculty, staff, prospective students, parents, and employers visiting the space. The t-slot extrusion will not be installed until early August, however, so I have instead created a free-standing display.
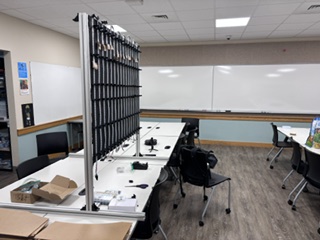
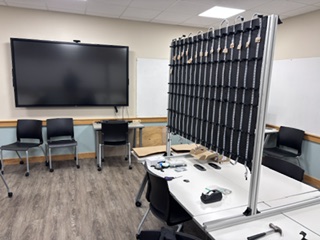
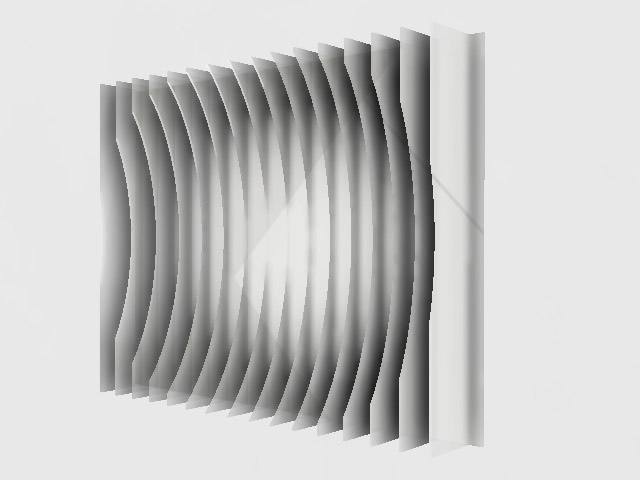
The 12" by 18" curved laser-cut acrylic slats project outward from the wall and form a concave interactive space with Neopixels mounted underneath.
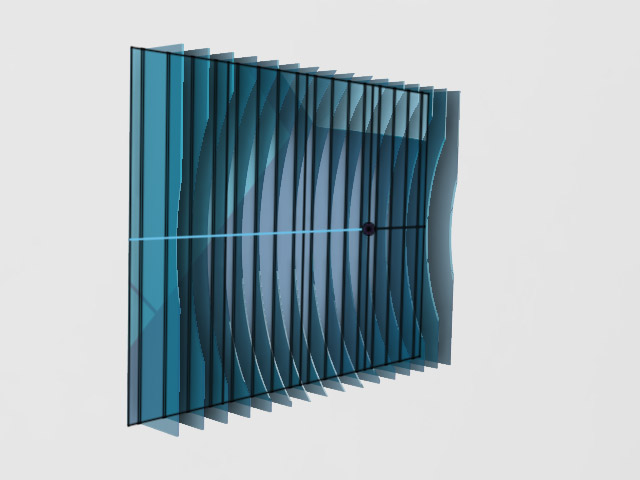
The exhibit reacts to users as they walk by, approach, stand in front of it, or walk away. The concave form is a compromise derived from the original concept of creating an immersive geodesic dome. Due to space constraints at both home and school, a full dome that I had originally proposed was impractical as the footprint for such a project would be prohibitively large. The concave form is intended to evoke a similar sense of immersion while accommodating the space available for the installation.
Who's done what beforehand?
I have not encountered a project that closely resembles the final form and interaction model of PXL. Several projects and artists helped shape the conceptual and technical direction of the work. I have worked through the fab academy pages, searching for neopixels, interactive art, and used Zotero to create a working bibliography.
- “-- Isaac --.” Accessed May 23, 2026. https://archive.fabacademy.org/2017/greenfablab/students/415/pages/project20.html.
- “How Maya Makes (Almost) Anything: Final Project [Summary].” Accessed May 22, 2026. https://fab.cba.mit.edu/classes/863.20/Architecture/people/MayaMurad/finalprojectsummary.html.
- “HTMAA 2024 Jocelyn Zhu.” Accessed May 22, 2026. https://fab.cba.mit.edu/classes/863.24/people/JocelynZhu/project_pages/final_project/project_doc.html.
- “Idea 1: Flip Disc Display.” September 24, 2023. https://fab.cba.mit.edu/final_project/idea1/.I like the concept of a vertical display that reacts to users.
- “Joris Lam Fab Academy 2017.” Accessed May 23, 2026. https://archive.fabacademy.org/archives/2017/fablabamsterdam/students/60/10outputdevices.html.
- Nadieh’s Fab Academy. “Final Project.” Accessed May 23, 2026. http://fabacademy.org/2021/labs/waag/students/nadieh-bremer/final-project/. Nadieh's documentation showed me how I could concieve of (and address) LEDs as a matrix, which was really helpful in designing my project.
- Robin Baumgarten: Playful Installation Art. “Wobbly Labs.” Accessed May 23, 2026. https://www.wobblylabs.com. I had met Robin at Fab 25 in Prague and was really taken by the installation he had created.
My concept differs from these projects in both its form factor and interaction model. The acrylic slats act as a medium for the light emitted by the NeoPixels, while the interaction model relies on a time-of-flight sensor to categorize user movement and trigger corresponding animation functionss.
Ideally, the project is also intended to function as a platform that my students can later use to learn about interaction design, embedded programming for TOF sensors and neopixels/addressable LEDs, and the use of feedback systems to shape user behavior.
What sources will you use?
Sources used to create this project included Fab Academy documentation, hardware datasheets, NeoPixel documentation, ESP32C3 documentation, sensor documentation, embedded programming references, and examples of interactive installations and responsive environments. I had reviewed my zotero libraries for the fab academy, and created a bibliography of these libaries and documents that I have used or referred to.
- Ada, Lady. “Assembly | Adafruit VL53L0X Time of Flight Micro-LIDAR Distance Sensor Breakout | Adafruit Learning System.” Accessed May 25, 2026. https://learn.adafruit.com/adafruit-vl53l0x-micro-lidar-distance-sensor-breakout/assembly.
- Ada, Lady. “Overview | Adafruit VL53L0X Time of Flight Micro-LIDAR Distance Sensor Breakout | Adafruit Learning System.” Accessed May 19, 2026. https://learn.adafruit.com/adafruit-vl53l0x-micro-lidar-distance-sensor-breakout/overview.
- Ada, Lady. “RGB LED Strips.” Adafruit Learning System. Accessed May 25, 2026. https://learn.adafruit.com/rgb-led-strips/overview.
- Adafruit Industries. Adafruit/Adafruit_NeoPixel. C++. December 12, 2012. Released February 15, 2026. https://github.com/adafruit/Adafruit_NeoPixel.
- Adafruit Industries. Adafruit/Adafruit_VL53L5. C. March 14, 2026. Released April 9, 2026. https://github.com/adafruit/Adafruit_VL53L5.
- Burgess, Phillip. “1,500 NeoPixel LED Curtain with Raspberry Pi and Fadecandy.” Adafruit Learning System. Accessed May 25, 2026. https://learn.adafruit.com/1500-neopixel-led-curtain-with-raspberry-pi-fadecandy/power-topology.
- Burgess, Phillip. “Adafruit NeoPixel Überguide.” Adafruit Learning System. Accessed May 25, 2026. https://learn.adafruit.com/adafruit-neopixel-uberguide/basic-connections.
- Burgess, Phillip. “Logic Level Shifting | Adafruit NeoPixel Überguide | Adafruit Learning System.” Accessed February 15, 2026. https://learn.adafruit.com/adafruit-neopixel-uberguide/logic-level.
- Burgess, Phillip. “Power Topology | 1,500 NeoPixel LED Curtain with Raspberry Pi and Fadecandy | Adafruit Learning System.” Accessed February 15, 2026. https://learn.adafruit.com/1500-neopixel-led-curtain-with-raspberry-pi-fadecandy/power-topology.
- DFPlayer Mini MP3 Module for Arduino & ESP32 Projects | DFRobot Wiki. “DFPlayer Mini MP3 Module: Elevate Your Arduino & ESP32 Sound Projects.” Accessed March 28, 2026. https://wiki.dfrobot.com/dfr0299/.
- “Final Project.” Accessed May 13, 2026. https://fabacademy.org/2021/labs/waag/students/nadieh-bremer/final-project/#the-neopixel-grid.
- “Getting Started with Seeed Studio XIAO ESP32C3 | Seeed Studio Wiki.” August 14, 2024. https://wiki.seeedstudio.com/XIAO_ESP32C3_Getting_Started/.
- Lily. “Control Your NeoPixel LEDs with WLED and XIAO ESP32 MCUs.” Latest News from Seeed Studio, May 6, 2024. https://www.seeedstudio.com/blog/2024/05/06/exciting-update-wled-now-supports-xiao-esp32-mcus/.
- “Pololu - VL53L5CX Time-of-Flight 8×8-Zone Distance Sensor Carrier with Voltage Regulator, 400cm Max.” Accessed May 25, 2026. https://www.pololu.com/product/3417.
- “Seeed Studio XIAO ESP32-C3.” Accessed May 25, 2026. https://www.seeedstudio.com/Seeed-XIAO-ESP32C3-p-5431.html.
- SparkFun Electronics. Sparkfun/SparkFun_VL53L5CX_Arduino_Library. C. October 22, 2021. Released April 29, 2026. https://github.com/sparkfun/SparkFun_VL53L5CX_Arduino_Library.
- “VL53L5CX | Product - STMicroelectronics.” Accessed May 25, 2026. https://www.st.com/en/imaging-and-photonics-solutions/vl53l5cx.html.
What will you design?
The exhibit will contain a 16 × 56 NeoPixel matrix composed of approximately 16 meters of addressable LED strips mounted beneath edge-lit acrylic slats. I was heaviliy influenced by Nadieh's LED matrix in my project.
To create this project, I have designed and fabricated the following components and systems:
- Plywood (2 x 24" by 36" 3mm thick (48in x 36 in total) base structure
- 16 Laser-cut 3 mm acrylic slats composed of 12' x 18 in upper and lower sections to accommodate the bed size limitations of the lab's Epilog laser cutter
- 90 dual slat holders (link to files).
- 12 single slat holders (link to file).
- 32 wire management guides (link to file).
- 3D printed enclosure (still working on this).
- M3 4040 t-slot nut. As part of Wildcard Week, I waterjet cut and tapped 36 custom T-slot nuts used to mount the exhibit onto permanent T-slot wall framing. (link to file).
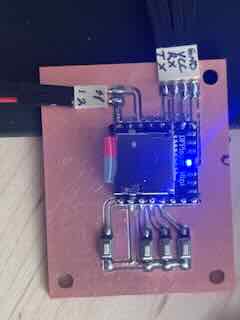
- Jeffuino custom PCB board based on the ESP32C3 XIAO.
As part of Electronics design and production weeks, I designed and milled this board.
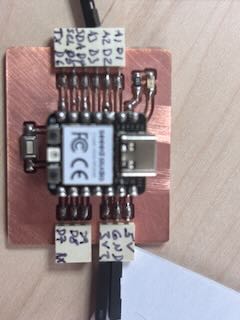 .
. - Custom mini MP3 player PCB (may be added in spiral).
To demonstrate input/output device programming and embedded programming, I will create a software system running on the Jeffuino board that categorizes six interaction states:
- No one present
- User approaching
- User standing still in front of the exhibit
- User walking away
- walking right to left
- walking left to right
Each interaction state will trigger a corresponding NeoPixel animation function. Sound functions using a DFPlayer Mini MP3 module may be added during a spiral if time permits.
What materials and components will be used?
I have used the following materials and components in building this project:
- 16 sheets of 12” × 24” × 1/8” clear acrylic
- ¼” plywood base structure (2x 24"x36")
- 40 mm T-slot aluminum extrusion
- M3 screws, nuts, and washers
- M6 screws, nuts, and washers
- Custom waterjet-cut T-slot nuts(cut from scrap aluminum at SFL Charlotte- these did not work at all- I had to add an m3 nut behind them)
- Structural printed components made of PETG (holders, wire mgmt guides)
- Adafruit NeoPixel addressable LED strips (60 neopixels per meter at 16 meters)
- VL53L5CX Time-of-Flight sensor
- XIAO ESP32C3 microcontroller
- DFPlayer Mini MP3 module
- SD card
- Single speaker
- 5V 10A power supply
- 10A fuse from automotive store
- Electrical wiring and wire management components
- Double-sided mounting tape
The acrylic slats are clear edge-lit acrylic elements mounted perpendicular to the plywood base using custom 3D printed holders.
Power usage is controlled through software brightness limitations and by using every fourth NeoPixel LED in order to reduce current draw and improve safety.
Where will they come from?
- Acrylic: MakerStock
- Plywood: Lowe’s
- PETG filament: SUNLU / Amazon
- NeoPixel strips: Adafruit
- XIAO ESP32C3: DigiKey
- Jeffuino PCB materials and components: DigiKey
- MP3 module and custom board components: DigiKey
- VL53L5CX ToF sensor: Pololu
- Power supply: Adafruit
- Fuse: automotive parts store
- T-slot extrusion: McMaster-Carr
- M3 and M4 hardware: Fab Academy inventory / Amazon
- Electrical wiring connectors: Lowe’s
How much will they cost?
Individual component pricing and sourcing information are documented in the Bill of Materials section of my final project.
What parts and systems will be made?
I designed and fabricated as part of this projecct the following custom systems and fabricated components :
- Laser-cut acrylic slats
- Plywood mounting base
- 3D printed slat holders (102)
- 3D printed wire management system (32)
- 3D printed electronics enclosure (1)
- Custom Jeffuino PCB (1)
- Custom Mini MP3 player board (1)
- Embedded interaction program - NeoPixel animation system and movement categorization system
- Custom waterjet-cut T-slot mounting hardware
- Integrated wall mounting system
What processes will be used?
The project required significant iteration during development. For instance, I produced 11 versions of the slat holder design, 3 versions of the enclosure.
To categorize movement states, the VL53L5CX ToF interaction sensor (8×8 zones) uses a combination of active zone locations and distance values to determine movment. I used Codex to iteratively work through 19 versions of the sensing/animation embedded programming.
The acrylic slats are mounted perpendicular to the plywood base using 90 dual holders and 12 single holders. The NeoPixel strips are attached to the base by these holders.
- CAD modeling in Fusion
- 2D vector design in Inkscape
- Laser cutting using the Epilog laser cutter
- 3D printing using the Prusa Core One
- PrusaSlicer workflow
- Waterjet cutting using the OMAX waterjet system
- PCB design in KiCad
- PCB fabrication using the Roland SRM-20 (using Gerber-to-PNG workflows and then Mods)
- Hand soldering
- Embedded programming using the Arduino IDE
- Sensor calibration and interaction testing using the arduino IDE and Codex
- Mechanical assembly and fastening
- Power management and wiring integration
- System integration and debugging
What questions need to be answered?
One remaining technical concern involves power distribution and safely providing power to the NeoPixel system. Current mitigation strategies include software brightness limitations, use of every third LED, and inclusion of a 10A fuse.
Future improvements could include:
- Improved and safer power distribution affording full-brightness of the display
- Improved calibration between sensor input and animation behavior
- Audio/user friendly audio controls
- MQTT-based tracking and logging of movement behavior
- Dedicated power controls
How will it be evaluated?
This project will be considered successful if users are drawn to interact with the exhibit in a way that creates enjoyment and draws attention to the use of interaction design and technology to shape behavior.
The project will also be successful if the ToF sensor can accurately categorize movement states most of the time and if the corresponding animation functions are enacted reliably.
A final measure of success is whether users understand how their movement directly shapes the visual output of the exhibit.