As part of this week, our group worked together on the interface and application programming group assignment — comparing as many GUI tool options as possible (Tkinter, Qt Designer / PyQt6, and LabVIEW), documenting each one's workflow along with its advantages and disadvantages, before building our individual interfaces. You can read the complete group assignment, including the tool comparisons and our shared documentation, here:
Group AssignmentGroup Assignment
Project Overview
PyQt6
During this week I developed the graphical user interface (GUI) for my final project, PrintVault Pro, a smart 3D printer enclosure. The objective was to create an intuitive desktop control panel that displays environmental information, shows the internal camera feed, and gives the user manual control over the enclosure subsystems (heater, fan and lights), along with safety actions.
The interface was designed using Qt Designer, a visual development environment that lets you build graphical applications by dragging and dropping widgets, and then implemented in Python with PyQt6.
The whole application was built following a clear separation between two parts:
- Frontend (the design): the visual layout — windows, panels, buttons, labels and styles — created entirely in Qt Designer.
- Backend (the functionality): the Python logic that brings the interface to life — reading sensor data, updating the labels, showing the camera, and reacting to button presses.
This separation is the core idea of the workflow. In Qt Designer the design is exported as a
.ui file (an XML description of the interface). That file is then converted into Python code
using PyQt6's pyuic6 tool:
pyuic6 -x interface.ui -o frontendFAB.py
The generated frontendFAB.py is the frontend: it contains all the
widgets and layouts exactly as designed, but no behavior. The backend, written by hand in a
separate file (backendFAB.py), imports that frontend and adds all the
functionality: it connects the buttons to their actions, updates the temperature and humidity labels,
draws the camera feed, and handles the network communication.
Keeping the design and the logic in separate files means the interface can be re-edited visually in Qt
Designer and re-exported with pyuic6 at any time, without touching — or losing — any of the
functional code in the backend.
Final Interface
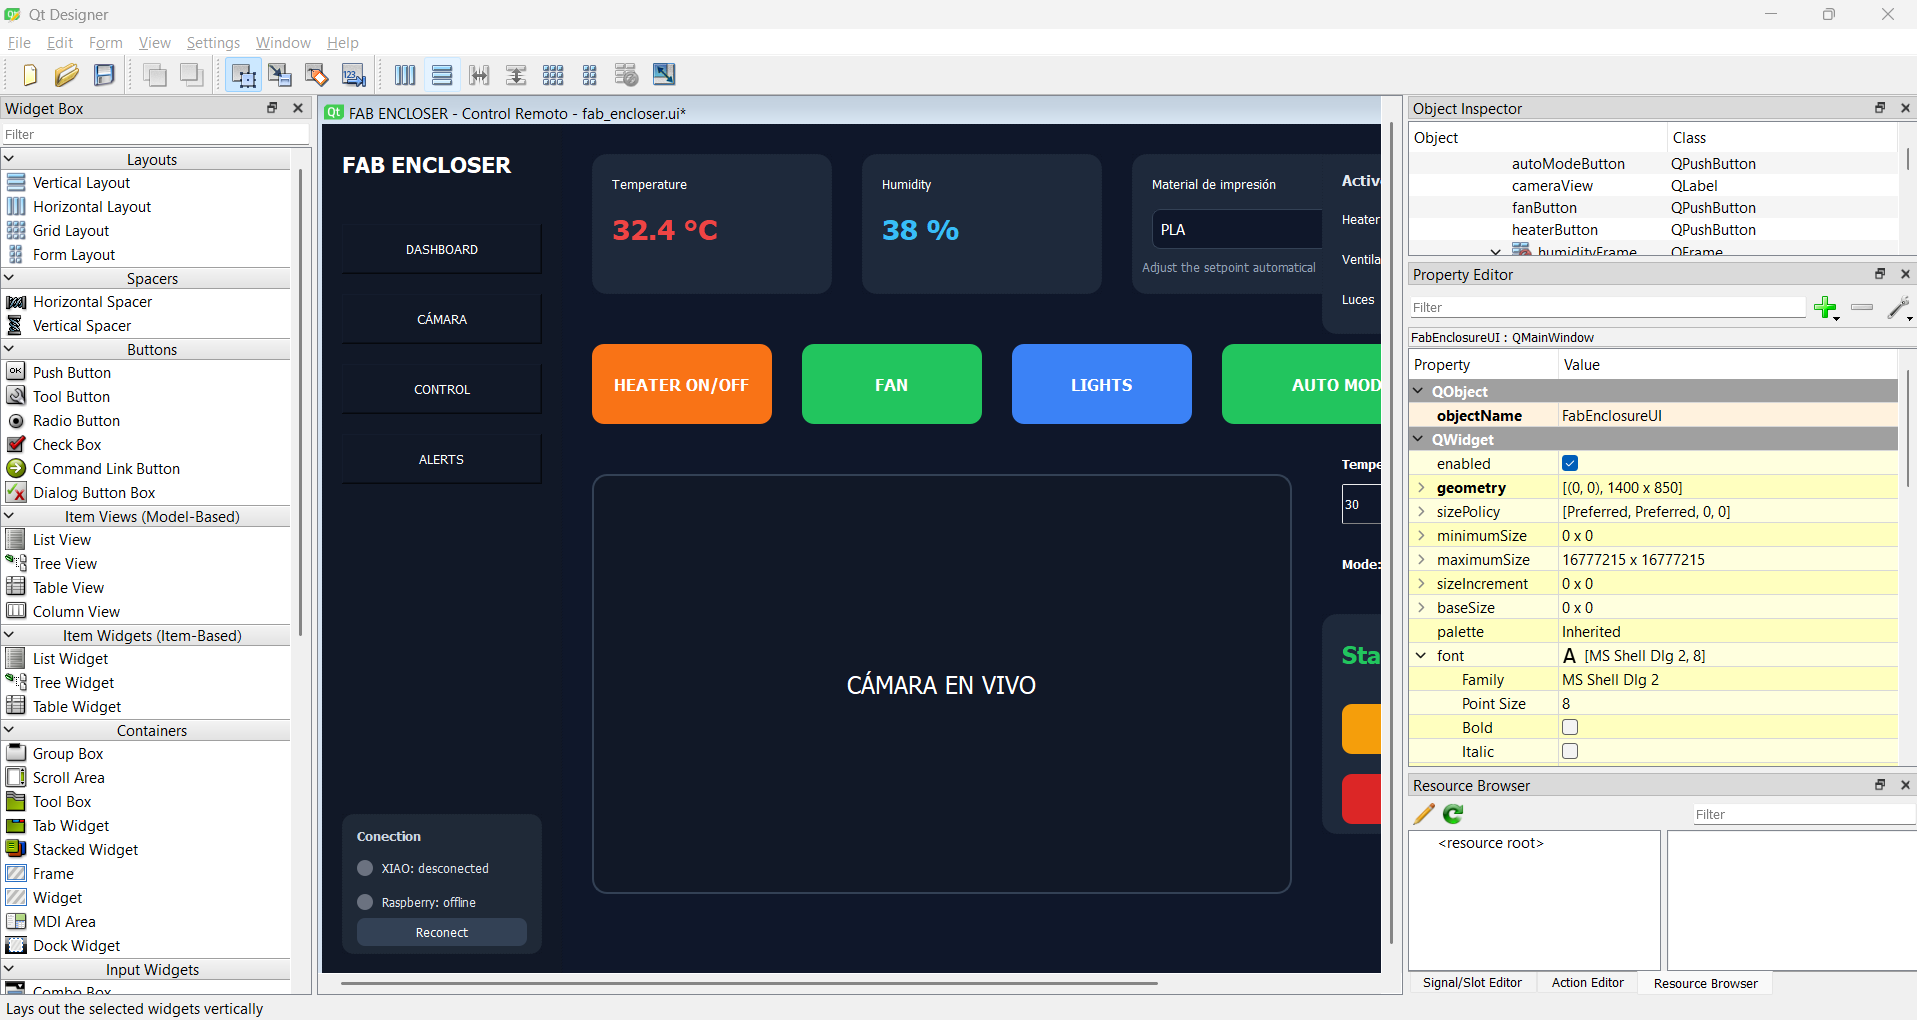
PrintVault Pro Dashboard
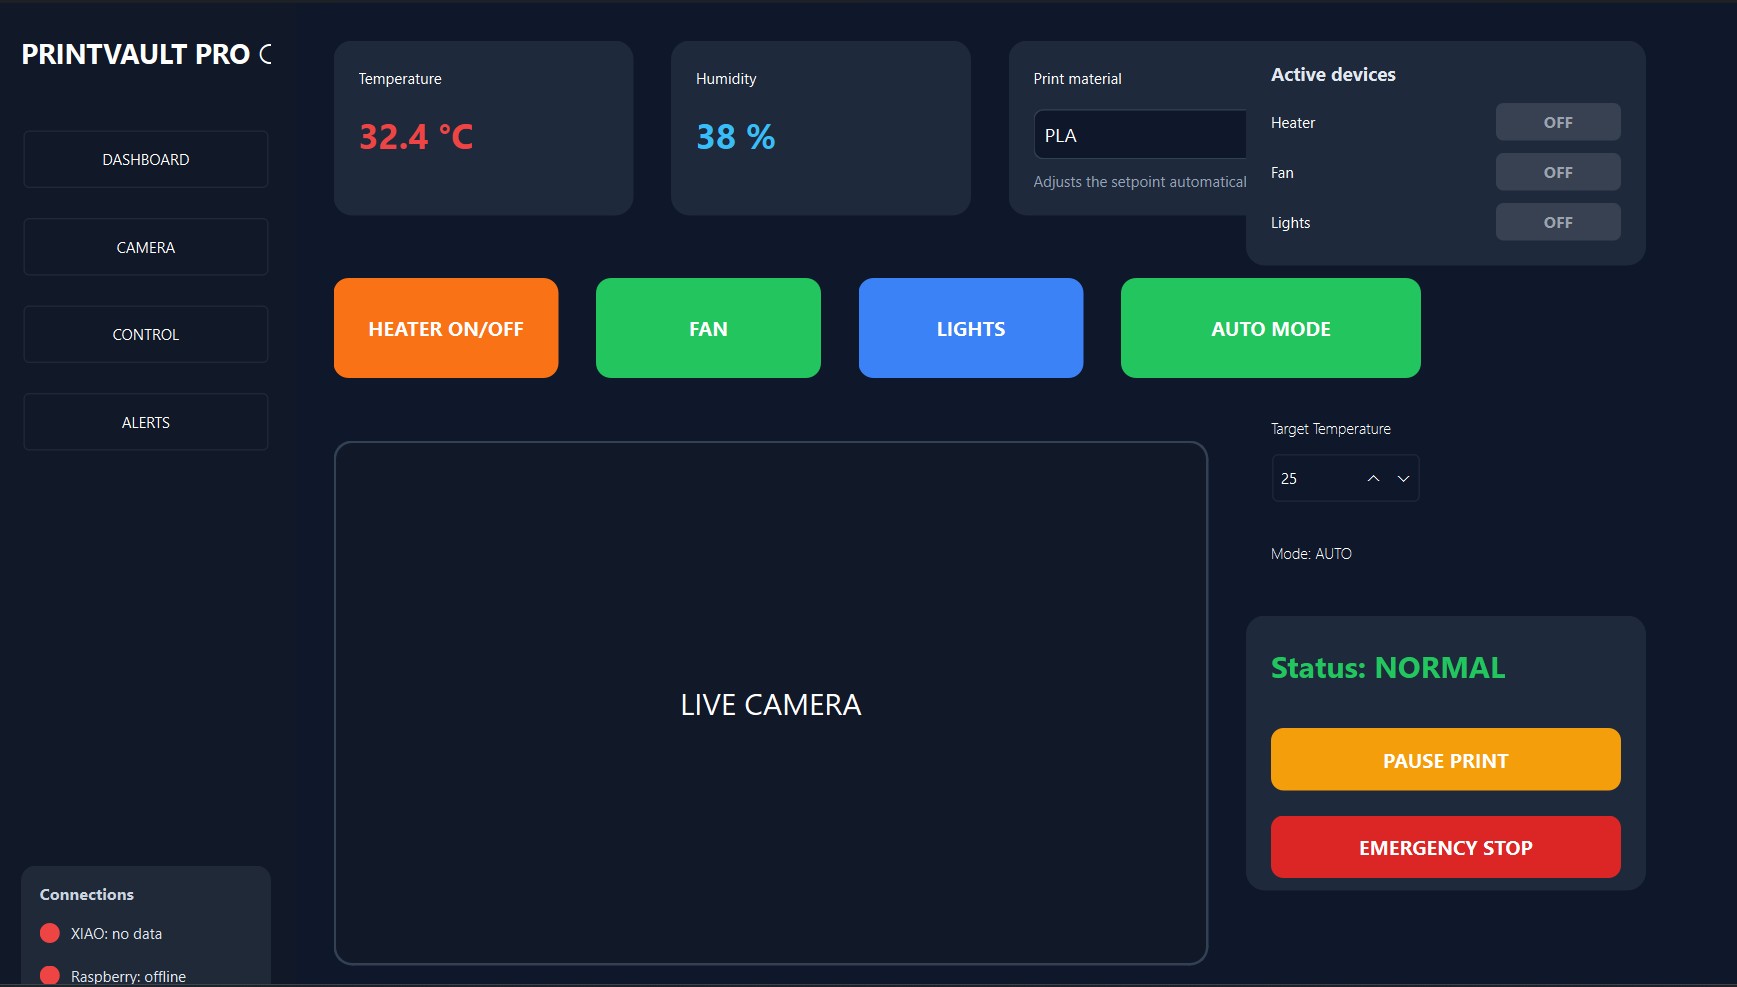
The final interface follows a modern dashboard design with a dark theme and high-contrast colors. The temperature is shown in red, the humidity in blue, and the action buttons are color-coded by function so critical information and controls can be identified at a glance.
Interface Objective
Final Project
The purpose of the interface is to provide a centralized dashboard for monitoring and controlling the enclosure remotely, over WiFi, from any computer on the network.
Since PrintVault Pro integrates a temperature/humidity sensor, a heater, a fan, lighting and a camera, the user needs a single place to see everything and act on it without touching the hardware. The dashboard was designed around five main functions:
- Environmental monitoring (temperature and humidity)
- Remote control of actuators (heater, fan, lights)
- Live camera visualization with AI annotations
- Material presets and target temperature adjustment
- System status and safety management
Qt Designer Workflow
Software Development
Qt Designer was the primary tool for building the layout. The interface is built visually by placing widgets inside a window and configuring their properties, which is much faster than writing the layout by hand. The workflow was:
- Create a new Main Window project.
- Define the general layout structure (sidebar, top cards, central area, right column).
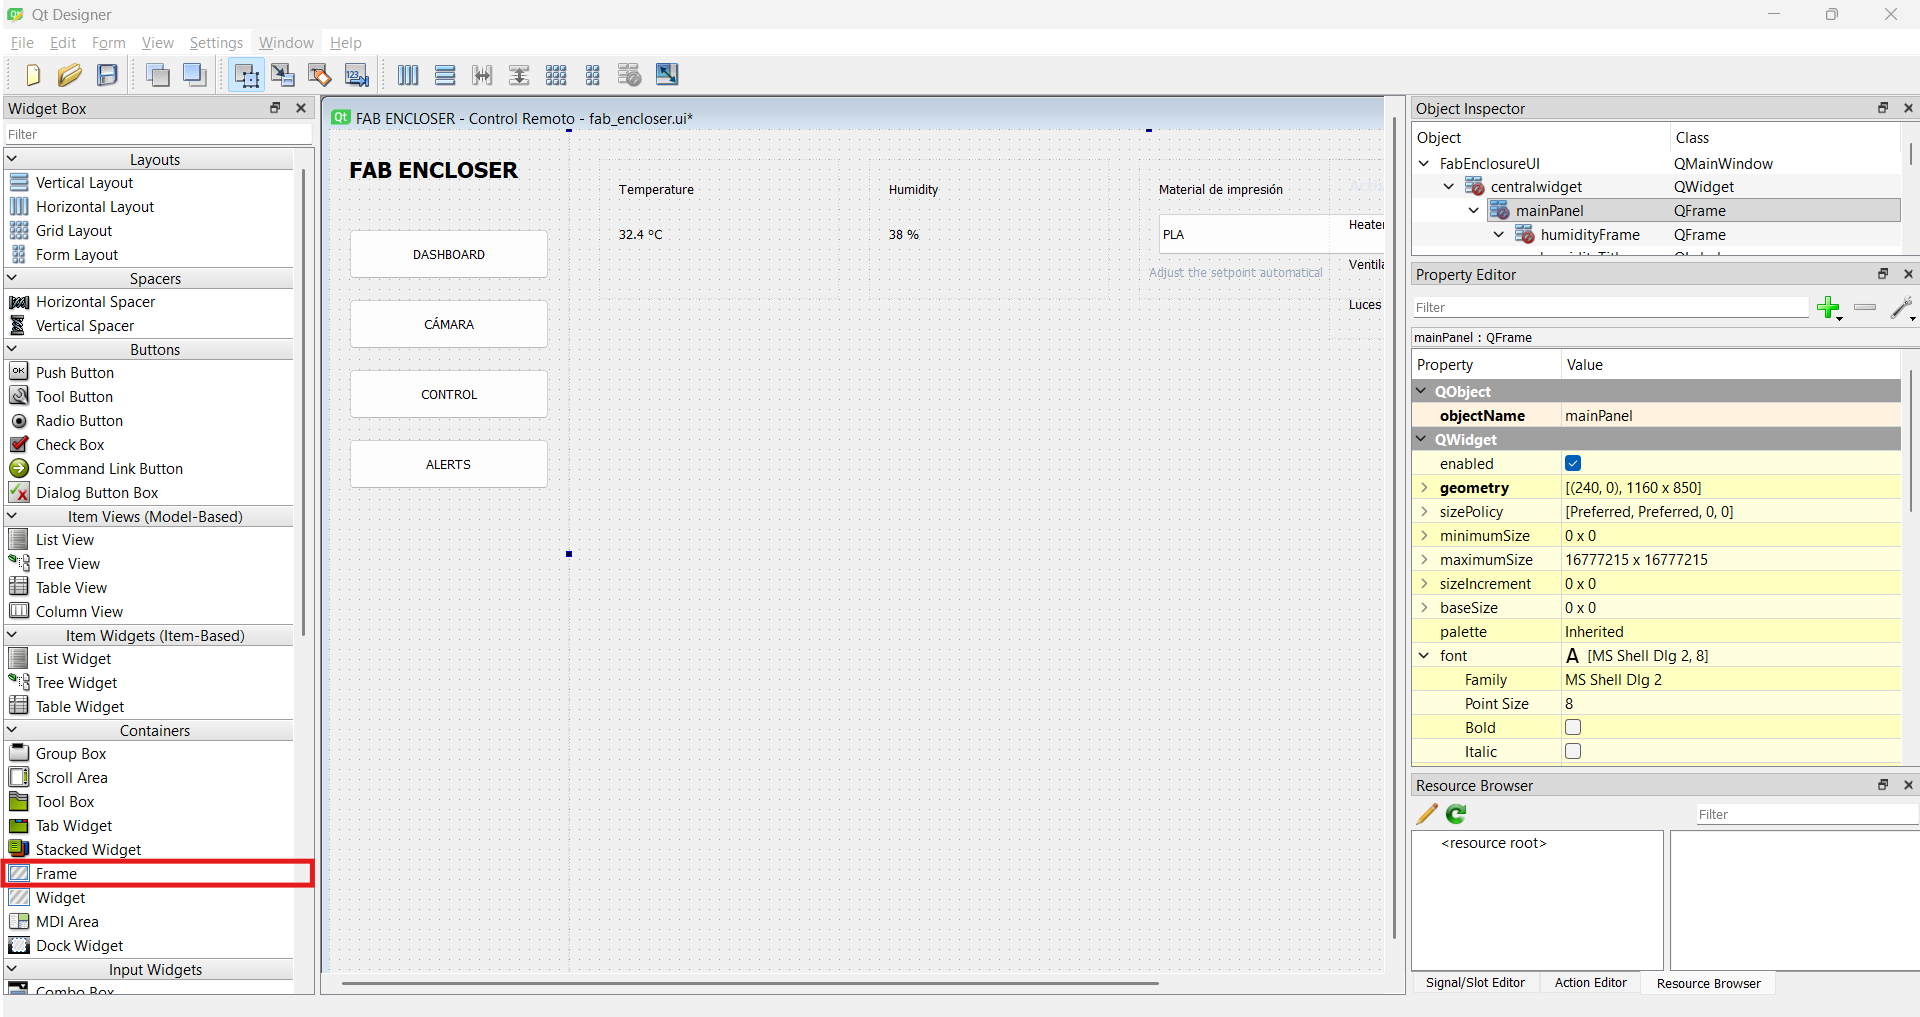
- Add containers and frames for each section.
- Insert buttons, labels and display panels.
- Customize colors, fonts and stylesheets for the dark theme.
- Save the interface as a
.uifile. - Convert it to Python using
pyuic6.
A key advantage of this workflow is that visual changes can be made in Qt Designer and re-exported without
rewriting the logic, since the layout (frontendFAB.py) and the behavior
(backendFAB.py) are kept separate.
Qt Designer Tools
How I Built It
The Tools I Used Inside Qt Designer
Qt Designer is organized into a few panels, and I used each one for a specific part of building the dashboard. Here is what each tool does and how I used it:
-
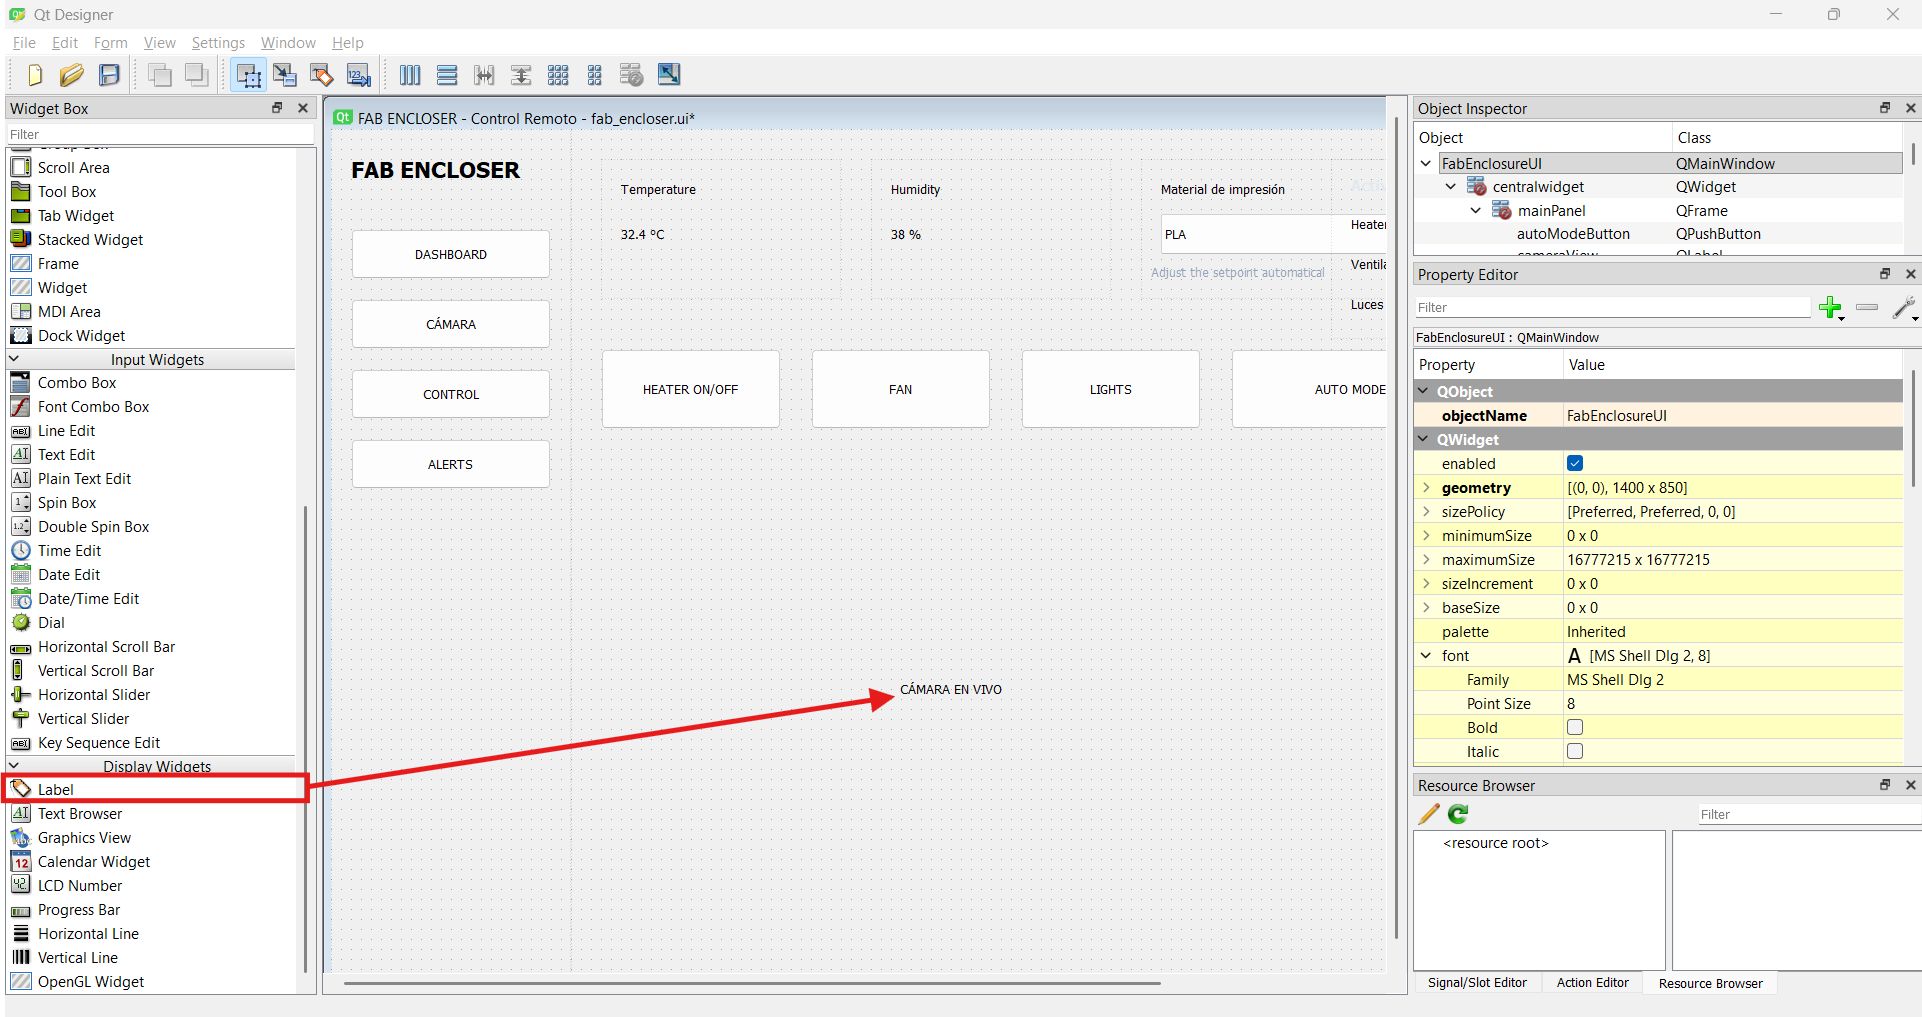
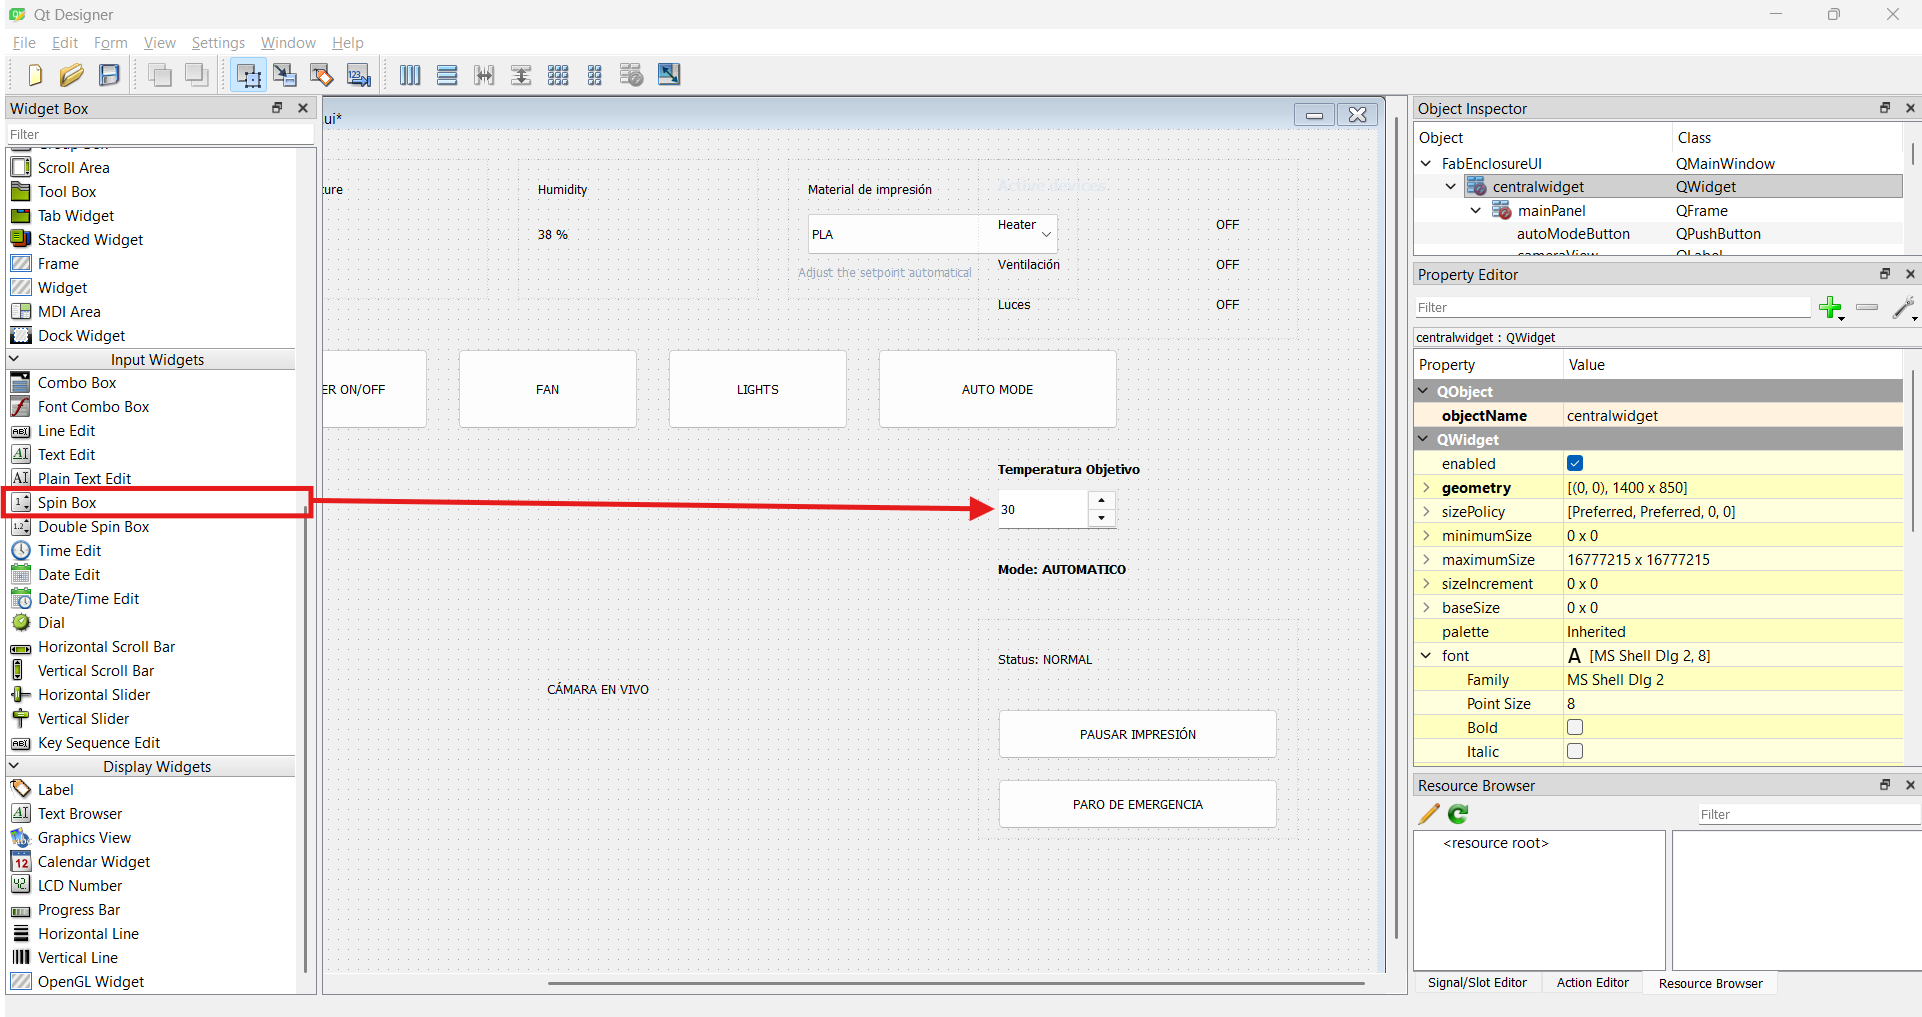
Widget Box (left panel): the library of all available widgets. I dragged elements
straight from here onto the window —
QPushButtonfor the buttons,QLabelfor the temperature/humidity values and the camera area,QComboBoxfor the material selector,QSpinBoxfor the target temperature, andQFrameas the container for each "card". -
Object Inspector (top-right): the tree of every widget in the window. I used it to
rename every object to meaningful names (
tempValue,heaterButton,cameraView, etc.). This naming is critical, because the backend refers to each widget by exactly that name (e.g.self.ui.tempValue). -
Property Editor (bottom-right): where I set the position, size and properties of each
widget —
geometry(x, y, width, height), the spinbox'sminimum/maximum(20–60 °C), and the text of labels and buttons. -
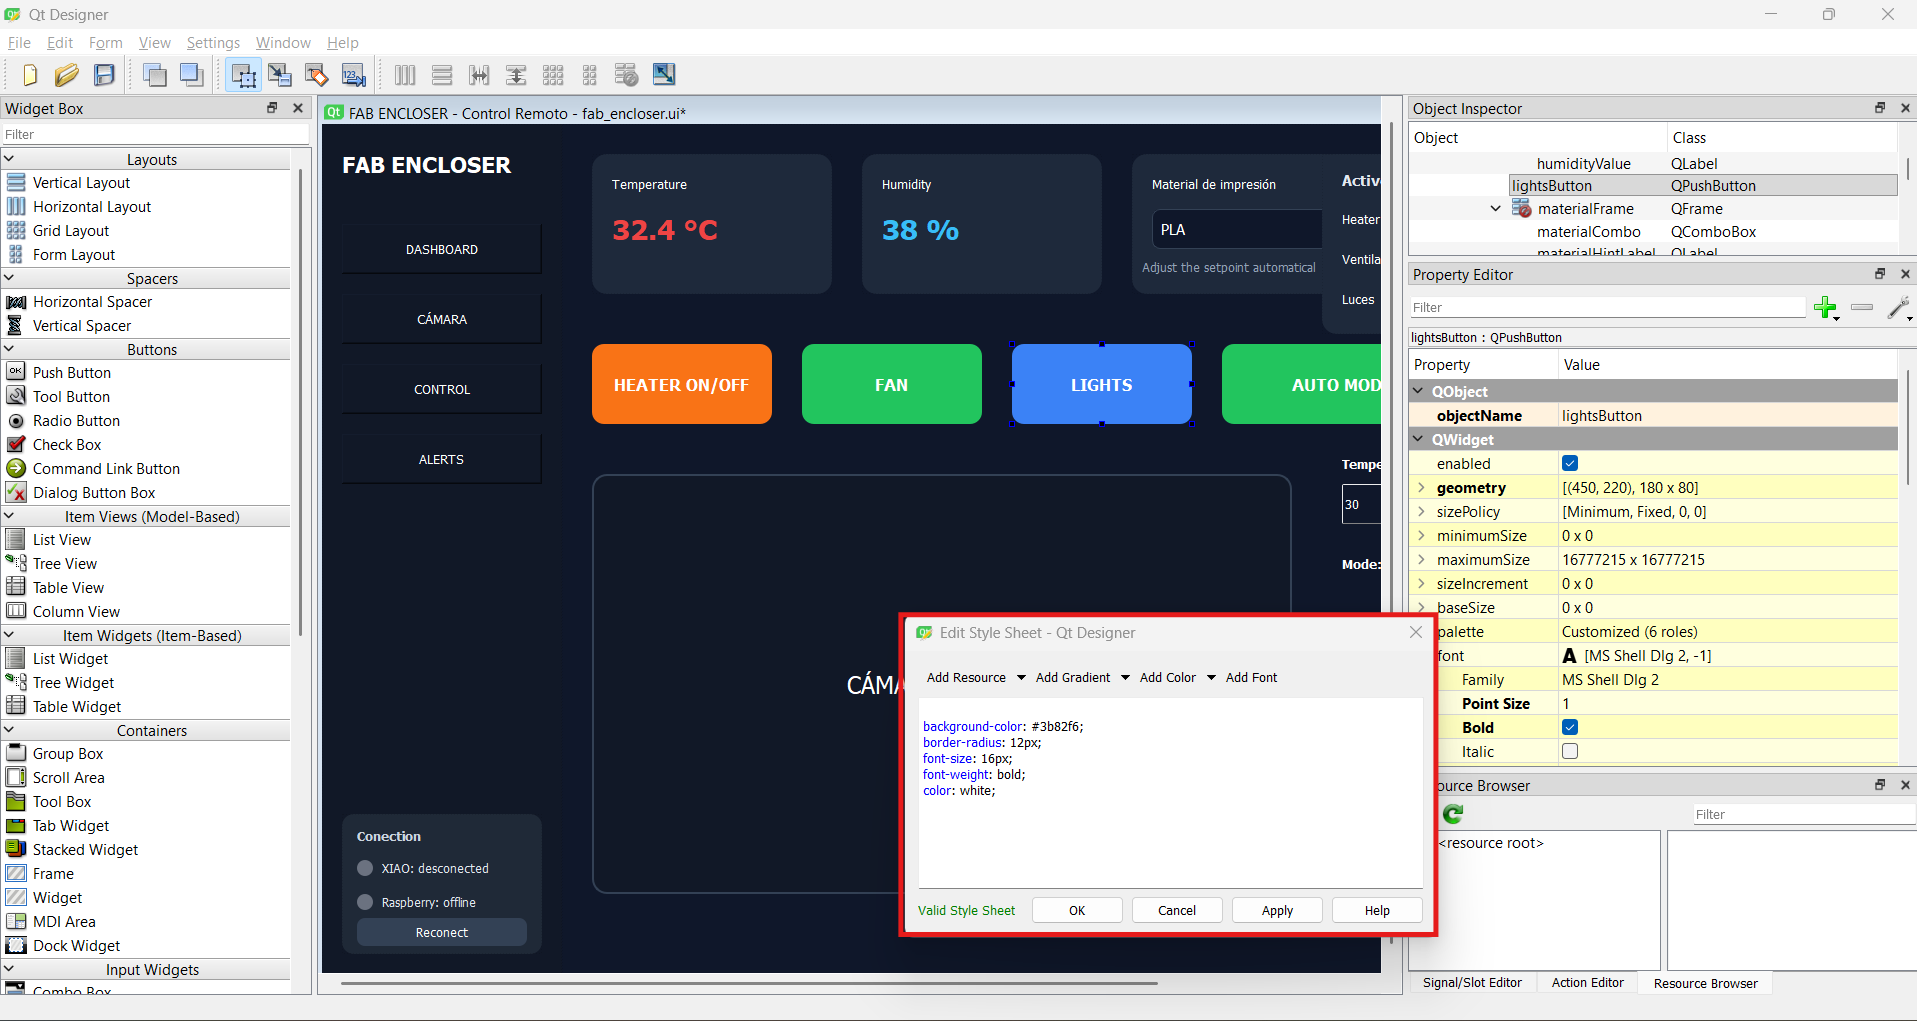
Stylesheet editor (right-click → Change styleSheet…): this is where I created the dark
theme. I wrote CSS-like rules to set
background-color,border-radiusfor the rounded cards, fonts, and the color-coding of each button (orange heater, green fan, blue lights, red emergency). - Layouts: to keep elements aligned I grouped widgets and applied layouts so the sidebar, the top cards and the right column organize themselves instead of relying only on fixed coordinates.
Step by Step
- Created a new Main Window project (it gives a
QMainWindowwith a central widget).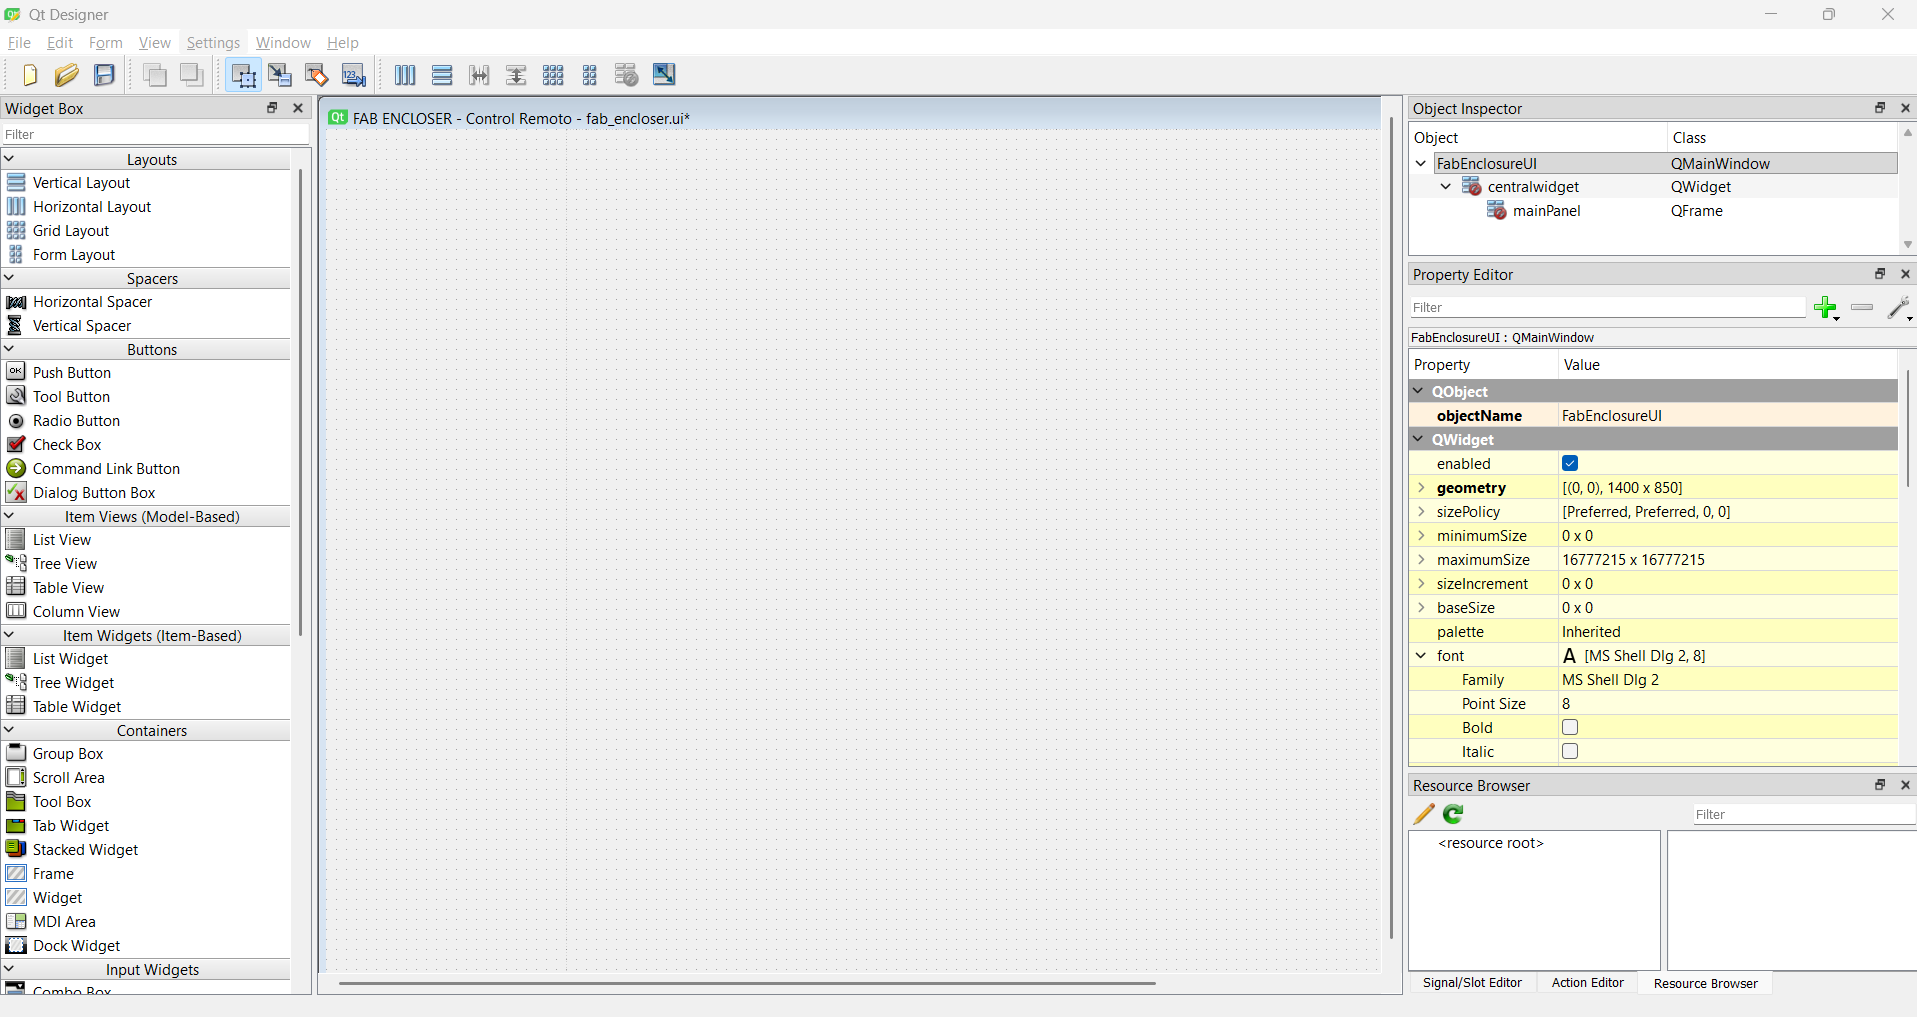
- Dropped a
QFramefor the sidebar and added the four navigation buttons and the logo label.
- Built the top cards (Temperature, Humidity, Material, Active devices) as separate frames so each has its own rounded background.
- Added the control buttons row (Heater, Fan, Lights, Auto) and the big camera label in the center.
- Added the right column: target-temperature spinbox, mode label, status panel, and the Pause/Emergency buttons.
- Named every widget in the Object Inspector and styled everything with stylesheets for the dark theme.
- Saved as
interface.uiand converted it withpyuic6.
How the Interface Was Built
Layout Breakdown
1. Left Navigation Menu
A vertical navigation panel on the left holds the main sections: Dashboard, Camera, Control and Alerts. The PrintVault Pro logo sits at the top of this column.
2. Environmental Monitoring Cards
At the top of the dashboard, two cards show the live readings coming from the SHT31 sensor: Temperature (e.g. 32.4 °C) and Humidity (e.g. 38 %). These labels update in real time from the data the enclosure sends.
3. Print Material and Active Devices
Next to the sensor cards, a Print material selector (PLA, PETG, ABS, ASA, TPU, Nylon, PC) automatically adjusts the target temperature for the chosen material. Beside it, an Active devices panel shows the current ON/OFF state of the Heater, Fan and Lights, so the user always sees the real actuator states reported by the controller.
4. Manual Control Buttons
A row of four large, color-coded buttons gives direct control:
- Heater ON/OFF (orange)
- Fan (green)
- Lights (blue)
- Auto Mode (green) — switches between closed-loop AUTO and manual control
5. Live Camera Area
A large central frame displays the live video feed from the Raspberry Pi camera. This is the biggest area of the dashboard because visual monitoring — and the AI failure detection drawn on top of it — is one of the most important functions of the project.
6. Target Temperature and Mode
On the right, a Target Temperature spinbox lets the user set the setpoint manually, and a Mode: AUTO label shows whether the closed-loop control or manual control is currently active.
7. Status and Safety Panel
A dedicated status panel shows the current operating condition (Status: NORMAL, which turns to WARN or ALERT when needed) together with two critical safety actions: Pause Print and Emergency Stop.
8. Connections Panel
At the bottom-left, a Connections panel reports link health with colored indicators: the state of the XIAO (e.g. "no data") and the Raspberry (e.g. "offline"), so the user can immediately tell whether the problem is the controller or the gateway.
Interface Components
Widgets Used
| Qt Widget | Purpose in PrintVault Pro |
|---|---|
| QMainWindow | Main application window |
| QFrame | Section containers: cards, camera area, status and connections panels |
| QLabel | Temperature, humidity, status, mode and the camera image |
| QPushButton | Heater / Fan / Lights / Auto Mode, Pause Print, Emergency Stop and the sidebar menu |
| QComboBox | Print material selector that sets the target temperature |
| QSpinBox | Target temperature adjustment |
| Layouts | Automatic organization of the sidebar, cards and right column |
| Stylesheets | Dark theme and color-coded buttons |
Connecting the Logic
Backend
After converting the layout to Python, the behavior was added in backendFAB.py. The app does
not talk to the microcontroller directly; instead it connects over WiFi to the Raspberry Pi gateway, which
bridges to the XIAO ESP32-S3 over BLE. The main responsibilities of the backend are:
- WebSocket client: receives the 1 Hz state (temperature, humidity, actuator states, mode, status) and updates the labels and indicators.
- MJPEG video: reads the camera stream from the gateway and shows each frame in the central camera label.
- Commands: each button sends a short text command (heater, fan, lights, mode, setpoint, emergency) to the gateway, which forwards it to the XIAO.
- State reconciliation: the UI never trusts itself — every indicator reflects what the controller actually reports, so the screen always matches the physical state.
Because PyQt's event loop and Python's asyncio loop don't normally coexist, the app uses qasync to run the WebSocket and health-check tasks inside the Qt application without freezing the interface. Finally, the app was packaged into a standalone Windows executable with PyInstaller so it runs on any PC without a Python installation.
From .ui to .py
pyuic6
Once the visual design was finished in Qt Designer, it was saved as a .ui file. That file is
an XML description of the interface — it is not directly runnable in Python. To turn it into usable Python
code, PyQt6's pyuic6 tool was used:
pyuic6 -x interface.ui -o frontendFAB.pyThis command generates a Python file containing every widget, layout and property defined in Qt Designer. From this point on, the project is organized into two files:
frontendFAB.py— the design, generated automatically bypyuic6. It should not be edited by hand, because it is regenerated every time the design changes in Qt Designer.backendFAB.py— the functionality, written manually. It imports the frontend, displays the window, and connects every element to its behavior.
Frontend Code
frontendFAB.py
This is the design file generated automatically from Qt Designer with pyuic6. It defines all
the widgets and layouts of the dashboard:
# frontendFAB.py — generated with: pyuic6 -x interface.ui -o frontendFAB.py
from PyQt6 import QtCore, QtGui, QtWidgets


class Ui_FabEnclosureUI(object):
    def setupUi(self, FabEnclosureUI):
        FabEnclosureUI.setObjectName("FabEnclosureUI")
        FabEnclosureUI.resize(1400, 850)
        self.centralwidget = QtWidgets.QWidget(parent=FabEnclosureUI)
        self.centralwidget.setObjectName("centralwidget")
        self.sidebar = QtWidgets.QFrame(parent=self.centralwidget)
        self.sidebar.setGeometry(QtCore.QRect(0, 0, 240, 850))
        self.sidebar.setStyleSheet("\n"
"background-color: #111827;\n"
"color: white;\n"
"     ")
        self.sidebar.setObjectName("sidebar")
        self.titleLabel = QtWidgets.QLabel(parent=self.sidebar)
        self.titleLabel.setGeometry(QtCore.QRect(20, 20, 200, 40))
        self.titleLabel.setStyleSheet("\n"
"font-size: 22px;\n"
"font-weight: bold;\n"
"      ")
        self.titleLabel.setObjectName("titleLabel")
        self.dashboardButton = QtWidgets.QPushButton(parent=self.sidebar)
        self.dashboardButton.setGeometry(QtCore.QRect(20, 100, 200, 50))
        self.dashboardButton.setObjectName("dashboardButton")
        self.cameraButton = QtWidgets.QPushButton(parent=self.sidebar)
        self.cameraButton.setGeometry(QtCore.QRect(20, 170, 200, 50))
        self.cameraButton.setObjectName("cameraButton")
        self.controlButton = QtWidgets.QPushButton(parent=self.sidebar)
        self.controlButton.setGeometry(QtCore.QRect(20, 240, 200, 50))
        self.controlButton.setObjectName("controlButton")
        self.alertsButton = QtWidgets.QPushButton(parent=self.sidebar)
        self.alertsButton.setGeometry(QtCore.QRect(20, 310, 200, 50))
        self.alertsButton.setObjectName("alertsButton")
        self.connFrame = QtWidgets.QFrame(parent=self.sidebar)
        self.connFrame.setGeometry(QtCore.QRect(20, 690, 200, 140))
        self.connFrame.setStyleSheet("\n"
"background-color: #1f2937;\n"
"border-radius: 12px;\n"
"      ")
        self.connFrame.setObjectName("connFrame")
        self.connTitle = QtWidgets.QLabel(parent=self.connFrame)
        self.connTitle.setGeometry(QtCore.QRect(15, 10, 170, 24))
        self.connTitle.setStyleSheet("\n"
"font-size: 13px;\n"
"font-weight: bold;\n"
"color: #cbd5e1;\n"
"       ")
        self.connTitle.setObjectName("connTitle")
        self.xiaoDot = QtWidgets.QLabel(parent=self.connFrame)
        self.xiaoDot.setGeometry(QtCore.QRect(15, 46, 16, 16))
        self.xiaoDot.setStyleSheet("\n"
"background-color: #6b7280;\n"
"border-radius: 8px;\n"
"       ")
        self.xiaoDot.setText("")
        self.xiaoDot.setObjectName("xiaoDot")
        self.xiaoConnLabel = QtWidgets.QLabel(parent=self.connFrame)
        self.xiaoConnLabel.setGeometry(QtCore.QRect(40, 44, 150, 20))
        self.xiaoConnLabel.setStyleSheet("\n"
"font-size: 12px;\n"
"color: #e2e8f0;\n"
"       ")
        self.xiaoConnLabel.setObjectName("xiaoConnLabel")
        self.piDot = QtWidgets.QLabel(parent=self.connFrame)
        self.piDot.setGeometry(QtCore.QRect(15, 80, 16, 16))
        self.piDot.setStyleSheet("\n"
"background-color: #6b7280;\n"
"border-radius: 8px;\n"
"       ")
        self.piDot.setText("")
        self.piDot.setObjectName("piDot")
        self.piConnLabel = QtWidgets.QLabel(parent=self.connFrame)
        self.piConnLabel.setGeometry(QtCore.QRect(40, 78, 150, 20))
        self.piConnLabel.setStyleSheet("\n"
"font-size: 12px;\n"
"color: #e2e8f0;\n"
"       ")
        self.piConnLabel.setObjectName("piConnLabel")
        self.reconnectButton = QtWidgets.QPushButton(parent=self.connFrame)
        self.reconnectButton.setGeometry(QtCore.QRect(15, 104, 170, 28))
        self.reconnectButton.setStyleSheet("\n"
"background-color: #334155;\n"
"border-radius: 8px;\n"
"font-size: 12px;\n"
"color: white;\n"
"       ")
        self.reconnectButton.setObjectName("reconnectButton")
        self.mainPanel = QtWidgets.QFrame(parent=self.centralwidget)
        self.mainPanel.setGeometry(QtCore.QRect(240, 0, 1160, 850))
        self.mainPanel.setStyleSheet("\n"
"background-color: #0f172a;\n"
"color: white;\n"
"     ")
        self.mainPanel.setObjectName("mainPanel")
        self.tempFrame = QtWidgets.QFrame(parent=self.mainPanel)
        self.tempFrame.setGeometry(QtCore.QRect(30, 30, 240, 140))
        self.tempFrame.setStyleSheet("\n"
"background-color: #1e293b;\n"
"border-radius: 15px;\n"
"      ")
        self.tempFrame.setObjectName("tempFrame")
        self.tempTitle = QtWidgets.QLabel(parent=self.tempFrame)
        self.tempTitle.setGeometry(QtCore.QRect(20, 15, 200, 30))
        self.tempTitle.setObjectName("tempTitle")
        self.tempValue = QtWidgets.QLabel(parent=self.tempFrame)
        self.tempValue.setGeometry(QtCore.QRect(20, 50, 200, 50))
        self.tempValue.setStyleSheet("\n"
"font-size: 28px;\n"
"font-weight: bold;\n"
"color: #ef4444;\n"
"       ")
        self.tempValue.setObjectName("tempValue")
        self.humidityFrame = QtWidgets.QFrame(parent=self.mainPanel)
        self.humidityFrame.setGeometry(QtCore.QRect(300, 30, 240, 140))
        self.humidityFrame.setStyleSheet("\n"
"background-color: #1e293b;\n"
"border-radius: 15px;\n"
"      ")
        self.humidityFrame.setObjectName("humidityFrame")
        self.humidityTitle = QtWidgets.QLabel(parent=self.humidityFrame)
        self.humidityTitle.setGeometry(QtCore.QRect(20, 15, 200, 30))
        self.humidityTitle.setObjectName("humidityTitle")
        self.humidityValue = QtWidgets.QLabel(parent=self.humidityFrame)
        self.humidityValue.setGeometry(QtCore.QRect(20, 50, 200, 50))
        self.humidityValue.setStyleSheet("\n"
"font-size: 28px;\n"
"font-weight: bold;\n"
"color: #38bdf8;\n"
"       ")
        self.humidityValue.setObjectName("humidityValue")
        self.materialFrame = QtWidgets.QFrame(parent=self.mainPanel)
        self.materialFrame.setGeometry(QtCore.QRect(570, 30, 290, 140))
        self.materialFrame.setStyleSheet("\n"
"background-color: #1e293b;\n"
"border-radius: 15px;\n"
"      ")
        self.materialFrame.setObjectName("materialFrame")
        self.materialTitle = QtWidgets.QLabel(parent=self.materialFrame)
        self.materialTitle.setGeometry(QtCore.QRect(20, 15, 250, 30))
        self.materialTitle.setObjectName("materialTitle")
        self.materialCombo = QtWidgets.QComboBox(parent=self.materialFrame)
        self.materialCombo.setGeometry(QtCore.QRect(20, 55, 250, 40))
        self.materialCombo.setStyleSheet("\n"
"background-color: #0f172a;\n"
"color: white;\n"
"border: 1px solid #334155;\n"
"border-radius: 8px;\n"
"padding-left: 8px;\n"
"font-size: 15px;\n"
"       ")
        self.materialCombo.setObjectName("materialCombo")
        self.materialCombo.addItem("")
        self.materialCombo.addItem("")
        self.materialCombo.addItem("")
        self.materialCombo.addItem("")
        self.materialCombo.addItem("")
        self.materialCombo.addItem("")
        self.materialCombo.addItem("")
        self.materialCombo.addItem("")
        self.materialHintLabel = QtWidgets.QLabel(parent=self.materialFrame)
        self.materialHintLabel.setGeometry(QtCore.QRect(20, 100, 250, 25))
        self.materialHintLabel.setStyleSheet("\n"
"font-size: 12px;\n"
"color: #94a3b8;\n"
"       ")
        self.materialHintLabel.setObjectName("materialHintLabel")
        self.heaterButton = QtWidgets.QPushButton(parent=self.mainPanel)
        self.heaterButton.setGeometry(QtCore.QRect(30, 220, 180, 80))
        self.heaterButton.setStyleSheet("\n"
"background-color: #f97316;\n"
"border-radius: 12px;\n"
"font-size: 16px;\n"
"font-weight: bold;\n"
"color: white;\n"
"      ")
        self.heaterButton.setObjectName("heaterButton")
        self.fanButton = QtWidgets.QPushButton(parent=self.mainPanel)
        self.fanButton.setGeometry(QtCore.QRect(240, 220, 180, 80))
        self.fanButton.setStyleSheet("\n"
"background-color: #22c55e;\n"
"border-radius: 12px;\n"
"font-size: 16px;\n"
"font-weight: bold;\n"
"color: white;\n"
"      ")
        self.fanButton.setObjectName("fanButton")
        self.lightsButton = QtWidgets.QPushButton(parent=self.mainPanel)
        self.lightsButton.setGeometry(QtCore.QRect(450, 220, 180, 80))
        self.lightsButton.setStyleSheet("\n"
"background-color: #3b82f6;\n"
"border-radius: 12px;\n"
"font-size: 16px;\n"
"font-weight: bold;\n"
"color: white;\n"
"      ")
        self.lightsButton.setObjectName("lightsButton")
        self.cameraView = QtWidgets.QLabel(parent=self.mainPanel)
        self.cameraView.setGeometry(QtCore.QRect(30, 350, 700, 420))
        self.cameraView.setStyleSheet("\n"
"background-color: #111827;\n"
"border: 2px solid #334155;\n"
"border-radius: 15px;\n"
"font-size: 24px;\n"
"      ")
        self.cameraView.setAlignment(QtCore.Qt.AlignmentFlag.AlignCenter)
        self.cameraView.setObjectName("cameraView")
        self.statusActivosFrame = QtWidgets.QFrame(parent=self.mainPanel)
        self.statusActivosFrame.setGeometry(QtCore.QRect(760, 30, 320, 180))
        self.statusActivosFrame.setStyleSheet("\n"
"background-color: #1e293b;\n"
"border-radius: 15px;\n"
"      ")
        self.statusActivosFrame.setObjectName("statusActivosFrame")
        self.activosTitle = QtWidgets.QLabel(parent=self.statusActivosFrame)
        self.activosTitle.setGeometry(QtCore.QRect(20, 12, 280, 28))
        self.activosTitle.setStyleSheet("\n"
"font-size: 15px;\n"
"font-weight: bold;\n"
"color: #e2e8f0;\n"
"       ")
        self.activosTitle.setObjectName("activosTitle")
        self.heaterStatusName = QtWidgets.QLabel(parent=self.statusActivosFrame)
        self.heaterStatusName.setGeometry(QtCore.QRect(20, 50, 150, 30))
        self.heaterStatusName.setObjectName("heaterStatusName")
        self.heaterStatusInd = QtWidgets.QLabel(parent=self.statusActivosFrame)
        self.heaterStatusInd.setGeometry(QtCore.QRect(200, 50, 100, 30))
        self.heaterStatusInd.setStyleSheet("\n"
"background-color: #374151;\n"
"color: #9ca3af;\n"
"border-radius: 6px;\n"
"font-size: 13px;\n"
"font-weight: bold;\n"
"       ")
        self.heaterStatusInd.setAlignment(QtCore.Qt.AlignmentFlag.AlignCenter)
        self.heaterStatusInd.setObjectName("heaterStatusInd")
        self.fanStatusName = QtWidgets.QLabel(parent=self.statusActivosFrame)
        self.fanStatusName.setGeometry(QtCore.QRect(20, 90, 150, 30))
        self.fanStatusName.setObjectName("fanStatusName")
        self.fanStatusInd = QtWidgets.QLabel(parent=self.statusActivosFrame)
        self.fanStatusInd.setGeometry(QtCore.QRect(200, 90, 100, 30))
        self.fanStatusInd.setStyleSheet("\n"
"background-color: #374151;\n"
"color: #9ca3af;\n"
"border-radius: 6px;\n"
"font-size: 13px;\n"
"font-weight: bold;\n"
"       ")
        self.fanStatusInd.setAlignment(QtCore.Qt.AlignmentFlag.AlignCenter)
        self.fanStatusInd.setObjectName("fanStatusInd")
        self.lightsStatusName = QtWidgets.QLabel(parent=self.statusActivosFrame)
        self.lightsStatusName.setGeometry(QtCore.QRect(20, 130, 150, 30))
        self.lightsStatusName.setObjectName("lightsStatusName")
        self.lightsStatusInd = QtWidgets.QLabel(parent=self.statusActivosFrame)
        self.lightsStatusInd.setGeometry(QtCore.QRect(200, 130, 100, 30))
        self.lightsStatusInd.setStyleSheet("\n"
"background-color: #374151;\n"
"color: #9ca3af;\n"
"border-radius: 6px;\n"
"font-size: 13px;\n"
"font-weight: bold;\n"
"       ")
        self.lightsStatusInd.setAlignment(QtCore.Qt.AlignmentFlag.AlignCenter)
        self.lightsStatusInd.setObjectName("lightsStatusInd")
        self.statusFrame = QtWidgets.QFrame(parent=self.mainPanel)
        self.statusFrame.setGeometry(QtCore.QRect(760, 490, 320, 220))
        self.statusFrame.setStyleSheet("\n"
"background-color: #1e293b;\n"
"border-radius: 15px;\n"
"      ")
        self.statusFrame.setObjectName("statusFrame")
        self.statusLabel = QtWidgets.QLabel(parent=self.statusFrame)
        self.statusLabel.setGeometry(QtCore.QRect(20, 20, 250, 40))
        self.statusLabel.setStyleSheet("\n"
"font-size: 24px;\n"
"font-weight: bold;\n"
"color: #22c55e;\n"
"       ")
        self.statusLabel.setObjectName("statusLabel")
        self.pausePrintButton = QtWidgets.QPushButton(parent=self.statusFrame)
        self.pausePrintButton.setGeometry(QtCore.QRect(20, 90, 280, 50))
        self.pausePrintButton.setStyleSheet("\n"
"background-color: #f59e0b;\n"
"border-radius: 10px;\n"
"font-size: 16px;\n"
"font-weight: bold;\n"
"color: white;\n"
"       ")
        self.pausePrintButton.setObjectName("pausePrintButton")
        self.emergencyButton = QtWidgets.QPushButton(parent=self.statusFrame)
        self.emergencyButton.setGeometry(QtCore.QRect(20, 160, 280, 50))
        self.emergencyButton.setStyleSheet("\n"
"background-color: #dc2626;\n"
"border-radius: 10px;\n"
"font-size: 16px;\n"
"font-weight: bold;\n"
"color: white;\n"
"       ")
        self.emergencyButton.setObjectName("emergencyButton")
        self.autoModeButton = QtWidgets.QPushButton(parent=self.mainPanel)
        self.autoModeButton.setGeometry(QtCore.QRect(660, 220, 240, 80))
        self.autoModeButton.setObjectName("autoModeButton")
        self.setpointLabel = QtWidgets.QLabel(parent=self.mainPanel)
        self.setpointLabel.setGeometry(QtCore.QRect(780, 320, 250, 40))
        font = QtGui.QFont()
        font.setBold(True)
        font.setWeight(75)
        self.setpointLabel.setFont(font)
        self.setpointLabel.setObjectName("setpointLabel")
        self.setpointSpinBox = QtWidgets.QSpinBox(parent=self.mainPanel)
        self.setpointSpinBox.setGeometry(QtCore.QRect(780, 360, 120, 40))
        self.setpointSpinBox.setMinimum(20)
        self.setpointSpinBox.setMaximum(60)
        self.setpointSpinBox.setProperty("value", 30)
        self.setpointSpinBox.setObjectName("setpointSpinBox")
        self.modeStatusLabel = QtWidgets.QLabel(parent=self.mainPanel)
        self.modeStatusLabel.setGeometry(QtCore.QRect(780, 420, 280, 40))
        font = QtGui.QFont()
        font.setBold(True)
        font.setWeight(75)
        self.modeStatusLabel.setFont(font)
        self.modeStatusLabel.setObjectName("modeStatusLabel")
        FabEnclosureUI.setCentralWidget(self.centralwidget)

        self.retranslateUi(FabEnclosureUI)
        QtCore.QMetaObject.connectSlotsByName(FabEnclosureUI)

    def retranslateUi(self, FabEnclosureUI):
        _translate = QtCore.QCoreApplication.translate
        FabEnclosureUI.setWindowTitle(_translate("FabEnclosureUI", "PrintVault Pro - Remote Control"))
        self.titleLabel.setText(_translate("FabEnclosureUI", "PRINTVAULT PRO"))
        self.dashboardButton.setText(_translate("FabEnclosureUI", "DASHBOARD"))
        self.cameraButton.setText(_translate("FabEnclosureUI", "CAMERA"))
        self.controlButton.setText(_translate("FabEnclosureUI", "CONTROL"))
        self.alertsButton.setText(_translate("FabEnclosureUI", "ALERTS"))
        self.connTitle.setText(_translate("FabEnclosureUI", "Connections"))
        self.xiaoConnLabel.setText(_translate("FabEnclosureUI", "XIAO: disconnected"))
        self.piConnLabel.setText(_translate("FabEnclosureUI", "Raspberry: offline"))
        self.reconnectButton.setText(_translate("FabEnclosureUI", "Reconnect"))
        self.tempTitle.setText(_translate("FabEnclosureUI", "Temperature"))
        self.tempValue.setText(_translate("FabEnclosureUI", "32.4 °C"))
        self.humidityTitle.setText(_translate("FabEnclosureUI", "Humidity"))
        self.humidityValue.setText(_translate("FabEnclosureUI", "38 %"))
        self.materialTitle.setText(_translate("FabEnclosureUI", "Print material"))
        self.materialCombo.setItemText(0, _translate("FabEnclosureUI", "PLA"))
        self.materialCombo.setItemText(1, _translate("FabEnclosureUI", "PETG"))
        self.materialCombo.setItemText(2, _translate("FabEnclosureUI", "ABS"))
        self.materialCombo.setItemText(3, _translate("FabEnclosureUI", "ASA"))
        self.materialCombo.setItemText(4, _translate("FabEnclosureUI", "TPU"))
        self.materialCombo.setItemText(5, _translate("FabEnclosureUI", "Nylon (PA)"))
        self.materialCombo.setItemText(6, _translate("FabEnclosureUI", "PC (Polycarbonate)"))
        self.materialCombo.setItemText(7, _translate("FabEnclosureUI", "Custom"))
        self.materialHintLabel.setText(_translate("FabEnclosureUI", "Adjusts the setpoint automatically"))
        self.heaterButton.setText(_translate("FabEnclosureUI", "HEATER ON/OFF"))
        self.fanButton.setText(_translate("FabEnclosureUI", "FAN"))
        self.lightsButton.setText(_translate("FabEnclosureUI", "LIGHTS"))
        self.cameraView.setText(_translate("FabEnclosureUI", "LIVE CAMERA"))
        self.activosTitle.setText(_translate("FabEnclosureUI", "Active devices"))
        self.heaterStatusName.setText(_translate("FabEnclosureUI", "Heater"))
        self.heaterStatusInd.setText(_translate("FabEnclosureUI", "OFF"))
        self.fanStatusName.setText(_translate("FabEnclosureUI", "Fan"))
        self.fanStatusInd.setText(_translate("FabEnclosureUI", "OFF"))
        self.lightsStatusName.setText(_translate("FabEnclosureUI", "Lights"))
        self.lightsStatusInd.setText(_translate("FabEnclosureUI", "OFF"))
        self.statusLabel.setText(_translate("FabEnclosureUI", "Status: NORMAL"))
        self.pausePrintButton.setText(_translate("FabEnclosureUI", "PAUSE PRINT"))
        self.emergencyButton.setText(_translate("FabEnclosureUI", "EMERGENCY STOP"))
        self.autoModeButton.setStyleSheet(_translate("FabEnclosureUI", "background-color:#22c55e;border-radius:12px;font-size:16px;font-weight:bold;color:white;"))
        self.autoModeButton.setText(_translate("FabEnclosureUI", "AUTO MODE"))
        self.setpointLabel.setText(_translate("FabEnclosureUI", "Target Temperature"))
        self.modeStatusLabel.setText(_translate("FabEnclosureUI", "Mode: AUTO"))
Backend Explanation
How It Works
What the Backend Does
The backend (backendFAB.py) is the brain of the application. The frontend only draws the
widgets; the backend makes them do things. It never talks to the microcontroller directly —
instead it connects over WiFi to the Raspberry Pi 5 gateway, which bridges to the
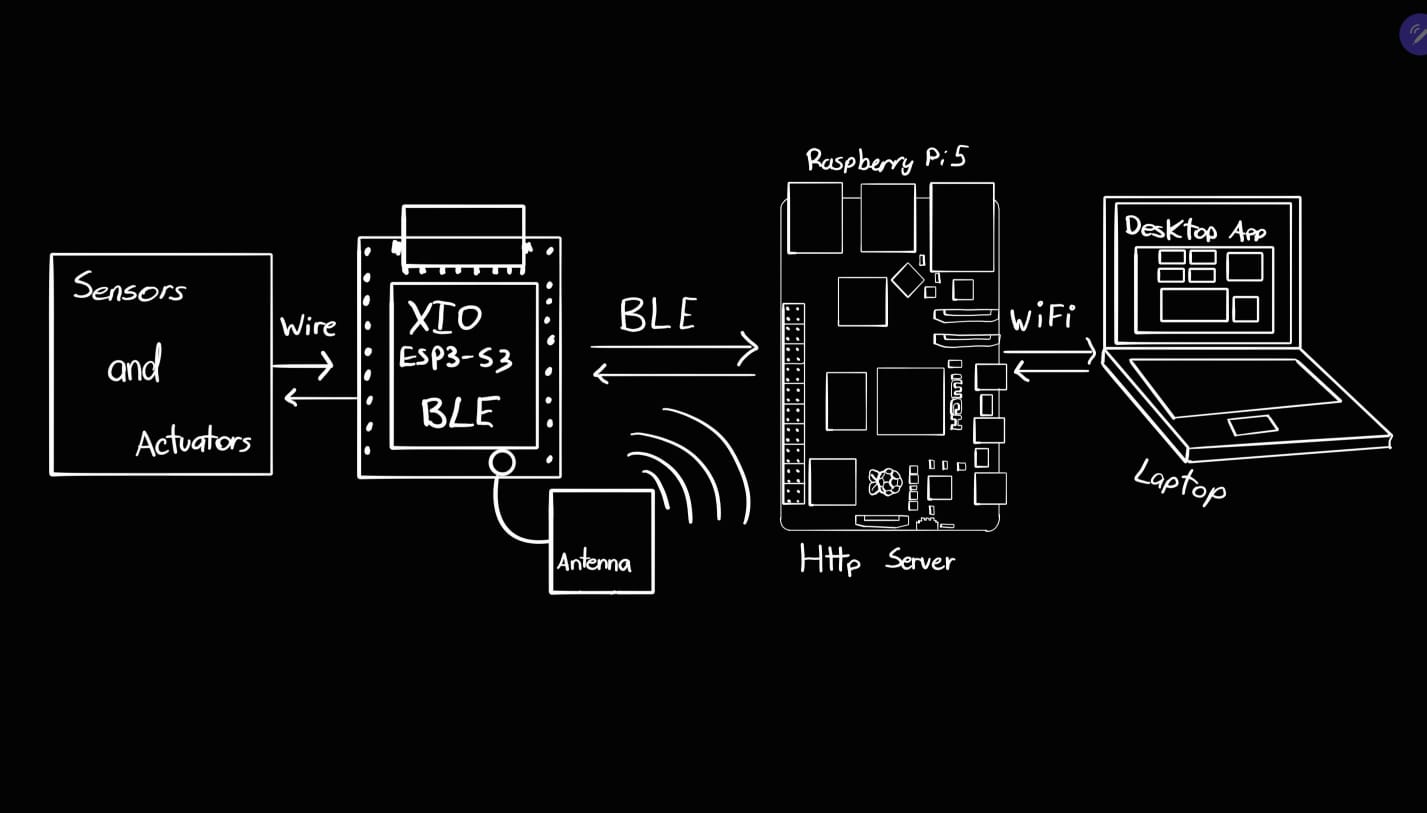
XIAO ESP32-S3 over BLE. So the data path is:
Desktop App (PyQt6) ⇄ WiFi ⇄ Raspberry Pi 5 gateway ⇄ BLE ⇄ XIAO ESP32-S3 ⇄ sensors & actuators
The Main Pieces
- WsClient (WebSocket client): keeps a live connection to the Pi. It receives the enclosure state once per second (temperature, humidity, heater/fan/lights states, mode, status) and sends the commands when you press a button. If the connection drops, it retries automatically every few seconds.
-
MjpegReader (video thread): reads the camera's MJPEG stream from the Pi in a separate
thread so the video never freezes the interface. It hunts for each complete JPEG frame (between the
FFD8start andFFD9end markers), turns it into aQImage, and shows it in the central camera label. -
PiMonitor (health check): every 5 seconds it asks the Pi's
/healthendpoint whether the Pi is alive and whether the Pi itself can see the XIAO over BLE. This is what drives the two colored connection dots, so you can tell instantly whether a problem is the gateway or the controller. - FabEnclosureApp (main window): ties everything together — it wires each button to its action, applies the material presets, and updates every label from the data the Pi reports.
How a Button Press Works
When you press, for example, the Heater button, the backend flips its internal state,
sends a short text command (H:1 or H:0) to the Pi through the WebSocket, and
updates the on-screen indicator. The Pi forwards that command to the XIAO over BLE. Crucially, the UI
doesn't simply trust its own button press: the next state message coming back from the controller is what
the indicators ultimately reflect, so the screen always matches the real physical state.
Safety and AI Alerts
The Emergency Stop immediately turns the heater off, forces the fan on, and paints the
status red — locally, without waiting for a round-trip — because safety must be instant. The backend also
listens for AI messages coming from the Pi's spaghetti-detection model: an ai_status changes
the status banner to a warning color, and a confirmed ai_alert raises a pop-up so a print
failure can't go unnoticed.
Keeping the UI Responsive
PyQt's event loop and Python's asyncio loop don't normally run together. To let the WebSocket
and health checks run without freezing the interface, the app uses qasync, which
merges the two loops. Finally, the whole app was packaged into a standalone Windows .exe with
PyInstaller, so it runs on any PC without installing Python.
Backend Code
backendFAB.py
This is the file written by hand. It imports the frontend, launches the application, and adds all the functionality: updating the temperature and humidity labels, displaying the camera feed, and connecting each button to its action over the network.
# backendFAB.py — application logic
import sys
import json
import asyncio

from PyQt6 import QtWidgets, QtCore, QtGui

# UI generated by pyuic6. Your file is named frontendFAB.py
from frontendFAB import Ui_FabEnclosureUI

try:
    import qasync
except ImportError:
    qasync = None

try:
    import websockets
except ImportError:
    websockets = None

import urllib.request   # health check and MJPEG stream reading


# --------------------------------------------------------------------
# CONFIGURATION
# --------------------------------------------------------------------
# Raspberry Pi 5 (gateway). Change the IP to your Pi's LAN address.
# When using Tailscale for internet access, put the Tailscale IP here.
PI_HOST = "192.168.100.90"
PI_PORT = 8000

PI_WS_URL     = f"ws://{PI_HOST}:{PI_PORT}/ws"
PI_VIDEO_URL  = f"http://{PI_HOST}:{PI_PORT}/video"
PI_HEALTH_URL = f"http://{PI_HOST}:{PI_PORT}/health"

PI_POLL_SECONDS = 5          # how often /health is checked

# Chamber temperature presets per material (degrees C).
# None = free setpoint ("Custom" mode).
# NOTE: these keys must match the items of materialCombo in frontendFAB.py.
MATERIAL_PRESETS = {
    "PLA": 25,
    "PETG": 30,
    "ABS": 45,
    "ASA": 45,
    "TPU": 30,
    "Nylon (PA)": 50,
    "PC (Polycarbonate)": 55,
    "Custom": None,
}


# ====================================================================
# WEBSOCKET CLIENT TO THE PI
# ====================================================================
class WsClient(QtCore.QObject):
    """Keeps the WebSocket with the Pi: receives state, sends commands."""

    connected = QtCore.pyqtSignal()
    disconnected = QtCore.pyqtSignal()
    state_received = QtCore.pyqtSignal(dict)
    log = QtCore.pyqtSignal(str)

    def __init__(self, parent=None):
        super().__init__(parent)
        self._ws = None
        self._stop = False
        self._outbox = asyncio.Queue()

    async def run(self):
        """Connection loop with automatic retries."""
        if websockets is None:
            self.log.emit("Missing websockets: pip install websockets")
            return
        while not self._stop:
            try:
                async with websockets.connect(PI_WS_URL) as ws:
                    self._ws = ws
                    self.connected.emit()
                    self.log.emit("WebSocket connected to the Pi.")
                    sender = asyncio.ensure_future(self._sender(ws))
                    try:
                        async for message in ws:
                            self._handle(message)
                    finally:
                        sender.cancel()
            except Exception as e:
                self.log.emit(f"WS disconnected: {e}")
            finally:
                self._ws = None
                self.disconnected.emit()
                if not self._stop:
                    await asyncio.sleep(3)   # wait before retrying

    async def _sender(self, ws):
        while True:
            cmd = await self._outbox.get()
            try:
                await ws.send(json.dumps({"cmd": cmd}))
            except Exception as e:
                self.log.emit(f"Error sending '{cmd}': {e}")

    def _handle(self, message: str):
        try:
            state = json.loads(message)
            self.state_received.emit(state)
        except json.JSONDecodeError:
            self.log.emit(f"Non-JSON message: {message}")

    def send(self, command: str):
        """Queues a command to be sent."""
        self._outbox.put_nowait(command)

    def stop(self):
        self._stop = True


# ====================================================================
# MJPEG VIDEO VIEWER
# ====================================================================
class MjpegReader(QtCore.QThread):
    """Reads the Pi's MJPEG stream in a thread and emits each frame as QImage."""

    frame_ready = QtCore.pyqtSignal(QtGui.QImage)
    error = QtCore.pyqtSignal(str)

    def __init__(self, url, parent=None):
        super().__init__(parent)
        self.url = url
        self._running = True

    def run(self):
        while self._running:
            try:
                req = urllib.request.Request(self.url)
                with urllib.request.urlopen(req, timeout=5) as stream:
                    buf = b""
                    while self._running:
                        chunk = stream.read(4096)
                        if not chunk:
                            break
                        buf += chunk
                        # Look for a complete JPEG (FFD8 ... FFD9)
                        start = buf.find(b"\xff\xd8")
                        end = buf.find(b"\xff\xd9")
                        if start != -1 and end != -1 and end > start:
                            jpg = buf[start:end + 2]
                            buf = buf[end + 2:]
                            img = QtGui.QImage.fromData(jpg, "JPEG")
                            if not img.isNull():
                                self.frame_ready.emit(img)
            except Exception as e:
                self.error.emit(str(e))
                if self._running:
                    self.msleep(2000)   # retry after 2 s

    def stop(self):
        self._running = False
        self.wait(2000)


# ====================================================================
# PI HEALTH MONITOR
# ====================================================================
class PiMonitor(QtCore.QObject):
    """Polls /health to know if the Pi is alive and if it sees the XIAO."""

    status_changed = QtCore.pyqtSignal(bool, bool)  # (pi_online, xiao_via_pi)

    def __init__(self, parent=None):
        super().__init__(parent)
        self._running = False
        self._last = None

    def _check_blocking(self):
        try:
            with urllib.request.urlopen(PI_HEALTH_URL, timeout=3) as resp:
                if resp.status == 200:
                    data = json.loads(resp.read().decode())
                    return True, bool(data.get("ble_connected", False))
        except Exception:
            pass
        return False, False

    async def run(self):
        self._running = True
        loop = asyncio.get_event_loop()
        while self._running:
            result = await loop.run_in_executor(None, self._check_blocking)
            if result != self._last:
                self._last = result
                self.status_changed.emit(result[0], result[1])
            await asyncio.sleep(PI_POLL_SECONDS)

    def stop(self):
        self._running = False


# ====================================================================
# MAIN WINDOW
# ====================================================================
class FabEnclosureApp(QtWidgets.QMainWindow):
    def __init__(self):
        super().__init__()
        self.ui = Ui_FabEnclosureUI()
        self.ui.setupUi(self)

        self.ws = WsClient(self)
        self.pi = PiMonitor(self)
        self.video = MjpegReader(PI_VIDEO_URL, self)

        # Local states (corrected by what the XIAO reports through the Pi)
        self._heater = False
        self._fan = False
        self._lights = False
        self._auto_mode = True
        self._ai_status = "—"

        self._wire_signals()
        self._apply_material(self.ui.materialCombo.currentText())
        self._set_xiao_ui(False)
        self._set_pi_ui(False)

        self.video.start()

    # ---- signal wiring --------------------------------------------
    def _wire_signals(self):
        self.ui.heaterButton.clicked.connect(self.toggle_heater)
        self.ui.fanButton.clicked.connect(self.toggle_fan)
        self.ui.lightsButton.clicked.connect(self.toggle_lights)

        self.ui.autoModeButton.clicked.connect(self.toggle_mode)
        self.ui.setpointSpinBox.valueChanged.connect(self.on_setpoint_changed)

        self.ui.materialCombo.currentTextChanged.connect(self._apply_material)

        self.ui.pausePrintButton.clicked.connect(self.pause_print)
        self.ui.emergencyButton.clicked.connect(self.emergency_stop)

        # The "Reconnect" button restarts the video viewer (the WS retries on its own)
        self.ui.reconnectButton.clicked.connect(self.restart_video)
        self.ui.dashboardButton.clicked.connect(self.restart_video)

        # WebSocket signals (XIAO data through the Pi)
        self.ws.connected.connect(lambda: self._set_xiao_ui(True))
        self.ws.disconnected.connect(lambda: self._set_xiao_ui(False))
        self.ws.state_received.connect(self.on_state)
        self.ws.log.connect(self.on_log)

        # Pi health
        self.pi.status_changed.connect(self._on_pi_status)

        # Video
        self.video.frame_ready.connect(self.on_frame)
        self.video.error.connect(lambda e: self.on_log(f"Video: {e}"))

    # ---- command sending ------------------------------------------
    def _send(self, command: str):
        self.ws.send(command)

    def restart_video(self):
        self.video.stop()
        self.video = MjpegReader(PI_VIDEO_URL, self)
        self.video.frame_ready.connect(self.on_frame)
        self.video.error.connect(lambda e: self.on_log(f"Video: {e}"))
        self.video.start()

    # ---- actuator actions -------------------------------------------
    def toggle_heater(self):
        self._heater = not self._heater
        self._send(f"H:{1 if self._heater else 0}")
        self._set_indicator(self.ui.heaterStatusInd, self._heater)

    def toggle_fan(self):
        self._fan = not self._fan
        self._send(f"F:{1 if self._fan else 0}")
        self._set_indicator(self.ui.fanStatusInd, self._fan)

    def toggle_lights(self):
        self._lights = not self._lights
        self._send(f"L:{1 if self._lights else 0}")
        self._set_indicator(self.ui.lightsStatusInd, self._lights)

    def toggle_mode(self):
        self._auto_mode = not self._auto_mode
        mode = "AUTO" if self._auto_mode else "MANUAL"
        self._send(f"MODE:{mode}")
        self._update_mode_ui(mode)

    def on_setpoint_changed(self, value):
        self._send(f"SP:{value}")

    def pause_print(self):
        self._send("PAUSE")
        self.on_log("PAUSE command sent.")

    def emergency_stop(self):
        self._send("EMERGENCY")
        self._heater = False
        self._fan = True
        self._set_indicator(self.ui.heaterStatusInd, False)
        self._set_indicator(self.ui.fanStatusInd, True)
        self.ui.statusLabel.setText("Status: EMERGENCY")
        self.ui.statusLabel.setStyleSheet(
            "font-size:24px;font-weight:bold;color:#dc2626;")

    # ---- material ---------------------------------------------------
    def _apply_material(self, text):
        sp = MATERIAL_PRESETS.get(text)
        if sp is not None:
            self.ui.setpointSpinBox.blockSignals(True)
            self.ui.setpointSpinBox.setValue(sp)
            self.ui.setpointSpinBox.blockSignals(False)
            self.ui.setpointSpinBox.setEnabled(False)
            self._send(f"MAT:{text}")
            self._send(f"SP:{sp}")
        else:
            self.ui.setpointSpinBox.setEnabled(True)
            self._send(f"MAT:{text}")

    # ---- message reception (from the XIAO or the AI, via the Pi) ----
    def on_state(self, st):
        # The Pi sends two families of messages over the same WebSocket:
        #   - XIAO state (no "type" field)
        #   - AI messages: type="ai_alert" or type="ai_status"
        msg_type = st.get("type")
        if msg_type == "ai_alert":
            self._on_ai_alert(st)
            return
        if msg_type == "ai_status":
            self._on_ai_status(st)
            return

        # --- from here on: normal XIAO state ---
        if "t" in st:
            self.ui.tempValue.setText(f"{st['t']:.1f} °C")
        if "h" in st:
            self.ui.humidityValue.setText(f"{int(st['h'])} %")

        if "heater" in st:
            self._heater = bool(st["heater"])
            self._set_indicator(self.ui.heaterStatusInd, self._heater)
        if "fan" in st:
            self._fan = bool(st["fan"])
            self._set_indicator(self.ui.fanStatusInd, self._fan)
        if "lights" in st:
            self._lights = bool(st["lights"])
            self._set_indicator(self.ui.lightsStatusInd, self._lights)

        if "mode" in st:
            self._auto_mode = (st["mode"] == "AUTO")
            self._update_mode_ui(st["mode"])

        if "sp" in st:
            self.ui.setpointSpinBox.blockSignals(True)
            self.ui.setpointSpinBox.setValue(int(st["sp"]))
            self.ui.setpointSpinBox.blockSignals(False)

        if "status" in st:
            self._update_status_ui(str(st["status"]))

    def on_frame(self, img):
        pix = QtGui.QPixmap.fromImage(img).scaled(
            self.ui.cameraView.size(),
            QtCore.Qt.AspectRatioMode.KeepAspectRatio,
            QtCore.Qt.TransformationMode.SmoothTransformation)
        self.ui.cameraView.setPixmap(pix)

    def on_log(self, msg):
        print("[NET]", msg)

    # ---- AI failure-detection alerts --------------------------------
    def _on_ai_status(self, st):
        # Live detection status from the Pi. NOTE: the Pi still sends its
        # status strings in Spanish ("Impresion normal", "Detectando posible
        # spaghetti", "SPAGHETTI DETECTADO"), so the keyword checks below
        # match those strings. If you translate pi_gateway.py, update them.
        status = st.get("status", "")
        self._ai_status = status
        # If you add a dedicated label in the Alerts panel, update it here.
        # For now statusLabel is reused as a quick warning when there is risk.
        if "SPAGHETTI" in status:
            self.ui.statusLabel.setText("Status: AI FAULT")
            self.ui.statusLabel.setStyleSheet(
                "font-size:24px;font-weight:bold;color:#dc2626;")
        elif "Detectando" in status or "Detecting" in status:
            self.ui.statusLabel.setText("Status: MONITORING")
            self.ui.statusLabel.setStyleSheet(
                "font-size:24px;font-weight:bold;color:#f59e0b;")

    def _on_ai_alert(self, st):
        # Confirmed AI alert (spaghetti). Visible warning.
        msg = st.get("msg", "Failure detected by AI")
        self.on_log(f"AI ALERT: {msg}")
        self.ui.statusLabel.setText("Status: AI FAULT")
        self.ui.statusLabel.setStyleSheet(
            "font-size:24px;font-weight:bold;color:#dc2626;")
        # Pop-up warning so it does not go unnoticed
        QtWidgets.QMessageBox.warning(self, "Print Alert", msg)

    # ---- UI helpers -------------------------------------------------
    def _set_indicator(self, label, on):
        if on:
            label.setText("ON")
            label.setStyleSheet(
                "background-color:#22c55e;color:white;"
                "border-radius:6px;font-size:13px;font-weight:bold;")
        else:
            label.setText("OFF")
            label.setStyleSheet(
                "background-color:#374151;color:#9ca3af;"
                "border-radius:6px;font-size:13px;font-weight:bold;")

    def _update_mode_ui(self, mode):
        self.ui.modeStatusLabel.setText(f"Mode: {mode}")
        if mode == "AUTO":
            self.ui.autoModeButton.setText("AUTO MODE")
            self.ui.autoModeButton.setStyleSheet(
                "background-color:#22c55e;border-radius:12px;"
                "font-size:16px;font-weight:bold;color:white;")
        else:
            self.ui.autoModeButton.setText("MANUAL MODE")
            self.ui.autoModeButton.setStyleSheet(
                "background-color:#64748b;border-radius:12px;"
                "font-size:16px;font-weight:bold;color:white;")

    def _update_status_ui(self, status):
        colors = {"NORMAL": "#22c55e", "WARN": "#f59e0b", "ALERT": "#dc2626"}
        color = colors.get(status.upper(), "#22c55e")
        self.ui.statusLabel.setText(f"Status: {status}")
        self.ui.statusLabel.setStyleSheet(
            f"font-size:24px;font-weight:bold;color:{color};")

    def _set_xiao_ui(self, connected):
        # "connected" here = WebSocket with the Pi is active
        if connected:
            self.ui.xiaoDot.setStyleSheet(
                "background-color:#22c55e;border-radius:8px;")
            self.ui.xiaoConnLabel.setText("XIAO: online")
            self.ui.titleLabel.setText("PRINTVAULT PRO ●")
        else:
            self.ui.xiaoDot.setStyleSheet(
                "background-color:#ef4444;border-radius:8px;")
            self.ui.xiaoConnLabel.setText("XIAO: no data")
            self.ui.titleLabel.setText("PRINTVAULT PRO ○")

    def _set_pi_ui(self, online):
        if online:
            self.ui.piDot.setStyleSheet(
                "background-color:#22c55e;border-radius:8px;")
            self.ui.piConnLabel.setText("Raspberry: online")
        else:
            self.ui.piDot.setStyleSheet(
                "background-color:#ef4444;border-radius:8px;")
            self.ui.piConnLabel.setText("Raspberry: offline")

    def _on_pi_status(self, pi_online, xiao_via_pi):
        # The Pi also reports whether IT sees the XIAO over BLE.
        self._set_pi_ui(pi_online)
        if pi_online and not xiao_via_pi:
            self.ui.xiaoConnLabel.setText("XIAO: Pi BLE down")
            self.ui.xiaoDot.setStyleSheet(
                "background-color:#f59e0b;border-radius:8px;")

    # ---- clean shutdown ----------------------------------------------
    def closeEvent(self, event):
        self.pi.stop()
        self.ws.stop()
        self.video.stop()
        event.accept()


# ====================================================================
# STARTUP
# ====================================================================
def main():
    app = QtWidgets.QApplication(sys.argv)

    if qasync is None:
        print("Missing qasync: pip install qasync")
        print("The UI will open, but the WebSocket will not work without an async loop.")
        win = FabEnclosureApp()
        win.show()
        sys.exit(app.exec())

    loop = qasync.QEventLoop(app)
    asyncio.set_event_loop(loop)

    win = FabEnclosureApp()
    win.show()

    asyncio.ensure_future(win.ws.run())
    asyncio.ensure_future(win.pi.run())

    with loop:
        loop.run_forever()


if __name__ == "__main__":
    main()
Reflection
This week introduced me to graphical application development and showed how a software interface ties an entire fabrication project together. Building the PrintVault Pro dashboard made it clear how environmental monitoring, actuator control and computer vision can live in a single application.
I learned to use Qt Designer to quickly create a professional UI, to organize widgets with layouts, to keep
the visual design (frontendFAB.py) separate from the logic (backendFAB.py), and to
package everything into an executable with PyInstaller.
This interface is the primary control center for my final project: it lets the user monitor temperature, humidity and the live camera, control the heater, fan and lights, set a material preset, and trigger safety actions like Pause Print and Emergency Stop — all remotely through a simple, intuitive dashboard.