Microcontrollers
At the beginning of the week, I realized that I had almost no understanding of embedded systems, microcontrollers, or how digital devices are programmed. In order to create a strong conceptual foundation, I started by making a mind map where I visually connected the concepts of sensors, microcontrollers, code, power, and outputs. This helped me understand that a microcontroller acts as the "brain" of an electronic system, constantly receiving data, processing it, and sending instructions.
Mind Map
Comparing Microcontrollers
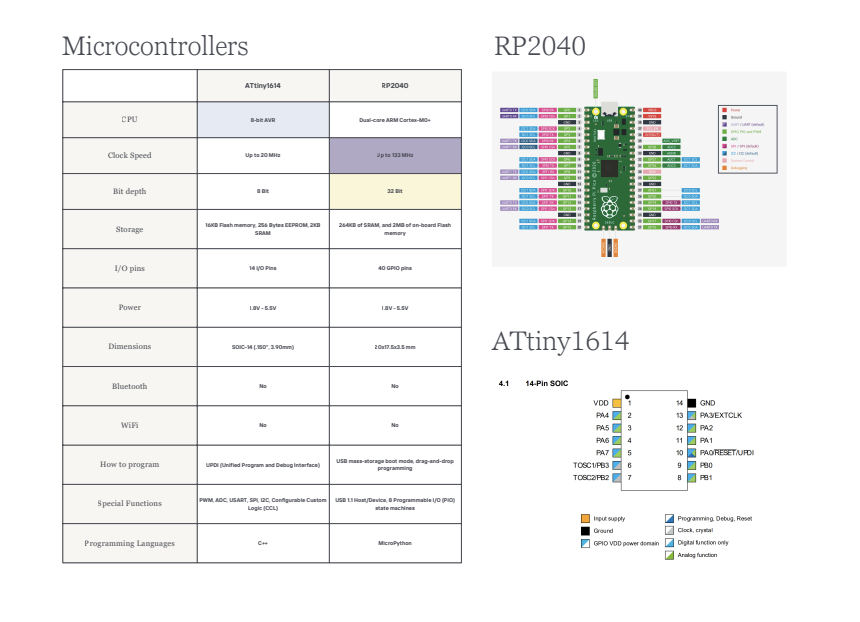
Before writing any program, I wanted to understand how different microcontrollers vary internally and why choosing the correct one matters depending on the project requirements. For this reason, I compared two different microcontrollers through their datasheets: the ATtiny1614 and the RP2040.
Instead of only looking at them as physical boards, I analyzed the technical information that defines their capabilities: number of analog and digital pins, memory capacity, processing speed, voltage operation, communication protocols, and programming flexibility. This comparison allowed me to understand that the datasheet is not just a manual, but the technical identity card of the board.
Key takeaway from comparing datasheets:
Through this process I understood that while the ATtiny1614 is a compact and efficient solution for simple tasks, the RP2040 offers much more memory, dual-core processing, and a wider range of communication possibilities, which makes it more versatile for larger embedded systems.
You can find my comparison table here.
Learning C Programming
Once I understood the hardware side, the next challenge was programming. Since I had never coded in C before, I first tried to learn through YouTube tutorials and online courses, but most of them were too long, too theoretical, or difficult to follow quickly. Then I discovered a platform called Cody, which uses a Duolingo-like system to teach programming in small interactive lessons. I liked the methodology, but it had a limitation: the credits ran out and the waiting time was too long. This inspired me to recreate the same gamified teaching structure using AI.
So I experimented with a different strategy: using artificial intelligence as an interactive programming mentor. Instead of asking AI to generate the code for me, I designed a prompt where it acted as a Fab Academy style C teacher that explained one concept at a time, gave me exercises, evaluated my answers, and forced me to write every code block myself.
This strategy ended up being extremely effective because instead of passively copying code, I progressively understood how each programming command works and why it is necessary inside an embedded system.
By the end of the lesson, I was able to write my own C program for an indoor air quality monitor that reads a gas sensor value and activates either a green or red LED depending on the measured air condition, while also sending numerical data to the Serial Monitor.
This was the prompt I used:
Role: Act as an expert, charismatic, and gamified C programming teacher utilizing the Fab Academy methodology.

Objective: Teach me C programming basics from scratch to build an indoor air quality monitor
(Seeed Studio XIAO ESP32C6, MQ-135 gas sensor, RGB LED).
Time Limit: Maximum 2 hours. Keep explanations concise, direct, and fast-paced. Use emojis to make it engaging.

CRITICAL GOLDEN RULES:
NEVER write the project code for me.
When explaining theory, always use code examples featuring different sensors or components
(e.g., a light sensor or a motor), not my project's components.
Force ME to write the actual project code based on the theory provided.

Game Mechanics (Level-by-Level Flow): For each level, strictly follow this sequence.
Do not give me all the info at once.
  Step 1: Theory. Explain the concept simply using an analogy and a short, unrelated code example.
  Step 2: Training. Give me 3 quick exercises (multiple choice, fill-in-the-blanks, spot the error)
          to test my understanding.
  Step 3: Pause. STOP HERE. Wait for me to answer.
  Step 4: Feedback. Evaluate my answers. If I am right, congratulate me.
          If I am wrong, explain why concisely.
  Step 5: Project Integration. Give me the specific hardware parameters for my air quality monitor
          (e.g., pin numbers) and challenge ME to write the code block for this level.
          STOP HERE. Wait for me to submit my code. Correct my syntax until it is bug-free,
          then ask me to type "NEXT".

Syllabus:
  Level 1: Structure (setup / loop) & Variables (int).
  Level 2: Analog Inputs (analogRead).
  Level 3: Outputs & Logic (pinMode, digitalWrite, if/else).
  Level 4: Serial Communication (Serial.begin, Serial.print).
  Level 5: Final Assembly & Debugging (Putting it all together into one master code).

To Begin: Welcome me to "Mission Clean Air", start the 2-hour timer, and launch Level 1.
This is a video of my conversation with Gemini:
Final Code Obtained:
int sensorPin = A0;
int airQuality = 0;
int PinVerde = A1;
int PinRojo = A2;

void setup() {
  pinMode(PinVerde, OUTPUT);
  pinMode(PinRojo, OUTPUT);
  Serial.begin(9600);
}

void loop() {
  airQuality = analogRead(sensorPin);

  if (airQuality < 2100) {
    digitalWrite(PinVerde, HIGH);
    digitalWrite(PinRojo, LOW);
  }
  else {
    digitalWrite(PinRojo, HIGH);
    digitalWrite(PinVerde, LOW);
  }

  Serial.println("Air Quality Level:");
  Serial.print(airQuality);
  delay(1000);
}Basic Programming Concepts: C vs. Python
These are the notes composed from my investigation and the programming course. The goal is to understand key concepts and how they are applied in C (for microcontrollers), alongside some Python comparisons.
0. Rules & Tips
The Semicolon: In C, every statement must always end with a semicolon (;).
Counting: In programming, you always start counting from 0, not 1.
The Equals Sign (=): In programming, = does not mean a mathematical result; it represents an assignment (saving a value into a variable).
Comments: Use // to put notes or comments in your C code that the computer will ignore.
Libraries: Pre-written collections of code you can add to your project. They allow you to easily control complex sensors or modules without writing all the complicated low-level code from scratch.
1. Program Structure (C/Arduino)
Every program is divided into two main parts:
- setup(): Only runs once at the very beginning.
- loop(): Runs over and over again, infinitely.
2. Variables & Booleans
Variables are like boxes where you store data (which can change). Each variable has a name and a specific type of data.
- In C: You have to explicitly tell the computer the type of variable. Integer variables (whole numbers): int (e.g., int co2_level = 400;). Decimal variables: float (e.g., float temperature = 38.7;)
- In Python: The language automatically detects the type of variable. (e.g., co2_level = 400, temperature = 38.7)
Booleans are a data type that can only have 2 values: True or False.
- In C: Values are lowercase. bool dangerousAir = false;
- In Python: Values always start with a capital letter. dangerous_air = False
3. Inputs and Outputs (GPIO)
Digital signals are strictly 0 or 1 (OFF or ON), while analog signals represent a range (from 0 to a maximum value).
Inputs:
- To read an analog signal: analogRead(pinNumber);
- To read a digital signal: digitalRead(pinNumber);
- Recommendation: Always set the pin of your sensor as a variable first.
Outputs: Instructions that send voltage from the microcontroller pins to external components (like LEDs).
- pinMode(pin, MODE); — Placed in setup(), tells the microcontroller if a pin will send or receive current.
- digitalWrite(pin, HIGH); — Makes the pin send voltage (Turns it ON).
- digitalWrite(pin, LOW); — Stops sending voltage (Turns it OFF).
int waterLevelPin = 3;
int currentLevel = 0;

void loop() {
  currentLevel = analogRead(waterLevelPin);
}
4. Conditionals
These dictate the path your code takes. They evaluate mathematical conditions (using > greater than, < less than, or == equal to) and decide which block of code to execute using If/Else.
In C: You have to put parentheses () around the condition and curly brackets {} to group the code.
In Python: Doesn't use curly brackets. It uses a colon : and indentation.
// C version:
if (co2_level > 1200) {
  dangerousAir = true;
} else {
  dangerousAir = false;
}

# Python version:
if co2_level > 1200:
    dangerous_air = True
else:
    dangerous_air = False
5. Serial Communication
To be able to show data, the board needs to know how to construct and send text messages. Before building a whole website, we practice by sending messages to your computer using the Serial Monitor.
- Serial.begin(9600); — Goes in setup(). The 9600 is the "baud rate" (the speed of the conversation).
- Serial.print("Hello"); or Serial.print(variable); — Goes in loop(). Used to send text or values.
- Serial.println(); — Adds an "Enter" (new line) at the end of the message.
- delay(1000); — Pauses the code (in milliseconds). Controls the speed of the message so humans can read it.
6. Loops and Arrays
Arrays: A single variable that contains an ordered list of data. It is like a filing cabinet.
Loops: Instructions to repeat a task multiple times automatically, like a recipe.
Example of use for my project: You save 10 sensor readings in the filing cabinet (array), and with a loop, you add them all up and divide by 10 to get the average.
The for loop has three fundamental parts:
- The counter (Start): Where we start counting (e.g., int i = 0).
- The condition (Limit): Until when we keep repeating (e.g., i < 5).
- The increment (Step): How much we add to the counter each turn (e.g., i++).
// Declares a filing cabinet called 'readings' with 5 drawers:
int readings[5] = {400, 410, 415, 420, 800};

// To access the FIRST data, you open drawer 0:
int firstData = readings[0];

// To access the LAST data (the fifth one), you open drawer 4:
int lastData = readings[4];

// This code will repeat the instructions for i = 0, 1, 2, 3, and 4.
for (int i = 0; i < 5; i++) {
  Serial.println(valveHistory[i]);
}
Example of a Loop and an Array working together:
void setup() {
  // 1. Start communication to be able to "print" to the screen
  Serial.begin(9600);

  // 2. Create our array and our variable for the sum
  int readings[5] = {400, 410, 415, 420, 800};
  int totalSum = 0;

  // 3. The loop does the heavy lifting in memory (it doesn't print anything yet)
  for (int i = 0; i < 5; i++) {
    totalSum = totalSum + readings[i];
  }

  // 4. Calculate the average
  int average = totalSum / 5;

  // 5. NOW YES! We give the explicit order to show the results
  Serial.print("The total CO2 sum is: ");
  Serial.println(totalSum);

  Serial.print("The environmental average is: ");
  Serial.println(average);
}

void loop() {
  // The main loop stays empty for now
}
Wokwi Simulation
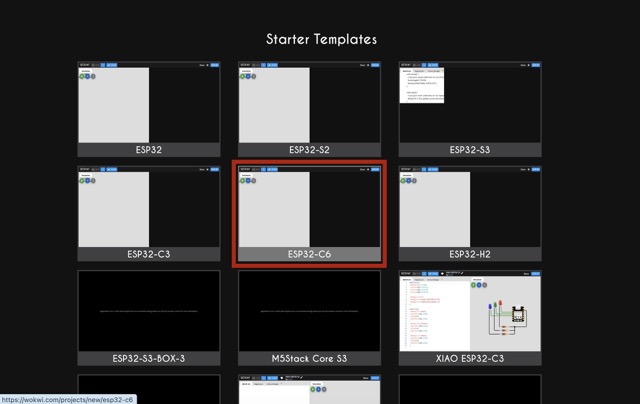
SIMULATION PROCESS:
1. I opened Wokwi and selected an ESP32 simulation environment.
2. I specifically chose the XIAO ESP32-C6 because it is the board I will use in my final project.
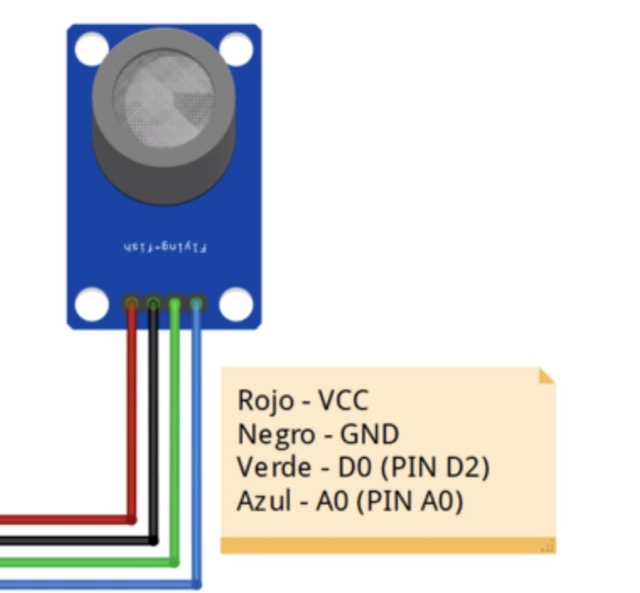
3. I pasted the C code I had developed and added the MQ-135 gas sensor together with two LEDs as outputs.
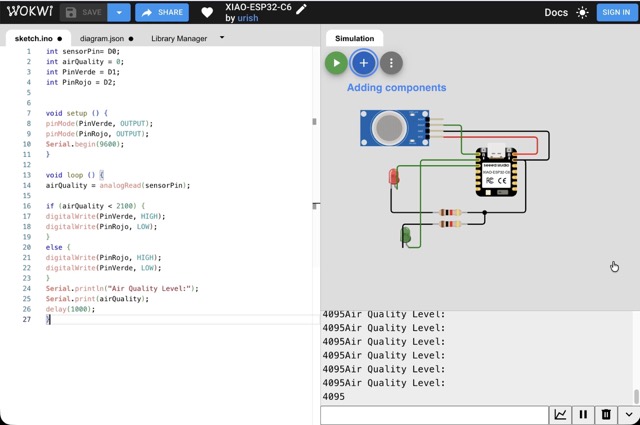
4. I started the simulation to test if the embedded system was functioning correctly.
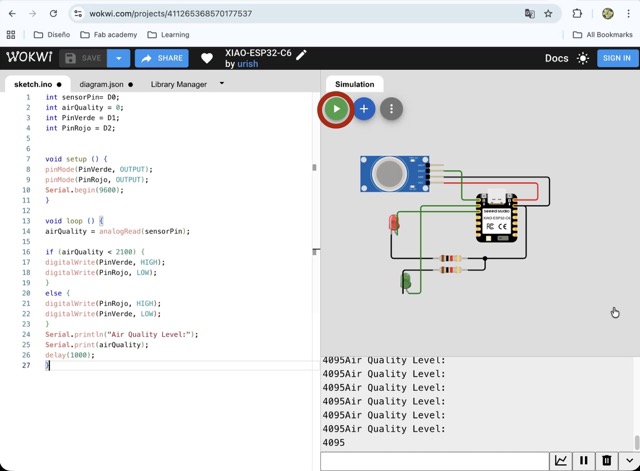
6. I discovered that I had mistakenly connected the sensor to a digital output pin instead of an analog input pin.
Code Explanation:
The program begins by declaring the analog input pin where the gas sensor is connected, as well as two output pins for the green and red LEDs. Inside setup(), the board initializes the LEDs as outputs and starts serial communication at 9600 baud. Then, inside the infinite loop(), the microcontroller continuously reads the air quality value using analogRead(). A conditional statement compares the measured value against a threshold. If the value is below 2100, the green LED turns on, indicating acceptable air. If the value exceeds that level, the red LED turns on, indicating poor air quality. At the same time, the measured sensor value is printed to the Serial Monitor every second.
SOURCE CODE:
int sensorPin = A0;
int airQuality = 0;
int PinVerde = A1;
int PinRojo = A2;

void setup() {
  pinMode(PinVerde, OUTPUT);
  pinMode(PinRojo, OUTPUT);
  Serial.begin(9600);
}

void loop() {
  airQuality = analogRead(sensorPin);

  if (airQuality < 2100) {
    digitalWrite(PinVerde, HIGH);
    digitalWrite(PinRojo, LOW);
  }
  else {
    digitalWrite(PinRojo, HIGH);
    digitalWrite(PinVerde, LOW);
  }

  Serial.println("Air Quality Level:");
  Serial.print(airQuality);

  delay(1000);
}
Final Result
This week was one of the most challenging but also one of the most transformative for me because I started with absolutely no knowledge of embedded programming and ended with a functional sensor that communicates through the microcontroller. More than just writing code, I learned how to approach programming as a logical construction process. I also discovered that with the right learning methodology, AI can become a very powerful educational tool rather than just a shortcut generator.
Problems encountered:
My biggest difficulty was the complete lack of previous knowledge in both electronics and C programming, which made the first part of the week feel overwhelming. Later, during simulation, I also encountered a hardware debugging issue because I accidentally connected the gas sensor to the wrong type of pin, causing the readings to fail.
How I solved them:
I solved the learning barrier by designing an AI-guided gamified course that forced me to actively write and understand every programming concept step by step. For the simulation issue, I carefully checked the logic of the wiring against the code and identified that the sensor had to be connected to an analog input instead of a digital output. Once corrected, the embedded system worked properly.
Final Reflection:
This week proved that embedded programming, while technically demanding, follows a very logical and approachable structure. Understanding the relationship between hardware pins, code logic, and serial communication gave me a solid foundation for the rest of the Fab Academy journey.