
INTERFACE AND APPLICATION PROGRAMMING
Individual assignments
- Write an application that interfaces a user with an input &/or output device that you made
This week consisted of programming application interfaces that allow giving a more visual aspect to instructions, commands or data projection that can be observed in real time. For this week, I used Qt Designer, Visual Studio Code and Python.
What is Interface and Application Programming?
Interface and Application Programming refers to the development of programs (applications) that allow a user to interact with an electronic device, generally through a visual or graphical interface. This interface can display data in real time (such as sensors) and send commands (such as activating or stopping a motor).
Steps to create the interface
In my case, I decided to create an interface related to my project. The main idea is to create an interface that shows in real time the speed of the car, the distance traveled, the distance between objects and buttons that allow stopping and activating the robot. To create this interface I followed these steps:
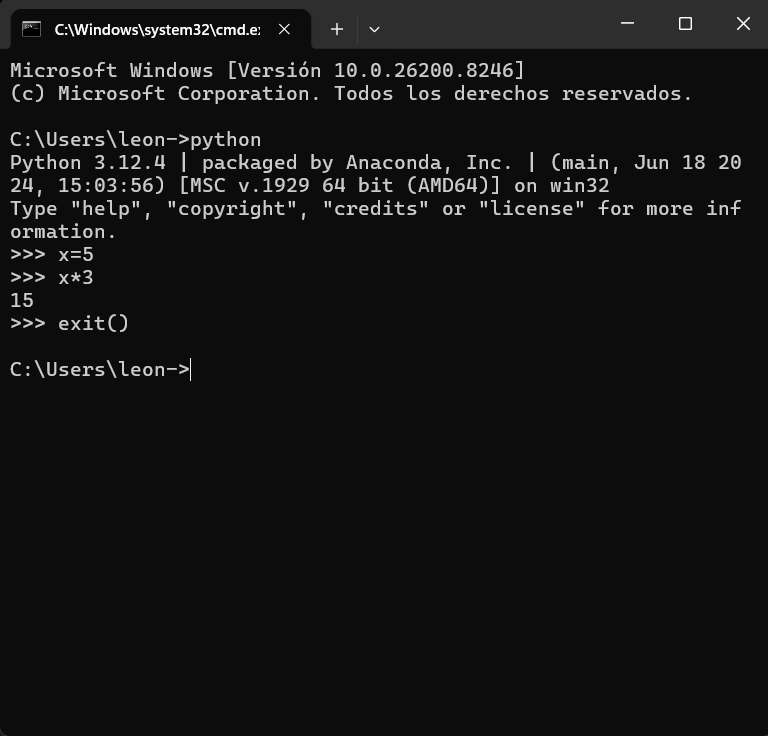
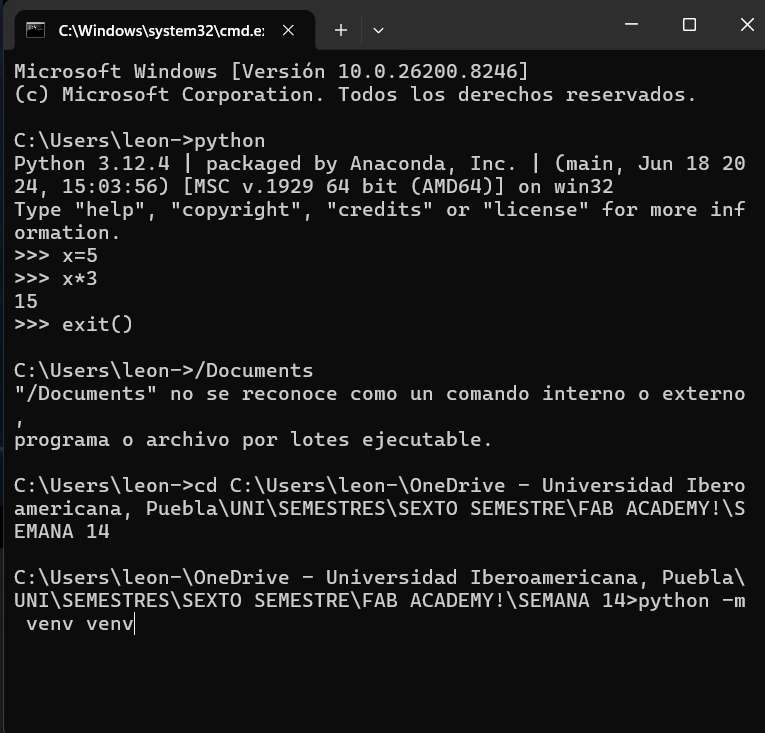
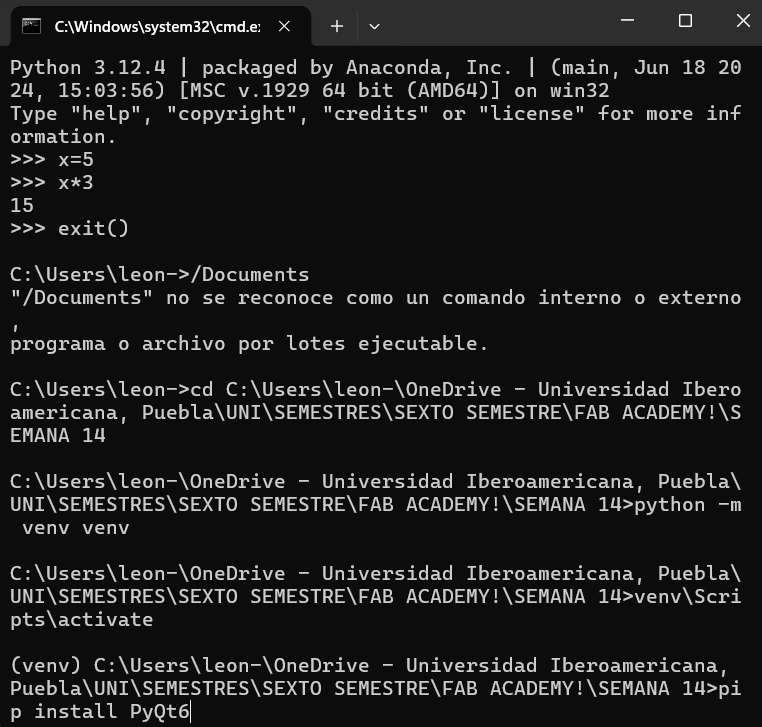
- First, open the computer terminal. First, enter the command python. This way, it was verified that the program is installed. In this case I did a simple multiplication and then exited the program with
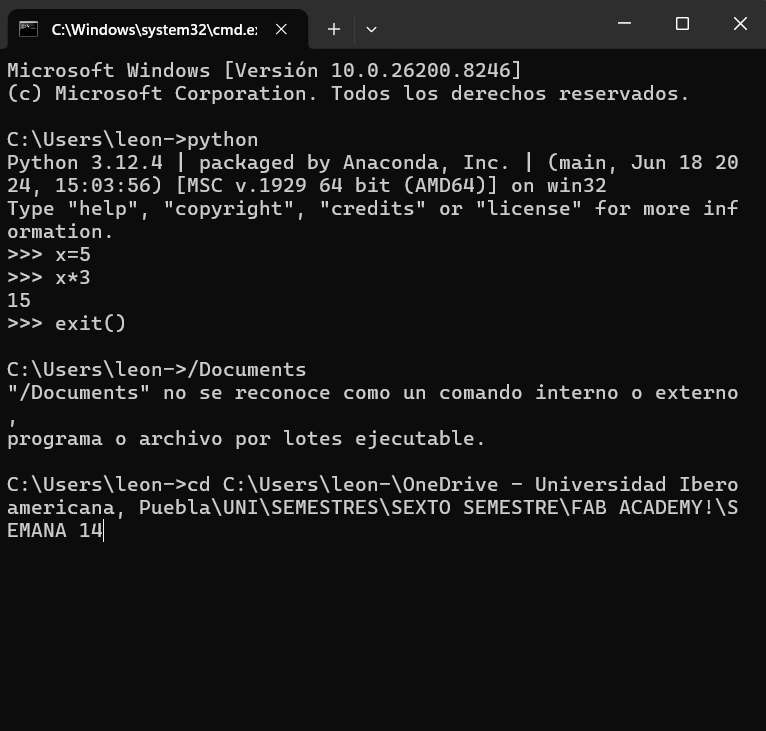
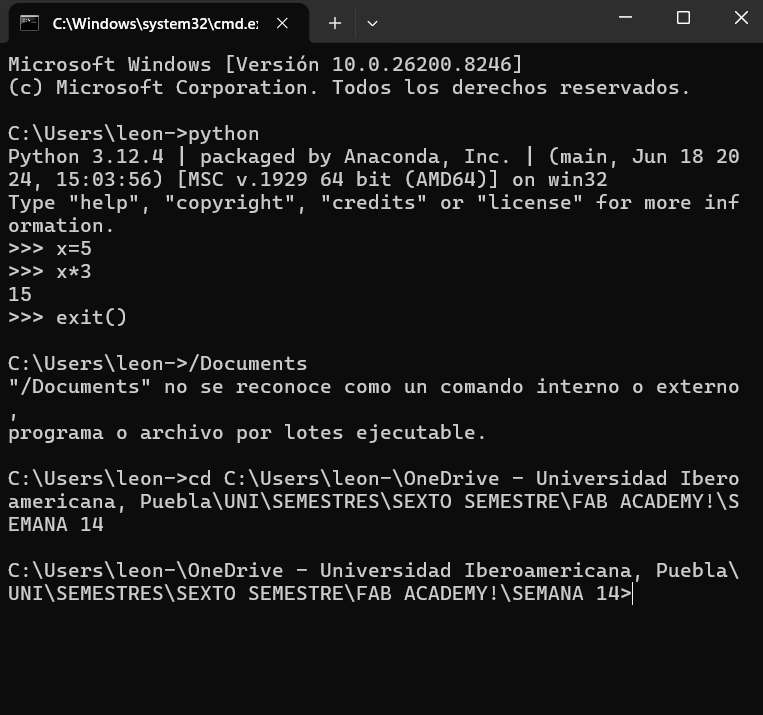
exit(). Note: It is important to know that these instructions are for Windows programs. - Then I created a new folder where I would create the main files for my program. After that, in the computer terminal I looked for this folder by typing cd and the path address of the program.
- Once done, the message appears indicating that the desired folder has been reached.
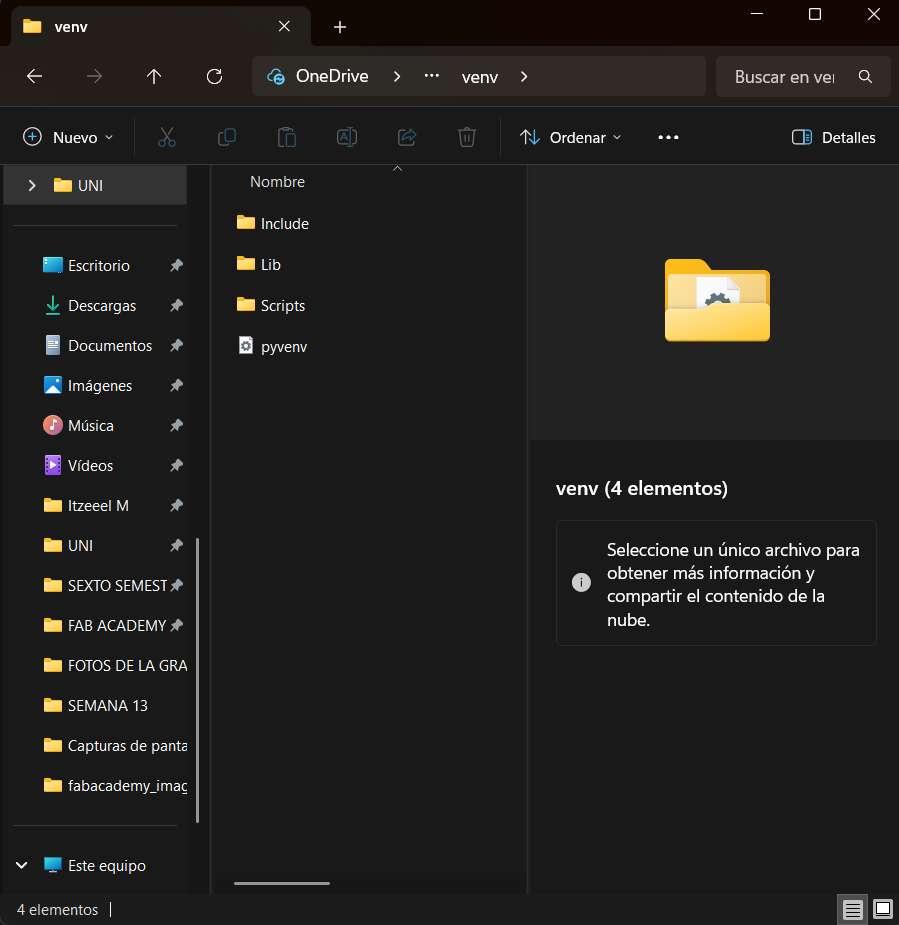
- After that, an isolated Python environment was created with the command
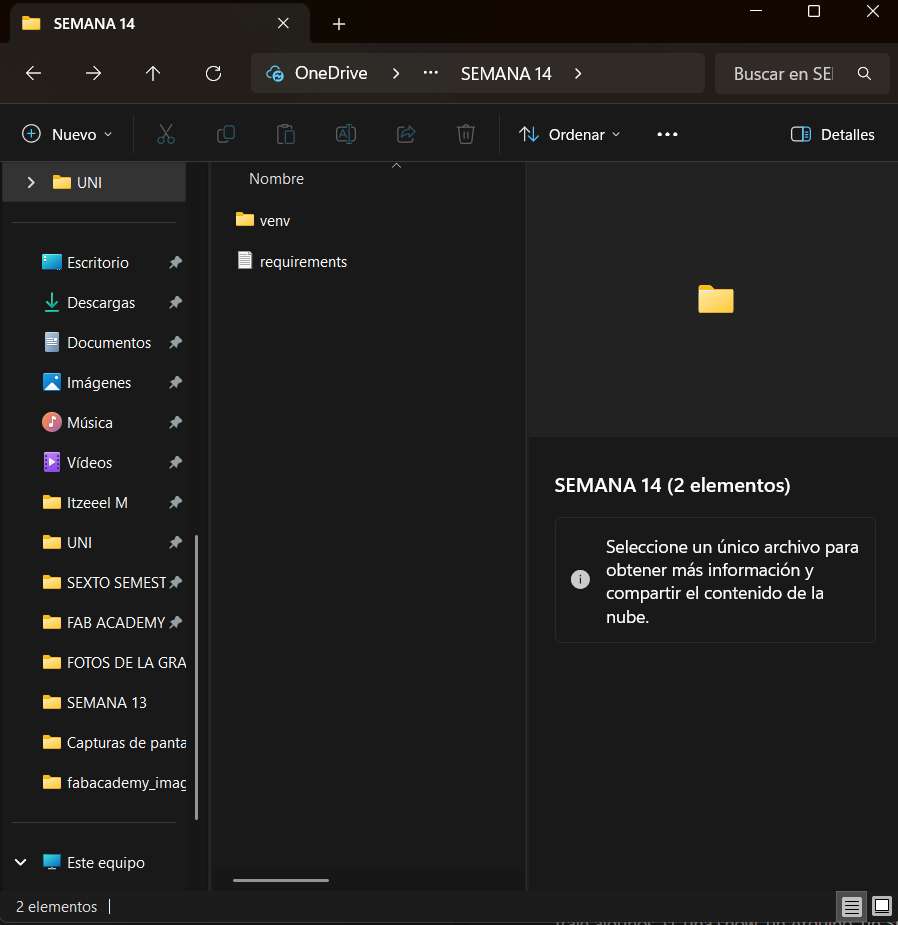
python -m venv venv. This way, a new folder named venv is created inside the created folder. Note: The interface file is placed next to this folder, not inside it. It is important not to modify or move it. If no message appears, everything was done correctly. - The venv folder will have the following files/folders: include, Lib, Scripts, pyvenv. It is important not to move them.
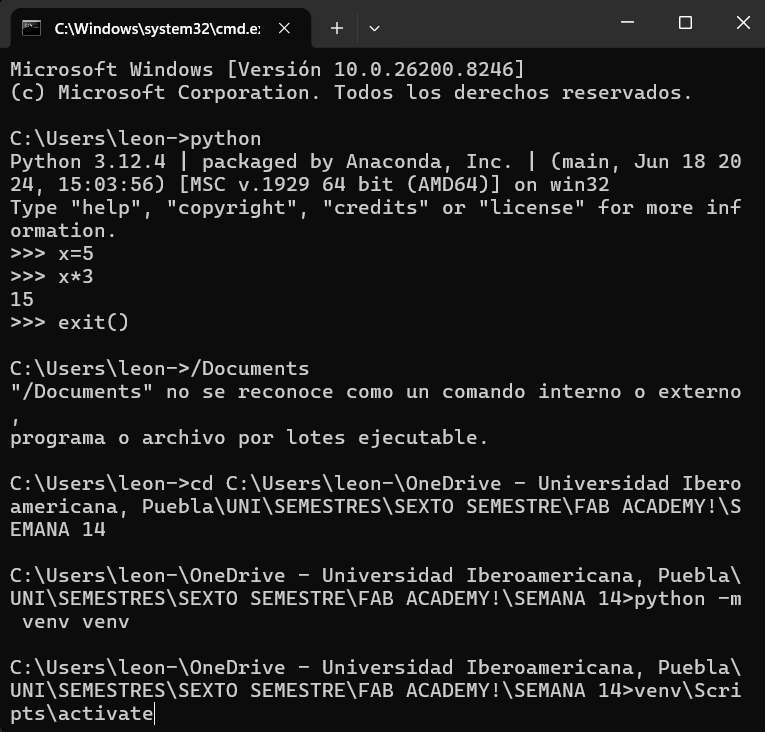
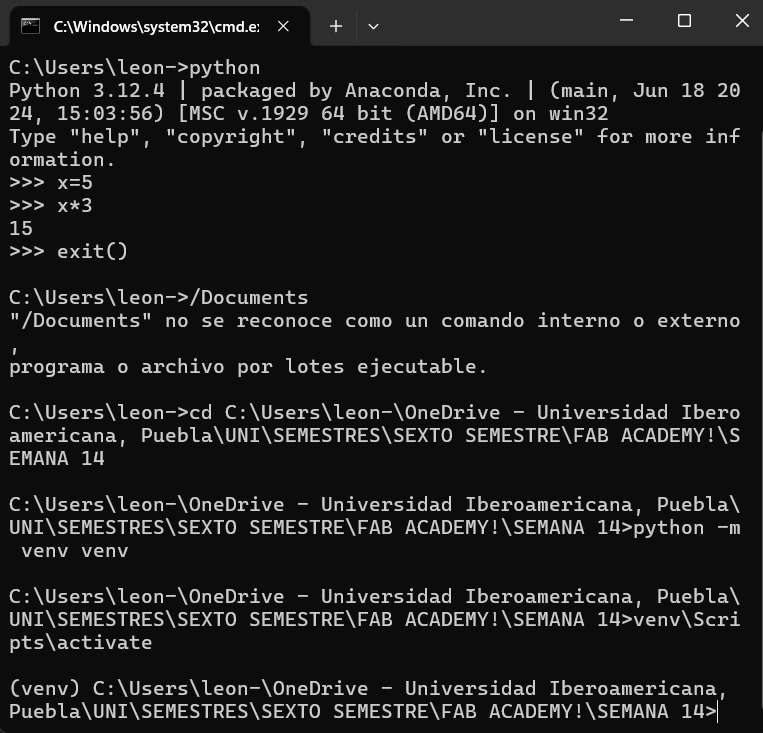
- Then, this folder must be activated with the command
venv\Scripts\activate. - To verify that the folder was activated, (venv) must appear at the beginning.
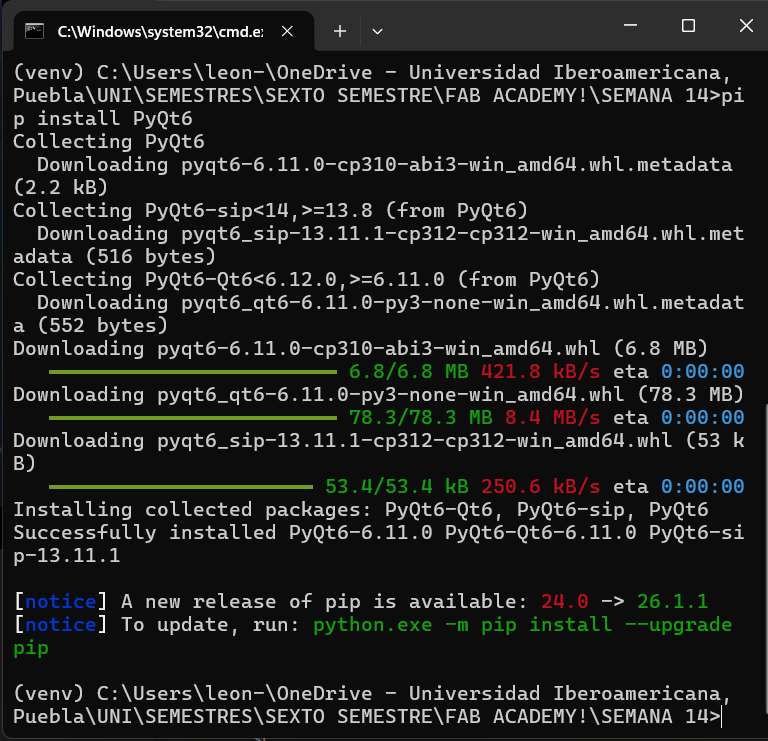
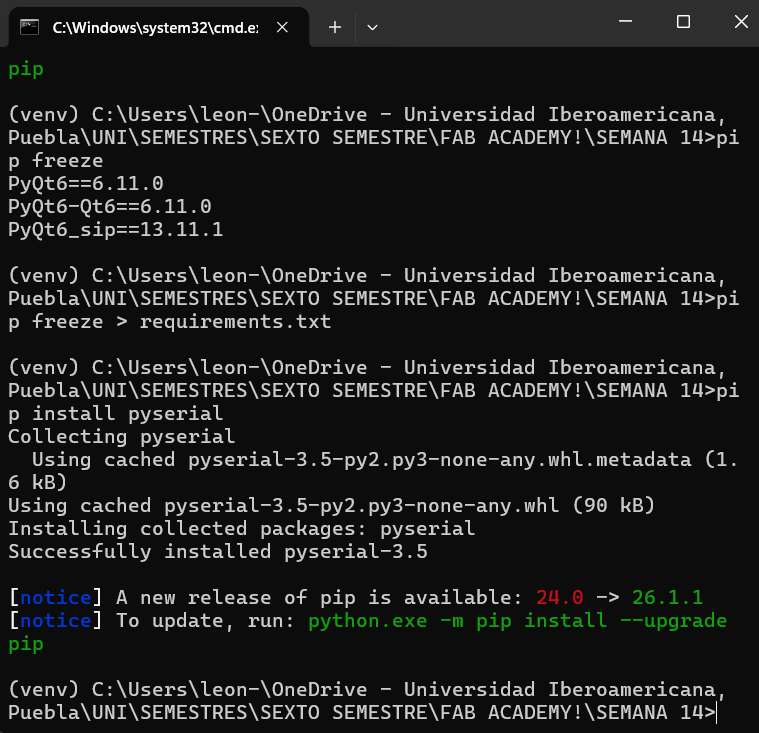
- To install necessary libraries, enter the command
pip install PyQt6. - This way, packages are installed correctly.
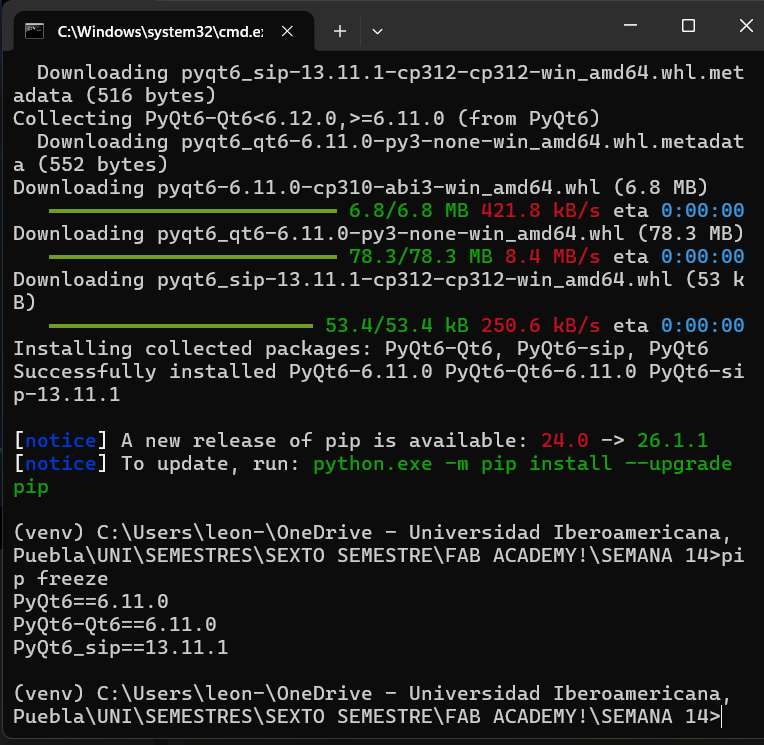
- To check if they were installed, you can also enter the command
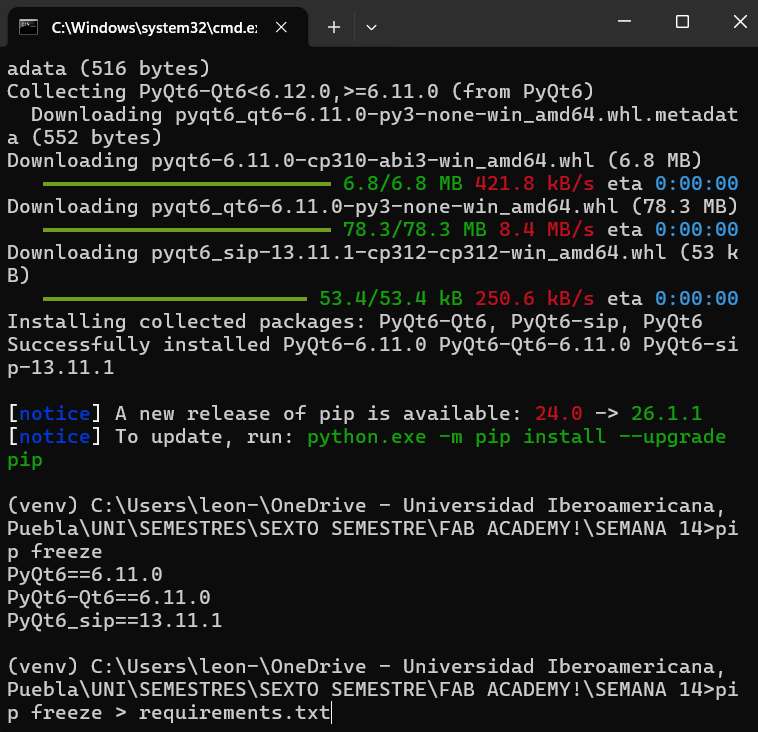
pip freeze. This shows the packages that are installed. - To have them installed automatically on other users, use the command
pip freeze > requirements.txt. Notes: No command should appear. - You can verify that the file where these packages appear has been created in the folder.
- To make the connection between Python and the program in the folder, use the command
pip install pyserial. - In the terminal, enter the command
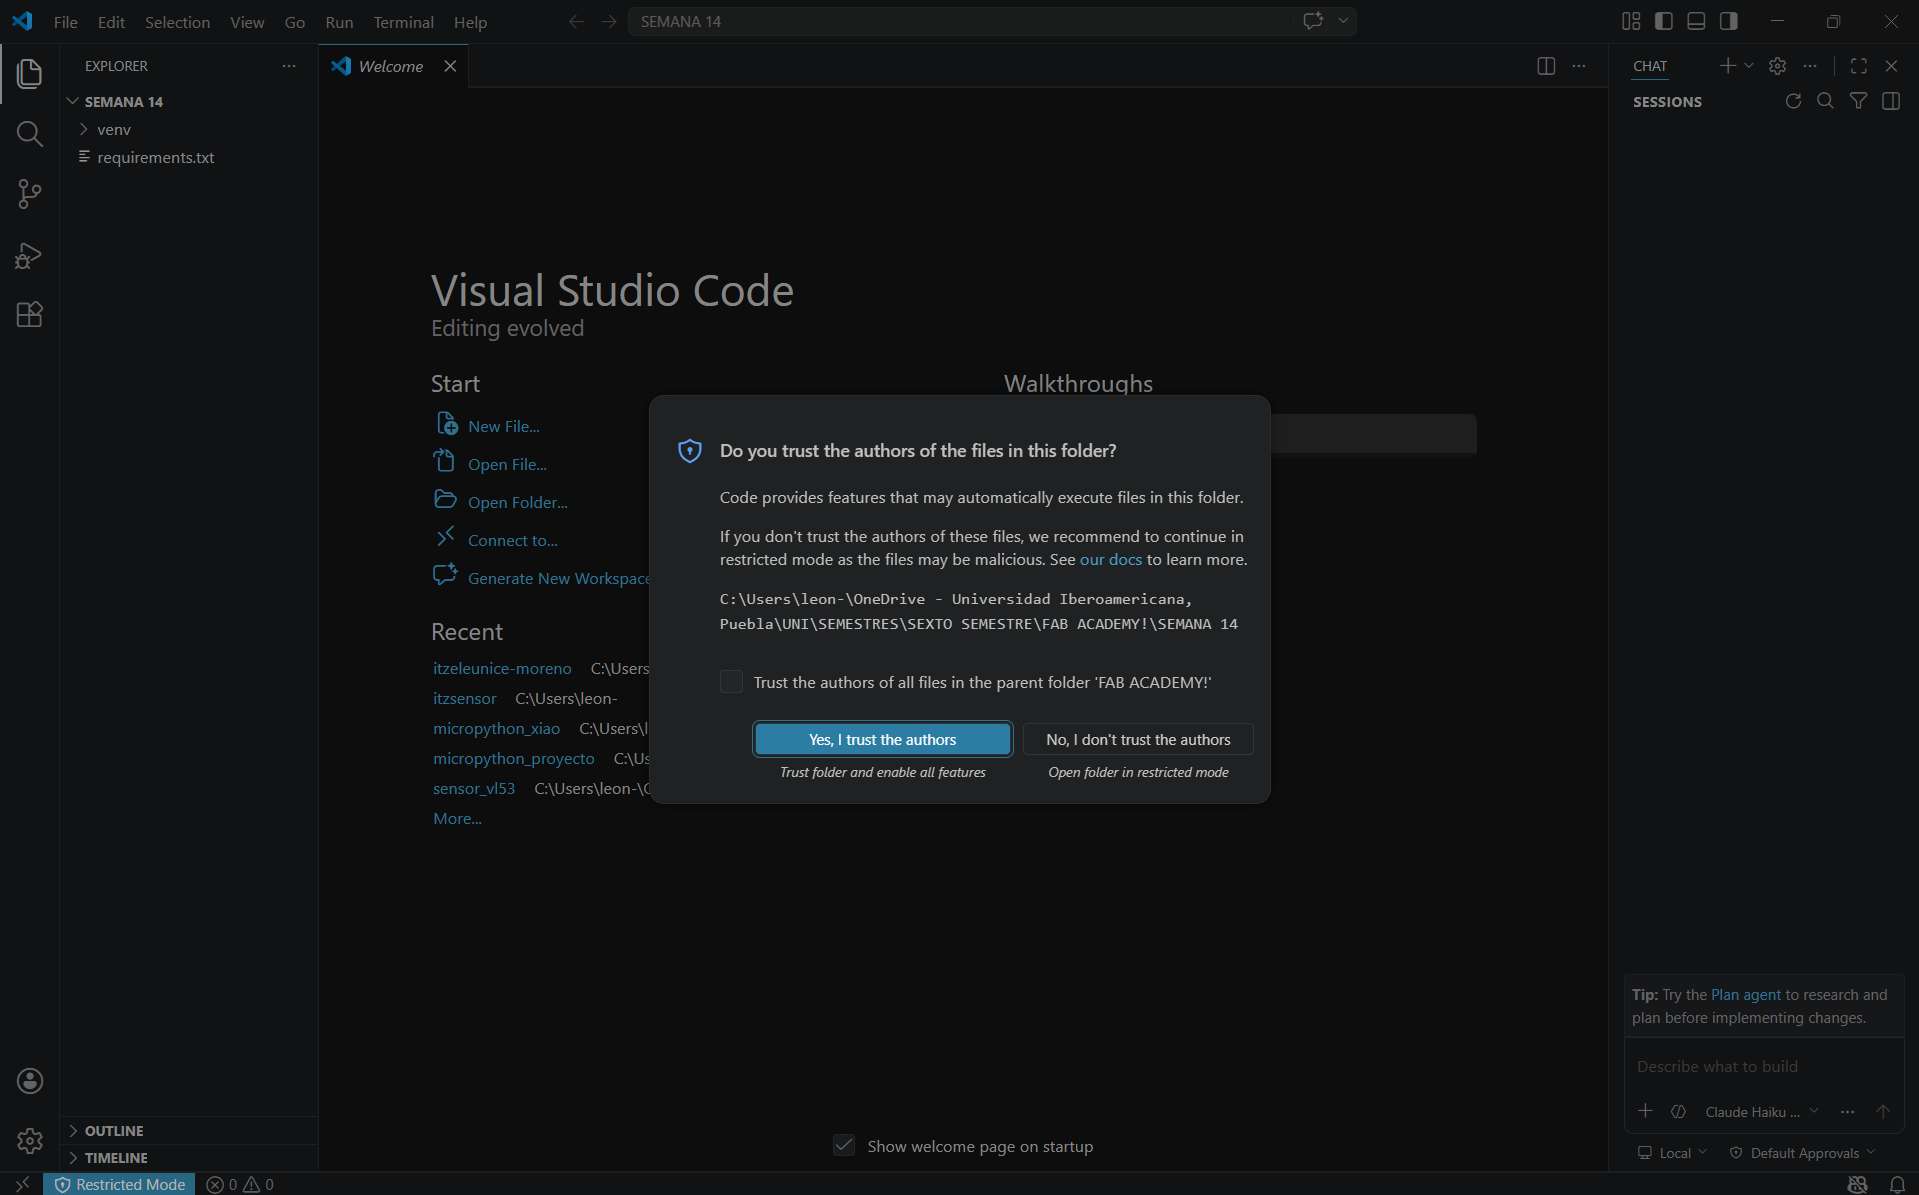
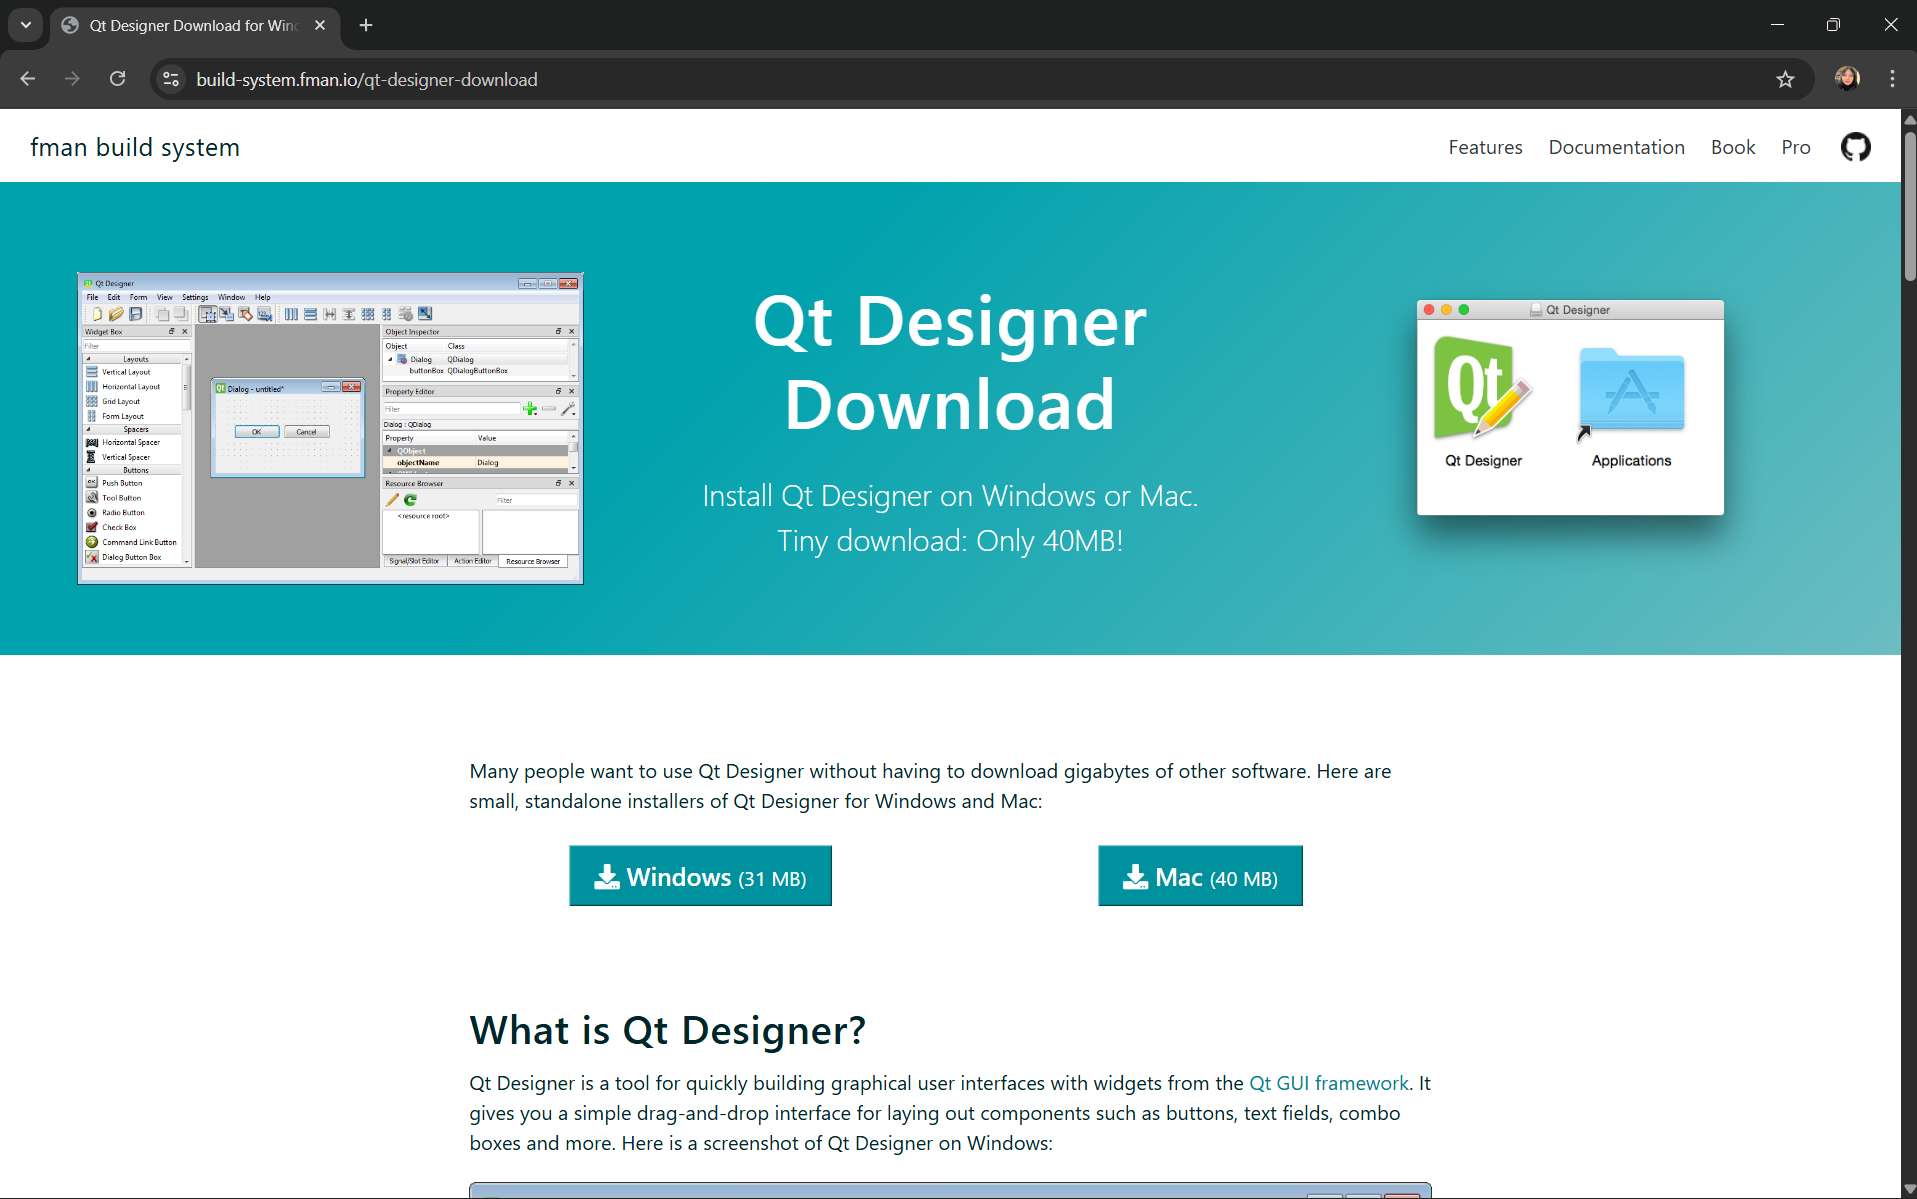
code .and this opens the Visual Studio Code program. - Then download Qt Designer click here. In my case I selected Windows.
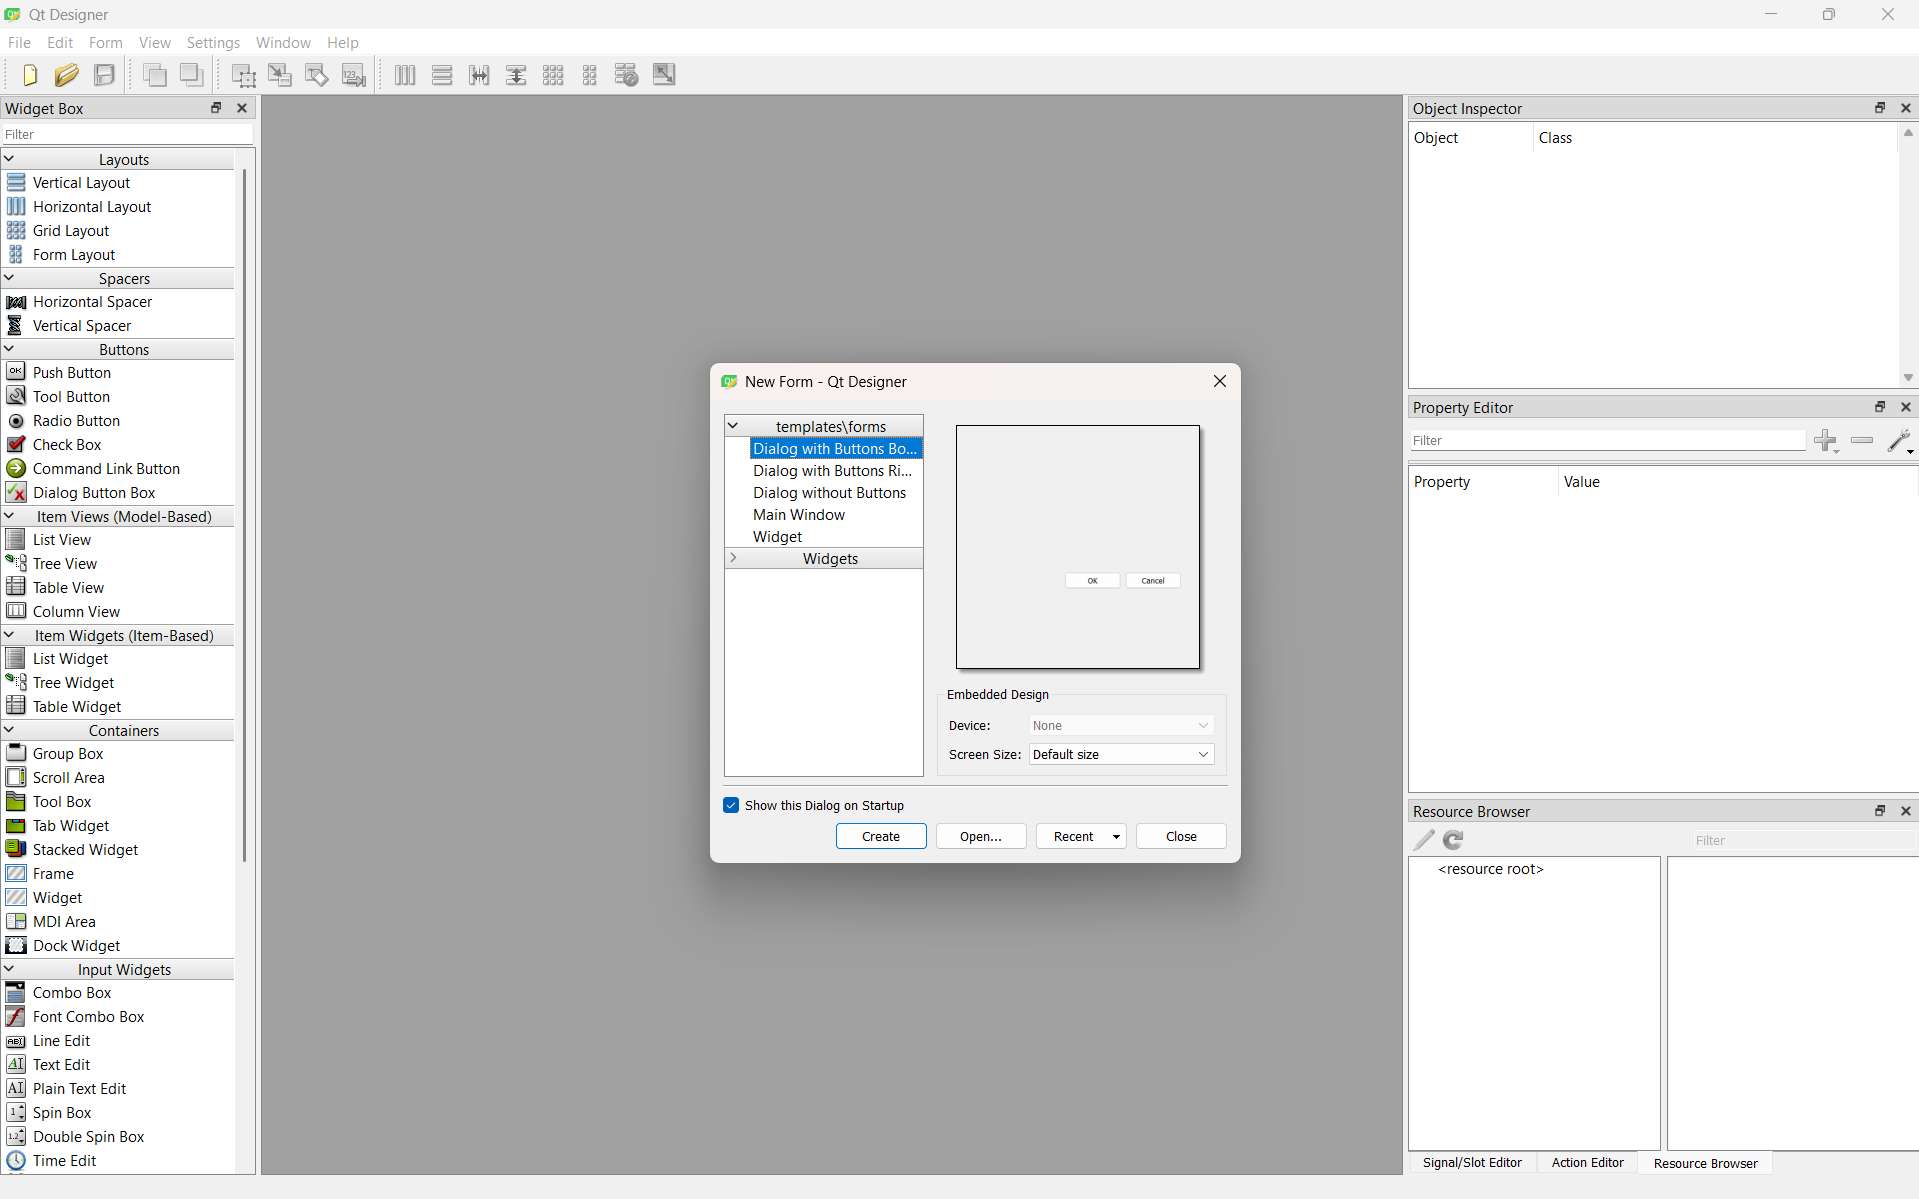
- Open the program and the following parts are shown.
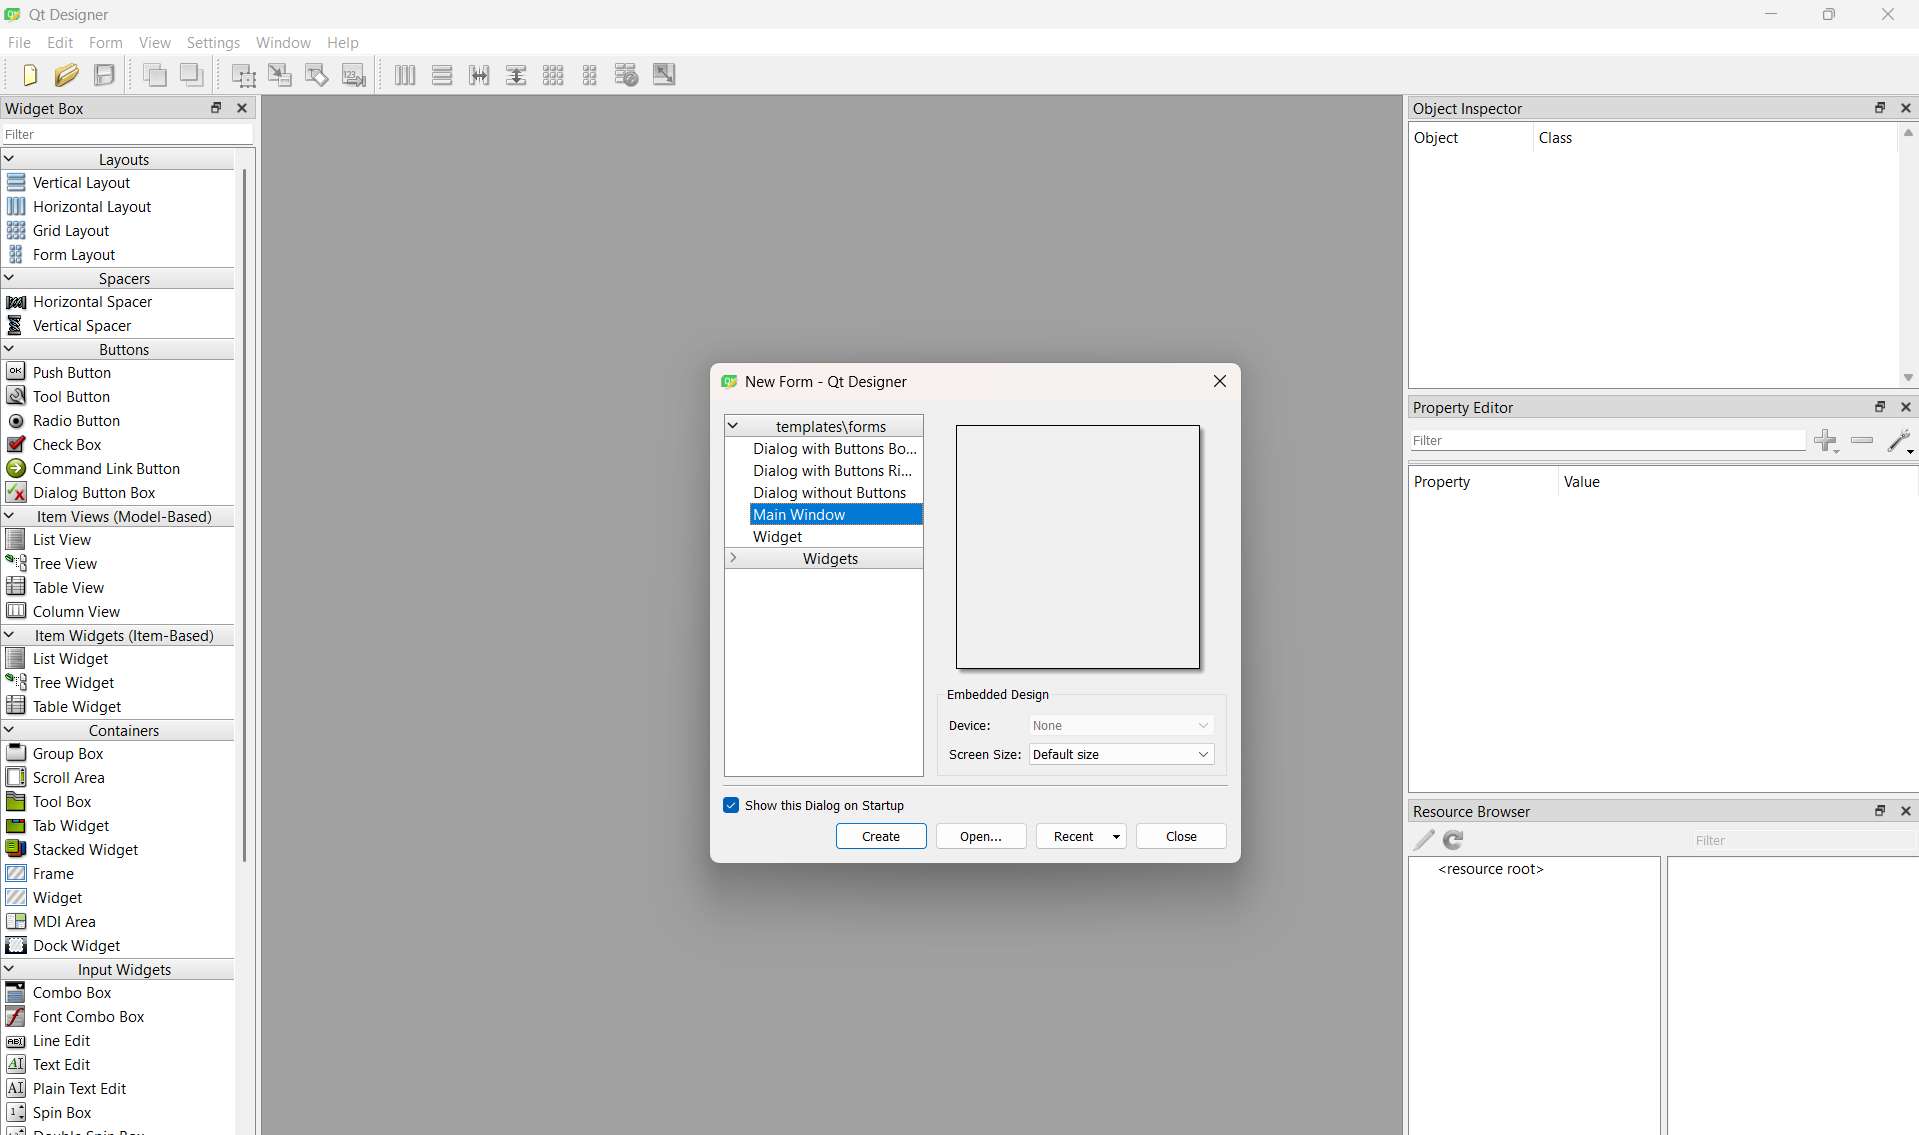
- To start, select Main Window and Create.
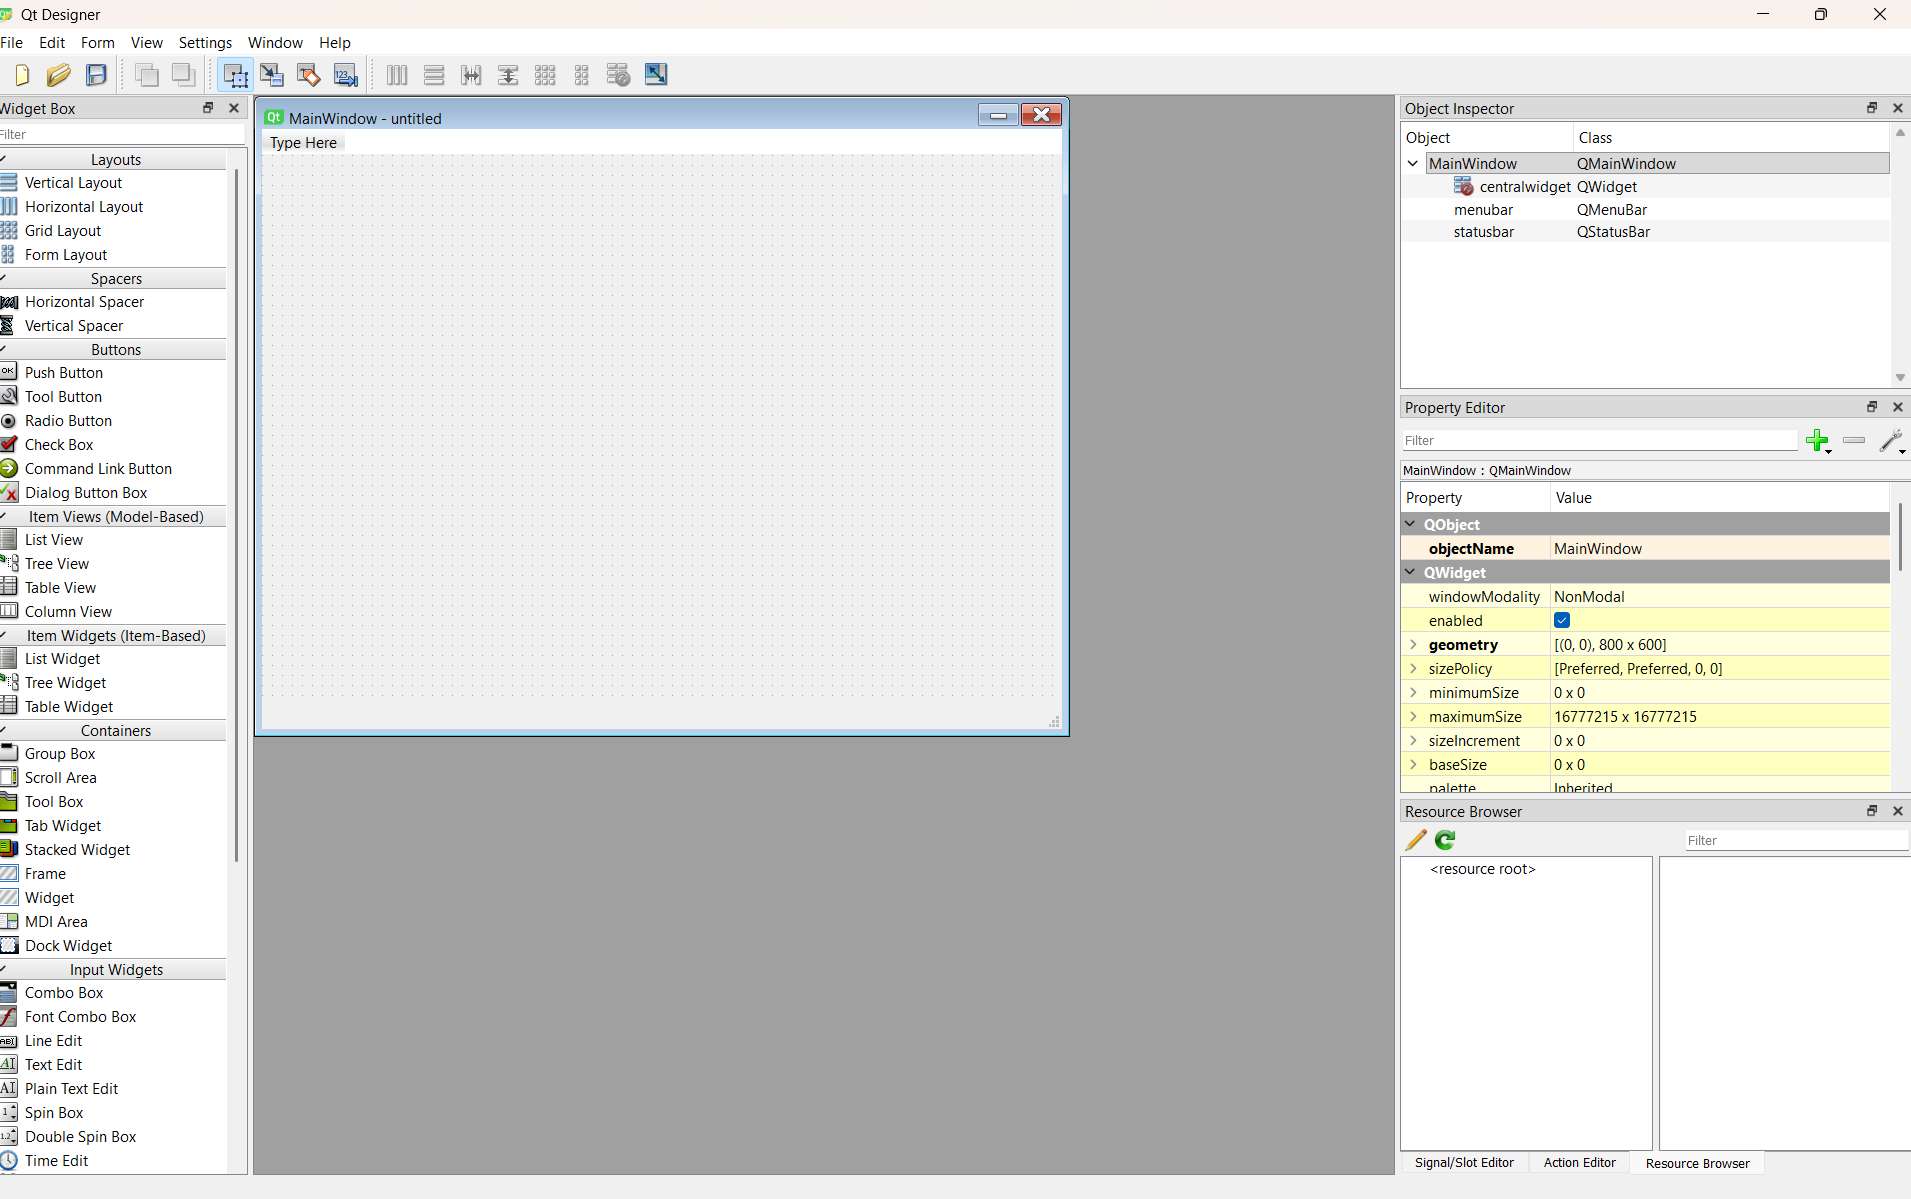
- This way a window opens where you can start designing the interface. On the left side you can find the different tools and commands that can be used to design this window.
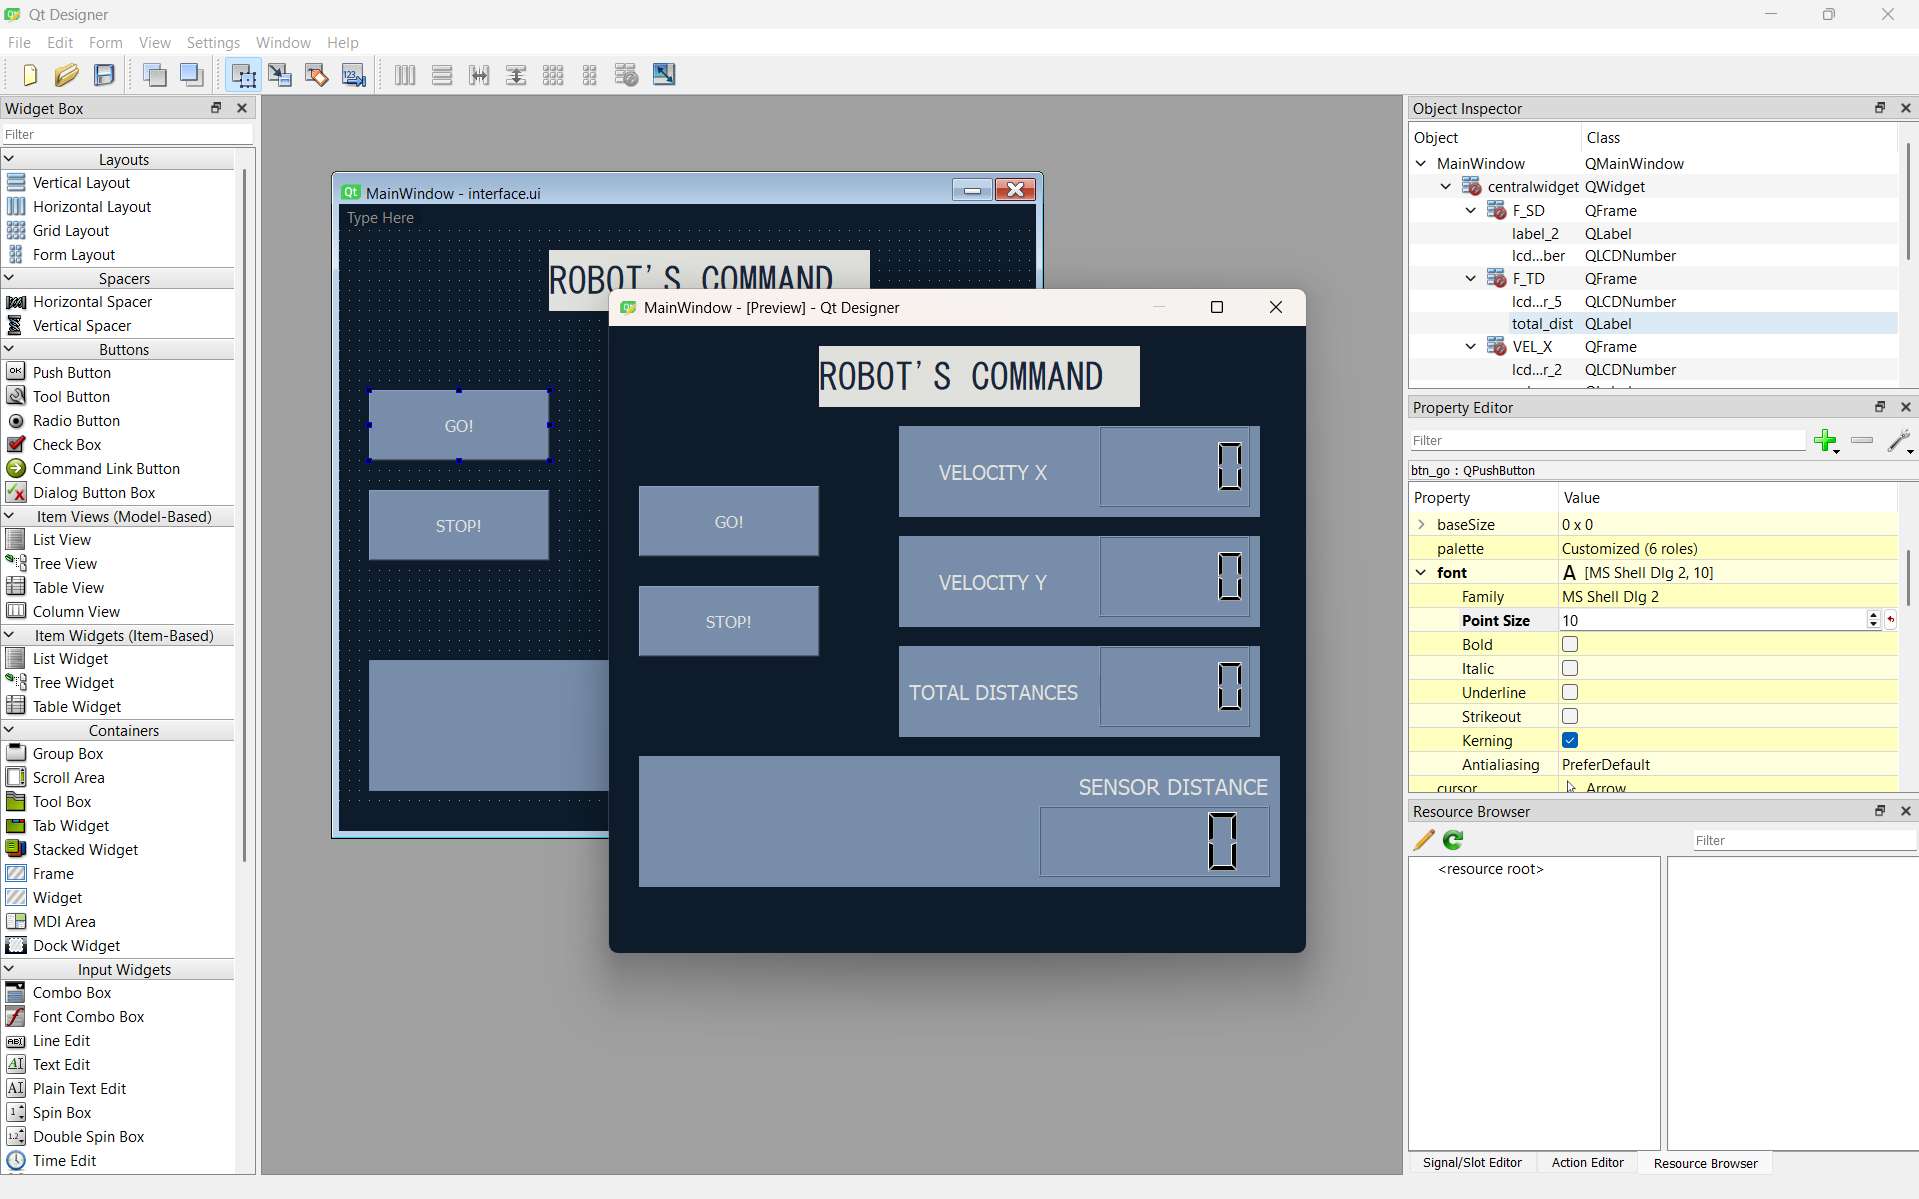
- In my case I started experimenting with these tools until I created a design related to my project. Once the program is saved with Ctrl+S, these changes can be seen in Visual Studio Code in the Interface.ui file.
- Finally, I finished the final design of the interface.
- This is the final result.
- Subsequently, in order for the code to have a better structure, two more files were created. The first one was called
frontend.py, this is a Python code that will contain the code of what is designed in Qt Designer. Meanwhile, the second code corresponds tobackend.py, where the logic that will be followed is written. The first format can be seen as a kind of code where the visual part is modified, while in the backend the instructions of what will be done are placed. - To create the first space (frontend), the code
pyuic6 -x interface.ui -o frontend.pyis used. In this way, it is generated from the Qt Designer file that is in the folder. - When I tried to create the file, I could not do it because the folder I used was created in OneDrive from my account, so I was not technically the owner. Therefore, I made a folder in user.
- The
pyuic6instruction did not work because my computer hadpyuic6installed in a different location than the one I was using. - Once this file is made, python
backend.pyis used to run the program from the terminal. To create the backend file, it was made manually from Visual Studio Code. - Thanks to these files, from Qt Designer you can modify the files and, to save these changes, in the terminal you place this code:
python -m PyQt6.uic.pyuic -x interface.ui -o frontend.py. - Finally, due to the interface I made, my objective was to use a VL53L0X sensor to measure distances and reflect these distances in the interface. From this, using a basic code that I had to test my sensor, I applied it to the logic in backend obtaining these codes.
Errors I had
Code fronted.py
# Form implementation generated from reading ui file 'interface.ui'
#
# Created by: PyQt6 UI code generator 6.11.0
#
# WARNING: Any manual changes made to this file will be lost when pyuic6 is
# run again.  Do not edit this file unless you know what you are doing.

from PyQt6 import QtCore, QtGui, QtWidgets

class Ui_MainWindow(object):
    def setupUi(self, MainWindow):
        MainWindow.setObjectName("MainWindow")
        MainWindow.resize(697, 627)
        MainWindow.setStyleSheet("background-color: rgb(13, 27, 42);")
        self.centralwidget = QtWidgets.QWidget(parent=MainWindow)
        self.centralwidget.setObjectName("centralwidget")
        self.titulo = QtWidgets.QLabel(parent=self.centralwidget)
        self.titulo.setGeometry(QtCore.QRect(210, 20, 321, 61))
        font = QtGui.QFont()
        font.setFamily("MS Gothic")
        font.setPointSize(22)
        self.titulo.setFont(font)
        self.titulo.setStyleSheet("background-color: rgb(224, 225, 221);\n"
"color: rgb(27, 38, 59);")
        self.titulo.setObjectName("titulo")
        self.btn_go = QtWidgets.QPushButton(parent=self.centralwidget)
        self.btn_go.setGeometry(QtCore.QRect(30, 160, 181, 71))
        font = QtGui.QFont()
        font.setPointSize(10)
        self.btn_go.setFont(font)
        self.btn_go.setStyleSheet("background-color: rgb(119, 141, 169);\n"
"color: rgb(224, 225, 221);")
        self.btn_go.setObjectName("btn_go")
        self.btn_stop = QtWidgets.QPushButton(parent=self.centralwidget)
        self.btn_stop.setGeometry(QtCore.QRect(30, 260, 181, 71))
        font = QtGui.QFont()
        font.setPointSize(10)
        self.btn_stop.setFont(font)
        self.btn_stop.setStyleSheet("background-color: rgb(119, 141, 169);\n"
"color: rgb(224, 225, 221);")
        self.btn_stop.setObjectName("btn_stop")
        self.F_SD = QtWidgets.QFrame(parent=self.centralwidget)
        self.F_SD.setGeometry(QtCore.QRect(30, 430, 641, 131))
        self.F_SD.setStyleSheet("background-color: rgb(119, 141, 169);")
        self.F_SD.setFrameShape(QtWidgets.QFrame.Shape.StyledPanel)
        self.F_SD.setFrameShadow(QtWidgets.QFrame.Shadow.Raised)
        self.F_SD.setObjectName("F_SD")
        self.lcdNumber = QtWidgets.QLCDNumber(parent=self.F_SD)
        self.lcdNumber.setGeometry(QtCore.QRect(400, 50, 231, 71))
        self.lcdNumber.setObjectName("lcdNumber")
        self.label_2 = QtWidgets.QLabel(parent=self.F_SD)
        self.label_2.setGeometry(QtCore.QRect(440, 20, 191, 21))
        font = QtGui.QFont()
        font.setPointSize(13)
        self.label_2.setFont(font)
        self.label_2.setStyleSheet("color: rgb(224, 225, 221);")
        self.label_2.setObjectName("label_2")
        self.VEL_X = QtWidgets.QFrame(parent=self.centralwidget)
        self.VEL_X.setGeometry(QtCore.QRect(290, 100, 361, 91))
        self.VEL_X.setStyleSheet("background-color: rgb(119, 141, 169);\n"
"border-color: rgb(224, 225, 221);")
        self.VEL_X.setFrameShape(QtWidgets.QFrame.Shape.StyledPanel)
        self.VEL_X.setFrameShadow(QtWidgets.QFrame.Shadow.Raised)
        self.VEL_X.setObjectName("VEL_X")
        self.lcdNumber_2 = QtWidgets.QLCDNumber(parent=self.VEL_X)
        self.lcdNumber_2.setGeometry(QtCore.QRect(200, 0, 151, 81))
        self.lcdNumber_2.setObjectName("lcdNumber_2")
        self.vel_x = QtWidgets.QLabel(parent=self.VEL_X)
        self.vel_x.setGeometry(QtCore.QRect(40, 30, 121, 31))
        font = QtGui.QFont()
        font.setPointSize(12)
        self.vel_x.setFont(font)
        self.vel_x.setStyleSheet("color: rgb(224, 225, 221);")
        self.vel_x.setObjectName("vel_x")
        self.VEL_Y = QtWidgets.QFrame(parent=self.centralwidget)
        self.VEL_Y.setGeometry(QtCore.QRect(290, 210, 361, 91))
        self.VEL_Y.setStyleSheet("background-color: rgb(119, 141, 169);")
        self.VEL_Y.setFrameShape(QtWidgets.QFrame.Shape.StyledPanel)
        self.VEL_Y.setFrameShadow(QtWidgets.QFrame.Shadow.Raised)
        self.VEL_Y.setObjectName("VEL_Y")
        self.lcdNumber_4 = QtWidgets.QLCDNumber(parent=self.VEL_Y)
        self.lcdNumber_4.setGeometry(QtCore.QRect(200, 0, 151, 81))
        self.lcdNumber_4.setObjectName("lcdNumber_4")
        self.vel_y = QtWidgets.QLabel(parent=self.VEL_Y)
        self.vel_y.setGeometry(QtCore.QRect(40, 30, 121, 31))
        font = QtGui.QFont()
        font.setPointSize(12)
        self.vel_y.setFont(font)
        self.vel_y.setStyleSheet("color: rgb(224, 225, 221);")
        self.vel_y.setObjectName("vel_y")
        self.F_TD = QtWidgets.QFrame(parent=self.centralwidget)
        self.F_TD.setGeometry(QtCore.QRect(290, 320, 361, 91))
        self.F_TD.setStyleSheet("background-color: rgb(119, 141, 169);")
        self.F_TD.setFrameShape(QtWidgets.QFrame.Shape.StyledPanel)
        self.F_TD.setFrameShadow(QtWidgets.QFrame.Shadow.Raised)
        self.F_TD.setObjectName("F_TD")
        self.lcdNumber_5 = QtWidgets.QLCDNumber(parent=self.F_TD)
        self.lcdNumber_5.setGeometry(QtCore.QRect(200, 0, 151, 81))
        self.lcdNumber_5.setObjectName("lcdNumber_5")
        self.total_dist = QtWidgets.QLabel(parent=self.F_TD)
        self.total_dist.setGeometry(QtCore.QRect(10, 30, 191, 31))
        font = QtGui.QFont()
        font.setPointSize(12)
        self.total_dist.setFont(font)
        self.total_dist.setStyleSheet("color: rgb(224, 225, 221);")
        self.total_dist.setObjectName("total_dist")
        MainWindow.setCentralWidget(self.centralwidget)
        self.menubar = QtWidgets.QMenuBar(parent=MainWindow)
        self.menubar.setGeometry(QtCore.QRect(0, 0, 697, 26))
        self.menubar.setObjectName("menubar")
        MainWindow.setMenuBar(self.menubar)
        self.statusbar = QtWidgets.QStatusBar(parent=MainWindow)
        self.statusbar.setObjectName("statusbar")
        MainWindow.setStatusBar(self.statusbar)

        self.retranslateUi(MainWindow)
        QtCore.QMetaObject.connectSlotsByName(MainWindow)

    def retranslateUi(self, MainWindow):
        _translate = QtCore.QCoreApplication.translate
        MainWindow.setWindowTitle(_translate("MainWindow", "MainWindow"))
        self.titulo.setText(_translate("MainWindow", "ROBOT'S COMMAND"))
        self.btn_go.setText(_translate("MainWindow", "GO!"))
        self.btn_stop.setText(_translate("MainWindow", "STOP!"))
        self.label_2.setText(_translate("MainWindow", "SENSOR DISTANCE"))
        self.vel_x.setText(_translate("MainWindow", "VELOCITY X"))
        self.vel_y.setText(_translate("MainWindow", "VELOCITY Y"))
        self.total_dist.setText(_translate("MainWindow", "TOTAL DISTANCES"))

if __name__ == "__main__":
    import sys
    app = QtWidgets.QApplication(sys.argv)
    MainWindow = QtWidgets.QMainWindow()
    ui = Ui_MainWindow()
    ui.setupUi(MainWindow)
    MainWindow.show()
    sys.exit(app.exec())
Code backend.py
from frontend import *
import serial
from PyQt6.QtCore import QTimer

class MainWindow(QtWidgets.QMainWindow, Ui_MainWindow):
    def __init__(self, *args, **kwargs):
        QtWidgets.QMainWindow.__init__(self, *args, **kwargs)
        self.setupUi(self)

        self.serial = None

        self.timer = QTimer()
        self.timer.timeout.connect(self.leer_sensor)

        self.btn_go.clicked.connect(self.go)
        self.btn_stop.clicked.connect(self.stop)

    def go(self):
        try:
            self.serial = serial.Serial('COM4', 115200, timeout=1)
            self.timer.start(100)
            print("Connected to ESP32!")
        except serial.SerialException as e:
            print(f"Serial Error: {e}")
        self.lcdNumber_2.display(10)
        self.lcdNumber_4.display(5)
        self.lcdNumber_5.display(0)

    def leer_sensor(self):
        try:
            if self.serial.in_waiting > 0:
                linea = self.serial.readline().decode('utf-8').strip()
                if linea.isdigit():
                    distancia = int(linea)
                    self.lcdNumber.display(distancia)
                    print(f"Distance: {distancia} mm")
        except Exception as e:
            print(f"Error reading sensor: {e}")

    def stop(self):
        self.timer.stop()
        if self.serial:
            self.serial.close()
            self.serial = None
        self.lcdNumber_2.display(0)
        self.lcdNumber_4.display(0)
        self.lcdNumber_5.display(0)
        self.lcdNumber.display(0)

if __name__ == "__main__":
    app = QtWidgets.QApplication([])
    window = MainWindow()
    window.show()
    app.exec()
Explanation of backend.py code (logic)
| Code | Function |
|---|---|
from frontend import * |
Brings all the visual design made in Qt Designer |
import serial |
Allows communication with the ESP32 board |
from PyQt6.QtCore import QTimer |
Use of a timer that executes something periodically |
class MainWindow(QtWidgets.QMainWindow, Ui_MainWindow): |
Allows combining the Qt Window and the frontend design |
__init__ |
Visualization or first thing that runs when the window is opened |
go() |
Instructions to the code about what should be done |
def leer_sensor(self): |
Function that must be executed to read the sensor |
if __name__ == "__main__": |
Program startup from python backend.py |
To place the port or COM, I identified it through the input devices on my computer. In this way, I obtained the final result:
And this is how it looks like:
Conclusions
The design and programming of web interfaces are important because in this way you can establish visual aids that allow giving future instructions to facilitate the use of devices. In this case, creating an interface that allows me to activate and visualize data collected in real time in a simple way gives me the ability to have greater control over what happens on my robot in an optimal manner.
If you want to access to my work from this week, please click here to download!
Finally, for the group assignment for this week, you can find the information here