Mold Design
Group Assignment
Review the safety data sheets for each of the molding and casting materials, make and compare test casts with each of them, and compare printing vs. milling molds.
Group PageWhat I knew before: The only thing I was already familiar with coming into this week was how to create 3D models. I had never done any kind of hands-on work with wax, and I had never made a mold myself — although I had seen how both processes were done before.
Downloading the Model
I downloaded an STL file from cults3d.com. In my case, I chose a Pokéball themed after the Pokémon character Jigglypuff.

SolidWorks
Step 1 — Import the File
Import the file into SolidWorks, since it comes in STL format. To do this, simply open the STL file directly in SolidWorks.
Step 2 — Convert to a Mesh Solid
Convert the part into a mesh solid. I did this directly using the search option in the upper right corner of the software.
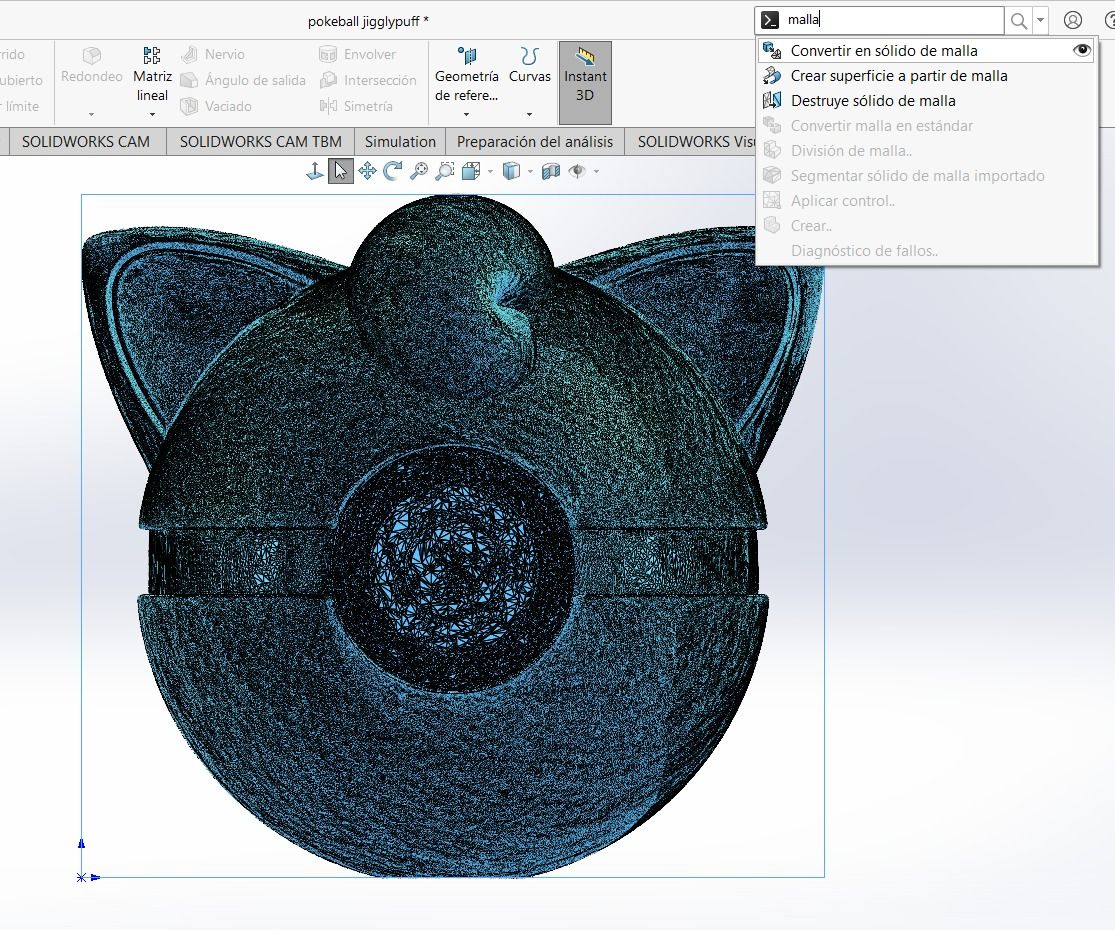
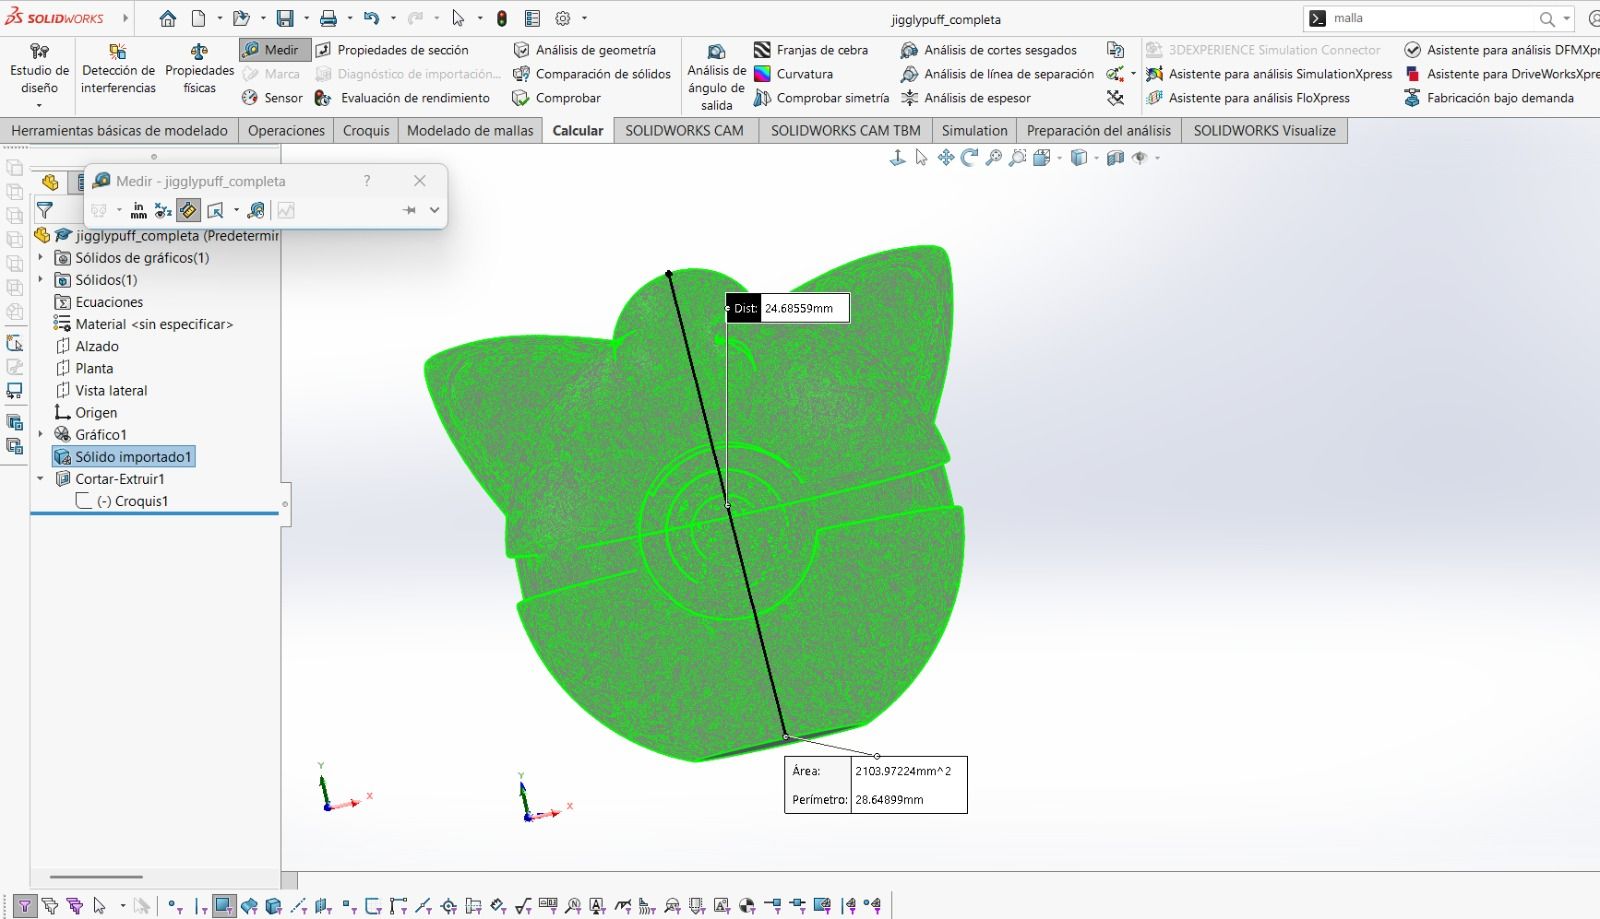
Step 3 — Measure the Part
Measure the part to determine its size using the Measure tool, which is found at:
Calculate tab → Measure tool → Ruler icon
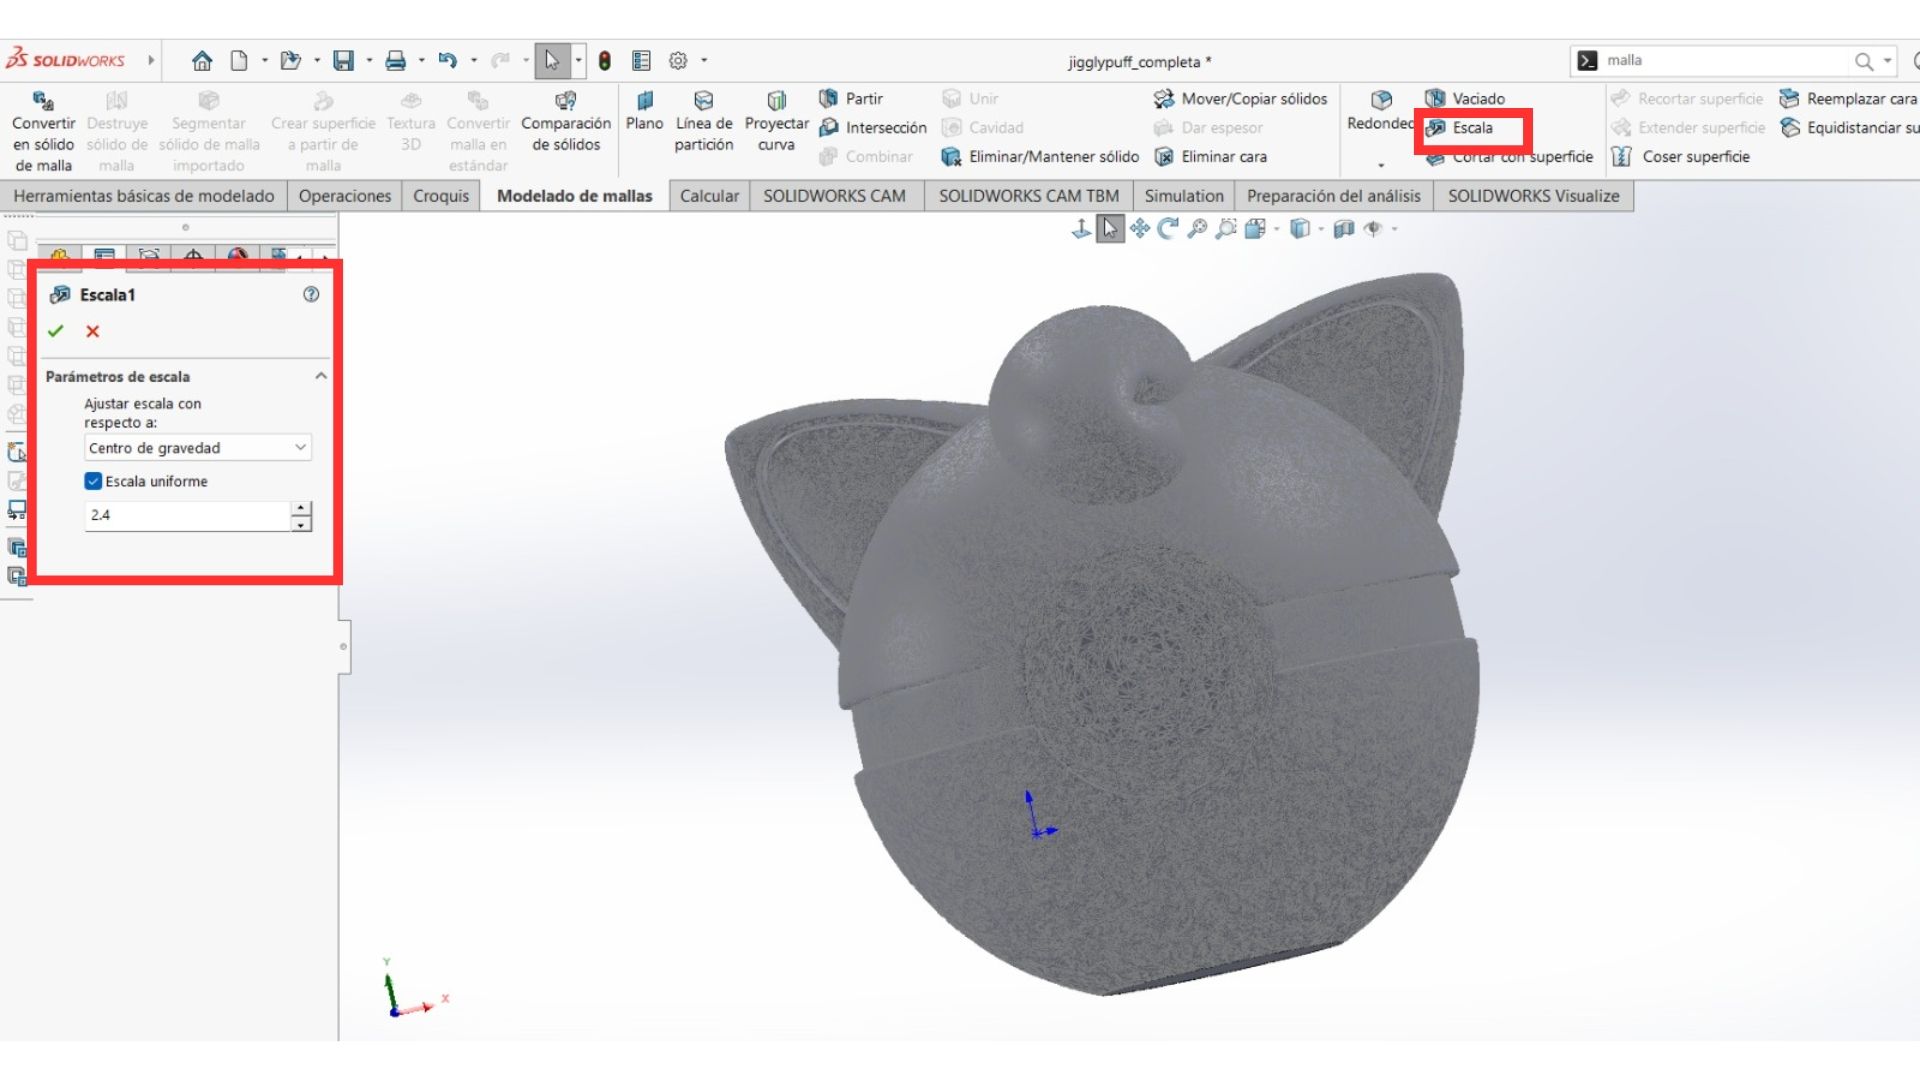
Step 4 — Scale the Model
Select the entire figure and scale the model by a factor of 2.4. Additionally, select the figure and create a point, which will be placed at the center of the figure.
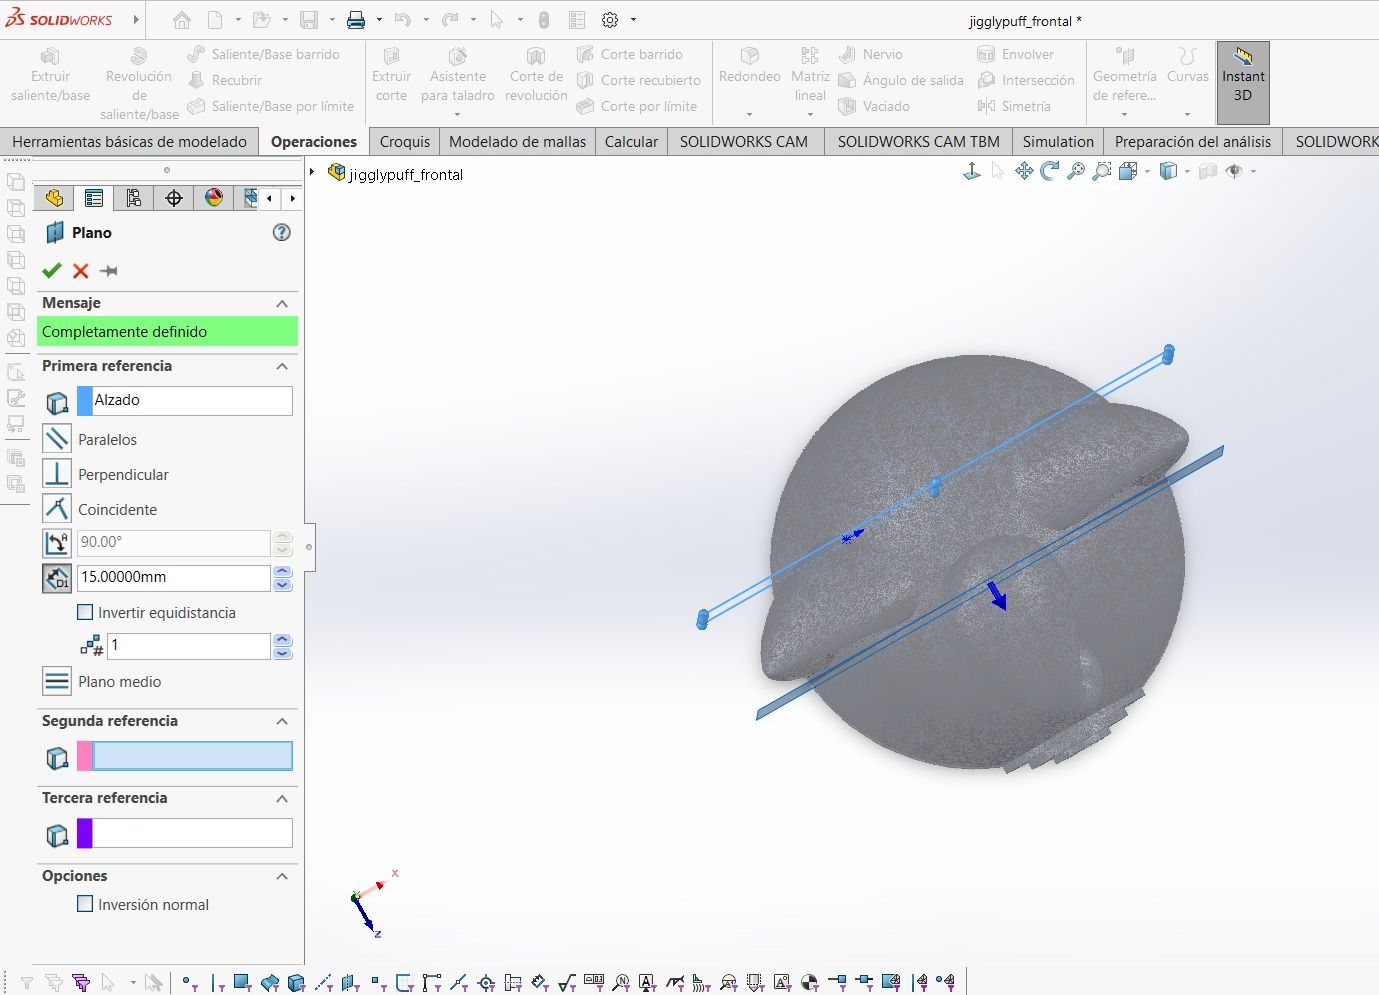
Step 5 — Create the Midplane
Create a plane exactly at the midpoint of the sphere by setting a distance of 15 mm.
Note: Building Both Mold Halves
To build both parts of the mold, the mold solids were constructed directly on top of the mesh solid (i.e., on top of the Pokéball) without deleting the part of the sphere that remained. This approach allowed me to quickly produce the counterpart of the mold by simply reversing the direction of the operations or using the opposite operation (for example, instead of a revolve boss/base to add material, a revolve cut to remove it). Once both mold halves were complete, the excess part could be deleted.
Back Piece of the Jigglypuff Pokéball
Step 6 — Create and Extrude a Rectangle
Create a rectangle that fully covers the part and extrude it.
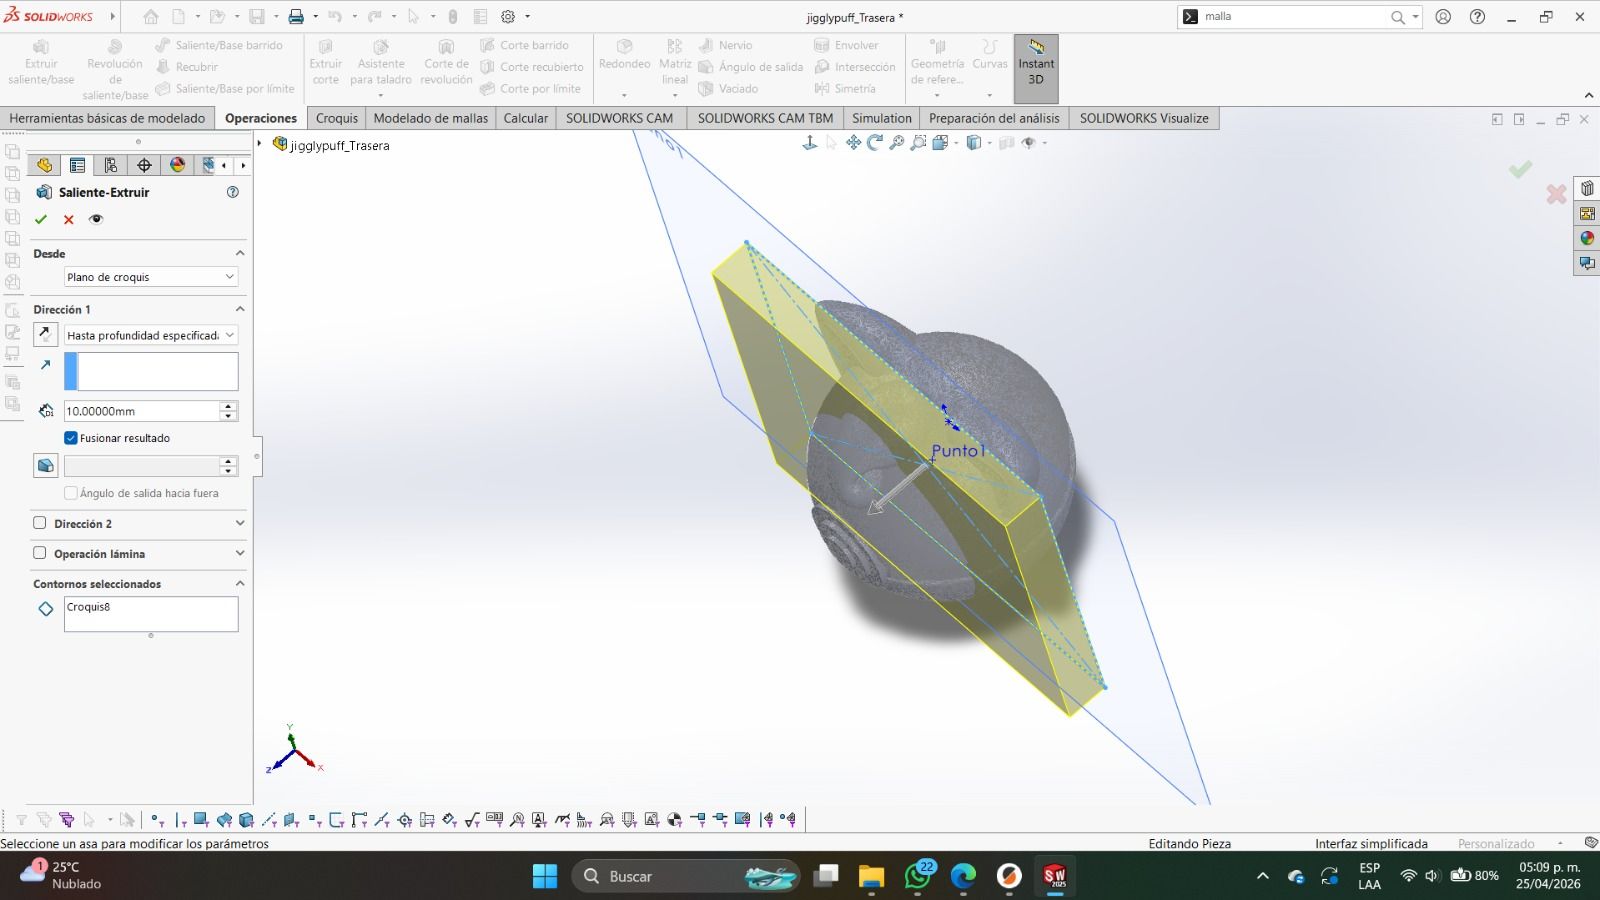
Step 7 — Create the Walls with an Offset
Using the same dimensions as the previous rectangle, create an offset to build the mold walls with a distance of 5 mm outward from the original rectangle.
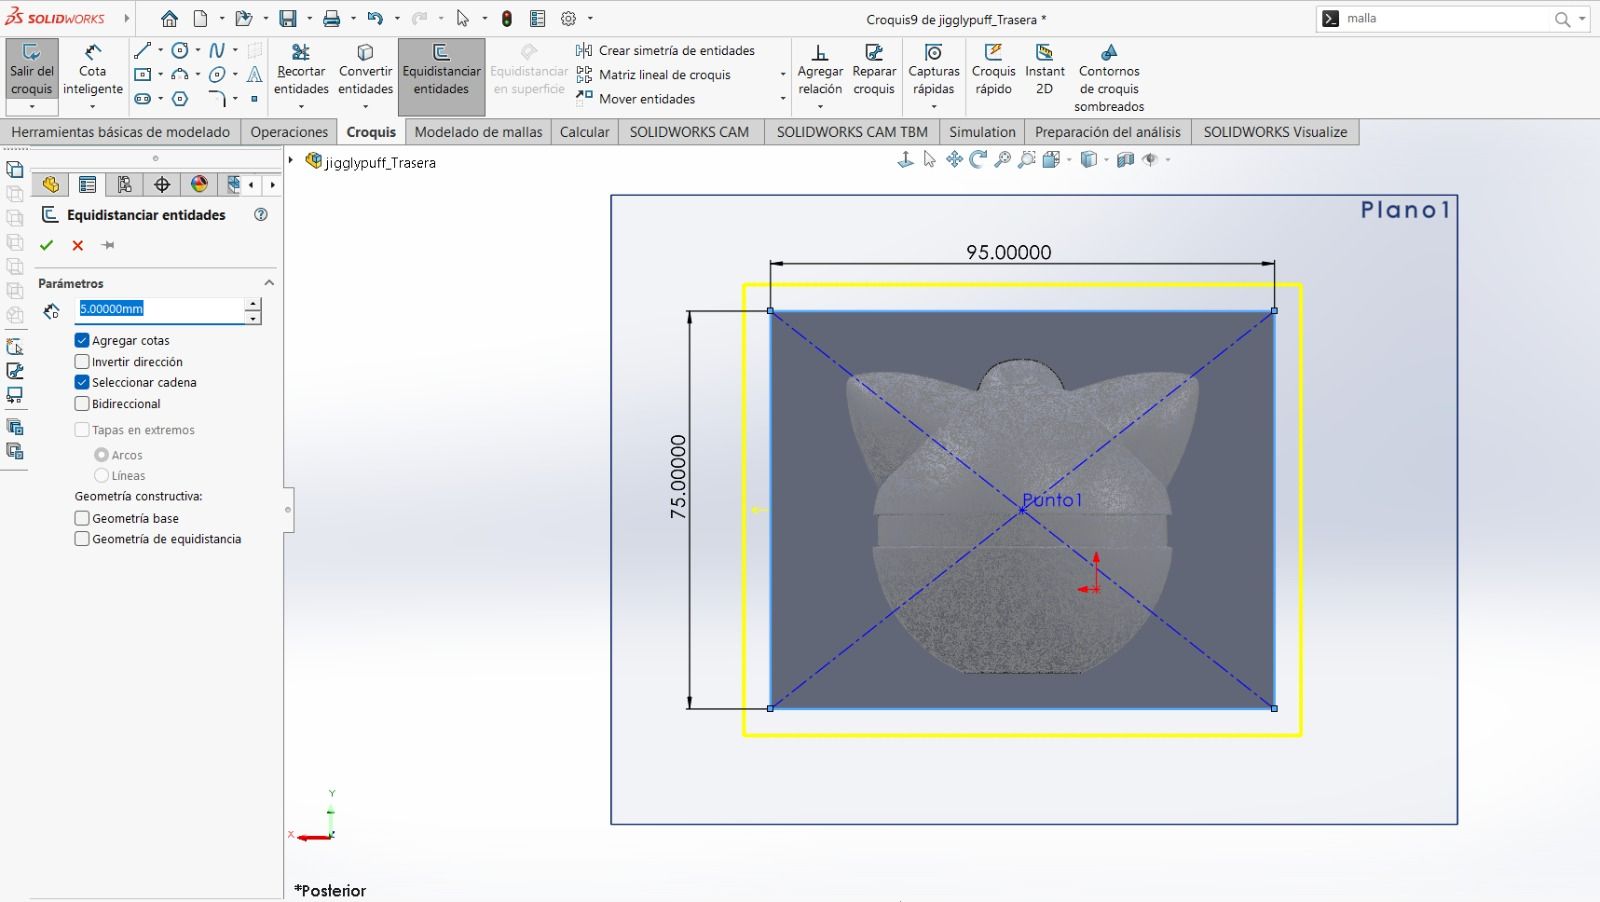
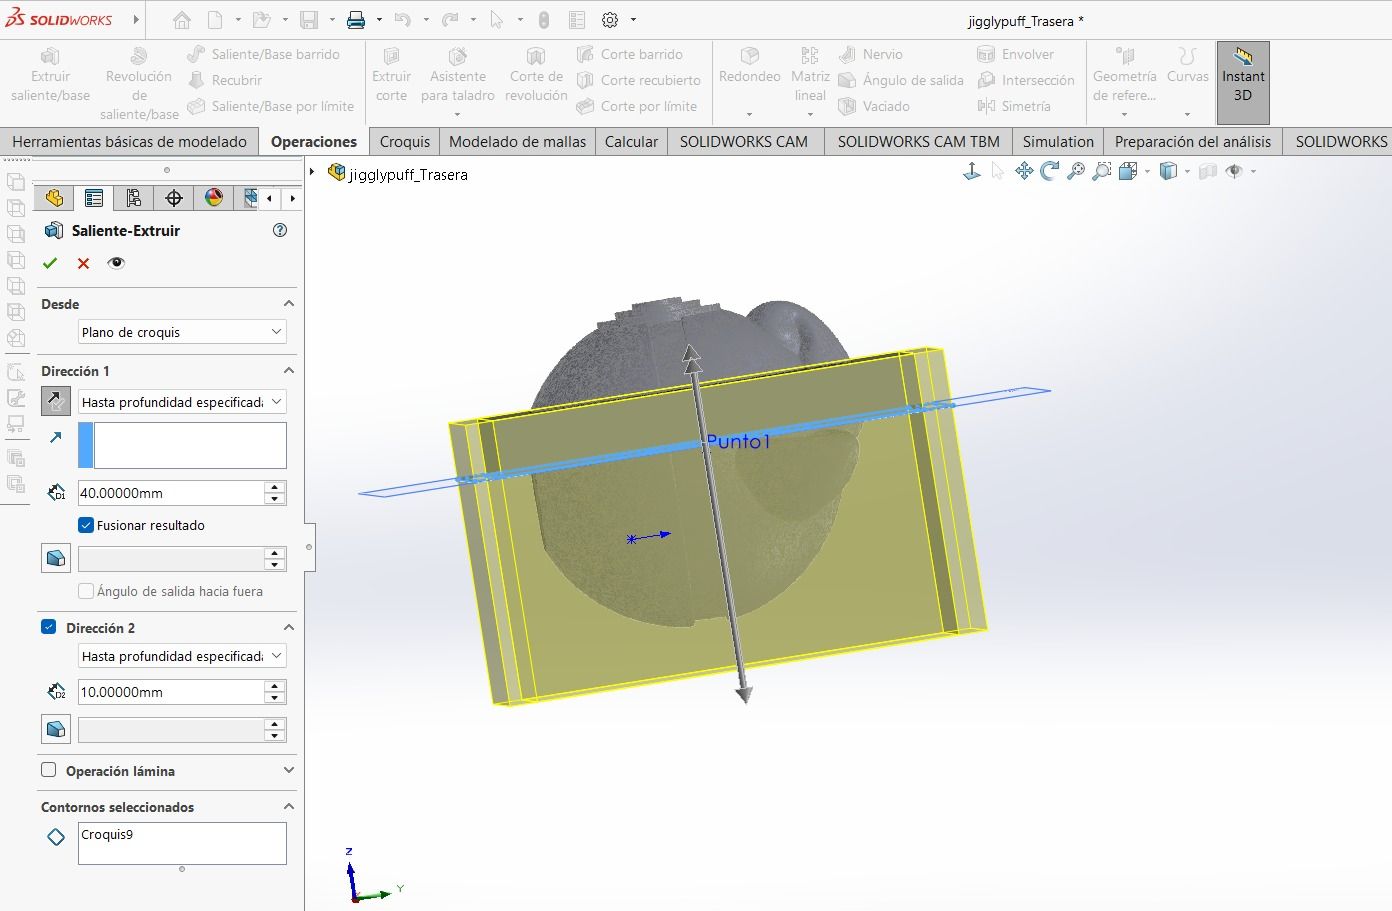
Step 8 — Extrude the Walls
Extrude the walls until they exceed the height of the Pokéball — in my case, 40 mm.
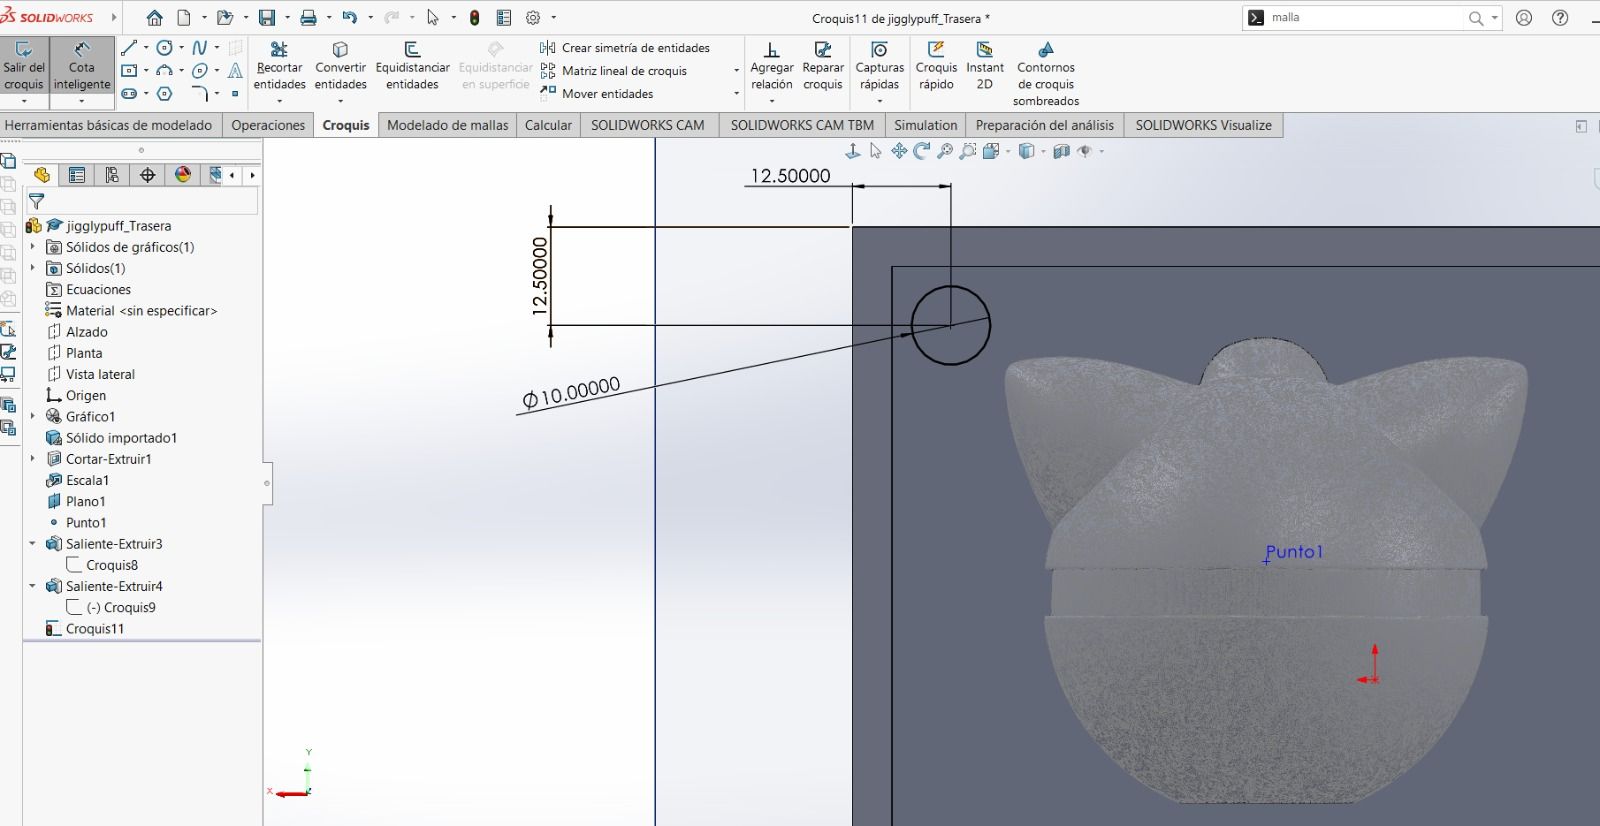
Step 9 — Create the Semicircle
Create the semicircle and dimension it at a specific distance from the mold walls.
Note: This step is important because it ensures that the area that will be revolved does not interfere with the part.
Step 10 — Revolve Cut
Perform the revolve cut. At this point, only one sphere needs to be created.
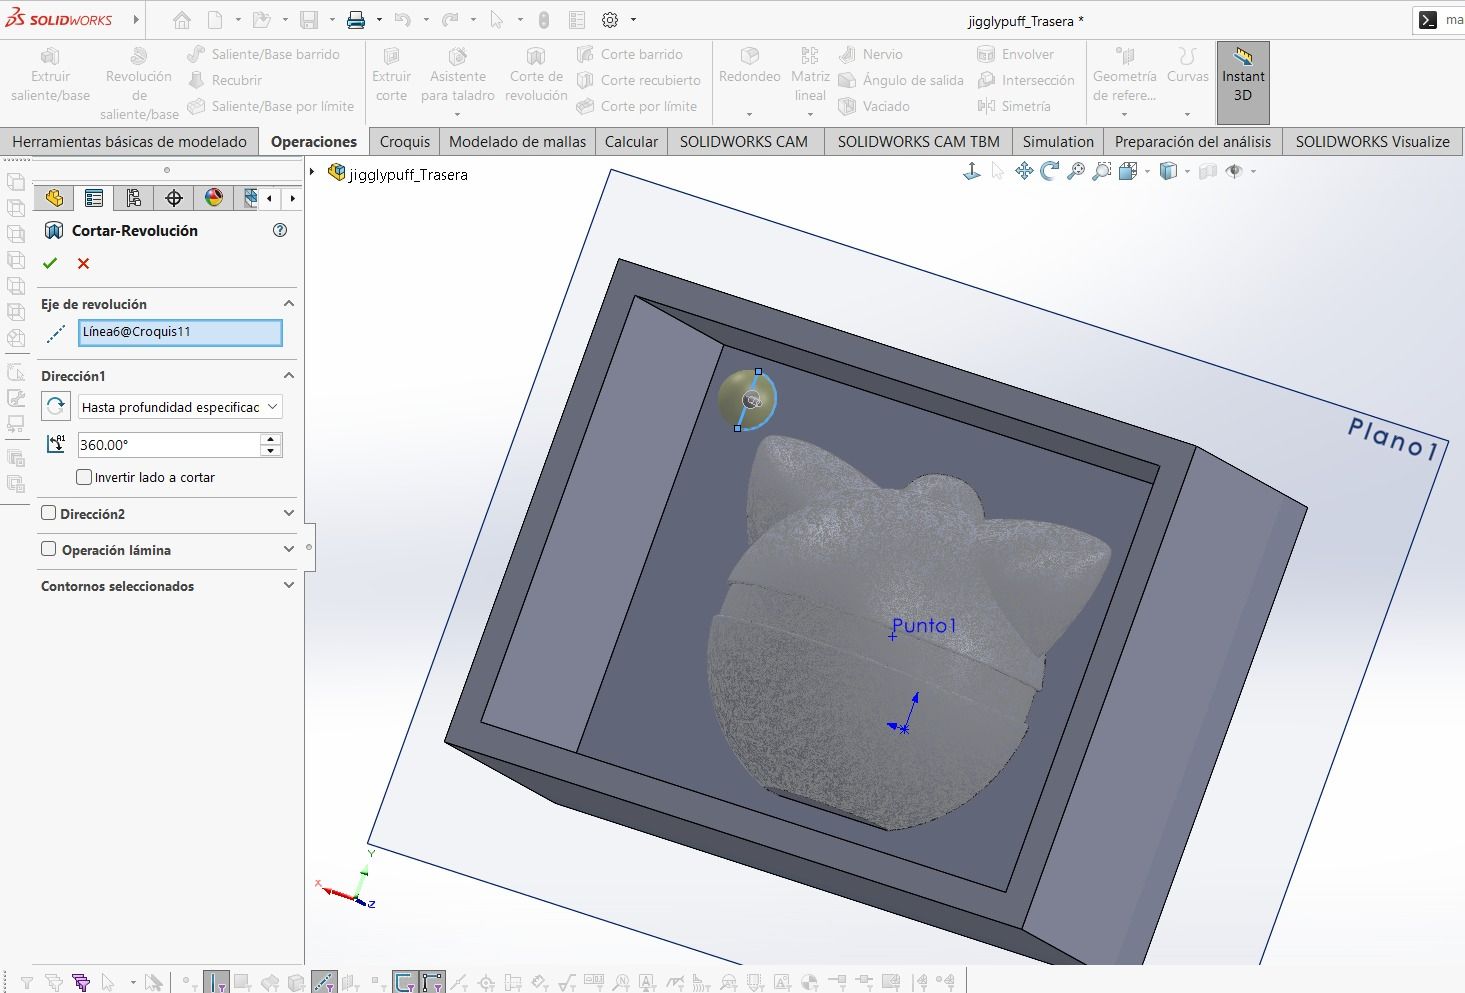
Note: For one mold half, use the Revolve Cut operation so that the sphere cavity is negative (a void). For the other mold half, the spheres must be positive, using the Revolved Boss/Base operation.
Step 11 — Pattern the Spheres
Create the pattern directly using the Revolve operation. Select the following configuration:
| Direction | View | Distance (mm) |
|---|---|---|
| 1 | Lateral | 85 |
| 2 | Top (Planta) | 60 |
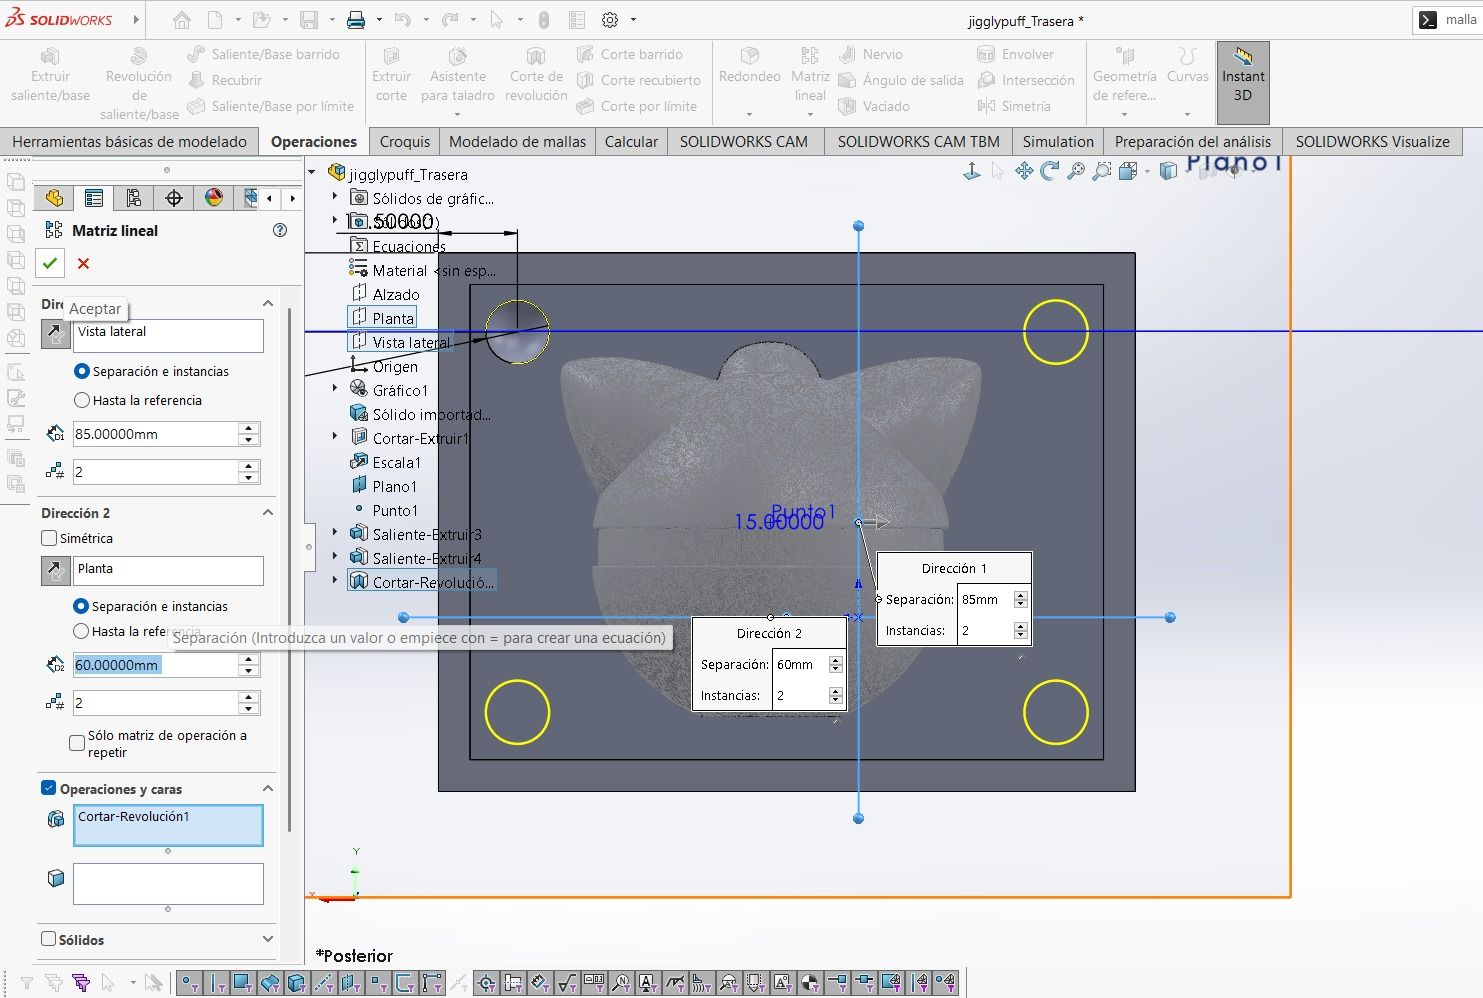
Front Mold
Step 12 — Create a New Plane
Create a plane using the Top view and the point at the center of the Pokéball.
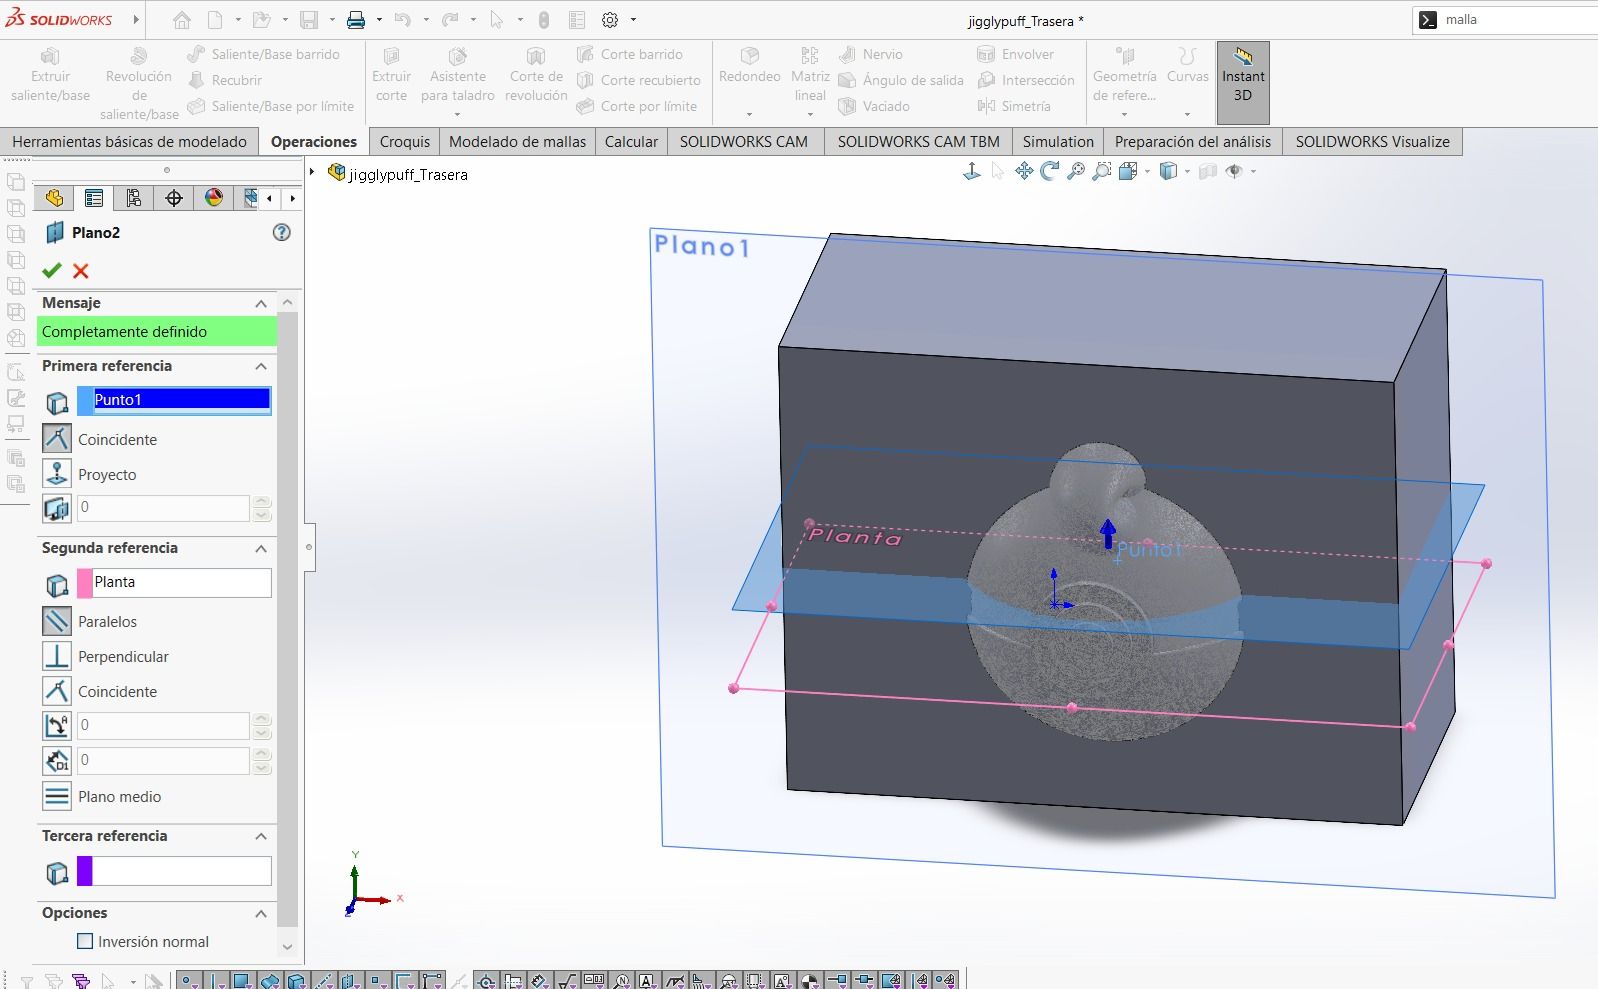
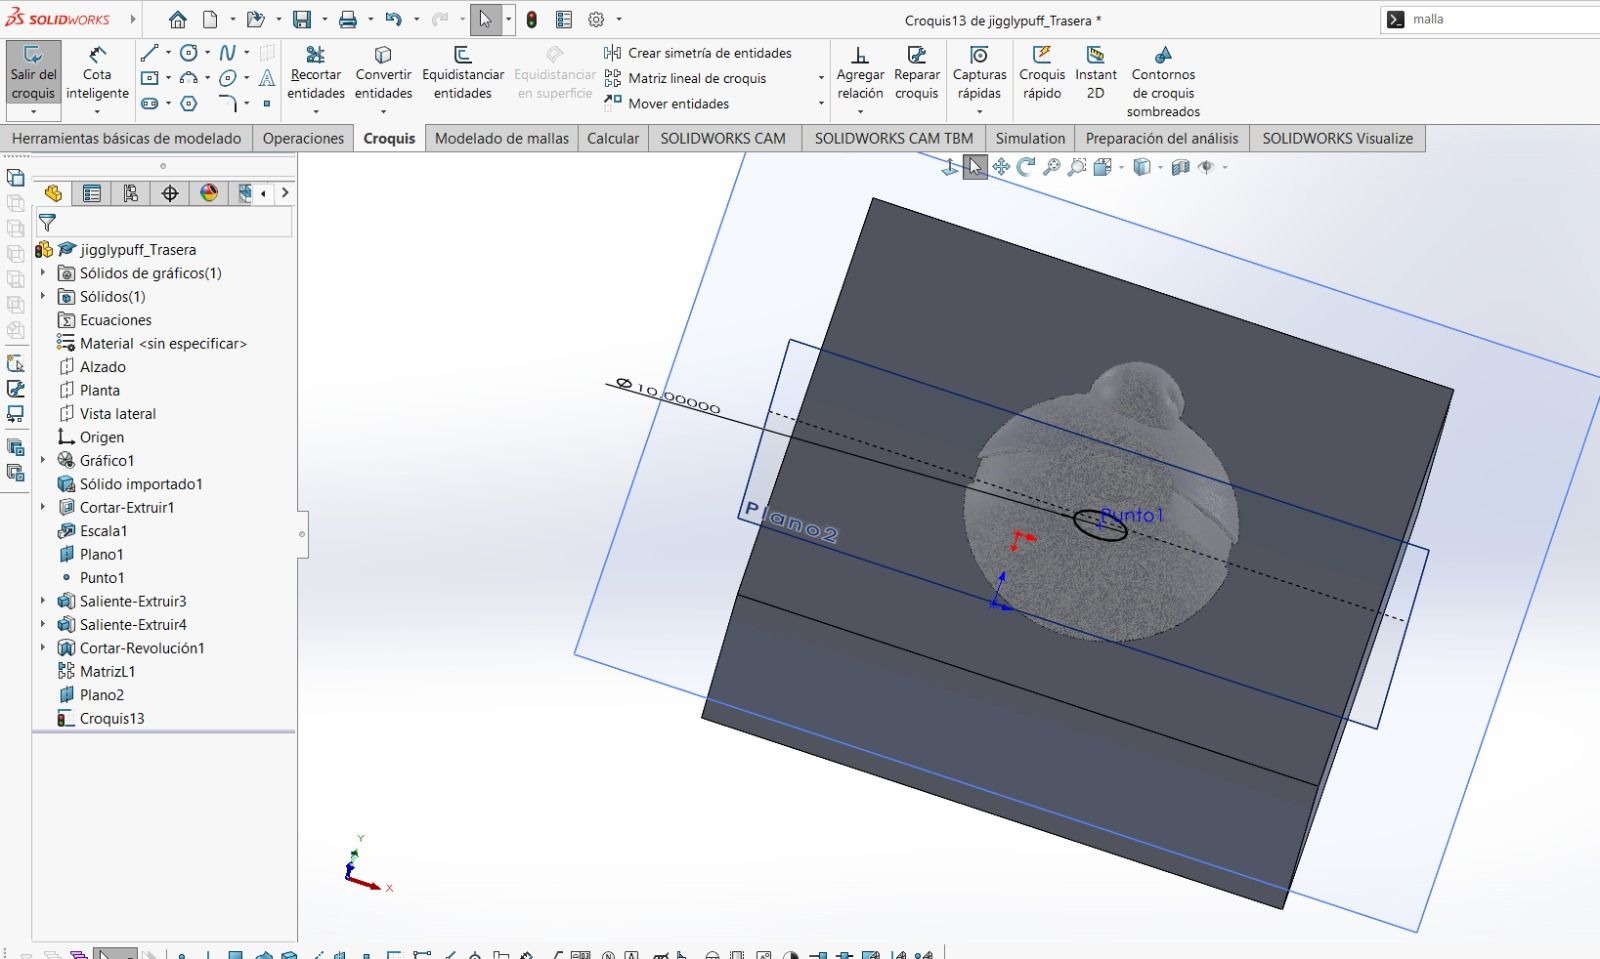
Step 13 — Add the Alignment Pins and Export
I generated a circle of 10 mm in diameter on Plane 2, and using the pattern operation, I created 4 circles, which I then revolved. Finally, I saved both mold halves in STL format.
3D Printing the Mold
The software used with the resin printer was:
Satel Lite 3D Slicer: ELEGOO SatelLite 3D Slicer – ELEGOO Official
Step 1 — Position the Models
Position the models inside the slicer software. It is important to test that all 6 models print correctly using the configuration shown in the image below.
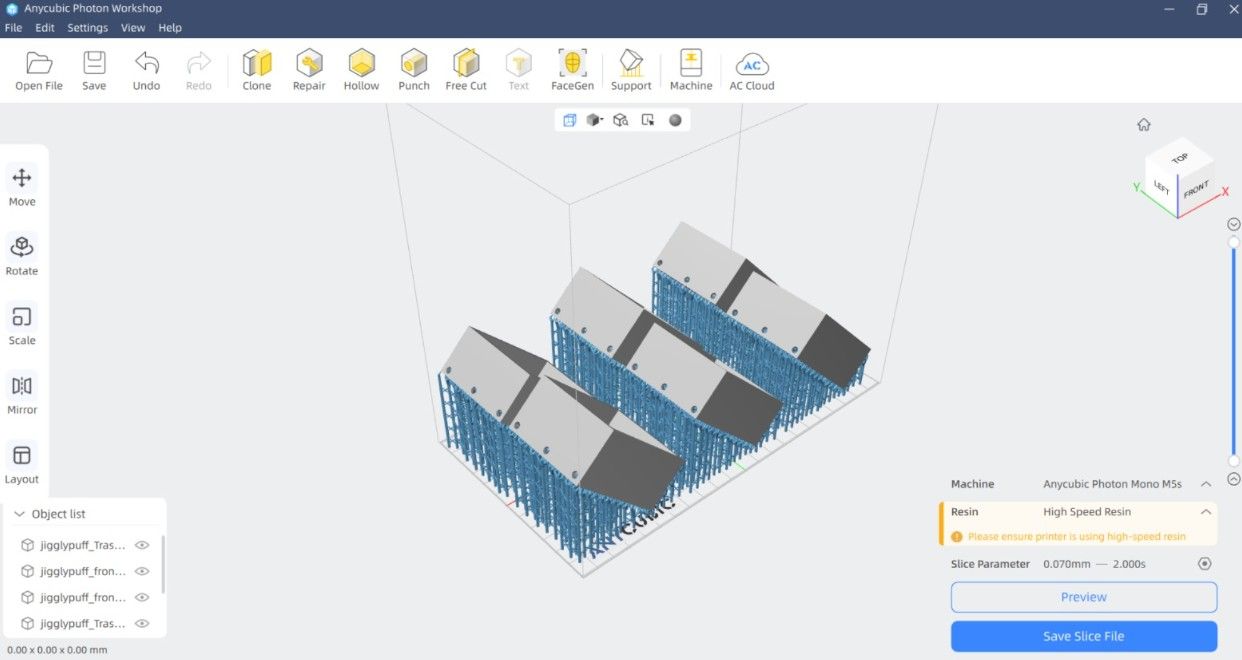
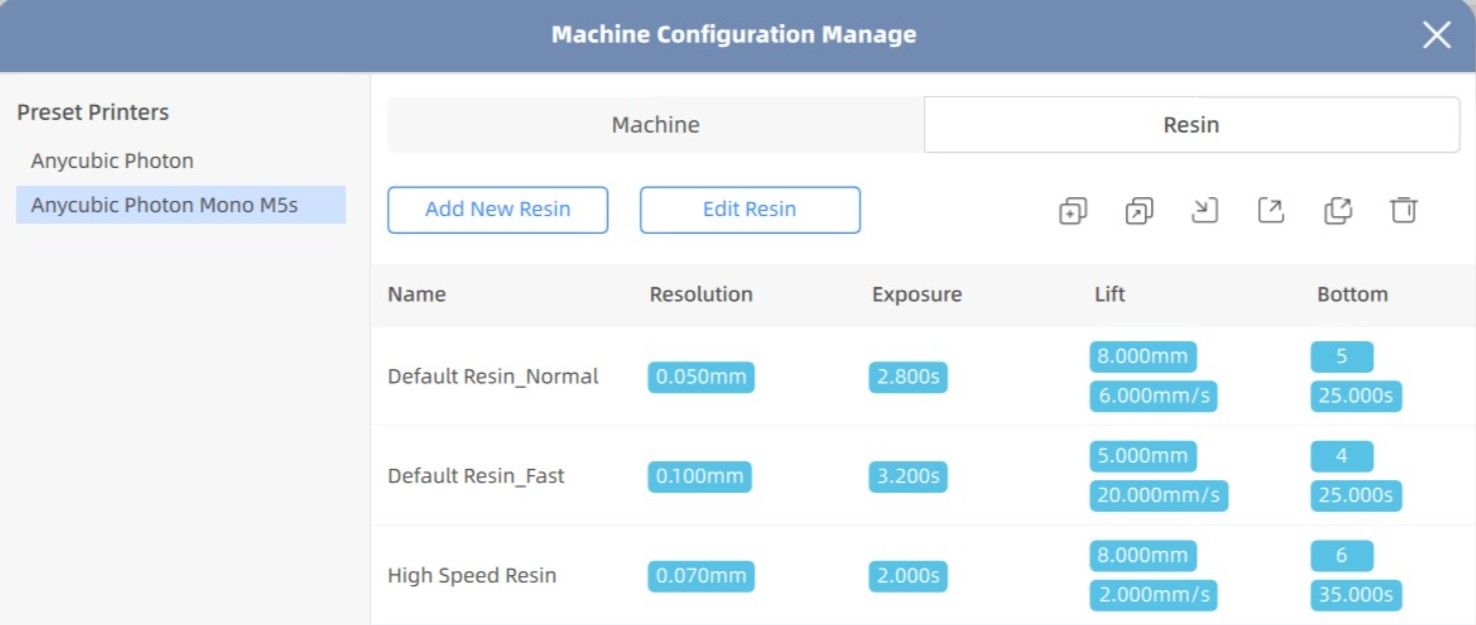
Print parameters used in Anycubic for High Speed Resin.
Resin Print Parameters — High Speed Resin (Anycubic)
| Parameter | Value |
|---|---|
| Layer Height | 0.05 mm |
| Normal Exposure Time | 2.0 s |
| Bottom Exposure Time | 30 s |
| Bottom Layers | 5 |
| Lift Speed | 3 mm/s |
| Lift Distance | 5 mm |
Note: replace these values with the exact numbers visible in your screenshot if they differ.
Note: It is important to position the models at an angle inside the slicer. This helps the resin drain more easily when the part comes off the build plate. It is also important to add supports; however, when the part is completely solid — as in this case — supports are not strictly necessary, but tilting the part is still recommended.
Materials Used
A fast-curing resin was used. The following images show the materials: fast-cure resin, isopropyl alcohol for cleaning, the Anycubic resin printer, and the UV curing machine.
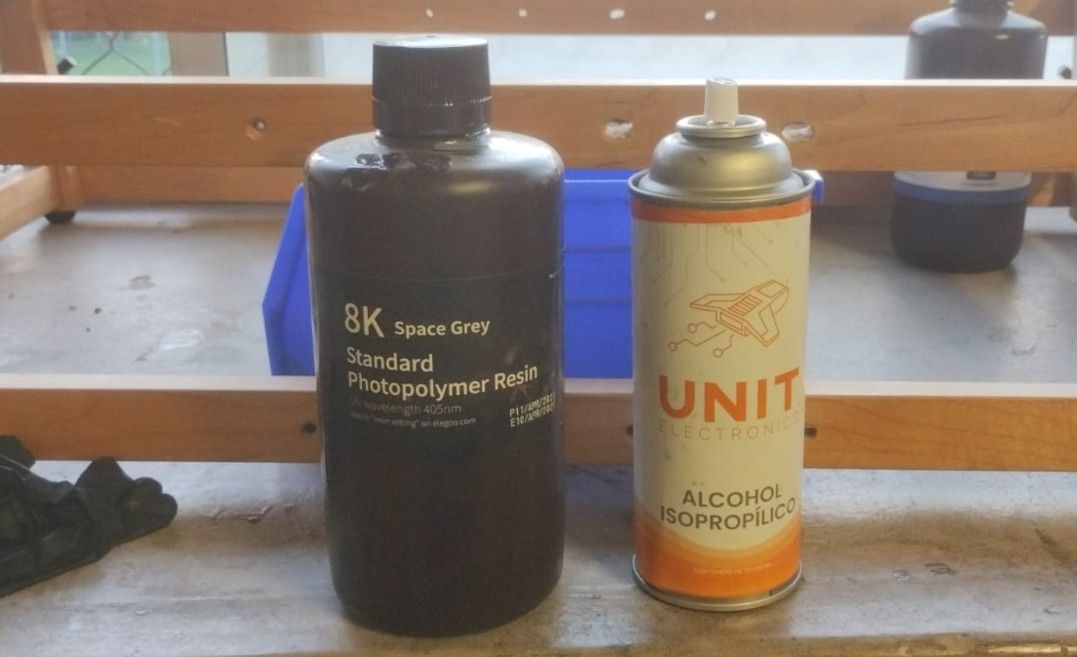
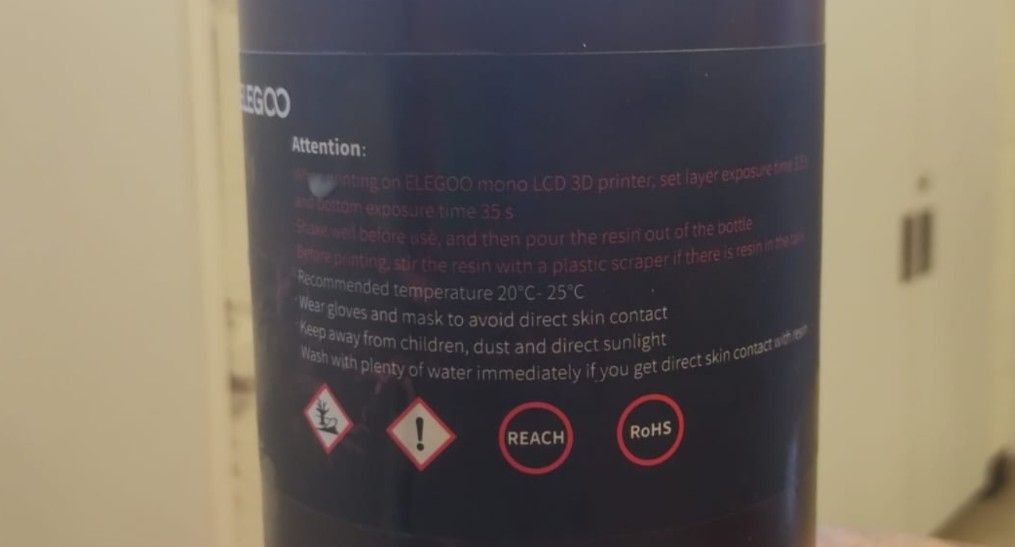
Left: Materials used. Right: Back of the resin bottle with instructions and specifications.
Print Results
The images below show how the molds turned out. As can be seen, out of the 4 print attempts, only one came out correctly — one mold from each side. This means the printer has dead pixels, so it is important to be careful. It is therefore good practice to print all the molds in a single attempt to identify this issue early.
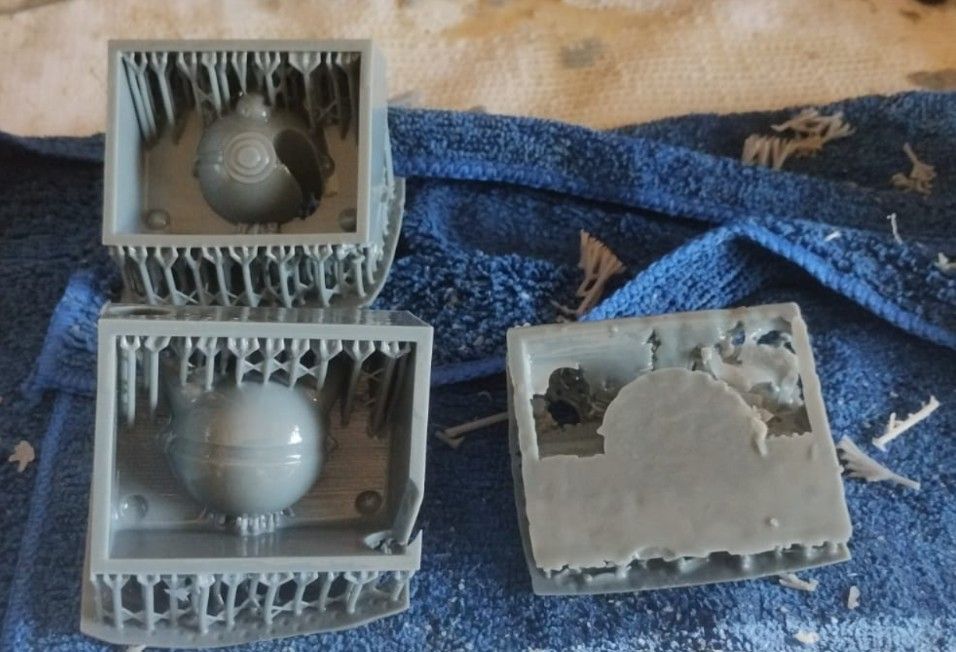
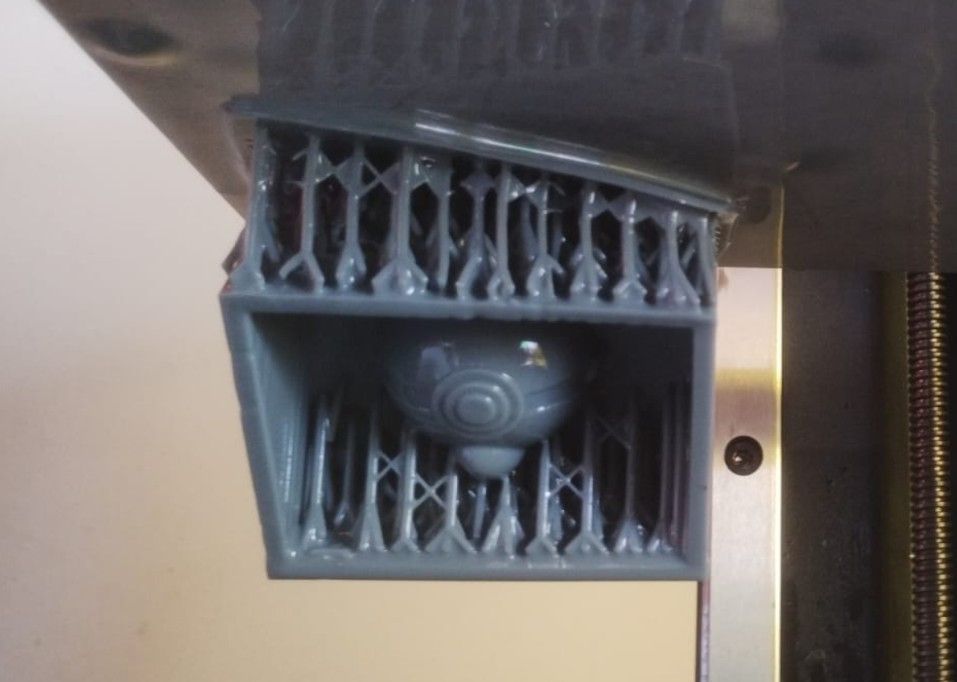
Left: Three of the four prints (only one correct). Right: The fourth print still attached to the build plate (the correct attempt).
Post-Processing
The supports must be removed before sending the part to cure, and the part must be cleaned with isopropyl alcohol. Once this is done, the part must be placed in the UV curing machine for approximately 15 minutes. If the part is still sticky, cure it for another 15 minutes. If it remains sticky after that, it should be left out in the sun.
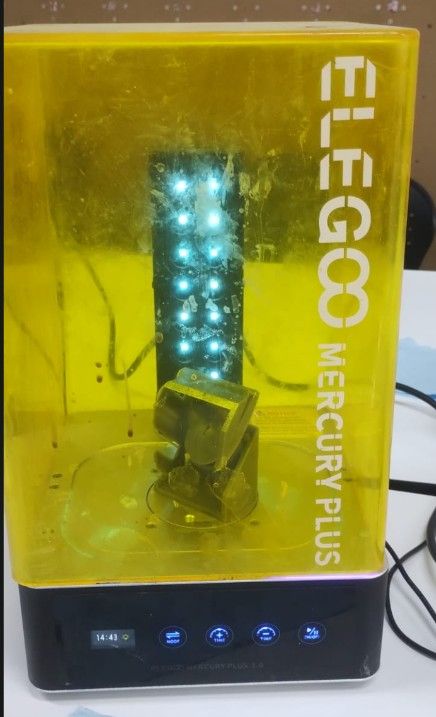
UV curing machine.
Problem I Encountered with the Molds
Some areas of the mold did not print correctly, leaving holes that could cause leaks when casting. To fix this, I filled in the gaps using moldable silicone; however, I do not recommend this approach — the silicone is not strong enough, and at the first opportunity it simply detaches from the resin mold.
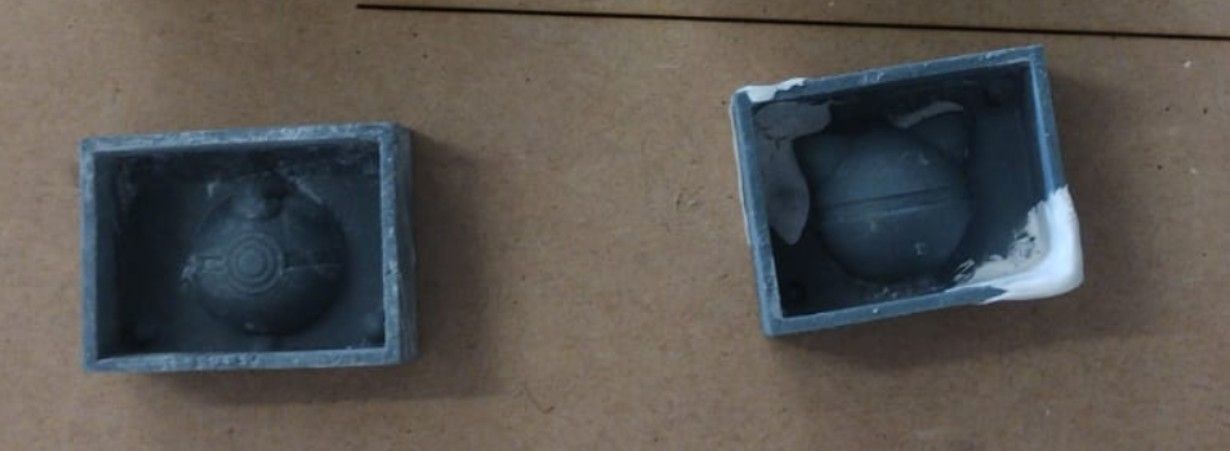
Final molds after post-processing.
FDM 3D Printing as a Backup
Since I was not sure whether the resin molds would work correctly, I also printed some backups using FDM with the Prusa printer. The parameters used are shown in the video below.
Parameters used in PrusaSlicer.
The FDM prints turned out as follows:
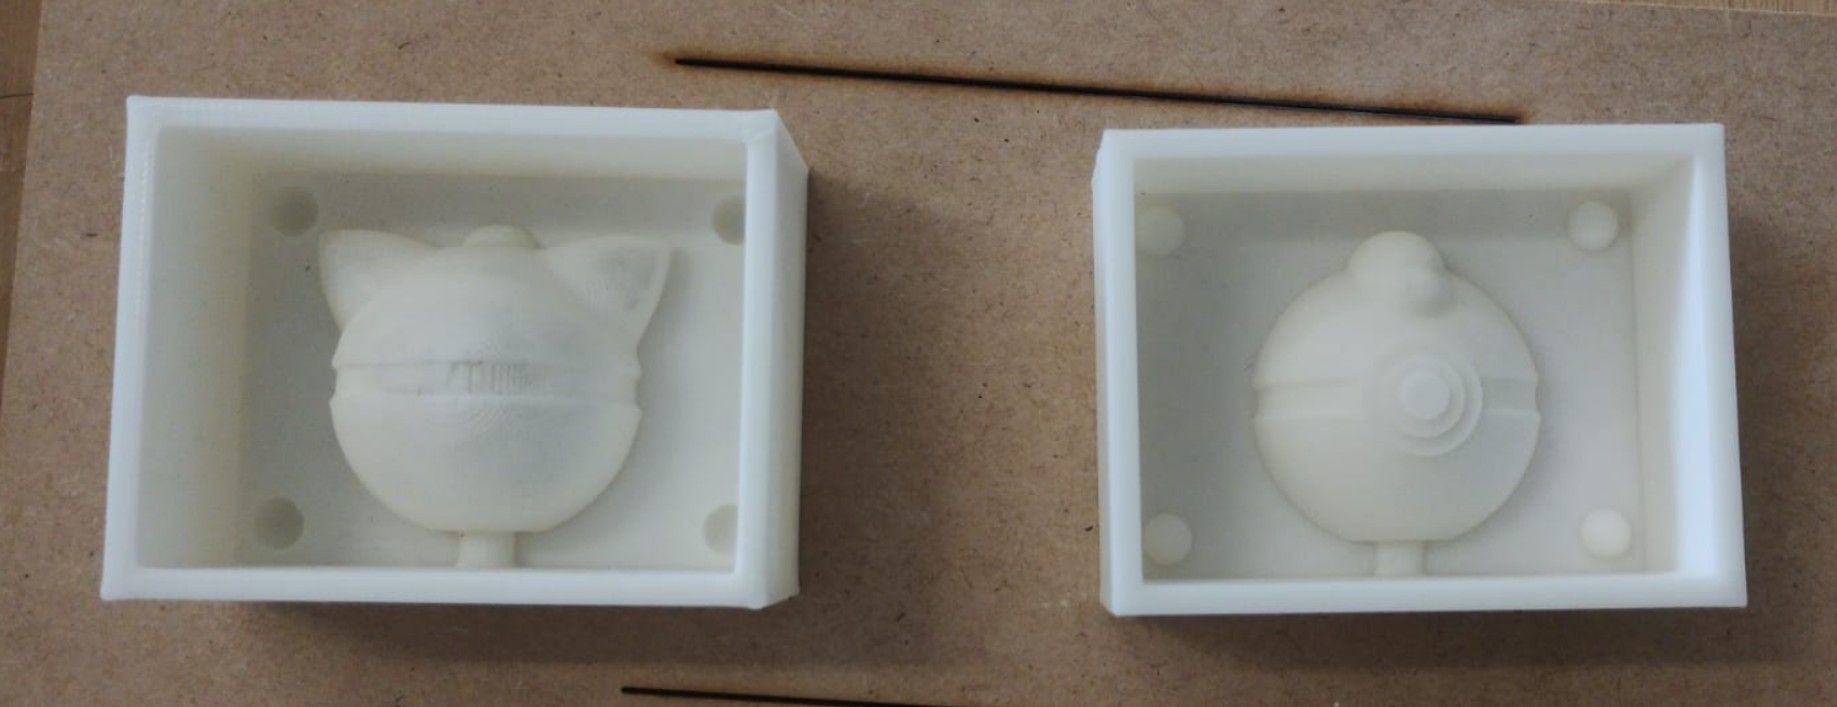
FDM Post-Processing
The FDM molds were not sanded or otherwise post-processed after printing.
Because FDM leaves visible layer lines on the surface, the resulting wax cast pieces show
those lines as texture. For a smoother mold surface — as required for a clean cast —
sanding with progressively finer grits (starting at 120, up to 400 or higher) and optionally
applying a thin coat of epoxy filler is recommended before pouring silicone.
However, I did try to sand the surface, but I couldn't. In any case, this second mold was more like a test in case the model didn’t come out with the resin.
Silicone
Safety Data Sheet — EcoFlex 00-30
For this week's group assignment, I reviewed the Safety Data Sheet (SDS) for the main casting material used: Smooth-On EcoFlex 00-30, a two-part platinum-cure silicone elastomer.
| Property | Details |
|---|---|
| Manufacturer | Smooth-On, Inc. |
| Product | EcoFlex 00-30 — Part A & Part B |
| General Use | Silicone Elastomer |
| Physical State | Viscous liquid (off-white) |
| Odor | Sweet odor |
| Specific Gravity | 1.07 |
| Viscosity | 100 poise |
| Flash Point | >300 °F (Non-flammable) |
| Flammability | Non-flammable |
Hazard Identification
According to the SDS (MSDS No. 844), EcoFlex 00-30 is not classified as hazardous under OSHA Hazard Communication Standard (29 CFR 1910.1200) or WHMIS. It contains no hazardous ingredients in either Part A or Part B.
First Aid Measures
| Exposure | Action |
|---|---|
| Inhalation | Move to fresh air immediately |
| Eye Contact | Flush with water; seek medical attention if irritation persists |
| Skin Contact | Wash thoroughly with soap and water; remove contaminated clothing |
| Ingestion | Do not induce vomiting; contact a physician immediately |
Personal Protective Equipment (PPE)
- Gloves: Chemically protective gloves — use vinyl gloves only (latex gloves will inhibit the cure of the silicone)
- Eye protection: Safety glasses or chemical safety goggles
- Respiratory protection: NIOSH/MSHA approved respirator if ventilation is insufficient
- Clothing: Long sleeves recommended to minimize skin contact
Storage & Handling
- Store in a cool, dry, well-ventilated area
- Use at room temperature (73°F / 23°C) — warmer temperatures will reduce working time and shelf life
- Keep away from strong acids and bases
Cure Inhibition Warning
⚠️ Addition-cure silicone may be inhibited by sulfur, latex, amines, or certain contaminants. This can result in permanent tackiness at the mold interface or a complete failure to cure. Always use clean tools and vinyl gloves.
SDS Source: Smooth-On EcoFlex Series MSDS No. 844
Silicone is a two-part material: Part A (the base) requires 100% of the total weight, while Part B (the catalyst) requires only 10% of Part A. This means a simple rule of three is needed to calculate the exact amounts. I used 11% instead of 10% to ensure there was enough catalyst.
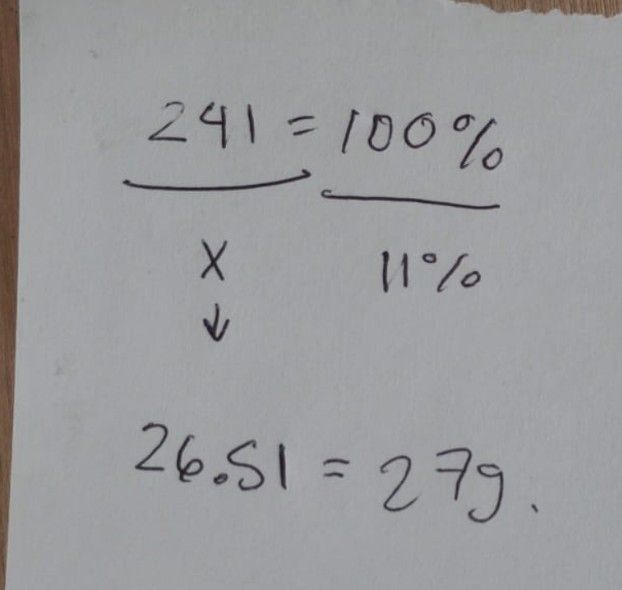
Rule of three calculation used to determine the amount of each component.
Once the measurements were calculated, I used a digital scale to weigh Part A (the silicone base) and Part B (the catalyst) separately into different containers.
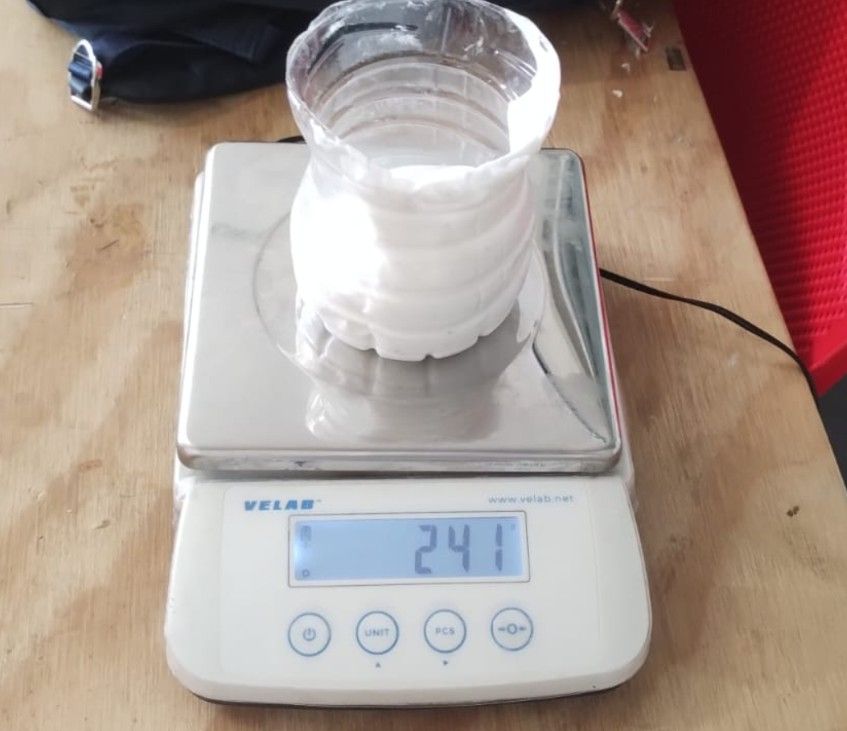
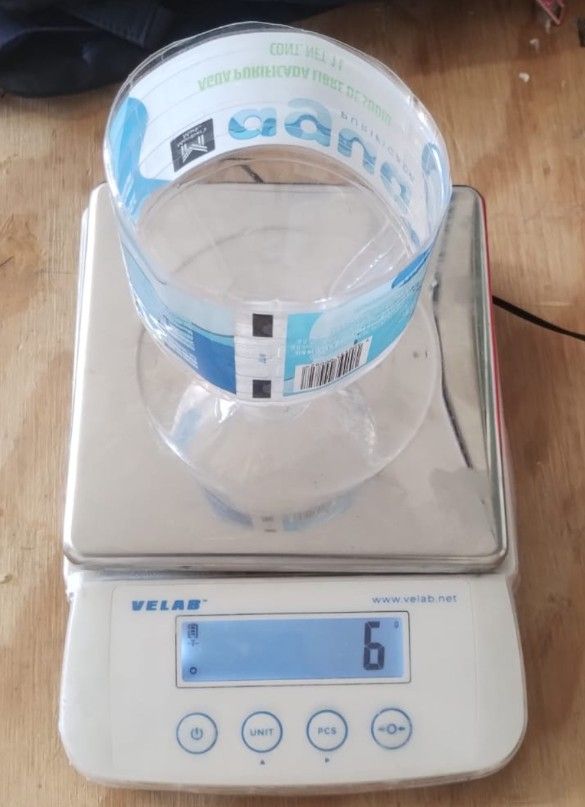
Left: Amount of silicone (Part A). Right: Amount of catalyst (Part B).
Afterwards, both parts must be mixed together — if they are not mixed, they will begin to cure separately.
Mixing both parts of the silicone.
Vacuum Degassing Machine
Once both parts are well mixed, the mixture is placed in the vacuum degassing machine, which removes all air bubbles. Here is how to use it:
- Open the door and place the container with the mixture inside. Once done, close the door tightly using the handle — make sure the handle reaches all the way up for a proper seal.
- Turn on the machine by rotating the red knob from OFF to ON.
- Press the green button (Vacuum Pump ON) to start the machine and begin generating the vacuum.
- The mixture will start to bubble and rise — this is completely normal. Leave it until the mixture starts to return to its original level and the bubbling subsides.
- Once the mixture looks normal again, turn off the vacuum process using the red button (Vacuum Pump OFF).
- At this point you will not be able to open the door because there is still a vacuum inside the machine. Press the black button until the gauge reads zero and you can no longer hear the vacuum releasing.
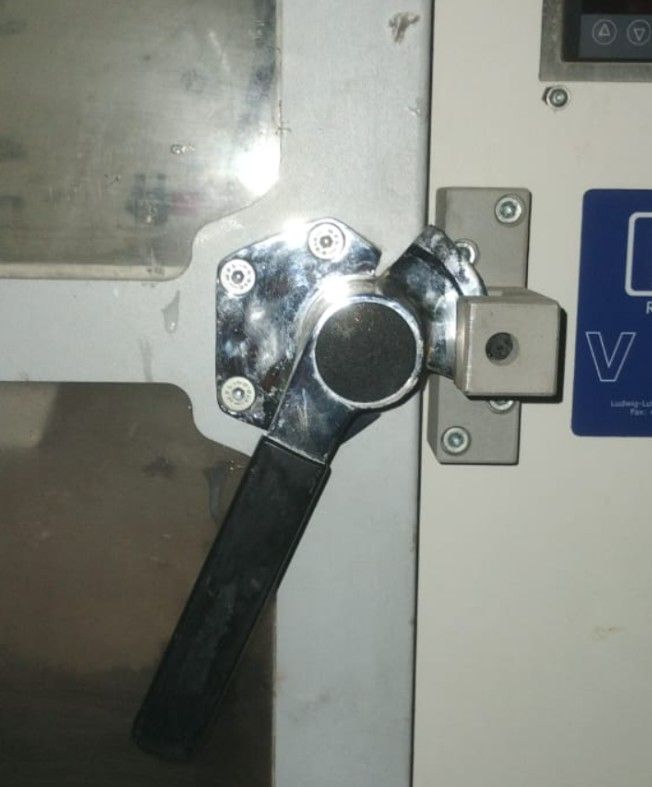
Handle used to open and seal the vacuum machine door.
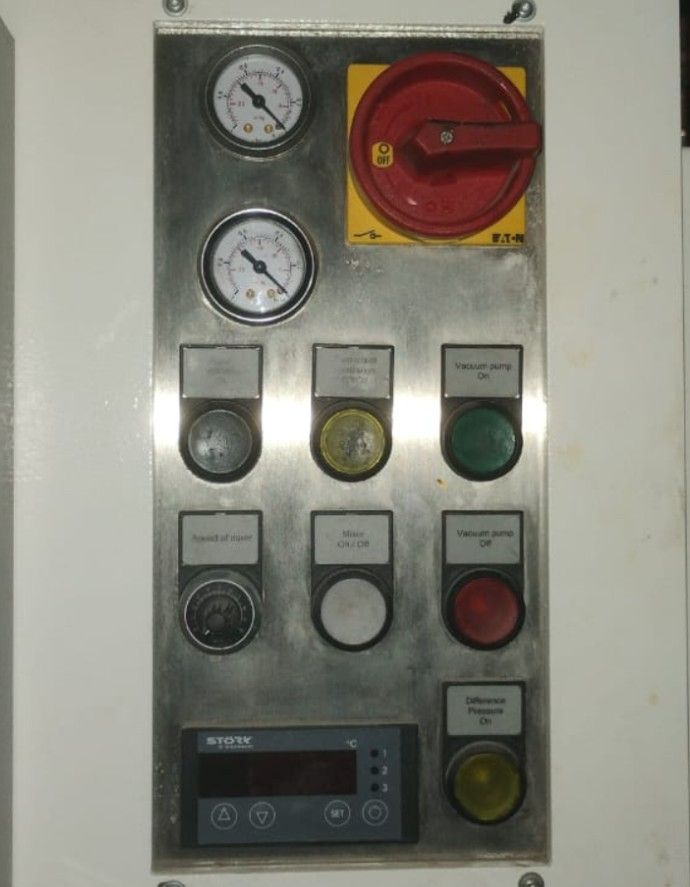
Vacuum degassing machine in operation.
Pouring the Silicone
Once the bubble-free mixture is ready, carefully pour it into the mold, making sure to cover all surfaces.
Note: It is extremely important to make sure the silicone reaches every part of the mold. If it does not, leaks may occur later due to holes that prevent the mold from being fully covered — which is exactly what happened to me.
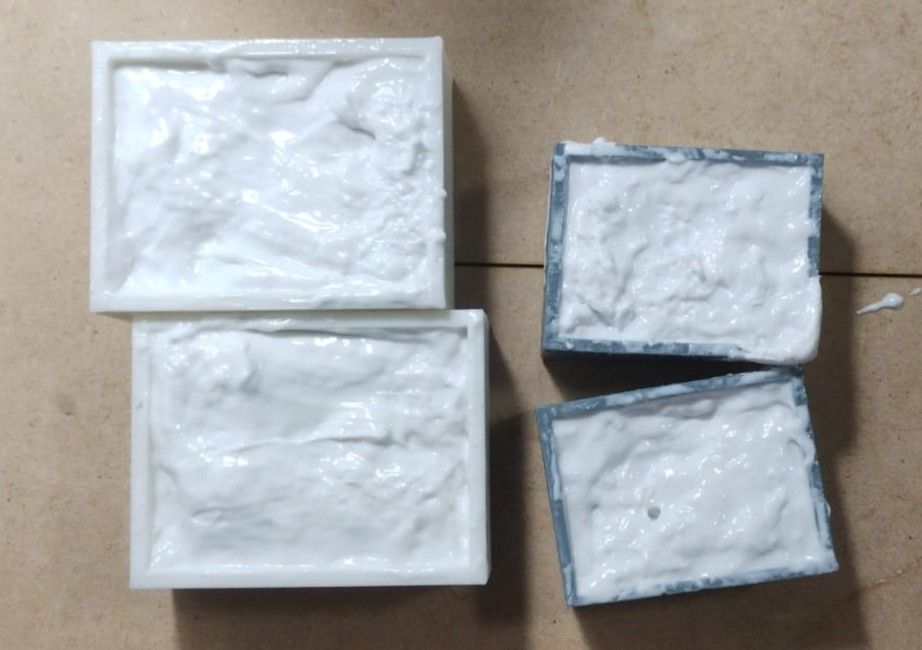
Demolding
Allow the silicone to dry for a few hours, preferably in a well-ventilated area since the smell is strong. Then carefully demold it. I used the back of a spoon to first separate the silicone from the entire perimeter of the mold, and then gradually peeled it off little by little.
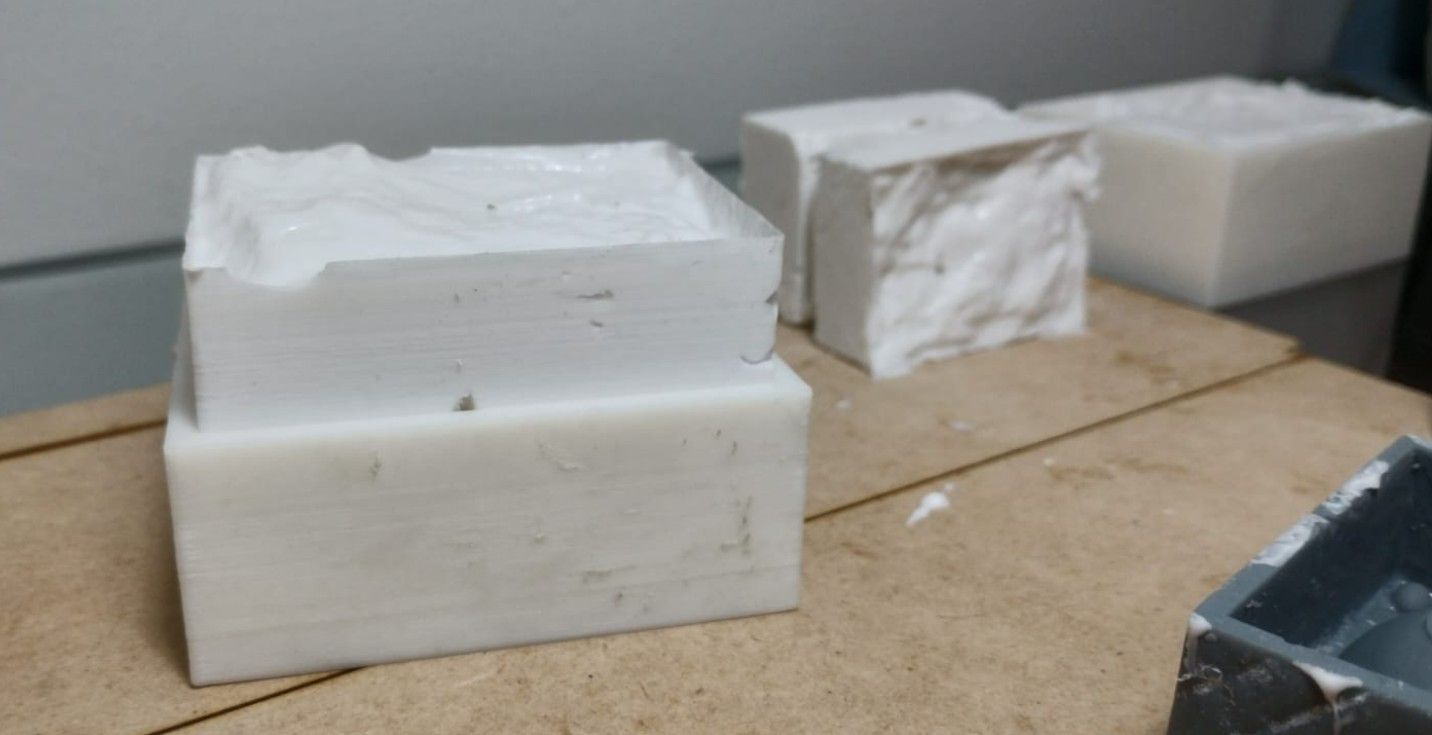
Silicone being demolded.
Wax Casting
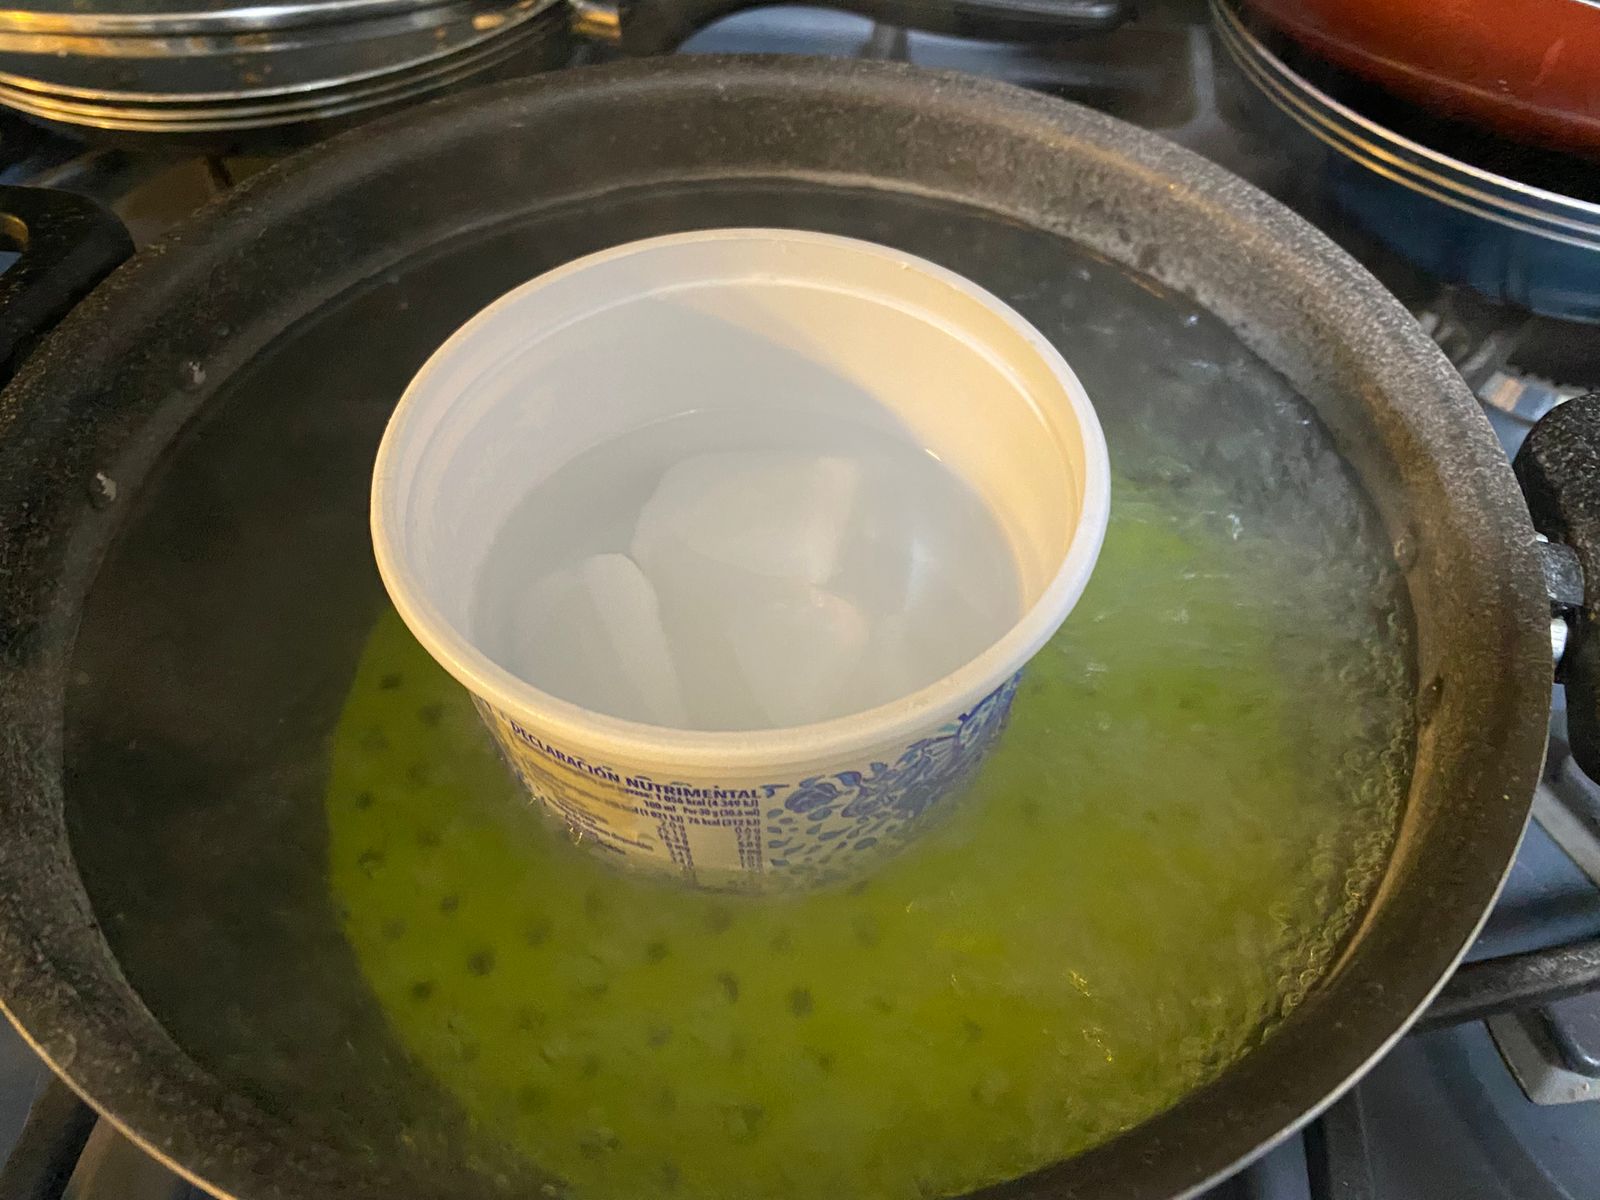
For the wax, the first step was to cut a candle and melt it in a double boiler (bain-marie) until it was completely liquid.
Problem I Encountered with the Molds
The silicone did not reach all parts of the mold, which created holes that could cause the wax to leak. To fix this, I wrapped the outside of the mold with wax paper (parchment paper) and secured it with both tape and rubber bands. This ensured that the two halves of the mold (Part A and Part B) would not separate, and that the wax paper was held tightly against the mold to prevent any leaks.
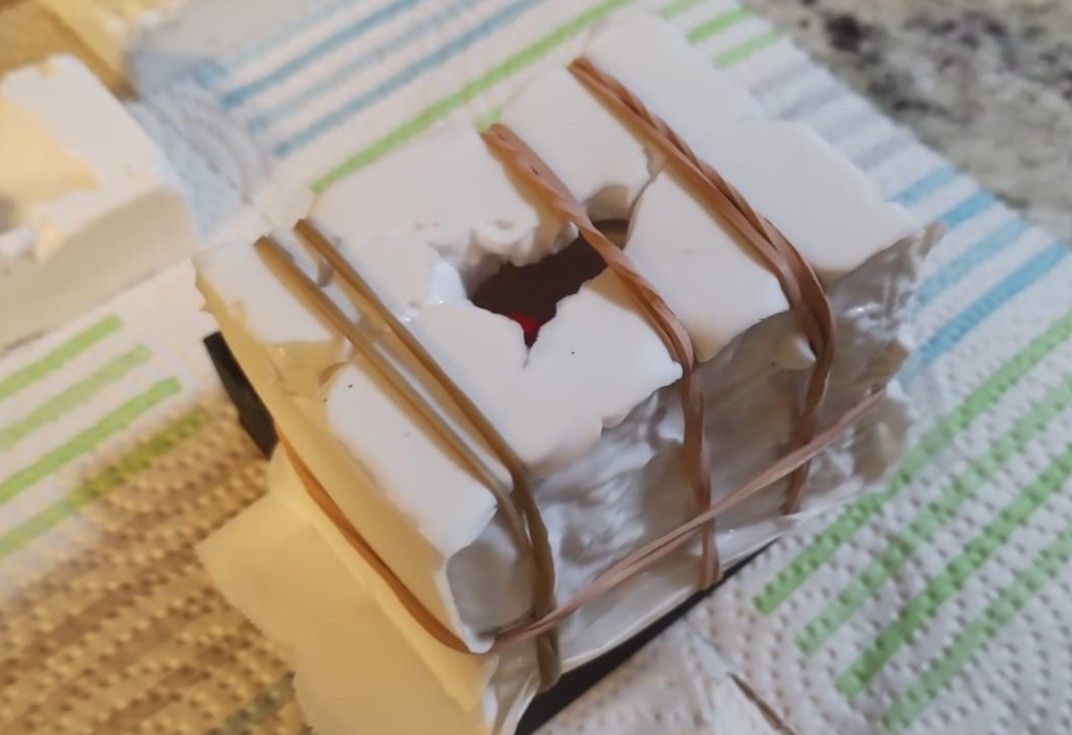
Mold with wax paper secured underneath to prevent leaks.
Once the mold was properly secured, I used a small funnel to pour the wax into it until it overflowed.
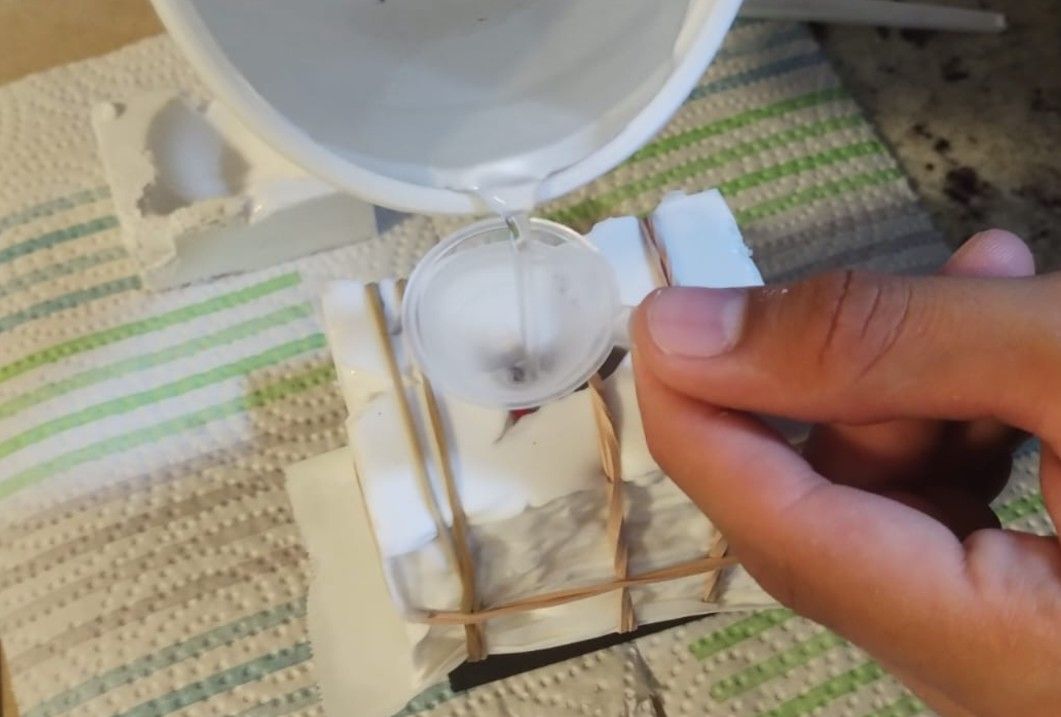
This same process was repeated with the other mold (the one made with resin).
Results
After waiting a few hours for the wax to set, I demolded the pieces. The results were as follows:
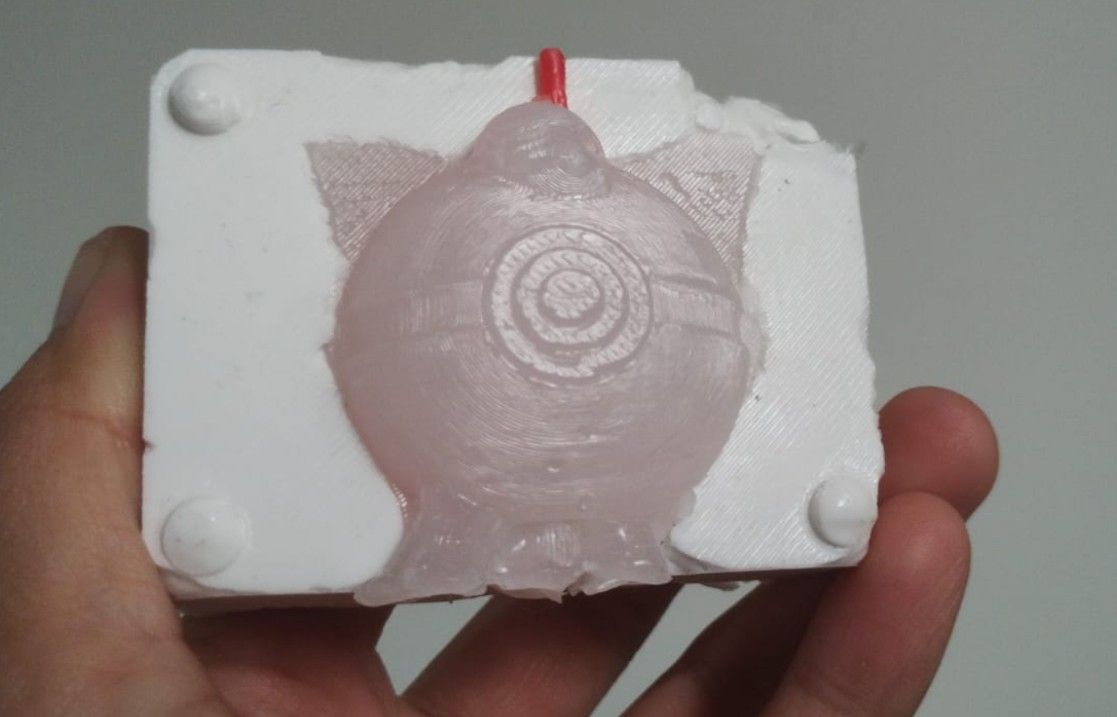
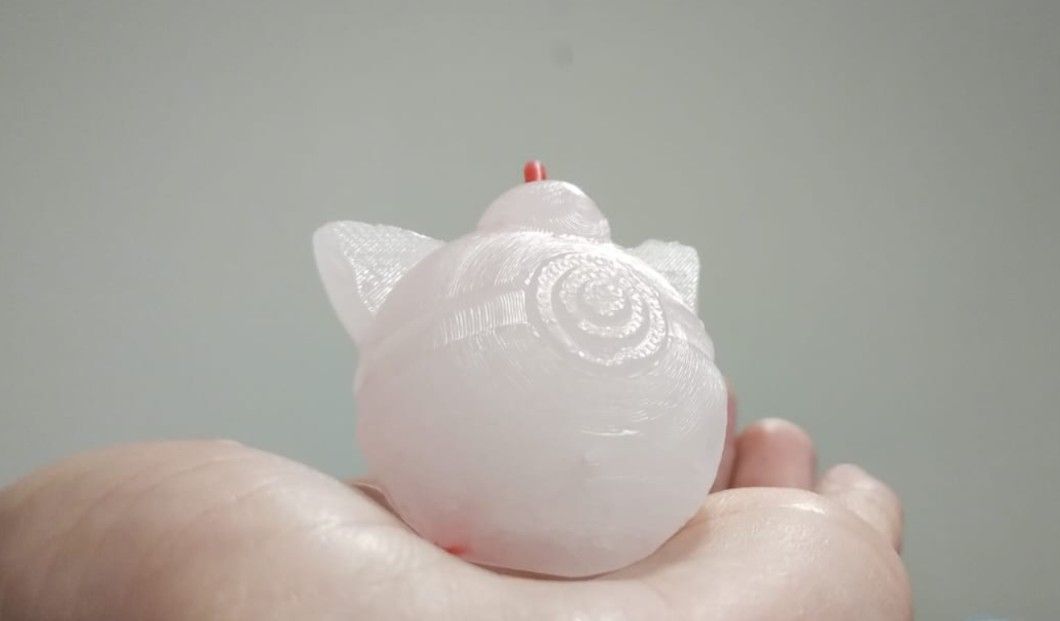
Left: Result before fully demolding. Right: Final demolded result.
Note: In reality, I made two molds: one using PLA filament (where the layer lines are slightly visible since I didn't have enough time for post-processing) and another using resin, which has a much better finish.
Issue with the resin mold figure: I wasn't thrilled with how it turned out because of the green makeshift wick I used. I had poured the candle into the PLA mold first, and since it is larger, I ran out of proper wick for the resin one. However, it still turned out well, and this was the final result.
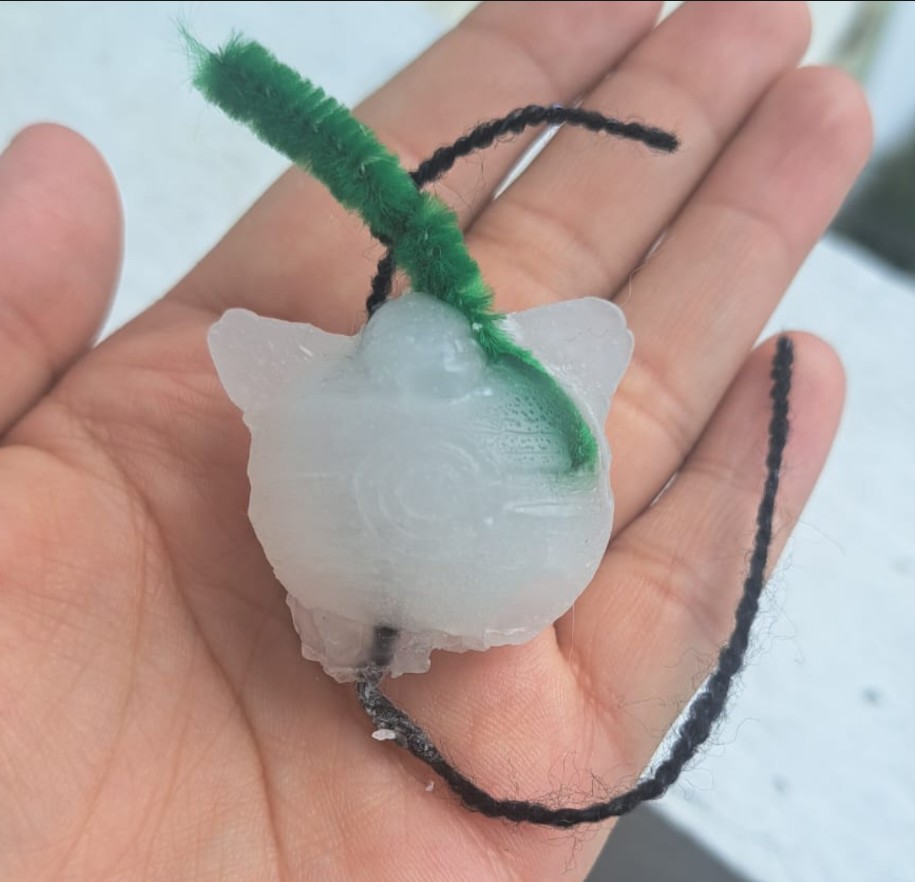
Resin mold final figure.
What I learned from the group assignment:
- Safety data sheets matter: Each material has specific risks. Polyurethane resins contain isocyanates, which are potent respiratory sensitizers and require a respirator with organic vapor cartridges. Epoxy resins can cause permanent skin sensitization with repeated contact. Even silicone — generally the safest option — can remain permanently sticky if it comes into contact with sulfur, latex, or amines (cure inhibition).
- Silicone 3030 vs. Epoxy Resin: Silicone produces flexible, detail-capturing parts ideal for soft components or jewelry, but the cured piece should be baked at 150°C for 10–15 minutes to eliminate its strong odor. Epoxy resin produces rigid, structurally strong parts but is highly exothermic during curing and requires thorough ventilation and IPA cleaning.
- 3D Resin Printing vs. CNC Wax Milling: Resin printing offers higher detail and is faster when the print succeeds, but standard UV resins can cause cure inhibition in platinum-cure silicones — the printed part must be fully cured and sealed before use. CNC-milled wax has no compatibility issues with silicone whatsoever, releases effortlessly without a release agent, and the wax chips can be melted down and reused. Wax molds are also the only food-safe option of the two.
What I learned this week:
- I learned the full workflow for designing a mold in SolidWorks: importing and converting an STL to a mesh solid, scaling, creating a midplane, building the mold walls, and using revolve cuts vs. revolve boss/base operations to generate negative and positive cavities respectively.
- I learned that resin printers can have dead pixels, which cause print failures; it is therefore good practice to print all molds in a single attempt to identify this issue early.
- I understood how to properly mix and degass two-part silicone using a vacuum degassing machine, and how critical it is to ensure the silicone covers every surface of the mold to avoid leaks.
- I learned that when holes exist in a mold, wax paper secured with tape and rubber bands is an effective workaround to prevent the wax from leaking during casting.
Files I Used This Week
w13_mold_files.zip
Mold Files
The following files are included in the package:
- 📁 01_solidworks_Moldes
- 📁 STL_Todos los documentos_3er intento
- jigglypuff_completa_solido importado (.SLDPRT)
- jigglypuff_frontal (.SLDPRT)
- jigglypuff_medioproceso_parainvertir (.SLDPRT)
- jigglypuff_Trasera (.SLDPRT)
- 📁 filamento_impresiones
- 02_prusa01_paga (.3mf)
- jigglyfuff_danitz (.bgcode)
- 📁 resina_impresiones
- polo_danib (PhotonWorkshop)
- polo_danib.stl
- resina_danib.stl
- resina_rap_jigglypuff (PhotonWorkshop)
- standard_danib.stl
- standard_rap_jigglypuff (PhotonWorkshop)