
What is GitLab and why use it?
GitLab is a web-based platform built around Git — a version control system that tracks every change made to your files over time. Think of it as a cloud backup for your code, but much more powerful: it keeps a full history of every version, lets you revert mistakes, and in Fab Academy it also hosts your documentation website automatically.
I use GitLab specifically because Fab Academy's infrastructure is built on it. Every student gets a personal repository where both the source code and the published site live. Whenever I push new changes, the site updates automatically — no manual uploading needed.
GitLab vs GitHub — what's the difference?
Both platforms are built on Git and work in a very similar way. GitHub is more popular in the open-source community, while GitLab is preferred in academic and enterprise environments because it includes a built-in CI/CD system (continuous deployment) at no cost. Fab Academy uses GitLab for this reason — every push triggers an automatic pipeline that publishes your site to the web without any extra configuration.
Installation & First Steps
Before writing any code, I had to install Git and set up a local workspace connected to the remote GitLab repository.
Installing Git
Git needs to be installed on your computer before you can use any terminal commands. Here's how:
Mac
Open Terminal and run git --version. If Git isn't installed, macOS will prompt you to install the Xcode Command Line Tools automatically.
Windows
Download the installer from git-scm.com and follow the setup wizard. Git Bash will be included as a terminal.
Verify installation
Run git --version in any terminal. If it returns a version number, Git is ready to use.
Cloning the repository & first steps in the terminal
These are the exact steps I followed to get my repository working locally for the first time:
- 1 Go to my GitLab repository and copy the HTTPS or SSH URL.
- 2 Create a folder on my computer for the project — no spaces in the name.
- 3 Open Terminal and navigate into the folder:
cd folder-name - 4 Clone the repository:
git clone [URL] - 5 Navigate into the cloned folder:
cd anasofia-tellez - 6 Open the folder in Visual Studio Code:
code .
Why is cloning important?
Cloning creates a complete local copy of the repository on your computer — including every file, every folder, and the full commit history. This means you can work offline, make changes at your own pace, and only send those changes to GitLab when you're ready.
Without cloning, you would have to edit files directly on the GitLab web interface, which is slow, limited, and doesn't allow you to preview your site locally before publishing it.
Work offline without internet. Preview changes locally before pushing. Full version history always available. Easy to recover from mistakes using git revert.
You must remember to push changes — local edits won't appear on the site until you do. If two people edit the same file, merge conflicts can occur and need to be resolved manually.
Web Development Basics
To build this site, I had to understand the "Big Three" of web development. Each layer has a distinct role, and together they make a complete, functional webpage.
The skeleton. It defines the structure of the page using tags like <h1>, <p>, <img>, and <section>.
The style. It controls colors, fonts, spacing, and layout — essentially everything the user sees visually.
The brain. It makes the page interactive and dynamic, handling events, animations, and logic.
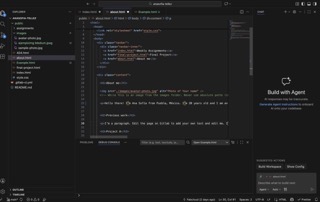
Navigating Visual Studio Code
Visual Studio Code (VS Code) is the code editor I used to write all the HTML and CSS for this site. It's free, lightweight, and has a lot of features that make web development much easier.
Getting started in VS Code
01. Open the project
Go to File → Open Folder and select your cloned repository folder. All your files will appear in the left sidebar (Explorer panel).
02. Open the terminal
Use the shortcut Ctrl + ` (or Terminal → New Terminal) to open a built-in terminal for Git commands.
03. Live preview
Install the "Live Server" extension. Right-click any HTML file and select "Open with Live Server" — your site updates automatically every time you save.
04. Useful shortcuts
Cmd/Ctrl + S to save. Cmd/Ctrl + Z to undo. Cmd/Ctrl + Shift + P for the command palette.
Styling the Page with CSS
All the visual style of this site lives in style.css. Here are some of the key CSS properties I used to start shaping the look and feel of the page:
background-colorSets the background color of an element. I used this on cards and the navbar.
border-radiusRounds the corners of elements — the distinctive rounded cards on this site all use this property.
display: gridArranges elements into a grid layout. Used for the bento header and process cards.
font-familyControls the typeface. This site uses Inter for body text and Fira Code for code snippets.
color / opacitySets text color and transparency. Most of the pink accents use #ff007f as the base color.
background-image + linear-gradientThe page background combines a dark overlay with a background image using this property.
Changes made so far
I built the full site structure from scratch — navbar, bento-style header, weekly assignment cards,
and a consistent color scheme around deep pink and black. I defined all styles in a single
style.css file shared across all pages, so any change I make there updates the entire site at once.
I also added a background image with a dark overlay, hover effects on cards, and responsive breakpoints
so the layout adapts to mobile screens.
Mastering Git
Git is a version control system that lets me track every change I make and keep my local files in sync with the remote repository. These are the core commands I used throughout the week:
git add .Stages all modified files, preparing them to be committed.
git commit -m "message"Saves a snapshot of the staged changes with a descriptive label.
git pushUploads your local commits to the remote GitLab repository.
git pullDownloads the latest changes from the remote repository to your local machine.
git statusShows which files have been modified, staged, or are untracked — useful before every commit.
git log --onelineDisplays a compact history of all past commits, so you can track your progress over time.
My workflow
Every time I make changes to the site, I follow the same cycle: git add . → git commit -m "..." → git push. This keeps the remote repository always up to date and gives me a full history of every version of the site.
GitLab & Site Deployment
GitLab is not just a place to store code — it also hosts the final website automatically through its built-in CI/CD pipeline. Every time I push changes, GitLab runs a small script that builds and publishes the updated site without any manual steps.
How the CI/CD pipeline works
CI/CD stands for Continuous Integration / Continuous Deployment. In Fab Academy, GitLab uses a .gitlab-ci.yml file to define what happens every time new code is pushed.
01. Push changes
I run git push from my local machine, sending the latest commits to GitLab.
02. Pipeline triggers
GitLab detects the push and automatically starts the CI/CD pipeline defined in the YAML file.
03. Build & deploy
The pipeline copies the files to the GitLab Pages server, making the site publicly available.
04. Live site
Within seconds, the updated site is live — no manual upload or FTP needed.
Visual Progress
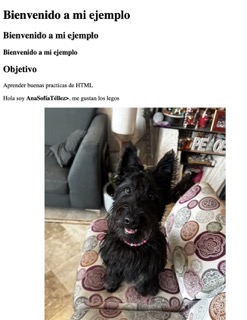
Here's a look at my first HTML exercises and the structure I planned for the site.
01. First HTML steps
Experimenting with tags, structure, and nesting elements for the first time.
Problems & Reflections
Not everything went smoothly this week. Here are some of the issues I ran into and how I solved them:
Problem 1 — Images not loading
Some images appeared as broken icons on the published site even though the file paths looked correct locally. The cause was a case sensitivity mismatch — filenames like Roland1.jpeg were referenced as roland1.jpeg in the HTML. On Mac this works fine, but GitLab's Linux server is case-sensitive, so the images failed to load remotely.
The fix: always match the filename capitalization exactly in the src attribute.
Problem 2 — Background not showing
On one of the weekly pages, the background image wasn't appearing. After checking the code, I found two issues: a duplicate <body> tag and a missing dot before assignments-page in the CSS. Once both were corrected, the background appeared correctly.
Reflections
This first week was about building the foundation — both technical and conceptual. Learning Git felt a bit intimidating at first, but once I understood the commit → push cycle, it started to feel like a natural part of the process. Setting up the site from scratch also helped me understand how HTML and CSS work together, which made the design decisions for the following weeks much easier to approach. The problems I encountered taught me more than the parts that worked smoothly — especially about how Linux servers handle file names differently from Mac.