Principles and practices, project management.
weekly schedule
| Time block | Wed | Thu | Fri | Sat | Sun | Mon | Tue |
|---|---|---|---|---|---|---|---|
| Global class | 3 h | ||||||
| Local class | 2 h | 1,5 h | |||||
| Research | 2 h | 2 h | 2 h | ||||
| Design | 3 h | 4 h | |||||
| Fabrication | |||||||
| Documentation | 2 h | 4h | |||||
| Review | |||||||
| Total |
overview
Week 1 sets the foundation for the entire Fab Academy journey. It focuses on two things: establishing my documentation workflow (Git, GitLab, building my personal website) and sketching initial ideas for my final project. According to Neil’s and local instructor’s orientation, the key principle is “document as you do”—recording every step, problem, and solution becomes a habit I should carry through all 18 weeks.
learning objectives
Communicate an initial project proposal. Identify and utilise version control protocol(s). Explore and use website development tool(s).
assignments
- download, read, and sign the student agreement and commit the file to your repo.
- work through a git tutorial.
- describe briefly what it will do and who will use it.
- make a website and describe how you did it.
- create a section about yourself on that website.
- add a page with your sketch and description of your final project idea(s).
- document steps for setting up your Git repository and adding files to it.
- push to your class GitLab repository.
The final project proposal, including the initial sketch and concept description, is documented in the Final Project Proposal page.
research
the tools (my stack).
Considering that documenting plays such a critical roll in the Fab Academy program, my first question was: How could I work locally, prepare my documentation and then publish it?
I am familiar with Obsidian, a free and flexible app that cares for the user’s privacy. It is a markdown editor, which I believe should ease my whole process. It works with plain .md files stored locally in a folder called a “vault.” Obsidian adds features like internal linking and templates, but at the end of the day, it’s just reading and writing text files.
But this is just the local editor. I need something else so I found Astro. Astro is a static site generator. They claim that:
Astro builds websites by converting content into 100% static HTML, CSS, and JavaScript files at build time, resulting in lightning-fast performance with minimal client-side JavaScript.]
In my case, Astro takes my markdown files, runs them through templates and layouts, and spits out a folder of plain HTML/CSS/JS. That output is what actually gets published.
Git Version control. It tracks every change I make and syncs everything with a remote repository on GitLab. When I push, it triggers the deployment.
GitLab CI/CD The automation layer. Every time I push to the repository, a pipeline kicks in: it installs dependencies, builds the site with Astro, and publishes the result to GitLab Pages.
VSCodium My code editor. Open-source fork of VS Code. I use it for anything that isn’t pure content writing—Astro components, configuration files, troubleshooting.

- I write content in Obsidian.
- edit code and config in VSCodium when needed.
- run
npm run dev* to preview the site locally atlocalhost:4321. - once I’m happy with the result, I commit and push with Git.
- the pipeline builds and deploys automatically.
npm run devstarts a local development server. Astro watches my files and rebuilds the site automatically when I save changes. I see the result instantly in my browser without pushing anything to GitLab.
process
web
After playing around with the GitLab editor, uploading some files and pictures, I started researching for a minimalist, modern and clutter-free template. Being an occasional Figma’s user I went straight looking for some of the community’s free templates. This one seemed right for the job:
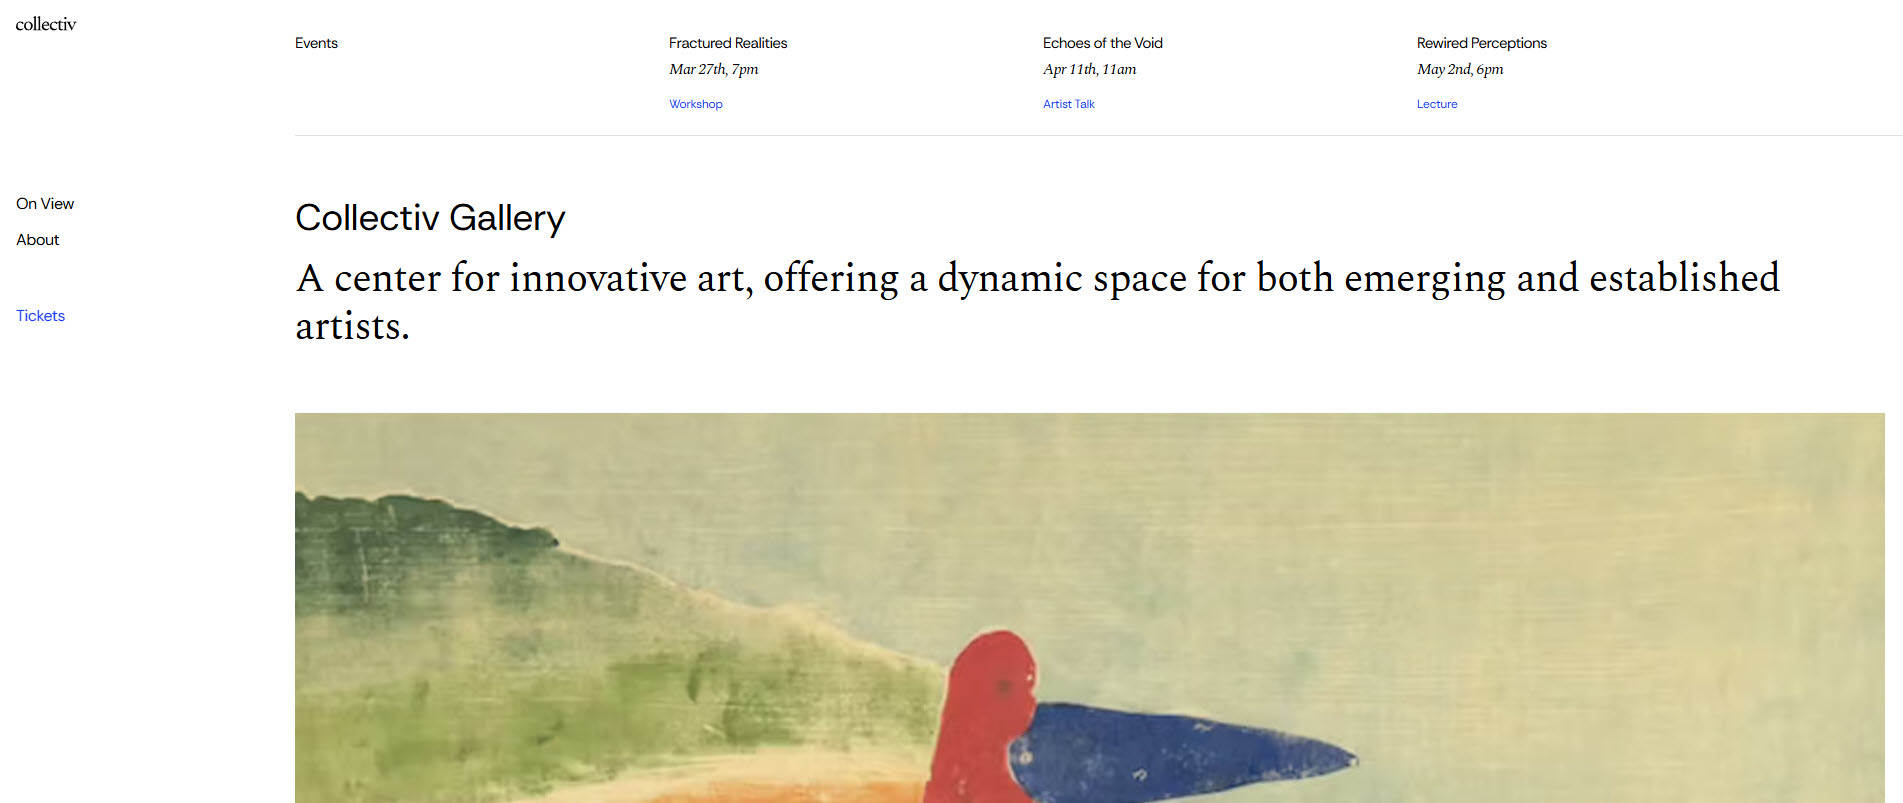
Some tweaking and prompting with their in-built AI (Figma Make), made me came out with the current design.
ai usage disclosure
For the past year and a half, I have been using large language models extensively—mainly Claude, but also ChatGPT, Perplexity, local models like Meta Llama and others—as part of my daily workflow. I use them to learn new concepts, troubleshoot code, draft documentation, and generally move faster through technical work.]
For Fab Academy, I am documenting the prompts and conversations that contributed to my progress. This is not about hiding AI assistance; it is about being transparent with how I actually work.
Below are the key prompts I used to set up and refine this documentation site.
Prompts.
Figma’s template tweaking:
-
Initial concept & aesthetic:
Create a documentation website for Fab Academy 2026 inspired by a minimalist art gallery aesthetic. The design must be strictly rectangular with zero rounded corners (
rounded-none). Implement a dual navigation system: a persistent vertical sidebar on the left and a horizontal navigation bar at the top. Ensure my name is presented subtly and discreetly, maintaining a clean and professional look. Use a neutral color palette (whites, blacks, and grays). -
Structure & grid layout:
Develop a homepage featuring a clean, responsive grid of 18 cards, representing the 18 weeks of the Fab Academy program. Each card should display the week number and the specific assignment title. Use high-quality placeholder images for each week that reflect a ‘maker’ or ‘laboratory’ environment. All typography should be professional and minimal.
-
Navigation & componentization:
Build a
SideNavigationcomponent for main sections (Home, About, Final Project, Agreements) and aTopNavigationcomponent that displays the current section or week title. Ensure the sidebar stays fixed on desktop and collapses gracefully on mobile. The transition between the grid and individual week pages should feel seamless. -
Dynamic week pages:
Implement a dynamic system to handle 18 individual week pages. Each page should include a header with the week’s title, a section for documentation text, an image gallery for process photos, and a dedicated area for file downloads (STLs, code, etc.). Use the official Fab Academy 2026 schedule for the week titles, starting with ‘Principles and Practices’ and ‘Project Management’.
-
Visual refinement:
Refine the UI to ensure absolute ‘rectangularity’. Every button, card, and container must have
border-radius: 0. Use thin, subtle borders (1px) to separate layout sections instead of heavy shadows, mimicking a digital architectural blueprint or a modern gallery catalogue.
Prompts using Claude:
-
Obsidian vault structure:
Configure the structure of the new Obsidian Vault step by step, with the most probable sections and subsections.
Solution: Created vault at C:\fab-academy\src\content\ with:
src/content/
├── _assets/           # Images (excluded from collections)
│   ├── weeks/week01-18/
│   ├── final-project/
│   └── about/
├── weeks/             # 18 weekly assignment files
├── final-project/     # Final project documentation
├── pages/             # Static pages (about, student-agreement)
└── _templates/        # Templater templates
Once the structure was created, I took care of the Obsidian settings.
Configuration:
| Setting | Value |
|---|---|
| Template folder (Templater) | _templates |
| New link format | Path from current file |
| Use [[Wikilinks]] | OFF |
| Default location for attachments | In subfolder under current folder |
| Subfolder name | _assets |
| Detect all file extensions | ON |
-
Content collections configuration:
Configure Astro content collections.
Solution: Created src/content/config.ts:
typescript
import { defineCollection, z } from 'astro:content';

const weeks = defineCollection({
  type: 'content',
  schema: z.object({
    title: z.string(),
    week: z.number(),
    date: z.coerce.date(),
    topic: z.string(),
    status: z.enum(['not-started', 'in-progress', 'completed']).default('not-started'),
    tags: z.array(z.string()).default([]),
    heroImage: z.string().optional(),
  }),
});-
Figma’s design integration:
Integrate Figma React components into Astro project.
Solution:
-
Installed Tailwind CSS v3:
npm install -D tailwindcss@3 @astrojs/tailwind -
Created
MainLayout.astrowith sidebar navigation -
Applied Figma design styles using Tailwind classes
-
Layout includes: side navigation, mobile header, footer.
-
GitLab CI/CD configuration:
Deploy to GitLab Pages.
Solution: Final .gitlab-ci.yml:
yaml
image: node:20

pages:
  cache:
    paths:
      - node_modules/
  script:
    - npm ci
    - npm run build
    - rm -rf public
    - mv dist public
  artifacts:
    paths:
      - public
  only:
    - main
Debugging:
Obviously, not everything worked fine the first time, some debugging was needed.
1 MDX comment syntax.
Problem: MDX files with HTML comments (<!-- -->) caused errors.
Solution: Convert all comments to JSX syntax:
powershell
Get-ChildItem -Path "C:\fab-academy\src\content" -Filter "*.mdx" -Recurse | ForEach-Object {
    $content = Get-Content $_.FullName -Raw
    $content = $content -replace '<!--', '{/*' -replace '-->', '*/}'
    Set-Content -Path $_.FullName -Value $content -NoNewline
}
2 Image workflow.
Problem: Images in _assets/ folder not rendering in Astro.
Solution: Use the public/ folder for images:
- Store images in
C:\fab-academy\public\images\about\ - Reference in markdown:
 - Rename files to avoid spaces:
mi-pequeno-unicornio-arcoiris.jpg
3 File Extensions for Obsidian.
Problem: Obsidian can’t edit .mdx files natively.
Solution:
- Rename
.mdxto.mdfor pages edited in Obsidian - Clear Astro cache after renaming:
Remove-Item -Recurse -Force "C:\fab-academy\.astro" - Enable “Detect all file extensions” in Obsidian settings
git
git is the most popular version control system (VCS). git let’s us:
- track changes across multiple files.
- compare versions of a project.
- “time travel” back to old versions.
- revert to a previous version.
- collaborate and share changes.
- combine changes.
Git installation and tutorial.
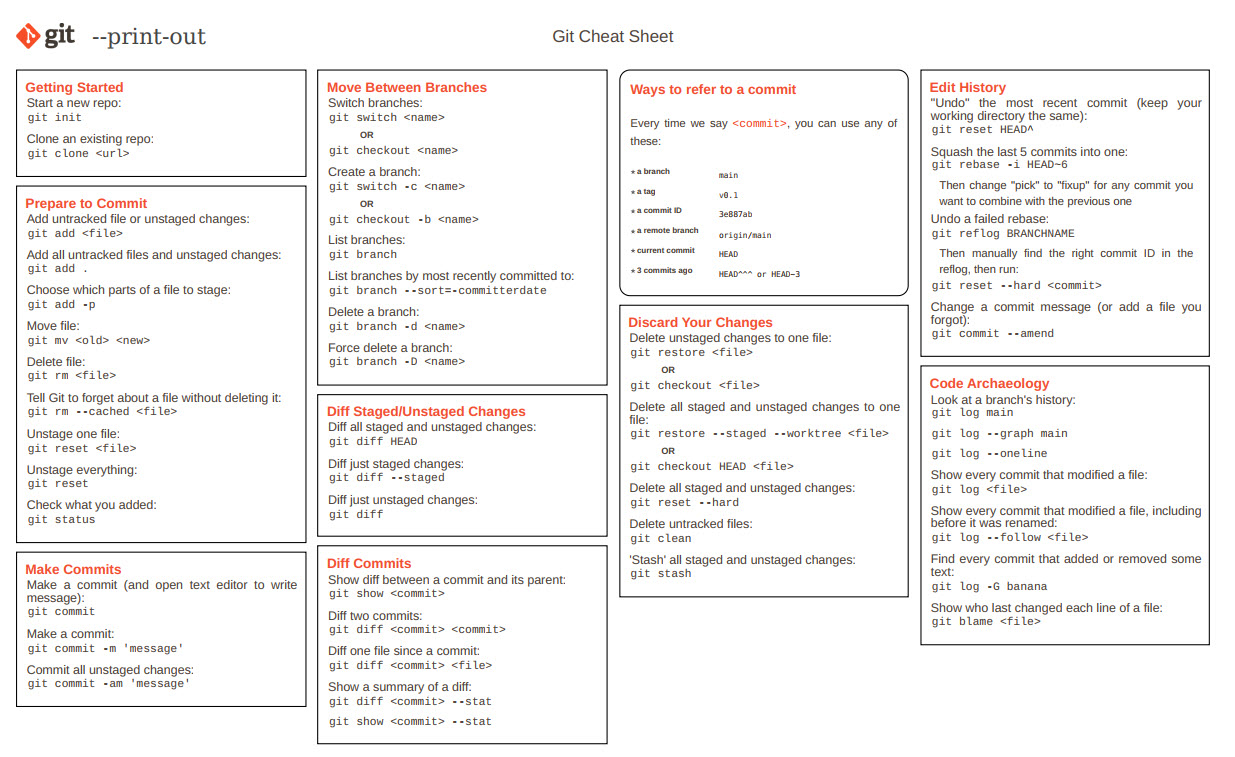
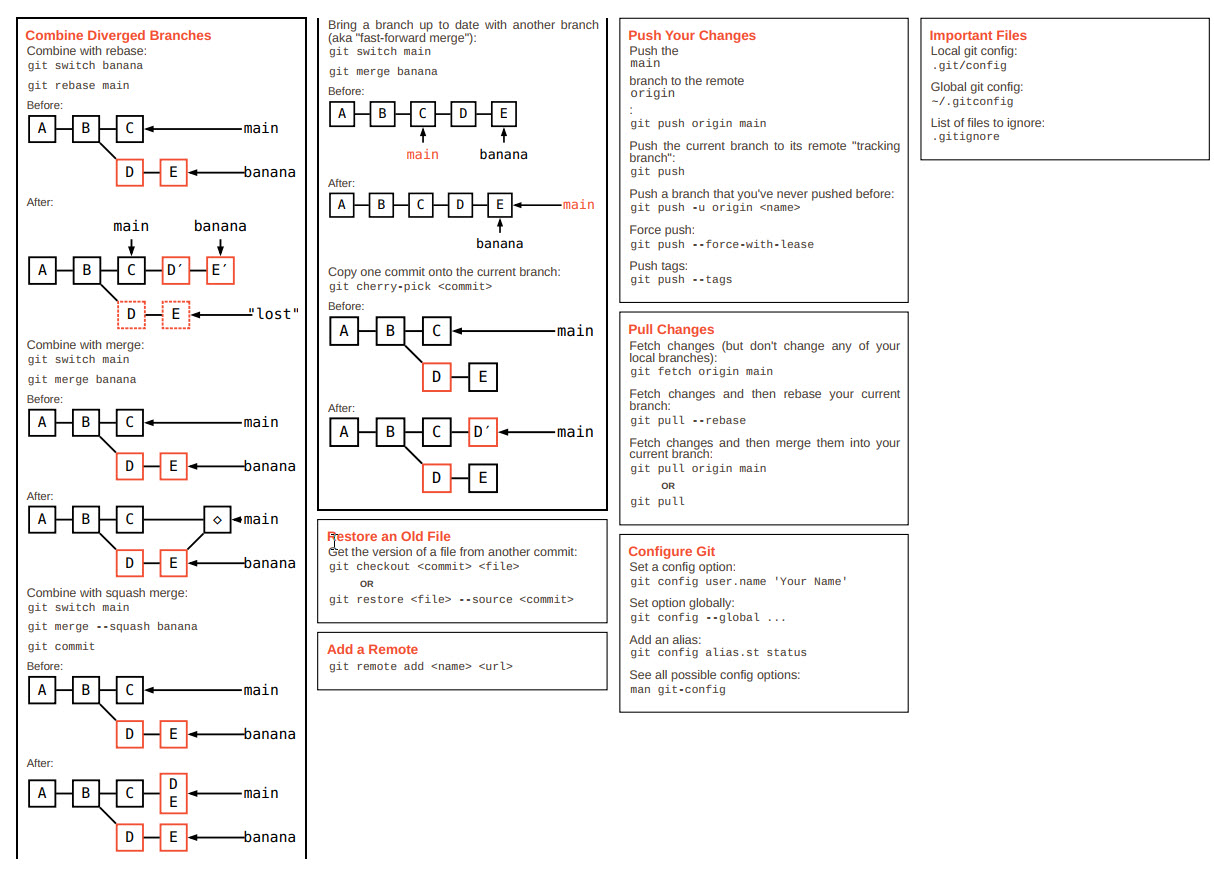
The official git’s site offers a lot of helpful information. One interesting resource is this cheat sheet with the most common commands:
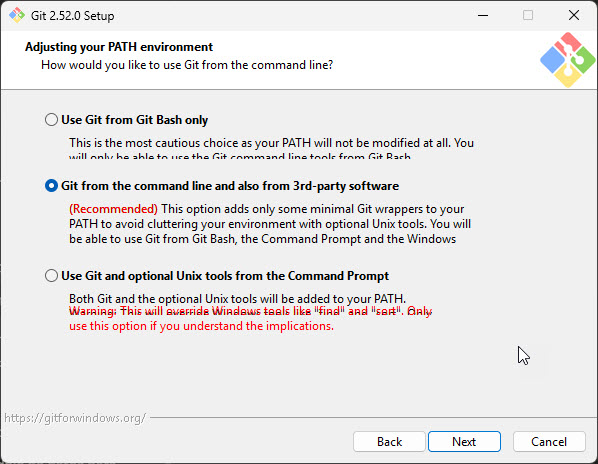
Following Eduardo Chamorro’s tutorial led me to a spotless installation.
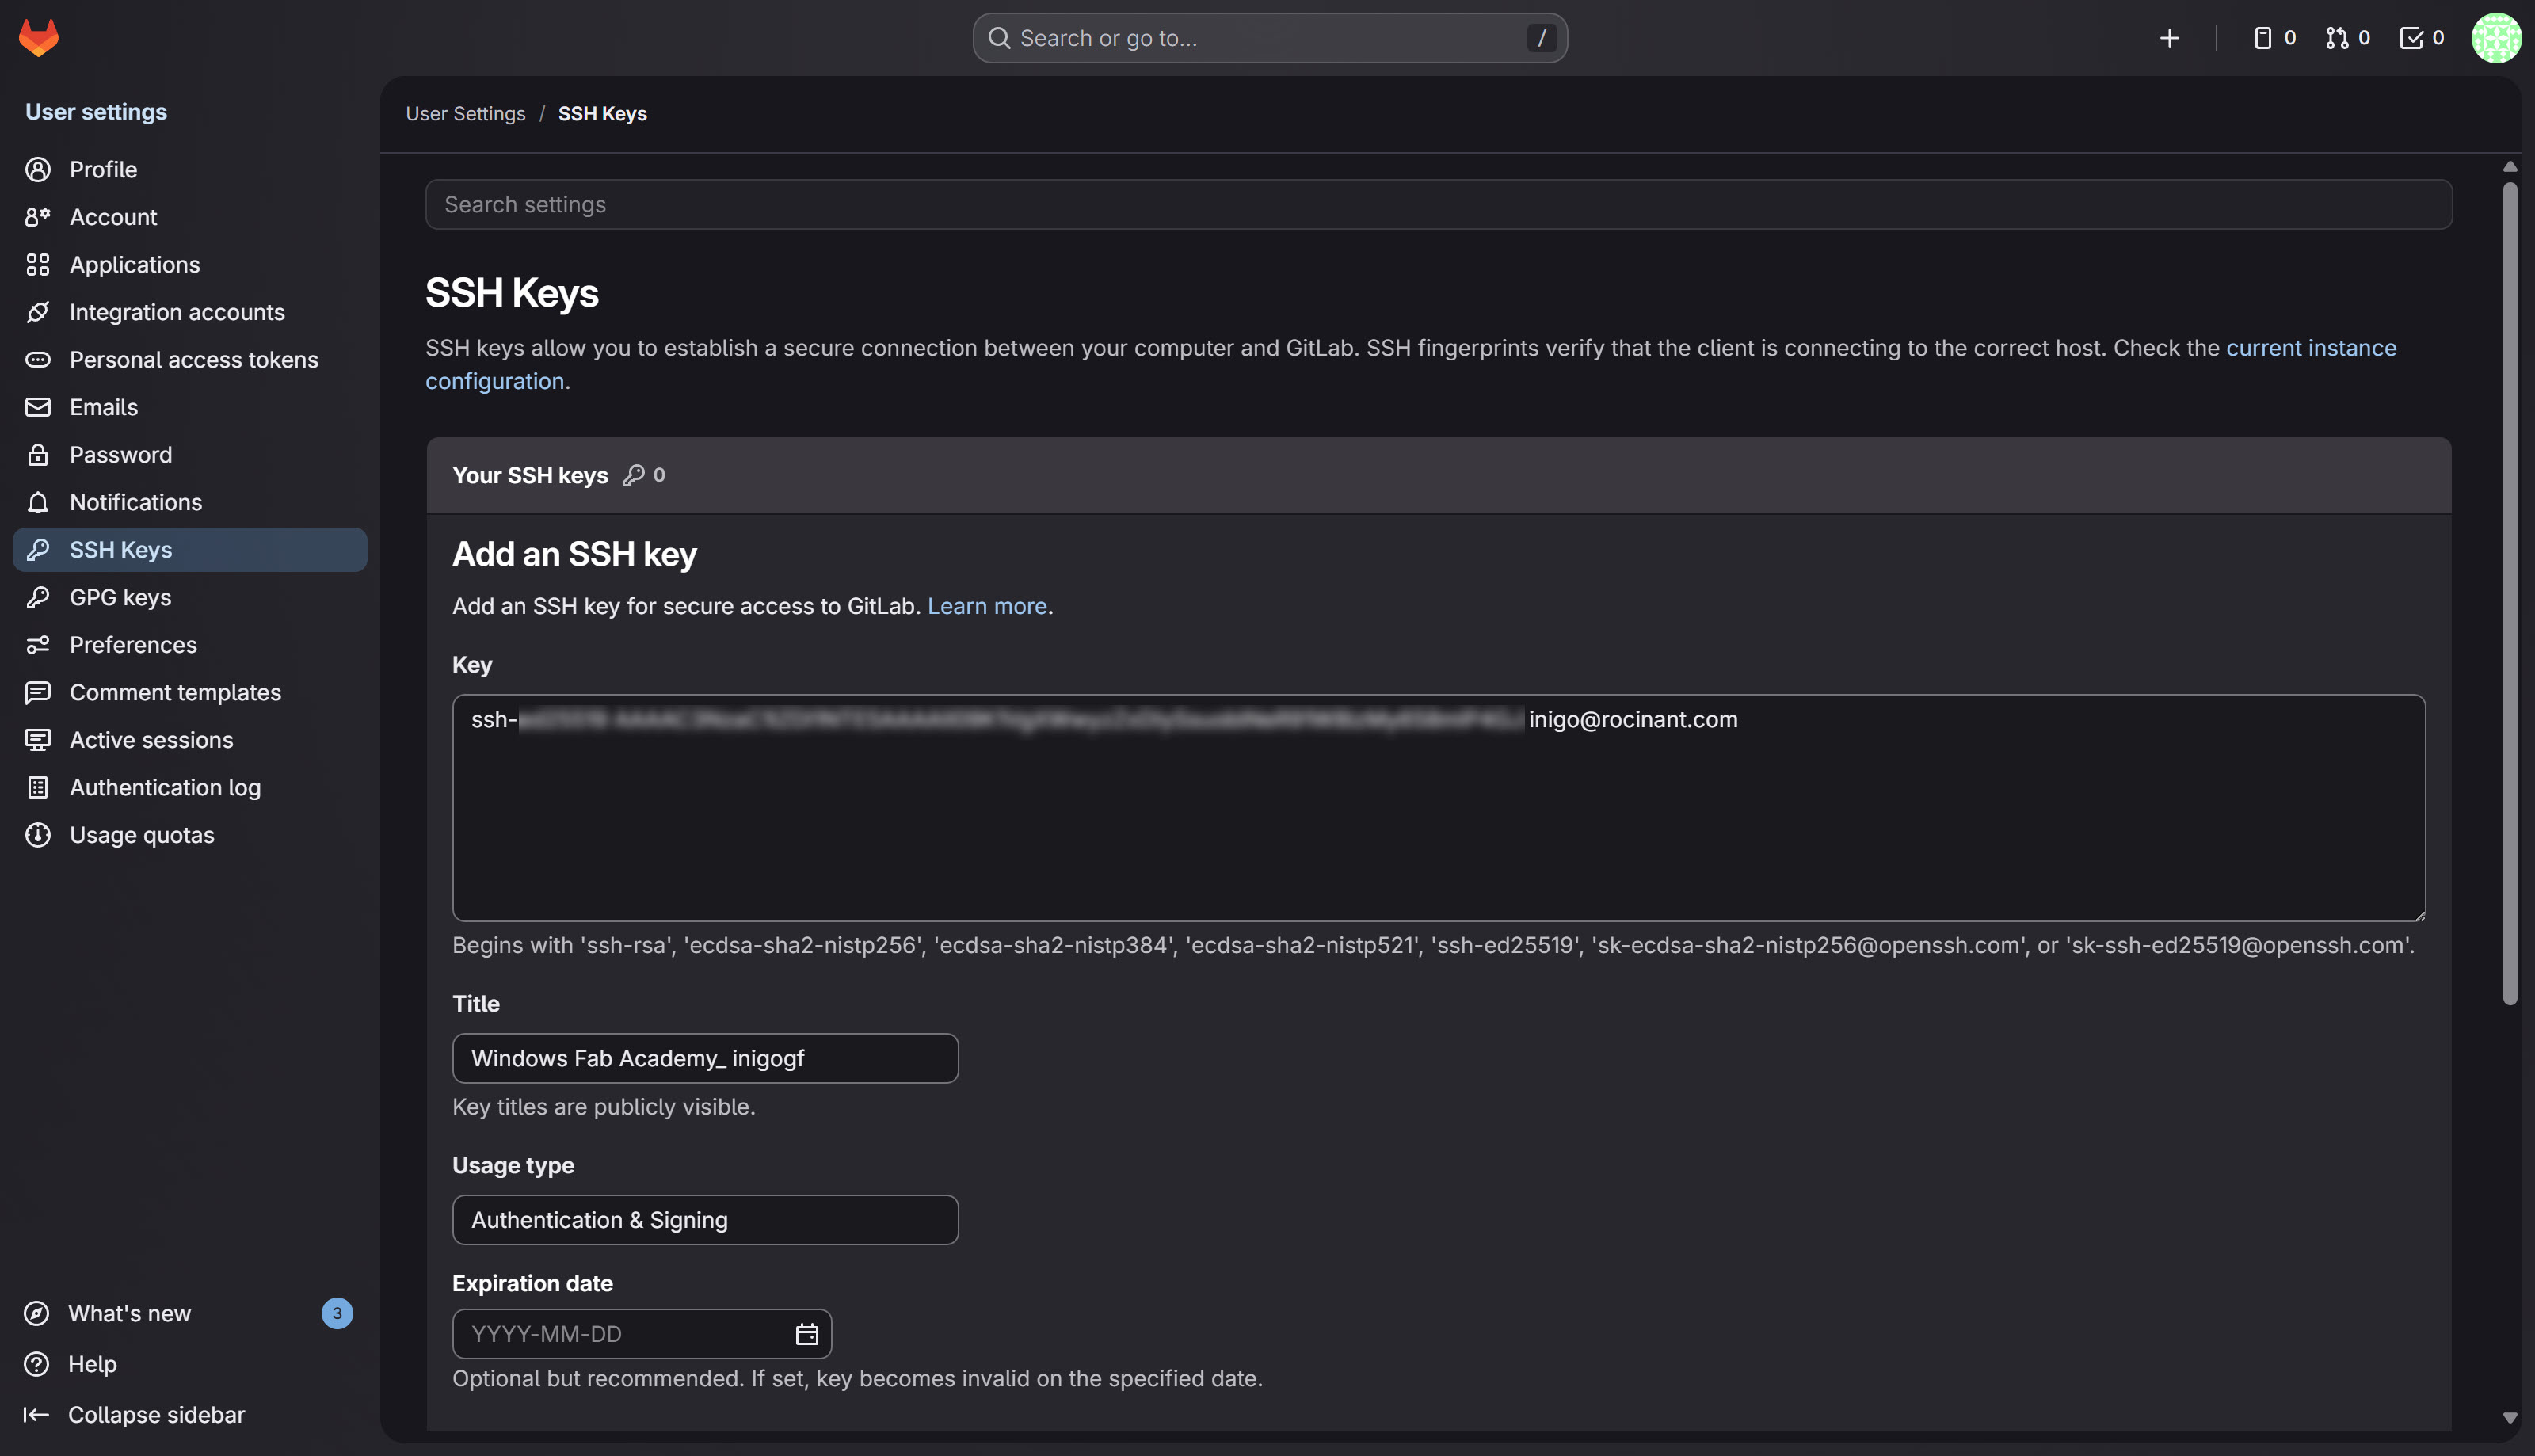
There was though one topic that kept thinking. Checking every element of the SSH key generation in the Internet
ssh-keygen -t rsa -C "your-email@example.com"led me to a comparison of two digital signature algorithms:
| Aspect | ed25519 | RSA |
|---|---|---|
| Created | 2011 | 1977 |
| Key length | 256 bits | 2048-4096 bits |
| Security | Equivalent to RSA-3072 | Depends on key size |
| Performance | Faster | Slower |
| Key size | Shorter (easier to copy) | Longer |
| Compatibility | All modern systems | Everything (including legacy) |
I ended up choosing the ed25519 SSH key generation. So far everything works fine.
Git mantra
Every documentation session follows the same sequence. The order matters: pulling first avoids conflicts with remote changes; checking status before and after the commit confirms exactly what was staged and what was recorded.
# 1. Pull — get the latest remote changes before doing anything
git pull

# 2. Status — see what files have changed locally
git status

# 3. Add — stage the files you want to include in the commit
git add .

# 4. Commit — record the snapshot with a descriptive message
git commit -m "week01: add git workflow documentation"

# 5. Status — confirm the commit was recorded cleanly
git status

# 6. Push — send the commit to GitLab and trigger the pipeline
git push
A typical session looks like this in the terminal:

Git Workflow
Basic commands:
First I make sure what files have changed:
cd C:\fab-academy git statusCheck commit size before pushing:
powershell
git diff --statThen, proceed with the commit and push:
git add .
git commit -m "Description of changes"
git push
Documenting in Obsidian
This is what the workflow looks like in practice. I open the vault directly in Obsidian — the src/content/ folder acts as the vault root — and navigate to the week file I want to edit.
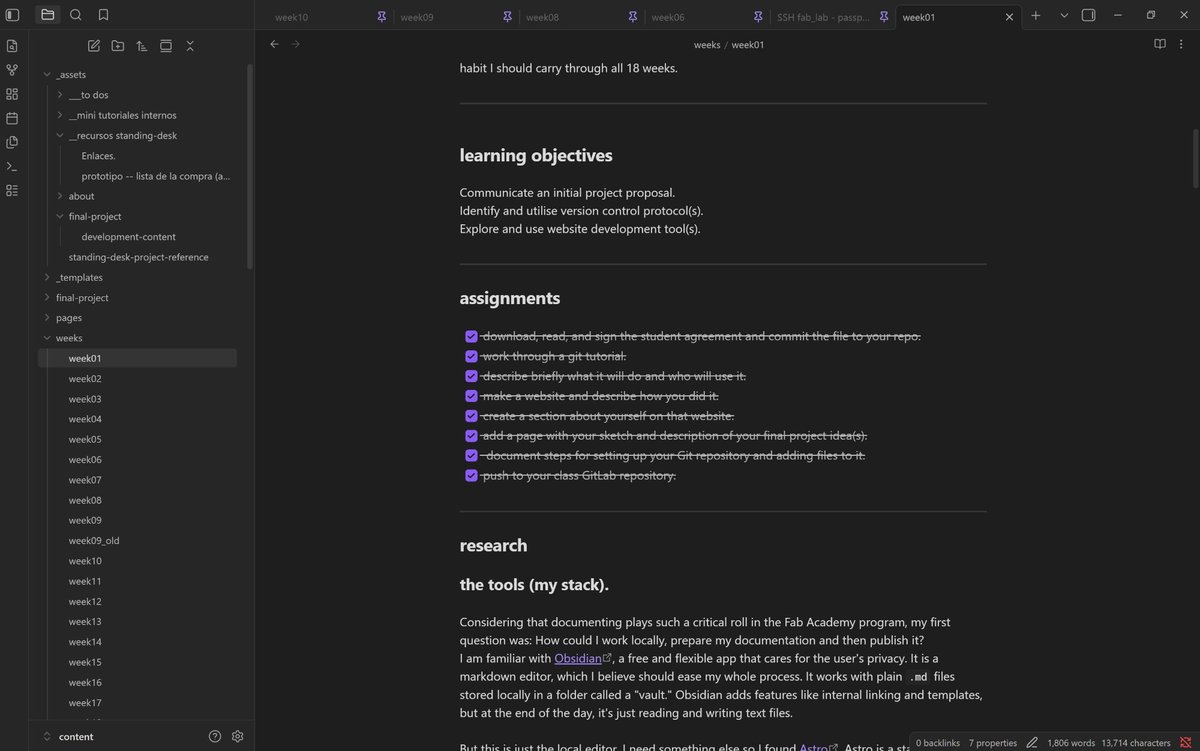
Once I save the file, the local Astro server at localhost:4321 picks up the change and rebuilds automatically. I verify the result in the browser before committing.