Final Project Planning
Before starting the fabrication process, it was important to define the scope of the
final project, identify the objectives, and determine how the knowledge
acquired throughout Fab Academy would be integrated into a single functional prototype.
The following questions were used as a framework to guide the planning, development,
fabrication, programming, and evaluation of the project.
01 What will it do?
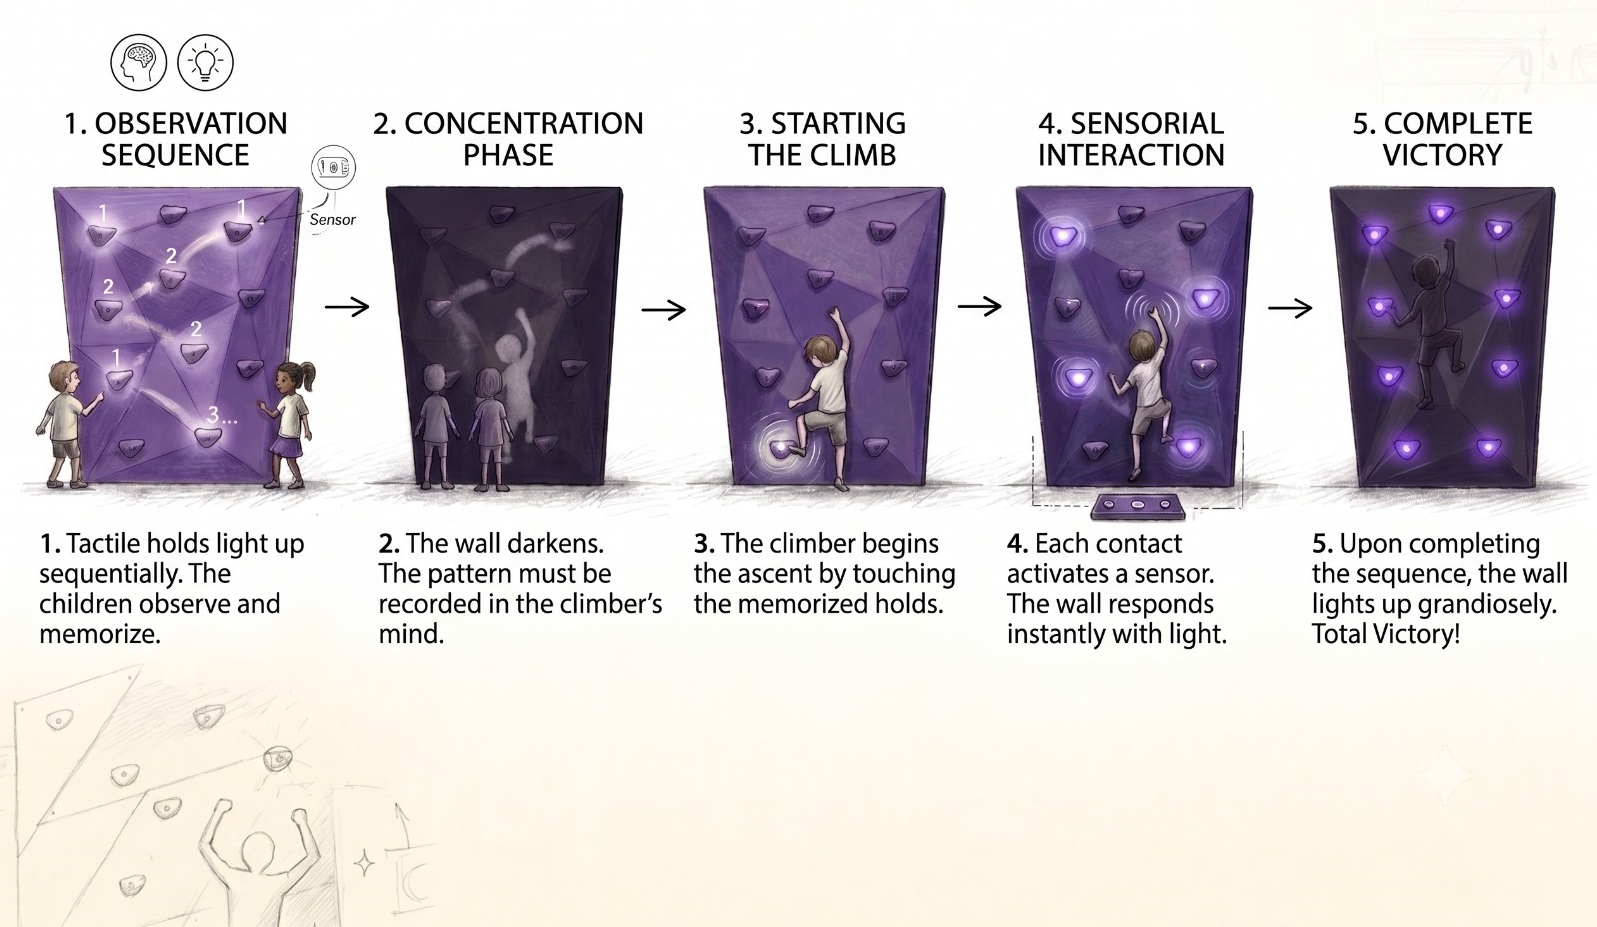
The project is an interactive climbing wall designed to promote
emotional development and well-being through movement, memory,
and play.
The system generates illuminated routes using LEDs integrated into transparent
climbing holds. Children must observe the sequence, memorize the pattern,
and reproduce it by touching the corresponding holds in the correct order.
The wall combines physical activity, cognitive stimulation, sensory interaction,
and positive reinforcement. When the correct sequence is completed, the system
provides visual and audio feedback, creating an engaging and motivating learning experience.
In addition, activities can be configured through a mobile application, allowing
therapists, educators, or parents to adapt the difficulty and interaction modes
according to each child's needs.
02 Who has done what beforehand?
Several projects have explored interactive climbing walls, educational games,
and sensory learning environments. Existing examples include climbing systems
that use lights, sounds, and interactive challenges to improve coordination,
motor skills, and cognitive development.
My contribution focuses on integrating
digital fabrication, interactive climbing holds, wireless communication,
mobile application control, and emotional well-being into a single platform.
Unlike conventional climbing walls, this project emphasizes memory exercises,
emotional engagement, and multisensory learning through customized digital fabrication
and embedded electronics.
03 What sources will you use?
- Fab Academy weekly assignments.
- ESP32 technical documentation.
- Arduino programming resources.
- Rhino 3D design workflow.
- ShopBot CNC machining documentation.
- Formlabs SLA printing documentation.
- Academic references related to emotional development and play-based learning.
- Open-source electronics and embedded systems resources.
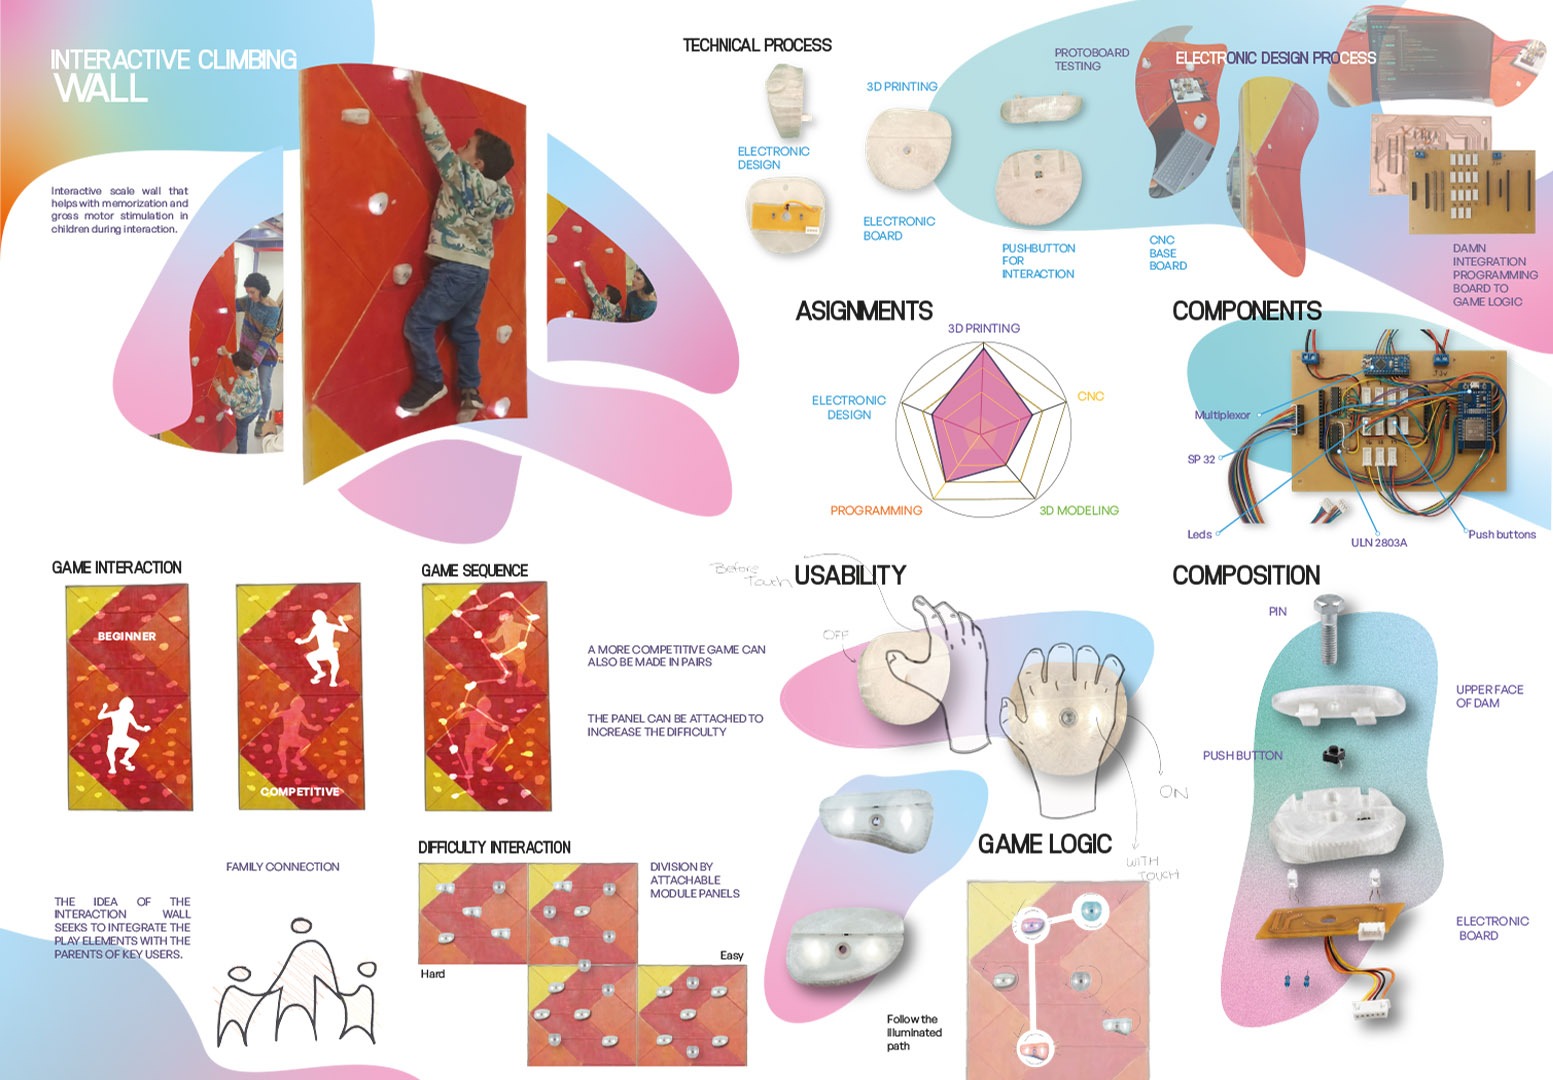
04 What will you design?
The project includes the design of both the physical and digital components required
for the interactive climbing wall.
- Playwood climbing wall structure.
- Interactive climbing holds.
- LED lighting system.
- ESP32 control architecture.
- Touch-sensitive interaction system.
- Mobile application interface.
- Electronic connections and wiring layout.
- Audio feedback system.
- Project visual identity and documentation.
05 What materials and components will be used?
- Playwood panels for the wall structure.
- Clear resin for the climbing holds.
- ESP32 microcontroller.
- LED lighting system.
- Push buttons.
- Power supply and wiring.
- Mobile application.
- Fasteners and assembly hardware.
06 Where will they come from?
The materials and components will be obtained from different sources according to
their function and availability.
- Fab Lab Indoamérica fabrication facilities.
- Local electronics suppliers.
- Digital fabrication laboratory resources.
- Open-source software platforms.
- Fab Academy documentation and learning resources.
Most of the manufacturing processes will be carried out directly within the Fab Lab
using CNC machining, SLA printing, electronics production, and assembly equipment.
07 How much will they cost?
| Item |
Estimated Cost (USD) |
| Plywood Panels |
$40 |
| Clear filament |
$44 |
| ESP32 |
$15 |
| LEDs and Electronics |
$35 |
| Buttons and Wiring |
$20 |
| Power Supply |
$5 |
| Assembly Materials |
$14 |
| Miscellaneous |
$15 |
| Painting |
$7,5 |
| Total Estimated Cost |
$195,5 |
08 What parts and systems will be made?
- Mechanical System: Plywood wall structure and climbing holds.
- Electronic System: ESP32, LEDs, touch sensors, and audio module.
- Software System: Embedded programming and game logic.
- Communication System: Wireless connection and mobile application.
- Interaction System: Visual, tactile, and auditory feedback.
09 What processes will be used?
- Computer-Aided Design (CAD).
- Parametric modeling in Rhino.
- CNC machining with ShopBot.
- SLA resin 3D printing.
- Electronics design and production.
- Soldering and assembly.
- Embedded programming.
- Wireless communication.
- Mobile interface development.
- System integration and testing.
10 What questions need to be answered?
Throughout the development process, several questions guided the design,
fabrication, and testing of the project.
- Can climbing activities be combined with memory-based challenges?
- How can interactive play support emotional well-being?
- How reliable are touch-sensitive climbing holds during use?
- What level of difficulty generates the highest engagement?
- How effective is visual guidance through illuminated routes?
- How can therapists and educators customize activities through the application?
- How can digital fabrication improve educational and therapeutic environments?
11 How will it be evaluated?
The project will be considered successful if the different systems function
together as a complete interactive experience.
- ✅ The climbing wall structure is fully assembled.
- ✅ The custom climbing holds function correctly.
- ✅ The ESP32 controls all interactive elements.
- ✅ The LEDs generate programmable routes.
- ✅ The touch-sensitive holds correctly detect user interaction.
- ✅ The system validates the selected sequence.
- ✅ The audio feedback responds appropriately.
- ✅ The mobile application communicates successfully with the wall.
- ✅ The complete prototype operates as a fully integrated system.
- ✅ The project demonstrates the integration of skills acquired throughout Fab Academy.