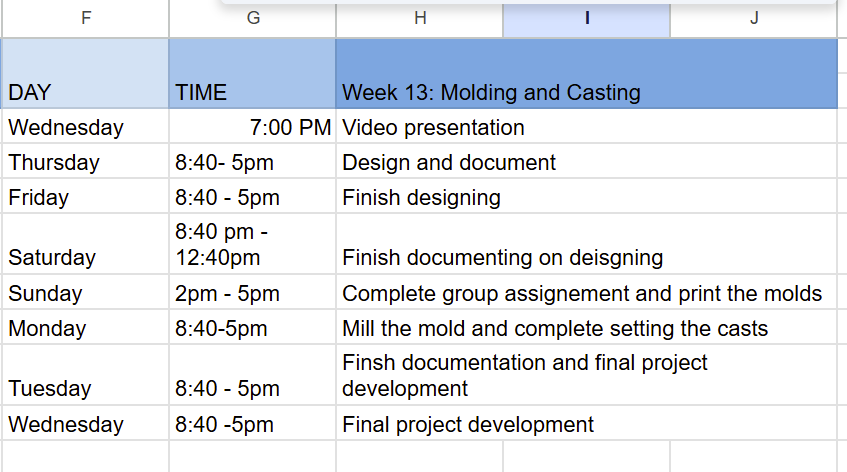
Week 13: Molding and Casting
Group assignment:
- Review the safety data sheets for each of your molding and casting materials
- Make and compare test casts with each of them
- Compare printing vs milling molds
Individual assignment:
- Design a mold around the process you’ll be using, produce it with a smooth surface finish that does not show the production process toolpath, and use it to cast parts.
Learning outcomes
- Design appropriate objects within the limitations of your process
- Demonstrate workflows used in mold design, construction and casting
Here comes another week!
Group assignment:
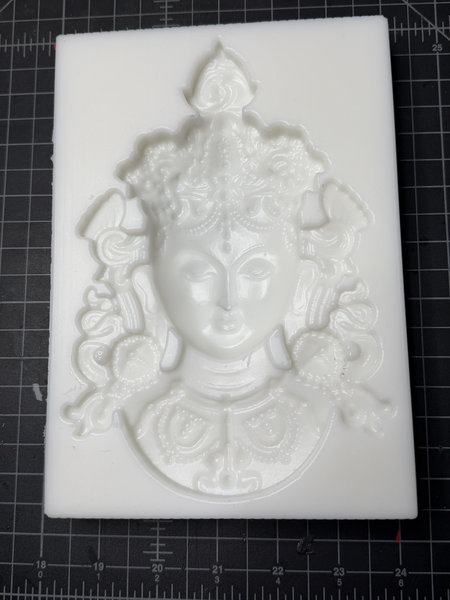
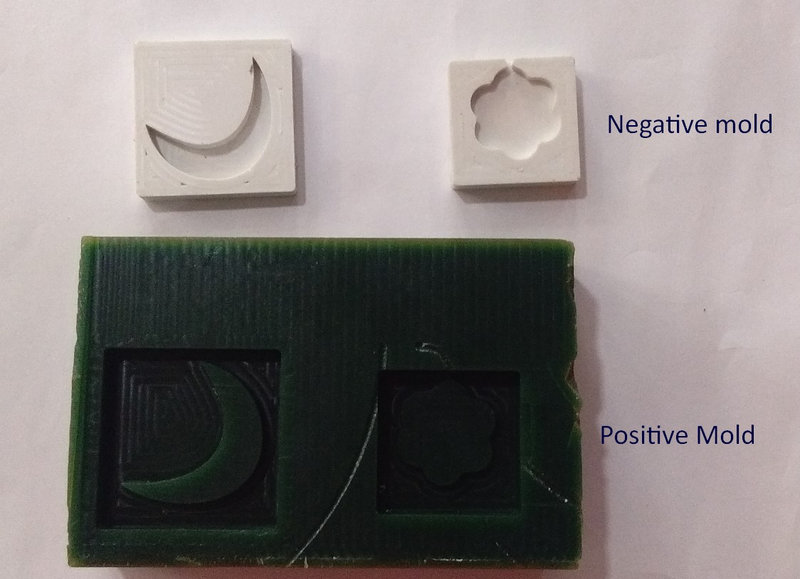
For the group assignment, we reviewed the safety data sheets for our lab’s molding and casting materials which included LSR 220 S silicone rubber, Ferris Machinable Blue Wax, Smooth Cast 305, and USG Ultimate Drystone and using LSR 220 S mixed at a 100:5 ratio, we made a silicone mold from a wax mold of the green Tara.
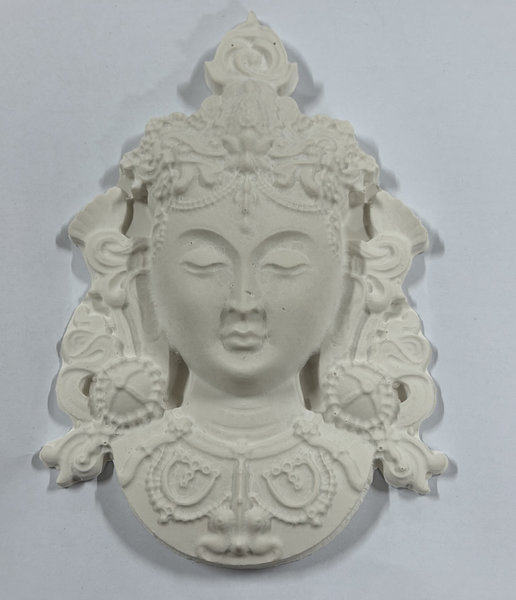
We then created test casts with two materials: USG Ultimate Drystone and Smooth Cast 305. The Drystone captured fine details very well but was fragile, especially in thin areas.
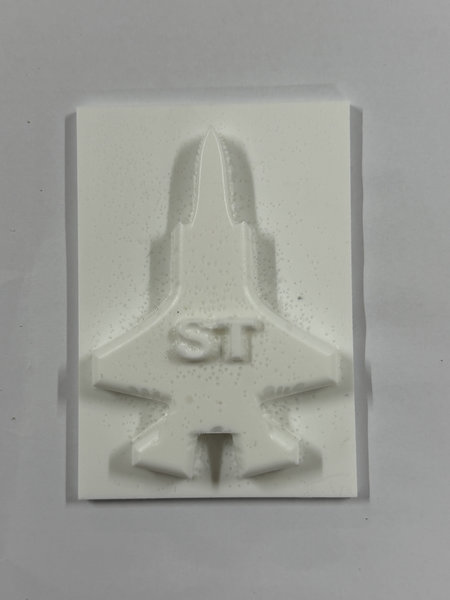
Then using one of our molds, a jet mold, we tested out Smooth Cast 305. Smooth Cast 305 produced a much stronger and more durable part, though with a few small surface bubbles.
Overall, the experience was really fun, my personal favourite was using the hydrostone for the tara mold.

You can access our group assignment here for more details.
Individual assignment:
Molding
Molding is a manufacturing process where a soft or liquid material (like plastic, metal, or glass) is shaped using a rigid form called a mold. First, a positive (male) mold is created, which represents the exact shape of the final object. This positive mold is then used to make a negative (female) mold, which has a hollow cavity in the same shape. Once the negative mold is ready, liquid material (such as plastic, resin, or metal) is poured into it and allowed to harden. After curing, the final object is removed from the mold. This process is commonly used to produce identical parts and decorative or structural components for products like furniture, walls, and ceilings.
 Picture Credit.
Casting:
Casting is the process of pouring a liquid material into a mold cavity, where it takes the shape of the mold. The liquid then hardens through cooling or a chemical reaction. Once fully solidified, the finished part, called a casting, is removed from the mold. Casting can be done using materials such as metals or cold setting substances like epoxy, concrete, plaster, and clay.
Differences between Molding and Casting:
- Molding: Creating the negative form (the void or shape). You make a mold out of a rigid material example; silicone, machined wax.
- Casting:Filling the negative form. You pour a liquid material exmaple; resin, plaster, metal into the mold to create the final solid object.
- Reusability: A mold is usually reusable (especially silicone molds) and each cast is a new copy.
- Output: Molding produces an empty cavity; casting produces the finished 3D part.
- Failure impact: If you ruin a mold, you lose the ability to make multiple casts. If you ruin a cast, you just clean the mold and pour again.
This image shows the process of making a cast using positive and negative molds.
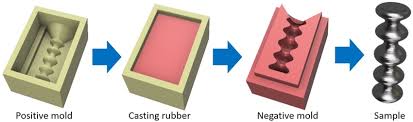 Image source.
Mold deisgn:
For the positive mold design, the software I'll be using is Fusion 360 because I am much more familiar with the software now. For the first mold which I will be 3d printing, I decided to make a simple bat mold because I thought it would be fun and simple.
I first defined all the parameters I'll be using for creating the base of my mold:
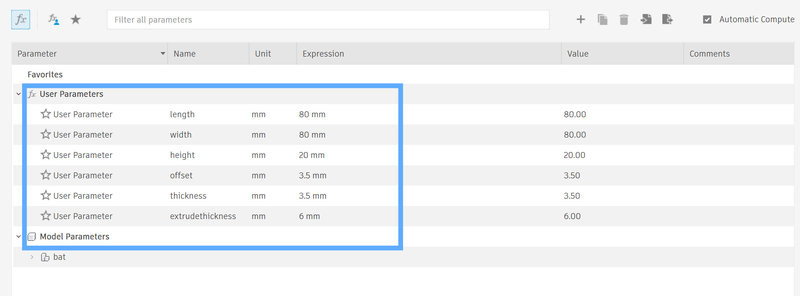
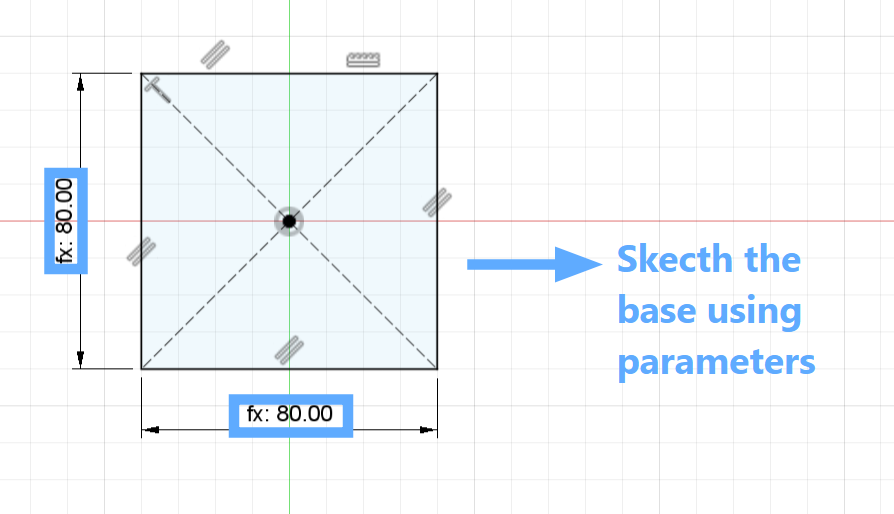
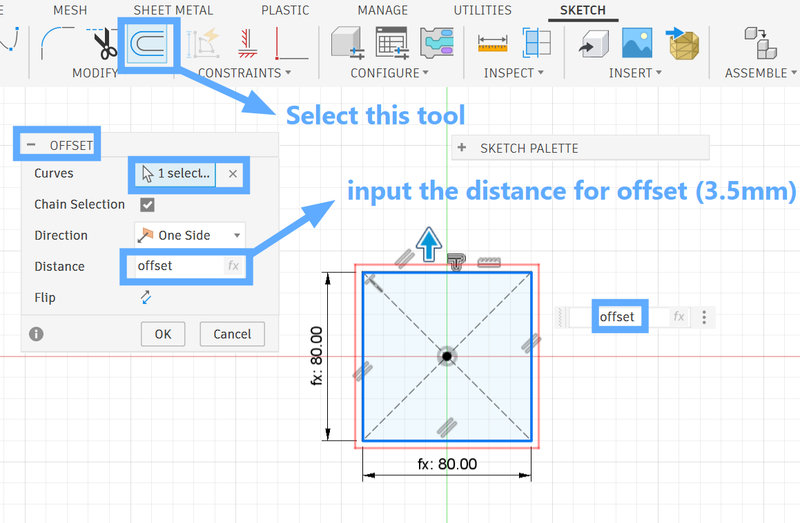
Then sketch the base for the mold using the center rectangle tool and use the predefined parameters. For the time being, I kept the length and the width of mold as 80mm x 80mm
Then offset the sketch by 3.5 mm using the offset tool, which is the set thickness of the walls
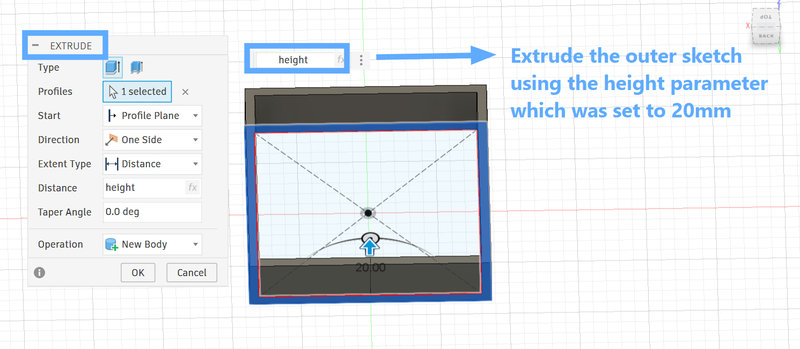
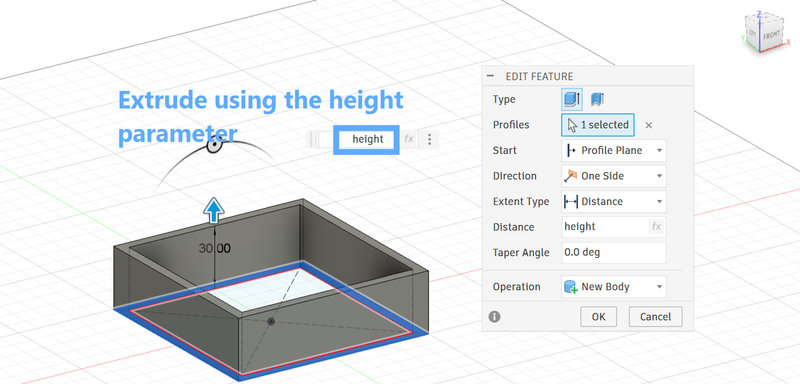
Then extrude the walls using the height parameter which was set to 20mm.
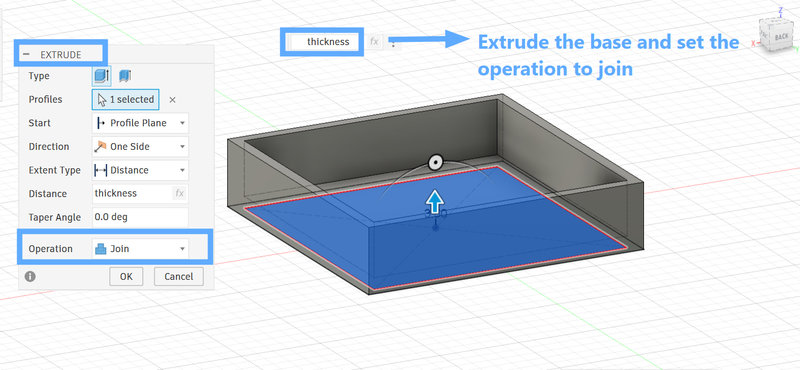
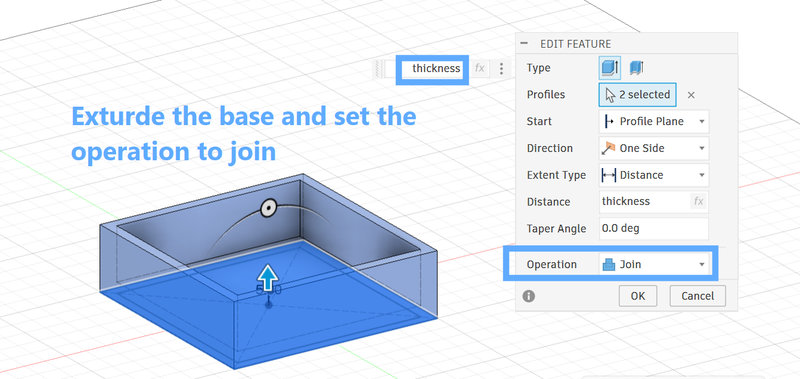
Extrude the base by the thickness as well and make sure to set the operation as join.
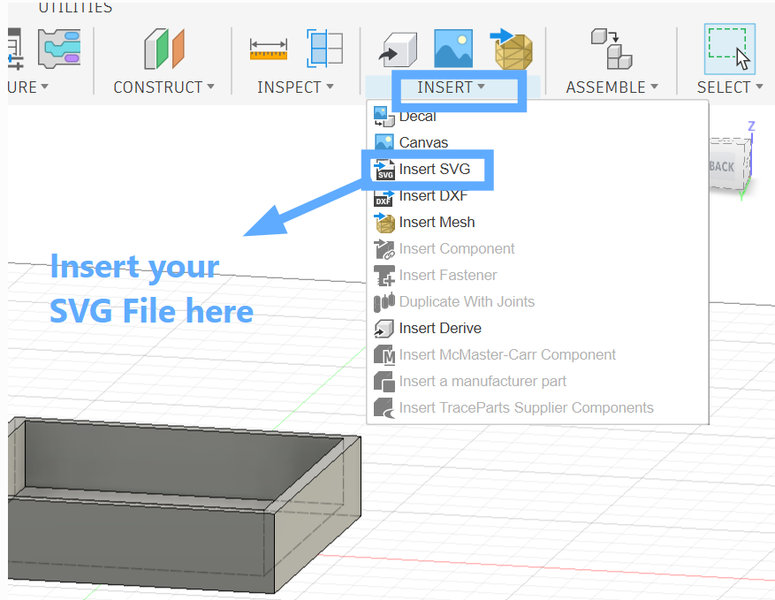
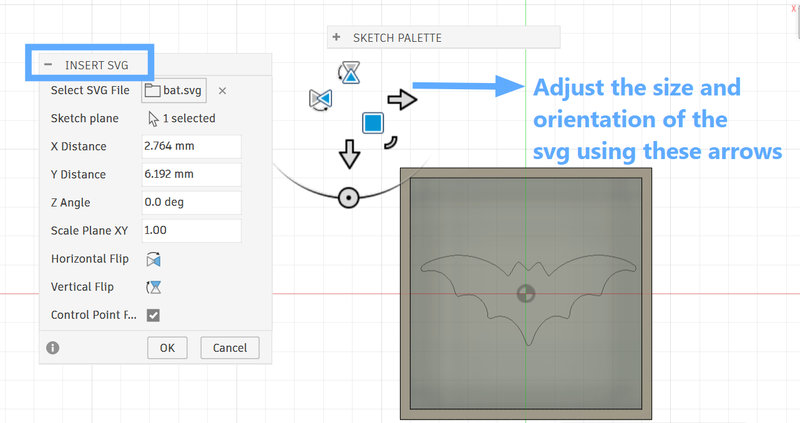
Then to make the bat, I downloaded the svg of the bat I wanted in pinterest and imported in Fusion under Insert > SVG :
You will be able to scale and move the svg around using the arrows so, I scaled the bat enough to fit inside the mold and placed it in the center of the base.
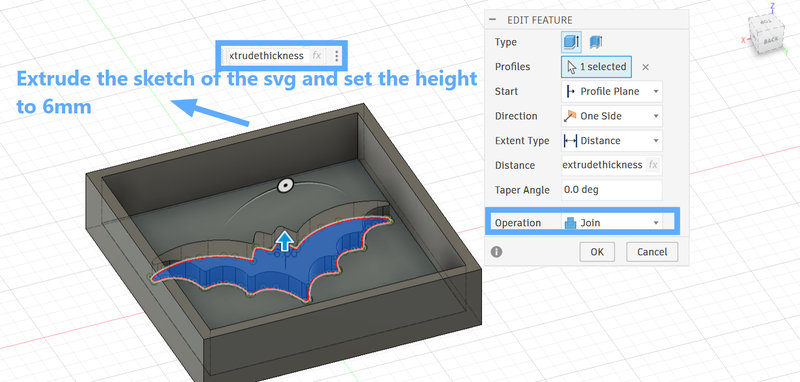
After adjusting the size and orientation, I extruded the bat with a height of 6mm.
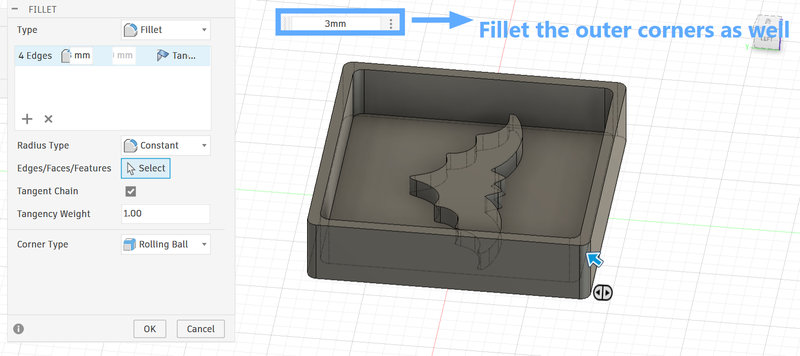
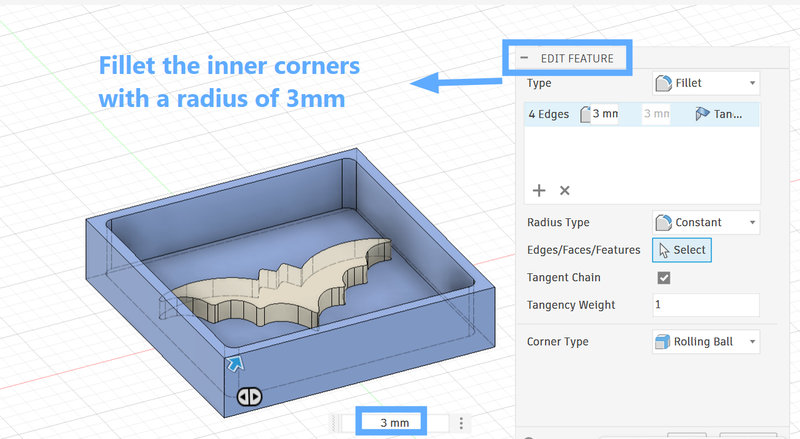
And since sharp corners in the mold would make it difficult to remove the silicone negative mold, I added fillets to both the inner and outer corners with a 3 mm radius.
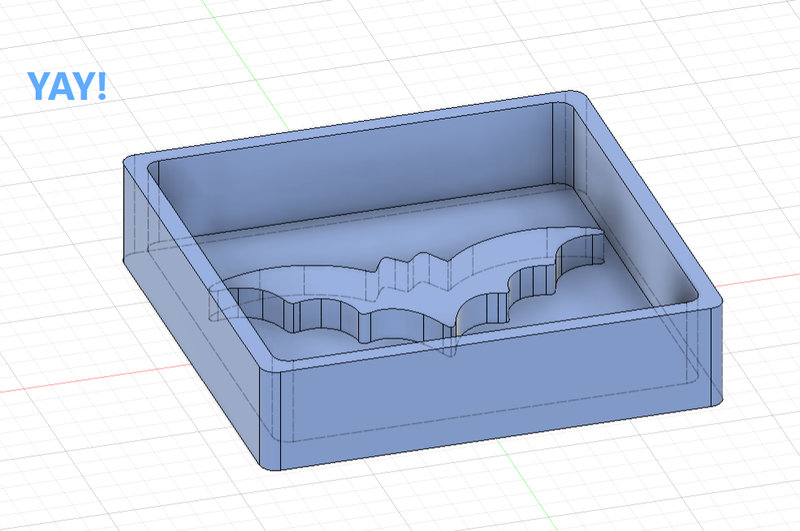
And with that, this is the final look of the mold! 😆
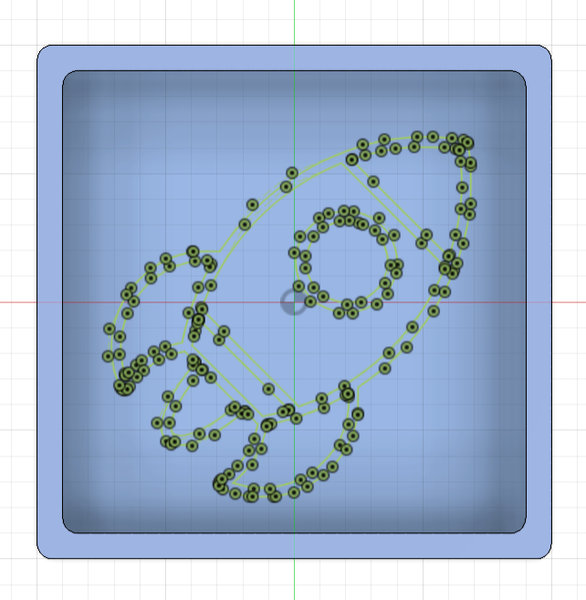
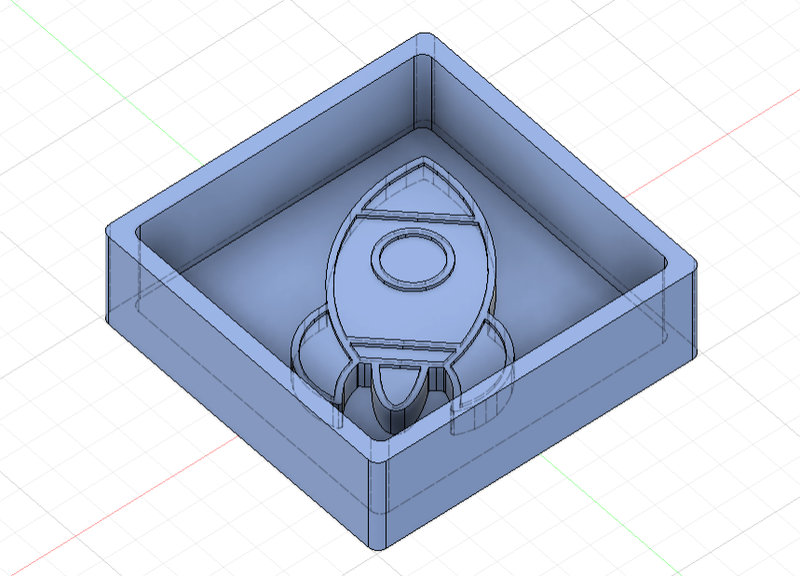
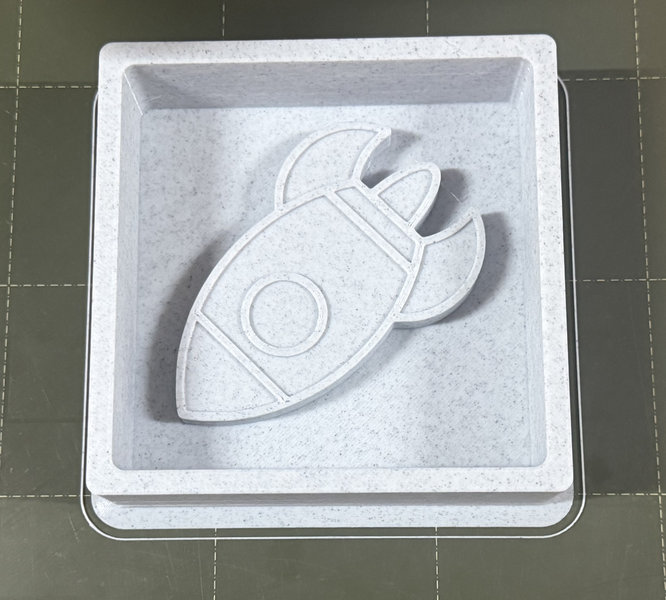
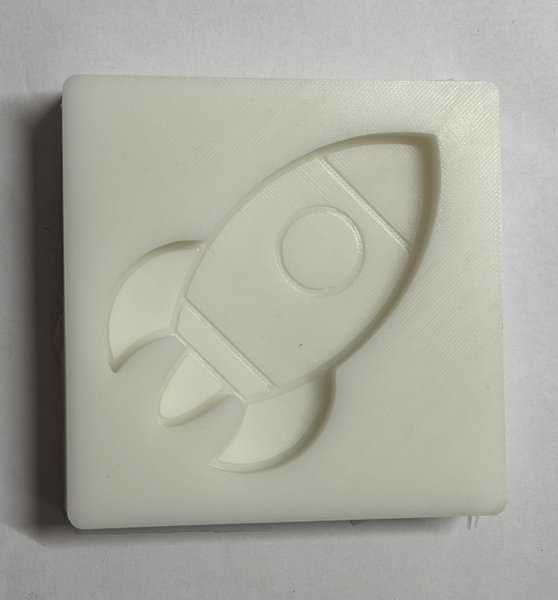
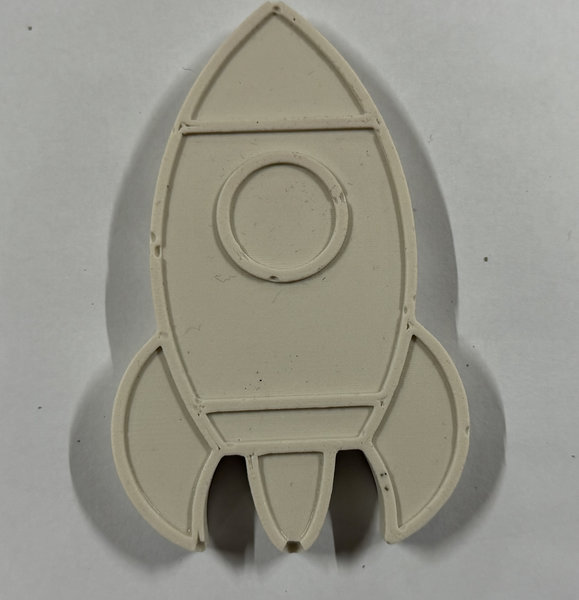
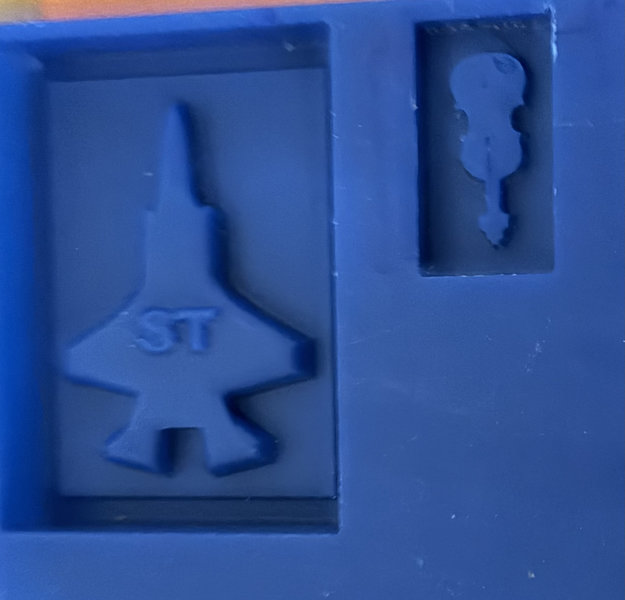
I decided to design another mold since we already had a bat mold in the lab. I made a mold of a rocket by following the same process except I used a SVG file of a rocket and extruded the parts that were raised by 6mm while the lower sections were raised to 5mm

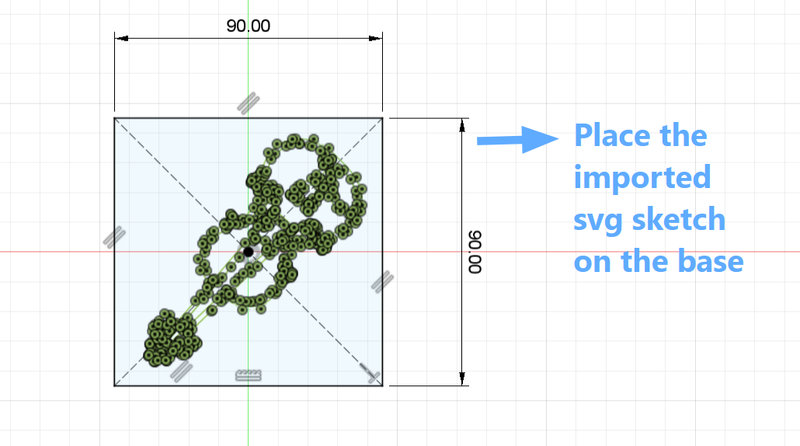
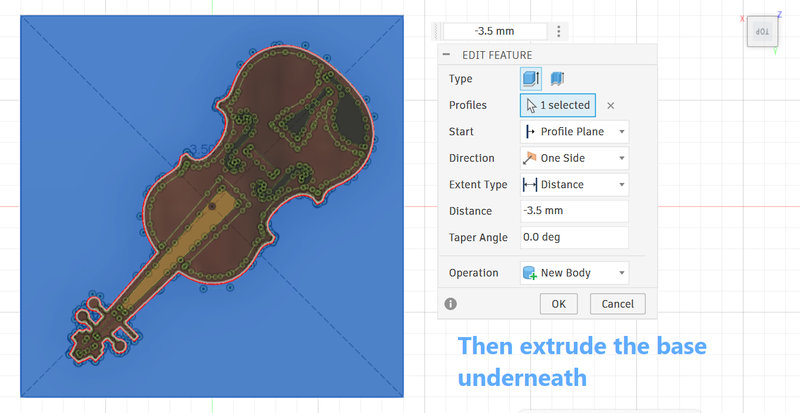
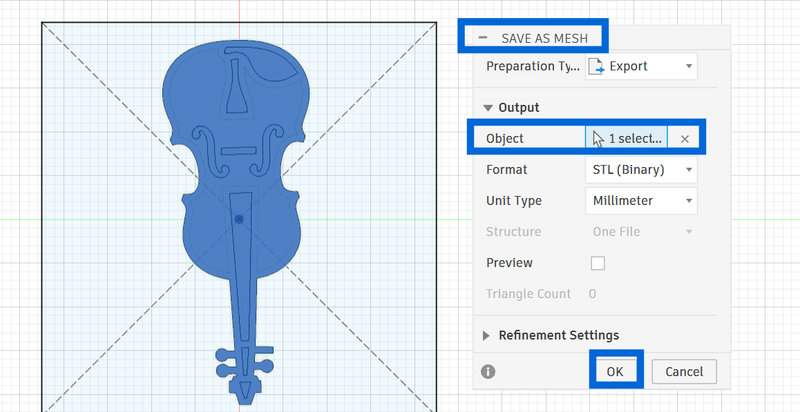
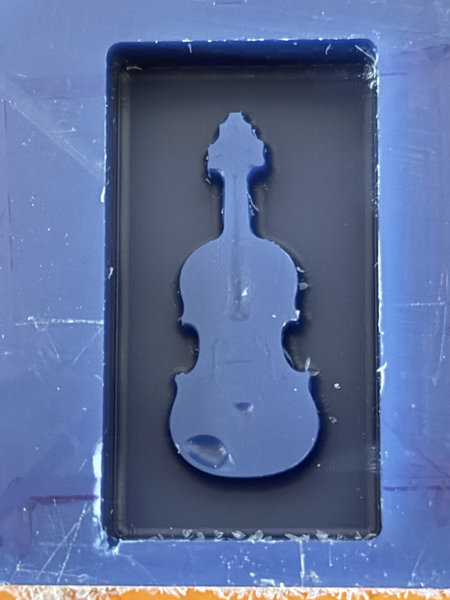
I designed the second mold that will be milled out in fusion as well and I wanted the second mold to be a violin. The process was similar except, I didn't have to make the borders of the mold since that will be set up later on.
I sketched the base and then inserted the downloaded svg and placed in the center of the base:
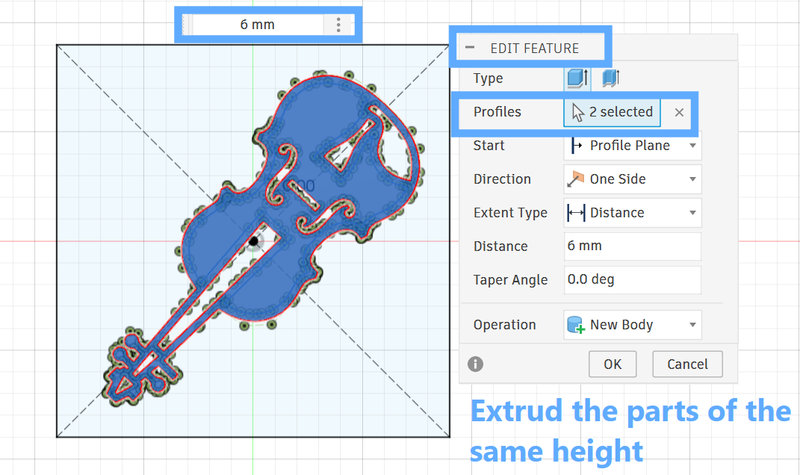
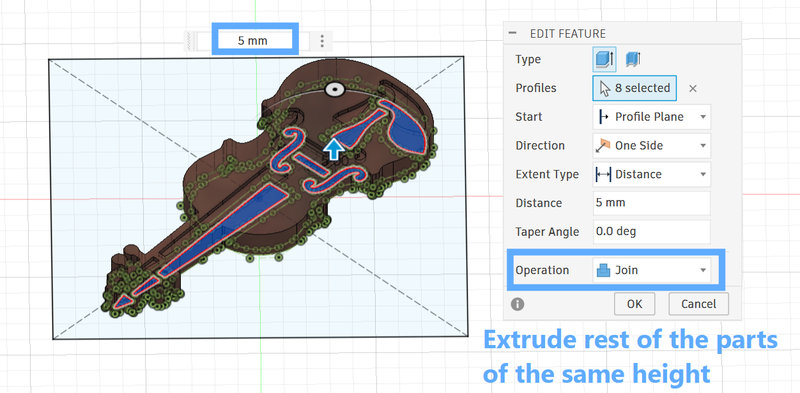
I then extruded certain parts of the violin design, since some areas needed to be pocket like holes. The raised sections were extruded to 6 mm, while the lower sections were set to 5 mm in height.
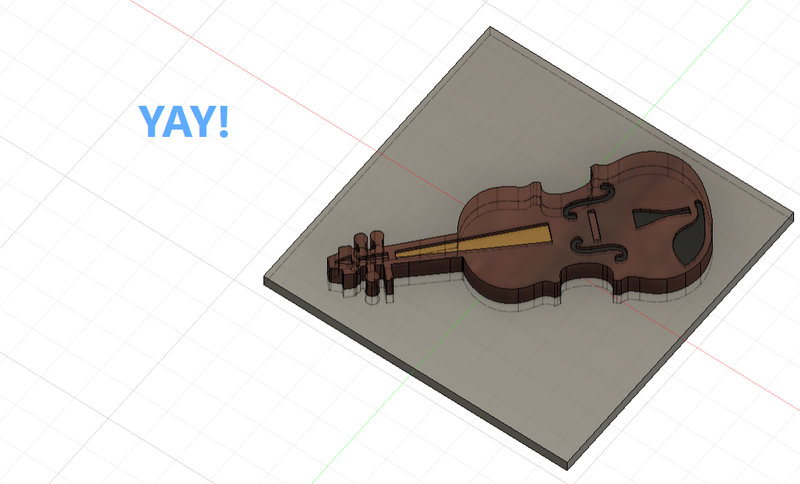
Then extrude the base as well:
This is the final look of the deisgn:
3D Printing:
I decided to 3D print the rocket mold since it was larger, and then mill the violin mold using the SRM-20.
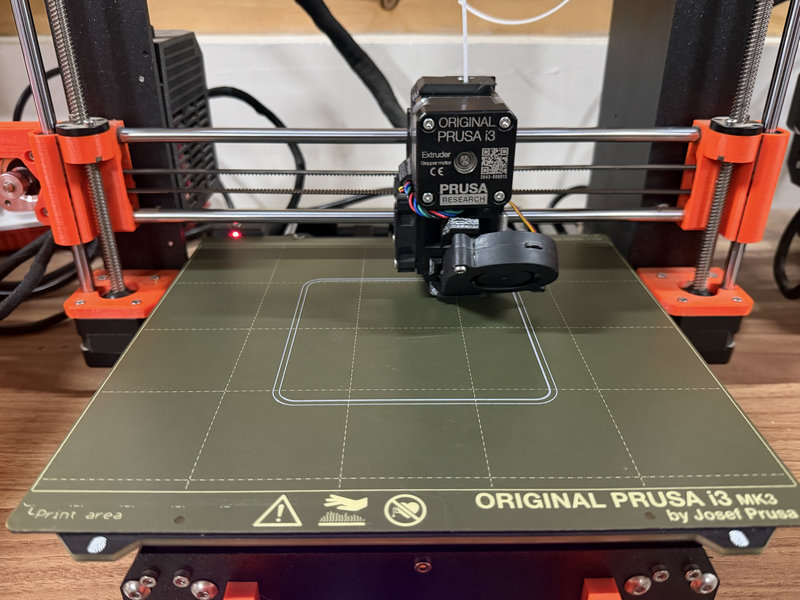
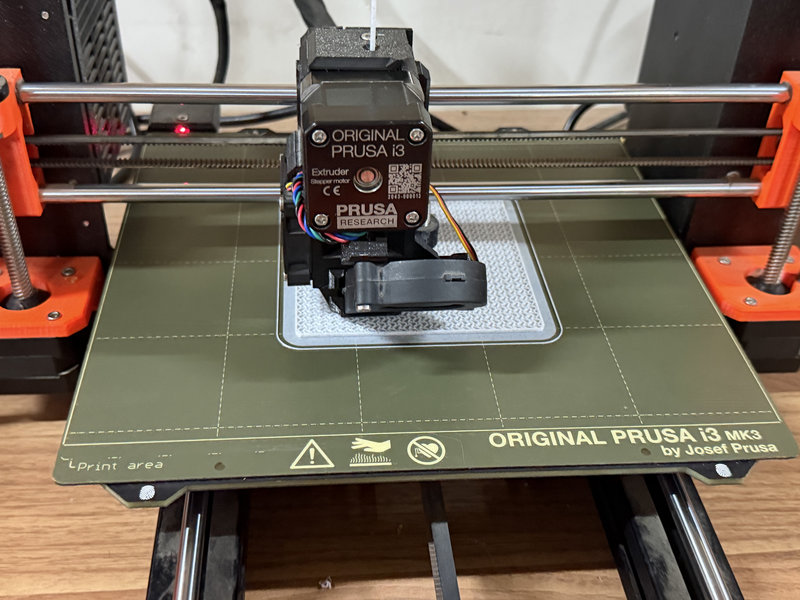
This was the mold when it finally finished printing.
Molding
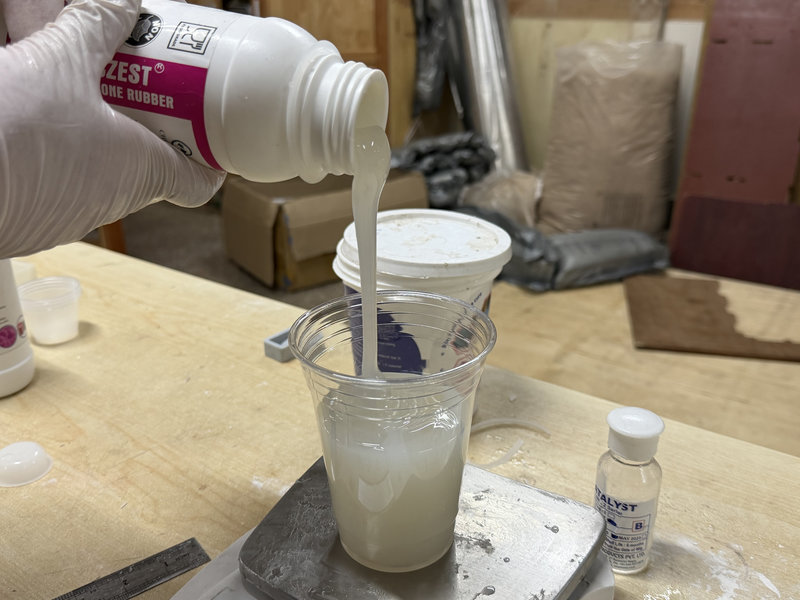
For molding, we used Siloczest Liquid Silicone Rubber 220 (Slow), which is classified as food safe.
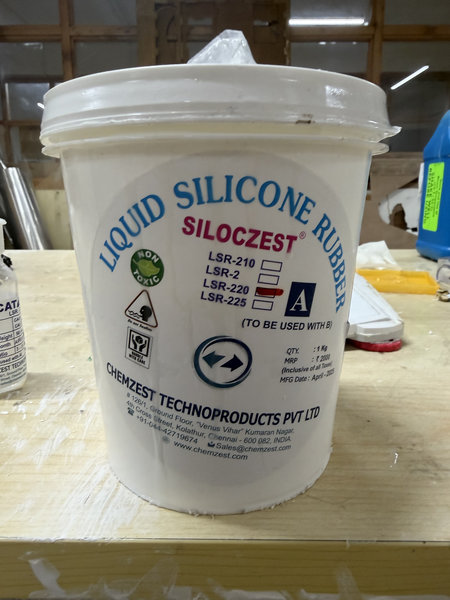
LSR 220 S is a moderately soft silicone that cures at a slower rate, which allows more time for mixing, pouring, and making adjustments during the molding process. It is user-friendly because it doesn’t require vacuum degassing which reduces preparation steps. This makes it especially suitable for creating molds with fine details, as the longer working time helps achieve better accuracy and fewer defects.
Here is some information about the material from the product’s datasheet.
Material Category:
Molding grade Liquid Silicone Rubber (LSR)
Main Characteristics:
- Hardness: 20 Shore A, offering a moderately soft and flexible texture
- Color: Opaque, milky white
- Air Bubble Removal: Vacuum degassing is not necessary (degassing refers to eliminating trapped air from a liquid material)
Common Uses:
This silicone is suitable for creating molds for a variety of items, including sculptures, artistic and craft projects, soaps and candles, artificial stone, as well as molds for materials like wood, plaster of Paris (POP), clay, and footwear components.
Mix Proportion:
Combine in a 100:5 ratio by weight (base to catalyst)
Setting Time:
Requires approximately 5 to 8 hours to fully cure, indicating a slower curing process
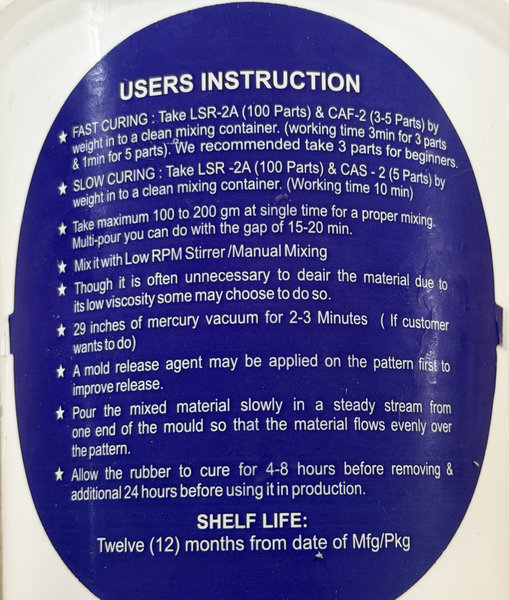
These are the usage instructions provided on the back of the product.
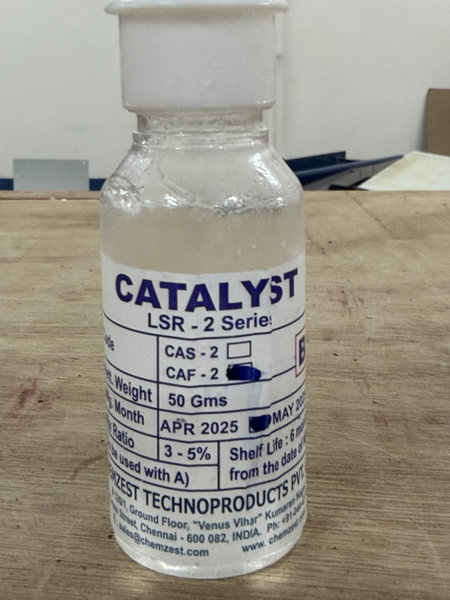
This is the catalyst used for the LSR.
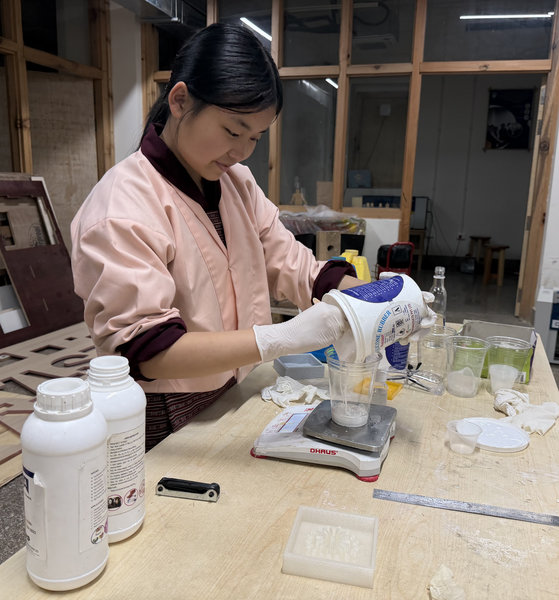
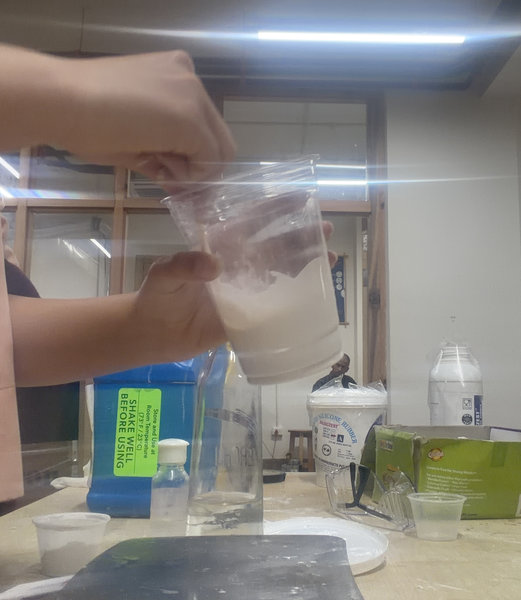
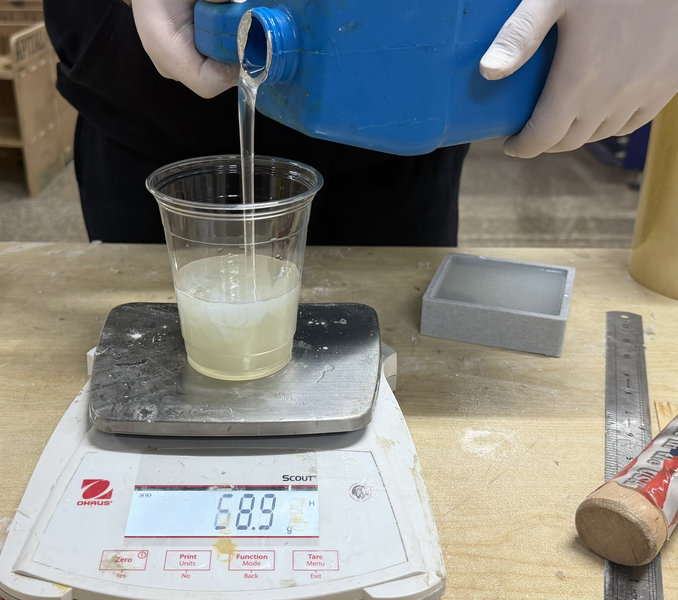
To make the negative mold using LSR and the catalyst, I used 200 g of LSR mixed with 10 g of catalyst, following the 100:5 ratio of LSR to catalyst.
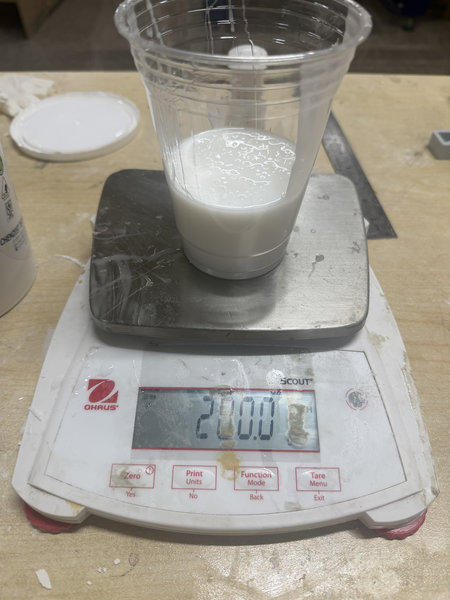
- First, I poured the LSR into a cup placed on a weighing scale, since the ratio is measured by weight. I made sure to zero the scale so the weight of the cup wasn't included. For my mold, I measured out 200 g of LSR.
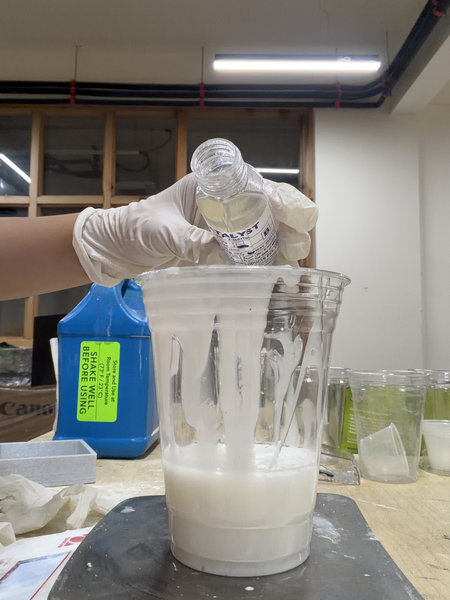
- Then I zeroed the scale again and added the catalyst at 5% of that amount, which is 10 g.
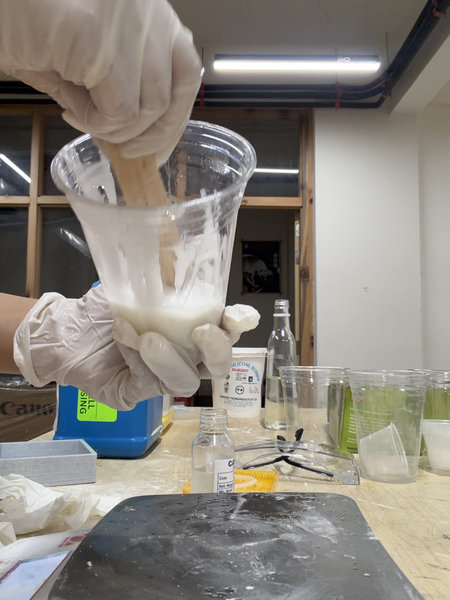
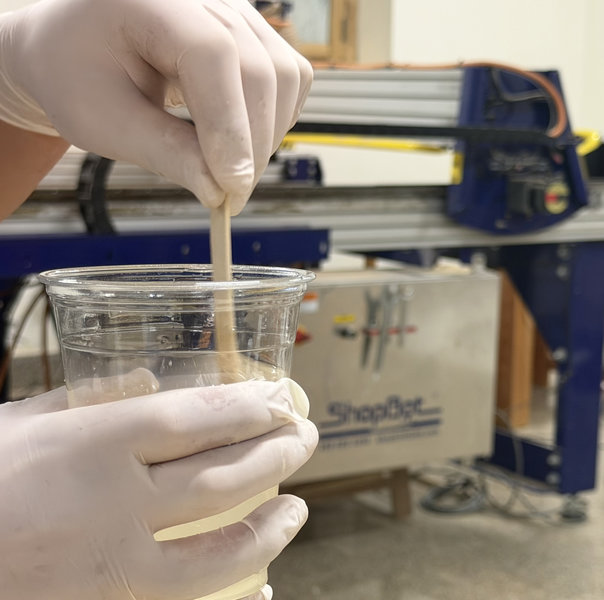
- Since the mixing time for the LSR and curing agent is about 3 minutes, I set a timer and mixed the two thoroughly.
- After mixing, I carefully poured the mixture into the mold before it started to set. To avoid air bubbles, I poured it slowly in thin streams from the lowest point of the mold.
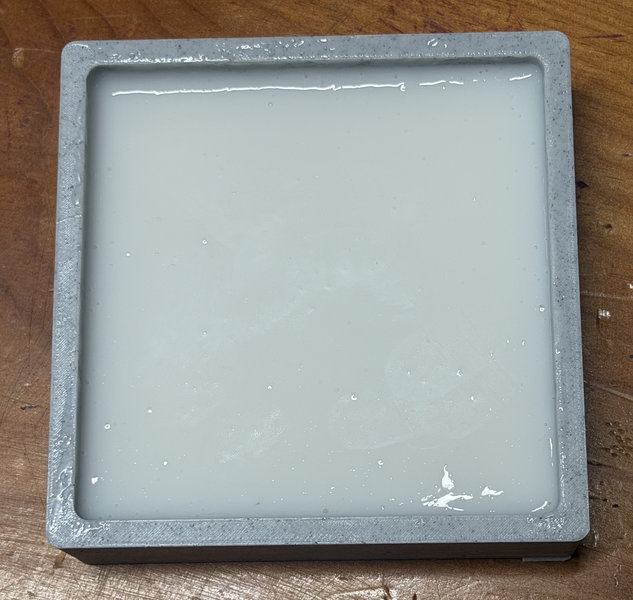
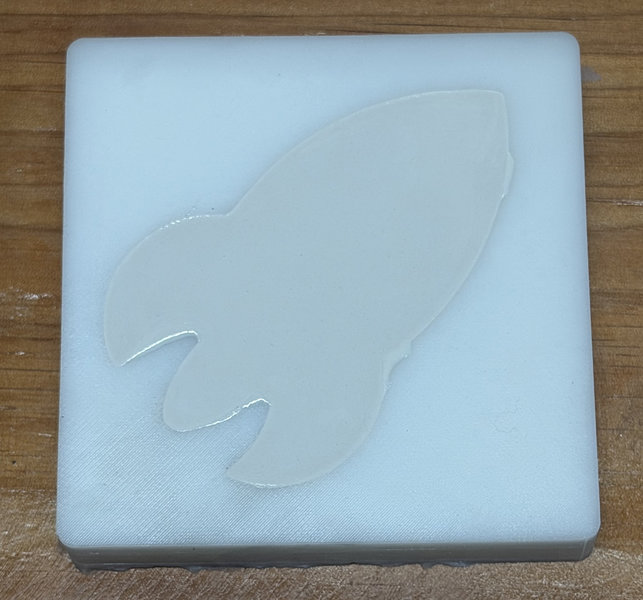
After the curing time was complete, I removed the mold, and it turned out well!
Now it's time for casting!
Casting:
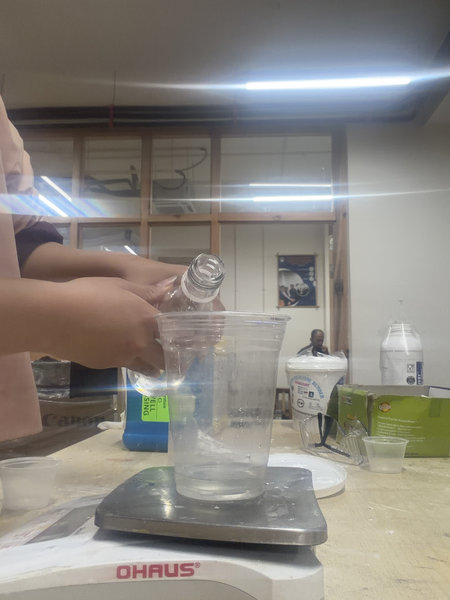
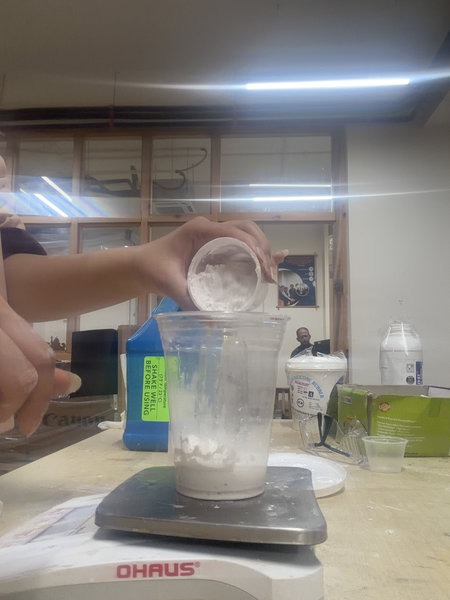
We decided to use hydrostone for our first casting.According to the datasheet, USG Ultimate DryStone has a 32:100 water to drystone mixing ratio by weight (32 grams of water to every 100 grams of drystone.
- Place the clean mixing cup on the digital scale and press the zero button so the scale reads 0 grams. Then pour water into the bucket until the scale reads 32 grams. Always remember to pour the powder into the water and never the reverse as mentioned in the user's guide at the back of the product.
- Press the tare button again to reset the scale to 0 grams. Then I slowly sift the USG Ultimate DryStone Casting Media into the water until the scale reads 100 grams.
- Start mixing immediately after adding the drystone to the water. Mix for 3 minutes until the slurry is smooth and consistent with no lumps. The consistency should be like a thick milkshake or heavy cream.
- Pour into the silicone mold. To prevent air bubbles and provide a smooth surface, careful pouring is important. Pour the mixture in one corner of the mold or into the lowest point and allow the slurry to rise and seek its own level.
I left the cast overnight to finish curing, and this was the result 😆
Milling
Our local instructors taught us how to use the modela player 4 software to mill our deisgns.
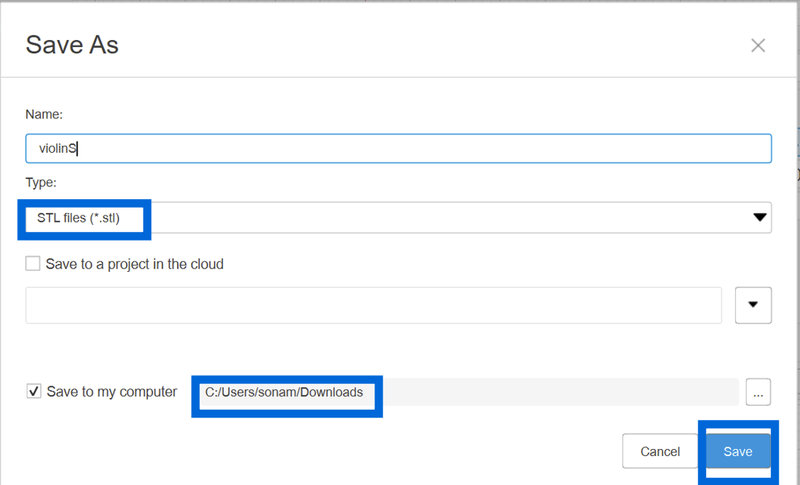
- First let's export our fusion design into stl files.Make sure to select only the body that you want to mill out and not the bottom base.
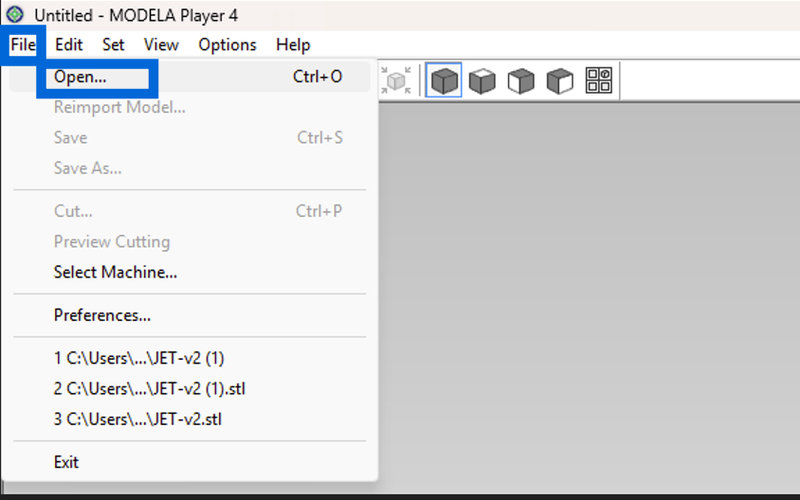
- Then open Modela Player 4.
- Modela Player 4 is a software used to prepare and send 3D design files to milling machines like the Roland SRM-20. It converts digital models into toolpaths, which are step-by-step cutting instructions that the machine follows. In the software, you can set important parameters such as material size, tool type, cutting depth, and speed before generating the machining process. Once ready, it transfers the data to the SRM-20, allowing the machine to accurately carve the design from a physical material. This makes the milling process more precise, controlled, and suitable for producing detailed prototypes and parts.
- First let's export our fusion design into stl files.
- Go to File > Open from the top menu bar. Open the STL file. Set up the model correctly in Modela Player, aligning it with how it will be placed in the machine.
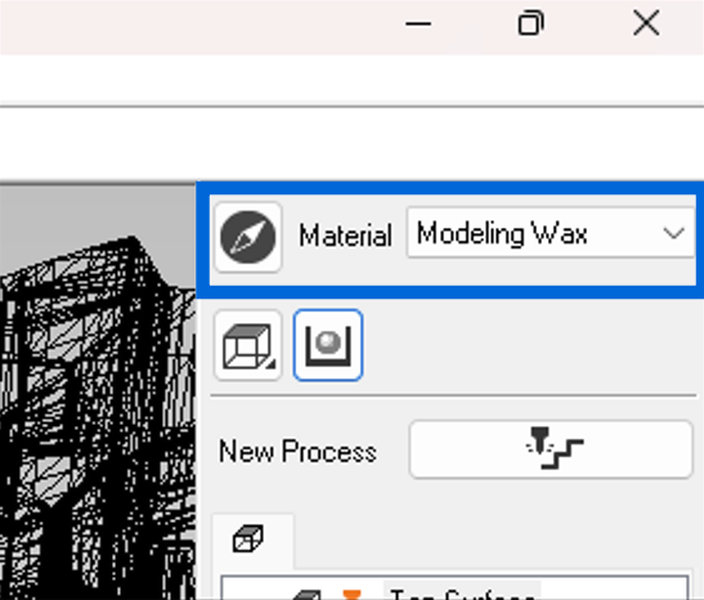
- Under Material, select Modeling Wax from the dropdown menu to select the material. Make sure the top surface setting is correct.
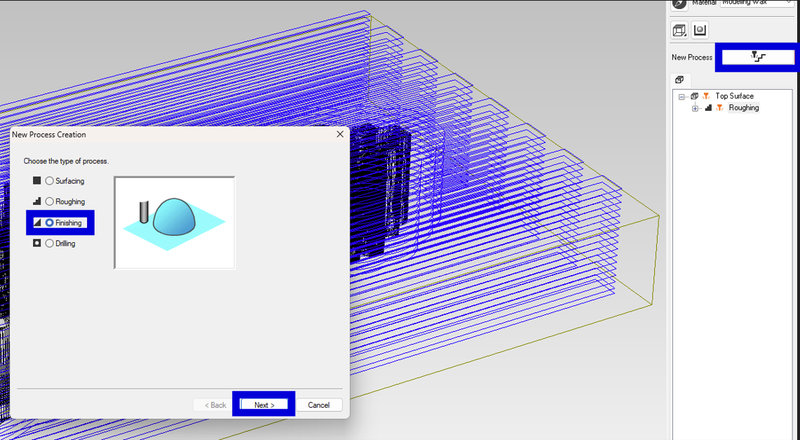
- Generate the machining data (.prn file) by setting up two steps: roughing and finishing. Roughing removes most of the material quickly, while finishing makes the final surface smooth and detailed.
- Generating the file for Roughing:
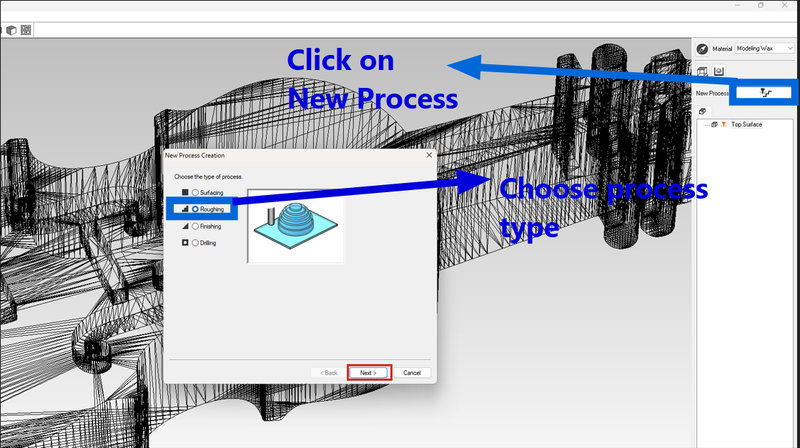
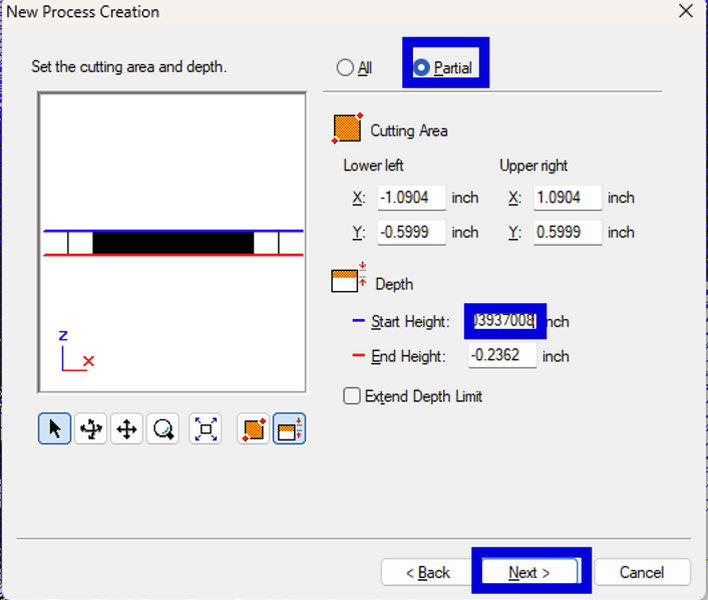
- Click on "New Process" and select "Roughing" type, then click next.
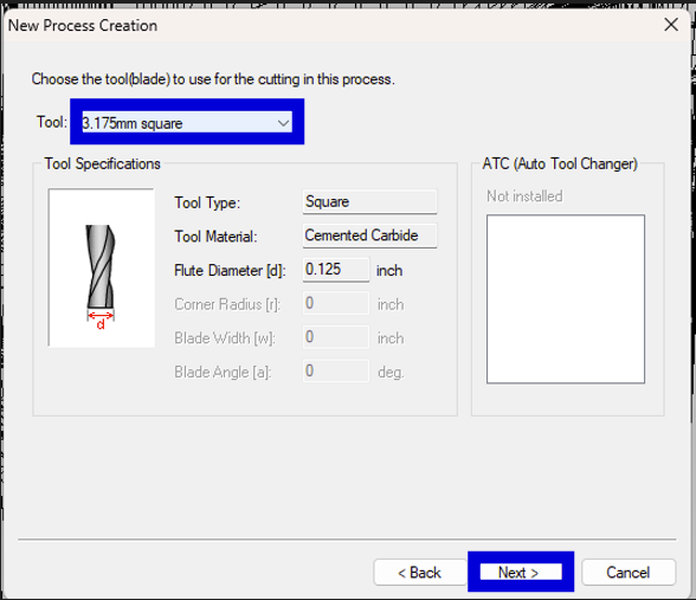
- Select a 3.175 mm square end mill and click next.
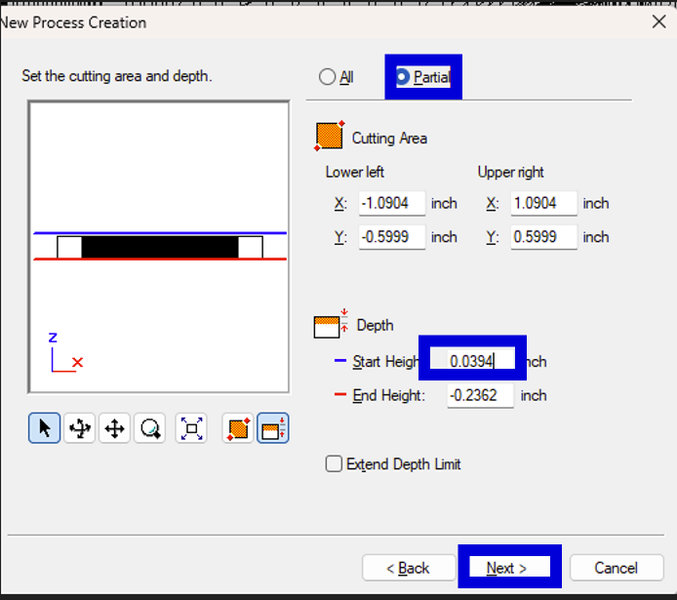
- Make sure Partial is selected and keep the cutting area, depth the same and define the start height of about 5 mm. At first, I was confused why we start 5 mm above the material, since the end mill would seem to cut in the air for a bit. After asking my lab mate, I found out that it's for safety reasons such as, it helps reduce the chance of the tool breaking. By starting above the surface, the end mill gradually engages before fully cutting into the material instead of hitting it abruptly.
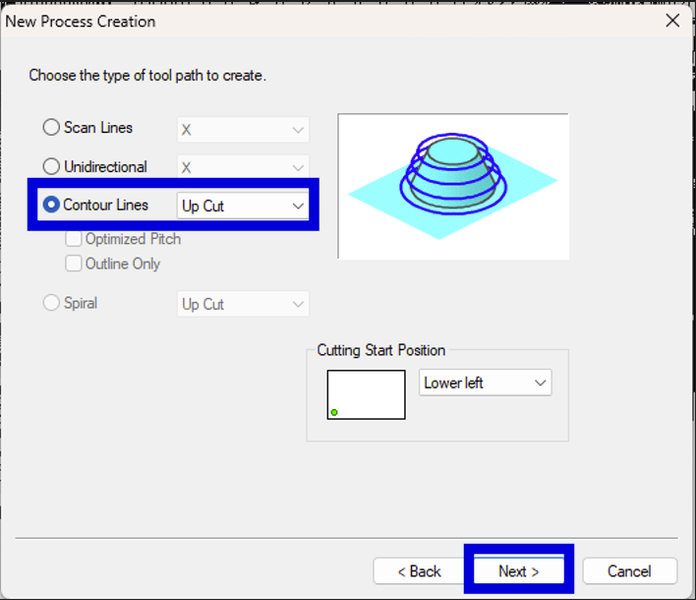
- Choose contour lines (upcut) as the toolpath and click on Next
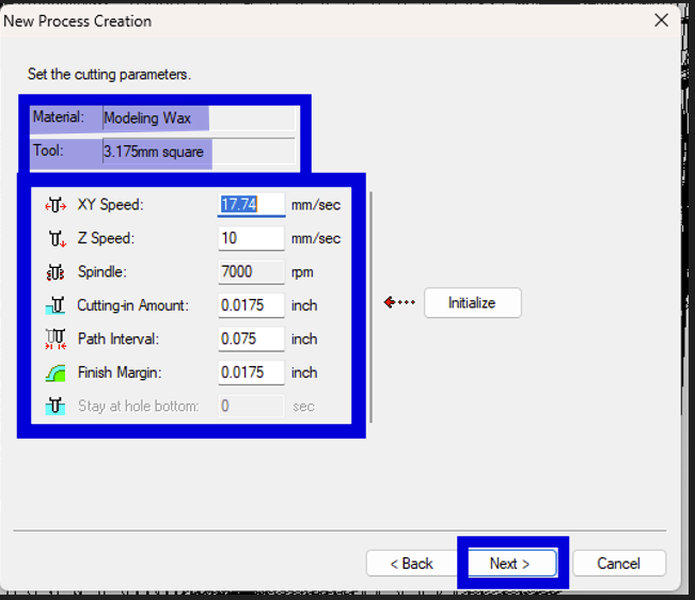
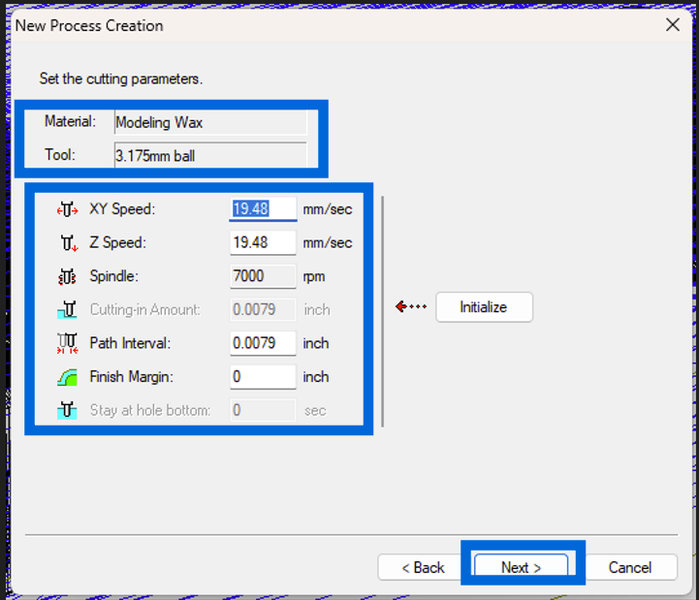
- A new window will pop up called Cutting Parameters. Check that all the settings such as the tool size and material are correct:
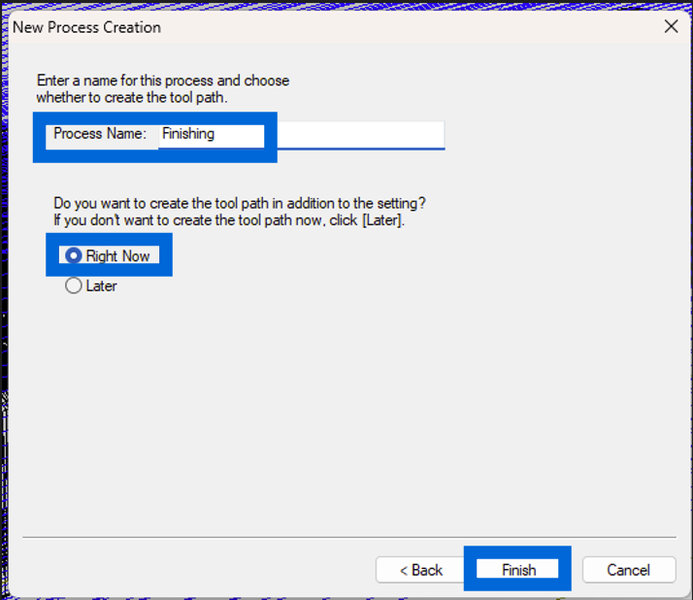
- Save the process by giving the process a name and clicking on "Finish" and now, let's move on to the finishing procedure.
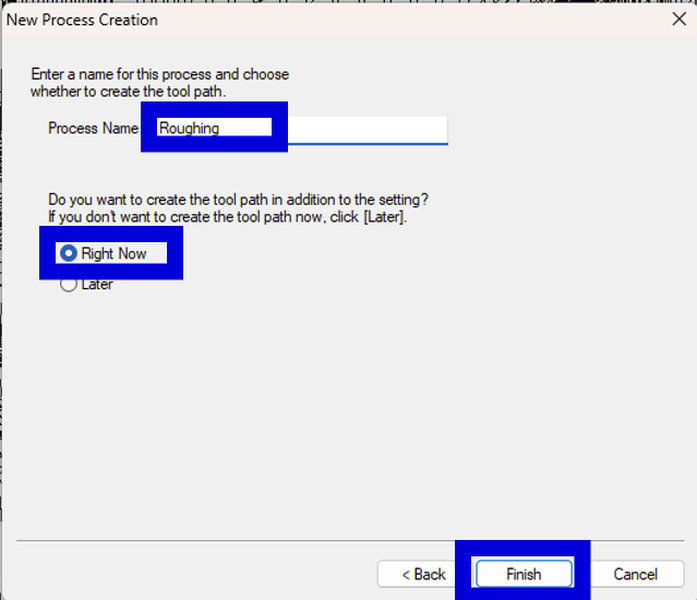
- Generating the file for Finishing:
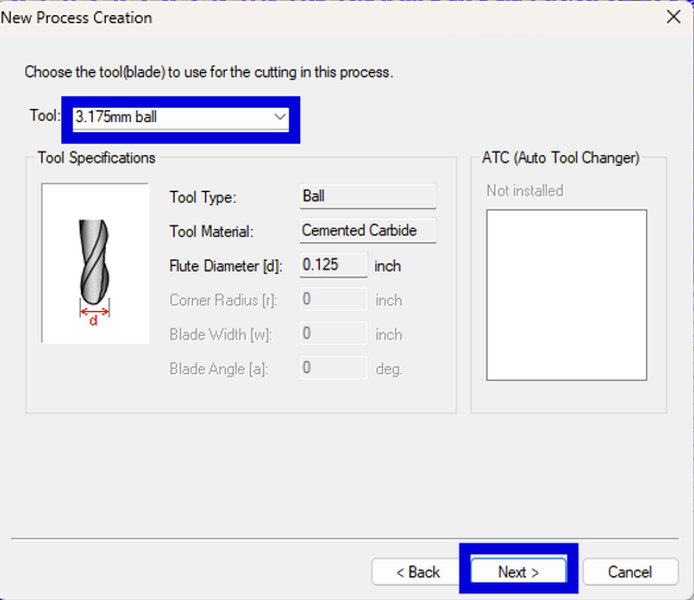
- It's the similar process except change tool size to a similar ⅛ inch end mill, but make sure it is a ball end mill for finer surface details. The reason we change from a square ⅛ end mill after roughing is because the square tool is mainly used for removing large amounts of material quickly, but it cannot capture fine details or smooth curved surfaces well. After roughing, we switch to a ball end mill because its rounded tip allows better surface finish, and much more accurate detailing of complex shapes in the mold.
- Set the toolpath to scan lines for smoother surface finishing and click on "Next"
- Generate and save the finishing file jsut like before

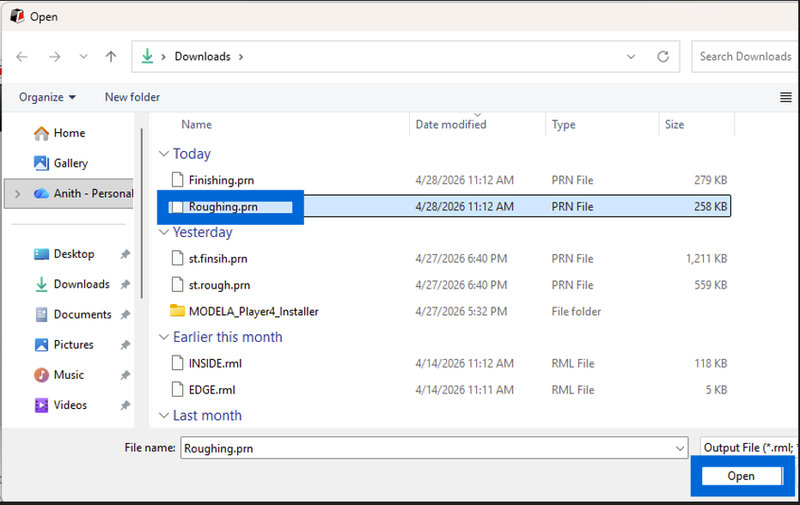
- Save both .prn files on your computer by clicking on this icon on the bottom of the screen and then selecting the file location.
- Hardness: 35 Shore A (firmer and more rigid than LSR 220 S's 20 Shore A)
- Color: Translucent (milky white if opaque)
- Air Bubble Removal: Vacuum degassing is required – unlike LSR 220 S which does not need degassing
- Fast catalyst version: Requires approximately 3-5 hours to fully cure at room temperature
- Slow catalyst version: Requires approximately 4-6 hours to fully cure at room temperature
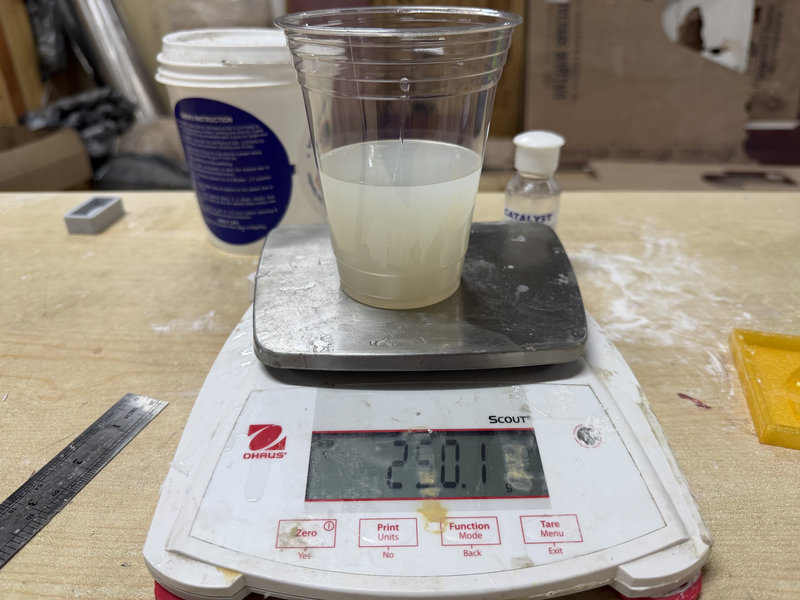
- Put the mixing cup on the digital scale and press the zero button so the scale reads 0 grams.
- Pour Part A (the base) into the cup until the scale reads 250 grams.
- Zero the scale again. With the Part A still in the cup, I press the tare button again to reset the scale to 0 grams.
- Pour Part B into the same cup until the scale reads 250 grams. Because the ratio is 1:1, I now have 250g of Part A and 250g of Part B in the cup so 500 grams total.
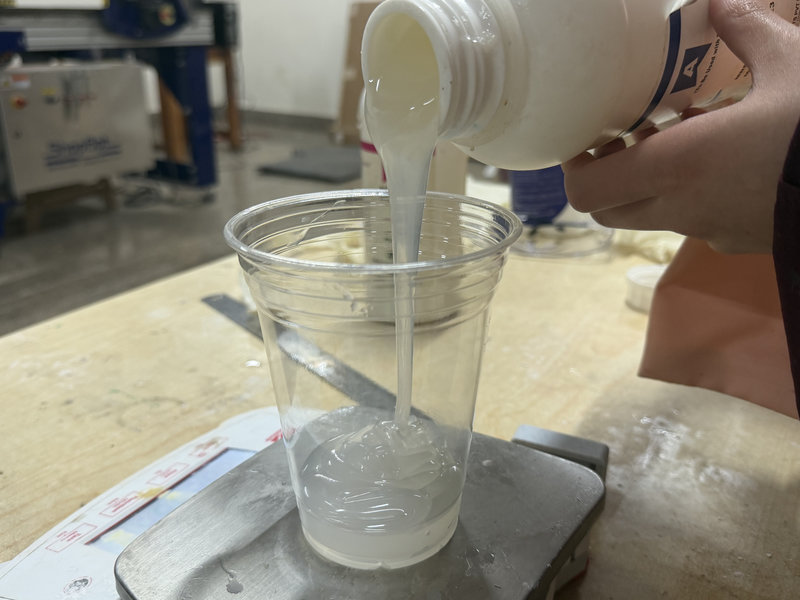
- Stir the mixture slowly but thoroughly, scraping the bottom and sides of the cup. The datasheet doesn't specify an exact mix time, but I mixed for about 3 minutes.
- Pour the mixture into the wax mold slowly to avoid air bubbles.
- Hardness: 70 Shore D, offering a rigid and durable finish (similar to hard plastic)
- Color: Bright white
- Viscosity: Ultra low (80 cps), which allows it to flow easily into detailed molds and capture fine features
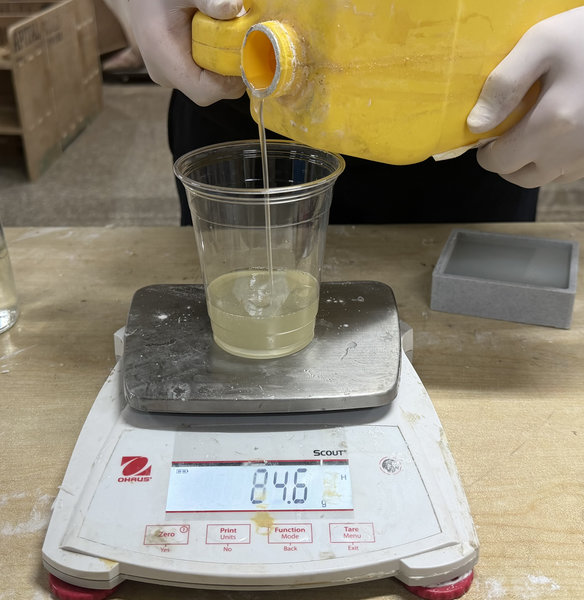
- Place the empty mixing cup on the digital scale and press zero so the scale reads 0 grams.
- We decided to mix it by weight, using a 100A:90B ratio. Pour Part A into the cup until the scale reads 100 grams.
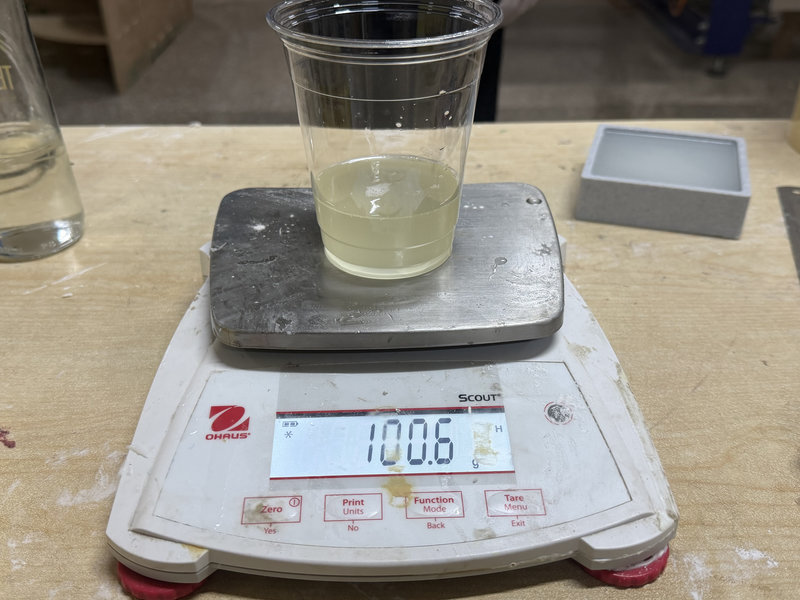
- Press tare/zero again to reset the scale to 0 grams.
- Pour Part B into the same cup until the scale reads 90 grams.
- Mix the two parts together thoroughly for about 2 minutes, scraping the sides and bottom of the mixing container several times.
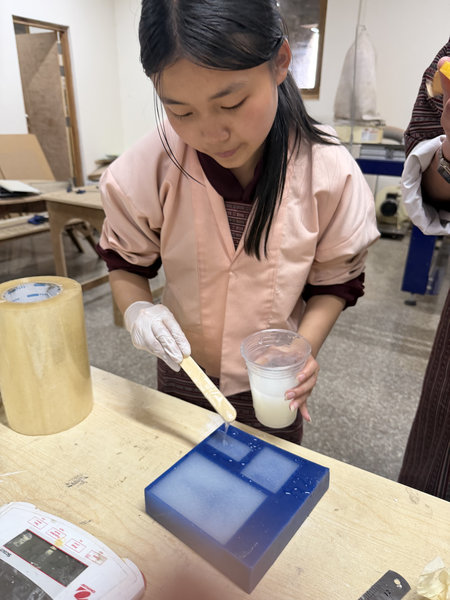
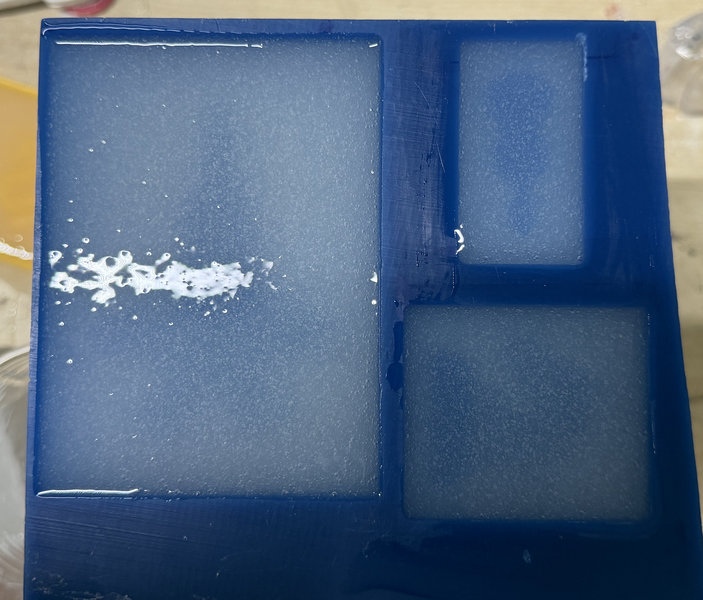
- Pour the mixture in a single spot at the lowest point of the mold and let it cure.
Then open VPanel and set up the axes. Mark the center of your design on the wax to help with positioning, and set that point as your origin. Zero the Z axis using the gravity method at the marked center, then zero the X and Y axes as well. The process is similar to setting up for PCB milling, just that this time you’re working with modeling wax.

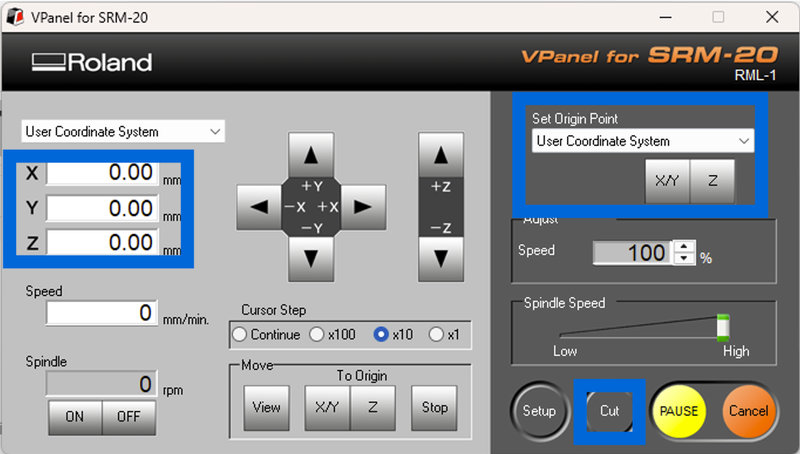
Then click Cut in VPanel, choose the roughing (.prn) file from your computer, and start the job. Make sure to use a 1/8 inch square end mill for roughing. The tool will move in the air for a bit at first since it is done for safety before it starts cutting the material.
Once the roughing job is done, switch the end mill to a 1/8 inch ball end mill for finishing. Rezero the Z axis, remove the roughing file, then load the finish (.prn) file, and start the cut.
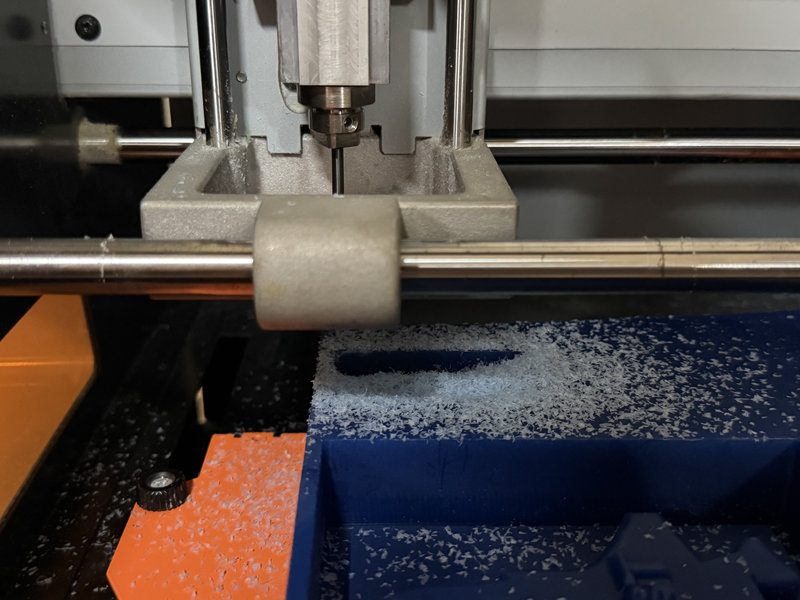
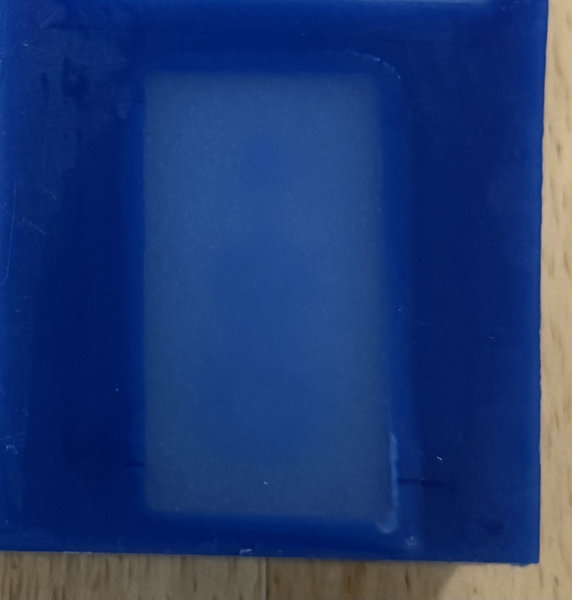
After waiting for the job to finish, this is how the mold turned out. I realized I should have made the design a bit bigger, since the end mill was too large to capture some of the finer details of the violin but it's okay.
Making the negative mold:
For negative mold, we decided to use LSR-140.
LSR 140 is a liquid silicone rubber with moderate hardness that cures at a standard rate, making it suitable for general mold making applications.
Here is some information about the material from the product's datasheet.
Material Category:
Molding grade Liquid Silicone Rubber (LSR)
Main Characteristics:
Common Uses:
This silicone is suitable for creating molds for food and medical parts molding, components casting, cement mold making, and human body parts making. It can also be used for molds for sculptures, prototypes, plaster, POP (Plaster of Paris), resins, and wax.
Mix Proportion:
Combine in a 100:5 ratio by weight (base to catalyst)
Setting Time:

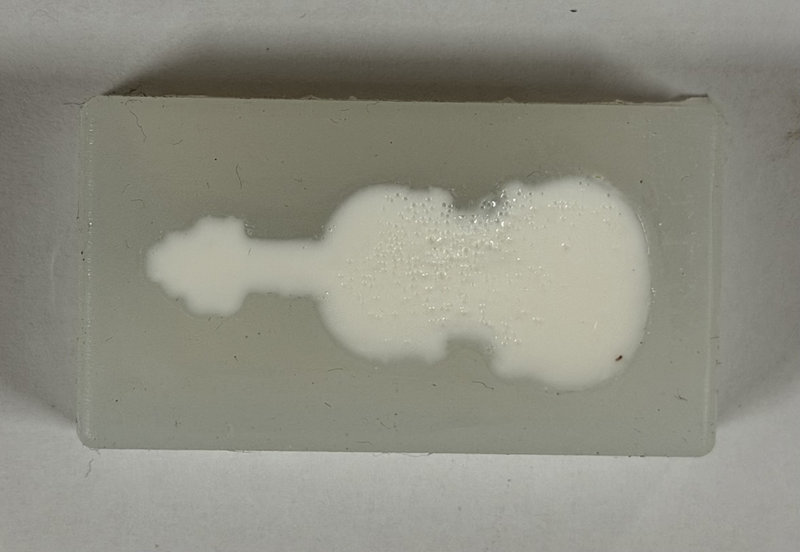
After the curing time was complete, I removed the violin mold, and this is how it turned out.

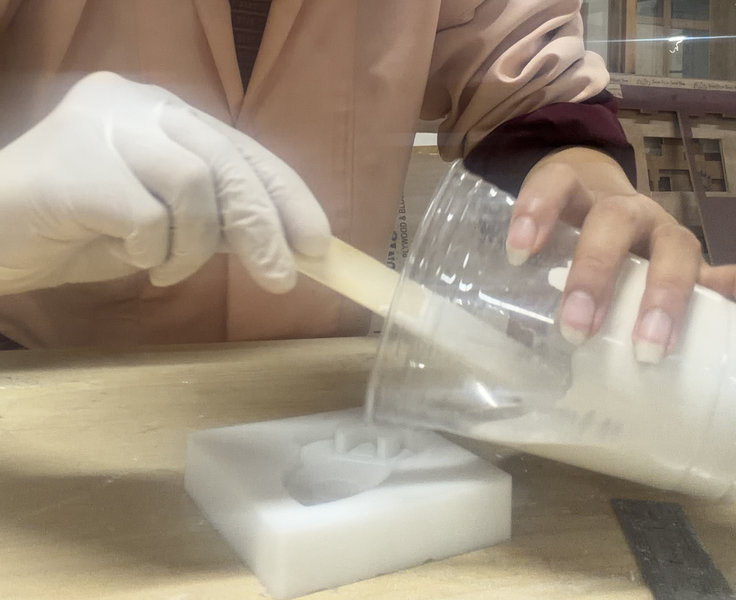
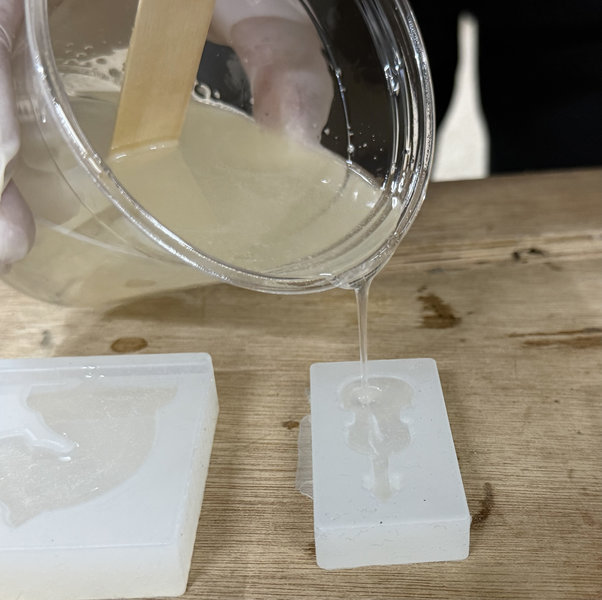
Casting
Now to make a violin cast, I decided to use Smooth Cast 305 this time.
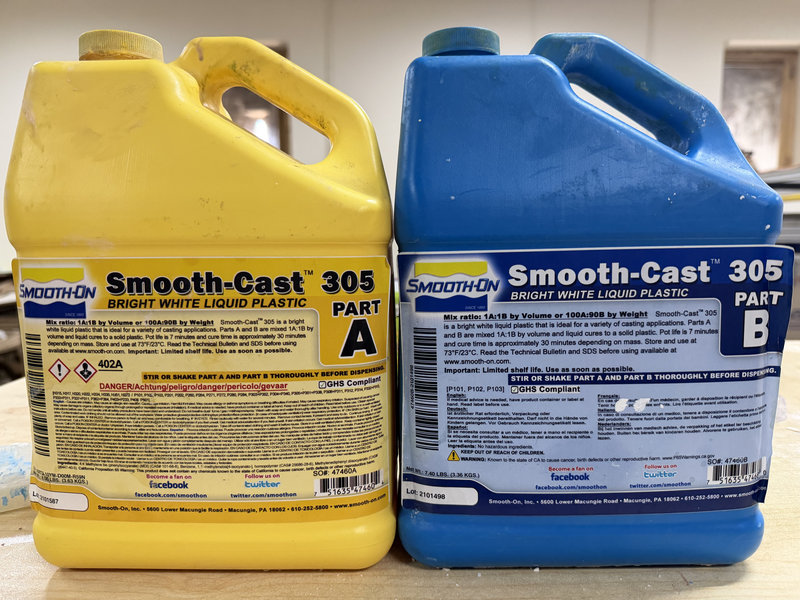
Smooth-Cast 305 is an ultra-low viscosity casting resin that produces bright white, tough, and durable castings that are virtually bubble-free without needing vacuum degassing. It offers a convenient mix ratio and is ideal for capturing fine details.
Here is some information about the material from the product's datasheet.
Main Characteristics:
Common Uses:
This resin is suitable for reproducing small to medium sized sculptures, making prototype models, decorative jewelry, and cold cast bronze castings. Fully cured castings are machinable, paintable, and resist moisture.
Mix Proportion:
Combine in a 100A:90B ratio by weight (or 1A:1B by volume).
Working/Pot Life:
Requires approximately 7 minutes of working time.
Cure/Demold Time:
Requires approximately 30 to 40 minutes to fully cure at room temperature.
Before starting, I shake both Part A and Part B thoroughly in their original containers so that the components are evenly mixed before I measure them out.
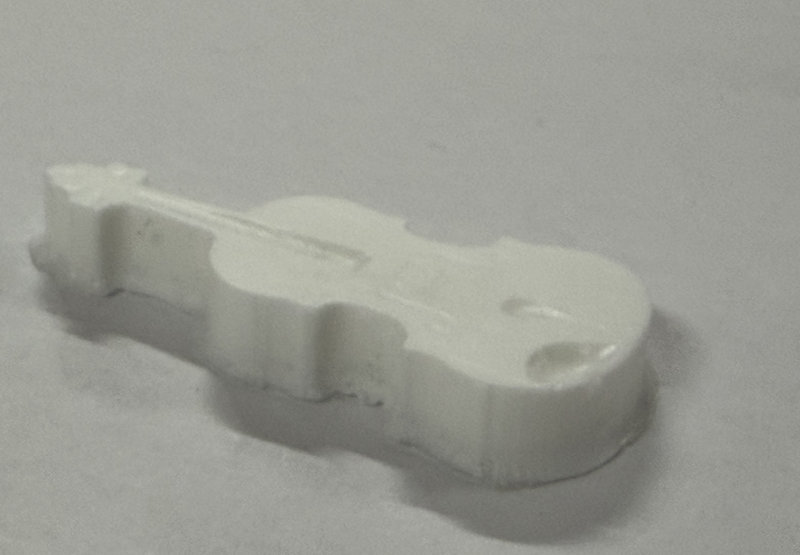
After leaving it overnight, these were the ressult the next day 😃
Reflection:
This week was really fun. So far, it was the best week for me and I got to make extra molds to give to my friends as well. o(*^@^*)o
That's all for this week. Thank you bye! (o゚v゚)ノ