
Final Project Action Plan
This is the schedule I made in google sheets for my final project since the deadline is drawing nearer.
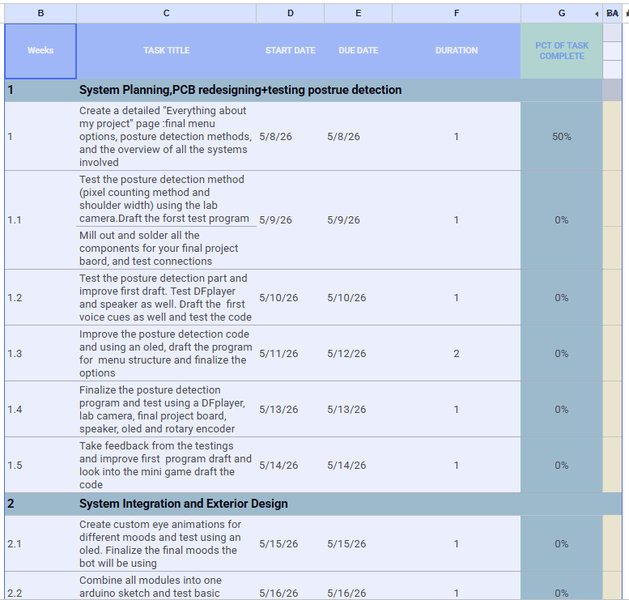
You can access the schedule in google sheets here.
Here is a basic summary of every tasks I've completed and all the tasks I have to complete:
Final Project Checklist
Electronics
Programming
Mechanical
Documentation
Everything about my final project:
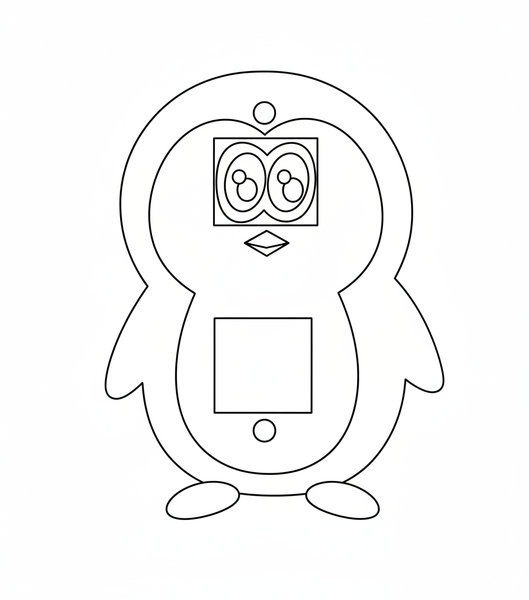
The desk bot is going to be an offline penguin shaped desk bot that helps you focus and corrects posture. It runs entirely on a XIAO ESP32-C3. Power comes from a 5V USB adapter plugged into the wall.
2. Bill of Materials (BOM)
| Component | Qty | Dimensions | Purpose |
|---|---|---|---|
| XIAO ESP32-C3 | 1 | 21 × 17.5 mm | Main brain |
| DS3231 RTC Module | 1 | 38 × 22 mm | Real-time clock for focus logs |
| KY-040 Rotary Encoder | 1 | 31 × 18 mm | Menu navigation input |
| 1.3″ OLED Display | 2 | 35 × 33 mm | Face expressions + belly stats |
| Arducam Mini 2MP (B0067) | 1 | 34 × 24 mm | Posture detection camera |
| DFPlayer Mini MP3 | 1 | 20 × 20 mm | Audio playback controller |
| 8Ω 3W Mini Speaker | 1 | 31 × 28 mm | Voice cues and alerts |
| Custom PCB | 1 | — | Holds XIAO + all connectors |
| 5V USB-C Adapter | 1 | — | Power supply (wall plug) |
| MicroSD Card | 1 | — | Stores audio .mp3 files |
| 3D printed PLA shells | — | — | Penguin enclosure (see §4) |
Refined rough sketch:
3. Where and How to Write the Arduino Code
- Code is written in Arduino IDE on a laptop, uploaded once via USB C, then the laptop is disconnected forever
- After the upload, the XIAO runs the code standalone, powered only by the 5V wall adapter
- Libraries needed (installed in Arduino IDE → Library Manager):
U8g2 — for both OLEDs
RTClib — for DS3231
DFRobotDFPlayerMini — for audio
ESP32Encoder — for rotary encoder
- Workflow: write sketch on laptop → plug XIAO in via USB-C → click Upload → unplug laptop → plug in wall adapter → ELI works independently
4. Mechanical Design: 3D Printed Parts
4.1 Penguin Dimensions
- Total height: 160 mm
- Head: 90 mm tall × 105 mm wide
- Body: 70 mm tall × 85 mm wide (incl. flippers)
- Feet: 20 mm tall
- Wall thickness throughout: 2 mm PLA
4.2 All Printed Parts and Their Colors
| Part | Color | Notes |
|---|---|---|
| Head back shell | Black | Hollow dome, slots on inner wall |
| Head front plate (face) | White | OLED cutout, camera bracket |
| Goggle ring | Black or white | Clips over face OLED |
| Body back shell | Black | all internals mount here |
| Body front shell | White | Belly OLED + encoder cutouts |
| Beak | Orange | Separate piece |
| Feet (×2) | Orange | Separate |
| Flippers (×2) | Orange | Separate, rectangular peg mount |
4.3 How Each External Part Mounts
- Beak: Has rectangular bent tabs on top edges that can be secured with screws or 3d printed pillars inside the face plate.
- Feet: Each foot has two ø8 mm round pegs on top. Pegs press into matching holes in the base of the body back shell. Superglue — permanent.
- Flippers: Two rectangular pegs on the inner edge of each flipper. Rectangular pegs prevent rotation and drooping. Press into holes on the body back shell side walls..
- Goggle ring (face OLED frame): Separate printed ring that sits over the face plate. Four cantilever snap tabs (2 × 4 mm arms, 1 mm hook) on the back of the ring. Four matching slots cut into the face plate edge. 0.2 mm clearance — clicks in, squeeze tabs to remove. Hides the rectangular OLED corners and creates the goggle look.
4.4 How the Shells Join Together
- Head: white face plate into black dome. Black back shell is a hollow dome, open at the front. White face plate has four snap tabs with hooks on its edges. Face plate slides into the dome from the front → four hooks catch inside four slots on the dome's inner wall. Black dome wall (2 mm) wraps visibly around the edge of the white face — this IS the natural black border of the penguin face, no painting needed.
- Body: front shell onto back shell. Split line runs vertically along the sides of the body. Back shell is deeper (~50 mm) and holds all electronics. Front shell is shallower (~30 mm), holds belly OLED and encoder. Three snap tabs on back shell edge click into three matching slots on front shell edge. Same tab geometry as head join (2 × 4 mm arms, 1 mm hooks).
4.5 External Component Placement (front view)
| Component | Location | Mount method |
|---|---|---|
| Arducam lens | Forehead, centre in the camera cutout, 10° downward tilt | the module will be secured with screws from the inside |
| Face OLED | top centre on the face plate, above beak | Rectangular cutout + 4 printed ledge/round tabs. |
| Goggle ring | Over face OLED for the framing | 4 snap tabs into face plate |
| Beak | Below face OLED, ~15 mm gap | Round snap fits |
| Belly OLED | Upper belly, on the white belly shell/plate | Rectangular cutout and 4 printed ledge/round tabs |
| Rotary encoder | Belly button position, ~18 mm below belly OLED | 6 mm hole in front shell, 2 printed ledge/round tabs |
| USB-C port | Right side of body back shell, mid-height | |
| Speaker grille | Lower back shell, left side | Printed slot pattern, speaker inside |
5. Internal Component Placement
All components mount to the interior walls of the body back shell.
5.1 Mounting Method: Printed Standoffs/pillars
- Cylindrical standoffs (5 mm tall) printed directly on the back shell interior wall
- PCB (XIAO) rests on top of standoffs
- a cap is used to close and tighten the standoffs.
5.2 Component Positions (top to bottom inside back shell)
- Upper zone (just below the head): XIAO ESP32-C3 PCB is mounted flat on back wall. DS3231 RTC is mounted below XIAO, 3 mm gap between them.
- Mid zone: Belly OLED and encoder is mounted on FRONT shell , centred on white belly.
- Lower zone: DFPlayer Mini is mounted on the back wall. Speaker is mounted on lower back wall right side where there is grille slots on the exterior.
5.3 Wire Routing
- C-shaped printed clips on back wall (spaced every 20–25 mm) hold wire bundles
- Arducam captures a JPEG frame, XIAO decodes it to raw pixels
- Frame is downsampled to 80 × 60 pixels before processing (fast enough on XIAO)
- Shoulder width: when slouching, shoulders roll forward and appear narrower in frame. Measured as pixel distance between left and right shoulder landmarks estimated from skin tone region edges.
- Forward head offset: ear midpoint should be vertically above shoulder midpoint. When head juts forward, ear rises above shoulder line. Measured as vertical gap in pixels.
- Shoulder tilt: one shoulder dropping sideways more than the other indicates slouching/leaning sideways.
- Head drop: nose position compared to shoulder midpoint. If nose drops significantly below baseline, head is drooping.
- Face size ratio: when leaning forward, face appears larger relative to shoulder width. Ratio increase confirms forward lean vs mere crookedness.
6. Posture Detection — Method (Arduino C++)
7.1 What the camera does
7.2 Five detection factors
7.3 Brightness centroid (primary on device method)
This code lowers the camera resolution to 80×60 pixels to make processing faster. It then looks for skin-colored pixels in the frame and calculates their average vertical position (called the centroid). This basically tells where your head and upper body are in the image. If not enough skin pixels are found, the system assumes you are not in front of the camera and pauses the timer. If the average position of the detected skin pixels moves too low in the frame, it assumes you are slouching and triggers an alert.
// Downsampled frame: 80×60 pixels
// Find vertical centre of mass of skin-toned pixels
int rowSum = 0, skinCount = 0;
for (int row = 0; row < 60; row++) {
  for (int col = 0; col < 80; col++) {
    if (isSkin(r, g, b)) { rowSum += row; skinCount++; }
  }
}
if (skinCount < 20) { pauseTimer(); return; } // person absent
int centroid = rowSum / skinCount;
if (centroid > SLOUCH_THRESHOLD) alertSlouch();
7.4 Skin tone detection (RGB ranges)
bool isSkin(uint8_t r, uint8_t g, uint8_t b) {
  return (r > 95 && g > 40 && b > 20 &&
          r > g && r > b && abs(r-g) > 15 && r > 100);
}
7.5 Calibration (one time on first use)
- User presses encoder while sitting upright
- the bot samples 60 frames over 3 to 5 seconds
- Calculates average centroid → saves as BASELINE to flash memory (survives power off)
- SLOUCH_THRESHOLD = BASELINE + (0.20 × 60) which is 20% lower than upright position
- Recalibrate any time from menu
7.6 Debouncing (importance for accuracy while working)
- Must see slouch for FRAMES_NEEDED = 30 continous frames before alert fires
- At 10 fps AI processing: 30 frames = ~3 seconds of sustained slouch
- The counter decreases slowly for every good-posture frame instead of resetting instantly.
- Buzzer cooldown is 30 seconds minimum between alerts so that the bot does not nag constantly
- If face disappears from frame ,pause timer (person left desk), no alert
8. Menu System Logic
8.1 How the rotary encoder works
- Turn clockwise : scroll down / increment value
- Turn counter clockwise : scroll up / decrement value
- Press to select / confirm
- Long press (hold 1.5s) : go back to previous screen / cancel
8.2 Full menu tree
HOME SCREEN (idle, shows time + ELI face)
│
├── [press] → MAIN MENU
│     ├── ① Start Focus
│     │     ├── Pomodoro (25 min work / 5 min break)
│     │     └── Custom Timer (set minutes with encoder)
│     ├── ② Focus Blueprint
│     │     └── Shows: sessions today, best time of day, total hours
│     └── ③ Settings
│           ├── Calibrate Posture
│           └── Set Sound Volume
│
└── [during active timer]
      ├── Posture check runs every ~5 seconds (background)
      ├── Stretch reminder at 90-minute mark
      └── [press] → Pause / Resume timer
8.3 Timer logic (Pomodoro)
- Work phase: 25 min countdown on belly OLED, face OLED shows focused eyes
- At 0:00 → DFPlayer plays "Session done! Take a break." → 5 min break countdown
- At break 0:00 → DFPlayer plays "Ready for next round?" → back to work phase
- Stretch reminder: after 90 cumulative work minutes → "Stand and stretch, good job!"
- Custom timer: encoder scrolls minutes 1–120, press to confirm, same countdown logic
8.4 Focus Blueprint storage
- DS3231 RTC provides accurate timestamps
- Each completed session stored as integer counters in ESP32 flash (not SD card)
- Stores: total sessions completed,
- Display shows: Sessions: 12 | Best: 6 AM | Today: 2
9. Audio System (DFPlayer + Speaker)
- MicroSD card contains numbered .mp3 files (e.g., 001.mp3 = startup sound)
- All audio files pre recorded and loaded onto SD before assembly
- Audio cues list:
- 001 — startup jingle
- 002 — "Sit tall! Good posture is good for your brain."
- 003 — "Session done! Take a break."
- 004 — "Stand and stretch, good job!"
- 005 — "Ready for next round?"
- 006 — encoder confirm beep (short tone)
- 007 — "No one home." (person left desk)
10. OLED Expressions (Face OLED)
| State | Expression |
|---|---|
| Idle / good posture | Happy half-moon eyes, slow blink |
| Focused / timer running | Determined narrow eyes, steady |
| Slouch detected | Alarmed wide eyes |
| Break time | Sleepy drooping eyes |
| Person absent | Sleeping zzz eyes |
| Startup | Blinking open animation |
Both OLEDs use the U8g2 library. 128 × 64 resolution; left 64×64 = left eye, right 64×64 = right eye. Expression animations stored as byte arrays, cycled in main loop.
11. How All Systems Work Together (System Logic)
Every 100 ms (main loop tick):
│
├── Read encoder → update menu state if changed
├── Read RTC → update timer countdown
├── Every ~5 s: capture camera frame → run posture check
│     ├── Good posture → no action
│     ├── Sustained slouch (30+ frames) → beep buzzer once, show alarm face
│     └── Face absent → pause timer, show sleeping face
├── Update belly OLED (timer / blueprint / menu)
├── Update face OLED (current expression)
└── Check idle timeout (10 min no encoder input → sleep mode)
11.1 Power flow
5V USB-C → PCB → 3.3V regulator on XIAO → all logic components.
11.2 Startup sequence
- Power on → XIAO initialises all peripherals
- Face OLED plays eye opening animation
- DFPlayer plays startup sound
- Belly OLED shows: Hello! I'm E.L.I. → transitions to home screen after 2 seconds
- RTC synced, camera warmed up, menu ready
11.3 Idle / sleep mode
After 10 minutes with no encoder input and no active timer, face OLED shows sleeping eyes, belly OLED dims, camera stops capturing (saves power). Any encoder interaction wakes ELI instantly.