Week 2: Computer Aided Design
Softwares:
Assignment:
Model (raster, vector, 2D, 3D, render, animate, simulate, ...) a possible final project
Explore softwares for CAD and compress your images and videos and learn converting image formats.
Document everything and commit it to your gitlab repository.
This is my time table for the week:

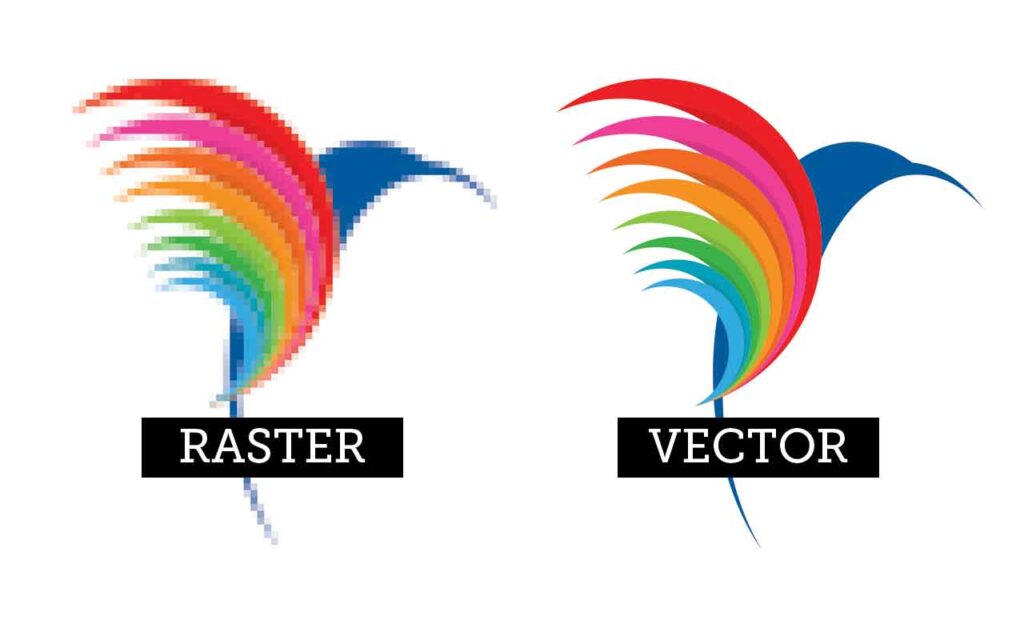
Raster VS Vector
Raster images?
Raster images are digital pictures made of a grid of colored squares called pixels. They're like digital mosaic so when thousands or millions of tiny pixels are placed together, they form a detailed image. They are best for photos and complex images, but become blurry (pixelated) if stretched too large.
Vector images?
Vector images are digital images created using mathematical formulas like points, lines, and curves rather than pixels. Because they are formula based, they can be scaled up to billboard size or down to an icon without ever becoming blurry, pixelated, or losing quality. Which is why they are ideal for logos and graphics.
Differences:
Resolution
- Raster: loses quality and you can see the pixels when zoomed in
- Vector: no quality lose and stays sharp at any size.
Uses
- Raster: best for photos and detailed images
- Vector: best for logos, illustrations, and designs that need resizing
File Size
- Raster: larger files because of lots of pixels
- Vector: smaller and lightweight beacuse it's just math-based shapes.
Compatibility
- Raster: easy to open and edit in most apps
- Vector: needs special software which makes it less accessible
File Types
- Raster: many formats, depends on software for exmaple .jpg, .png, .gif etc /li>
- Vector: also has different formats, but are more design focused like .svg, .eps etc
Flameshot

For documentation, we need to take a lot of screenshots, and I use the software called Flameshot because it’s simple and really easy to use.Flameshot is a open source, and cross platform screenshot software available for Linux, Windows, and macOS. It is designed to be powerful yet simple, allowing users to capture specific regions, annotate (draw, highlight, blur) immediately, and upload to the cloud.
Downloading Flameshot
This is how I downloaded the flameshot on my computer:
- Open PowerShell or Command Prompt (right-click Start button if you need to find it)
- Type this and hit enter:
winget install flameshot - Accept all the terms and wait until it finishes installing.

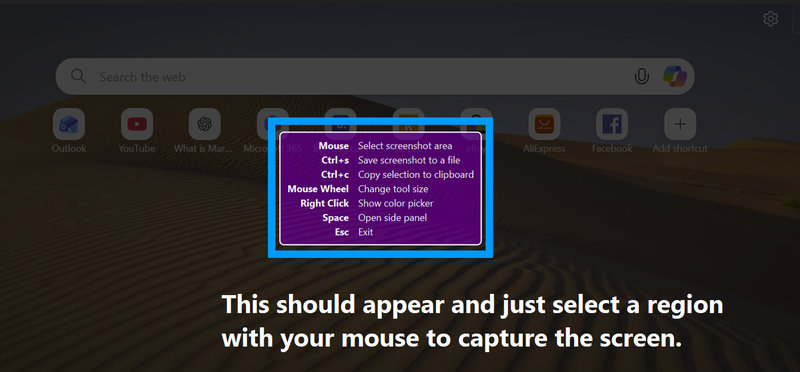
After installing the software, click the arrow on the bottom menu bar and select the software icon.

Then a box with instructions should appear. Read it and then click on the region you want to capture on your screen with your mouse.
Tools in Flameshot:
- Capture the whole screen, a selected area, or a specific window
- Add annotations like text, arrows, shapes, or freehand drawings
- Blur out sensitive parts of the screenshot
- Use a color picker to match colors for annotations
- Highlight important areas with different colors
- Upload screenshots directly to cloud services like Imgur
- Edit images instantly after capturing without opening another app
- Cross platform (Works across Linux, Windows, and macOS)
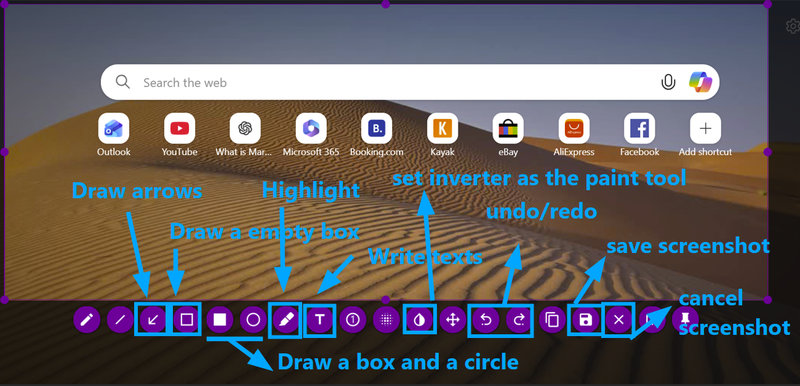
This is a label of some of the tools in flameshot while taking a screenshot:
XNConvert
Another software I frequently use is XNConvert for compressing images which is also a very important part of documentation. XNConvert is basically a free batch image processing tool. It lets you convert, resize, rename, or apply filters to multiple images at once instead of doing them one by one.
- Convert a folder of photos from HEIC to JPG
- Resize many images to a smaller resolution
- Add a watermark or border to all your documentation photos
- Rotate or crop multiple images in one go
Installing XNConvert:
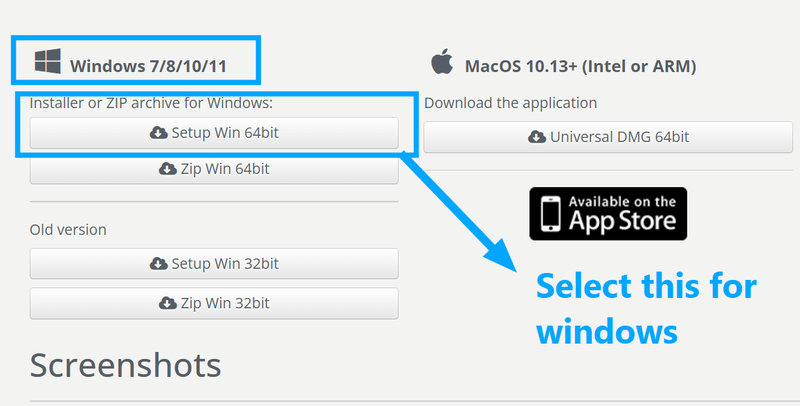
- Go to xnview.com/en/xnconvert.php
- Download the Windows installer (.exe file) under 'Downloads and Purchase'
- Run the installer and follow the prompts to set up the software
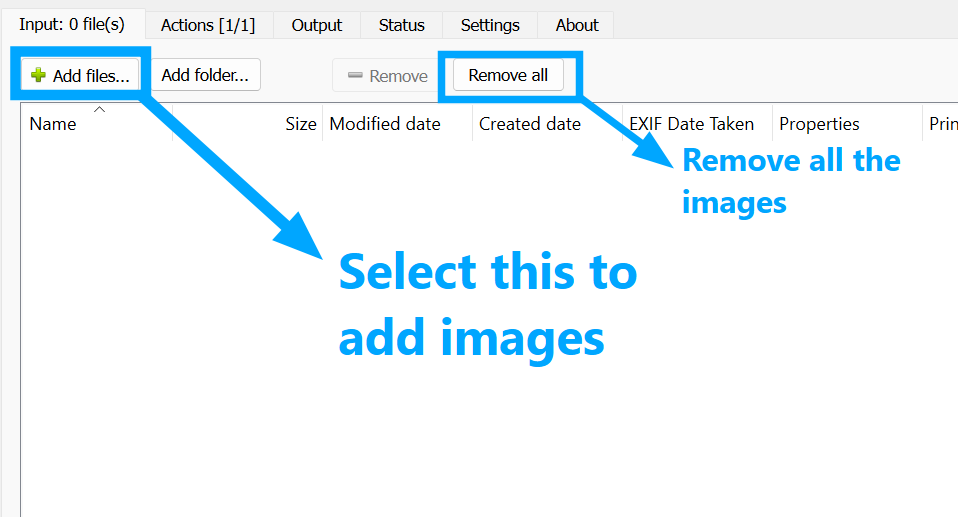
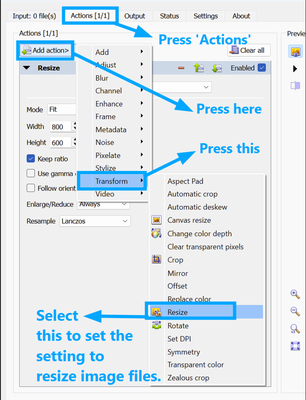
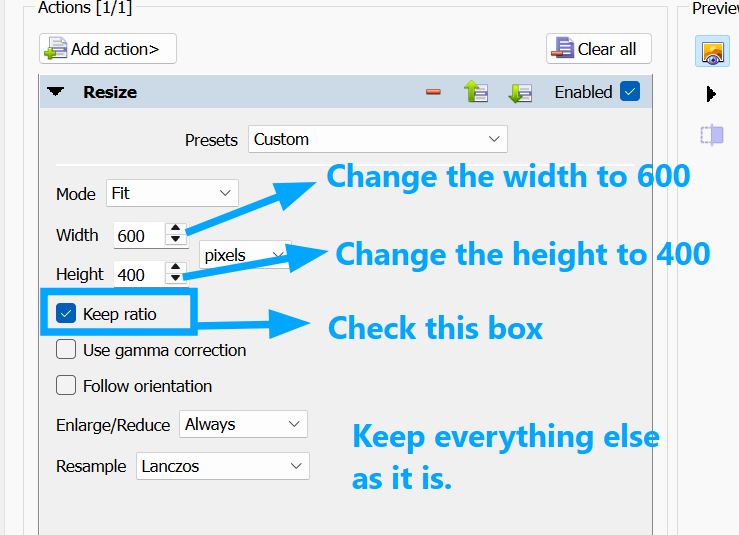
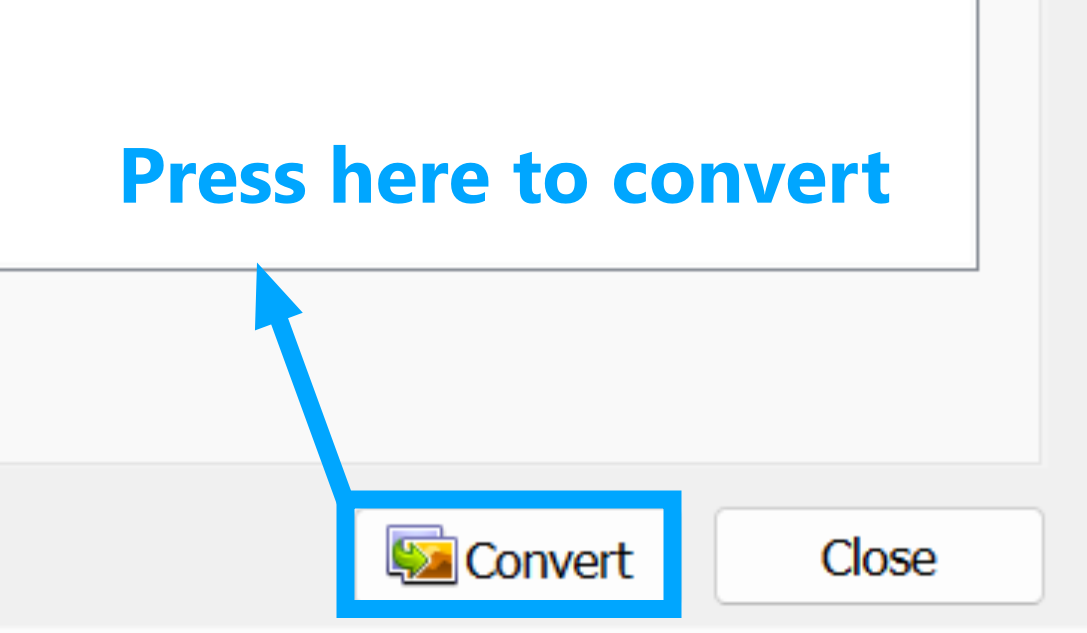
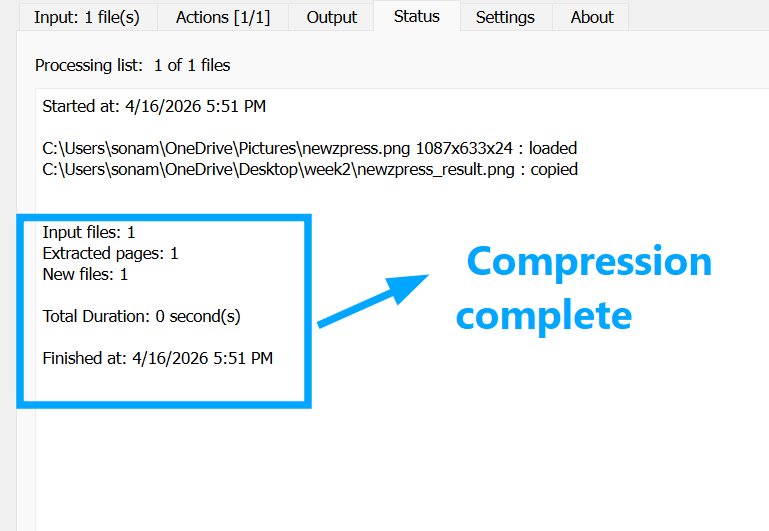
Now, to set the software to compress image files, set the following settings:
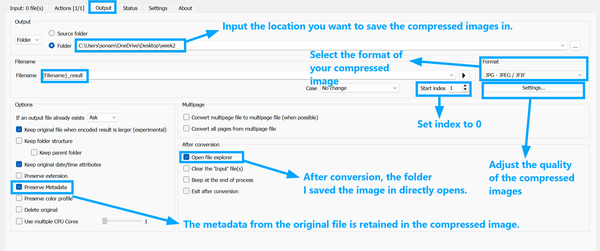
Then just press 'Convert' on the bottom right to compress the images.
FFmpeg
FFmpeg is a free tool that handles video and audio files from the command line. It can convert, compress, cut, or merge media files without needing a big editing software. I use the software for compressing videos and it's really great for compressing large video files into smaller file sizes.
Features of FFmpeg
- Turn a large video file into a smaller one for uploading
- Change a video from MP4 to GIF for quick demos
- Extract a specific clip from a long recording
- Remove the audio track from a video
- Combine multiple video clips into one
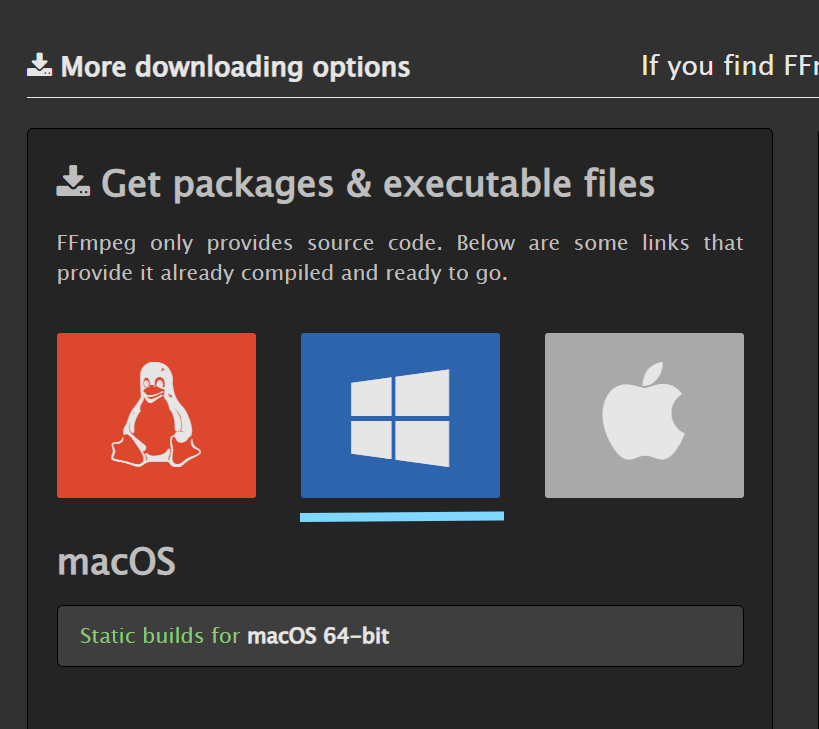
Installing FFmpeg:
- Go to the FFmpeg website and download the Windows version.
- Unzip the file into a folder on your computer.
- Open the folder and copy the path to the bin folder.
- Add that bin folder path to the Windows Path in Environment Variables.
- Open Command Prompt and type:
ffmpeg -version
- If you see the version details, FFmpeg is installed correctly.
Inkscape:
Inkscape is a free and open source software application for creating and editing vector graphics which allows images to be scaled up or down infinitely without any loss of quality or sharpness. This makes the software fundamentally different from pixel-based photo editors, as it is designed for precision, scalability, and clean edges.
The program uses the SVG (Scalable Vector Graphics) format as its primary file type, which is a universal standard for vector images on the web and in digital manufacturing. Common uses for Inkscape include designing logos, technical illustrations, detailed diagrams, and typography. It is also a practical tool for converting hand-drawn sketches or standard image files into precise vector paths suitable for fabrication processes like laser cutting, vinyl sign-making, or engraving.
Users have access to a suite of drawing and editing tools within the interface. These tools allow for the creation of basic and complex shapes, the manipulation of anchor points and curves, the styling of objects with fills and strokes, and the arrangement of elements using layers.
How to Install Inkscape:
This is how i installed Inkscape on my computer:
I searched up Inkscape Download for Windows on my browser and clicked on that link that said install on windows.

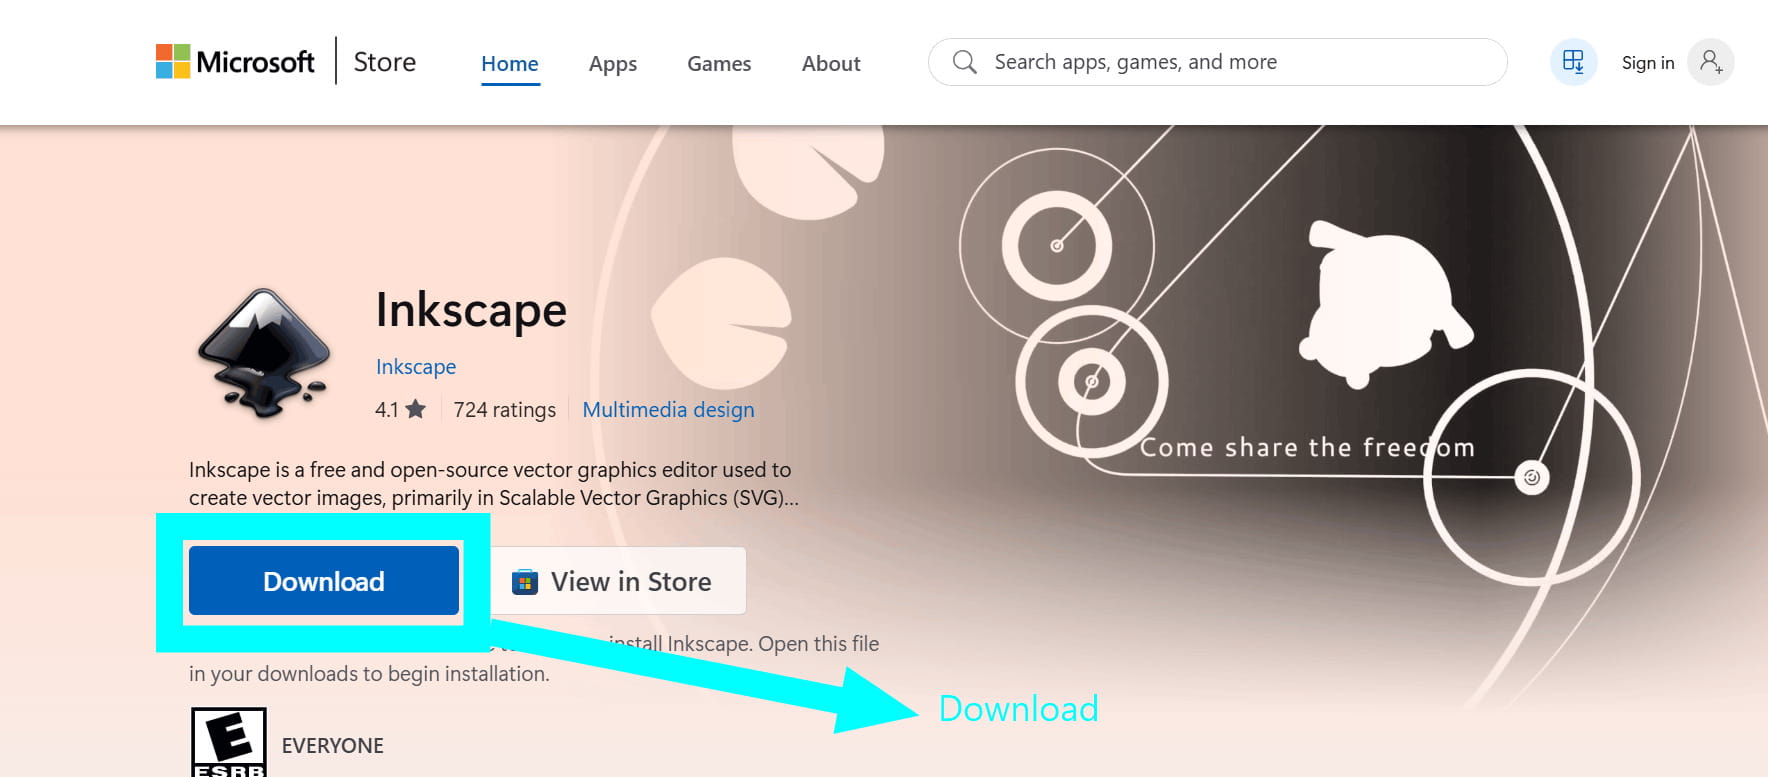
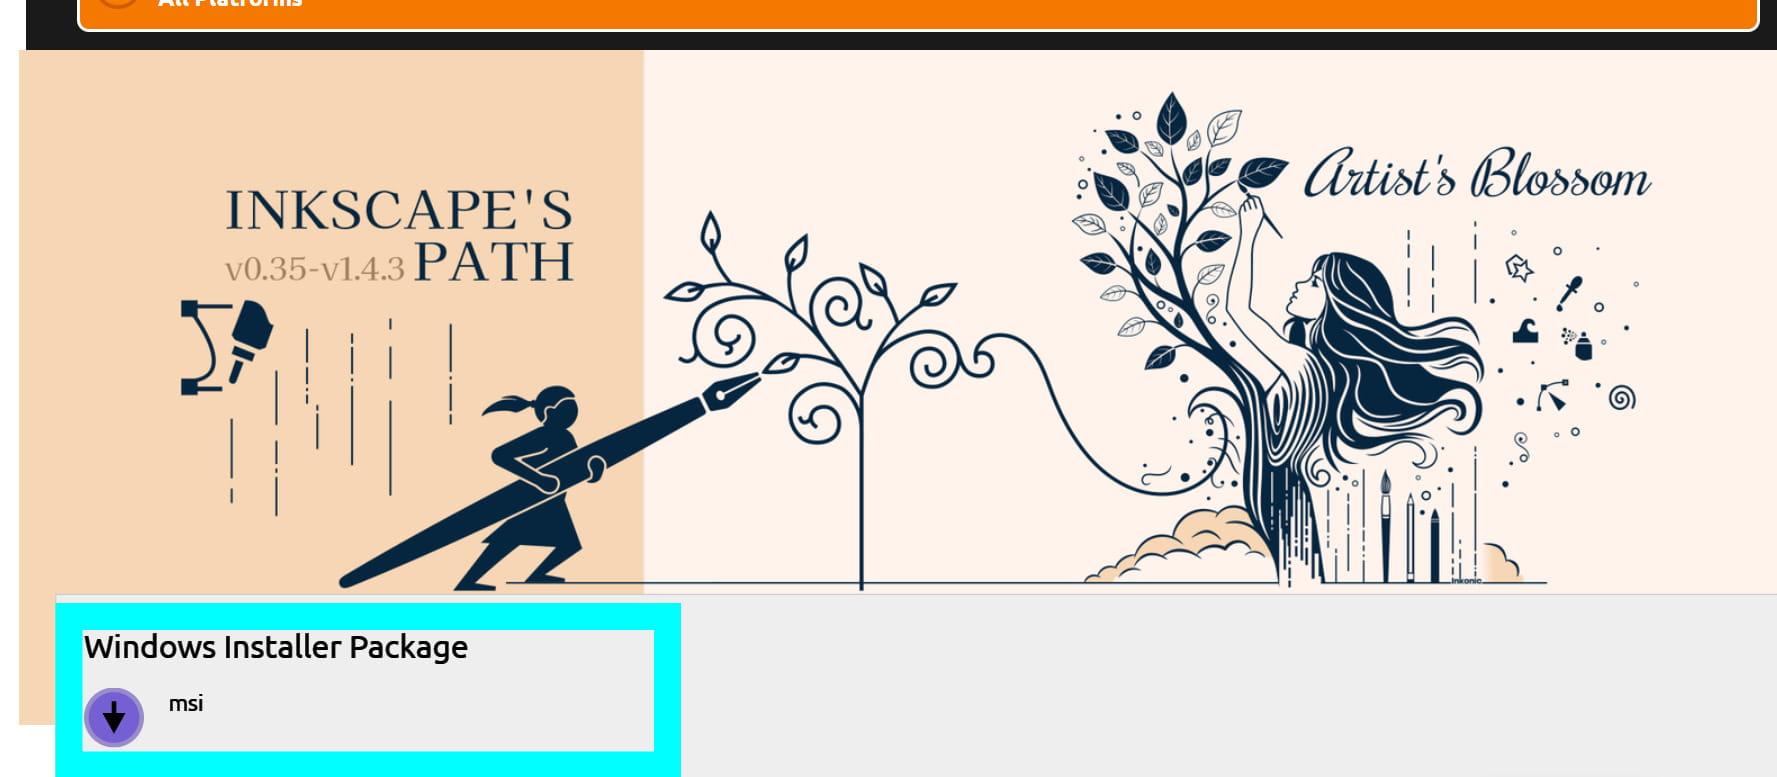
Once the installer package was downloaded, I opened the file and configured the software by completing all the necessary setup options.
I never really used Inkscape before so I referred to this tutorial to get started.
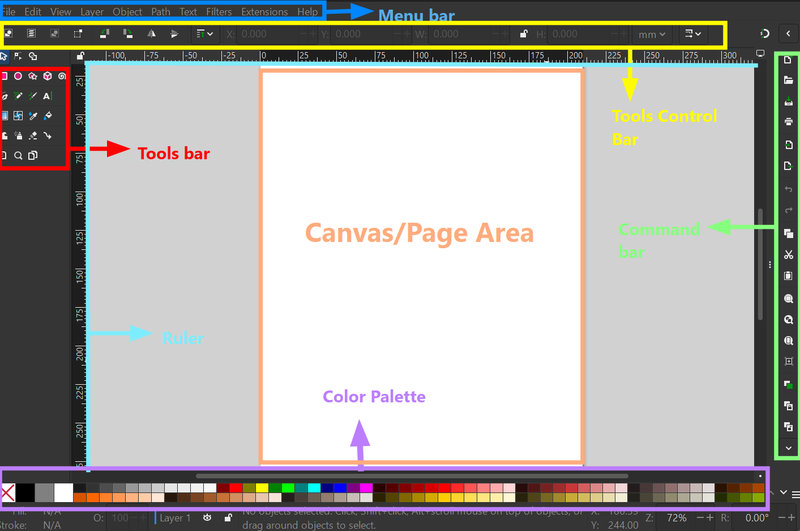
This is a label of the workplace in Inkscape:
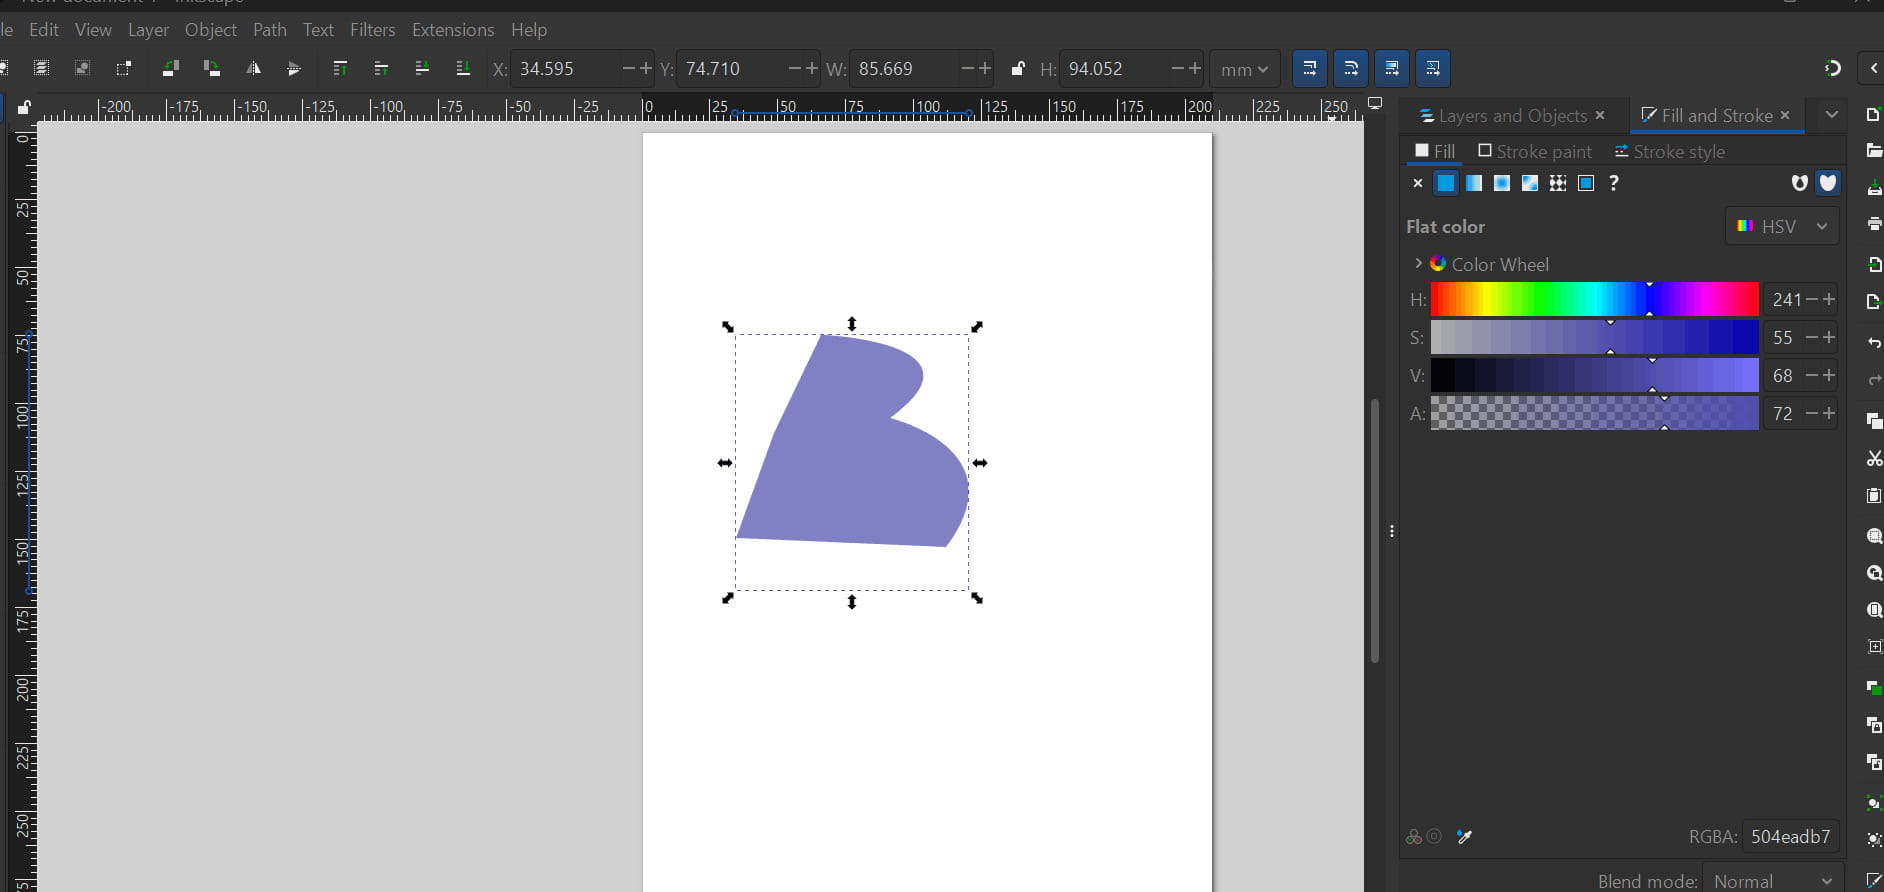
Just practiced a bit to get familiar with the tools by referring to the tutorial. I tried out making basic shapes and spirals and then filling them out with a different colour.

Then, I tried out the Bezier tool to make some parts curved in the shape. The Bezier tool in Inkscape is used to draw precise straight and curved lines by placing points and shaping them.

After some practice, I followed a tutorial to import and trace images in Inkscape to make the logo smoother.
I first used Gemini AI to generate detailed logo ideas for my project, including a design with a whale’s tail emerging from a wave. Out of the many suggestions, one stood out to me, so I asked the AI to generate an image to use as a reference. That was the prompt:
.jpg)
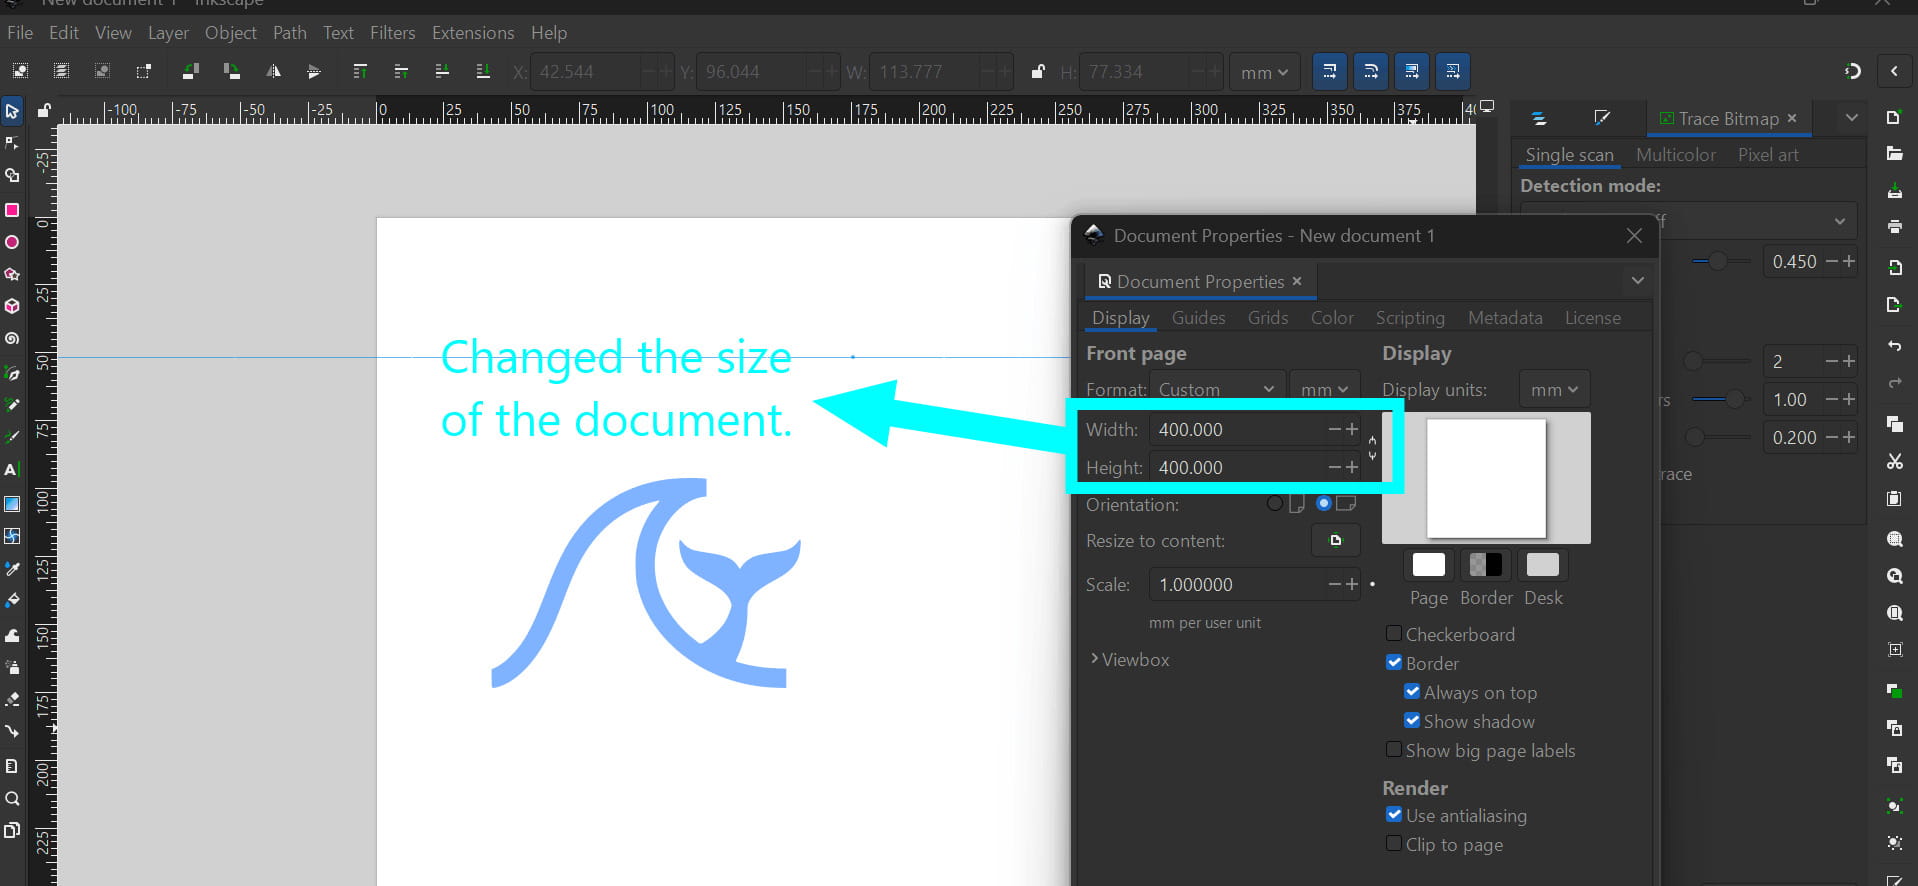
The AI generated a simple logo idea, which I saved and imported into Inkscape by going to File → Import and selecting the downloaded image. I resized the document to a square to make it easier to align elements and shapes on the page.
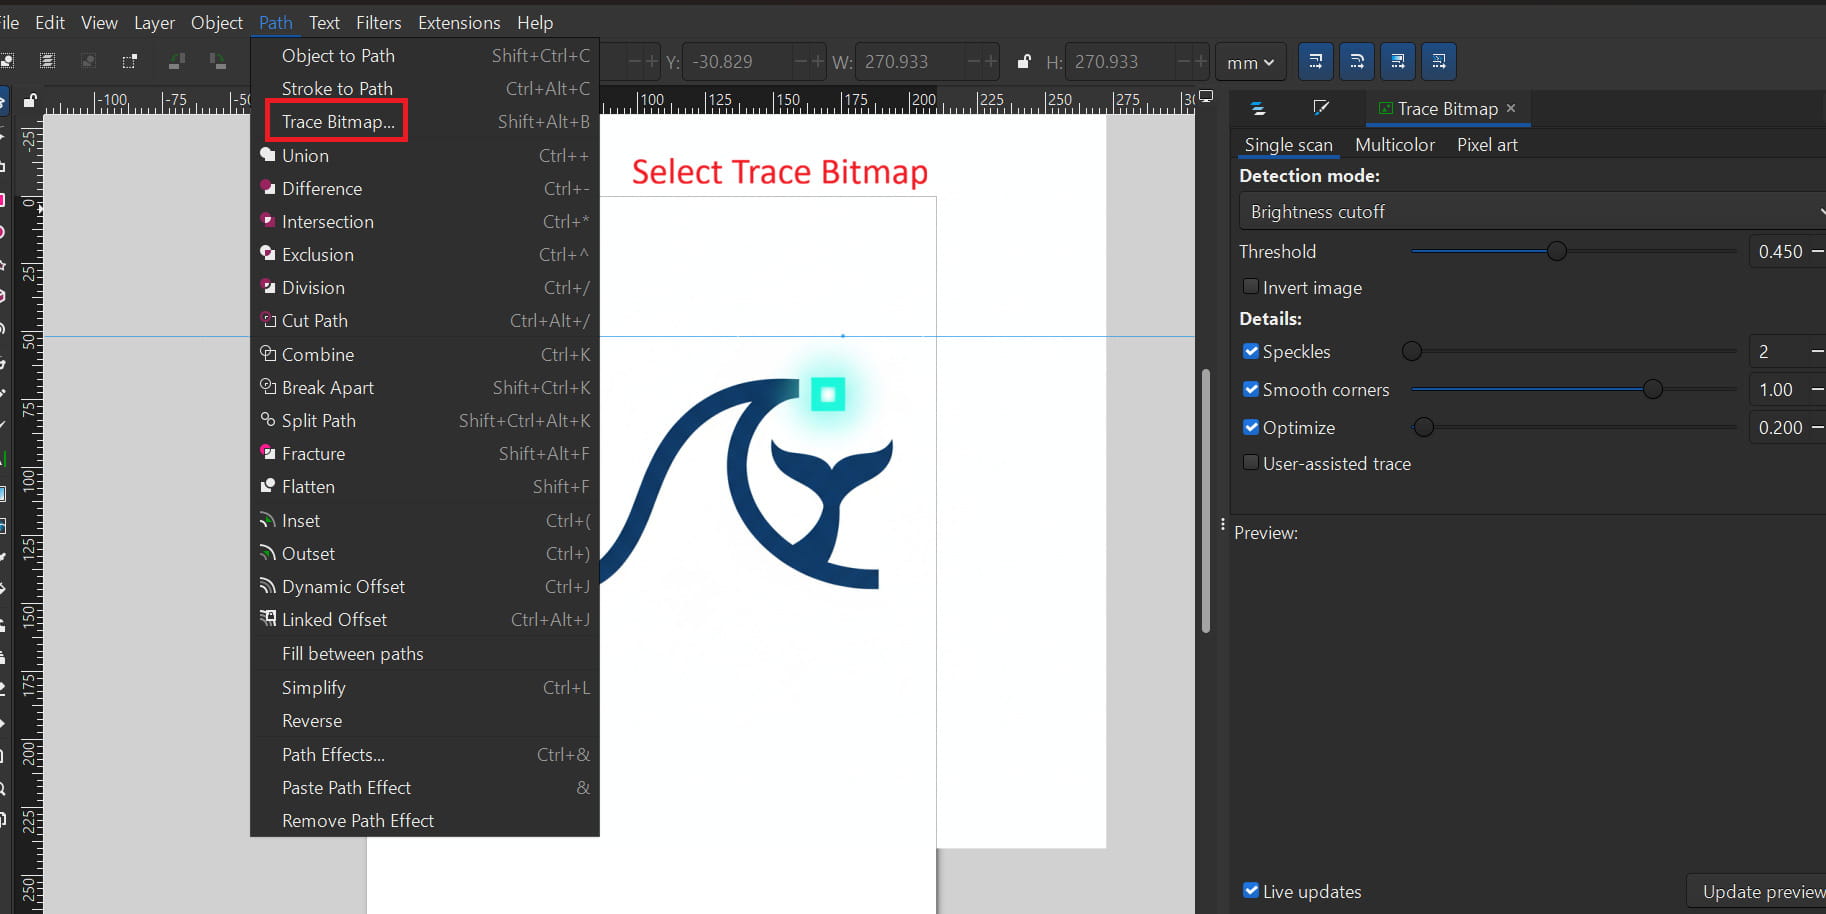
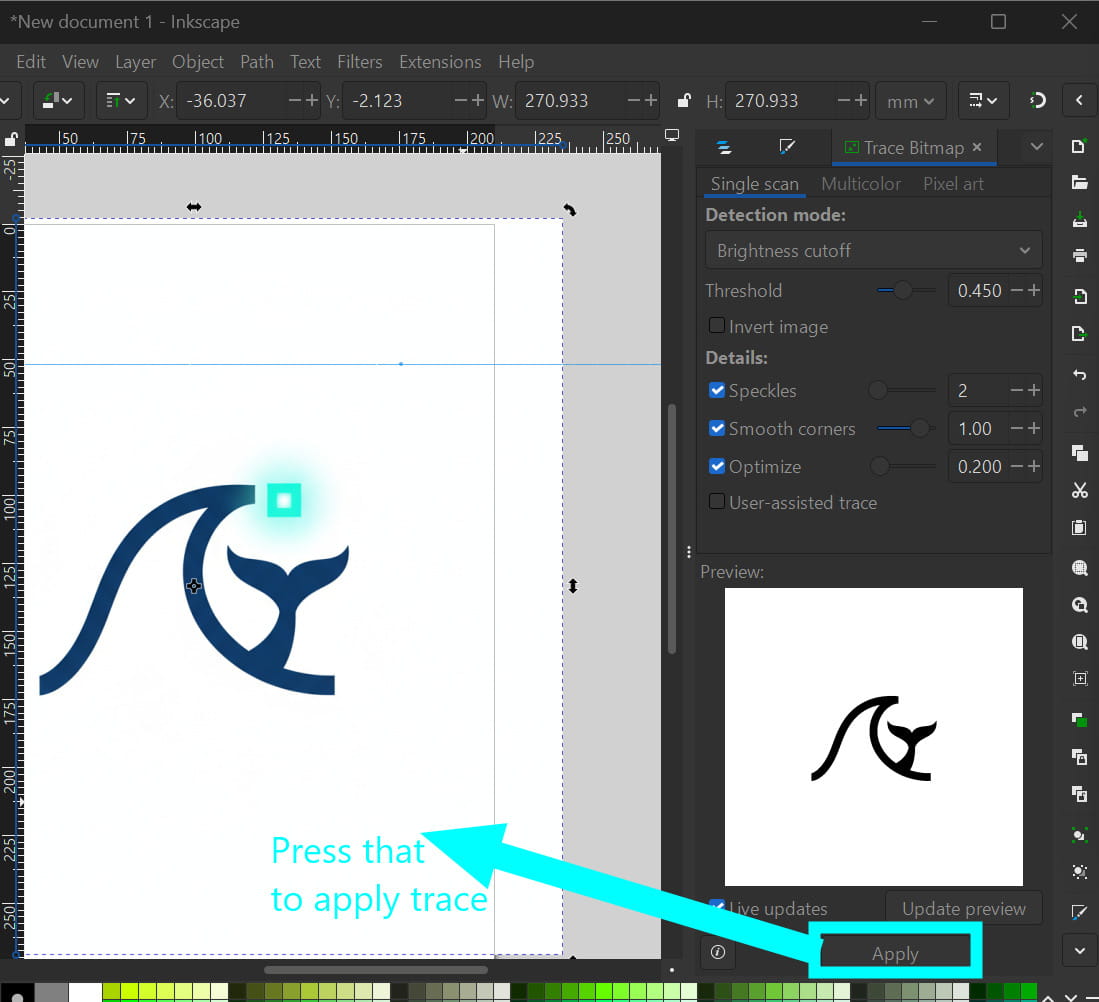
Next, I traced the image as the tutorial suggested. I went to Path → Trace Bitmap, clicked Apply, and a traced version appeared on the right side of the workspace with black outlines and a transparent background.
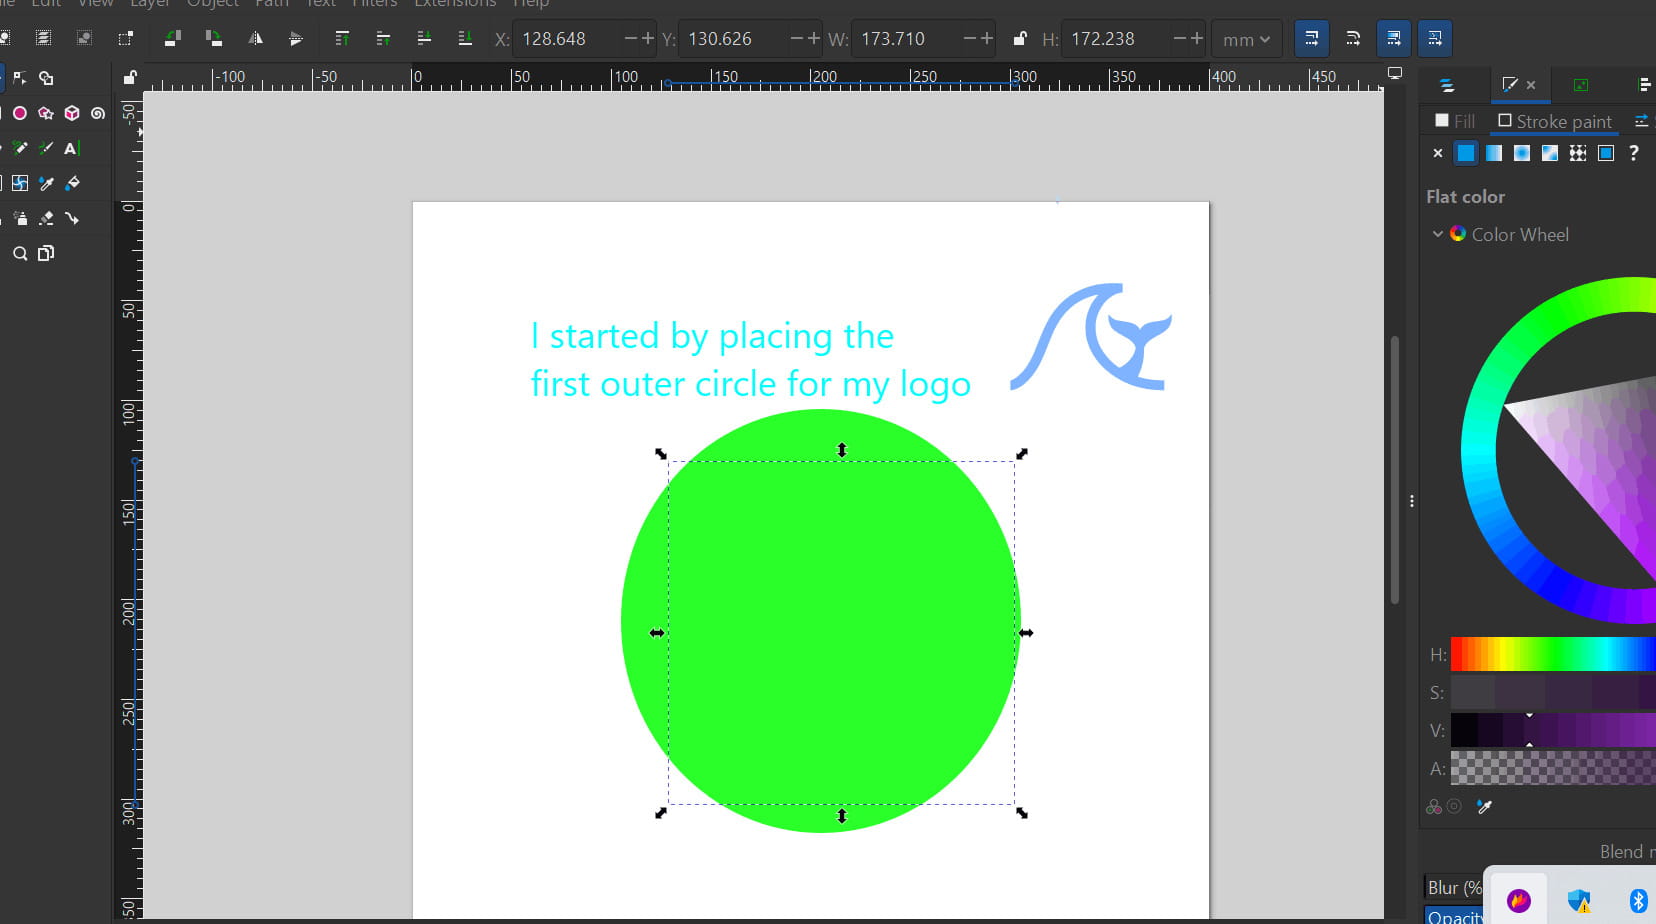
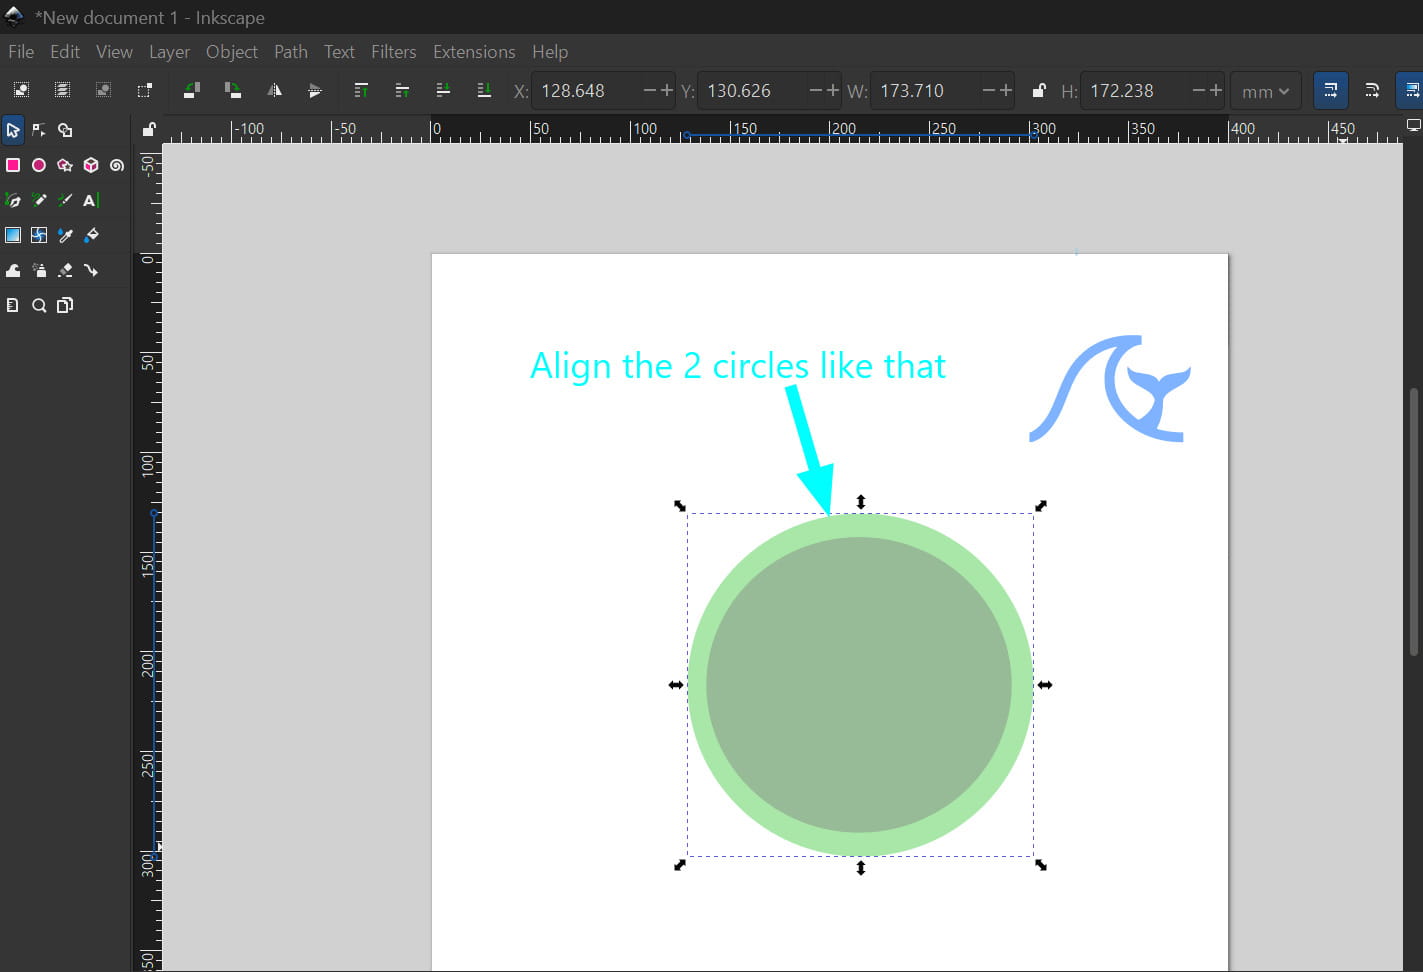
Next, to create a circular border like a real logo, I used the circle tool to draw two circles on the workspace.
.jpg)
Then, I positioned the smaller circle inside the larger one to form the circular border of the logo. Next, from the Object menu, I chose Align and Distribute and applied it to both circles.
.jpg)
I then arranged the circles together.
.jpg)
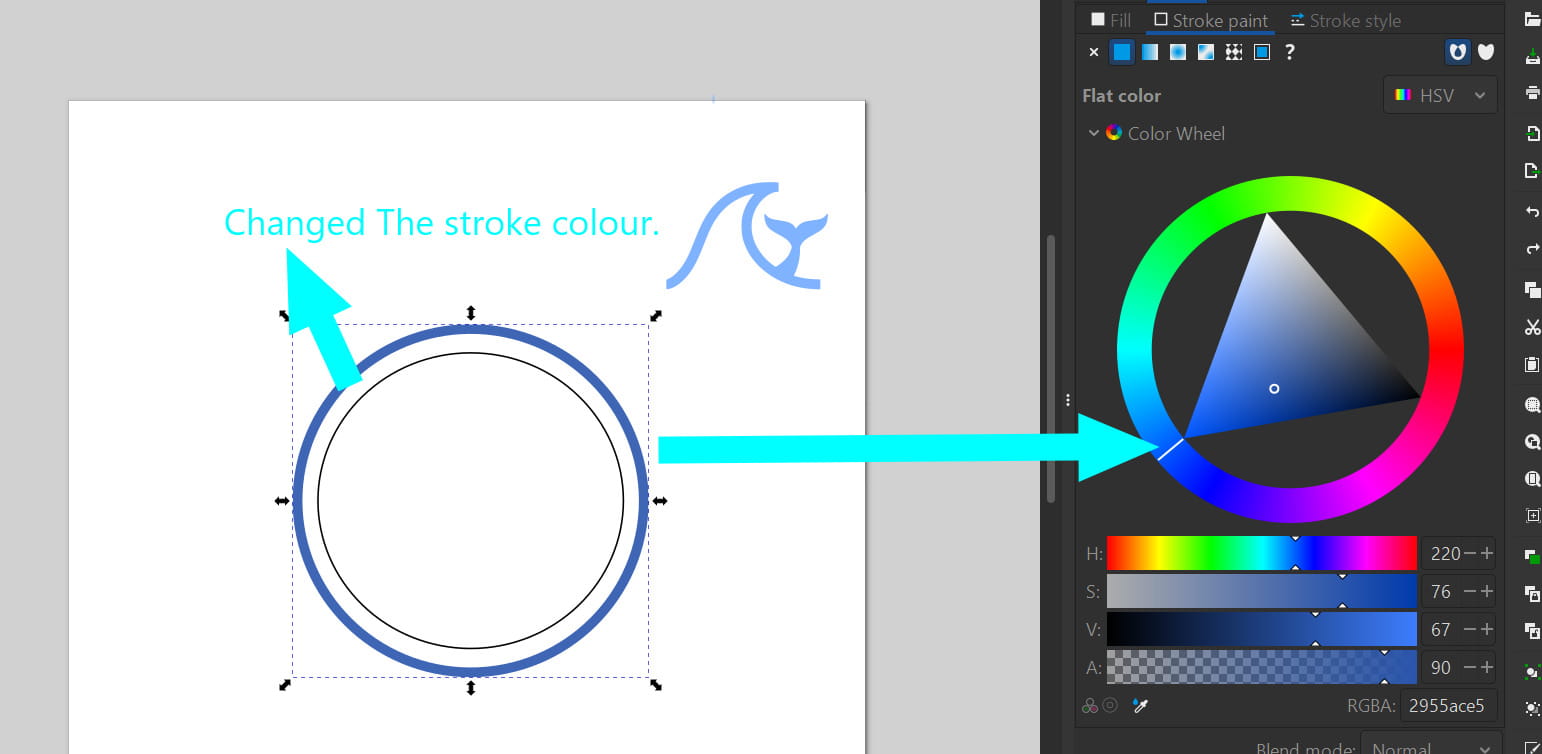
Then, to keep only the outline of the circle, I clicked ‘No fill’ to remove the inner color. Holding Shift, I selected black from the color palette, which made just the outline black.
.jpg)
I changed the width of the stroke as well.
.jpg)
I then adjusted the color using the gradient controls in the right panel. Since I imagine my bot having a light ocean blue color, I chose the same color for the outer border but a bit darker.
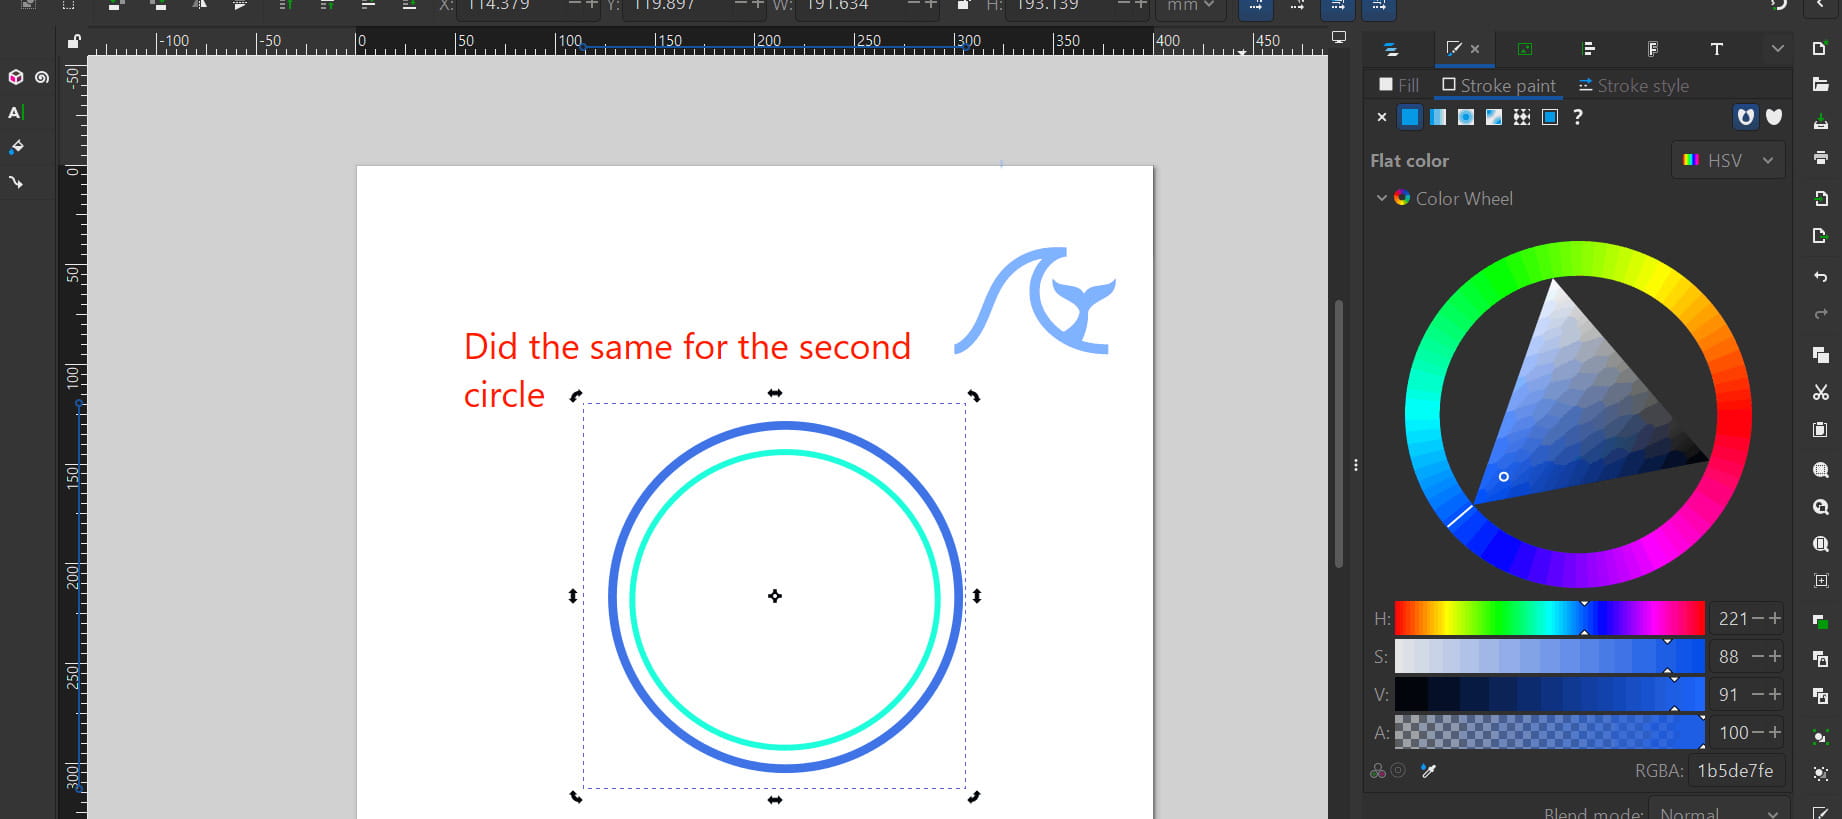
Then for the second border, I went for the color teal.
I did the same for the main illustration of our logo with blue.
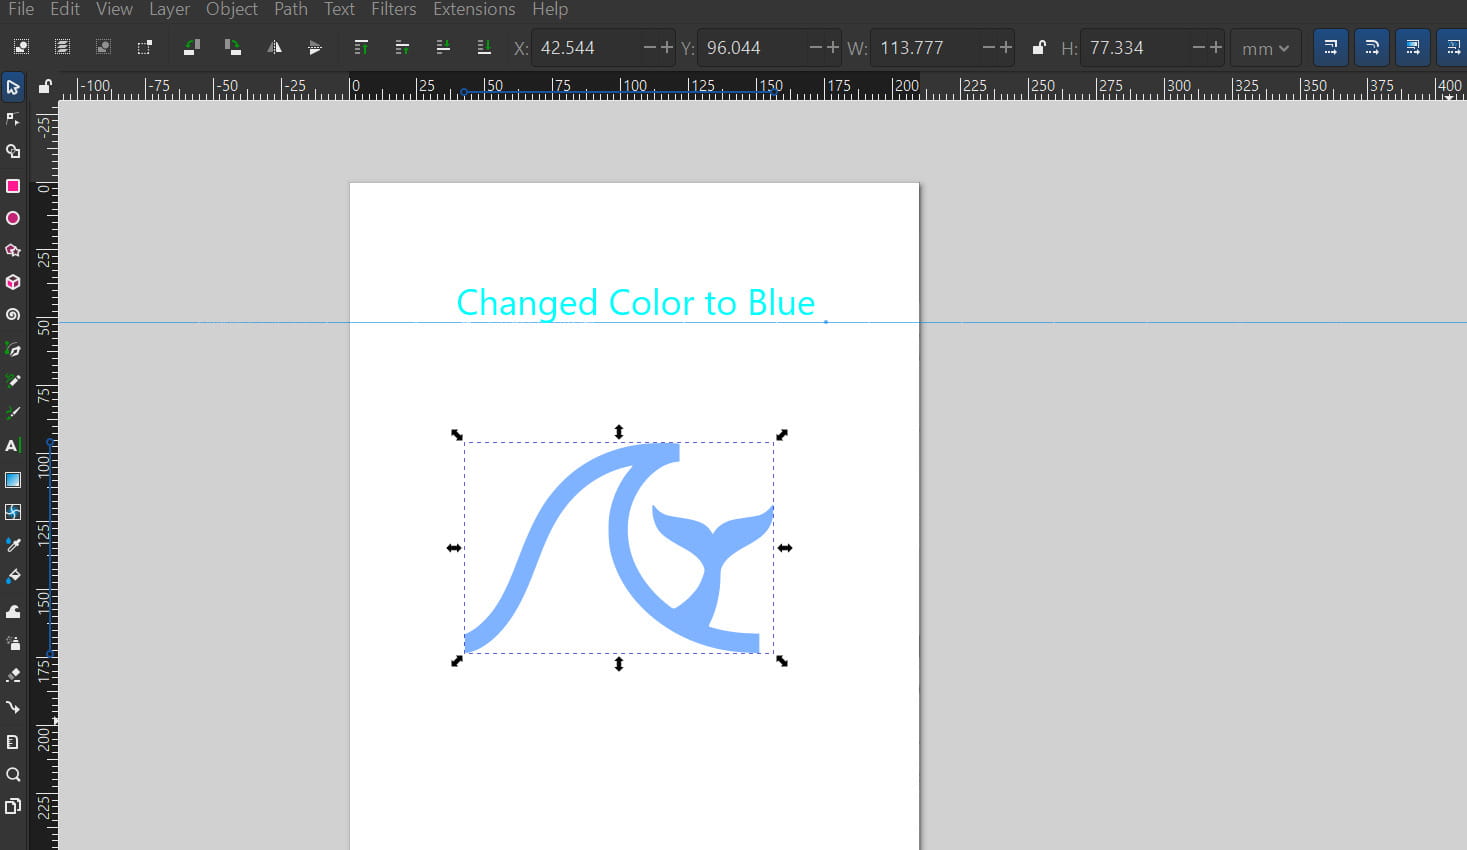
Then, after scaling the main illustration, I placed it right in the middle of the two circle borders using the center vertical and center horizontal align. And I grouped everything together so that all would stay right in place.
 - Copy.jpg)
Now this is the result:

Gimp:
GIMP (GNU Image Manipulation Program) is a free and open-source software for editing and creating images and digital art. It works with raster images, which are pictures made of tiny colored dots called pixels. This is different from vector software because the image quality depends on its resolution—if you zoom in too much, you can see the individual pixels, and enlarging an image too much can make it look blurry.
It is a powerful and popular alternative to paid software like Adobe Photoshop. You can use GIMP for many tasks, like fixing photos, creating digital paintings, designing graphics, or making textures for 3D models. It includes tools for cropping, adjusting colors, adding text, applying filters, and combining images using layers.
How to install Gimp:
To install GIMP, I went to the official GIMP website and downloaded the installer for my computer. After running the file, I followed the simple on-screen instructions to complete the setup.

I started with basic tasks in GIMP, such as removing the background from an image and placing it onto a different background. To do this, I downloaded two images, one with a clear background of a location and another of a character without a background.
.jpg)
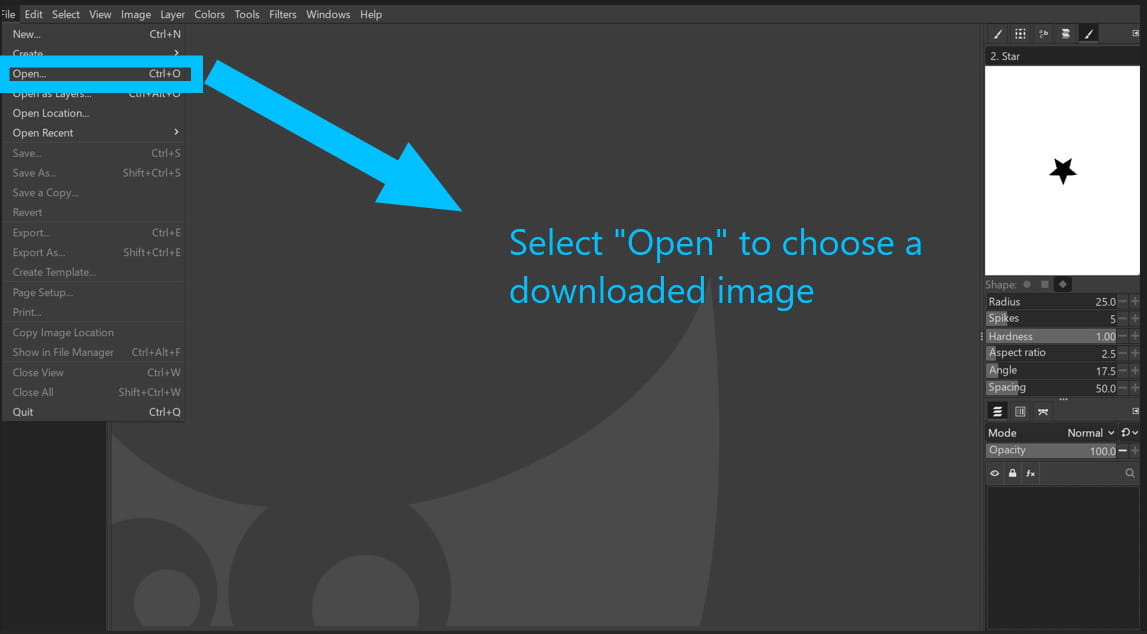
I then opened GIMP to begin editing. From the File menu, I selected Open to import an image.
From the View menu, select Zoom and then Fit Image in Window to make the image fill the screen, making it easier to work on details.
.jpg)
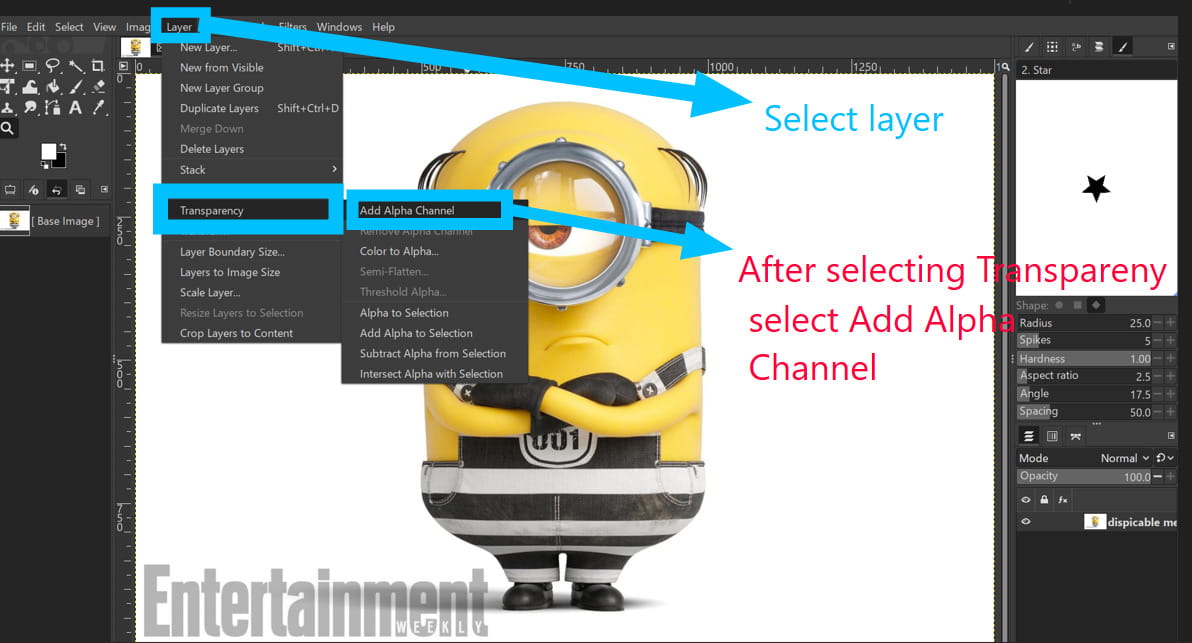
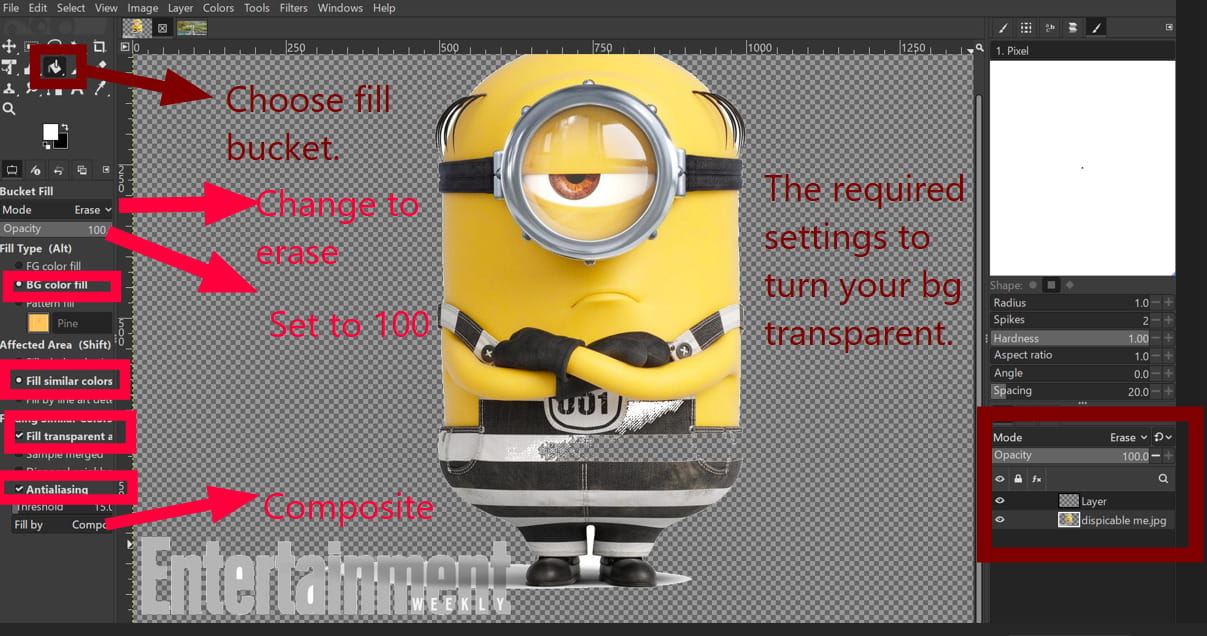
Next, select Layer → Transparency → Add Alpha Channel. This adds transparency to the existing layer, allowing you to erase parts of it so the background shows through instead of a solid color.
Then select ‘New Layer’. Selecting “New Layer” lets you edit separately without changing the original image.
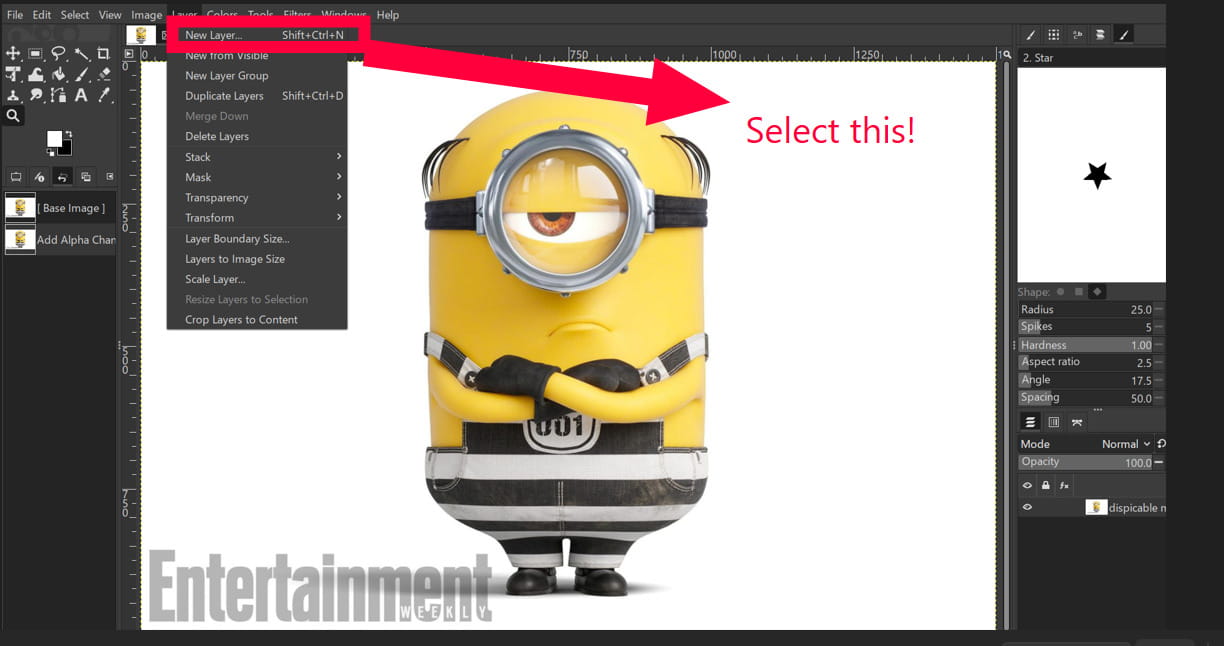
Set “Fill with” to Transparency when creating a new layer so the layer starts with a transparent background.
Select the Fill Bucket tool and make sure the settings match the example in the picture. Then click on the background to remove it, leaving it transparent.
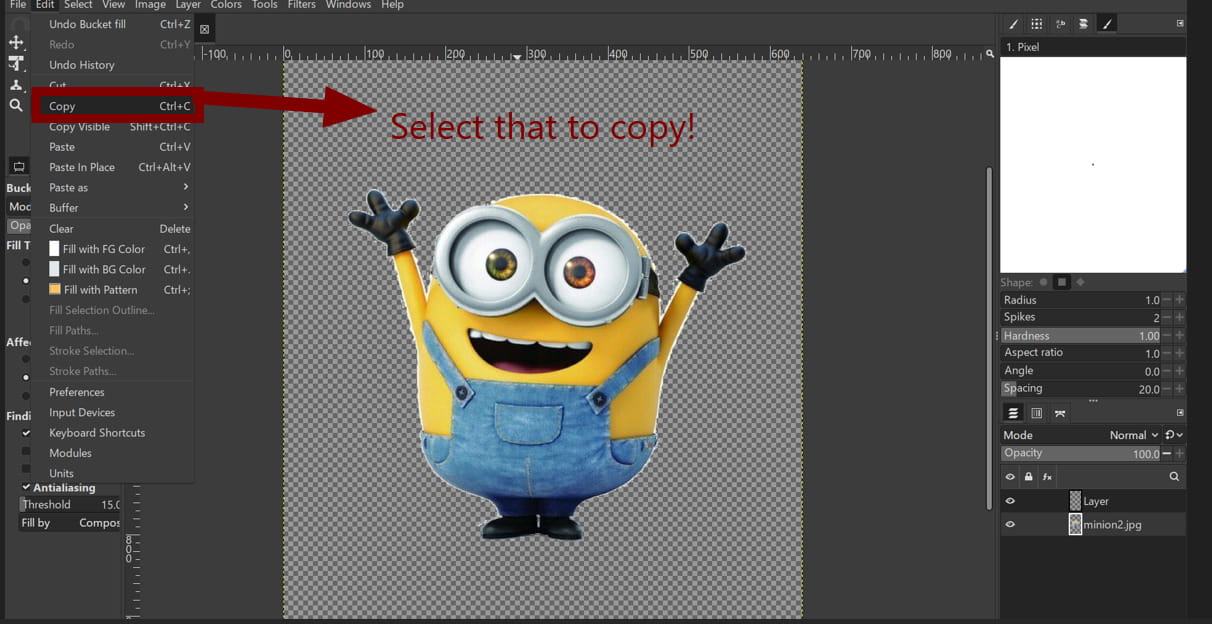
Removing the background from that image was difficult because of the text, which left many small traces. I decided to redo the whole thing again and use a cleaner image with fewer details to make background removal easier. This was the new photo I tried again with:
 (1).jpg)
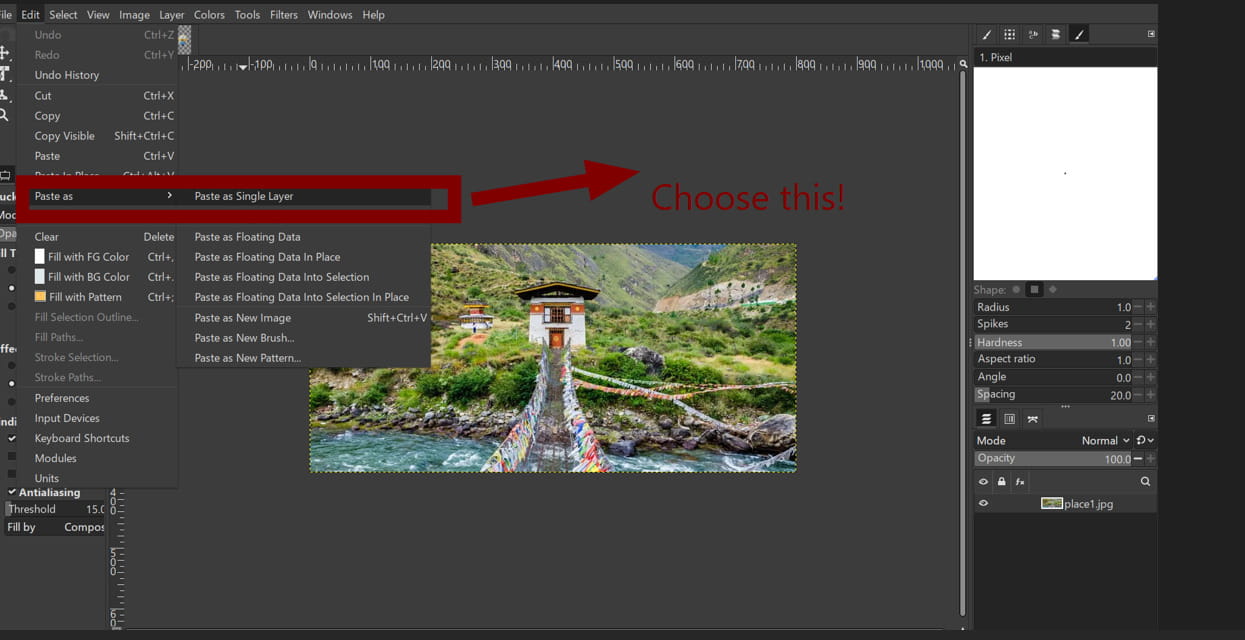
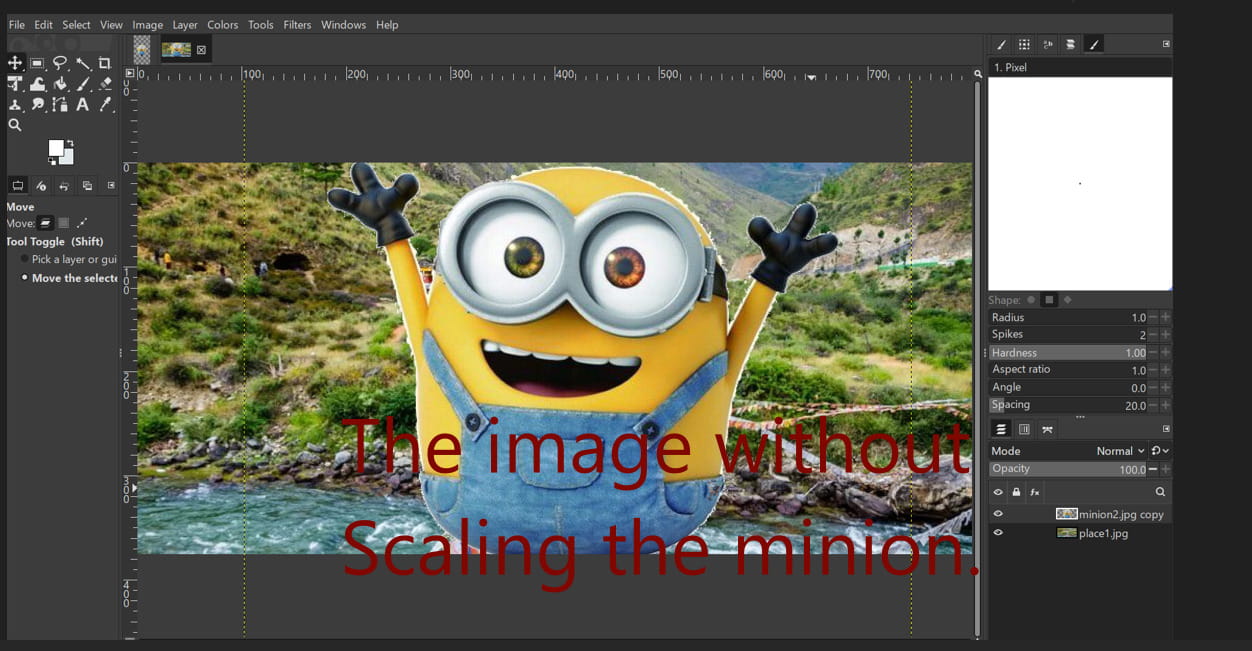
Following the same procedure, I copied the image after removing its background and pasted it as a separate layer onto the new background.
Then I scaled the minion to a reasonable size using the scale tool.

.jpg)
I tried it again with another background.
.jpg)

Gandalf’s there too now 😯 :

3D CAD Software:
Fusion 360
Autodesk Fusion 360 is a design and manufacturing software that brings CAD, CAM, and CAE tools all into one place. It lets you create accurate 3D models, try out different designs, and test how they’ll work before actually making them. It’s widely used in engineering and education because it makes the whole design process easier. Since it’s cloud-based, you can access and share your work from anywhere, which makes collaboration simple. It’s also pretty user friendly and gets regular updates, so it supports a smooth workflow from design to production.
Installing Fusion:
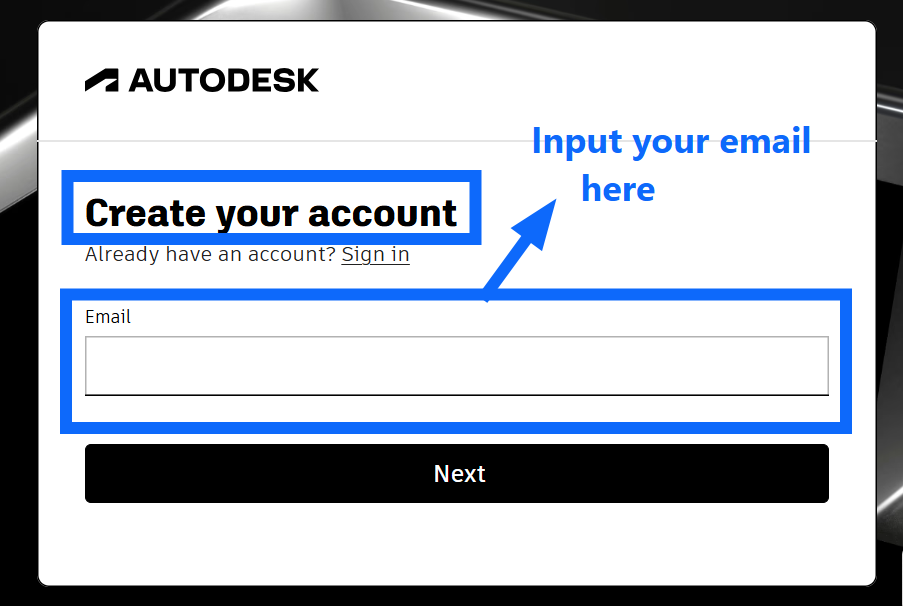
Step 1: Create an Autodesk Account
Go to autodesk.com and create a free account using your email address.
Step 2: Fill in your details
Fill in all of the required information and select the "Personal Use" (free hobbyist) or "Educational" license if you have a student email. The personal license is free for three years and renewable.
Step 3: Download the Installer
From your Autodesk Account dashboard, go to Products and Services and click the download link for Fusion 360.
Step 4: Run the Installer
Open the downloaded file and follow the on screen instructions. On Windows, you may need to right click and select "Run as Administrator".
Step 5: Sign In
Launch Fusion 360 and sign in with your Autodesk account credentials.
I already downloaded Autodesk Fusion 360 as part of my Fab Academy prep so I didn't have to go through the process again.
For this week’s assignment, I decided to model my final project in Fusion 360.I have no prior experience working with fusion 36 0 except for the time when I learned how to use it during Fab academy prep, which is why it was hard and confusing to work with at first.
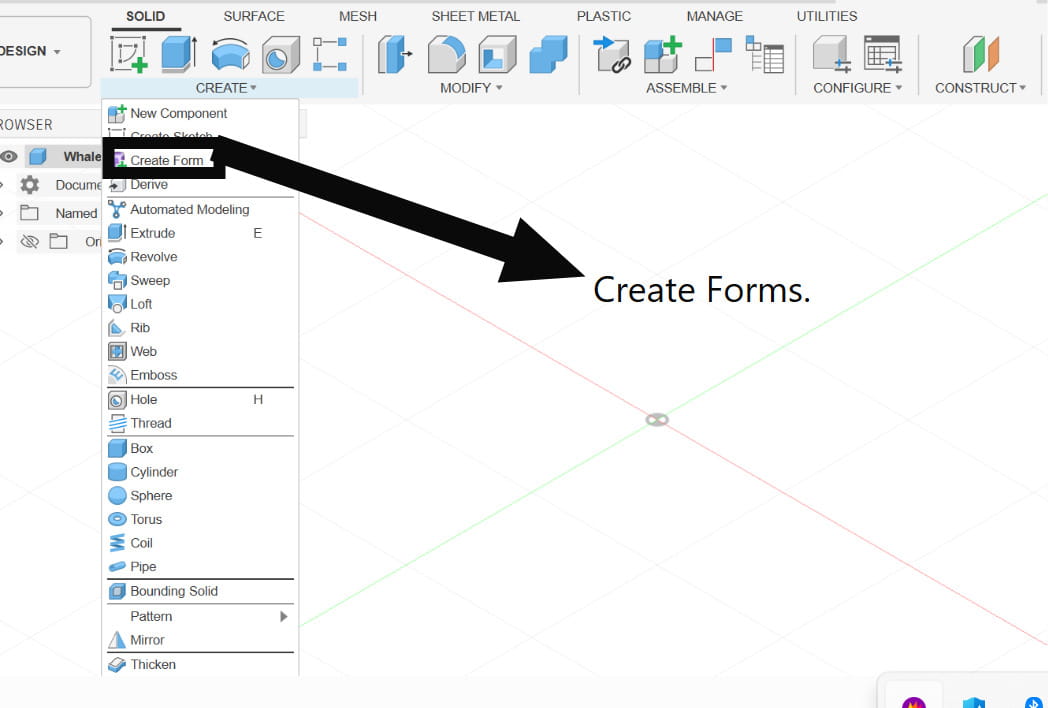
To make the curvatures of the whale, I decided to make the model in Forms. First, change your workspace from Solid to Forms by clicking on ‘Create Form’ from the Create dropdown menu.
Forms in Fusion
Forms is a workspace in Fusion 360 used for creating organic, free flowing shapes. It allows you to push, pull, and sculpt 3D geometry in a flexible way, making it ideal for designs like characters, toys, or curved objects. T-Splines are the underlying technology behind Forms. They allow smooth, continuous surfaces that can be easily adjusted without breaking the shape, combining the precision of CAD with the flexibility of sculpting. I used T-Splines to make my model from Fusion as well.
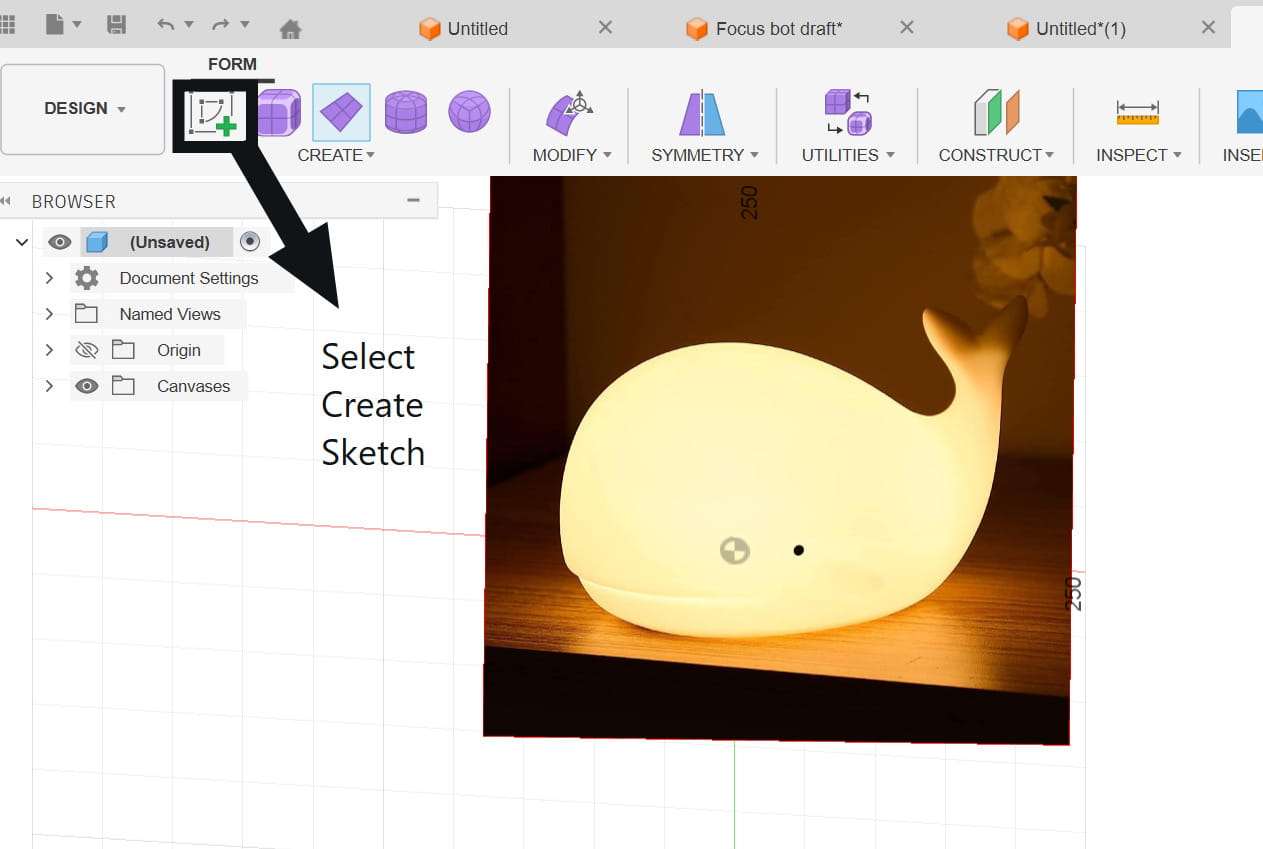
I inserted an image of a whale to use as a reference for modeling my project.
Next, I clicked Create Sketch to begin tracing the image.
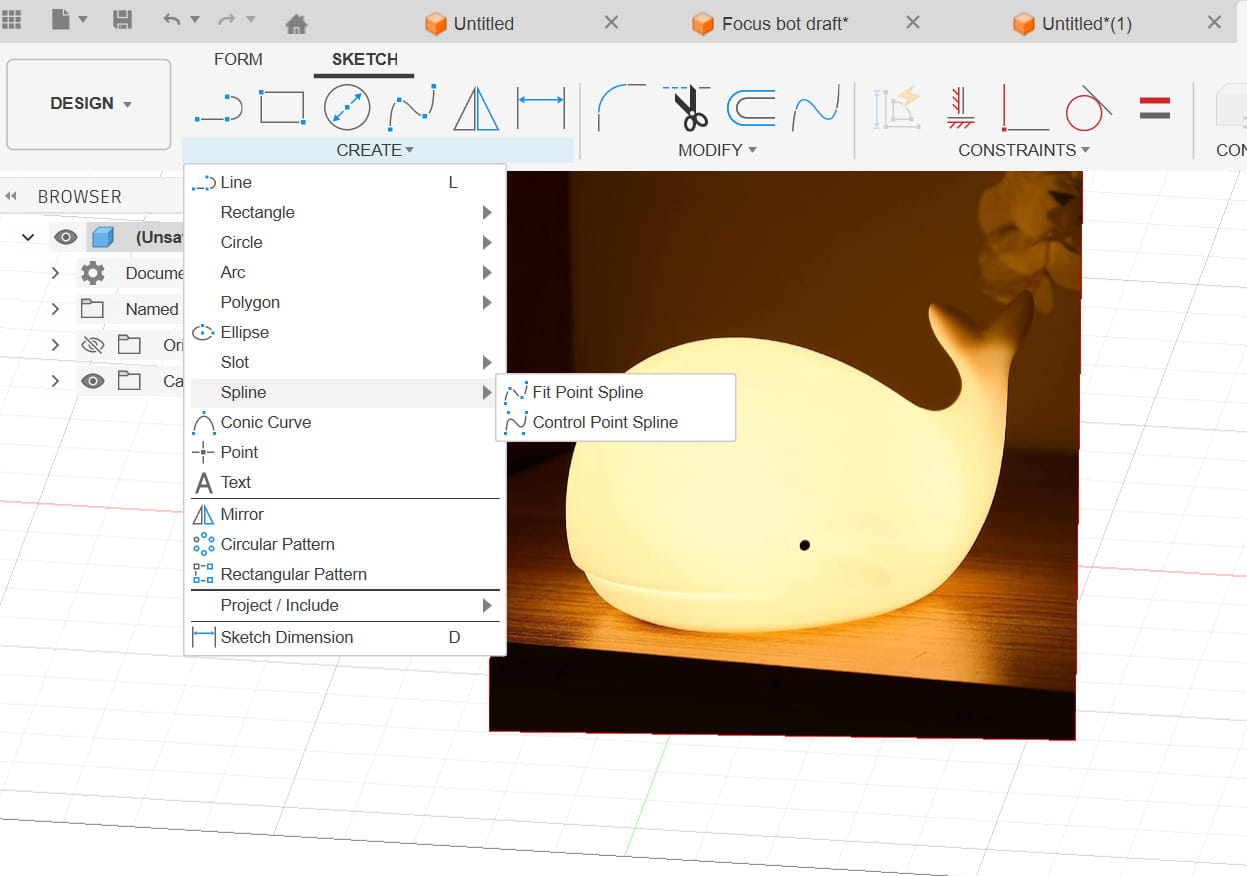
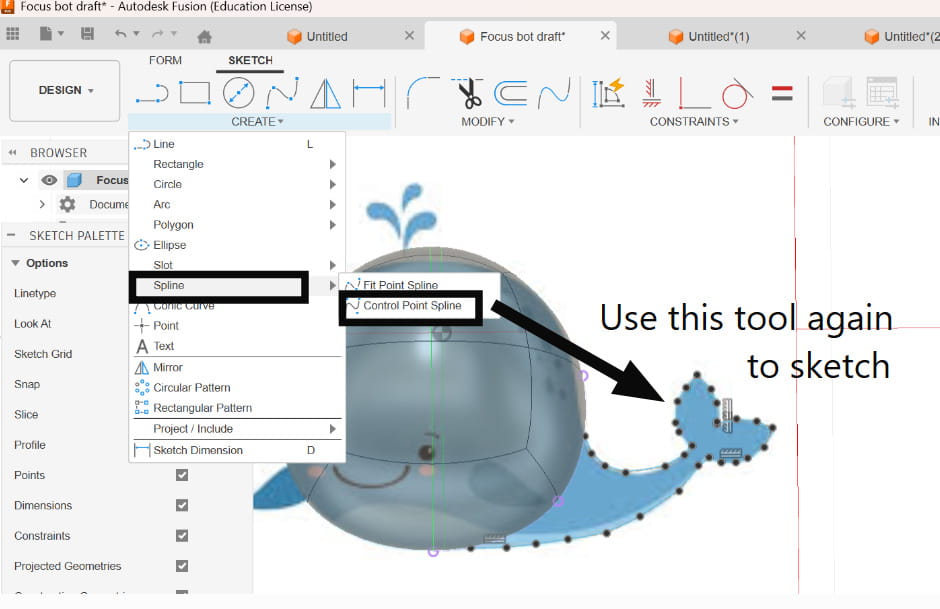
Then, from the Create menu, I selected the Spline tool and chose Control Point Spline to start shaping the curves. I chose the Control Point Spline because it allowed me to trace the image using points, which made creating the curves much easier.
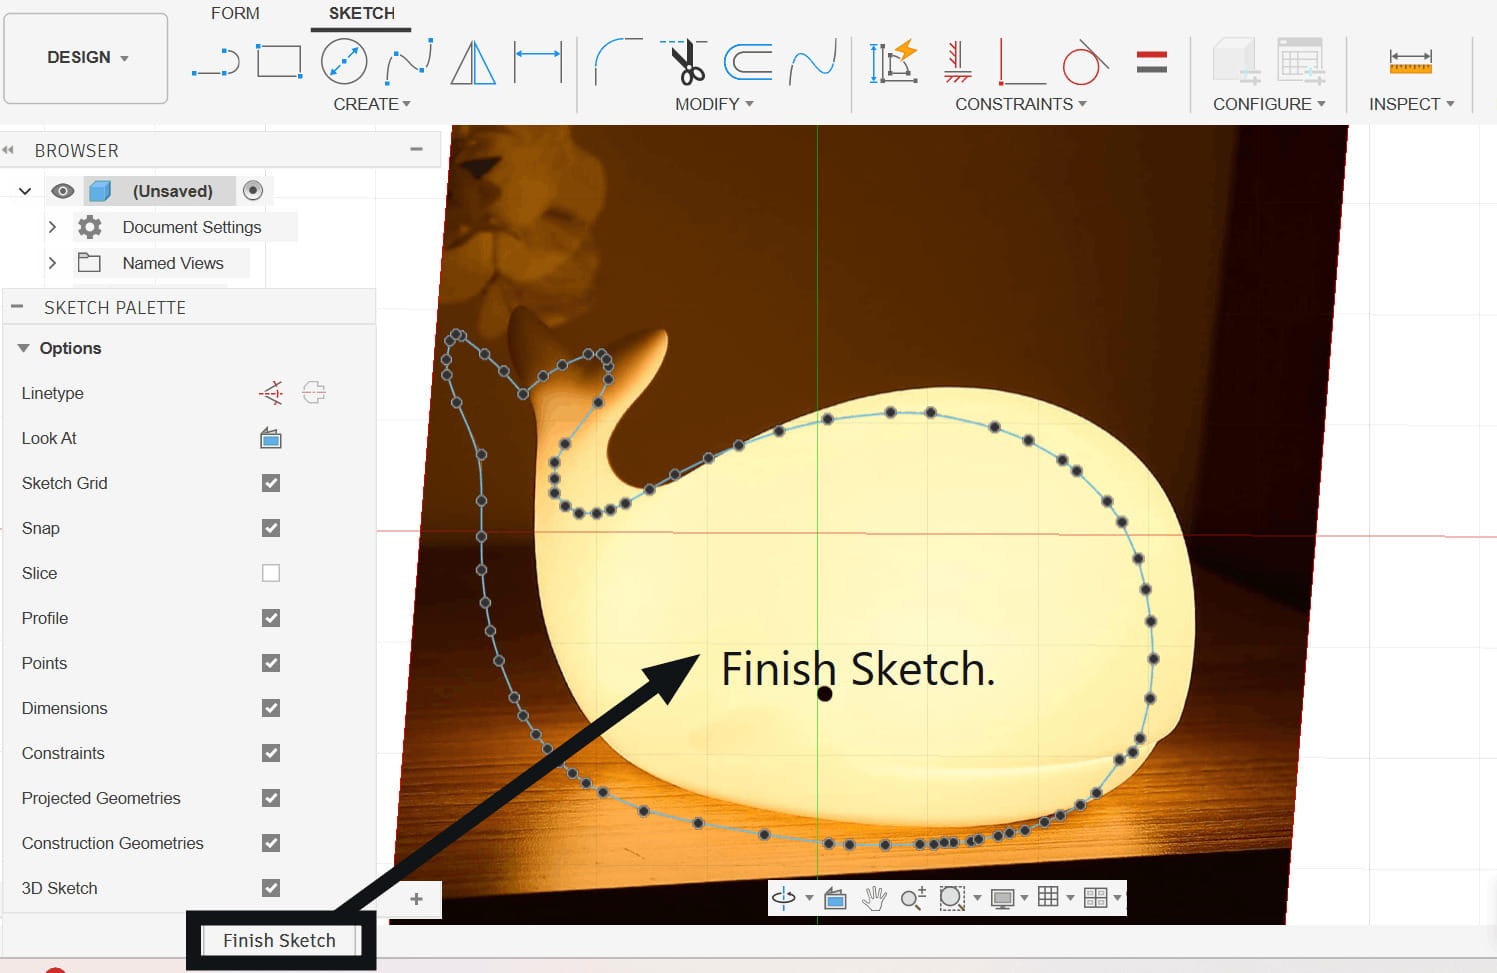
After finishing tracing, I clicked on Finish Sketch to return to Forms.
.jpg)
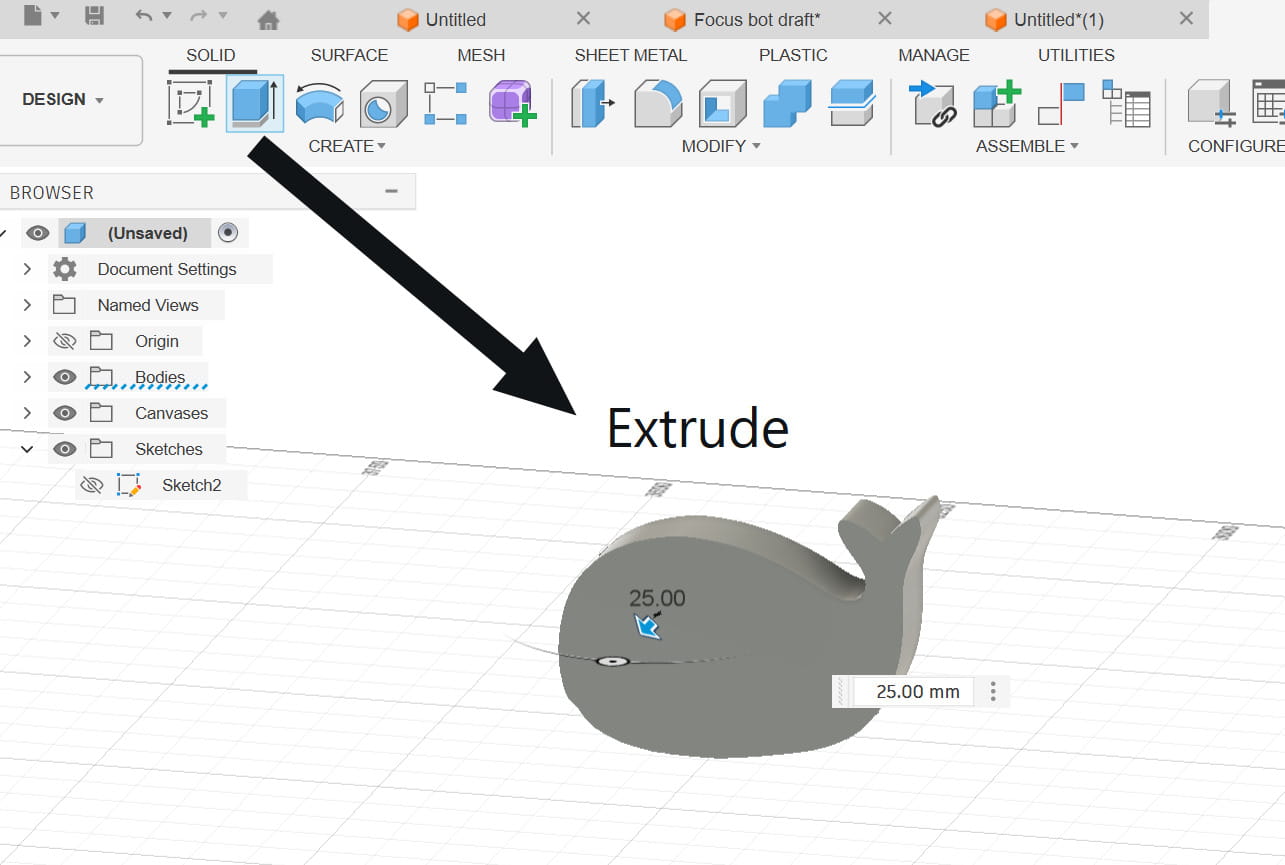
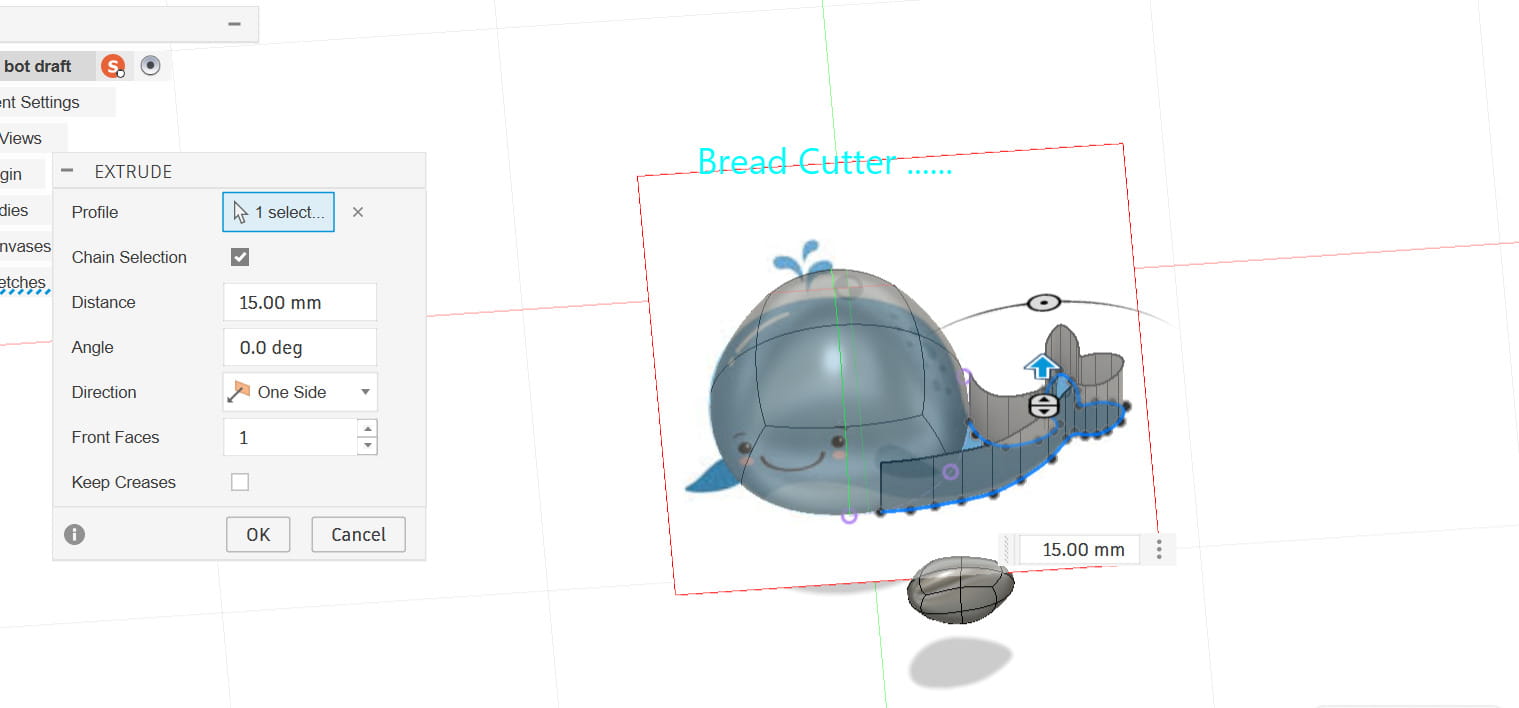
Then I tried to extrude the shape in Forms to modify the curvatures, but while doing so, only the edge part of the sketch turned into a surface, making it look hollow like a cookie cutter. I tried using tools like Bridge to fill the gaps, but I later found out that some tools in Forms don’t work the same way on T-Spline surfaces, which is why it didn’t work as I expected. So I went back to the Solid workspace to extrude the sketch.
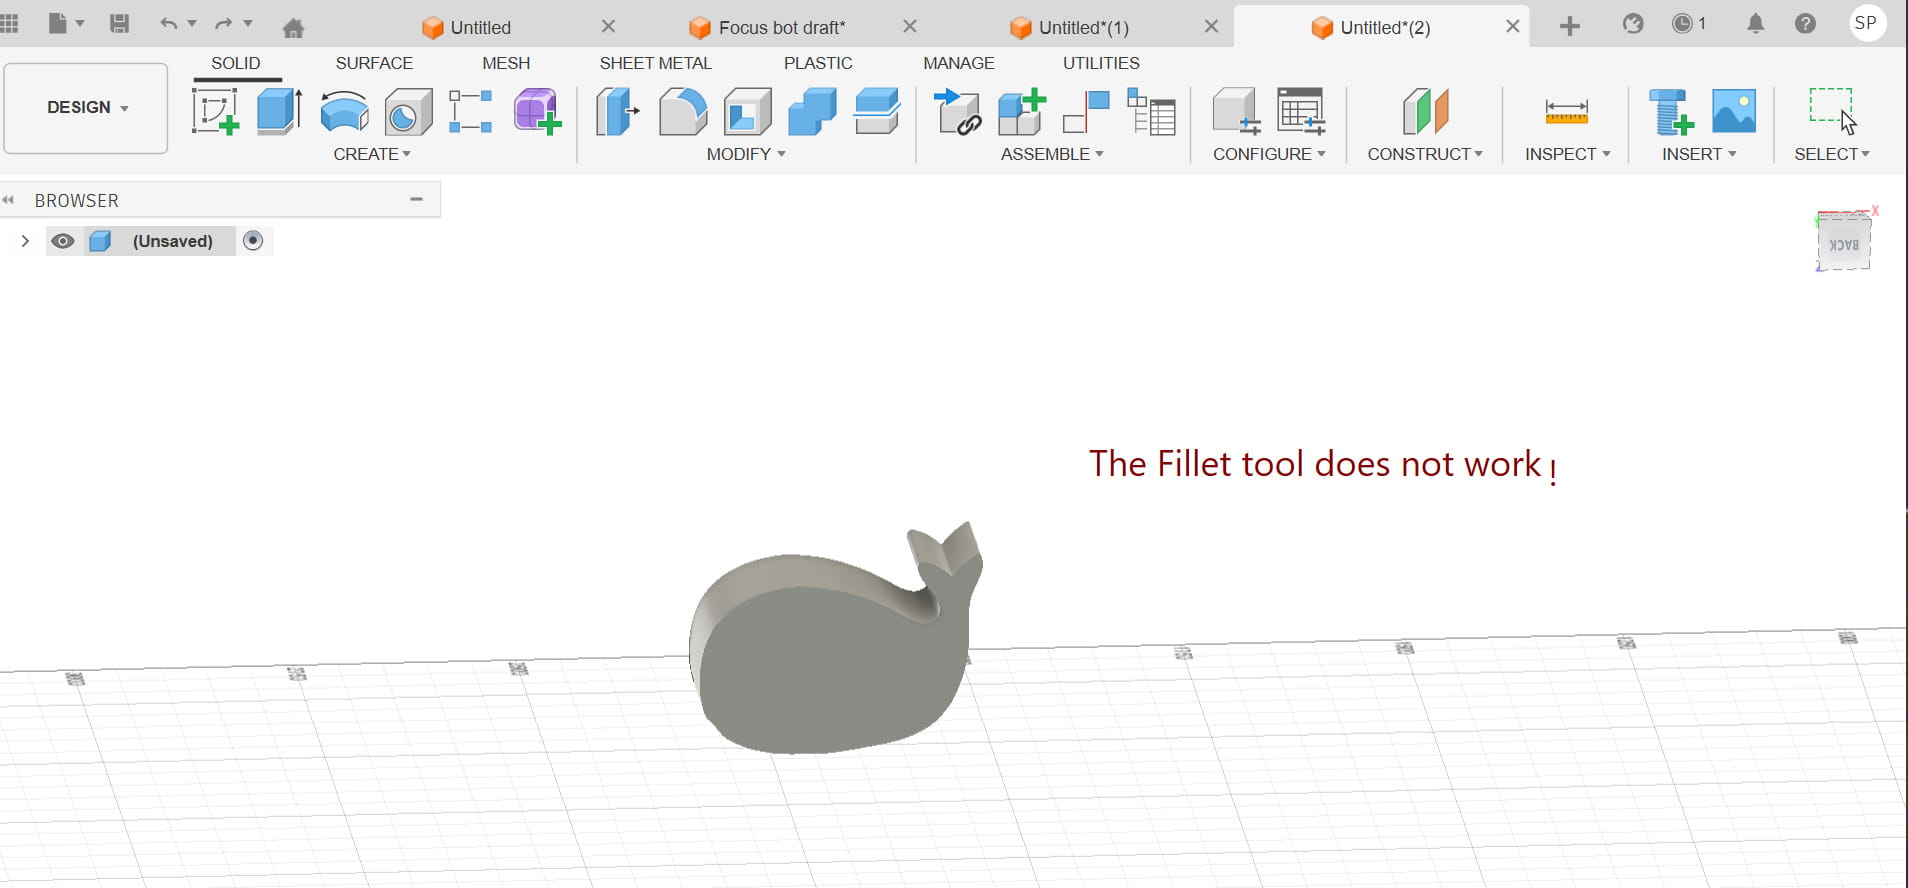
I tried to make the edges rounder using tools like Fillet and Chamfer, but those tools did not work on T-Spline extruded models.
Then, I went back to Forms to try and make the model rounder, but I couldn’t directly edit solid objects in Forms, and converting it back to a T-Spline surface caused some issues. I then made another mistake by trying again in Forms.
I replaced the image and used the Quadball to shape the whale. I modified each face on the Quadball to form the curvatures. And for the tail, I used the T-Spline again since I wasn’t in my right mind that day.
.jpg)
News flash, it ended up being a cookie cutter again.
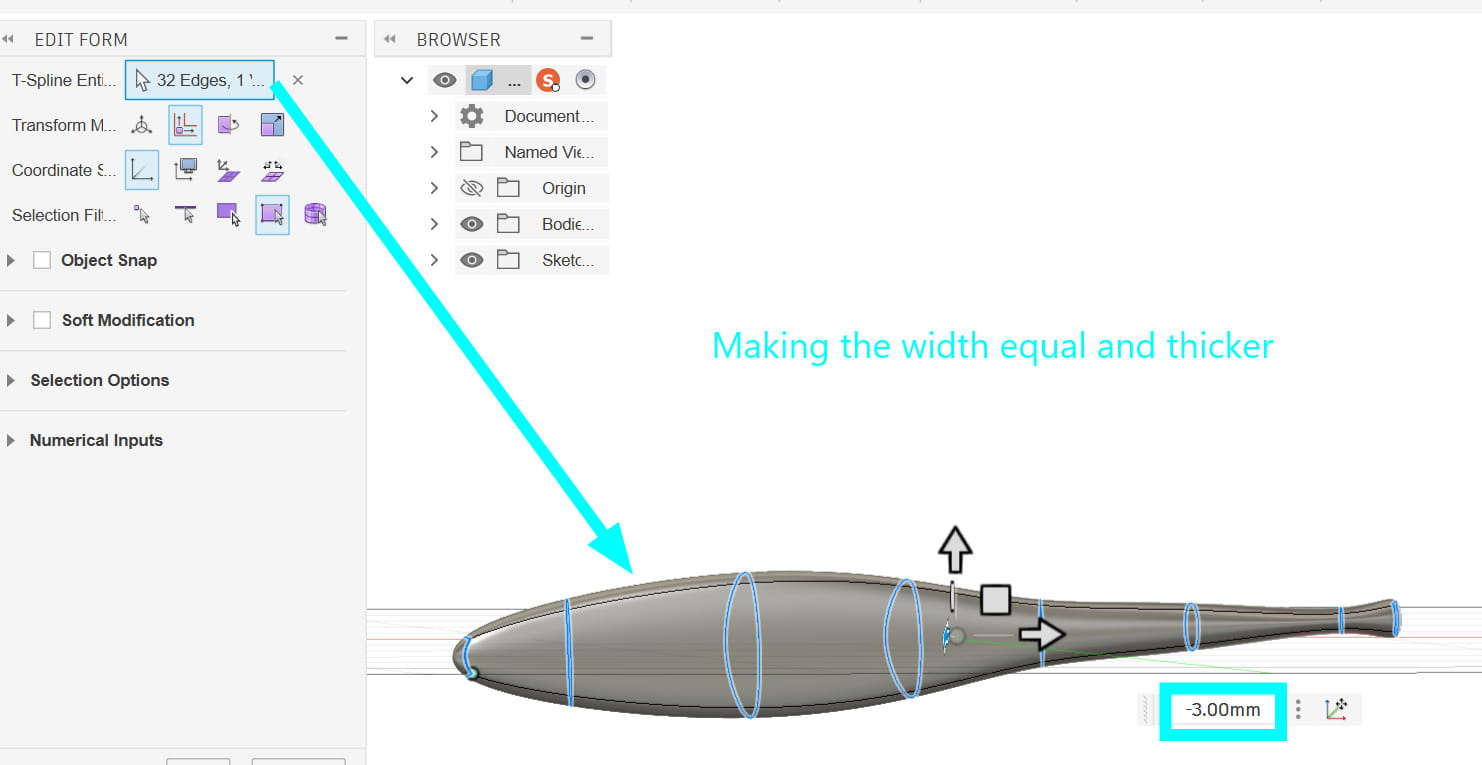
I ditched the T-Splines since extruding it was hard and the normal tools did not work on it. To help me, I followed this tutorial that showed how to make a simple fish using the Forms workspace in Fusion 360. I selected ‘Pipe’ from the ‘Create’ option. I adjusted all the required dimensions and settings just like the tutorial.

.jpg)
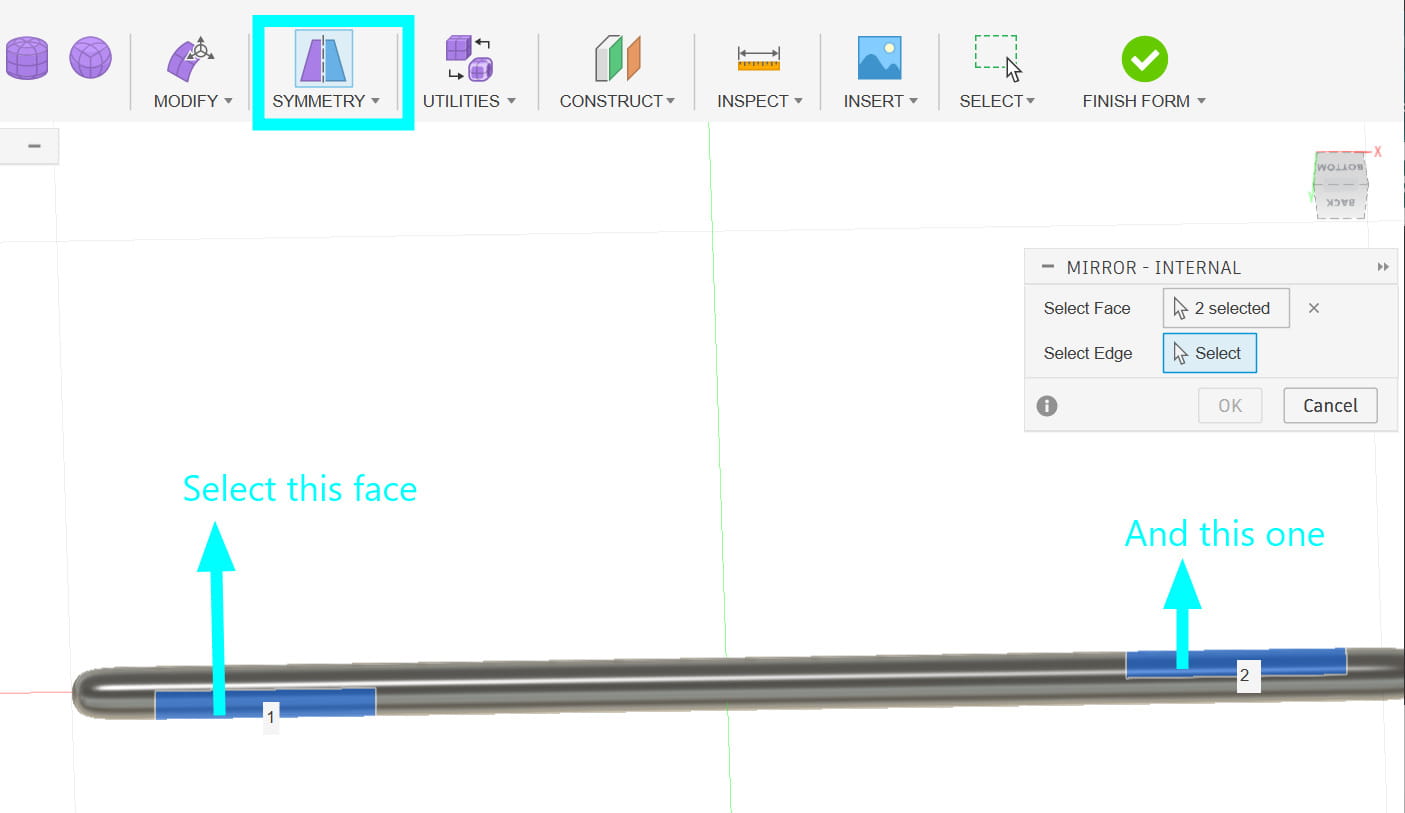
I turned on Mirror Internal under Symmetry so that when I modified one side of the model, the other side would update automatically, keeping both sides consistent.
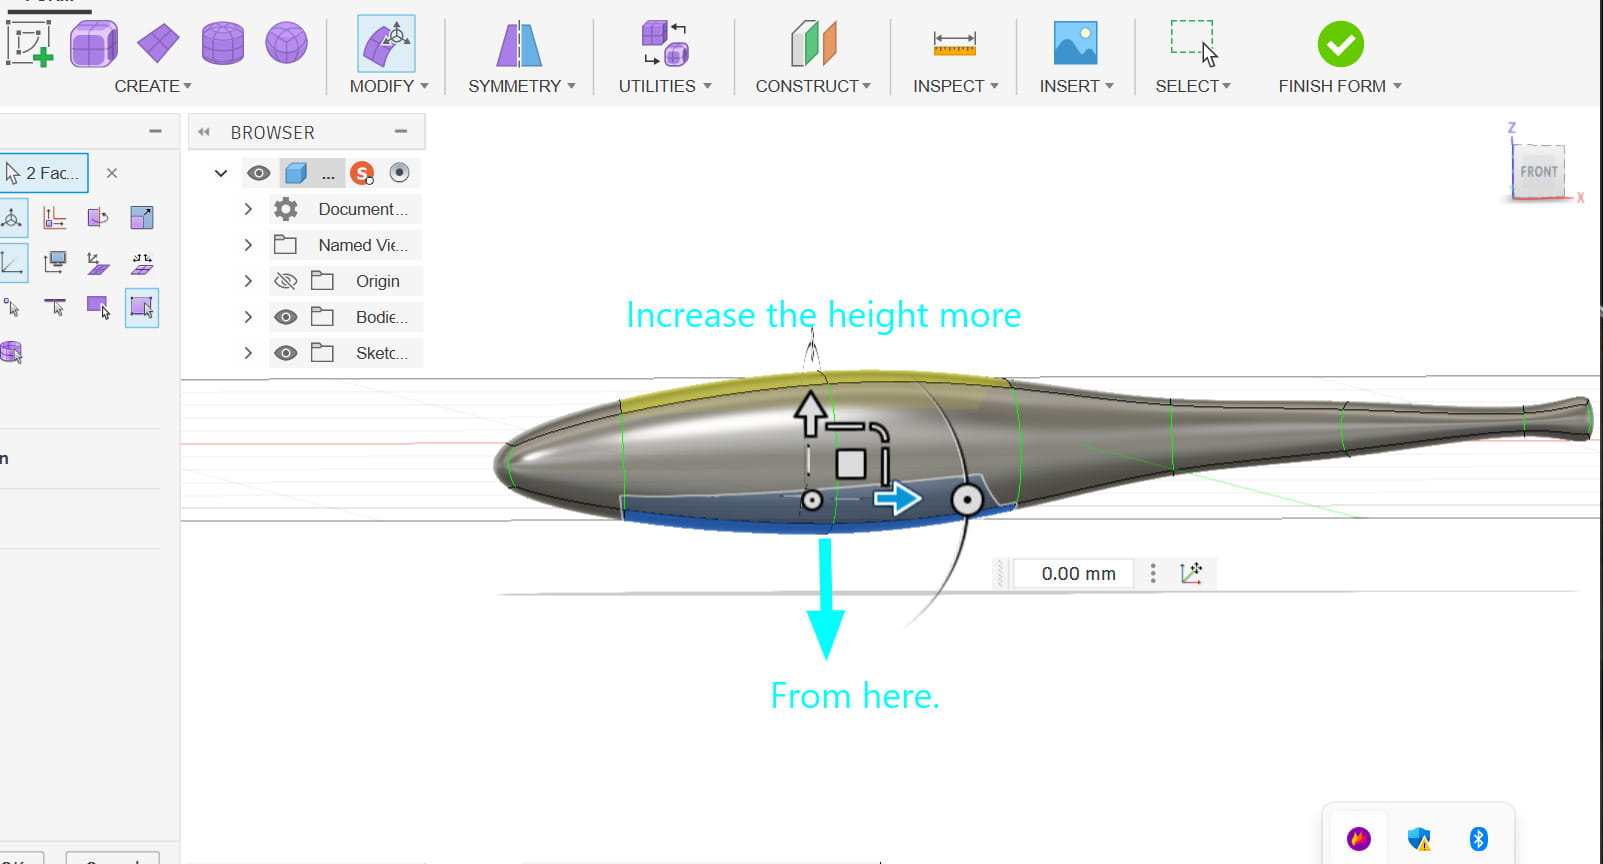
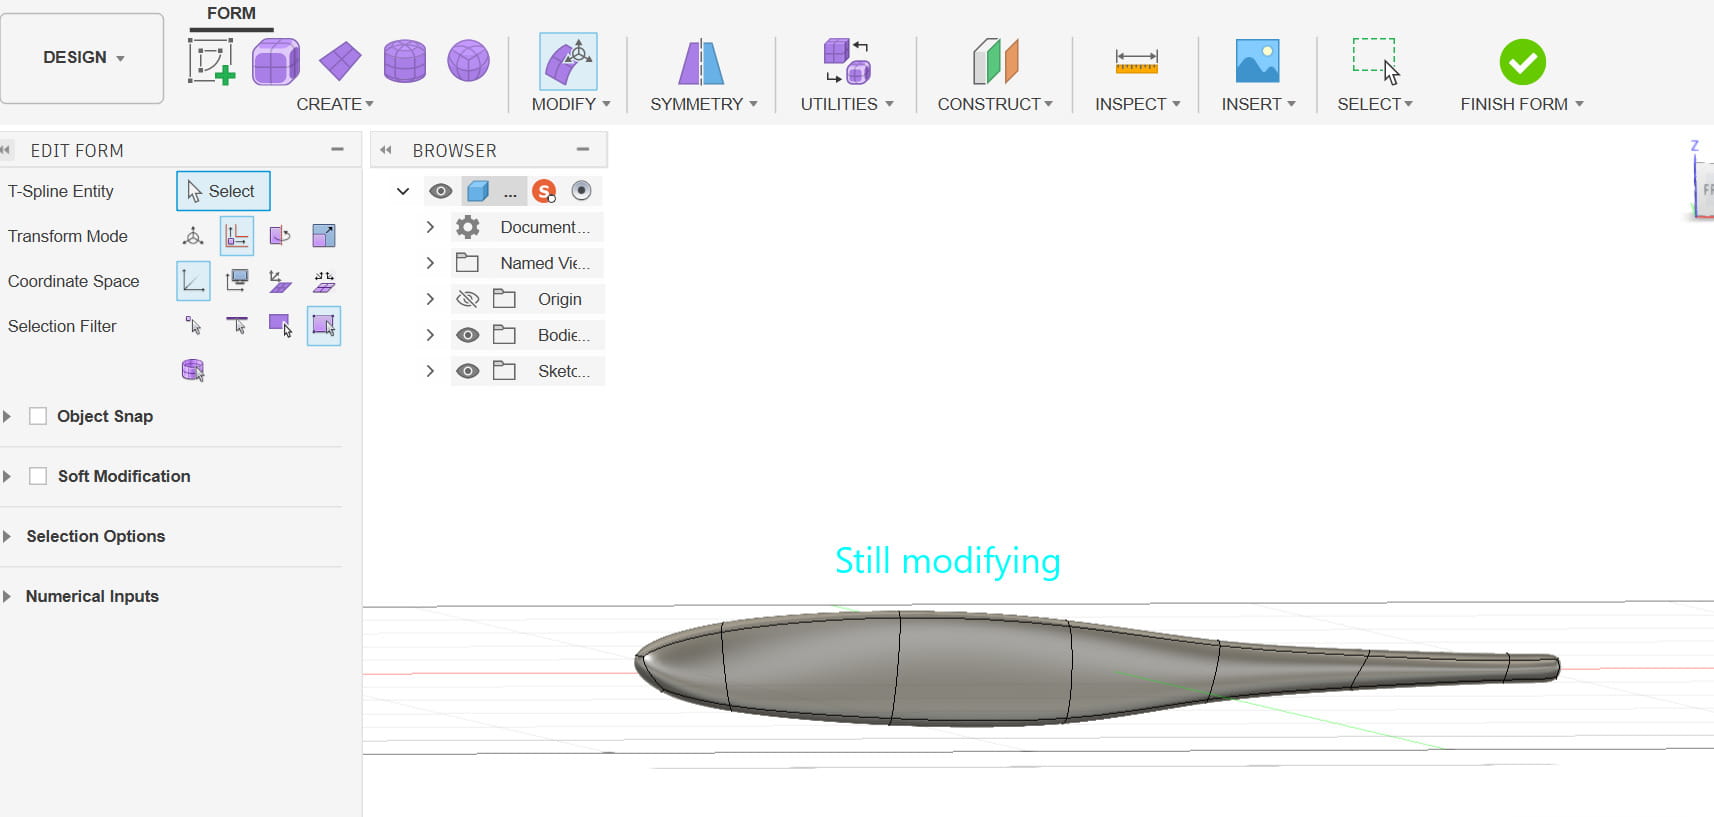
Then from Edit Form, I adjusted all the edges and surfaces to make it streamlined like a real fish. It wasn’t really a hard job to do but just a very lengthy process.
While I was at it, I decided to make another design just to practice. I made a gear slider.
.jpg)
.jpg)
.jpg)
Blender
Blender is a free, open-source 3D creation software used for modeling, sculpting, animation, rendering, and more. It allows users to create both realistic and stylized 3D objects, characters, and scenes. Blender is widely used in industries like animation, game design, and visual effects, and it supports a variety of workflows, including polygon modeling, sculpting, texturing, and simulation. Its flexibility and large community make it a popular choice for both beginners and professionals.
Since I was new to Blender, I followed the tutorial Mr. Rico shared with us, and also referred to another tutorial to help me create my model.
I imported a downloaded image into Blender.
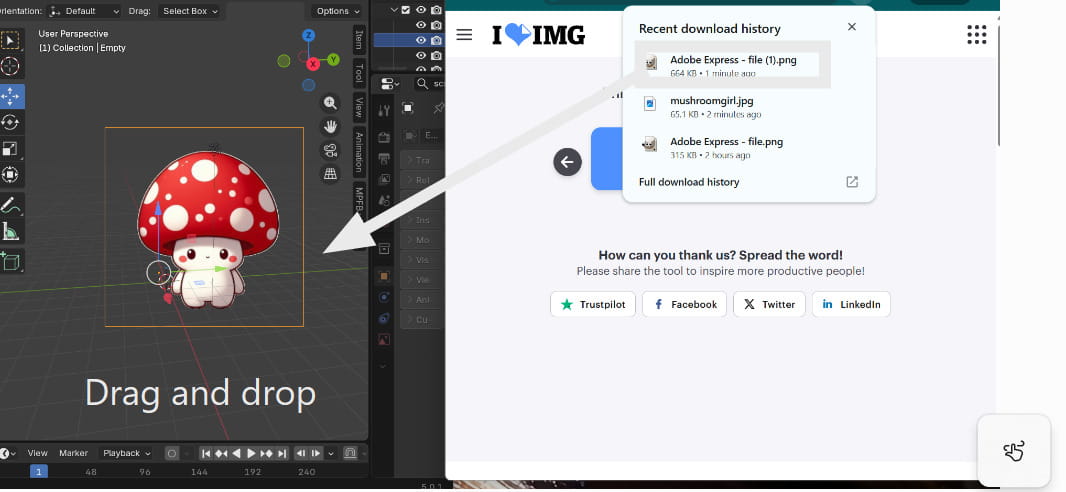
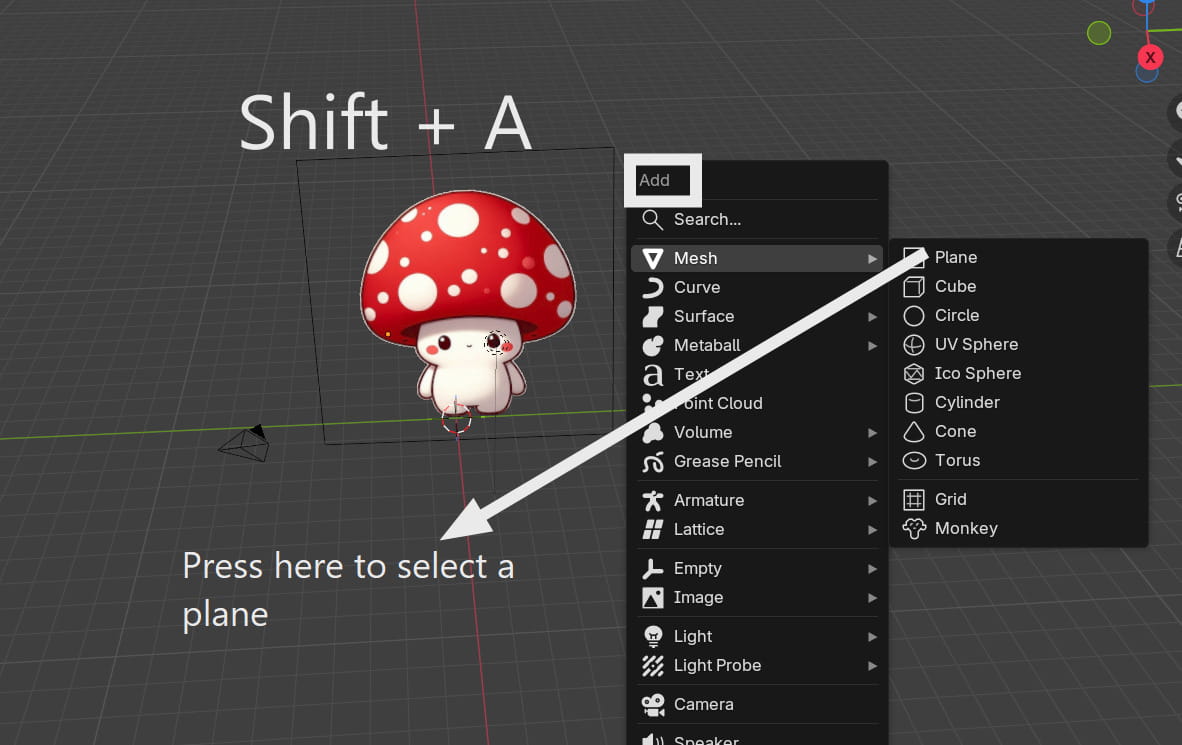
Then, I created an offset plane to keep my reference image properly aligned while modeling.
Then I deleted the plane, leaving only one vertex so that I could use it to trace my image by holding ‘E’ for extruding while dragging the vertex to form a line. To grab the vertex, I pressed ‘G’. I traced half of the image to extrude it into 3D later.
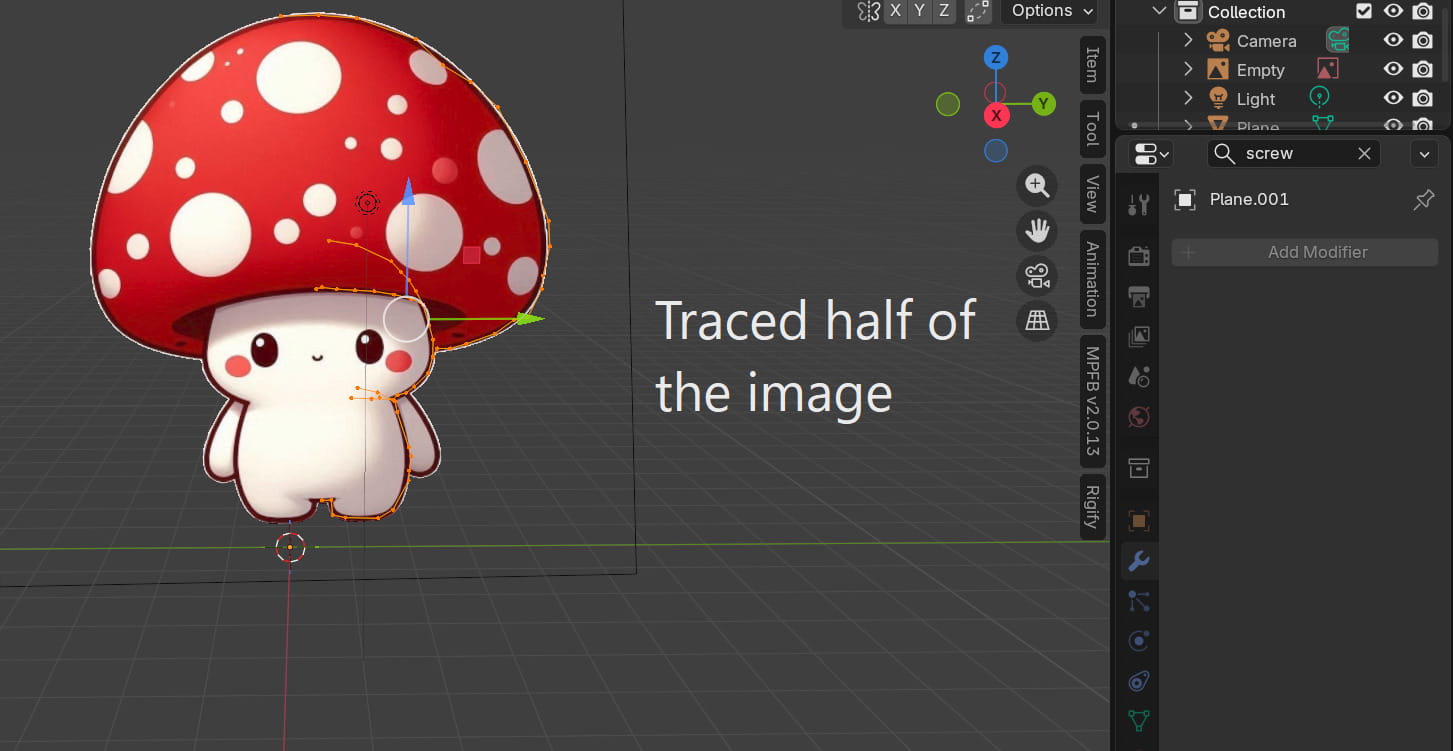
Then, I used the Screw modifier to turn the traced shape into 3D. This also automatically created the other half, making the model perfectly symmetrical. It works similarly to the Revolve tool in Fusion 360.

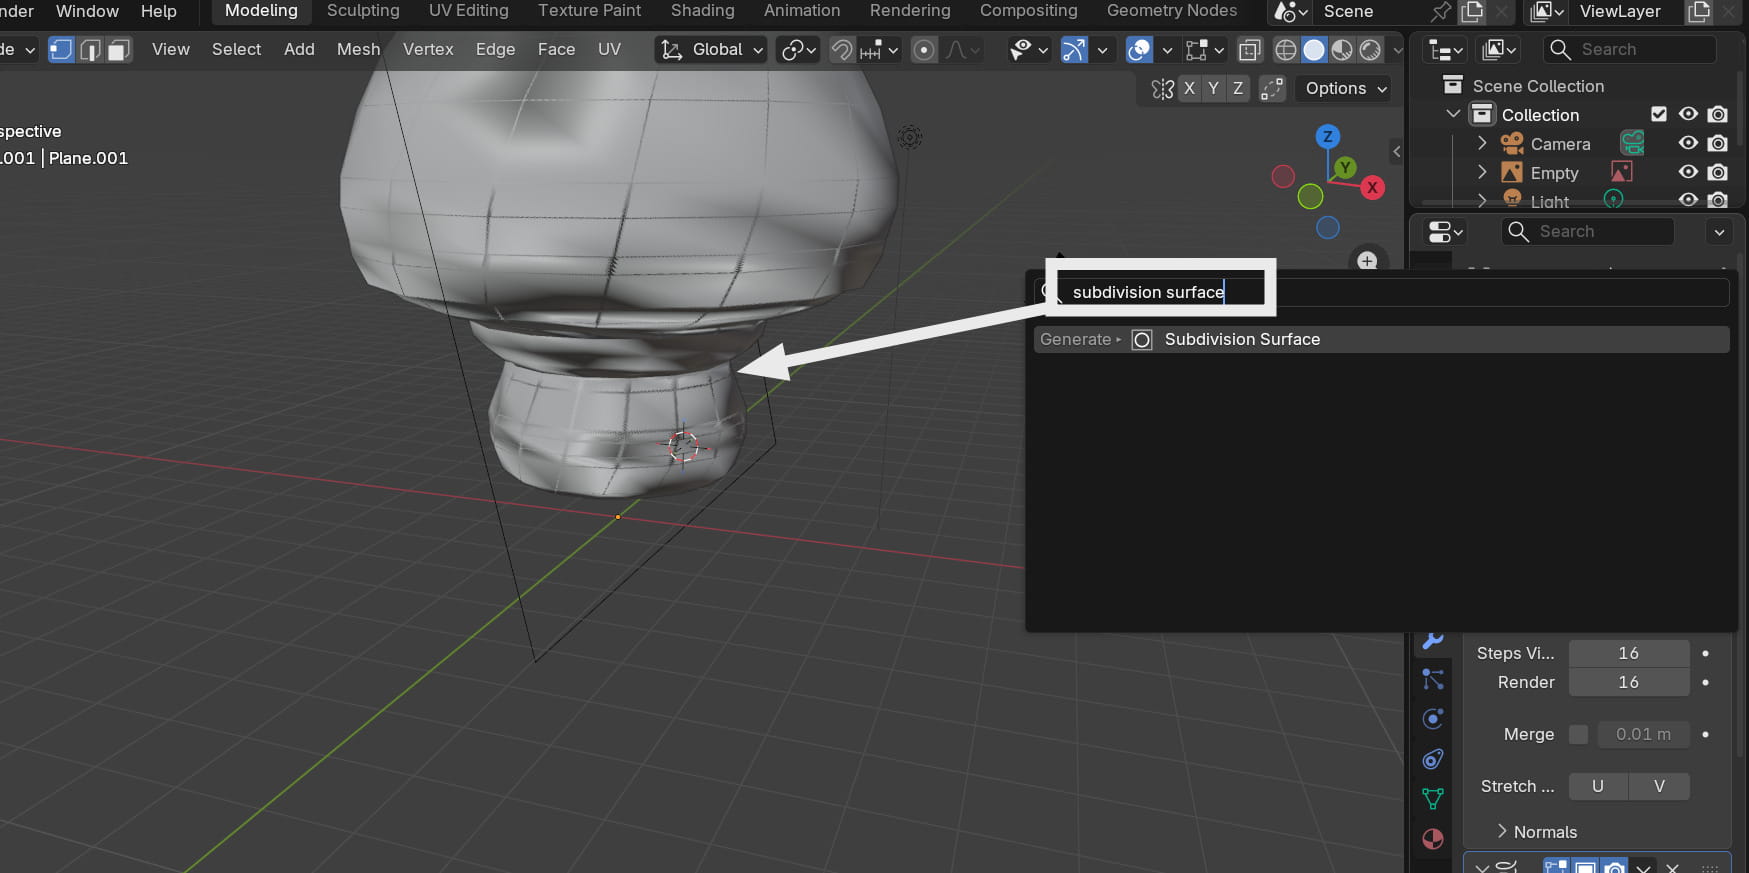
Then, I applied the Subdivision Surface modifier to make the model’s surfaces smoother and more rounded.
Blender is a great CAD software, but it struggles with highly complex geometry and can crash frequently. That’s exactly what happened to me 😭,it froze to the point where my laptop went into recovery mode, and I couldn’t even open it for about 30 minutes. I wasn’t able to finish modeling my mushroom, but I’ll try again on another laptop (┬┬﹏┬┬)
Onshape
Onshape is a modern, cloud-based 3D CAD (Computer-Aided Design) platform used to create mechanical parts and products. You can think of it like Google Docs for 3D modeling,rather than storing files on your computer, everything is saved in the cloud and accessed directly through your web browser.
.jpg)
.jpg)
.jpg)
I designed a casing for my final project board just for fun. The dimensions are estimated based on what I expect my board size to be, and I mainly created the casing to help visualize the base of my final project. The height of the board is 1.5 cm, and its dimensions are 7 cm by 7 cm.
This is the step by step process of how I designed the case in Onshape:
Create the Base Sketch
- Select the Top Plane and create a sketch.
- Draw a rectangle measuring 70 mm × 70 mm to match the estimated PCB size.
Extrude the Base
- Use the Extrude feature.
- Extrude the rectangle to create the base of the enclosure.
Create the Outer Walls
- Create a sketch on the top face of the base.
- Draw an outer rectangle around the PCB area.
- Use the Extrude tool to raise the enclosure walls to a height of 15 mm.
Hollow the Interior
- Sketch the inner cavity on the top face.
- Offset the walls to create the wall thickness of 2mm.
- Remove the internal material using Extrude Remove to create space for the PCB.
Add Mounting Holes
- Create a sketch on the base of the enclosure.
- Place four circles with a diameter of 3mm each for M2 screws near the corners matching the PCB mounting locations.
- Use Extrude Remove to cut the holes through the enclosure.
This week, we also practiced soldering in the lab and tested components to build a basic practice circuit and it was really fun. I kind of felt like a surgeon performing some operation 😆.
Cardboard Prototyping:
This week, we built a cardboard prototype of our project in under two hours to understand how the components would look and fit together.
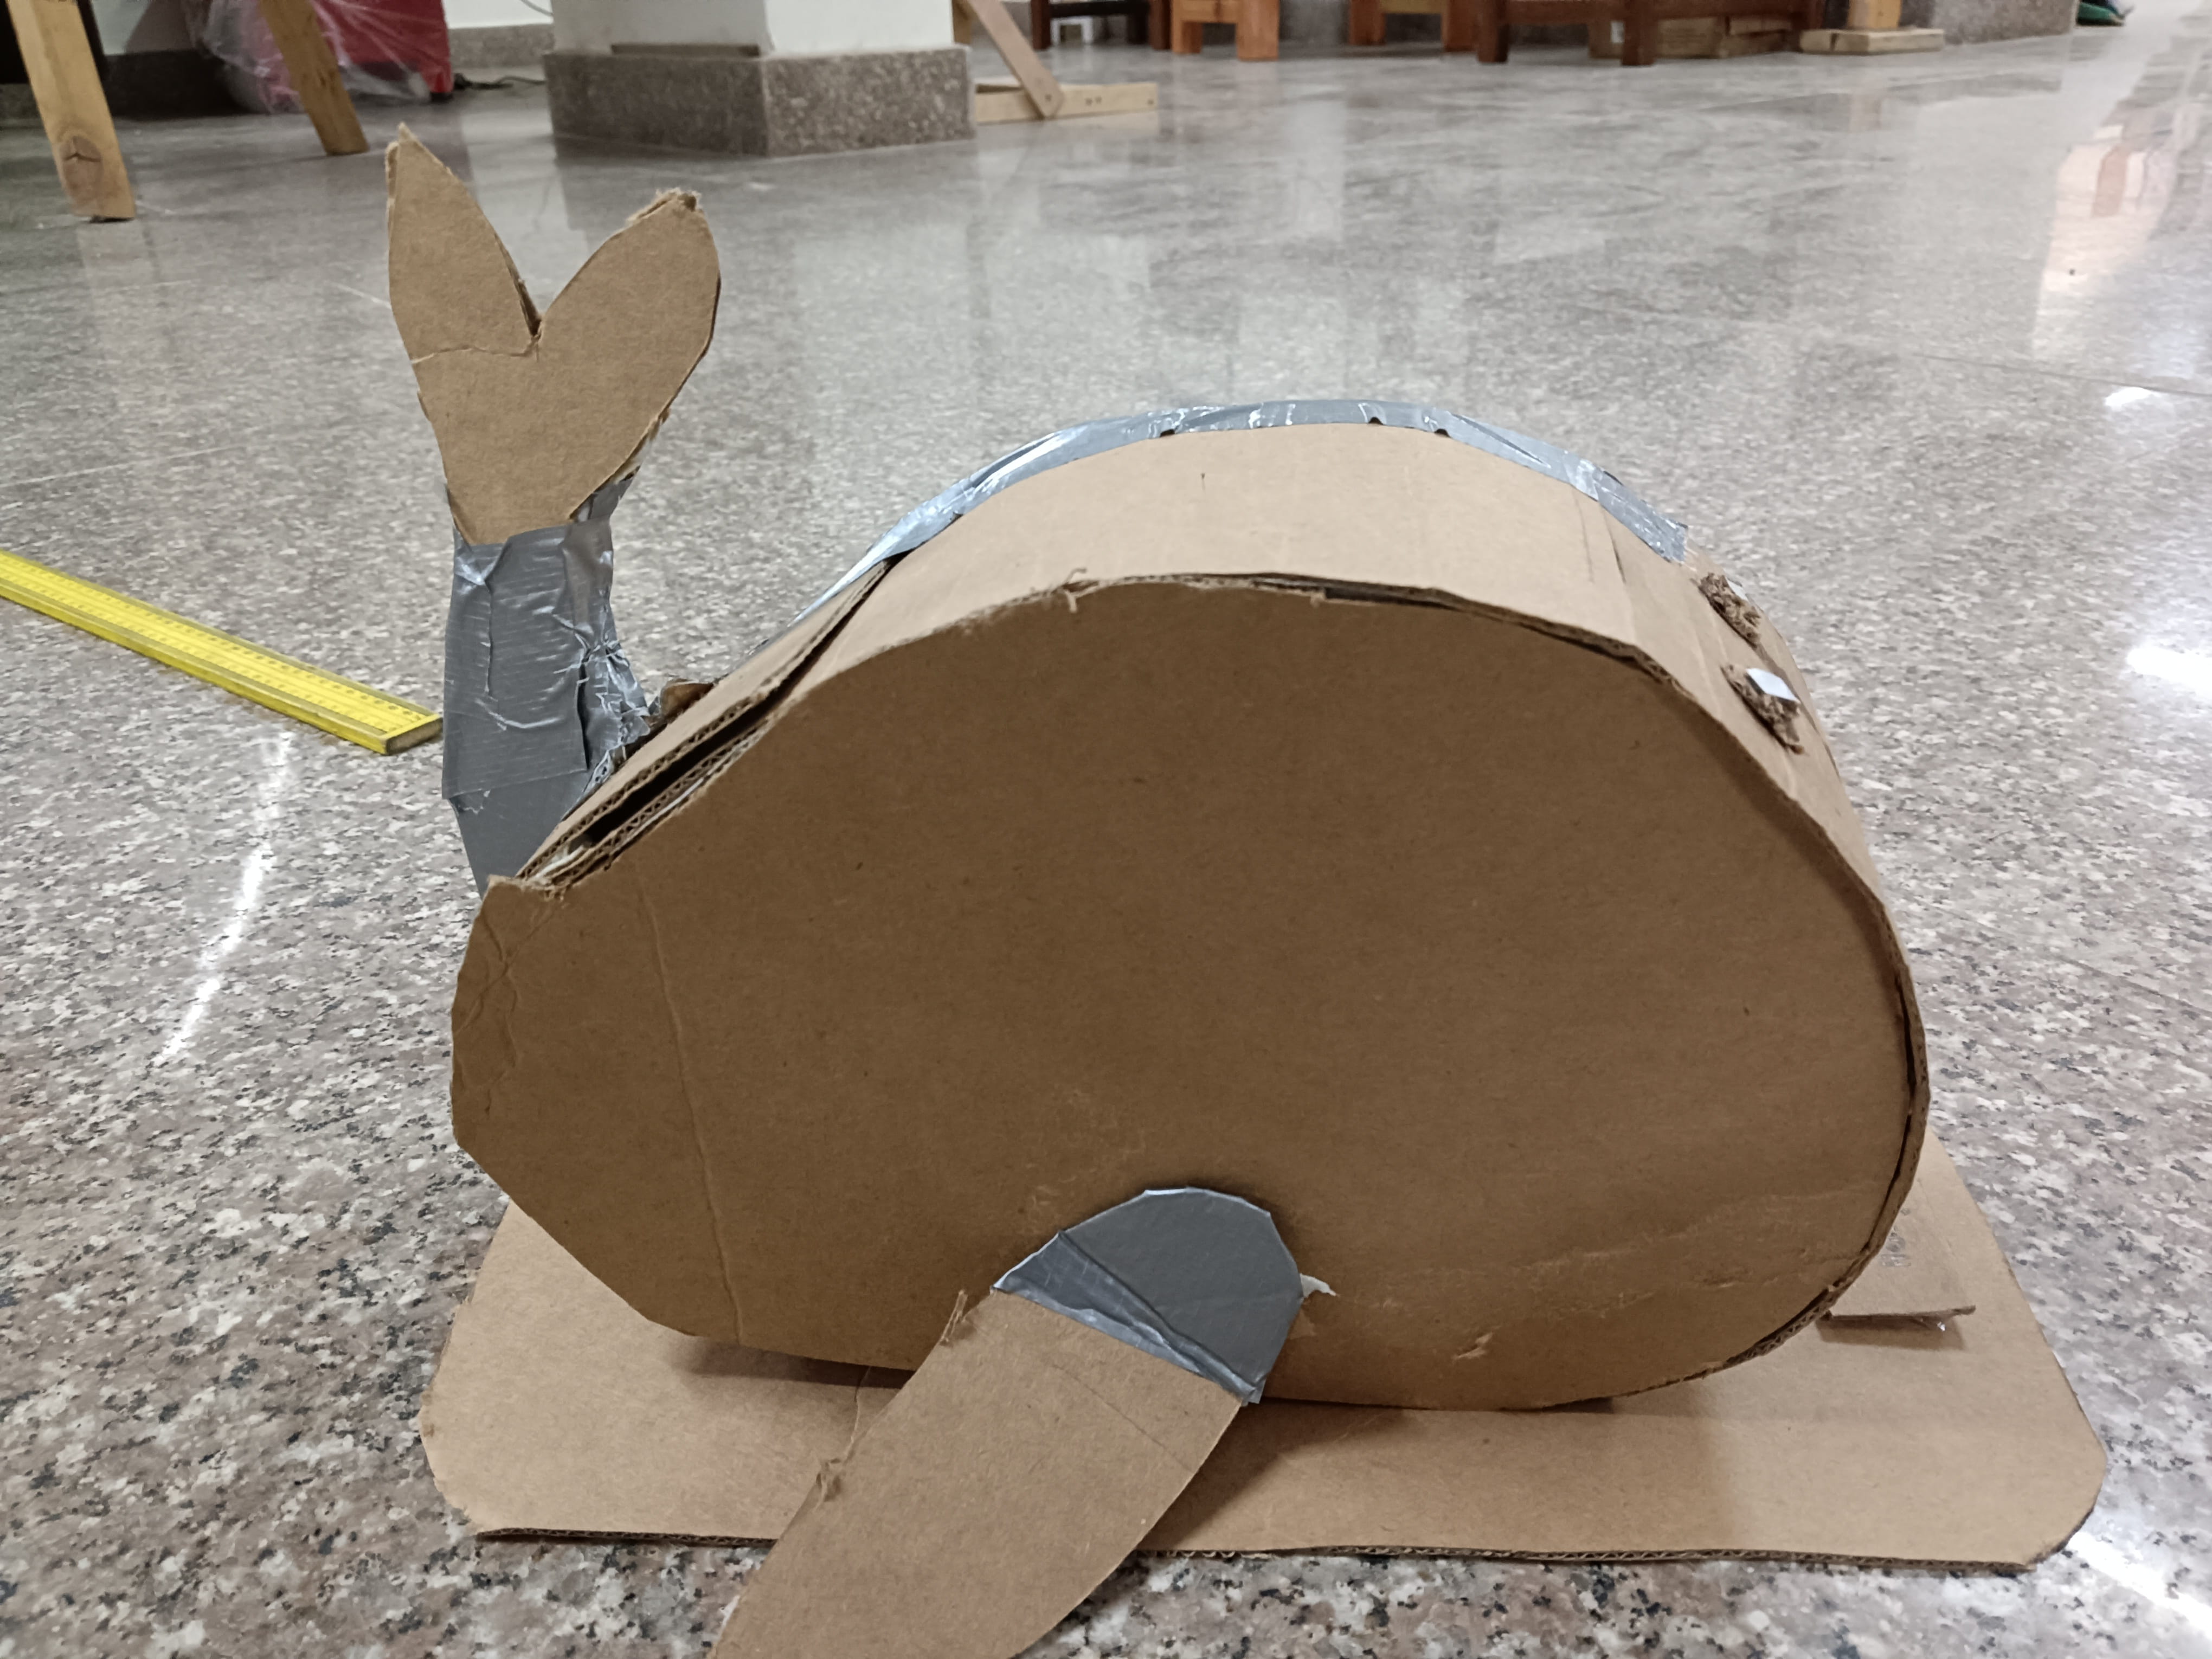
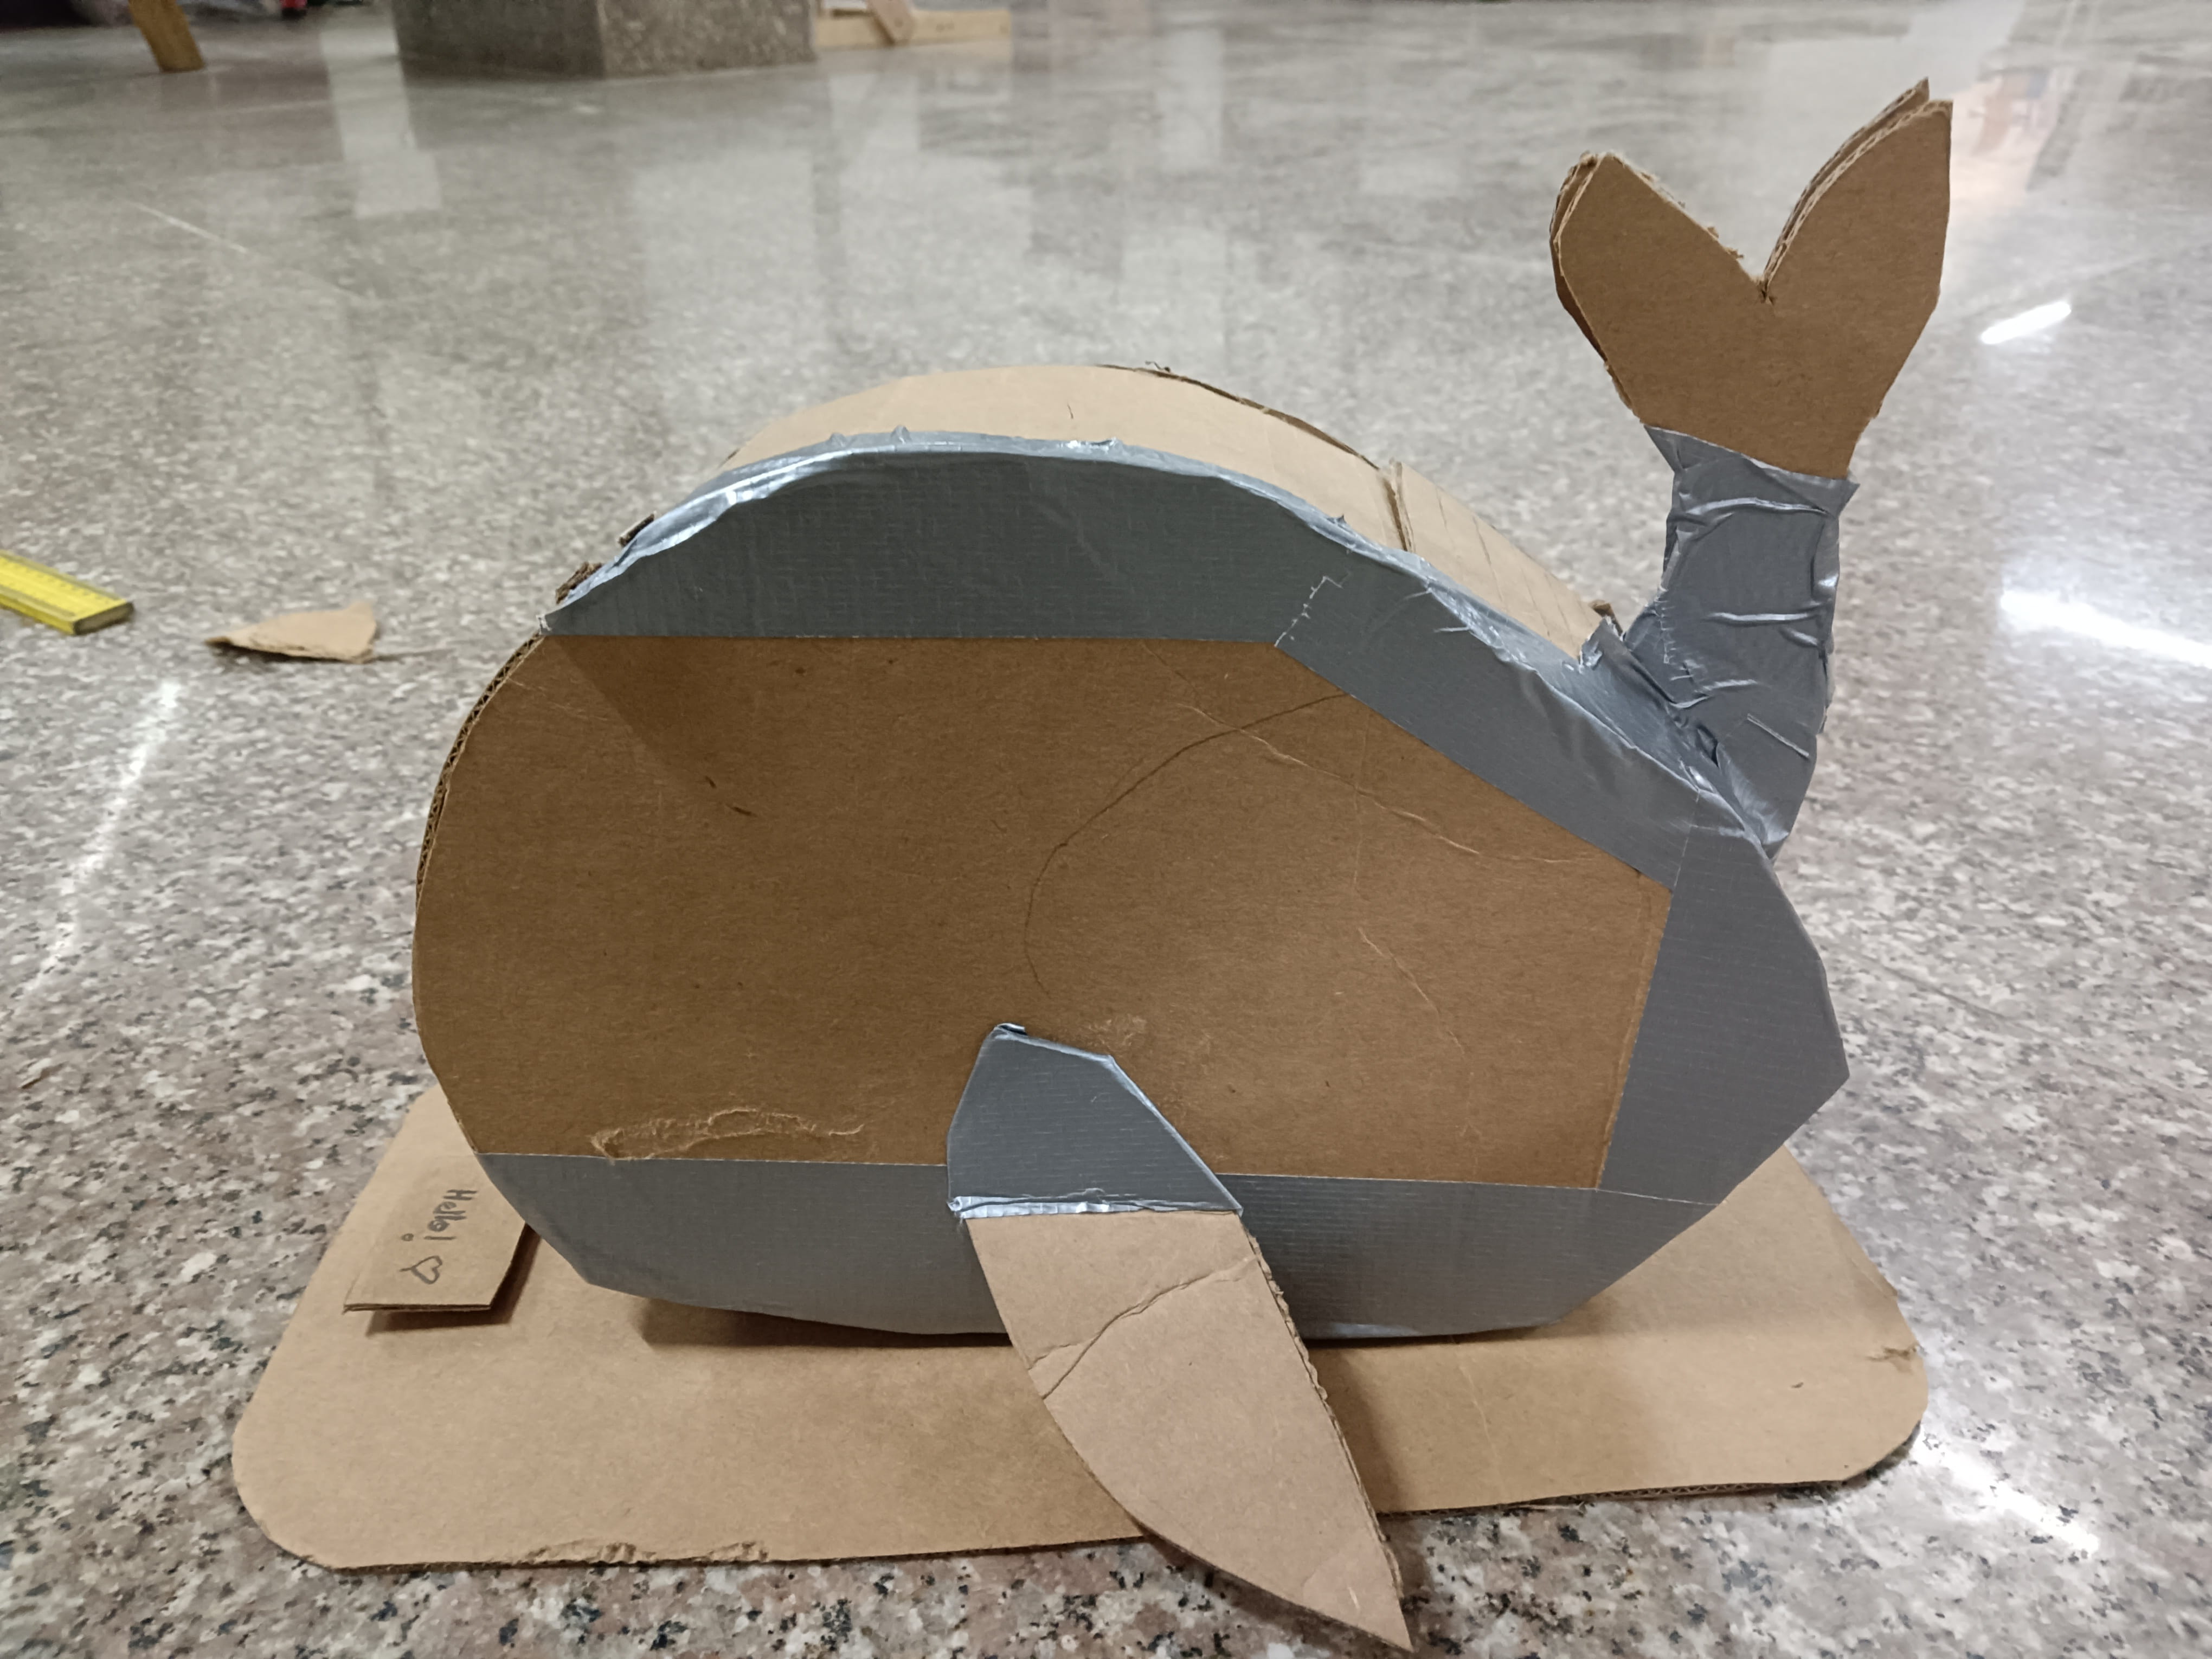
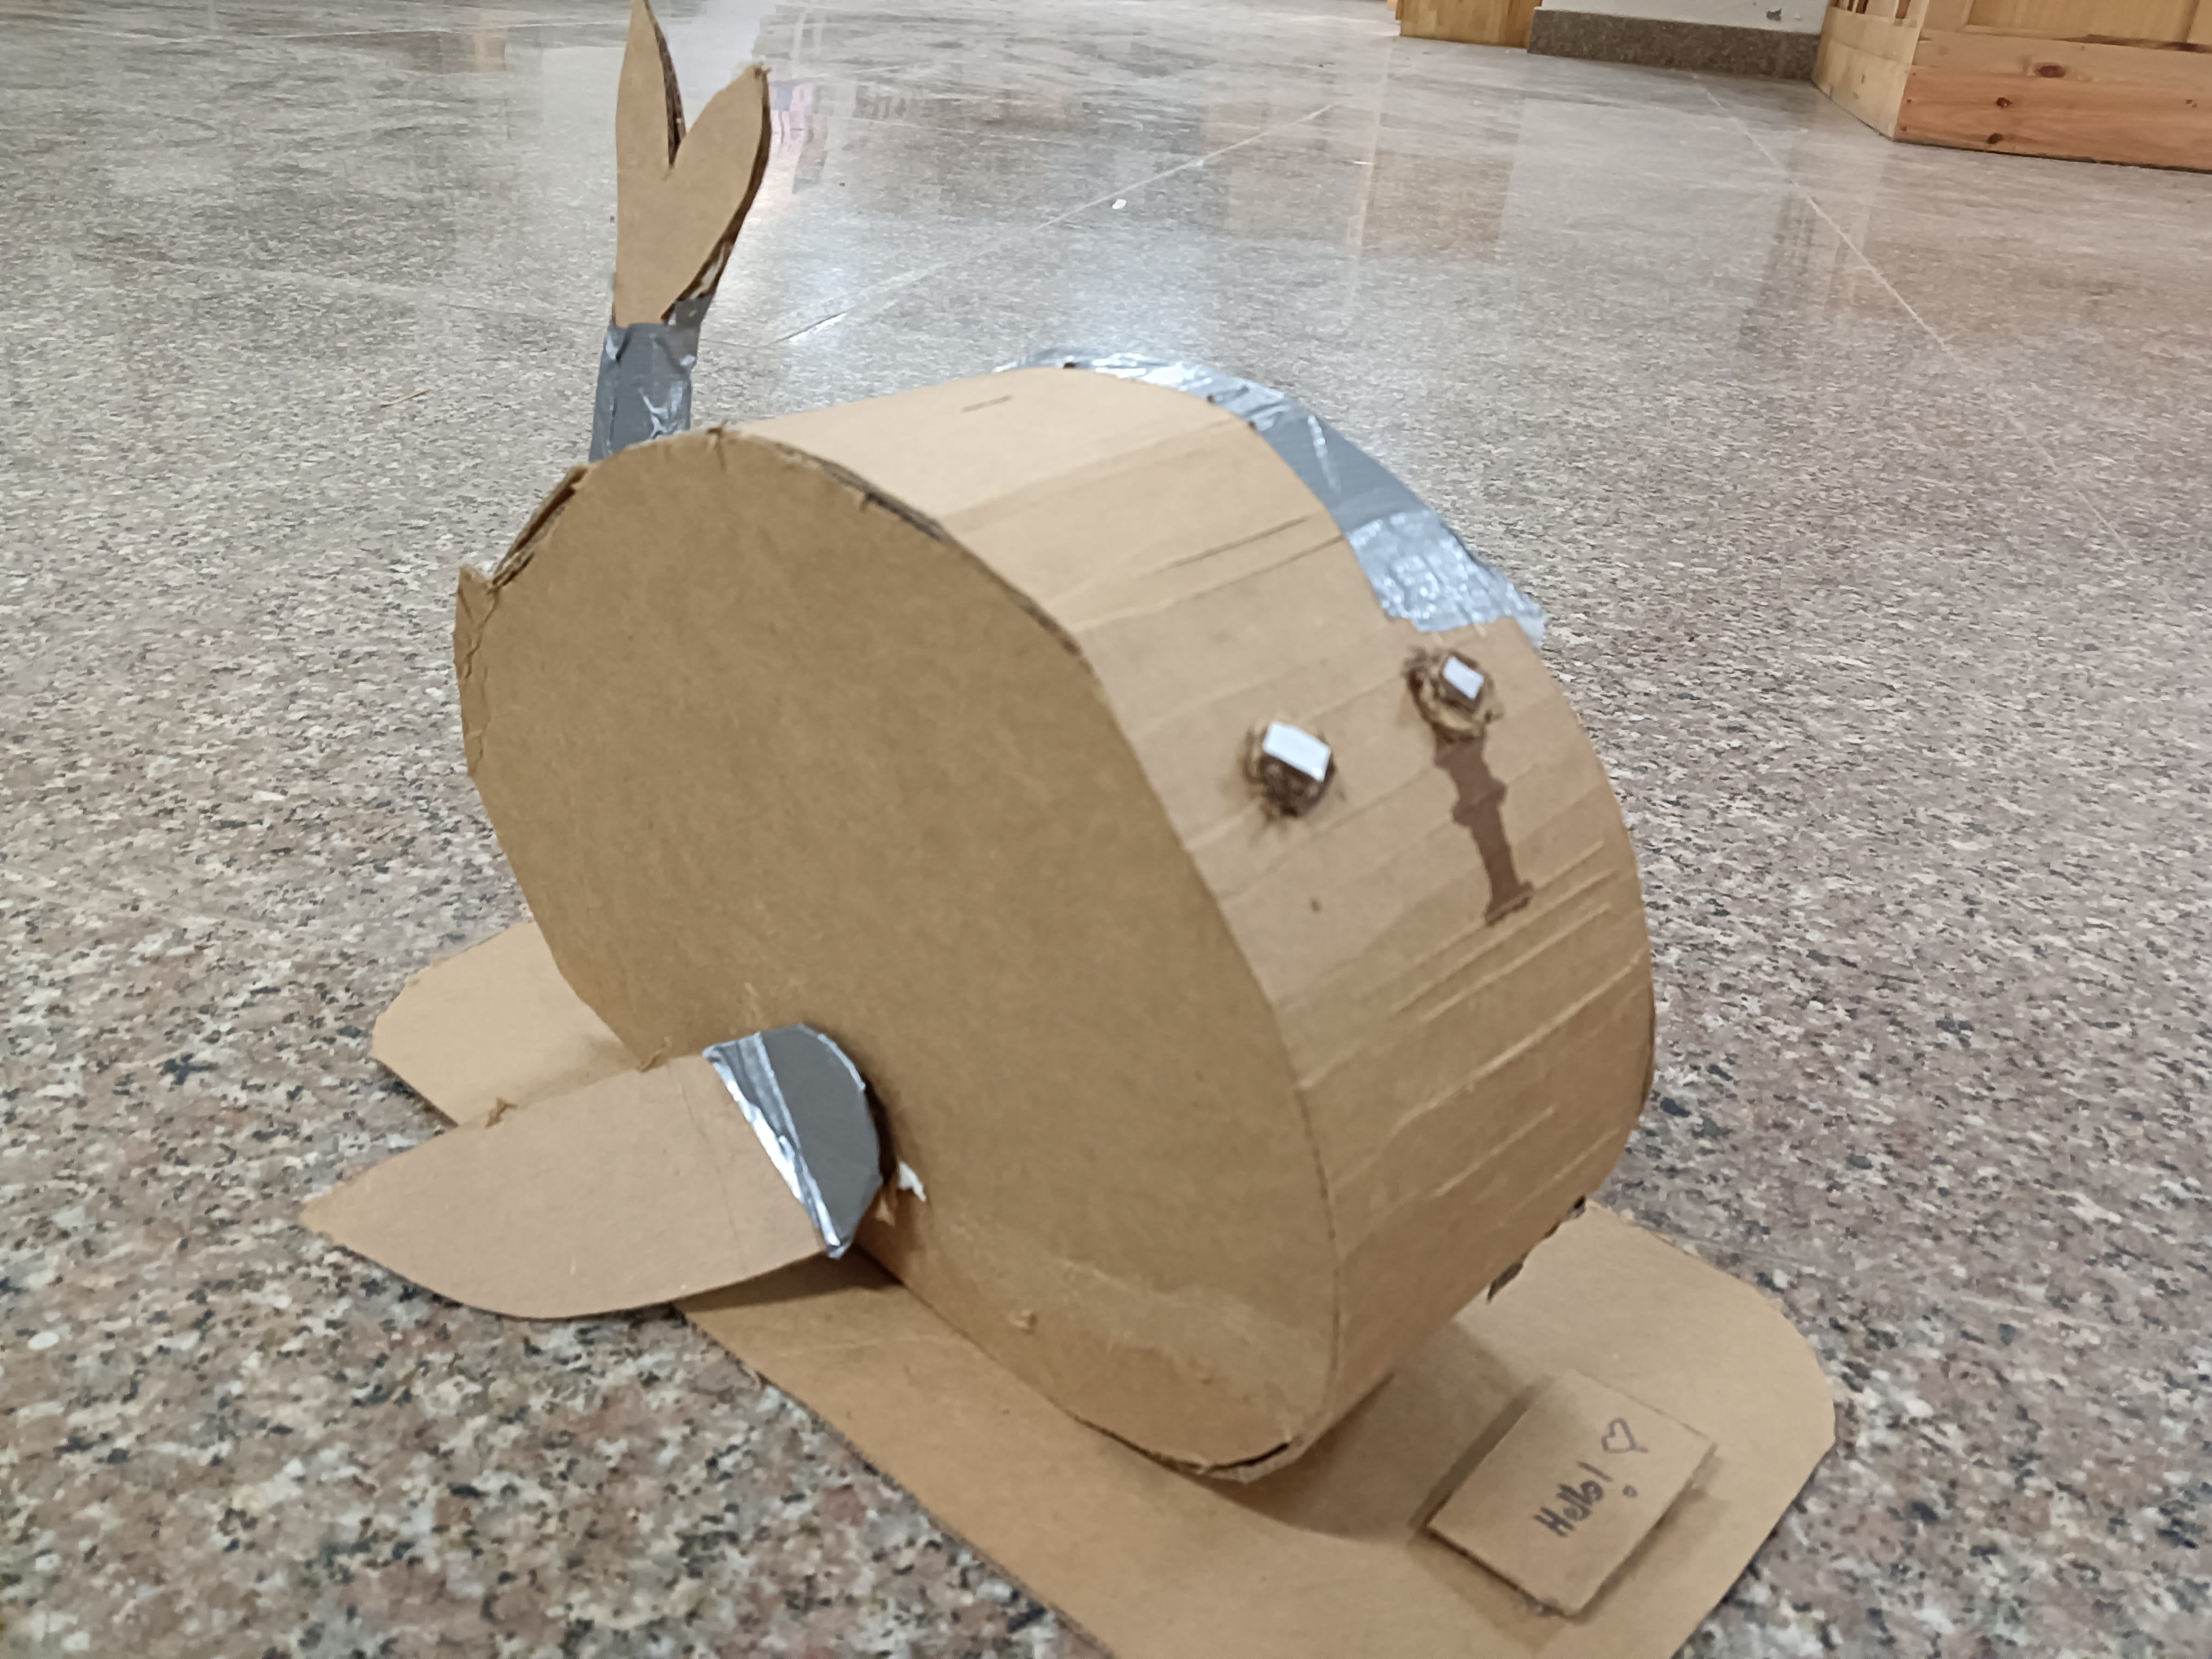
Through this experience, I was able to identify several gaps in my project idea and realized that I needed to work out many details instead of keeping everything abstract in my head.
Gaps such as:
- Camera orientation: Where will the camera/cameras be placed? On the tail or on the front of the body?
- Input method: How should users input data? (Fins, buttons, sensors, etc.)
- Casing: How can I open the bot easily to check internal components?
- Data Logging: How can data be logged efficiently without making the process too complicated?
- Menu Structure: What should the home menu look like and how should navigation work?
- Measurements: What are the exact measurements for internal and external fits?
- Internal Layout: How should connections be arranged for correct component placement?
Reflection:
This week was fun.Although it was a bit tough at first to use all the CAD softwares at first, especially since my laptop kept crashing 😣, I still enjoyed the process. I learned how to use several new tools and I got to work on my final project as well, so that's a win too! ☆*: .。. o(≧▽≦)o .。.:*☆