17. Wildcard Week
Complete Guide: Facial Expression Detection with XIAO ESP32S3 Sense
Assignment checklist
- Documented wildcard week exploration (facial expression detection on XIAO ESP32-S3)
- Completed Edge Impulse training and deployment workflow
- Documented ML accuracy and on-device inference speed
- Included source code and step-by-step tutorial
- Documented problems encountered and how I fixed them
Project Overview
Goal:        Detect facial expressions (Happy, Sad, Neutral, Angry)
Board:       XIAO ESP32S3 Sense (with OV2640 camera)
Platform:    Edge Impulse + Arduino IDE
Method:      Capture real images with YOUR camera → Train model → Deploy
Phase 1: Hardware Setup
What You Need
✅ XIAO ESP32S3 Sense board (with camera module attached)
✅ USB-C cable
✅ Computer with Chrome/Edge browser
✅ WiFi network (2.4GHz)
✅ Arduino IDE installed
Install Arduino IDE Support for XIAO
1. Open Arduino IDE
2. File → Preferences
3. In "Additional Board Manager URLs" add:
   https://raw.githubusercontent.com/espressif/arduino-esp32/gh-pages/package_esp32_index.json
4. Click OK
5. Tools → Board → Board Manager
6. Search "esp32" → Install "esp32 by Espressif Systems"
7. Wait for installation to complete
Board Settings in Arduino IDE
Tools → Board:           XIAO_ESP32S3
Tools → USB CDC On Boot:  Enabled
Tools → PSRAM:            OPI PSRAM    ← VERY IMPORTANT
Tools → Flash Size:       8MB
Tools → Partition Scheme:  Huge APP (3MB No OTA/1MB SPIFFS)
Tools → Port:             (select your COM port)
Phase 2: Capture Images with Your XIAO Camera
Step 1: Open CameraWebServer Example
Arduino IDE → File → Examples → ESP32 → Camera → CameraWebServer
This opens multiple files. You need to edit two of them.
Step 2: Edit CameraWebServer.ino
Find and change these lines:
// ============================================
// CHANGE 1: Select your camera model
// ============================================
// Comment out ALL other camera models, then add XIAO:

// #define CAMERA_MODEL_WROVER_KIT
// #define CAMERA_MODEL_ESP_EYE
// #define CAMERA_MODEL_ESP32S3_EYE
// #define CAMERA_MODEL_M5STACK_PSRAM
// #define CAMERA_MODEL_M5STACK_V2_PSRAM
// #define CAMERA_MODEL_M5STACK_WIDE
// #define CAMERA_MODEL_M5STACK_ESP32CAM
// #define CAMERA_MODEL_M5STACK_UNITCAM
// #define CAMERA_MODEL_AI_THINKER
// #define CAMERA_MODEL_TTGO_T_JOURNAL
#define CAMERA_MODEL_XIAO_ESP32S3           // ← ADD THIS LINE

// ============================================
// CHANGE 2: Enter your WiFi credentials
// ============================================
const char *ssid = "YOUR_WIFI_NAME";        // ← Your WiFi name
const char *password = "YOUR_WIFI_PASSWORD"; // ← Your WiFi password
Step 3: Check camera_pins.h
If CAMERA_MODEL_XIAO_ESP32S3 is not listed in camera_pins.h, add this at the bottom before the #endif:
#elif defined(CAMERA_MODEL_XIAO_ESP32S3)
#define PWDN_GPIO_NUM     -1
#define RESET_GPIO_NUM    -1
#define XCLK_GPIO_NUM     10
#define SIOD_GPIO_NUM     40
#define SIOC_GPIO_NUM     39

#define Y9_GPIO_NUM       48
#define Y8_GPIO_NUM       11
#define Y7_GPIO_NUM       12
#define Y6_GPIO_NUM       14
#define Y5_GPIO_NUM       16
#define Y4_GPIO_NUM       18
#define Y3_GPIO_NUM       17
#define Y2_GPIO_NUM       15
#define VSYNC_GPIO_NUM    38
#define HREF_GPIO_NUM     47
#define PCLK_GPIO_NUM     13
Step 4: Upload the Sketch
1. Connect XIAO to computer via USB-C
2. Select correct Port in Tools menu
3. Click Upload (→ button)
4. Wait for "Done uploading"
Step 5: Get the Camera IP Address
1. Open Serial Monitor (Tools → Serial Monitor)
2. Set baud rate to 115200
3. Press the small RESET button on XIAO board
4. Wait for this message:

   WiFi connected
   Camera Ready! Use 'http://192.168.1.XXX' to connect

5. Copy that IP address
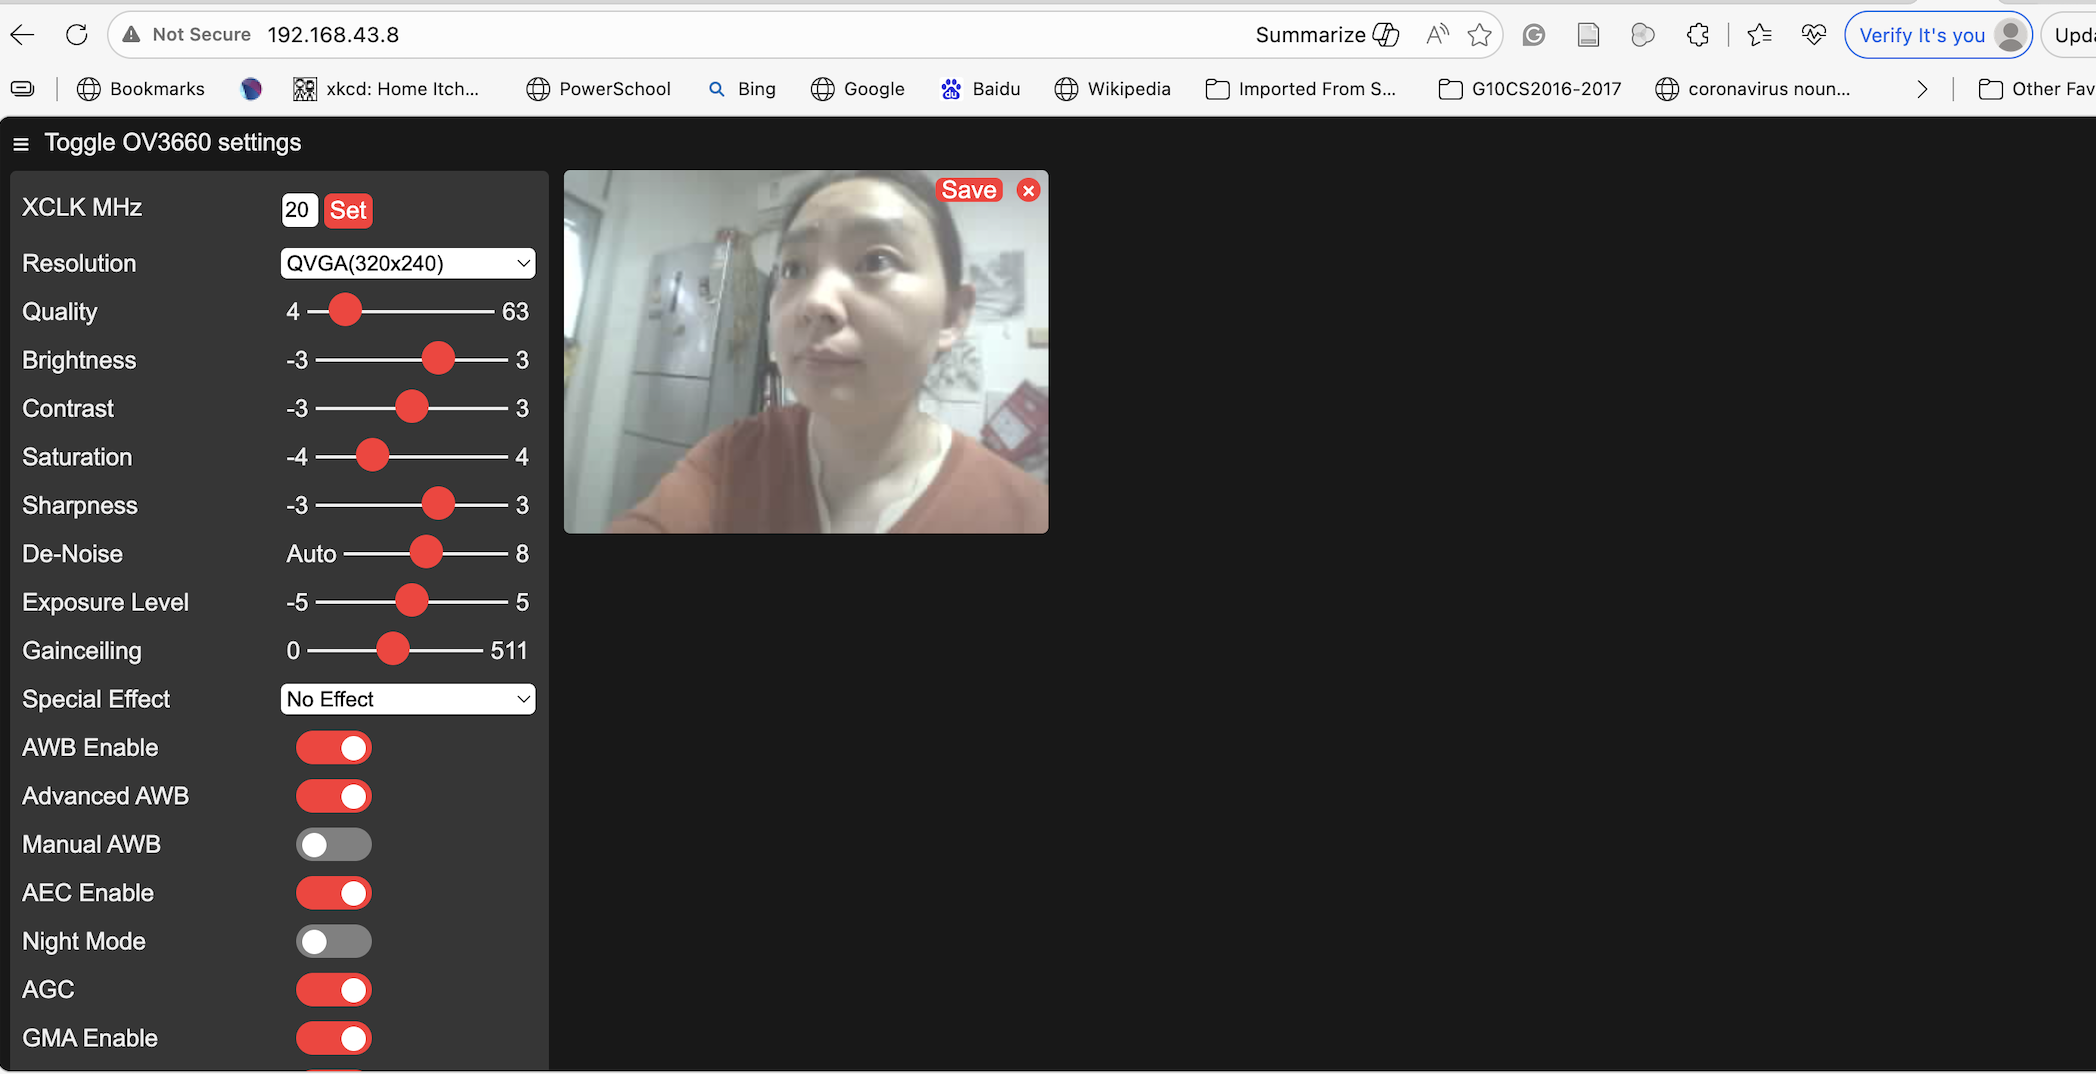
Step 6: Open Camera in Browser
1. Open Chrome or Edge on your computer
2. Type the IP address: http://192.168.1.XXX
3. You should see the camera control page
4. Set Resolution to QVGA (320x240) or lower
5. Click "Start Stream"
6. You should see live video from your XIAO camera
Step 7: Capture Expression Images
Now capture images for each expression. Start with only 2 classes first!
Round 1: Start with 2 Classes (Happy vs Neutral)
📸 CAPTURING HAPPY IMAGES (50-100 photos)
──────────────────────────────────────────
1. Sit 30cm from camera
2. Make a BIG smile (show teeth!)
3. Click "Save" button in browser to download image
4. Slightly change:
   - Head angle (straight, slight left, slight right)
   - Lighting (lamp on, lamp off, different room)
   - Smile variation (teeth showing, closed mouth smile)
5. Save each image to a folder called "Happy"

📸 CAPTURING NEUTRAL IMAGES (50-100 photos)
──────────────────────────────────────────
1. Sit 30cm from camera (same distance!)
2. Keep face completely relaxed, no expression
3. Click "Save" to download
4. Slightly change angle, lighting
5. Save each image to a folder called "Neutral"
Expression Tips — Make Them OBVIOUS
😊 HAPPY:
   ✅ Big wide smile
   ✅ Show teeth
   ✅ Squint eyes slightly (natural smile)
   ❌ Don't do subtle polite smile

😐 NEUTRAL:
   ✅ Completely relaxed
   ✅ Mouth closed, natural
   ✅ Eyes looking at camera
   ❌ Don't accidentally smile

😢 SAD (add later):
   ✅ Corners of mouth pulled DOWN
   ✅ Head tilted slightly down
   ✅ Droopy eyes
   ❌ Don't look too similar to neutral

😠 ANGRY (add later):
   ✅ Furrow eyebrows HARD
   ✅ Clench jaw
   ✅ Squint eyes aggressively
   ❌ Don't look too similar to sad
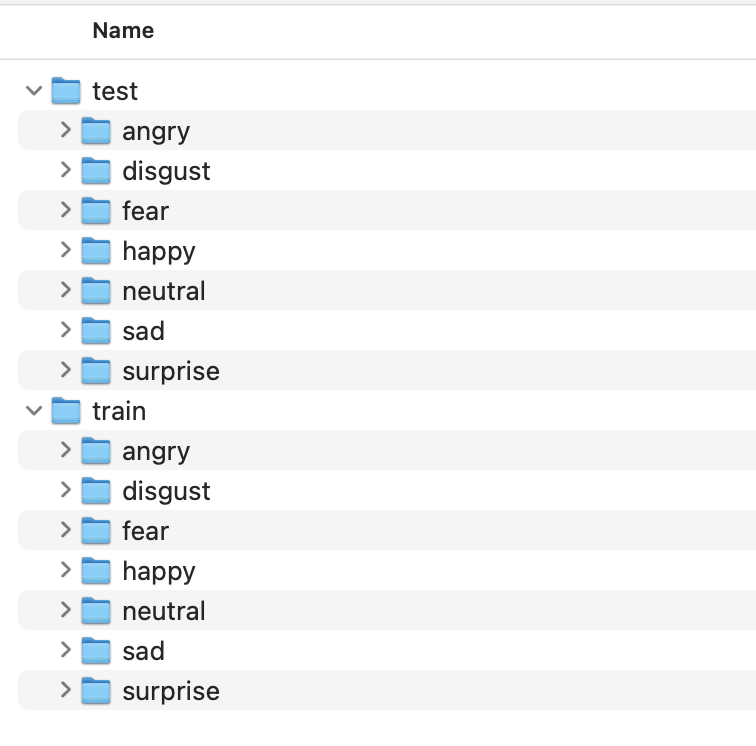
Organize Your Folders
📁 facial_expressions/
   ├── 📁 Happy/
   │    ├── img_001.jpg
   │    ├── img_002.jpg
   │    ├── img_003.jpg
   │    └── ... (50-100 images)
   │
   └── 📁 Neutral/
        ├── img_001.jpg
        ├── img_002.jpg
        ├── img_003.jpg
        └── ... (50-100 images)
Phase 3: Edge Impulse — Create Project & Upload Data
Step 1: Create Edge Impulse Account & Project
1. Go to https://studio.edgeimpulse.com
2. Sign up (free account)
3. Click "Create new project"
4. Name it: "Facial Expression XIAO"
5. Select: "Images" as project type
6. Select: "Classify single image" (not object detection)
Step 2: Upload Your Images
1. Go to "Data acquisition" (left menu)
2. Click "+ Add data" button (top right)
3. Click "Upload data"
4. Settings:
   - Category: "Split automatically between training and testing"
   - Label: "Happy"
5. Click "Choose files" → Select ALL images from your Happy folder
6. Click "Upload data"
7. Wait for upload to complete

8. Repeat for Neutral:
   - Click "+ Add data" → "Upload data"
   - Label: "Neutral"
   - Choose all files from Neutral folder
   - Upload

Step 3: Verify Your Data
After uploading, you should see:

Data acquisition page:
┌─────────────────────────────┐
│  Training data:             │
│    Happy:    ~80 images     │
│    Neutral:  ~80 images     │
│                             │
│  Test data:                 │
│    Happy:    ~20 images     │
│    Neutral:  ~20 images     │
└─────────────────────────────┘

(Edge Impulse auto-splits 80/20)
Phase 4: Edge Impulse — Design the Impulse
Step 1: Create Impulse
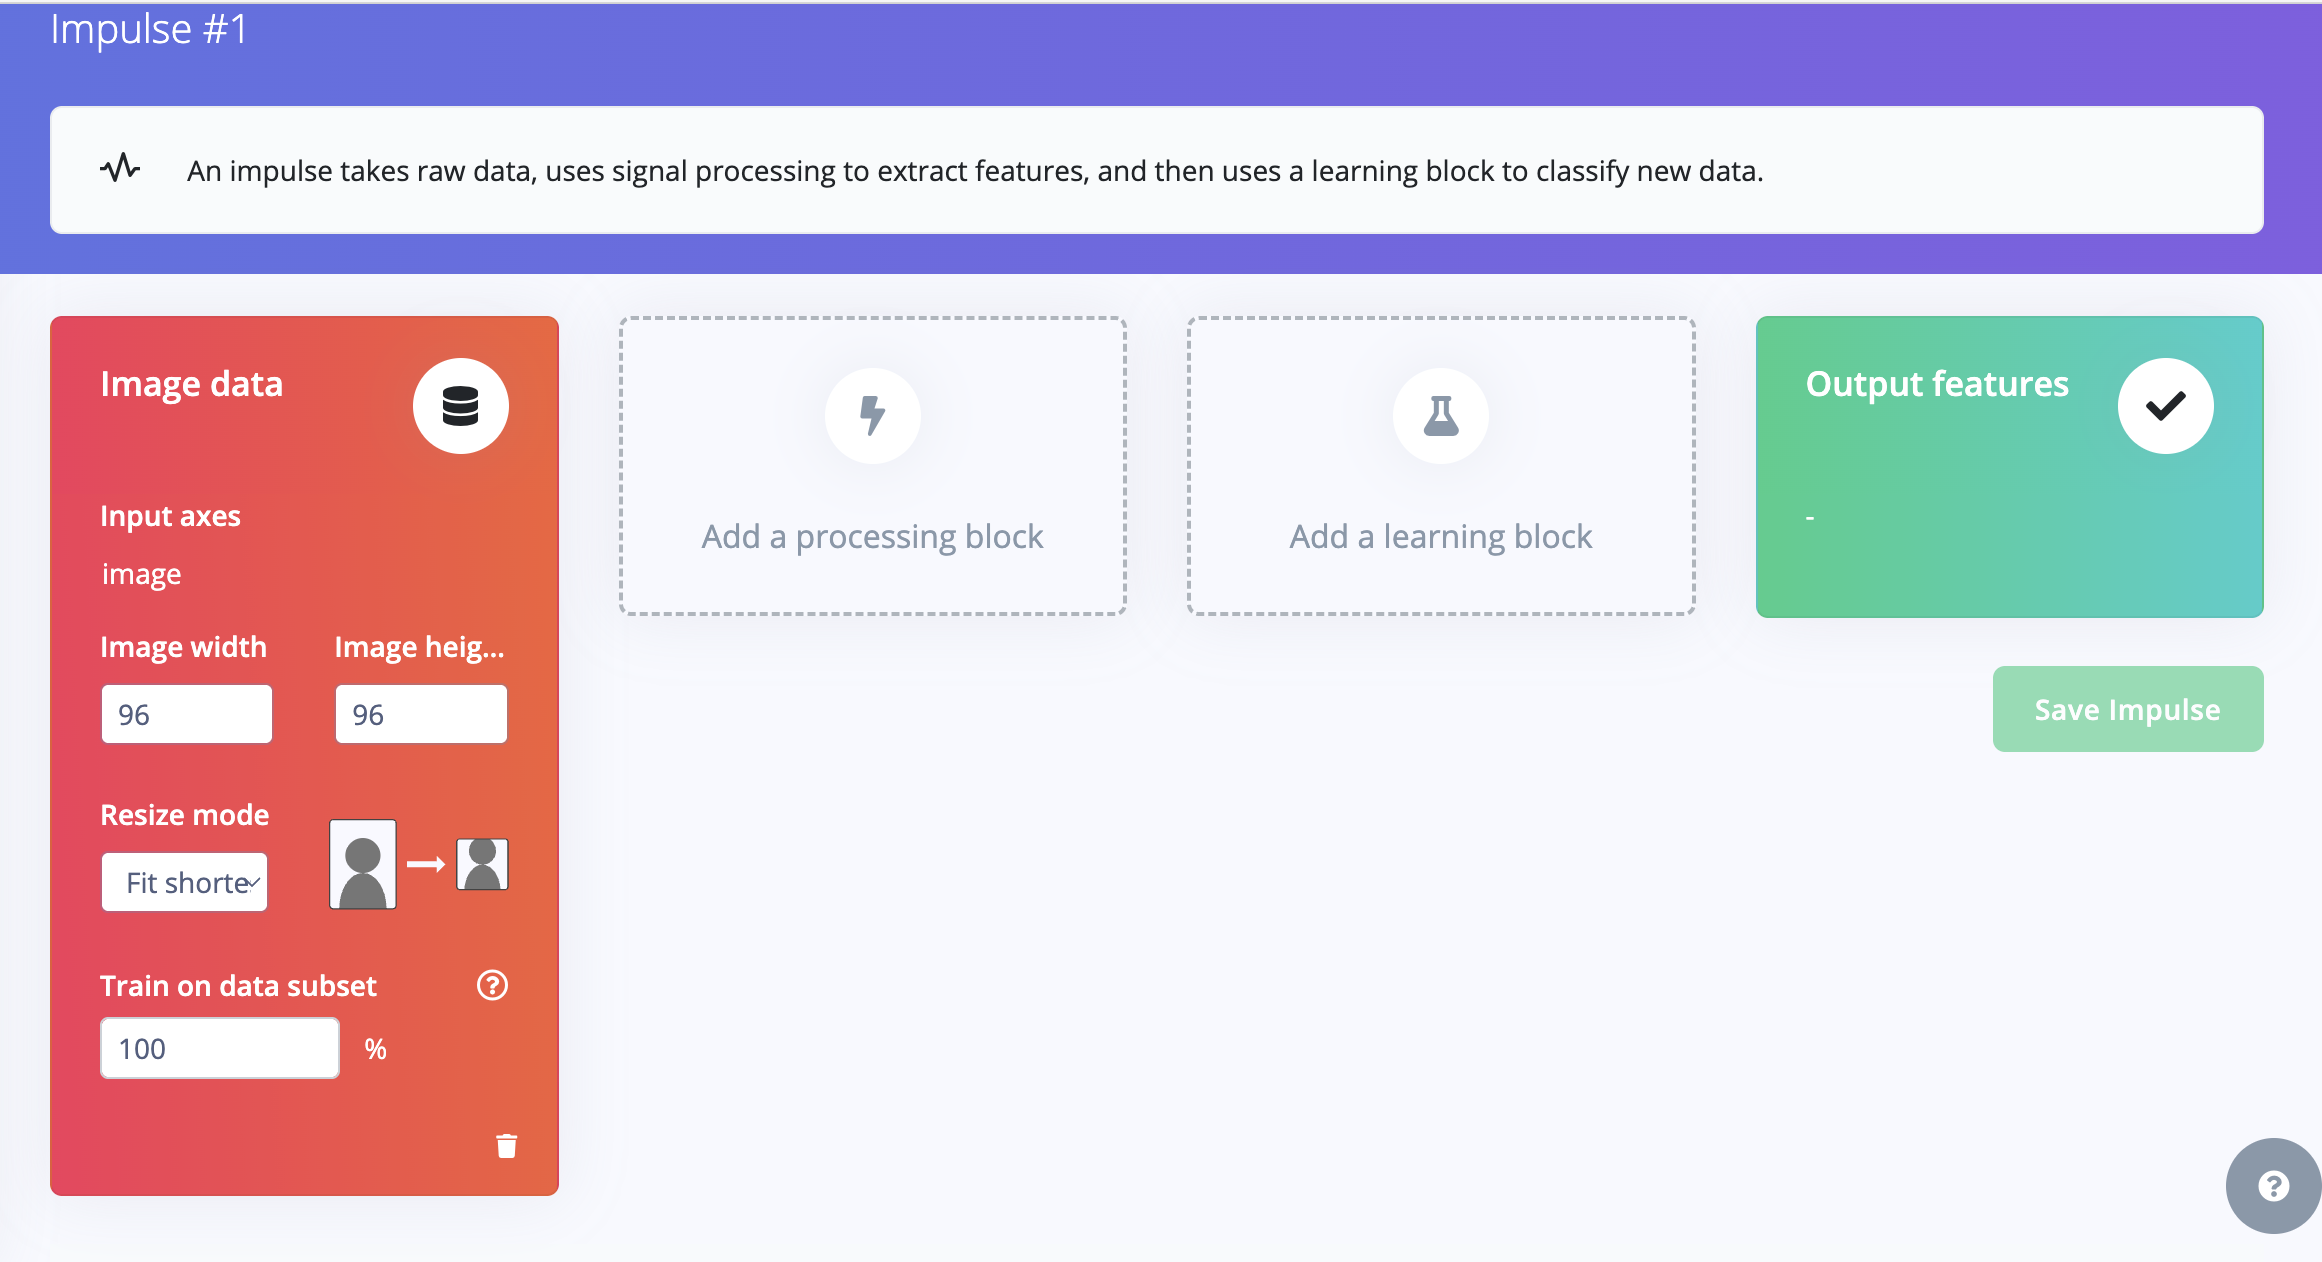
1. Go to "Create impulse" (left menu)
2. Set these blocks:

┌──────────────┐    ┌──────────────┐    ┌──────────────┐
│  IMAGE DATA  │ →  │  PROCESSING  │ →  │  LEARNING    │
│              │    │              │    │              │
│ Image width: │    │  Image       │    │  Transfer    │
│   96         │    │  (built-in)  │    │  Learning    │
│ Image height:│    │              │    │  (Images)    │
│   96         │    │              │    │              │
│ Resize mode: │    │              │    │              │
│ Fit shortest │    │              │    │              │
└──────────────┘    └──────────────┘    └──────────────┘
Detailed steps:
1. Image data block (already added):
   - Image width: 96
   - Image height: 96
   - Resize mode: Fit shortest axis

2. Click "+ Add a processing block" → Choose "Image"

3. Click "+ Add a learning block" → Choose "Transfer Learning (Images)"

4. Click "Save Impulse"
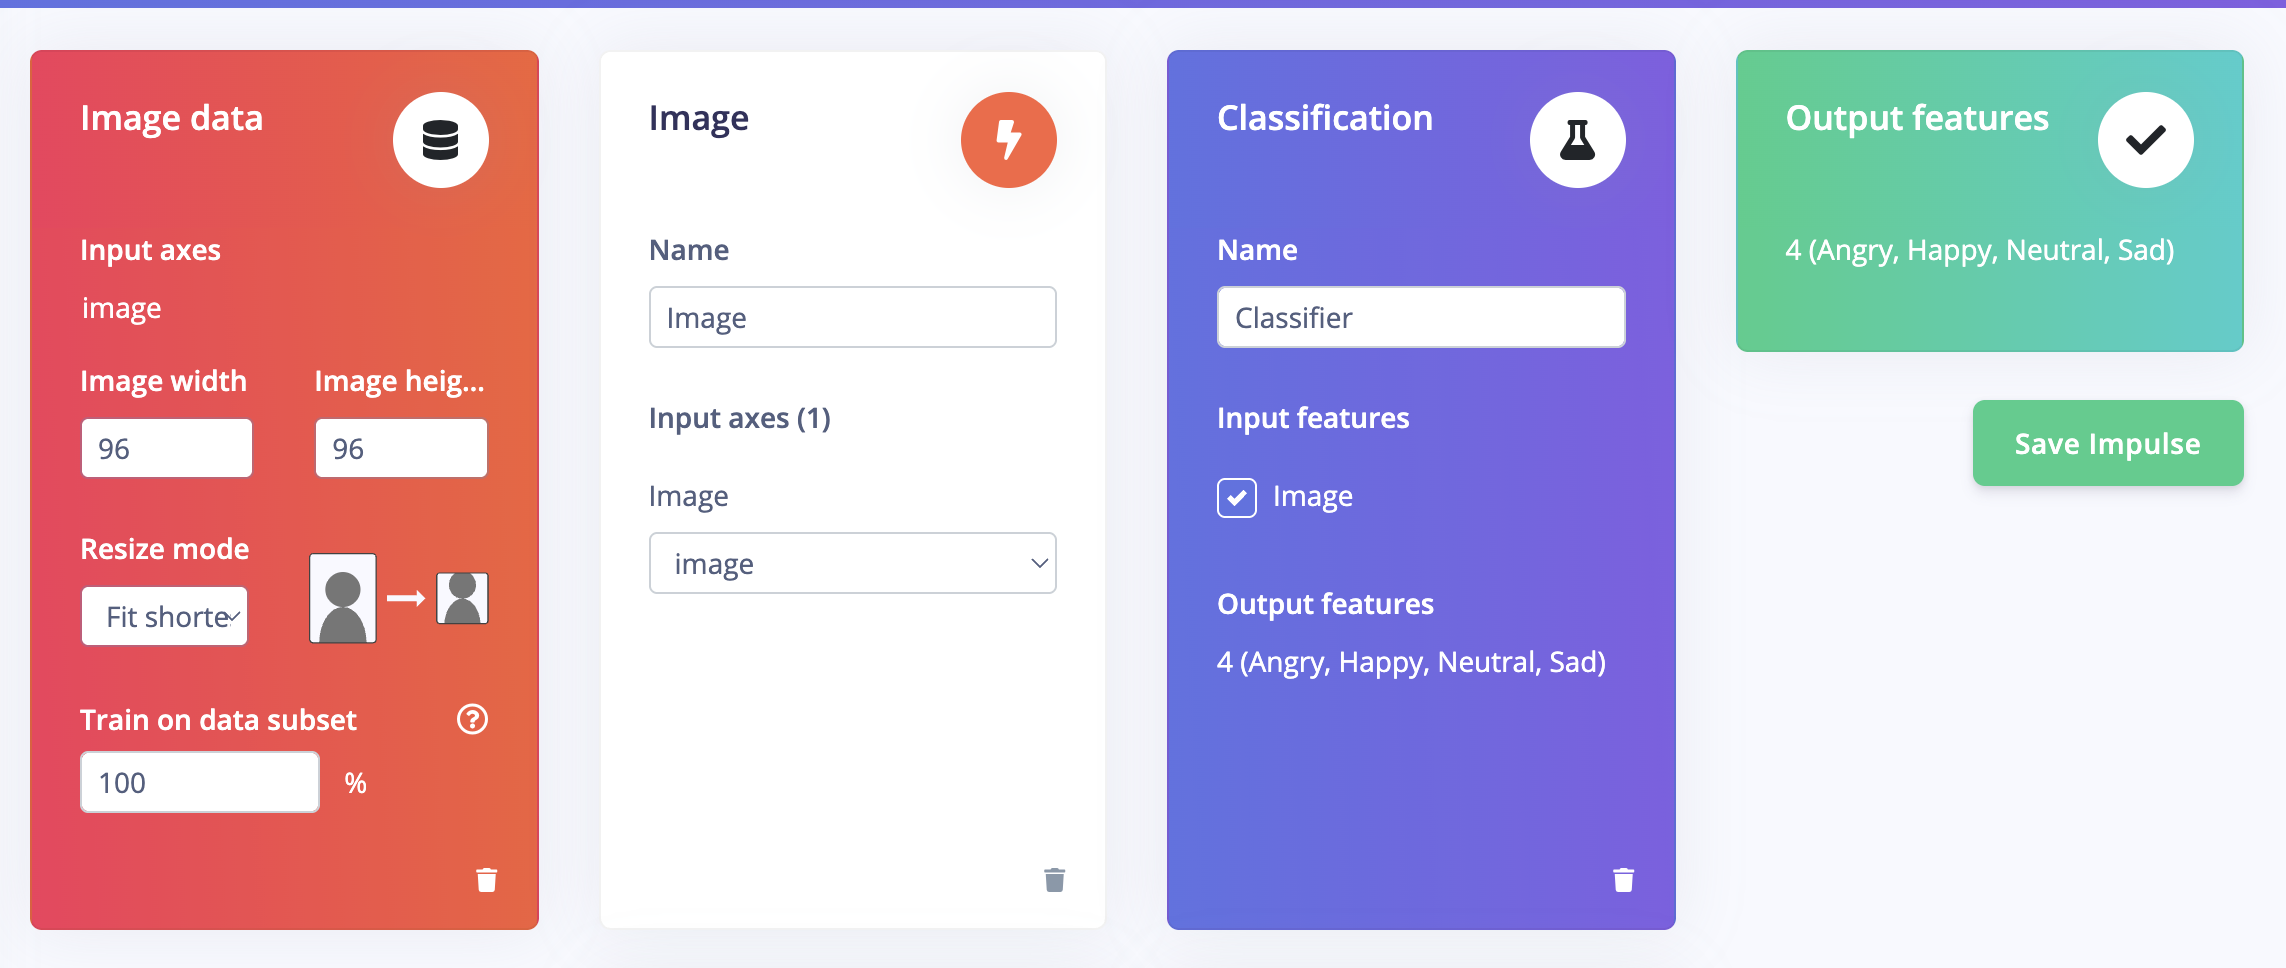
Step 2: Configure Image Processing
1. Click "Image" in the left menu (under Impulse design)
2. Set Color depth: Grayscale
   (Grayscale works better for expressions + saves memory on XIAO)
3. Click "Save parameters"
4. Click "Generate features"
5. Wait for processing to complete
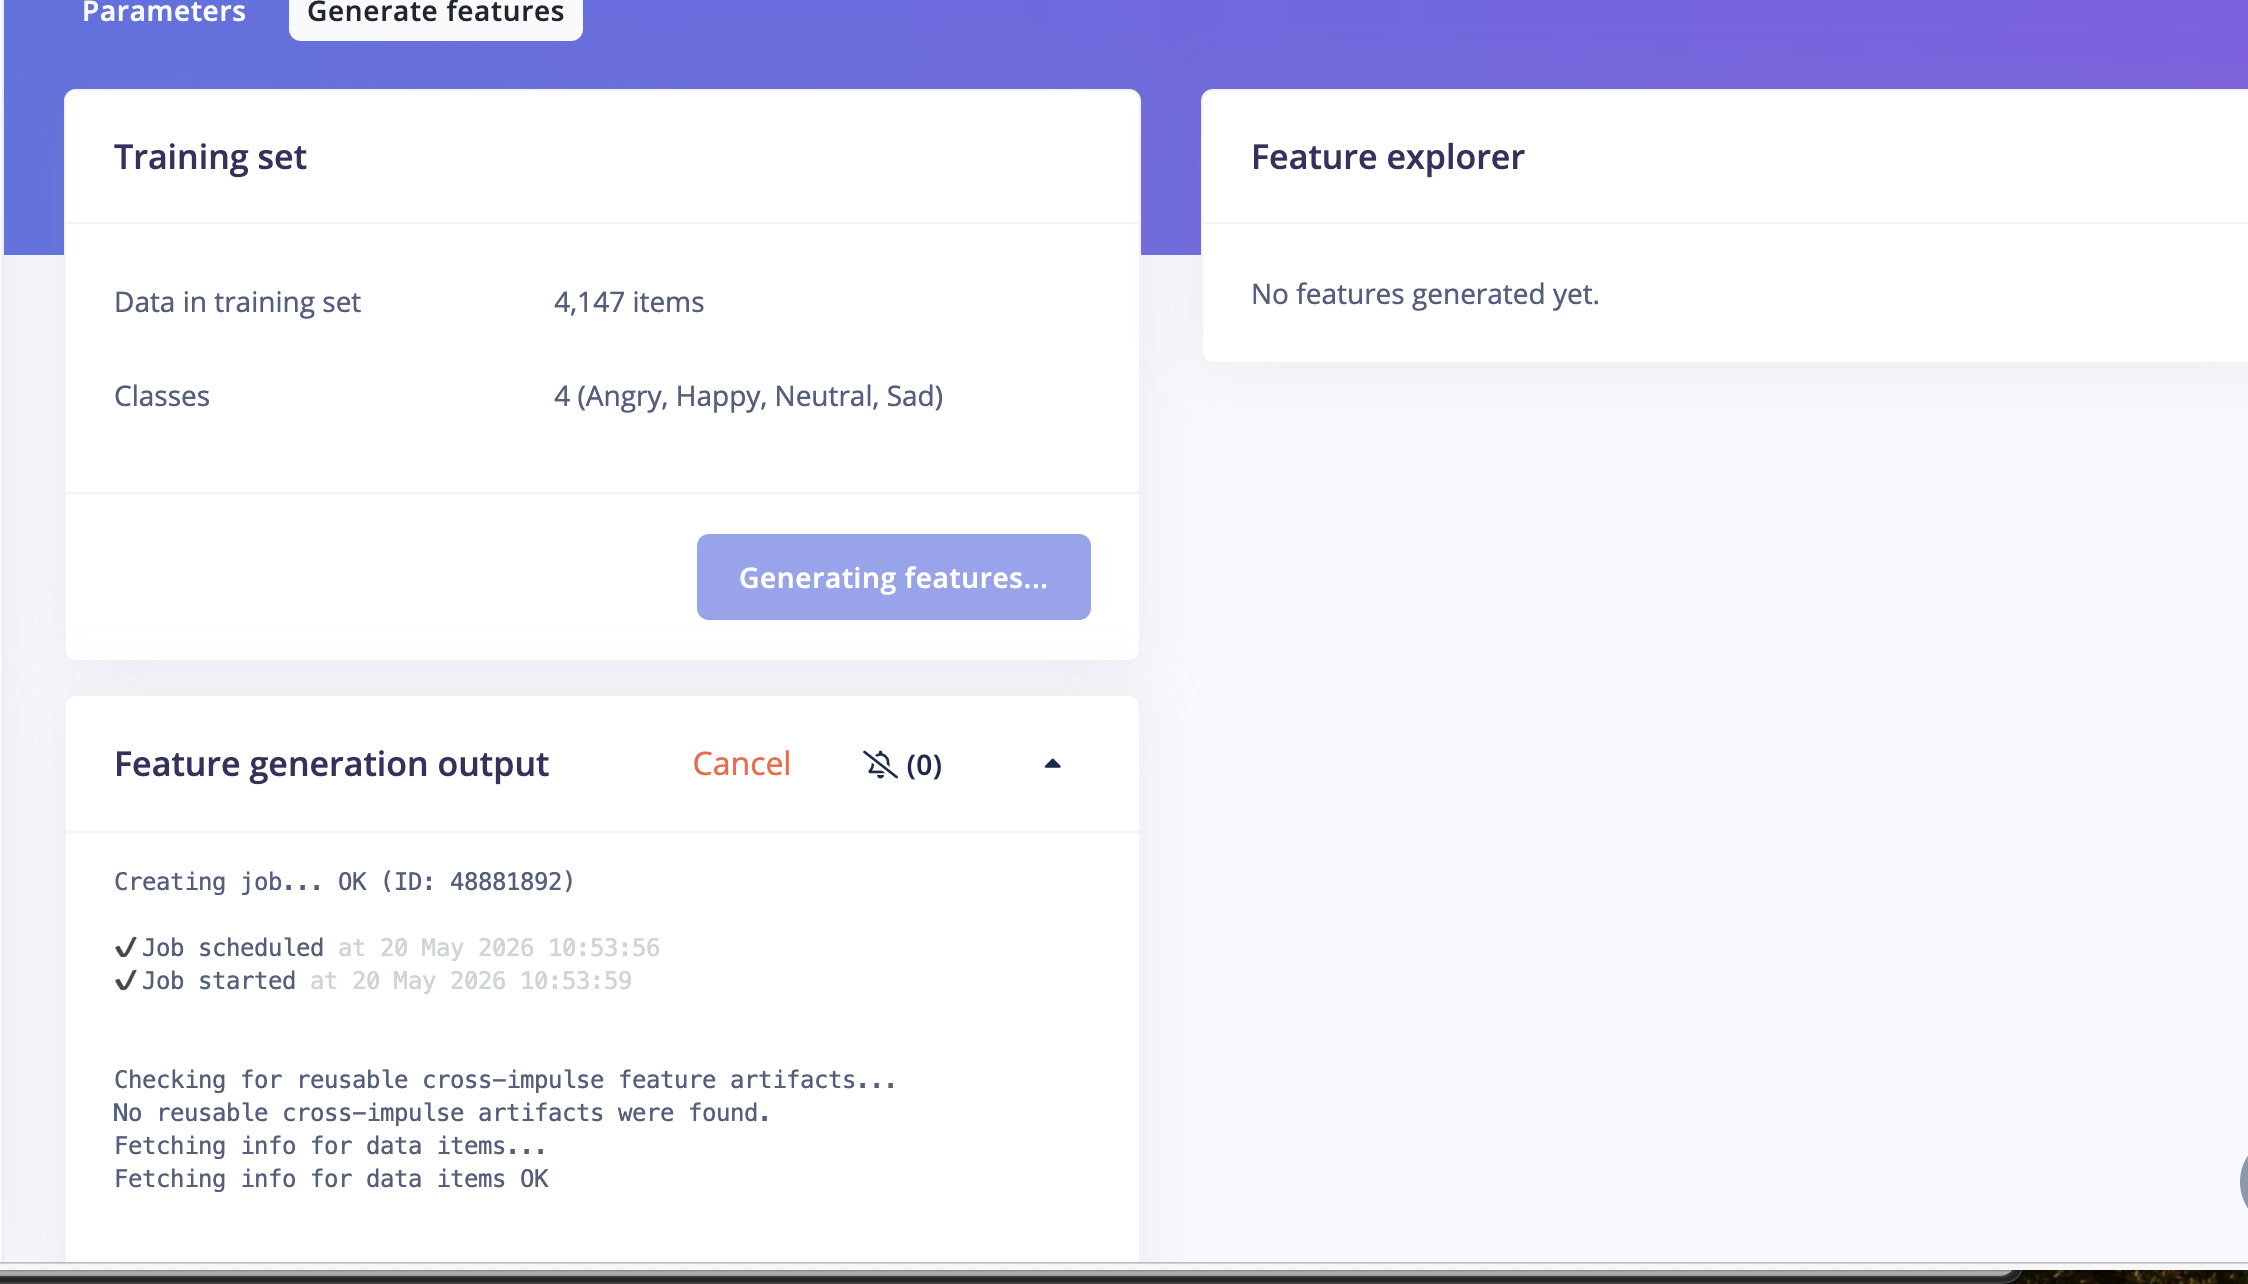
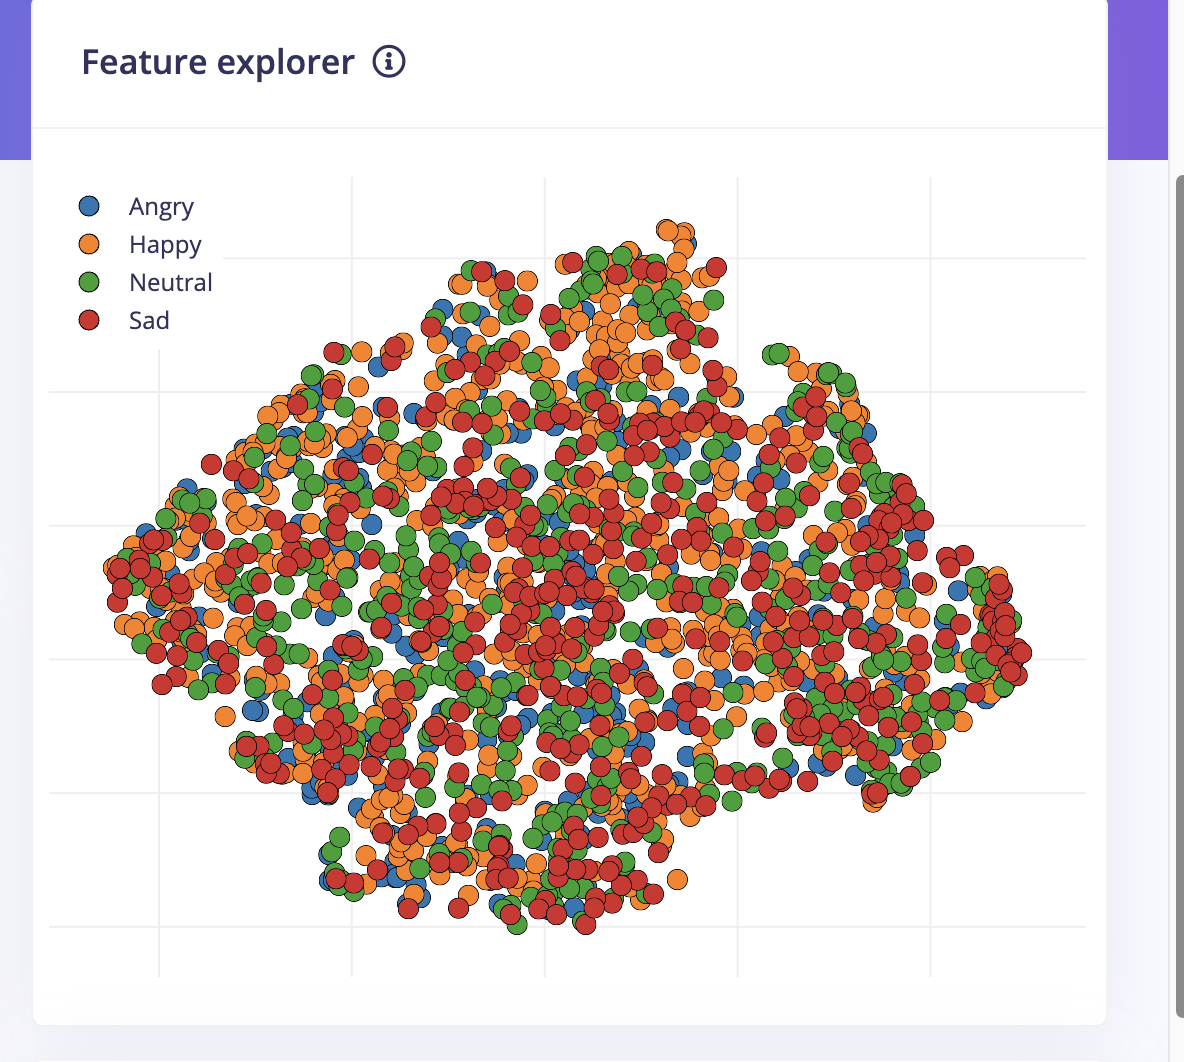
Step 3: Check Feature Explorer 🔍
After generating features, check the Feature Explorer:

GOOD ✅                          BAD ❌
┌─────────────────┐             ┌─────────────────┐
│  🟠🟠🟠        │             │ 🟠🟢🟠🟢🟠🟢  │
│   🟠🟠🟠       │             │ 🟢🟠🟢🟠🟢🟠  │
│                 │             │  🟠🟢🟠🟢🟠   │
│       🟢🟢🟢   │             │ 🟢🟠🟢🟠🟢🟠  │
│        🟢🟢🟢  │             │   ALL MIXED     │
│  SEPARATED      │             │                 │
└─────────────────┘             └─────────────────┘

If GOOD → Continue to training
If BAD  → Go back and capture better images
Phase 5: Edge Impulse — Train the Model
Step 1: Configure Training
1. Click "Transfer learning" in left menu
2. Set these parameters:

   Number of training cycles:    50
   Learning rate:                0.0005
   Data augmentation:            ON ✅

   Neural network architecture:  MobileNetV2 96x96 0.1
                                 (smallest option — fits on XIAO!)
IMPORTANT: Choose MobileNetV2 96x96 0.1 — this is the smallest model that will fit in your XIAO's memory!
Step 2: Start Training
1. Click "Start training"
2. Wait 2-5 minutes
3. Check results:

   GOOD RESULTS (2 classes):
   ┌──────────────────────────┐
   │  Accuracy: 85-95%   ✅  │
   │  Loss:     < 0.5    ✅  │
   │                          │
   │  Confusion Matrix:       │
   │           Happy Neutral  │
   │  Happy:    92%    8%     │
   │  Neutral:   5%   95%    │
   └──────────────────────────┘
What Your Results Mean
Accuracy > 85%  → ✅ Great! Continue to deployment
Accuracy 70-85% → ⚠️ OK, but try more/better images
Accuracy < 70%  → ❌ Need better data, check images quality
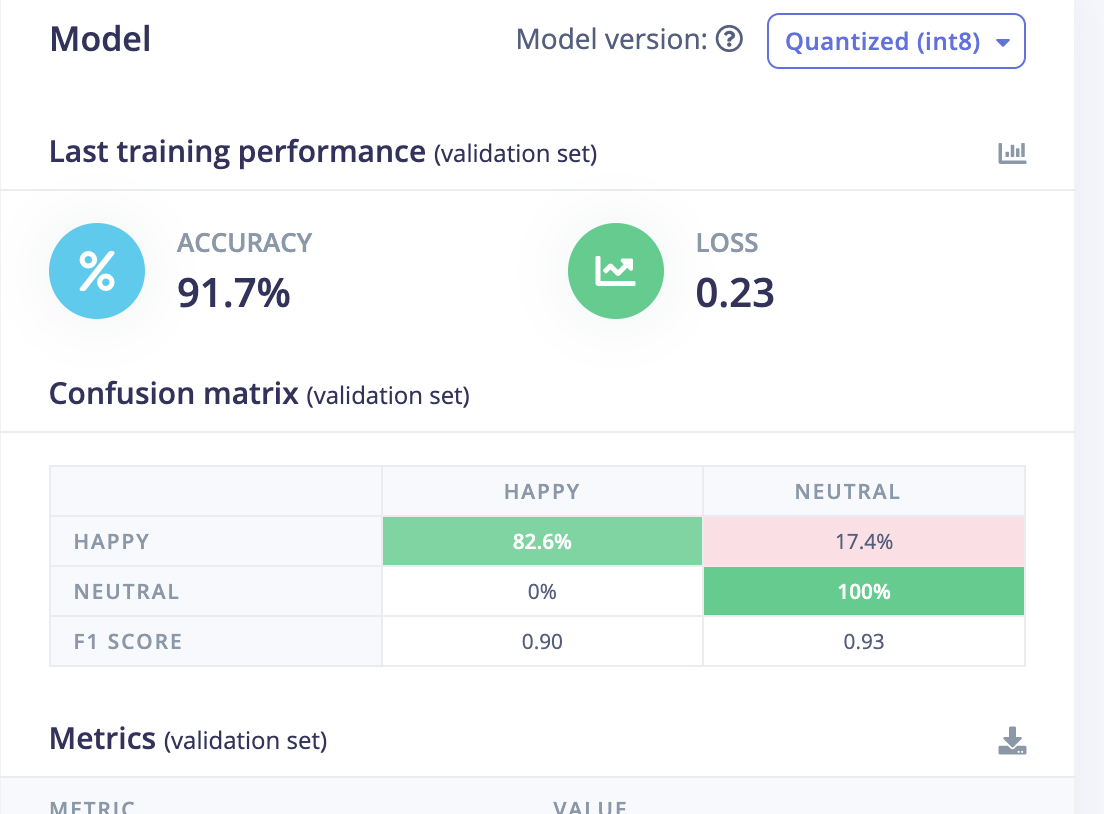
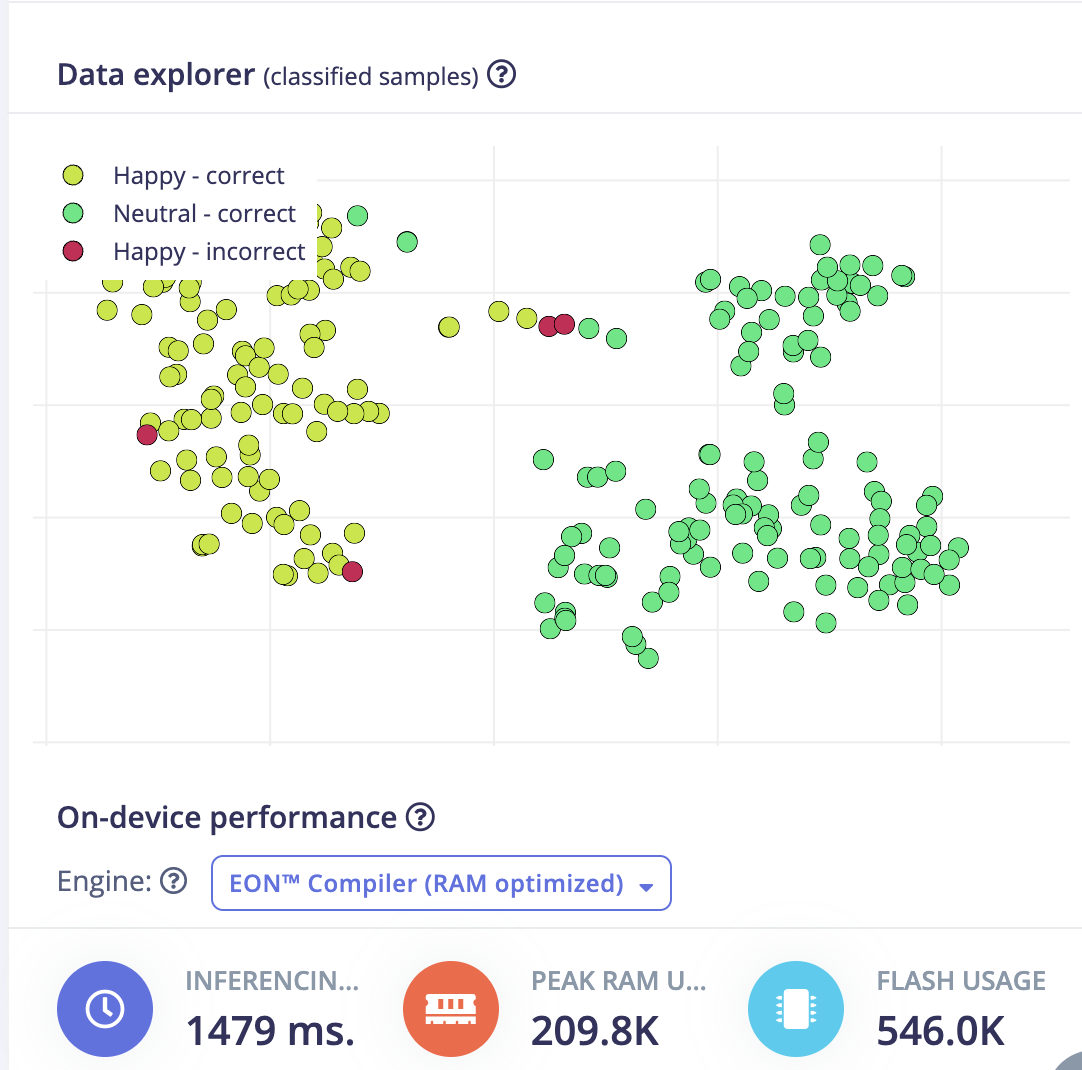
My Results — ML Accuracy & On-Device Speed
I started with a 2-class model (Happy vs Neutral) on real images captured from the XIAO OV2640 camera, then trained MobileNetV2 96×96 0.1 with grayscale preprocessing and int8 quantization. These numbers come directly from Edge Impulse after training and building the Arduino library.
Validation accuracy
91.7% (int8 quantized model, validation set)
Training loss
0.23
Inference time
1479 ms per frame on XIAO (EON RAM-optimized build)
Memory footprint
209.8 KB peak RAM · 546 KB flash
Confusion matrix (validation set)
| Actual label | Predicted Happy | Predicted Neutral | F1 score |
|---|---|---|---|
| Happy | 82.6% | 17.4% | 0.90 |
| Neutral | 0% | 100% | 0.93 |
Neutral was classified perfectly on the validation set; Happy was the harder class — about one in six smiles was read as Neutral, usually when the expression was subtle or lighting changed between capture and test.
On-device performance vs. deployment budget
| Metric | Measured | Edge Impulse budget | Notes |
|---|---|---|---|
| Inferencing time | 1479 ms | ≤ 500 ms | Over budget, but acceptable for a ~2 s demo loop; camera JPEG decode adds overhead beyond the model alone |
| Peak RAM | 209.8 KB | 256 KB | Fits with PSRAM enabled |
| Flash (ROM) | 546 KB | 2800 KB | MobileNetV2 0.1 + int8 keeps the model small |
| End-to-end loop | ~2 s | — | Sketch calls classify_image() then delay(2000); Serial Monitor showed ~90%+ confidence on clear expressions |
Phase 6: Edge Impulse — Configure Target Device
Step 1: Set Deployment Target
1. Go to "Deployment" in left menu
2. OR go to Dashboard → Target device settings
3. Enter these settings:

   Target device:     Espressif ESP-EYE (ESP32 240MHz)
   Processor family:  ESP32
   Clock rate:        240 MHz

   (Scroll down for Application Budget)
   Available RAM:     256 KB
   Available ROM:     2800 KB
   Maximum latency:   500 ms

4. Click "Save"
Step 2: Build Arduino Library
1. Go to "Deployment" (left menu)
2. Select "Arduino library"
3. Select "Quantized (int8)" ← Smaller, faster, works on XIAO
4. Click "Build"
5. Wait for build to complete
6. A .zip file will download automatically

   📦 ei-facial-expression-xiao-arduino-1.0.1.zip
Phase 7: Deploy to XIAO ESP32S3
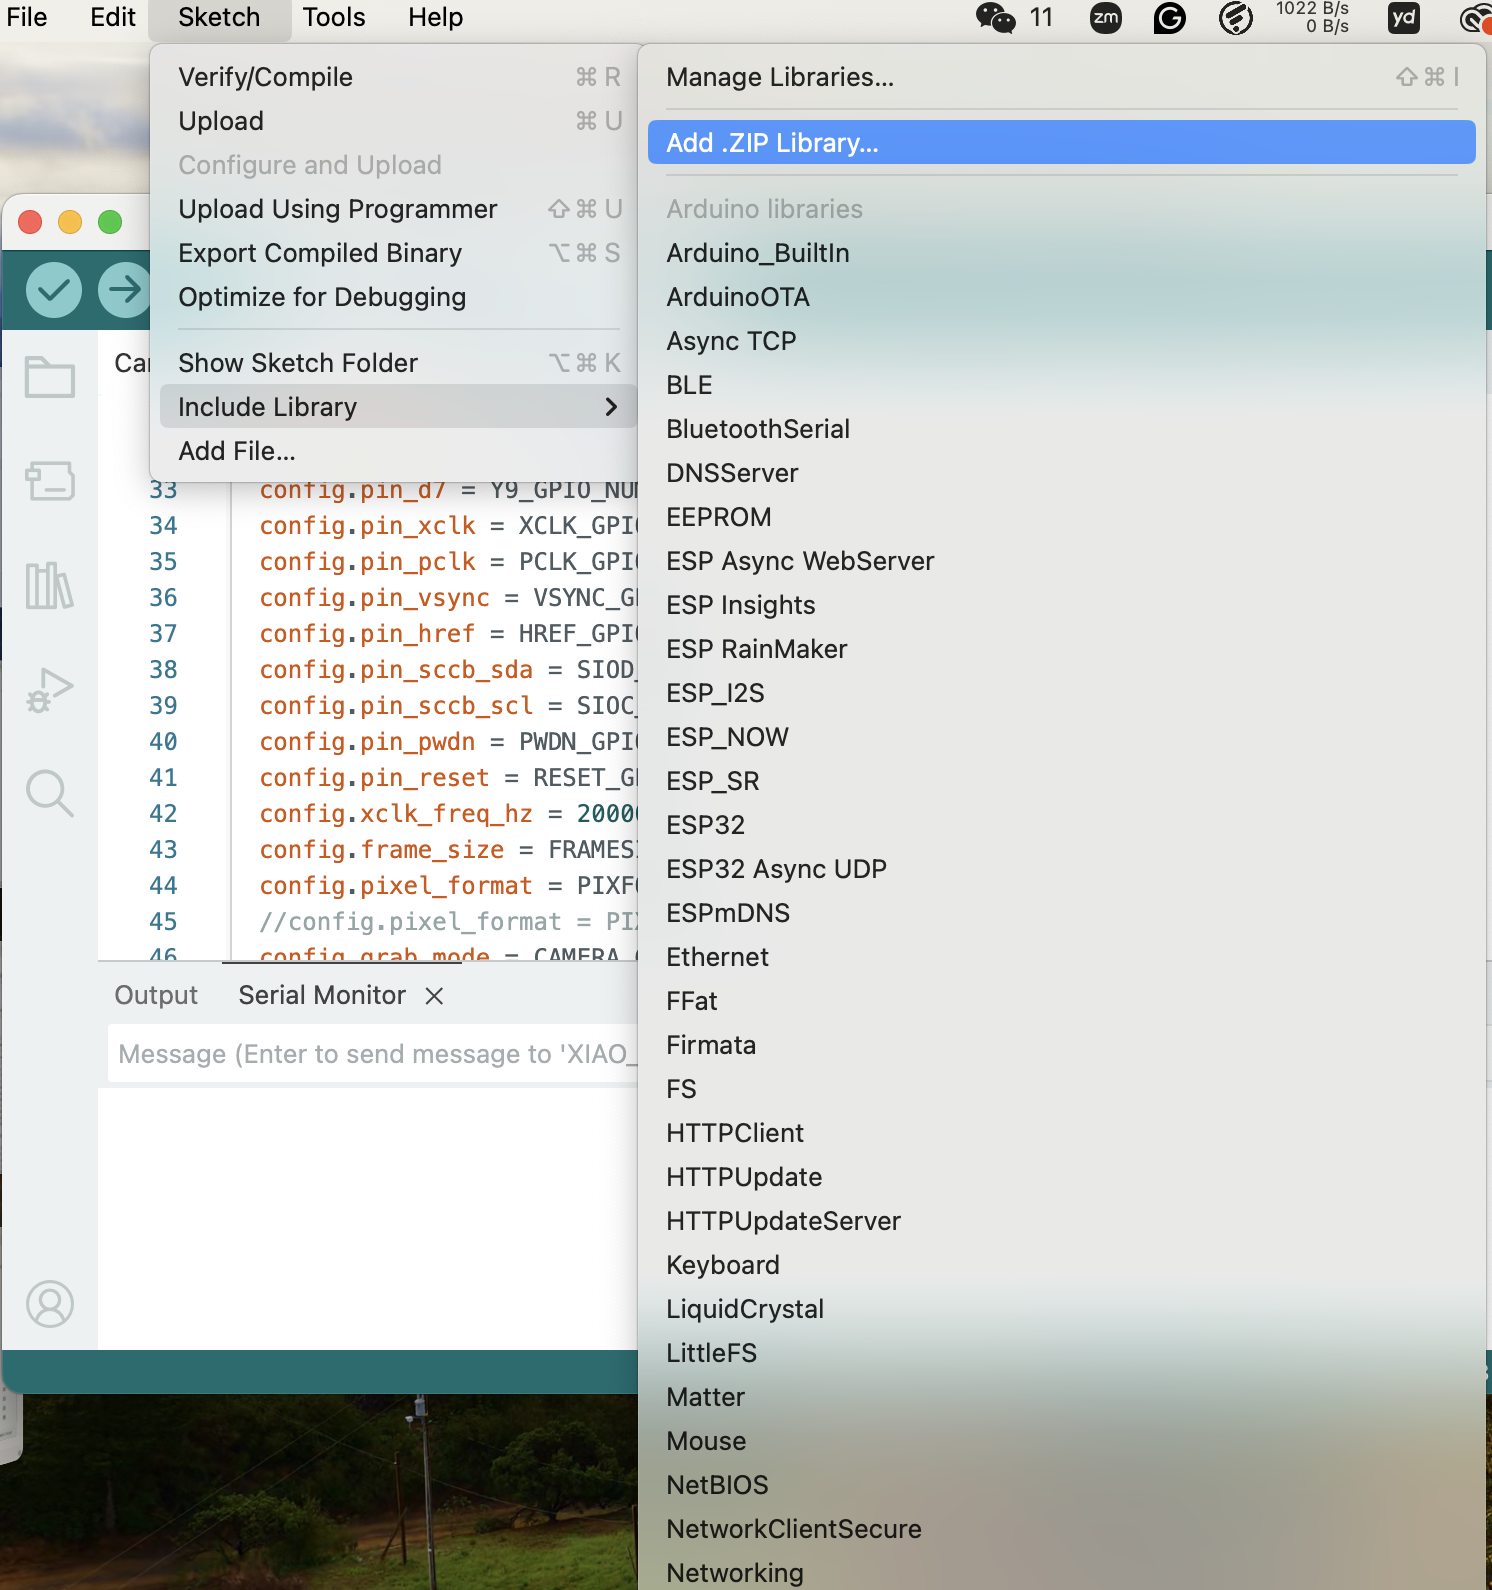
Step 1: Install the Library in Arduino IDE
1. Open Arduino IDE
2. Sketch → Include Library → Add .ZIP Library
3. Select the downloaded .zip file
4. Wait for "Library installed" message
Step 2: Create the Inference Sketch
Create a new sketch and paste this code:
/* ============================================
 *  Facial Expression Detection
 *  XIAO ESP32S3 Sense
 * ============================================ */

// ---- CHANGE THIS to match your library name ----
#include <Facial_Expression_XIAO_inferencing.h>
// Check: Arduino/libraries/ folder for exact name

#include "esp_camera.h"

// ----- XIAO ESP32S3 Camera Pins -----
#define PWDN_GPIO_NUM     -1
#define RESET_GPIO_NUM    -1
#define XCLK_GPIO_NUM     10
#define SIOD_GPIO_NUM     40
#define SIOC_GPIO_NUM     39
#define Y9_GPIO_NUM       48
#define Y8_GPIO_NUM       11
#define Y7_GPIO_NUM       12
#define Y6_GPIO_NUM       14
#define Y5_GPIO_NUM       16
#define Y4_GPIO_NUM       18
#define Y3_GPIO_NUM       17
#define Y2_GPIO_NUM       15
#define VSYNC_GPIO_NUM    38
#define HREF_GPIO_NUM     47
#define PCLK_GPIO_NUM     13

// ----- Settings -----
#define CAMERA_FRAME_SIZE FRAMESIZE_96X96
#define IMAGE_WIDTH       96
#define IMAGE_HEIGHT      96

// ----- Global Variables -----
camera_fb_t *fb = NULL;

// =============================================
//  SETUP
// =============================================
void setup() {
    Serial.begin(115200);
    while (!Serial && millis() < 3000);

    Serial.println("=================================");
    Serial.println(" Facial Expression Detection");
    Serial.println(" XIAO ESP32S3 Sense");
    Serial.println("=================================");

    // Initialize camera
    camera_config_t config;
    config.ledc_channel = LEDC_CHANNEL_0;
    config.ledc_timer   = LEDC_TIMER_0;
    config.pin_d0       = Y2_GPIO_NUM;
    config.pin_d1       = Y3_GPIO_NUM;
    config.pin_d2       = Y4_GPIO_NUM;
    config.pin_d3       = Y5_GPIO_NUM;
    config.pin_d4       = Y6_GPIO_NUM;
    config.pin_d5       = Y7_GPIO_NUM;
    config.pin_d6       = Y8_GPIO_NUM;
    config.pin_d7       = Y9_GPIO_NUM;
    config.pin_xclk     = XCLK_GPIO_NUM;
    config.pin_pclk     = PCLK_GPIO_NUM;
    config.pin_vsync    = VSYNC_GPIO_NUM;
    config.pin_href     = HREF_GPIO_NUM;
    config.pin_sccb_sda = SIOD_GPIO_NUM;
    config.pin_sccb_scl = SIOC_GPIO_NUM;
    config.pin_pwdn     = PWDN_GPIO_NUM;
    config.pin_reset    = RESET_GPIO_NUM;
    config.xclk_freq_hz = 20000000;
    config.pixel_format = PIXFORMAT_JPEG;
    config.frame_size   = CAMERA_FRAME_SIZE;
    config.grab_mode    = CAMERA_GRAB_WHEN_EMPTY;
    config.fb_location  = CAMERA_FB_IN_PSRAM;
    config.jpeg_quality = 10;
    config.fb_count     = 1;

    esp_err_t err = esp_camera_init(&config);
    if (err != ESP_OK) {
        Serial.printf("Camera init FAILED! Error: 0x%x\n", err);
        Serial.println("Check: Is camera module attached?");
        while (1) { delay(1000); }
    }

    Serial.println("Camera initialized OK!");
    Serial.println("Starting detection...\n");
}

// =============================================
//  Get camera image and convert for Edge Impulse
// =============================================
bool get_camera_data(size_t offset, size_t length, float *out_ptr) {
    fb = esp_camera_fb_get();
    if (!fb) {
        Serial.println("Camera capture failed!");
        return false;
    }

    // Decode JPEG to RGB
    // Edge Impulse expects pixel values as floats
    // For JPEG, we need to decode first

    size_t jpg_buf_len = fb->len;
    uint8_t *jpg_buf = fb->buf;

    // Simple approach: convert JPEG buffer
    // The library handles this internally

    esp_camera_fb_return(fb);
    return true;
}

// =============================================
//  Capture and classify
// =============================================
void classify_image() {
    Serial.println("📸 Capturing image...");

    // Capture frame
    fb = esp_camera_fb_get();
    if (!fb) {
        Serial.println("❌ Camera capture failed!");
        return;
    }

    // Allocate buffer for RGB888 image
    uint8_t *rgb_buf = (uint8_t *)malloc(IMAGE_WIDTH * IMAGE_HEIGHT * 3);
    if (!rgb_buf) {
        Serial.println("❌ Memory allocation failed!");
        esp_camera_fb_return(fb);
        return;
    }

    // Convert JPEG to RGB888
    bool converted = fmt2rgb888(fb->buf, fb->len, PIXFORMAT_JPEG, rgb_buf);
    esp_camera_fb_return(fb);

    if (!converted) {
        Serial.println("❌ Image conversion failed!");
        free(rgb_buf);
        return;
    }

    // Prepare signal for Edge Impulse
    ei_impulse_result_t result = { 0 };

    // Create signal from RGB buffer
    signal_t signal;
    signal.total_length = IMAGE_WIDTH * IMAGE_HEIGHT;
    signal.get_data = [rgb_buf](size_t offset, size_t length, float *out_ptr) -> int {
        for (size_t i = 0; i < length; i++) {
            size_t pixel = offset + i;
            // Convert RGB to single float (same format as Edge Impulse expects)
            uint8_t r = rgb_buf[pixel * 3 + 0];
            uint8_t g = rgb_buf[pixel * 3 + 1];
            uint8_t b = rgb_buf[pixel * 3 + 2];
            // Pack as 0xRRGGBB float (Edge Impulse format)
            out_ptr[i] = (r << 16) + (g << 8) + b;
        }
        return 0;
    };

    // Run classifier
    EI_IMPULSE_ERROR res = run_classifier(&signal, &result, false);

    // Free RGB buffer
    free(rgb_buf);

    if (res != EI_IMPULSE_OK) {
        Serial.printf("❌ Classifier failed! Error: %d\n", res);
        return;
    }

    // ---- Print Results ----
    Serial.println("┌─────────────────────────────┐");
    Serial.println("│  DETECTION RESULTS          │");
    Serial.println("├─────────────────────────────┤");

    float max_value = 0;
    int max_index = 0;

    for (size_t i = 0; i < EI_CLASSIFIER_LABEL_COUNT; i++) {
        Serial.printf("│  %-12s : %5.1f%%      │\n",
                      result.classification[i].label,
                      result.classification[i].value * 100);

        if (result.classification[i].value > max_value) {
            max_value = result.classification[i].value;
            max_index = i;
        }
    }

    Serial.println("├─────────────────────────────┤");

    // Show detected expression with emoji
    const char* expression = result.classification[max_index].label;

    if (strcmp(expression, "Happy") == 0) {
        Serial.println("│  😊 HAPPY!                  │");
    } else if (strcmp(expression, "Sad") == 0) {
        Serial.println("│  😢 SAD                     │");
    } else if (strcmp(expression, "Angry") == 0) {
        Serial.println("│  😠 ANGRY                   │");
    } else if (strcmp(expression, "Neutral") == 0) {
        Serial.println("│  😐 NEUTRAL                 │");
    } else {
        Serial.printf("│  → %s\n", expression);
    }

    Serial.printf("│  Confidence: %.1f%%           │\n", max_value * 100);
    Serial.println("└─────────────────────────────┘\n");
}

// =============================================
//  MAIN LOOP
// =============================================
void loop() {
    classify_image();
    delay(2000);  // Classify every 2 seconds
}
Step 3: Fix the Library Include Name
IMPORTANT! Find the correct library name:

1. Go to: Arduino/libraries/ folder on your computer
2. Find the Edge Impulse library folder name
3. Open: src/ folder inside it
4. Find the .h file that looks like:

   Facial_Expression_XIAO_inferencing.h

5. Update the #include line in your sketch to match EXACTLY:

   #include <YOUR_EXACT_LIBRARY_NAME_inferencing.h>
Step 4: Upload to XIAO
Arduino IDE Settings (same as before):
   Board:            XIAO_ESP32S3
   PSRAM:            OPI PSRAM
   Flash Size:       8MB
   Partition Scheme: Huge APP (3MB No OTA/1MB SPIFFS)
   Port:             (your COM port)

Click Upload → Wait for completion
Step 5: Open Serial Monitor & Test
1. Tools → Serial Monitor
2. Set baud rate: 115200
3. Point camera at your face
4. You should see:

=================================
 Facial Expression Detection
 XIAO ESP32S3 Sense
=================================
Camera initialized OK!
Starting detection...

📸 Capturing image...
┌─────────────────────────────┐
│  DETECTION RESULTS          │
├─────────────────────────────┤
│  Happy        : 92.3%      │
│  Neutral      :  7.7%      │
├─────────────────────────────┤
│  😊 HAPPY!                  │
│  Confidence: 92.3%          │
└─────────────────────────────┘
Phase 8: Add More Classes (After 2-Class Success)
Once Happy vs Neutral works well:
Round 2: Add SAD
─────────────────
1. Go back to CameraWebServer sketch
2. Upload it to XIAO again
3. Capture 50-100 Sad expression images
4. Upload to Edge Impulse with label "Sad"
5. Re-generate features → Check feature explorer
6. Re-train model
7. Re-deploy

Round 3: Add ANGRY
─────────────────
1. Same process — capture Angry images
2. Upload → Re-train → Re-deploy
🔧 Troubleshooting
| Problem | Solution |
|---|---|
| Camera init failed | Check camera module is attached firmly; Enable PSRAM in board settings |
| WiFi not connecting | Check SSID/password; Use 2.4GHz WiFi only (not 5GHz) |
| No IP address shown | Press RESET button; Check Serial Monitor baud is 115200 |
| Browser shows nothing | Make sure phone/computer is on SAME WiFi network |
| Library include error | Check exact .h filename in Arduino/libraries/ folder |
| Out of memory | Use MobileNetV2 96x96 0.1; Use Grayscale; Use int8 quantization |
| Low accuracy | Capture MORE images; Make expressions MORE exaggerated |
| Feature explorer mixed | Images too similar; Clean bad images; Reduce classes |
📊 Complete Project Checklist
Phase 1: Hardware
   □ XIAO ESP32S3 Sense ready
   □ Arduino IDE configured
   □ Board settings correct (PSRAM enabled!)

Phase 2: Data Capture
   □ CameraWebServer uploaded
   □ WiFi connected, IP address obtained
   □ Happy images captured (50-100)
   □ Neutral images captured (50-100)
   □ Images organized in folders

Phase 3: Edge Impulse Setup
   □ Project created (Image classification)
   □ Images uploaded with correct labels
   □ 80/20 train/test split

Phase 4: Impulse Design
   □ Image block: 96x96, Grayscale
   □ Processing: Image block added
   □ Learning: Transfer Learning added
   □ Features generated
   □ Feature explorer shows SEPARATED clusters ✅

Phase 5: Training
   □ MobileNetV2 96x96 0.1 selected
   □ Training cycles: 50
   □ Data augmentation: ON
   □ Accuracy > 85%

Phase 6: Deployment
   □ Target device configured (256KB RAM, 2800KB ROM)
   □ Arduino library built (int8 quantized)
   □ .zip downloaded

Phase 7: Run on XIAO
   □ Library installed in Arduino IDE
   □ Inference sketch uploaded
   □ Serial monitor showing results
   □ Correct expressions detected! 🎉

Phase 8: Expand
   □ Add Sad class → retrain → redeploy
   □ Add Angry class → retrain → redeploy
   □ Final 4-class model working! 🎯