This week I worked on making my board interact with a GUI that I coded in python on my computer to blink fast and blink slowly with its built in LED.
Group Assignment
This week I worked with my group to learn how to use Python and the Command Line to create a basic GUI that turns the LED in an Arduino Uno On and Off.
We used the Arduino IDE to code the board, and then we used Python to create a GUI that would activate the LED and then deactivate it.
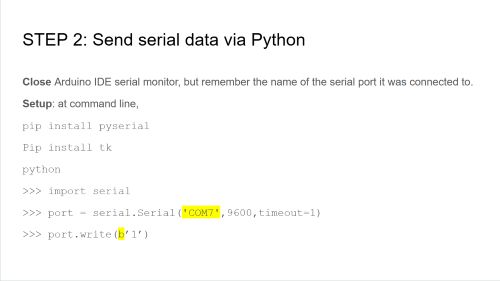
We first had to install pyserial, which we did by typing "pip install pyserial" into the command line.
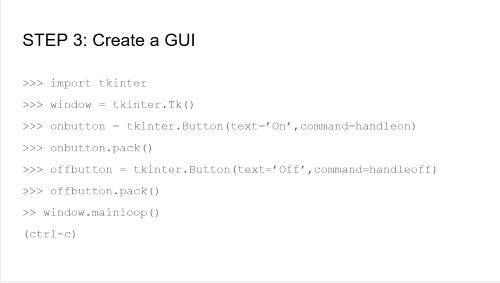
Then we created a simple GUI using tkinter, which is a built in library in Python.
We used the tkinter library to create a simple GUI with two buttons, one for turning the LED on and one for turning it off.
Code for Microcontroller and Computer
At this point, like in the past weeks, I will explain how my code works, but I will explain it in two separate parts, once for the board's arduino code, and once for the computer's code. This week, I had more help from chatgpt. You can find my conversation with it here .
Board Code
            #define LED_PIN 25  // The built-in LED on the XIAO RP2040 is on pin 25

            void setup() {
              pinMode(LED_PIN, OUTPUT);  // Initialize the built-in LED pin as an output
              Serial.begin(9600);        // Start the serial communication at 9600 baud
            }
This code initiliaizes the serial sending process and defines pin 25 as the built in LED's pin.
            void loop() {
                if (Serial.available() > 0) {  // Check if there's data available to read
                  String command = Serial.readStringUntil('\n');  // Read the incoming data as a string
                  command.trim();  // Remove any extra spaces or newlines
This is code that checks to see if there is an serial messages available, and tells the board to then read it and remove any extra spaces or new lines.
            if (command == "fast") {
                blinkFast();
              }
              else if (command == "slow") {
                blinkSlow();
              }
              else if (command == "stop") {
                stopBlinking();
              }
            }
          }
This code tells the board to respond by blinking its LED based on which command it receives.
            // Function to blink the LED fast (every 100ms)
            void blinkFast() {
              while (true) {
                digitalWrite(LED_PIN, HIGH);
                delay(100);  // Fast blink (100ms)
                digitalWrite(LED_PIN, LOW);
                delay(100);  // Fast blink (100ms)

                if (Serial.available()) {
                  String command = Serial.readStringUntil('\n');
                  command.trim();
                  if (command == "stop") {
                    stopBlinking();
                    break;
                  }
                }
              }
            }
This code tells the board how to blink fast, and to stop blinking if it receives a "stop" command.
            // Function to blink the LED slow (every 1 second)
            void blinkSlow() {
              while (true) {
                digitalWrite(LED_PIN, HIGH);
                delay(1000);  // Slow blink (1 second)
                digitalWrite(LED_PIN, LOW);
                delay(1000);  // Slow blink (1 second)

                if (Serial.available()) {
                  String command = Serial.readStringUntil('\n');
                  command.trim();
                  if (command == "stop") {
                    stopBlinking();
                    break;
                  }
                }
              }
            }
This code tells the board how to blink slowly, and to stop blinking if it receives a "stop" command.
            // Function to stop the LED from blinking
            void stopBlinking() {
              digitalWrite(LED_PIN, LOW);  // Turn off the LED
            }
This code tells the board how to stop blinking.
            #define LED_PIN 25  // The built-in LED on the XIAO RP2040 is on pin 25

            void setup() {
              pinMode(LED_PIN, OUTPUT);  // Initialize the built-in LED pin as an output
              Serial.begin(9600);        // Start the serial communication at 9600 baud
            }

            void loop() {
              if (Serial.available() > 0) {  // Check if there's data available to read
                String command = Serial.readStringUntil('\n');  // Read the incoming data as a string
                command.trim();  // Remove any extra spaces or newlines

                if (command == "fast") {
                  blinkFast();
                }
                else if (command == "slow") {
                  blinkSlow();
                }
                else if (command == "stop") {
                  stopBlinking();
                }
              }
            }

            // Function to blink the LED fast (every 100ms)
            void blinkFast() {
              while (true) {
                digitalWrite(LED_PIN, HIGH);
                delay(100);  // Fast blink (100ms)
                digitalWrite(LED_PIN, LOW);
                delay(100);  // Fast blink (100ms)

                if (Serial.available()) {
                  String command = Serial.readStringUntil('\n');
                  command.trim();
                  if (command == "stop") {
                    stopBlinking();
                    break;
                  }
                }
              }
            }

            // Function to blink the LED slow (every 1 second)
            void blinkSlow() {
              while (true) {
                digitalWrite(LED_PIN, HIGH);
                delay(1000);  // Slow blink (1 second)
                digitalWrite(LED_PIN, LOW);
                delay(1000);  // Slow blink (1 second)

                if (Serial.available()) {
                  String command = Serial.readStringUntil('\n');
                  command.trim();
                  if (command == "stop") {
                    stopBlinking();
                    break;
                  }
                }
              }
            }

            // Function to stop the LED from blinking
            void stopBlinking() {
              digitalWrite(LED_PIN, LOW);  // Turn off the LED
            }
This is the full code for the board.
Computer Code
First, we have to go to our command line, and type "pip install pyserial". This downloads everything we need to have Python send serial commands to our board, just like how you might do it with the Arduino serial terminal.
            import tkinter as tk
            import serial
            import time
This code sets up our GUI code by importing all the necessary functions, such as tkinter, the built in GUI library.
            # Set up serial connection to XIAO RP2040
            ser = serial.Serial('COM6', 9600)  # Replace 'COM6' with Your serial port
This code defines our serial port and sets up a serial connection.
            # Function to send 'fast' command to microcontroller
            def fast_blink():
                ser.write(b'fast\n')

            # Function to send 'slow' command to microcontroller
            def slow_blink():
                ser.write(b'slow\n')

            # Function to stop blinking
            def stop_blink():
                ser.write(b'stop\n')
This code tells the board how to send the "fast", "slow", and "stop" commands we will be using.
            root = tk.Tk()
            root.title("XIAO RP2040 LED Control")
This code titles our GUI interfact as "XIAO RP2040 LED Control"
        # Create and place buttons on the window
        fast_button = tk.Button(root, text="Fast", command=fast_blink)
        fast_button.pack(pady=10)

        slow_button = tk.Button(root, text="Slow", command=slow_blink)
        slow_button.pack(pady=10)

        stop_button = tk.Button(root, text="Stop", command=stop_blink)
        stop_button.pack(pady=10)
This code creates the buttons for our GUI, and places them on the window.
        # Run the GUI
        root.mainloop()
This code runs the GUI.
        import tkinter as tk
        import serial
        import time

        # Set up serial connection to XIAO RP2040
        ser = serial.Serial('COM3', 9600)  # Replace 'COM3' with your XIAO's serial port

        # Function to send 'fast' command to microcontroller
        def fast_blink():
            ser.write(b'fast\n')

        # Function to send 'slow' command to microcontroller
        def slow_blink():
            ser.write(b'slow\n')

        # Function to stop blinking
        def stop_blink():
            ser.write(b'stop\n')

        # Set up the GUI
        root = tk.Tk()
        root.title("XIAO RP2040 LED Control")

        # Create and place buttons on the window
        fast_button = tk.Button(root, text="Fast", command=fast_blink)
        fast_button.pack(pady=10)

        slow_button = tk.Button(root, text="Slow", command=slow_blink)
        slow_button.pack(pady=10)

        stop_button = tk.Button(root, text="Stop", command=stop_blink)
        stop_button.pack(pady=10)

        # Run the GUI
        root.mainloop()
This is the full code for the computer.
This is the final product of my code, where you can see it being sent from my computer, across the boards, to the receiving Mac computer!