This week I worked on making my board send messages to a friend's board, which then displayed itself on their serial monitor.
Group Assignment
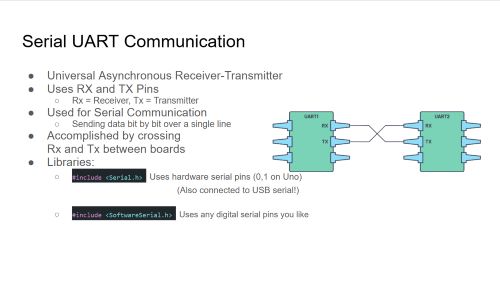
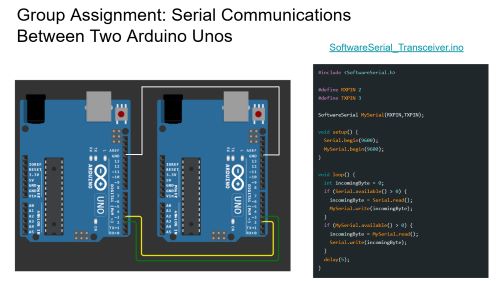
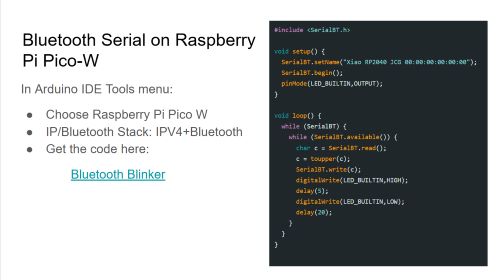
This week we learned about networking devices, such as connecting two arduinos to eachother and re-creating how an old internet modem messager system worked. We also learned how to make boards communicate to computers through bluetooth and wifi, and the various different processes involved in doing so. We also learned how to make our boards send and receive data from eachother, and how to make them send and receive data from a computer. We used a serial monitor to do all of this, which we typed messages into that either went to a classmates computer or to our own computer through a bluetooth connection.
Process for Coding Circuit Board
I had a lot of help with coding this again week, but this time I didn't use ChatGPT as much as I did last week. Instead, my good friends Zach and Zac helped! Zach is a memeber of Fab Academy 2023, and Zac is one of my co-workers. You can find my conversation in ChatGPT here.


At this point, like in the past weeks, I will explain how my code works, but I will explain it in two separate parts, one for each board.
Sender Code
          void setup() {
            // Start Serial1 for TX/RX communication
            Serial1.begin(9600);
          }
This code initiliaizes the serial sending process between my TX and RX pins, which you should have wired to each other, with TX to RX and RX to TX.
          void loop() {
            // Send a message
            Serial1.println("Hello from Sender!");
            delay(1000); // send every second
          }
This is sending code, which tells the sending board to send a the message "Hello from Sender!" every second, which the other board then receives.
          void setup() {
            // Start Serial1 for TX/RX communication
            Serial1.begin(9600);
          }

          void loop() {
            // Send a message
            Serial1.println("Hello from Sender!");
            delay(1000); // send every second
          }
This is the full Sender code.
Receiver Code
          void setup() {
            // Start USB Serial for debug output
            Serial.begin(9600);
            // Start Serial1 for receiving messages
            Serial1.begin(9600);
          }
This code sets up our reciever to get ready to receive messages, and additionally makes it possible to debug the USB port that its connected to.
          void loop() {
            if (Serial1.available()) {
              String msg = Serial1.readStringUntil('\n');
              Serial.println("Received: " + msg);
            }
          }
This is the final stage of our code, which tells the receiving board "If there is a message available, print that message as "Received:_________".
          void setup() {
            // Start USB Serial for debug output
            Serial.begin(9600);
            // Start Serial1 for receiving messages
            Serial1.begin(9600);
          }

          void loop() {
            if (Serial1.available()) {
              String msg = Serial1.readStringUntil('\n');
              Serial.println("Received: " + msg);
            }
          }
This is the full code for the Receiving board.
This is the final product of my code, where you can see it being sent from my computer, across the boards, to the receiving Mac computer!