System Integration
1. What is System Integration?
System Integration is the process of connecting different subsystems or technological components into a single, cohesive architecture that functions as a unified system. Its main goal is to ensure that independent elements—whether hardware, software, or both—work together in a coordinated manner to perform complex tasks that they could not achieve individually. This process involves establishing communication between various modules, ensuring interface compatibility, and designing a centralized or distributed control logic that enables efficient system operation. Integration can include everything from the physical connection of devices to the programming of communication protocols and data synchronization. In engineering projects, system integration is essential to ensure that sensors, actuators, processors, and user platforms interact properly, meeting the functional, performance, and safety objectives of the system.
My final system
My final project is a rehabilitation exoskeleton designed to assist people with limited mobility in the upper limb, especially those with brachial plexus injuries. The system consists of a custom mechanical structure, manufactured using 3D printing. The goal is to create an exoskeleton that supports the hand, allowing controlled flexion and extension movements, which will enable assisted rehabilitation.
The device is actuated by servo motors and a pulley mechanism, and is controlled by a Xiao ESP32C3 microcontroller. The exoskeleton is designed to be comfortable and safe to wear, with adjustable straps and supports that ensure proper alignment with the user's arm.
The main function of the system is to support motor rehabilitation by enabling repetitive and guided hand movements, which are essential for muscle recovery and neuroplasticity. The system includes a button-based control interface to improve accessibility and user autonomy.
3. Materials
The following tables outline the components used in my final rehabilitation exoskeleton project, categorized by mechanical structure, external electronics, and components used in my custom PCB.
3.1 Mechanical Components
| Item | Details |
|---|---|
| TPU Filament | (for flexible parts and cushioning) |
| M3 Screws & Nuts | Various lengths and quantities (TBD) |
| Velcro Straps | For adjusting and securing the exoskeleton |
| Tension Cable | 1/8" for the tensioning mechanisms |
| Supports and Plates | Base plate, motor supports, and anchors (3D printed) |
3.2 External Electronics Components
| Component | Quantity |
|---|---|
| SG90 or MG995 Servo Motors | 5 units |
| Xiao ESP32C3 Microcontroller | 1 unit |
| 5V External Power Source | 1 unit (for servos) |
| Prototyping Board | 1 unit |
| Dupont Cables | Assorted |
| Power Switch | 1 unit |
| Control Button | 1 unit (for manual motor control) |
| LED (Motor Active Indicator) | 1 unit |
| LED (Bluetooth Connection Indicator) | 1 unit |
3.3 Custom PCB Components
| Component | Specification / Package | Quantity |
|---|---|---|
| XIAO RP2040 | — | 1 |
| SG90 or MG995 Servo Motors | — | 5 |
| Resistor | 220Ω (for LED) | 2 |
| Resistor | 10kΩ (for button pull-down) | 1 |
| Capacitor | 10µF, 0805 | 3 |
| LED | 5mm, Red (Motor Active Indicator) | 1 |
| LED | 5mm, Blue (Bluetooth Indicator) | 1 |
| Pin Header Connector | 2-pin | 6 |
| Pin Header Connector | 3-pin | 3 |
| Pin Header Connector | 4-pin | 1 |
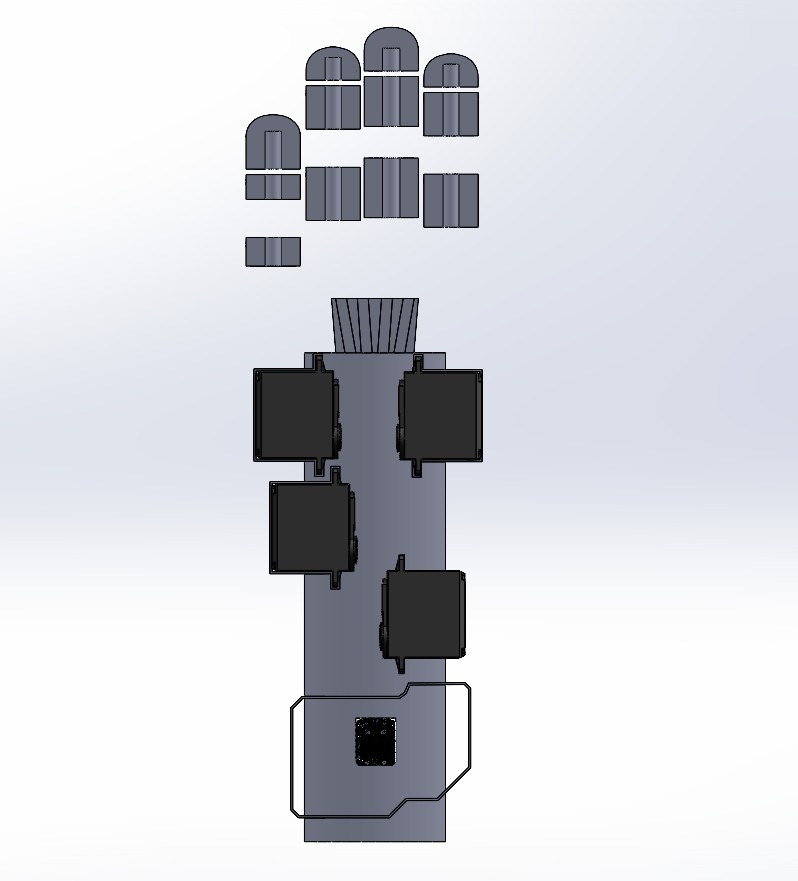
4. Mechanical Design
The mechanical design of the exoskeleton focuses on providing a functional and adaptable solution to aid individuals with brachial plexus paralysis. The project aims to create a device that helps users restore mobility and strength in their affected hand, incorporating a combination of lightweight and durable materials to ensure both comfort and effectiveness.
The structure of the exoskeleton is designed with a strong emphasis on modularity and ease of assembly, ensuring that all parts can be efficiently manufactured and assembled. The use of TPU filament for 3D printing offers flexibility and strength, providing optimal comfort while maintaining durability. Additionally, key components such as the joints and supports are designed to be adjustable to accommodate various hand sizes and needs.
The design is structured into several interlocking parts to allow easy adjustments and upgrades. Press-fit geometries were utilized for initial alignment during assembly, with screw reinforcement ensuring the final structure is stable and secure. This hybrid approach ensures that the exoskeleton can withstand daily use while allowing for adjustments to meet the needs of different users.
For the motion system, servo motors are used to actuate the joints, providing precise control over the movements of the affected hand. The servo motors are connected to the hand segments using custom-designed mounts, ensuring a reliable fit while maintaining smooth movement. The system is powered by a 5V external power source for the motors, and the entire exoskeleton is controlled using the Seeed Studio XIAO ESP32C3 microcontroller.
One of the key mechanical features of the exoskeleton is its adjustable joints, designed to mimic the natural range of motion of the human hand. These joints allow for easy adaptation to different users, with settings for varying hand sizes and rehabilitation stages.
The exoskeleton is designed to be lightweight yet robust, with a modular frame that can be customized to fit a variety of hand shapes and sizes. The hand sections are printed in TPU, with a total material usage of approximately 750 grams for each hand and a total print time of around 30 hours. This ensures that the device is both comfortable and efficient, without compromising on strength.
Overall, the mechanical design of the exoskeleton focuses on providing users with a comfortable, adjustable, and functional device to aid in the rehabilitation of brachial plexus paralysis. The integration of 3D printed parts, servo motors, and a modular frame structure allows for continuous customization and improvement of the device, ensuring that it meets the needs of its users as they progress through their rehabilitation process.
Exoskeleton Programming
The exoskeleton's servo motors will be controlled using an Arduino board. The servos will move in controlled steps to accommodate varying user strengths. This approach ensures that the movement can be adjusted according to the user's rehabilitation needs, as every individual may have different muscle control and requirements for physical therapy.
Button Functionality
The exoskeleton includes a physical button, which the user can press to initiate or stop the movement of the servos. This button provides the user with control over the exoskeleton, allowing them to start or stop the rehabilitation process with ease. In practical scenarios, the button’s function can be customized to match the user’s specific needs, such as different speeds or ranges of movement. For example, a single press could make the servos execute a full hand movement, while another press might pause it.
Possible Issues
- Servo connection: If the servos are not connected correctly to the Arduino, they will fail to move or respond unpredictably. This can happen if there are loose connections, faulty wires, or insufficient power supply.
- Button failure: A malfunctioning button may result in the system either not starting or stopping unexpectedly. This could be due to poor wiring, a damaged switch, or incorrect configuration in the Arduino code.
- Power issues: If the power source is unstable or insufficient, the servos might not operate at full capacity or could stop unexpectedly during operation.
- Signal interference: In rare cases, there could be interference between the components of the system, leading to erratic movements or non-responsiveness of the servos. Ensuring that the servos and button are wired correctly and are using proper power supply can minimize this issue.
Description of the Code
Servos and Button: The code controls four servos, which simulate the movement of the fingers. These servos move in a series of small steps that incrementally simulate the bending of the fingers. The button attached to the system allows the user to control when to initiate or halt these movements, giving them control over the therapy process.
Controlled Movement: The servos are programmed to move in increments of 5 degrees, reaching up to 180 degrees. The movement simulates the hand’s range of motion, and this can be adjusted to accommodate the user’s needs. The servos move for one second before pausing, which allows the user to control the pace of the rehabilitation.
Thumb Movement: The goal for the thumb is to work similarly to the other fingers, with controlled steps. However, the thumb presents a greater challenge due to its wider range of motion and more complex angles. It requires more precise control to simulate its full range of movement, which makes it more challenging to program accurately. The servo for the thumb needs to account for additional angular movements to replicate the thumb’s function in grasping, which involves more sophisticated control logic.
Possible Failures: There are some potential failures that could disrupt the system's performance. These include poor connections or malfunctions in the servos or button, which could prevent the exoskeleton from working as intended. It's important to ensure that all components are properly connected and functioning before use.
Arduino Code
                        #include

                        // Define servos
                        Servo servo1;
                        Servo servo2;
                        Servo servo3;
                        Servo servo4;

                        int buttonPin = 2;  // Button input
                        int buttonState = 0;  // Current button state

                        void setup() {
                            // Attach servos to pins
                            servo1.attach(9);
                            servo2.attach(10);
                            servo3.attach(11);
                            servo4.attach(12);

                            // Initialize button pin
                            pinMode(buttonPin, INPUT);
                        }

                        void loop() {
                            buttonState = digitalRead(buttonPin);

                            if (buttonState == HIGH) {
                                // Move servos in small steps
                                for (int pos = 0; pos <= 180; pos += 5) {
                                    servo1.write(pos);
                                    servo2.write(pos);
                                    servo3.write(pos);
                                    servo4.write(pos);
                                    delay(100);
                                }
                                // Return servos to the original position
                                for (int pos = 180; pos >= 0; pos -= 5) {
                                    servo1.write(pos);
                                    servo2.write(pos);
                                    servo3.write(pos);
                                    servo4.write(pos);
                                    delay(100);
                                }
                            }
                        }
Additional Information
Thumb Movement: While the thumb movement is intended to follow a similar approach to the other fingers, it presents unique challenges due to the thumb's range of motion and the greater number of possible angles. The thumb must mimic the more complex motions of the hand, such as grasping, which means that the servo controlling the thumb might require more refined adjustments. These adjustments will involve a more detailed understanding of the thumb's biomechanics to ensure effective and natural movement during rehabilitation.
7. Testing
During the testing phase, I will validate the system's functionality by assessing each component individually to ensure proper integration of the mechanical, electronic, and programming elements. The servos (S90) that control finger movements will be tested for smooth operation and responsiveness to the user's commands. The tension cable mechanism and adjustable velcro straps will also be tested for comfort and effective support during use.
A key part of the testing will involve the button, which will allow the user to activate or deactivate the system. When pressed, the button will initiate or stop the servo movements, enabling the user to control the range of motion at will. The response time and reliability of the button will be checked to ensure it functions consistently throughout the test.
The tension cables, which help simulate the flexing of the fingers, will be tested for their ability to hold tension securely and provide a natural feeling of finger movement. The adjustable velcro straps will be evaluated for their comfort and ease of use, ensuring they securely fit around the user's hand without causing discomfort during extended periods of use.
One potential challenge during testing could be the variability of servo movements, particularly if the servos' range of motion or torque does not meet the required specifications. I will adjust the programming to accommodate different user needs by calibrating the servos' movements to work smoothly even with varying finger strength. Fine-tuning the servo angle adjustments will be crucial to ensuring the system adapts to different users.
I will also pay attention to the overall ergonomic design of the exoskeleton, ensuring that all components work harmoniously to simulate natural hand movements without causing strain or discomfort. The final test will verify that the exoskeleton provides effective rehabilitation support for the user while being easy to control and comfortable to wear.
8. Checklist
-
✔ Implemented methods of packaging:
The exoskeleton system incorporates packaging methods to ensure robustness and functionality:- Servo Mounting: The servos (S90) are securely mounted using custom brackets that ensure stable movement while being responsive to the user's actions.
- Cable Routing: Tension cables, servo wires, and power lines are routed neatly through the handpiece to prevent tangling and ensure smooth operation of the servos.
- Mechanism Alignment: The tension cables and velcro straps are aligned precisely to ensure that the fingers move naturally and fluidly, supporting a comfortable fit.
- Surface Finish: Printed parts, including the hand structure, have been carefully sanded for smoothness, followed by a protective coating to ensure a clean, professional finish.
-
✔ Designed the exoskeleton to look like a finished product:
The exoskeleton is designed with attention to both visual and functional aspects. Components are securely mounted, and internal wiring is compact and organized to meet user comfort standards. The velcro straps and overall design ensure that the system is both efficient and wearable for the user during rehabilitation. -
✔ Documented system integration:
A complete breakdown of system integration, including the interaction between servos, the button, and the mechanical components like the tension cable, is documented. Testing will verify that the servos respond correctly to the button input and that the exoskeleton mimics the desired finger movements. -
✔ Linked to your system integration documentation:
The final project page will include a link to the integration documentation, where evaluators can review the testing phase, the system components, and the mechanical and electrical setup.
9. Comments and Recommendations
One of the most important lessons learned from this project was that mechanical design is not only about fitting components together but also about ensuring that they work effectively under real-world conditions. In particular, the design of the finger movement mechanism and the use of tension cables to simulate natural hand motions were key challenges. Adjusting the servos for accurate movement while considering user comfort was another critical aspect.
Additionally, selecting appropriate components, such as the S90 servos and the adjustable velcro straps, was vital for ensuring the exoskeleton’s usability and comfort. Future improvements could include optimizing the servo calibration to better suit individual hand sizes and strength variations.
Packaging and wiring were also key considerations. Wire routing and packaging will also be a focus. The first design may encounter wiring issues, such as clutter or instability, which I will address by improving internal wire routing. I will also ensure the velcro straps are more adjustable, enhancing comfort and ergonomics. Ultimately, balancing form and function will remain a key challenge, ensuring the system is both lightweight and fully functional.
For future students, I recommend focusing on the comfort and adjustability of your design. Use iterative testing to refine both mechanical and user interaction elements. Be open to redesigning components when necessary to achieve a more natural and effective system.
10. Learning Outcomes
Completing the final integration of the exoskeleton allowed me to apply a variety of skills gained throughout my studies. This project emphasized the importance of understanding mechanical design, electronics, and programming while focusing on the user's comfort and interaction with the device.
I gained valuable insights into servo control, particularly in terms of ensuring smooth and responsive movement, and learned how to balance torque and precision for delicate tasks like finger flexion. I also explored the impact of cable tension and adjustments on the overall functionality of the device.
On the mechanical side, designing a system that can adjust to various hand sizes presented its own set of challenges. This required careful consideration of both the mechanical structure and the tension system that drives the finger movements. From an electrical standpoint, managing power consumption and ensuring that the servos responded correctly to user inputs were crucial aspects of the project.
The project also taught me how important it is to test in real-world conditions, as small changes in design can have a significant impact on both functionality and user experience. Ultimately, this process deepened my understanding of the importance of integration and iterative design, which are essential skills in creating functional and adaptable systems.
- © Copyright 2025 [Paula Rivero Robledo]
- Creative Commons Attribution Non Commercial