Week 14 - Interface and application programming
This week's group assignment was to explore and compare various software tools for building user interfaces that interact with microcontrollers.
The individual assignment was to write an application for the embedded board that I made, which interfaces a user with input and/or output devices. Since I couldn't think of anything that directly helps with my final project, I decided to make something simple with the help of ChatGPT.
This week helped me get an overview of the many different ways to create interactive user interfaces. While not directly related to my final project, it gave me valuable experience in connecting microcontrollers with graphical interfaces.
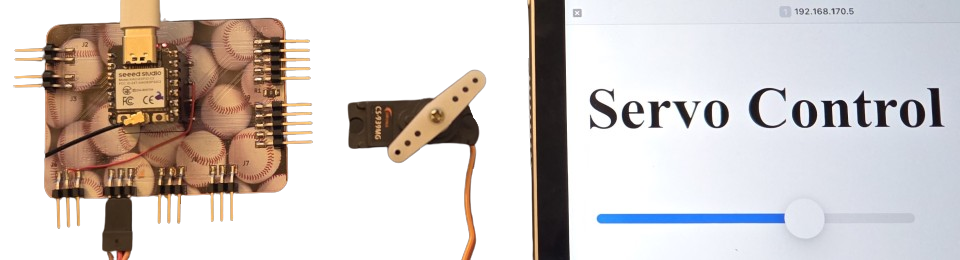
Servo Control with Web Interface
I thought it would be nice to control a servo from my iPad. For this, I used the following prompt: "I want to control a servo from a browser? I have an ESP32-C3 and a CS-939MG servo."
Servo demo code
#include <WiFi.h>
#include <WebServer.h>
//#include <Servo.h> // I replaced this with the following line:
#include <ESP32Servo.h>

const char* ssid = ""; // I put my network's SSID here
const char* password = ""; // and the password here

WebServer server(80);
Servo myservo;

static const int servoPin = D3;  // I put the pin of my servo here

String html = R"rawliteral(
<!DOCTYPE html>
<html>
<body>
	<h2>Servo Control</h2>
	// I made the minimum angle 40 degrees and the maximum 180 degrees. These seemed to work well with the servo.
	<input type="range" min="40" max="180" value="90" id="servoSlider">
	<p>Angle: <span id="angleValue">90</span></p>
	<script>
	const slider = document.getElementById("servoSlider");
	const angleText = document.getElementById("angleValue");
	slider.oninput = function() {
		angleText.innerText = this.value;
		fetch(`/set?angle=${this.value}`);
	}
	</script>
</body>
</html>
)rawliteral";

void setup() {
Serial.begin(115200);
myservo.attach(servoPin);
myservo.write(90);

WiFi.begin(ssid, password);
Serial.print("Connected: ");
Serial.println(WiFi.localIP());
while (WiFi.status() != WL_CONNECTED) {
	delay(1000);
	Serial.println("Connecting to WiFi..");
}
Serial.println("Connected: " + WiFi.localIP().toString());

server.on("/", HTTP_GET, []() {
	server.send(200, "text/html", html);
});

server.on("/set", HTTP_GET, []() {
	if (server.hasArg("angle")) {
	int angle = server.arg("angle").toInt();
	angle = constrain(angle, 40, 180);
	myservo.write(angle);
	server.send(200, "text/plain", "OK");
	}
});

server.begin();
}

void loop() {
server.handleClient();
I uploaded the code provided by ChatGPT and made a few changes, which I've marked with comments in the code above. First, I encountered an error related to the Servo.h library, which I resolved, as I also did in week 10, by replacing Servo.h with ESP32Servo.h.
The code runs a web server on the ESP32-C3, serving a simple interface for controlling the servo. After obtaining the ESP32-C3's IP address from the Arduino IDE serial monitor, I opened it in a web browser on my iPad, which was connected to the same 2.4 GHz Wi-Fi network. The browser loaded an HTML page served by the ESP32-C3, featuring a slider for setting the servo angle. When the slider is adjusted, the PWM signal sent to the servo is updated accordingly, allowing real-time control from the browser.
ChatGPT warned me against powering the servo from the ESP32-C3’s 5 V output, since the CS-939MG can draw up to 1-2 A under load: more than a USB port can safely provide. According to the product page, the typical operating current is around 200 mA. For simplicity, I decided to power the servo directly from the ESP32-C3 despite the warning, and just avoided stalling it to prevent excessive current draw. This approach worked without issue in my case.
p5.js
I also wanted to try p5.js, a creative coding tool that makes it easy to build interactive visual interfaces on the web. I aimed to create something interactive directly on this web page, and was able to build a slider that changes the background color. I used ChatGPT for help with both the idea and implementation, particularly with the following prompts:
- "Can I control the background color of an entire web page with p5.js?"
- "How do I combine HTML and p5.js?"
I received an example sketch.js file from ChatGPT, which I then modified to suit my needs. You can see the final sketch.js version at the end of this page, with my changes marked in the comments. To load the following sketch, which controls the background color, into this web page, I added the following lines to the HTML file:
<div id="servo-ui"></div>
<script src="https://cdn.jsdelivr.net/npm/p5@1.9.0/lib/p5.min.js"></script>
<script src="sketch.js"></script>