Week 1: Assignment Overview
- Final project idea
-
Project Management
- Complete a Git tutorial and document your repository setup.
- Create a personal website with a section about yourself and your project sketch.
-
Agreement
- Signed and uploaded.
Manuel Ayala-Chauvin
Institution: Fablab - Universidad Tecnológica Indoamérica
Year: 2025
1. Final Project Idea
Sponge Puppet with Mechanism for Storytelling
1. Introduction
Storytelling is a powerful tool for stimulating children's imagination, improving language comprehension, and strengthening the bond between the narrator and the listener. This project aims to design and build a sponge puppet with an internal mechanism that synchronizes facial movements with narration.
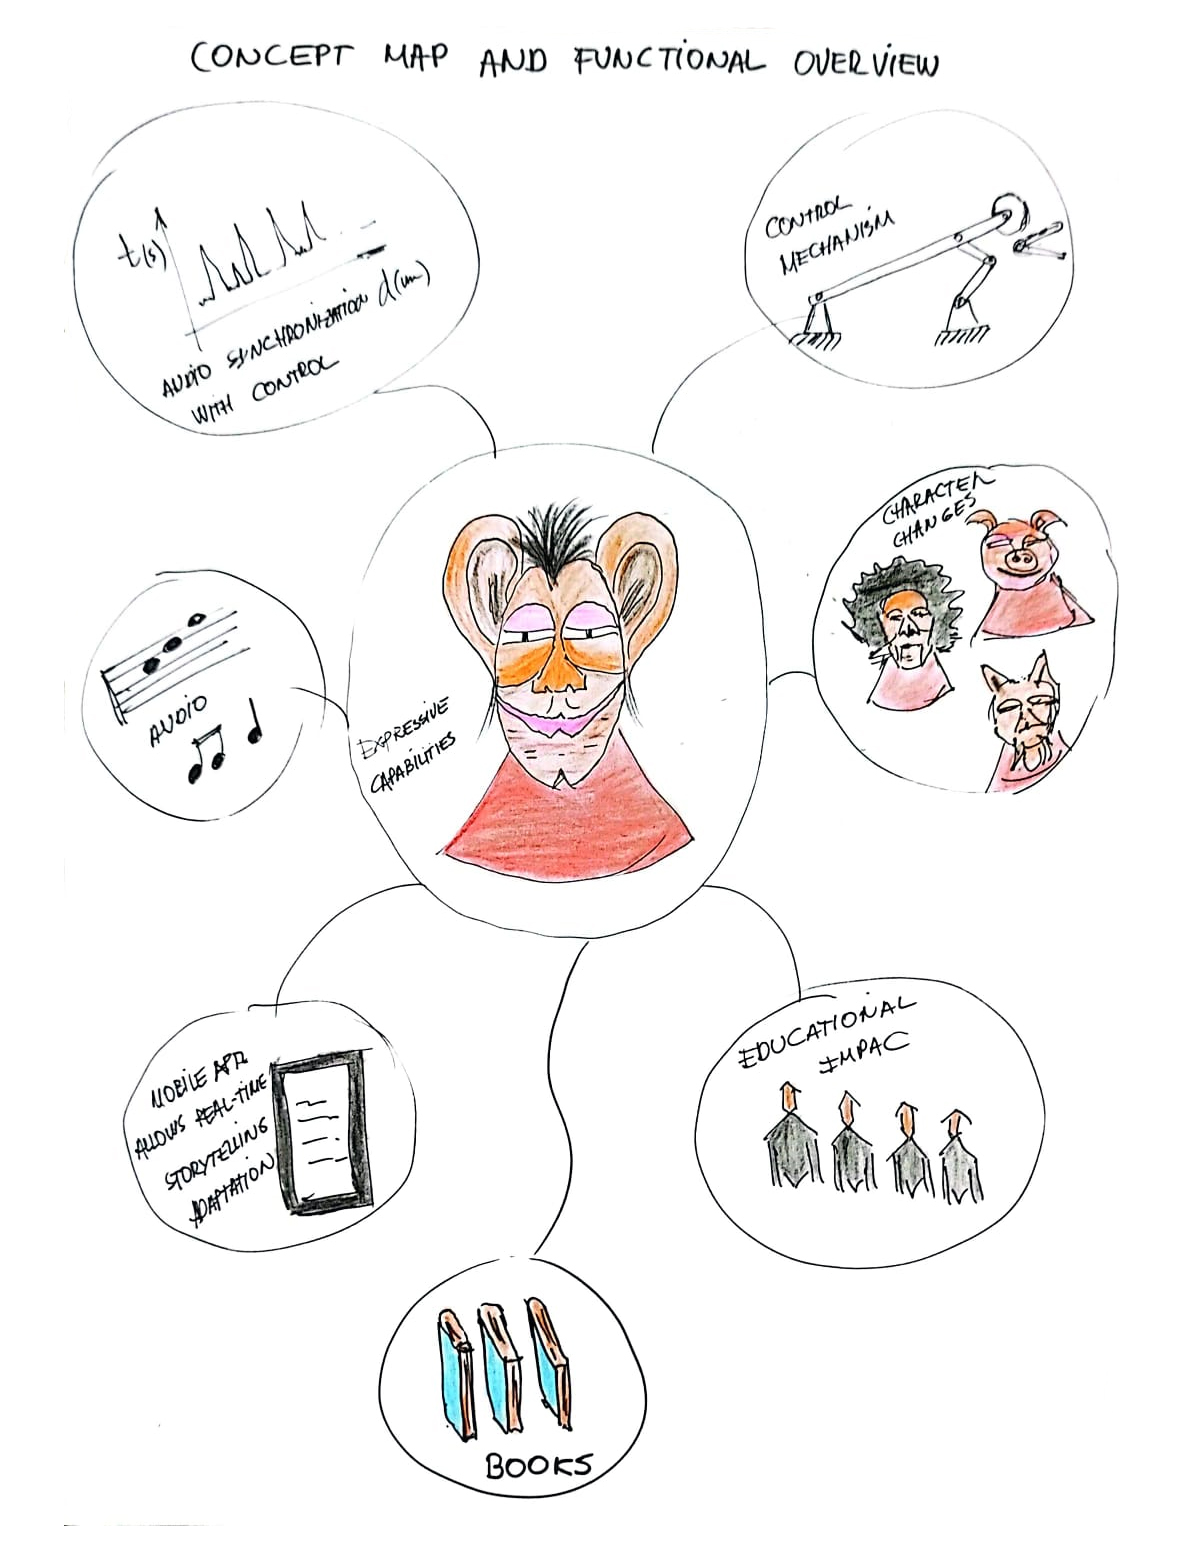
This project proposes a smart, customizable puppet that combines creativity, education, technology, and emotional interaction into a single innovative platform. The conceptual structure demonstrates how the puppet becomes an advanced educational tool that drives children's narrative development, artistic expression, and autonomous learning.
The system not only allows for physical customization of the character (by changing eyes, mouths, hair, and noses), but also synchronizes the user’s voice with expressive movements, creating an immersive storytelling experience.

1.1. Key Elements of the Concept
1.1.1. Audio Synchronization with Motion Control
The puppet integrates an audio synchronization system that analyzes voice signals and controls mouth movement through signal processing algorithms. This technical capability ensures audio-visual coherence between speech and puppet movement, enhancing realism and immersion.
Impact: Improves puppet expressiveness, fostering emotional connection with the audience.
1.1.2. Motion Control Mechanism
Mouth opening and closing are achieved through a four-bar linkage mechanism, powered by a precision motor. This mechanical solution guarantees smooth, efficient, and repeatable movements, with low energy consumption and high reliability.
Impact: Allows for a compact, lightweight, and easily maintainable design, ideal for educational and recreational use.
1.1.3. Character Changes
The puppet is designed as a customizable platform. Children can modify its appearance by swapping parts (eyes, mouths, noses, hair) to create:
- Real animals
- Fantasy creatures
- Unique characters from their imagination
Impact: Stimulates creativity, encourages divergent thinking, and provides unique experiences for each user.
1.1.4. Mobile App for Control and Story Adaptation
An intuitive mobile app allows users to:
Connectivity is provided via Bluetooth, ensuring mobility and ease of use.
- Upload voice recordings or stories
- Activate the puppet’s synchronized movement
- Adapt storytelling in real time
Impact: Promotes early digital literacy and the use of emerging technologies in educational contexts.
1.1.5. Educational Impact
The project strongly focuses on educational skills development:
- Narrative and oral expression: Children learn to tell structured stories.
- Literacy: Stories can be transcribed into small books or digital stories.
- Creative and emotional thinking: Creating characters and stories stimulates empathy, self-awareness, and imagination.
Impact: Integrates as a pedagogical tool in basic and special education programs.
1.1.6. Story Documentation and Book Production
The system promotes the documentation of created stories in written form (books, illustrated stories), reinforcing reading and writing skills.
Impact: Completes the creative cycle from oral storytelling to literary production.
1.1.7. Strategic Conclusion
The customizable interactive puppet is far more than a toy: It is a platform for creative and educational development, designed to build essential 21st-century skills in children. It integrates precision mechanics, audio processing, mobile technology, and pedagogical dynamics into a powerful and scalable system.
Unique Value Proposition:
- Experiential learning through creativity
- Full customization of characters and narratives
- Genuine integration of educational and emotional technology
- Future expansion with new movement modules (eyes, hands)
2. General Objective
Design and construct an interactive sponge puppet with a movement mechanism synchronized with the voice, making storytelling more engaging for children.
3. Specific Objectives
- Design an internal structure that enables mouth movement and basic facial expressions.
- Use accessible materials and digital fabrication techniques to build the puppet.
- Implement an activation mechanism based on servo motors controlled by an electronic board.
- Develop an automatic synchronization system between narration and mouth movement.
4. Justification
Puppets have been used for centuries as educational and entertainment tools. However, most require manual manipulation, limiting immersion in the story. This project seeks to create an interactive puppet that enhances the storytelling experience, offering a more dynamic and immersive way to tell stories.
5. Methodology
Design and Fabrication:
- Creation of the puppet model in 3D software (Solid Works, Fusion 360, or Blender).
- Cutting and assembling the sponge to form the head and main structure.
- Implementation of a mechanical system for mouth mobility and facial expressions.
Electronics and Programming:
- Use of an Arduino board or similar to control the mouth mechanism.
- Implementation of servo motors for synchronized movement.
- Development of synchronization software based on voice detection.
6. Expected Impact
- Improvement in storytelling experiences.
- Increased attention and interaction from children.
- Use of accessible technologies for education and entertainment.
2. Project Management & Version Control
2.1 Installing Git
- Go to the official Git website.
- Choose and download the correct version for your OS.
- Run the installation file and follow the instructions.
- To confirm installation, run:
git --version
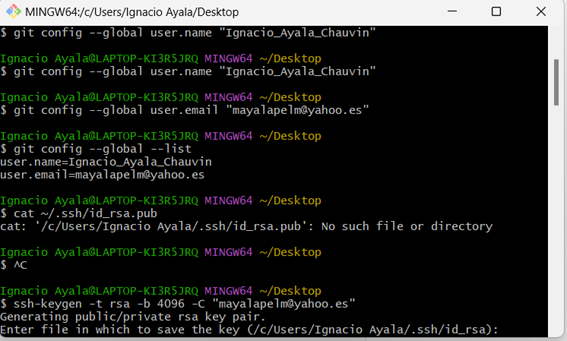
2.2 Setting Up Your Git Profile
git config --global user.name "Manuel Ignacio Ayala Chauvin"git config --global user.email "your_email@example.com"
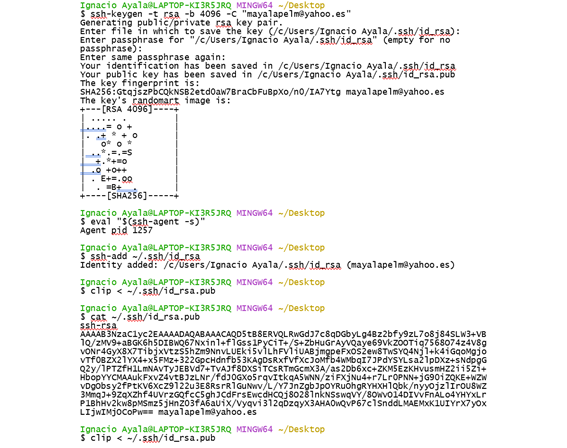
2.3 Connecting Git to GitHub/GitLab Using SSH
- Check if you already have an SSH key:
- If no key is found, generate one:
cat ~/.ssh/id_rsa.pubssh-keygen -t rsa -b 4096 -C "your_email@example.com"
2.4 How to Generate an HTML5
This guide explains step by step how to create an HTML5 document with all elements aligned to the left.
2.4.1. Create a New HTML File
Open your favorite text editor and create a new file (for example, index.html).
2.4.2. Set Up the Basic HTML Structure
Begin with the following structure:
<!DOCTYPE HTML>
			  <html>
				<head>
				  <meta charset="utf-8" />
				  <meta name="viewport" content="width=device-width, initial-scale=1, user-scalable=no" />
				  <title>Your Title Here</title>
				  <link rel="stylesheet" href="path/to/your/stylesheet.css" />
				</head>
				<body>
				</body>
			  </html>
2.4.3. Add Custom Styles for Left Alignment
Inside the <head> tag, include a <style> block to set text
alignment to left:
<style>
				body,
				.container,
				header,
				section,
				footer,
				.content,
				nav ul {
				  text-align: left;
				}
				body {
				  background-color: #f5f5f5;
				  color: #000;
				}
				a {
				  color: #000;
				  text-decoration: none;
				}
				a:hover {
				  text-decoration: underline;
				}
				h1, h2, h3, h4, h5, h6 {
				  color: #000;
				  font-weight: bold;
				}
			  </style>
2.4.4. Build the Header and Navigation
Add the header section with your logo and navigation menu inside the <body>:
<div id="header">
				<div class="top">
				  <div id="logo">
					<h1 id="title">Your Name</h1>
					<p>Your Profession</p>
				  </div>
				  <nav id="nav">
					<ul>
					  <li><a href="#top" id="top-link">Intro</a></li>
					  <li><a href="#FinalProject" id="FinalProject-link">Final Project</a></li>
					  <li><a href="#ProjectManagement" id="ProjectManagement-link">Project Management</a></li>
					  <li><a href="#Agreement" id="Agreement-link">Agreement</a></li>
					  <li><a href="#WeekConclusion" id="WeekConclusion-link">Week Conclusion</a></li>
					</ul>
				  </nav>
				</div>
				<div class="bottom">
				  <!-- Social Icons can be added here -->
				</div>
			  </div>
2.4.5. Create the Main Content Sections
Add a container for your main content sections, for example:
<div id="main">
				<section id="top" class="one dark cover">
				  <div class="container">
					<header>
					  <h1>Week 1: Assignment Overview</h1>
					</header>
					<footer>
					  <a href="#FinalProject" class="button scrolly">Final Project</a>
					</footer>
				  </div>
				</section>
				<!-- Add additional sections as needed -->
			  </div>
2.4.6. Add Specific Content for Each Section
For example, for the "Project Management & Version Control" section:
<section id="ProjectManagement" class="two">
				<div class="container">
				  <h2>2. Project Management & Version Control</h2>
				  <h3>2.1 Installing Git</h3>
				  <ol>
					<li>Visit the <a href="https://git-scm.com/downloads" target="_blank">official Git website</a>.</li>
					<li>Download the version appropriate for your OS.</li>
					<li>Run the installer and follow the instructions.</li>
					<li>Confirm installation by running:
					  <pre><code class="language-bash">git --version</code></pre>
					</li>
				  </ol>
				  <img src="path/to/image1.png" alt="Steps to install Git" width="600">
				  <!-- Add subsections for Git profile setup and SSH key generation as needed -->
				  <footer>
					<a href="#Agreement" class="button scrolly">Agreement</a>
				  </footer>
				</div>
			  </section>
2.4.7. Include Scripts Before Closing the Body
Add your JavaScript files just before the closing </body> tag:
<script src="assets/js/jquery.min.js"></script>
			  <script src="assets/js/jquery.scrolly.min.js"></script>
			  <script src="assets/js/jquery.scrollex.min.js"></script>
			  <script src="assets/js/browser.min.js"></script>
			  <script src="assets/js/breakpoints.min.js"></script>
			  <script src="assets/js/util.js"></script>
			  <script src="assets/js/main.js"></script>
2.4.8. Save and Test Your Document
Save the file and open it in your web browser to ensure that all elements are correctly aligned to the left and that the page functions as expected.
Agreement
Fab Academy Student AgreementThe Fab Academy is responsible for:
- Teaching principles and practices of digital fabrication
- Arranging lectures, recitations, meetings, and events for the class
- Evaluating and providing feedback on student work
- Offering clear standards for completing assignments
- Certifying and archiving student progress
- Promoting a respectful environment free of harassment and discrimination
I am a Fab Academy student, responsible for:
- Attending class lectures and participating in reviews
- Developing and documenting projects in enough detail to reproduce them
- Honestly reporting my work and attributing the work of others
- Following locally applicable health and safety guidance
- Promoting a respectful environment free of harassment and discrimination
Manuel Ignacio Ayala Chauvin
Week 1: Conclusion
The first week at Fab Academy has been fundamental in establishing the foundation for the entire learning and project management process. During this time, I outlined the idea for my final project: creating a sponge puppet with an internal mechanism that synchronizes facial movements with narration, aiming to transform the storytelling experience into something more interactive and dynamic.
Simultaneously, I familiarized myself with essential project management and version control practices. I completed a Git tutorial, installed and configured the tool, and learned how to connect Git to platforms such as GitHub or GitLab using SSH keys. This will allow me to document and rigorously track the development of my projects.
Additionally, I created a personal webpage using HTML by following a detailed guide that included setting up the basic structure, adding custom styles to align all elements to the left, and building a functional navigation bar. This activity enabled me to document my profile, the proposal for my final project, and other relevant details.
Finally, I signed and uploaded the Student Agreement, committing myself to adhere to the policies and standards of Fab Academy. All these activities have laid the necessary groundwork to advance in the course, integrating both technical knowledge and management skills.
In summary, this first week has been a period of significant learning and tool integration, preparing me to face future challenges in the realm of digital fabrication and project management.
Resource Download
Click the button below to access and download all available materials.
Download Resources