
Group Assignment:
- Compare as many tool options as possible.
- Document your work on the group work page and reflect on your individual page what you learned.
Individual Assignment:
- Write an application for the embedded board that you made. that interfaces a user with an input and/or output device(s)

Have you answered these questions?
-
Linked to the group assignment page.✅
Documented your process.✅
Explained the UI that you made and how you did it.✅
Explained how your application communicates with your embedded microcontroller board.✅
Explained any problems you encountered and how you fixed them.✅
Included original source code (or a screenshot of the app code if that's not possible).✅
Included a ‘hero shot’ of your application running & communicating with your board.✅
Group Assignment
- Compare as many tool options as possible.
- Document your work on the group work page and reflect on your individual page what you learned.
Group assignment
teamwork
To develop this task, I met virtually with my colleague evelyn-cuadrado to research the different types of interface creation tools. These include Visual Design tools (without much programming) and traditional GUI programming tools. Below is a brief summary of each.
Interface creation tools are programs, environments, or libraries that allow you to design and develop visual interactions between the user and a system, whether it's a computer, a web application, a mobile application, or an embedded system. These interfaces can include buttons, menus, graphics, touchscreens, and more.
1. Visual Design (Low-Code / No-Code)- MIT App Inventor / Kodular
- Figma / Adobe XD
- Node-RED Dashboard
- HTML + CSS + JavaScript
- Processing / p5.js integrated
- Tkinter / PyQt / Kivy
Reflections
- What I learned during the development of this group task is that to create an interface, where there is visual interaction between the user and a system, there are different types, which usually adapt to specific needs of interaction, usability and functionality. For this, there are several tools, such as those mentioned above, those that do not require too much programming and those that require writing code to define the interface and its behavior.
- Within visual design tools, we find some advantages, but also certain limitations, for example limited scalability and tool dependency. Within traditional programming tools, we find certain advantages that allow us to create completely customized interfaces with complex behaviors, but there are also some disadvantages such as maintenance: since projects developed in this way require more maintenance and testing as functionality is added.
Individual assignment
- >Write an application for the embedded board that you made. that interfaces a user with an input and/or output device(s)
To develop the project, I decided to create a small prototype. I sought to simulate a robotic turtle with natural movement, capable of moving both on land and in water. I also designed the control interface for this project. I will explain its development step by step.
Once we have a clear idea, we need to define how the turtle will function. To do this, we must select the appropriate electronic components. The following table details the list of selected components:
- Microcontroller: ESP32-C3
- Modules: 4 servomotors, controlled by the microcontroller
- Other components: battery, electronic connections, and mechanical structure
Since we'll be using servomotors, a user interface analysis is required, including the functions needed to control movement. Turtles typically turn slowly, changing the direction of their hind legs. Therefore, a simulation of natural movement was proposed using a button interface to synchronize forward and backward movements, as well as changing direction at a controlled angle.
1.-interface development
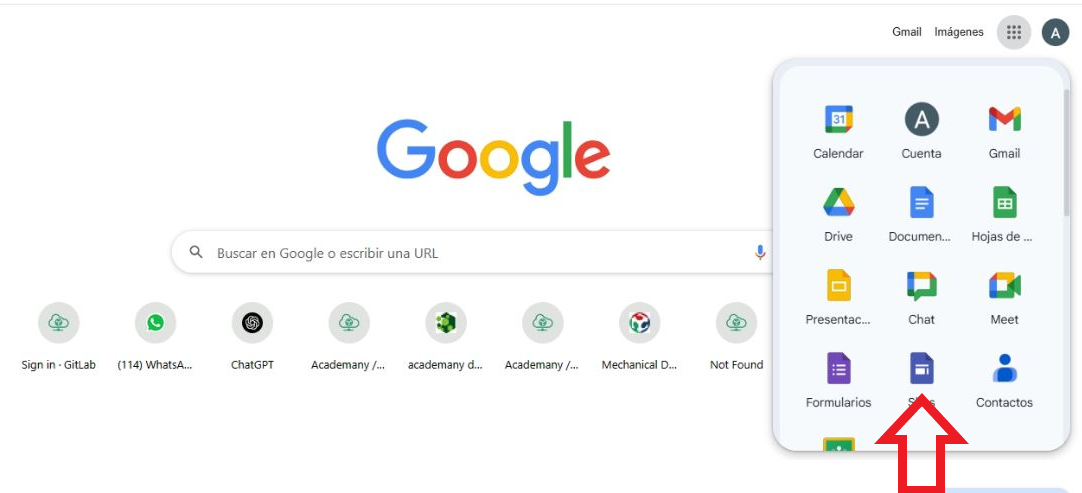
To do this, a preliminary HTML interface has been developed, which will be loaded directly onto the ESP32-C3 without the need for external servers. This ensures faster response speeds without latency or wasted time. To develop this code, open your Google search engine and open your Gmail account. Once opened, go to the points section and select Google sites:
1.-Access Google Sites:
Within the Google applications in our Gmail account, we will locate the Google site, as shown in the image.
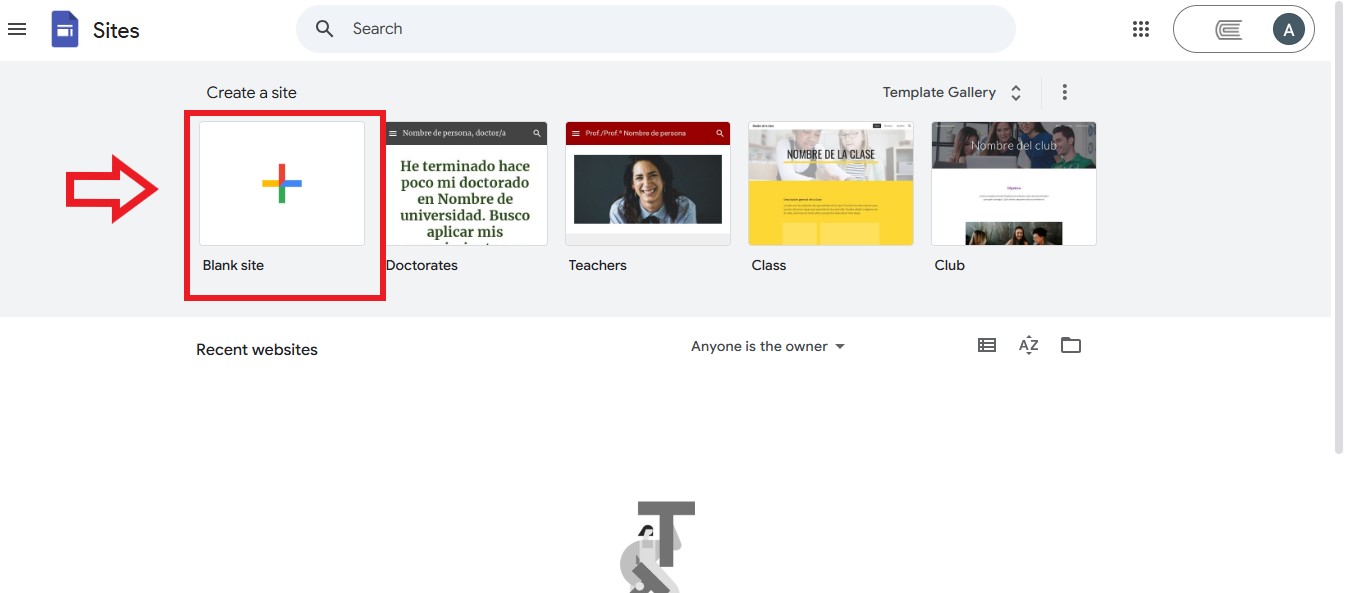
2.-building a site from scratch
Now that the page loads, we must select “blank site”:
3.-blank page
Once the site is created, a blank page will load.
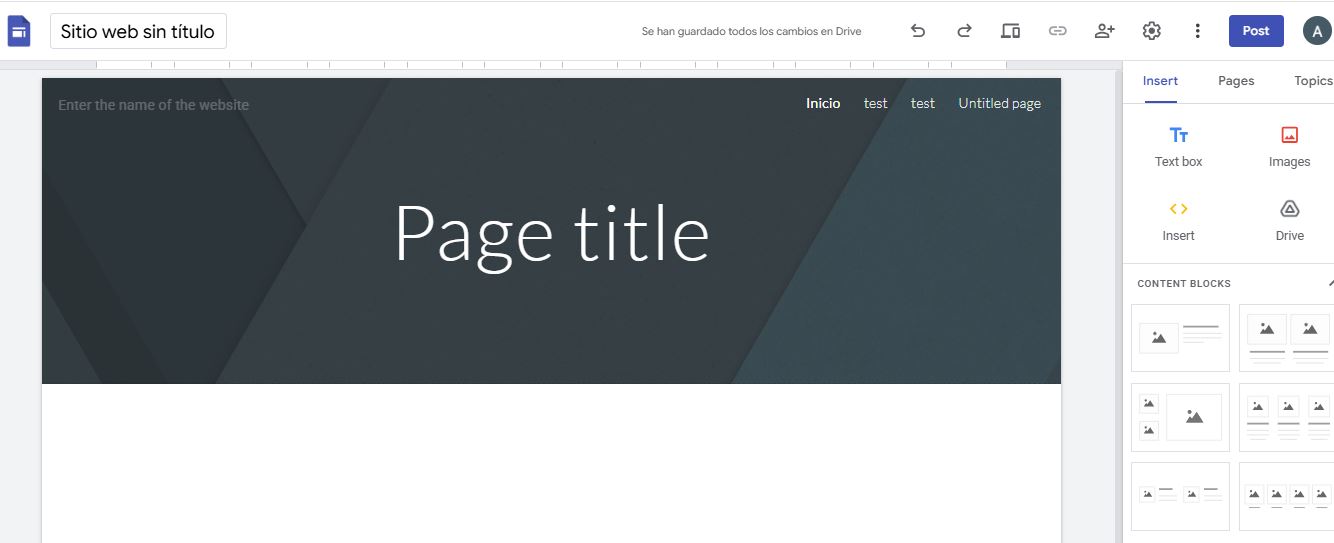
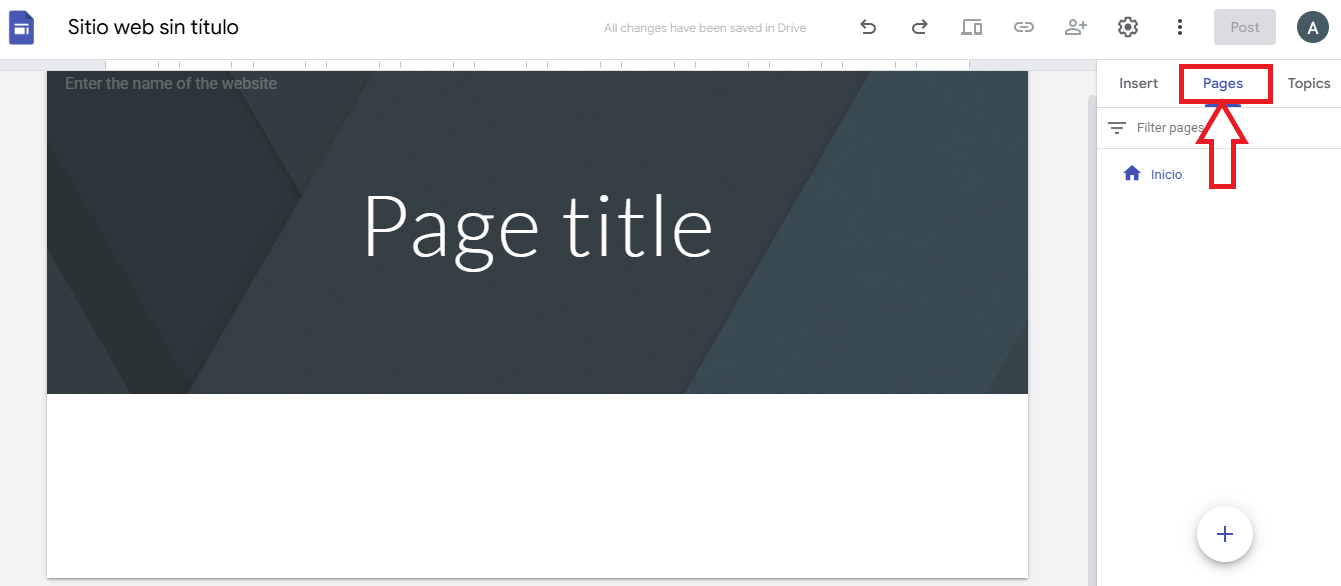
4.-select pages
Once the blank page is loaded, we move to the upper right area and select pages:
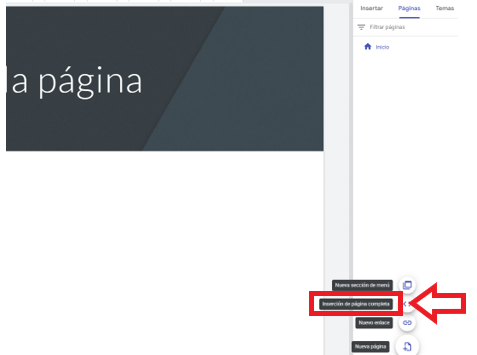
5.-full page insertion
We must go to the lower right area where the “+” icon will select “full page insertion”
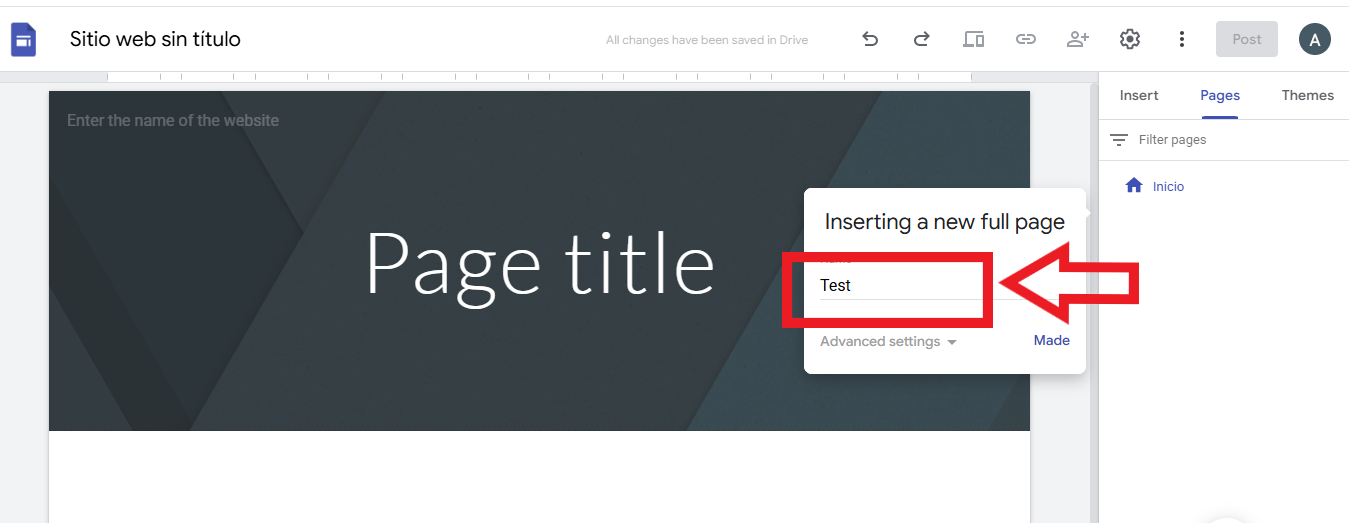
6.-Add a title to the site
The site title will appear in the header and title bar of the web or mobile window after you publish the site.
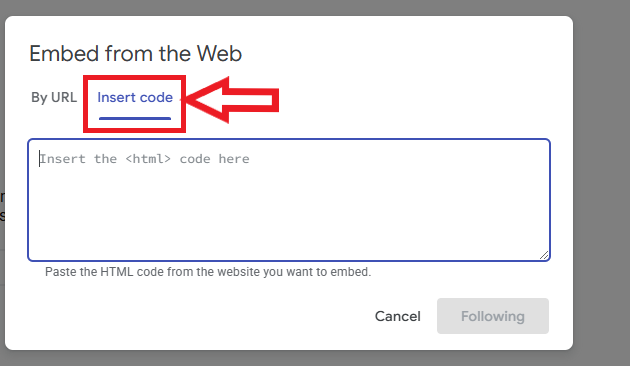
7.-Option to insert code
A tab will open in which we must go to “Insert code”
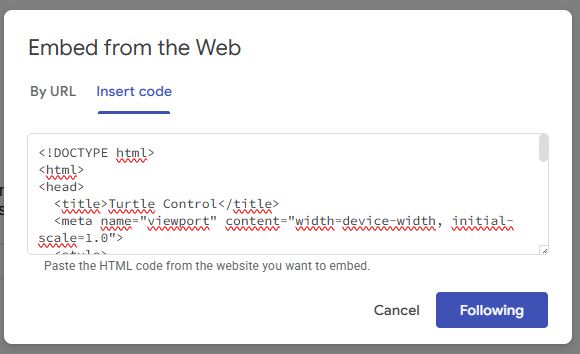
8.-Insert HTML code:
We will insert our HTML code.
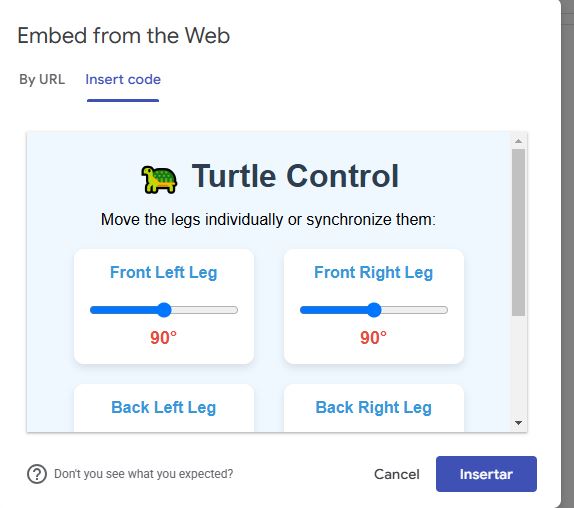
9.-web page demo visualization
We press "next", we will see a demo of how the web page will look.
We save, and the web page will be saved on the main page created and if we want to edit the code we go to "edit" and the code will be loaded for editing, we continue this procedure until we get the ideal page for our design.
Google Sites was used as a testing environment to visualize how the user interface will look, uploading the HTML code for preview.
2.-Integration of the main code into the Arduino development platform
Once the interface design is complete, the main code will be integrated into the Arduino development platform, where the system's operating logic will be programmed.
2.1 Operation of the Main Code- 2.1.1 Objective
- 2.1.2 General Structure of the Code
2.1.1 Objective
Control 4 servo motors (simulating the legs of a robotic turtle) using a web interface accessible from any device connected to the Xiao ESP32-C3 Access Point (AP).
2. General Structure of the Code
The code is divided into 4 main blocks:
-
Initial Configuration
- Global Variables:
angulosMaximos[]: Stores the angles configured by the user (e.g., 90°).posActual[]: Stores the real-time position of each servo.automatico: Flag to enable/disable automatic movement.
-
Setup (Initialization)
-
Servo Configuration:
- Pin assignment (GPIO2, 3, 4, 5).
- Standard PWM frequency (50Hz) and pulse range (500µs to 2400µs).
Access Point (AP):
- Creates a WiFi network named "TortugaRobot" (IP: 192.168.4.1).
-
Web Server Endpoints:
- URLs to receive commands from the interface:
/on,/off: Turn movement on/off./set?servo1=90: Update max angles./sync: Reset servos to 0°.
- URLs to receive commands from the interface:
-
Servo Configuration:
-
Main Loop
- Web Request Handling
-
Synchronized Movement:
- Uses
millis()to avoid blocking delays. - Moves forward/backward in 1° steps every 20ms.
- Synchronization:
- All servos wait to reach max angle before returning.
- Left servos (clockwise) vs. right servos (counter-clockwise).
- Uses
-
Web Interface
- Dynamically Generated HTML:
- Sliders to adjust maximum angles (0° to 180°).
- Control buttons (On/Off, Synchronize).
- Communication with the ESP32::
- JavaScript uses fetch() to send commands (e.g. /set?servo1=45).
- Dynamically Generated HTML:
3.-Programming Code
The main programming code is made up of our HTML interface code and the Arduino IDE programming code for controlling our servomotors.
Turtle Control Interface Code
<!DOCTYPE html>
<html>
<head>
  <title>Turtle Control</title>
  <meta name="viewport" content="width=device-width, initial-scale=1.0">
  <style>
    body {
      font-family: Arial, sans-serif;
      background-color: #f0f8ff;
      margin: 0;
      padding: 20px;
      text-align: center;
    }
    h1 {
      color: #2c3e50;
      margin-bottom: 10px;
    }
    .row {
      display: flex;
      justify-content: center;
      gap: 30px;
      margin: 20px 0;
    }
    .servo-card {
      background-color: white;
      border-radius: 10px;
      padding: 15px;
      box-shadow: 0 4px 8px rgba(0, 0, 0, 0.1);
      width: 150px;
    }
    .servo-name {
      font-weight: bold;
      color: #3498db;
      margin-bottom: 10px;
    }
    .slider {
      width: 100%;
      margin: 10px 0;
    }
    .angle-value {
      font-size: 18px;
      color: #e74c3c;
      font-weight: bold;
    }
    .sync-btn {
      background-color: #27ae60;
      color: white;
      border: none;
      padding: 12px 25px;
      border-radius: 5px;
      font-size: 16px;
      cursor: pointer;
      margin-top: 10px;
      transition: background-color 0.3s;
    }
    .sync-btn:hover {
      background-color: #2ecc71;
    }
    .power-btn {
      background-color: #3498db;
      color: white;
      border: none;
      padding: 12px 25px;
      border-radius: 5px;
      font-size: 16px;
      cursor: pointer;
      margin: 5px;
      transition: background-color 0.3s;
    }
    .power-btn:hover {
      background-color: #2980b9;
    }
    .power-btn:disabled {
      background-color: #95a5a6;
      cursor: not-allowed;
    }
    .update-btn {
      background-color: #9b59b6;
      color: white;
      border: none;
      padding: 12px 25px;
      border-radius: 5px;
      font-size: 16px;
      cursor: pointer;
      margin: 5px;
      transition: background-color 0.3s;
    }
    .update-btn:hover {
      background-color: #8e44ad;
    }
  </style>
</head>
<body>
  <h1>🐢 Turtle Control</h1>
  <p>Adjust max angles and control movement:</p>

  <!-- Front Legs -->
  <div class="row">
    <div class="servo-card">
      <div class="servo-name">Front Left Leg</div>
      <input type="range" min="0" max="180" value="90" class="slider" id="servo1" oninput="updateAngle(1, this.value)">
      <div class="angle-value" id="angle1">90°</div>
    </div>
    <div class="servo-card">
      <div class="servo-name">Front Right Leg</div>
      <input type="range" min="0" max="180" value="90" class="slider" id="servo2" oninput="updateAngle(2, this.value)">
      <div class="angle-value" id="angle2">90°</div>
    </div>
  </div>

  <!-- Back Legs -->
  <div class="row">
    <div class="servo-card">
      <div class="servo-name">Back Left Leg</div>
      <input type="range" min="0" max="180" value="90" class="slider" id="servo3" oninput="updateAngle(3, this.value)">
      <div class="angle-value" id="angle3">90°</div>
    </div>
    <div class="servo-card">
      <div class="servo-name">Back Right Leg</div>
      <input type="range" min="0" max="180" value="90" class="slider" id="servo4" oninput="updateAngle(4, this.value)">
      <div class="angle-value" id="angle4">90°</div>
    </div>
  </div>

  <!-- Control Buttons -->
  <div class="row">
    <button class="power-btn" id="power-on" onclick="sendCommand('on')">▶️ Power On</button>
    <button class="power-btn" id="power-off" onclick="sendCommand('off')">⏹️ Power Off</button>
  </div>
  <div class="row">
    <button class="sync-btn" onclick="sendCommand('sync')">🔄 Sync (0°)</button>
    <button class="update-btn" onclick="updateAngles()">🔃 Update Angles</button>
  </div>

  <script>
    function updateAngle(servoNum, angle) {
      document.getElementById("angle" + servoNum).textContent = angle + "°";
      fetch("/set?servo" + servoNum + "=" + angle)
        .then(response => console.log("Servo " + servoNum + " set to " + angle + "°"))
        .catch(err => console.error("Error:", err));
    }

    function sendCommand(cmd) {
      fetch("/" + cmd)
        .then(response => {
          console.log("Command sent:", cmd);
          if (cmd === 'on') {
            document.getElementById("power-on").disabled = true;
            document.getElementById("power-off").disabled = false;
          } else if (cmd === 'off') {
            document.getElementById("power-on").disabled = false;
            document.getElementById("power-off").disabled = true;
          }
        })
        .catch(err => console.error("Error:", err));
    }

    function updateAngles() {
      fetch("/angles")
        .then(response => response.json())
        .then(data => {
          for (let i = 1; i <= 4; i++) {
            const angle = data["servo" + i];
            document.getElementById("servo" + i).value = angle;
            document.getElementById("angle" + i).textContent = angle + "°";
          }
          console.log("Angles updated from ESP32");
        });
    }

    document.getElementById("power-off").disabled = true;
  </script>
</body>
</html>
Interface Code Explanation
This web interface allows you to control the Turtle robot's four servomotors using interactive sliders and buttons. It is designed to work with the XIAO ESP32-C3, which acts as a web server and connects to it via Wi-Fi.
Overall Structure
The HTML code is divided into three main sections:
- <head>: Defines the page title, metadata, and custom CSS styles.
- <body>: Contains the visual interface with sliders and control buttons.
- <script>: Contains JavaScript functions that interact with the ESP32.
Servo Sliders
Each slider controls one of the robot’s servomotors. The value ranges from 0° to 180° and updates in real time on the screen.
<input type="range" min="0" max="180" value="90" class="slider" id="servo1" oninput="updateAngle(1, this.value)">
<div class="angle-value" id="angle1">90°</div>
Control Buttons
There are buttons to turn the servos on, off, synchronize (move all to 0°), and update angles. These buttons send commands to the ESP32 using JavaScript:
fetch("/on");       // Turn on
fetch("/off");      // Turn off
fetch("/sync");     // Synchronize all to 0°
fetch("/angles");   // Get current angles
Communication with ESP32
JavaScript functions use fetch() to send data to defined routes on the ESP32 (for example: /set?servo1=90).
Style and Design
The CSS styling provides a clean interface with individual cards for each servo, friendly colors, and highlighted buttons.
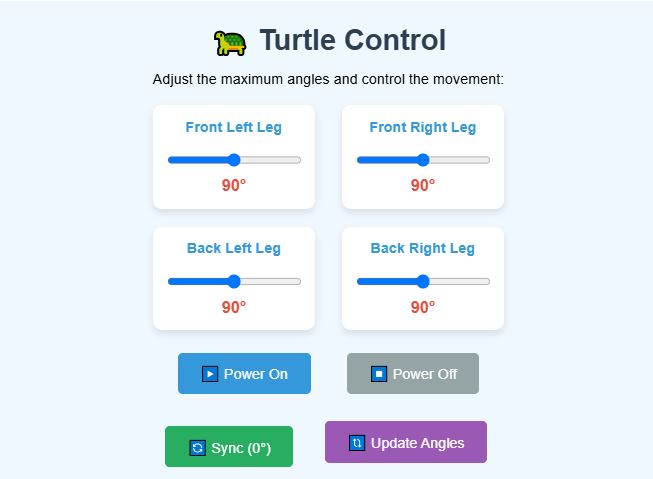
✅ Result
Thanks to this interface, you can easily control the Turtle robot's movement from any device connected to the WiFi network created by the ESP32-C3. These results can be seen in the video below.
Turtle Control Code with ESP32-C3 (Arduino)
#include <WiFi.h>
#include <WebServer.h>
#include <ESP32Servo.h>

const char* ssidAP = "TortugaRobot";
const char* passwordAP = "12345678";

WebServer server(80);
Servo servo1, servo2, servo3, servo4;
const int pinServos[] = {2, 3, 4, 5};
int angulosMaximos[] = {90, 90, 90, 90};
int posActual[] = {0, 0, 0, 0};
bool automatico = false;
bool haciaAdelante = true;
unsigned long ultimoPaso = 0;
const int intervaloPasos = 20;

void setup() {
  Serial.begin(115200);
  ESP32PWM::allocateTimer(0);
  ESP32PWM::allocateTimer(1);
  ESP32PWM::allocateTimer(2);
  ESP32PWM::allocateTimer(3);

  servo1.setPeriodHertz(50);
  servo1.attach(pinServos[0], 500, 2400);
  servo2.setPeriodHertz(50);
  servo2.attach(pinServos[1], 500, 2400);
  servo3.setPeriodHertz(50);
  servo3.attach(pinServos[2], 500, 2400);
  servo4.setPeriodHertz(50);
  servo4.attach(pinServos[3], 500, 2400);

  resetServos();
  WiFi.softAP(ssidAP, passwordAP);
  Serial.print("Access Point creado! IP: ");
  Serial.println(WiFi.softAPIP());

  setupEndpoints();
  server.begin();
}

void loop() {
  server.handleClient();
  if (automatico) moverServosSincronizados();
}

// Resto del código...
4.-Project Consolidation Using DeepSeek
An agile, incremental development methodology was adopted for the system's development, in which functional components were designed and tested independently before being integrated. This methodology allows for greater flexibility and adaptation to changes during the development process, facilitating continuous product improvement.
In this approach, short, specific functions were first developed for controlling a servomotor using the XIAO ESP32-C3 board, ensuring its proper operation separately. In parallel, the HTML code for the buttons and selection menus that make up the system's main interface was designed.
Once validated, all these functions were entered into the DeepSeek chat, an artificial intelligence capable of automatically organizing, structuring, and connecting code fragments. DeepSeek consolidated these pieces into a single, optimized, and functional source file, ready to be loaded and executed directly on the XIAO ESP32-C3 board.

5.-XIAOESP32-C3 connections and servomotors
The four servomotors are connected to the XIAOESP32-C3 card through a control driver respectively.
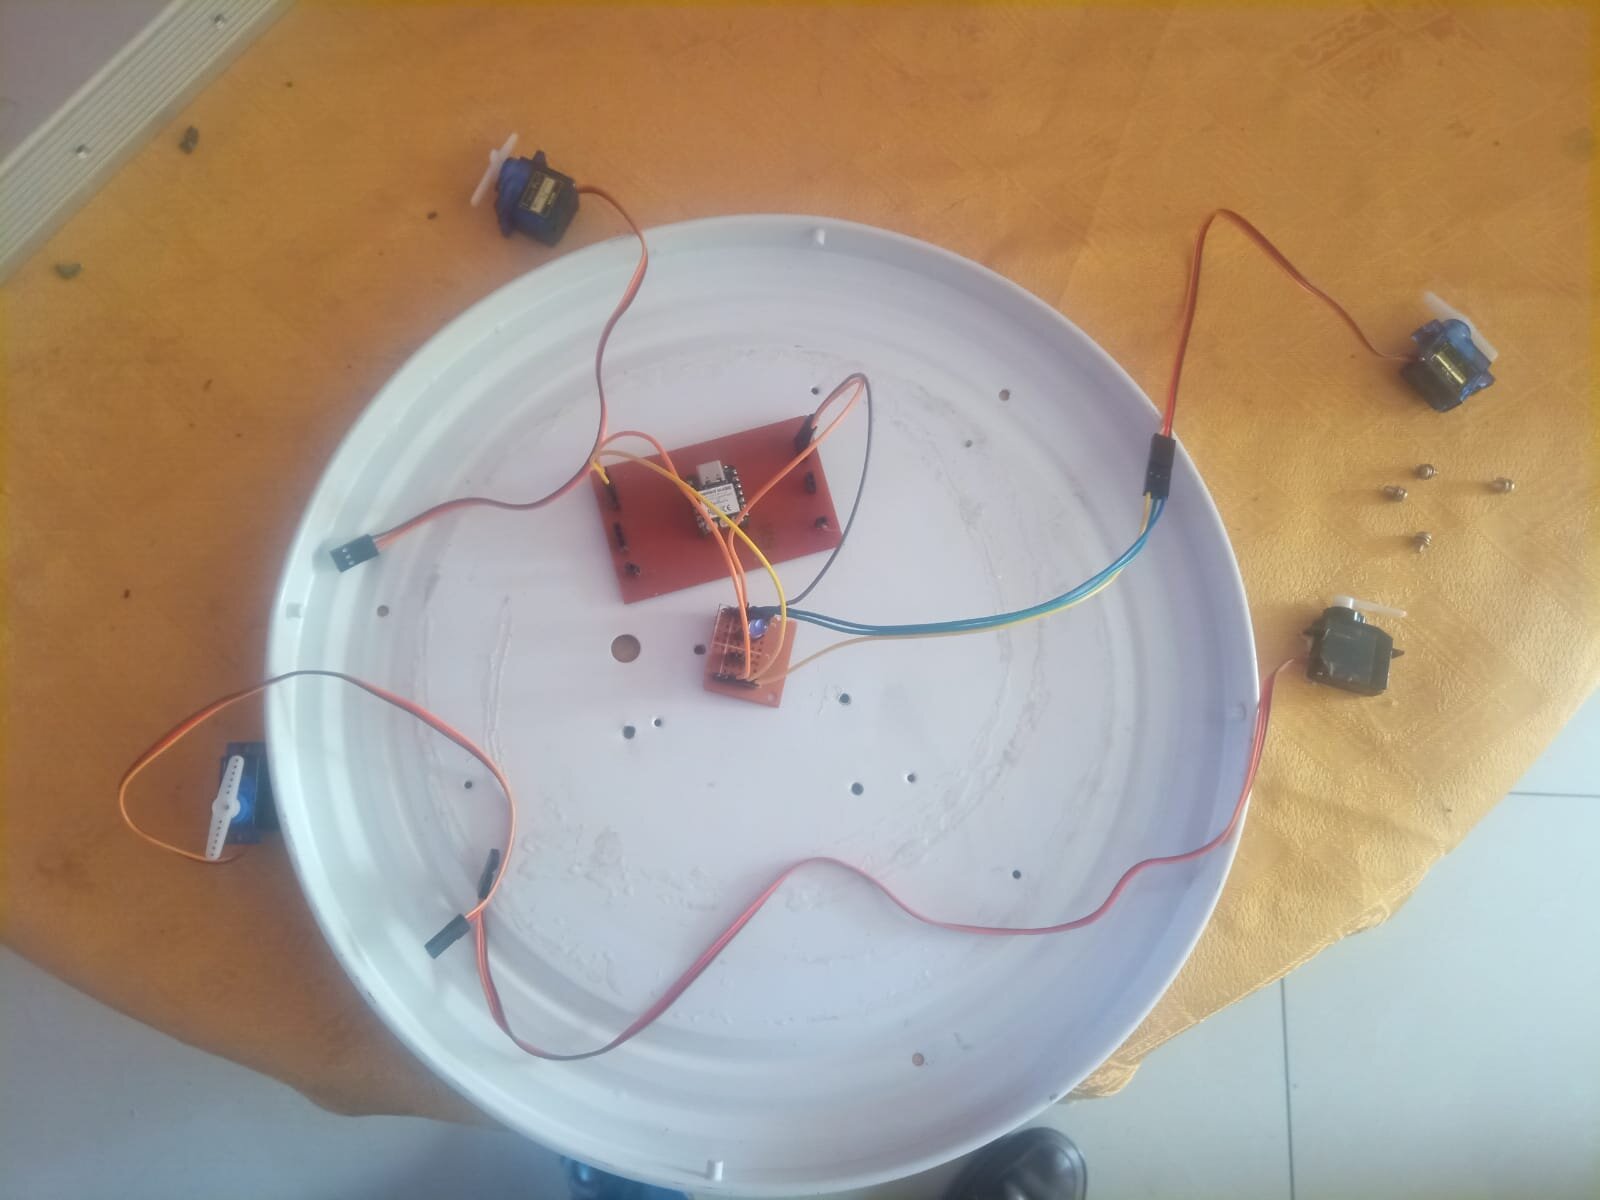
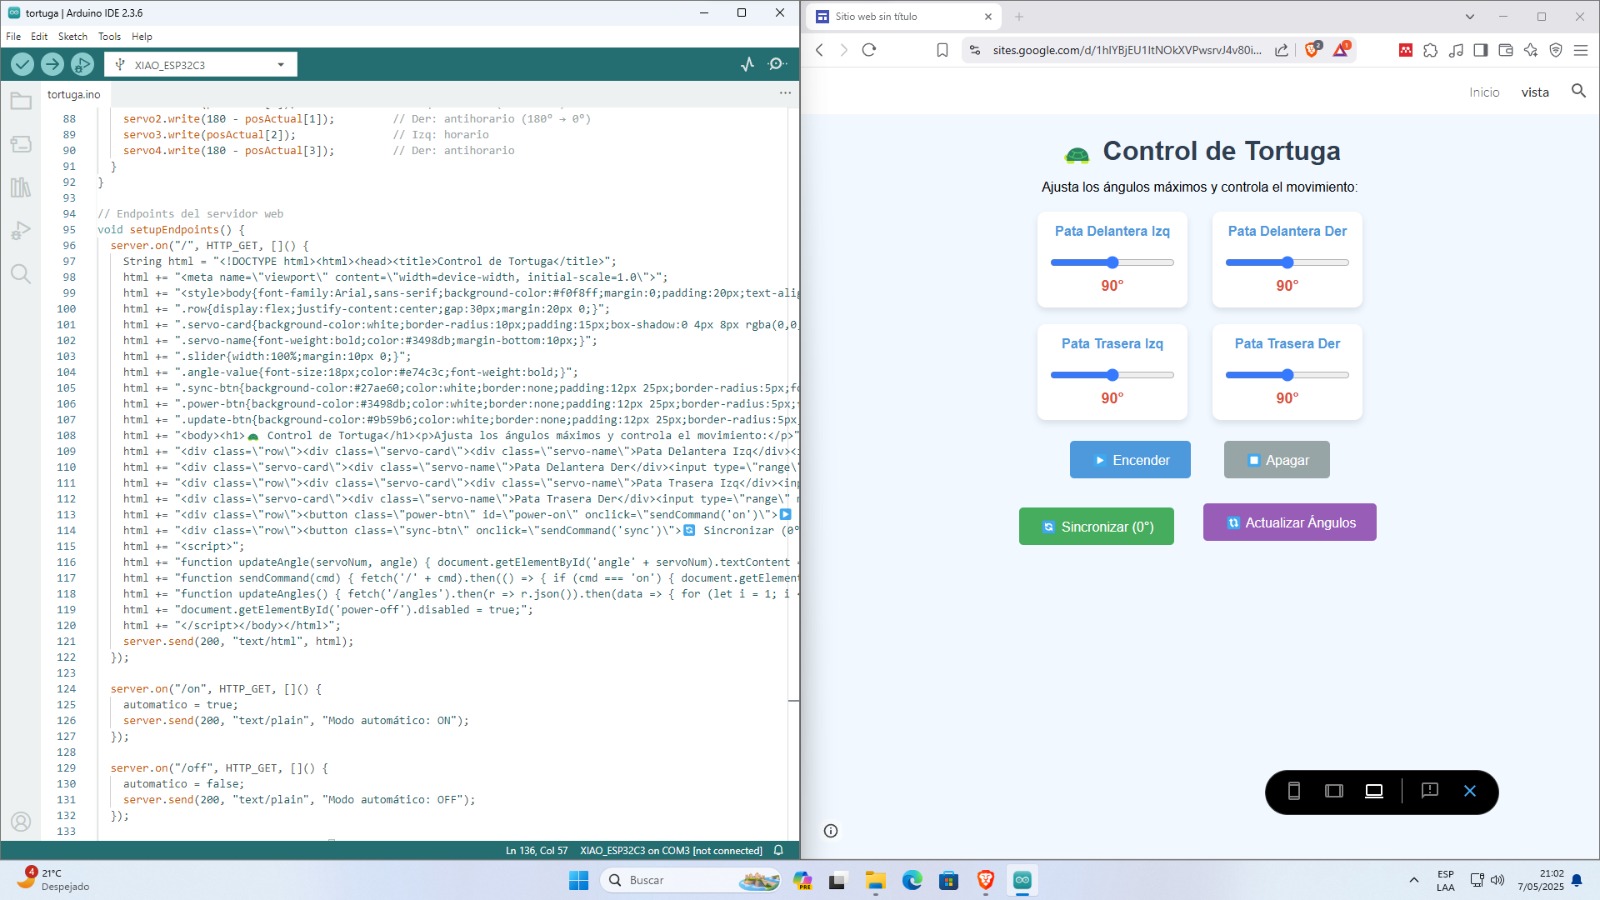
In order to do the tests, the first thing we did was connect to the XIAOESP32-C3 wifi, from our mobile device, which is called turtle, once connected we loaded the page of our interface by putting the IP and we can view the interface that was designed, we have the first servomotor on the right leg, to control its angle of rotation, the range is changed and then updated.
and we continue to perform tests to verify that everything is working correctly.
Did you have any problems?
In this case, I developed a local web interface to control an articulated turtle figure with four servomotors, using the ESP32-C3. The interface was designed in HTML and JavaScript, hosted directly on the microcontroller, allowing control without an internet connection.
During the process, one of the main problems was the ESP32-C3's memory limit when loading large HTML files. To solve this problem, I optimized the code by reducing unnecessary styles and using compressed versions of the scripts. I also used SPIFFS memory storage to better manage resources.
Another challenge was properly synchronizing the servo movements without them interfering with each other. I solved this by adjusting the activation times and using asynchronous functions for a smoother response.
Conclusions
- After reviewing the documentation for week 14 of Fab Academy 2025, I am very happy with the development and creation of the interface for my project, in this case the control of the turtle, whose buttons and sliders were developed to control the four servomotors, which were carried out through the interface that I designed. At first, I had some complications understanding how the main code was integrated with the program code in the Arduino IDE, investigating to create my first interface, which fills me with great joy to have been able to achieve it, I relied on some resources such as Chat GPT, which is a very powerful tool.
- The virtual collaboration I had with my instructor, Ronal Vilca, was very helpful, as it provided me with certain guidelines to better develop the interface I had planned to create. The use of HTML, CSS, and JavaScript allowed me to build a responsive graphical interface that can be accessed from any device connected to the ESP32-C3's Wi-Fi network without the need for external applications. Using libraries such as ESPAsyncWebServer or WebServer.h, it is possible to set up a web server directly on the ESP32-C3, hosting the interface locally without the need for internet access. Real-Time Hardware Control Using fetch(), XMLHttpRequest, or WebSockets in JavaScript, fluid communication was achieved between the web interface and the ESP32-C3, allowing pin activation, sensor reading, and real-time system status monitoring.