Week 14: Interface & Application Programming
Group Assignment: compare as many tool options as possible
Individual Assignment: write an application that interfaces a user with an input &/or output device that you made
What is this?
We need to design and program a method to communicate with a device, to send &/or receive, data &/or commands. If our chosen device is output, then we should be able to control it from our application interface, however if the chosen device is input, then we should be able to get data from it.
We will use Webserial, which is a method for browsers to communicate to devices through USB. To start using Webserial we need an interface, and must be opened in an appropriate browser, because not all browers support this kind of serial communication. In Windows, both Chrome and Edge are viable options, whereas in IOS, we cannot use Safari, but instead must use Opera or another which also supports the Serial connections.
How to start?
For communication between the browser and device, we not only need an interface (normally in HTML) but we also need a program for the device that will work accordingly, for example it will give an output based on the commands given through the browser, or if it is an input device, can communicate that input data accordingly.
As it was our first time to do this, we used AI (perplexity.ai), generating the interface and program with the following prompt: "Give a simple web serial program example, connecting a serial device attiny 1614 through a serial converter with web UI in html/css, and don't forget Arduino program for the device."
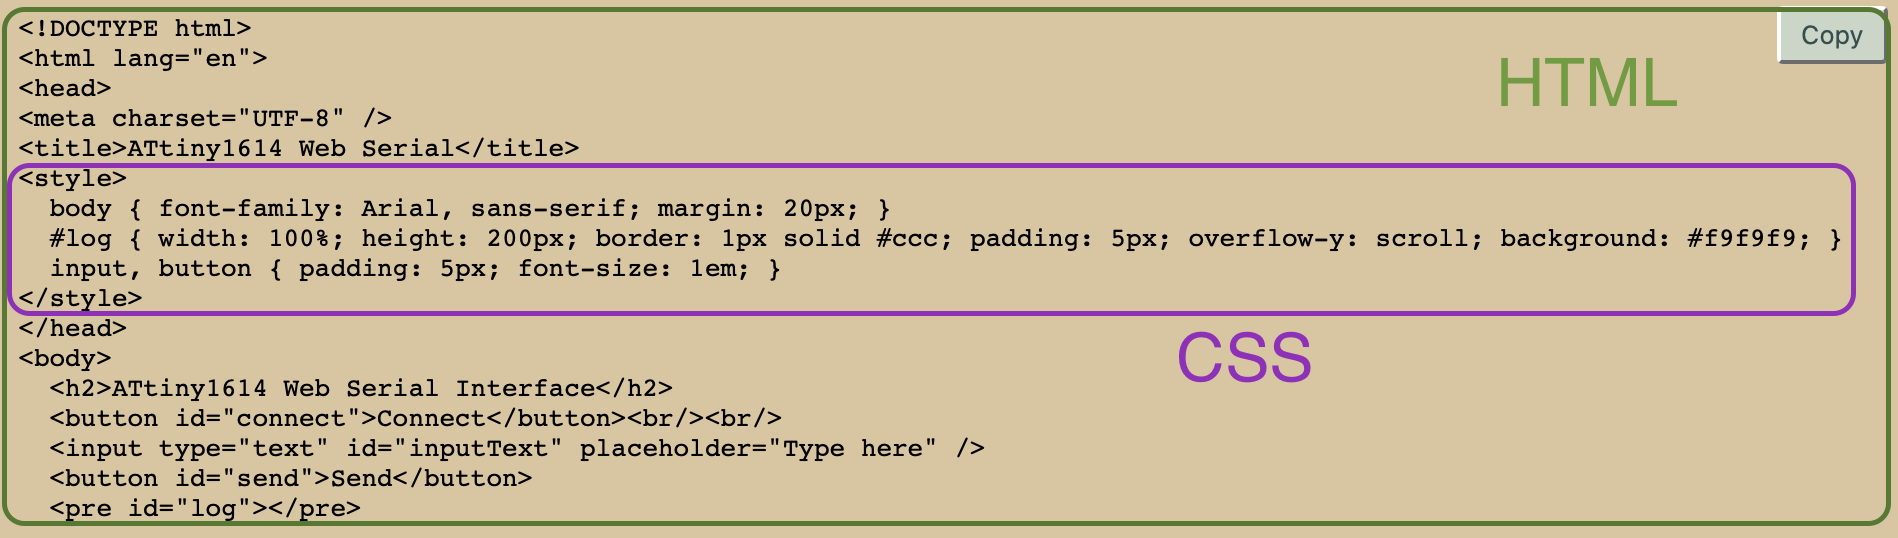
The brower code follows, it's in html/css and javascript; we'll comment further below..
<!DOCTYPE html>
<html lang="en">
<head>
<meta charset="UTF-8" />
<title>ATtiny1614 Web Serial</title>
<style>
body { font-family: Arial, sans-serif; margin: 20px; }
#log { width: 100%; height: 200px; border: 1px solid #ccc; padding: 5px; overflow-y: scroll; background: #f9f9f9; }
input, button { padding: 5px; font-size: 1em; }
</style>
</head>
<body>
<h2>ATtiny1614 Web Serial Interface</h2>
<button id="connect">Connect</button><br/><br/>
<input type="text" id="inputText" placeholder="Type here" />
<button id="send">Send</button>
<pre id="log"></pre>
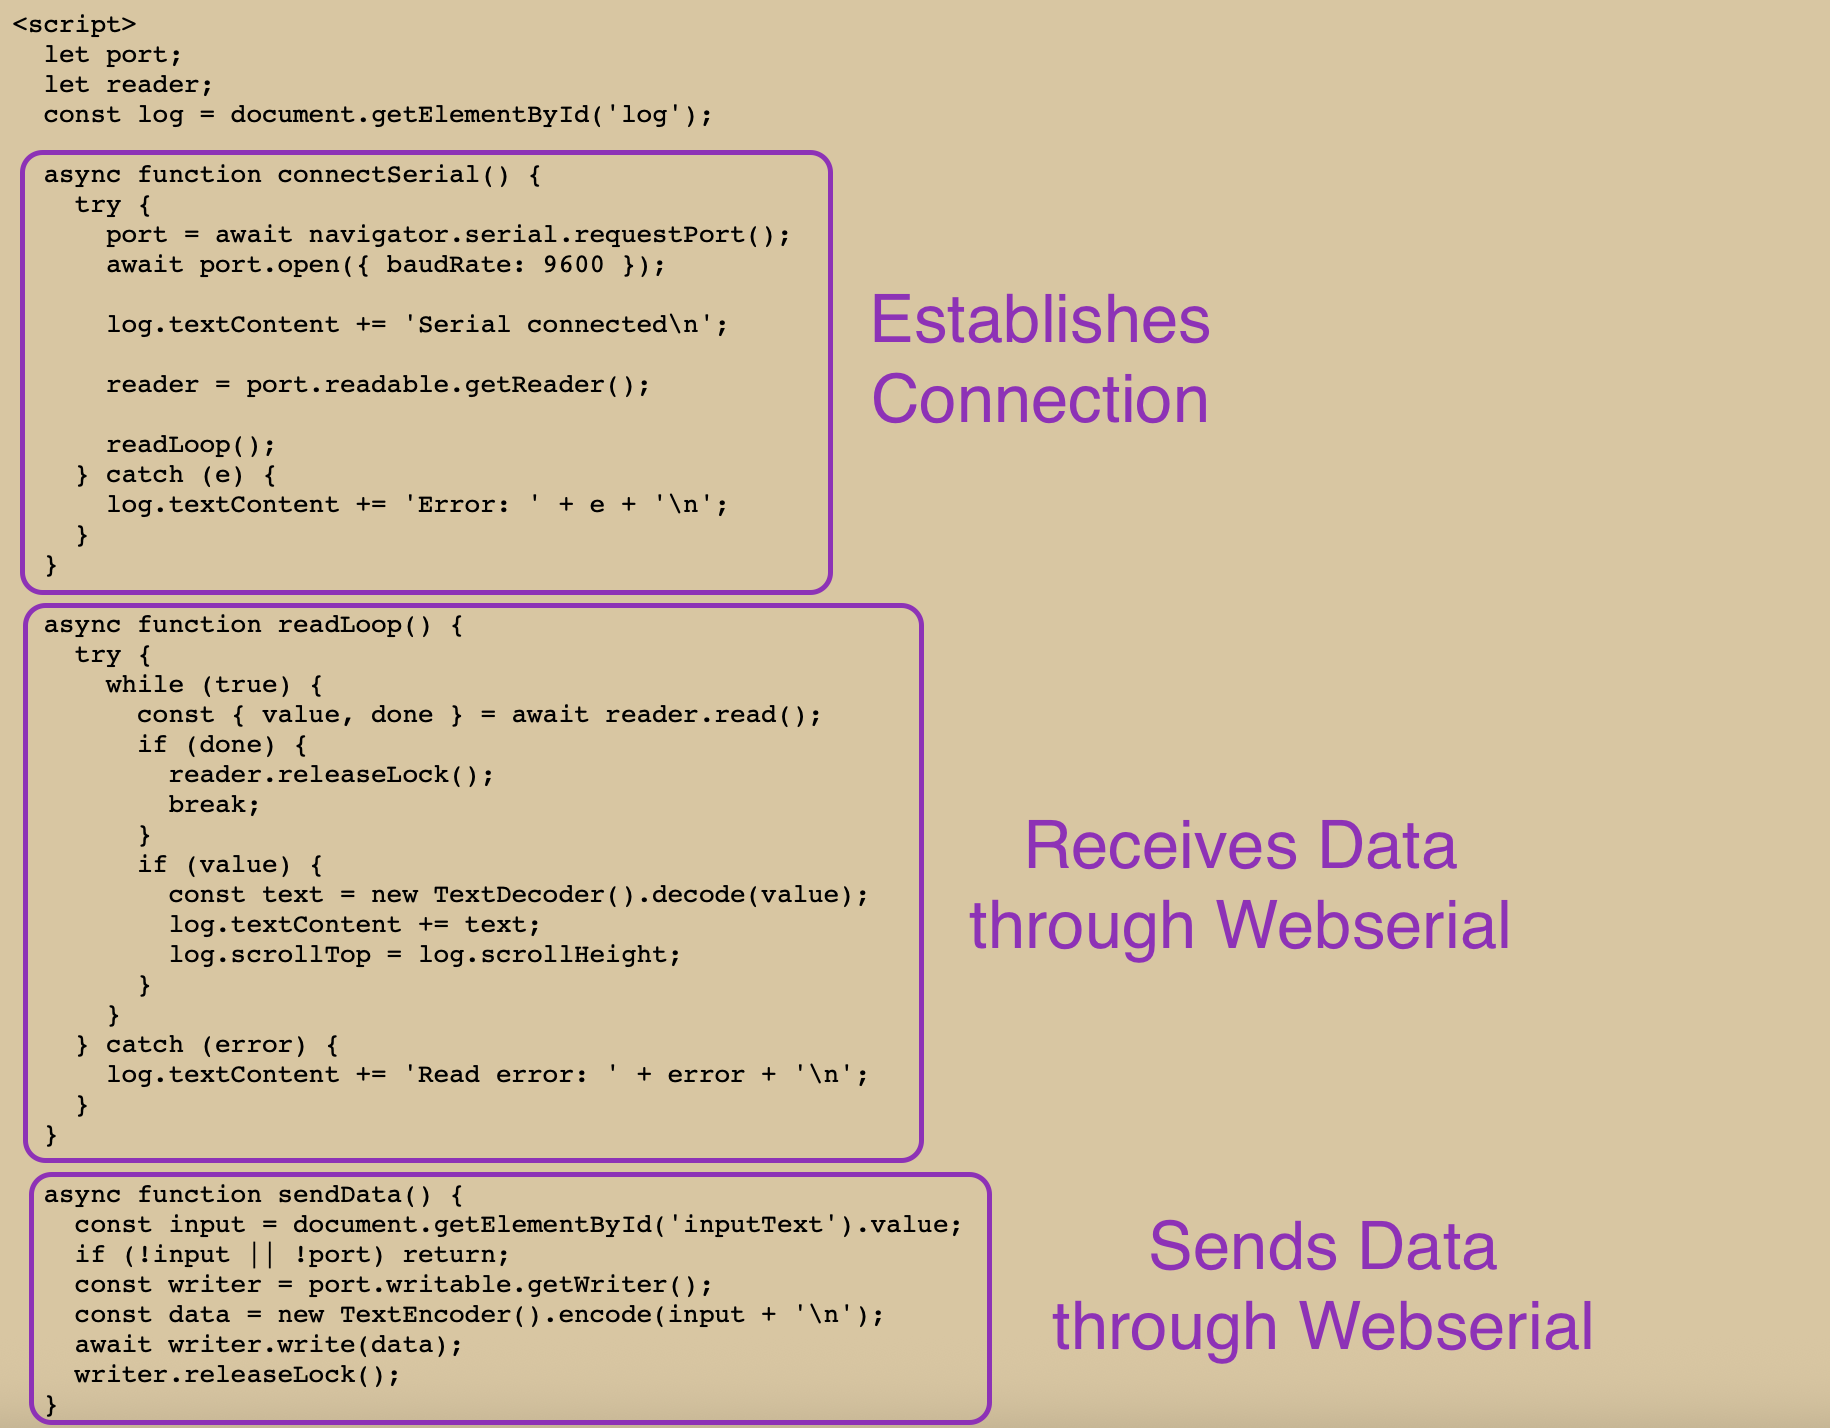
<script>
let port;
let reader;
const log = document.getElementById('log');
async function connectSerial() {
try {
port = await navigator.serial.requestPort();
await port.open({ baudRate: 9600 });
log.textContent += 'Serial connected\n';
reader = port.readable.getReader();
readLoop();
} catch (e) {
log.textContent += 'Error: ' + e + '\n';
}
}
async function readLoop() {
try {
while (true) {
const { value, done } = await reader.read();
if (done) {
reader.releaseLock();
break;
}
if (value) {
const text = new TextDecoder().decode(value);
log.textContent += text;
log.scrollTop = log.scrollHeight;
}
}
} catch (error) {
log.textContent += 'Read error: ' + error + '\n';
}
}
async function sendData() {
const input = document.getElementById('inputText').value;
if (!input || !port) return;
const writer = port.writable.getWriter();
const data = new TextEncoder().encode(input + '\n');
await writer.write(data);
writer.releaseLock();
}
document.getElementById('connect').addEventListener('click', connectSerial);
document.getElementById('send').addEventListener('click', sendData);
</script>
</body>
</html>
The first 17 lines are in HTML/CSS giving the page layout and style.
The "script" from line 19 is Javascript and this specifies the functionalities. Specifically there are three main javascript functions the first "connectSerial" establishes the connection, "readLoop" recieves data, while "sendData" sends data through Webserial.
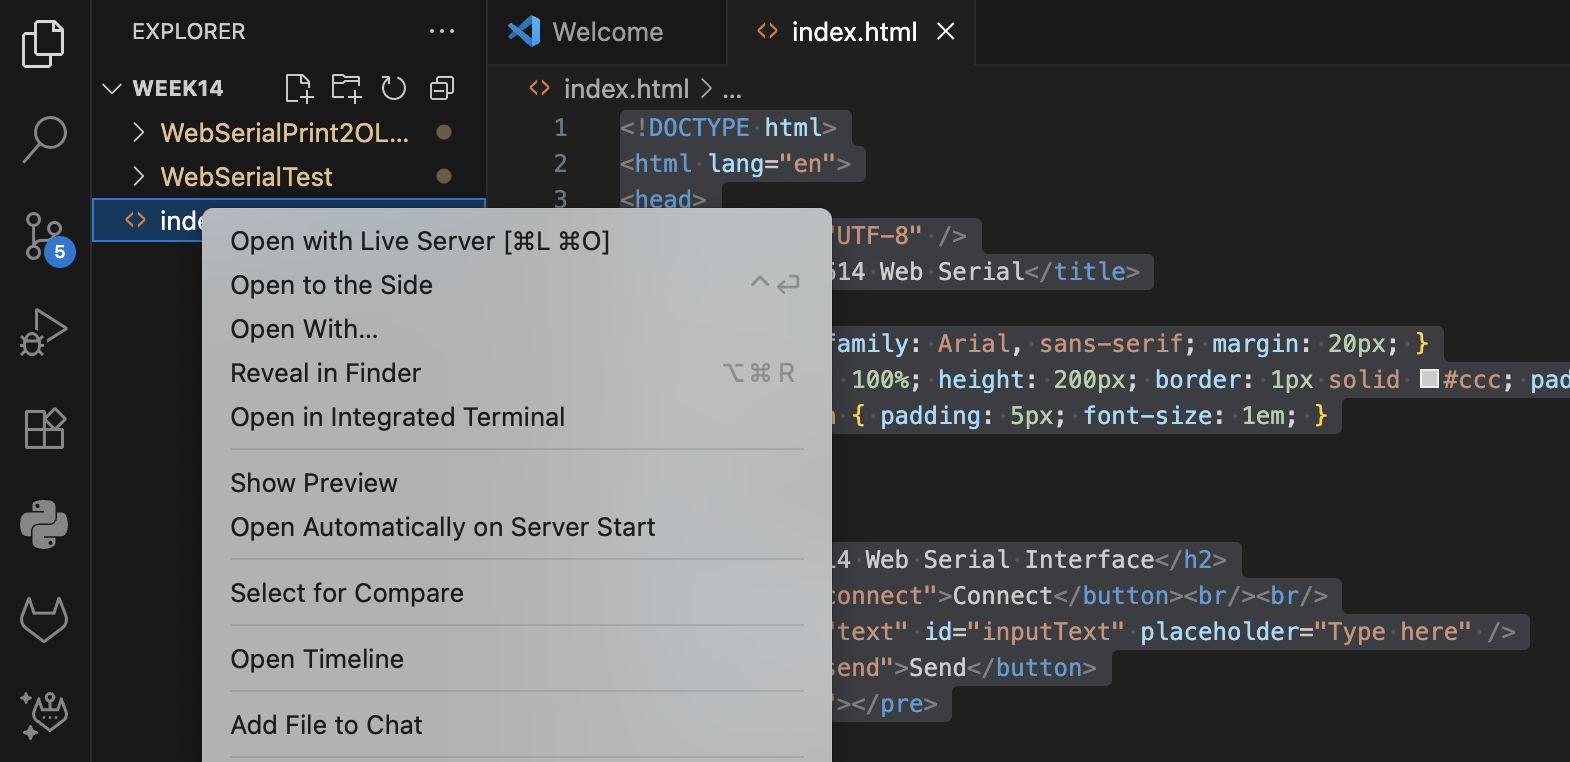
We run it from VSCode by right-clicking and selecting "Open in Live Server". It opens in safari by default, however we cannot connect there, so we simply copy/paste the address into our Opera browser which as mentioned supports the Web Serial connections.
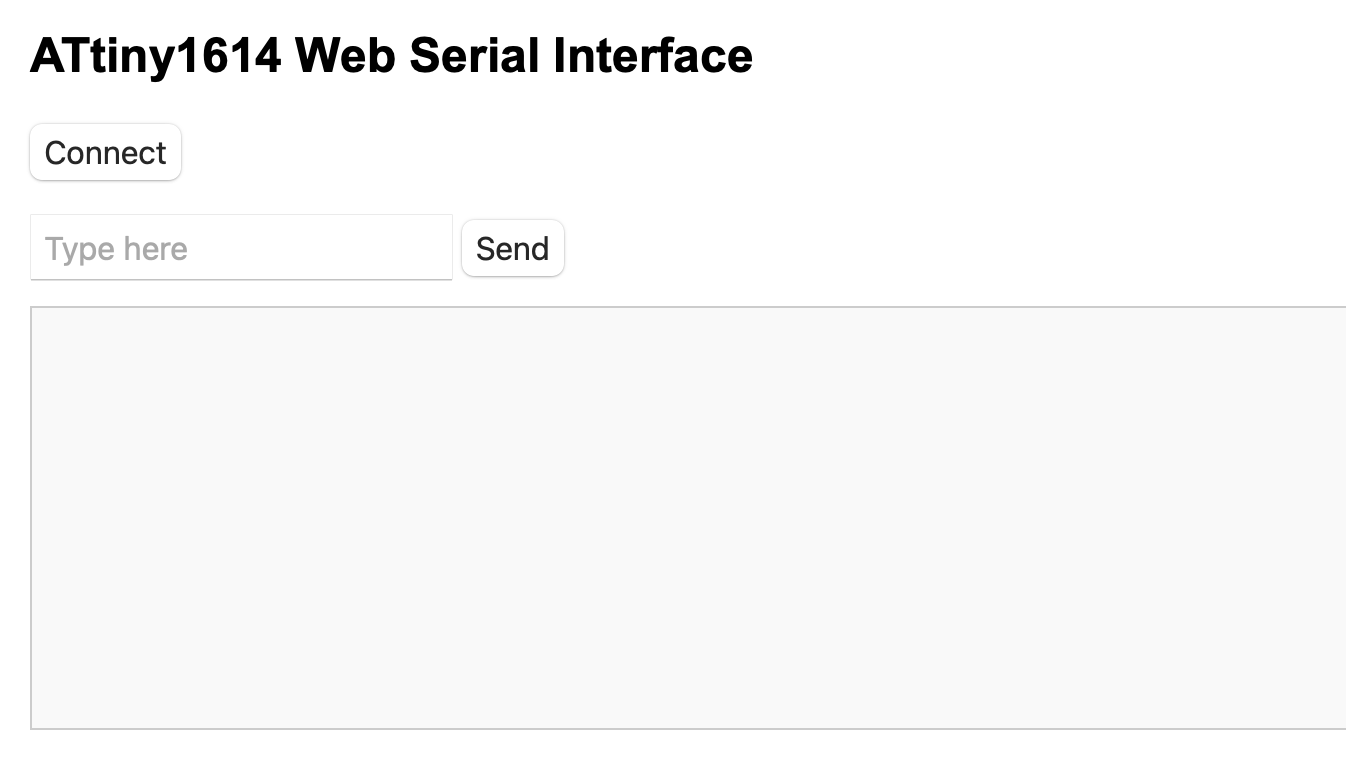
And now it appears like this in the browser and we can establish the connection:
After establishing the connection, we may enter text which is echoed back.

We slightly modify the code to have an additional message sent back from the board, but the additional message will only be sent if the programmer is switched back to FTDI mode.
And here is the program for that:
String vakk = "";
void setup() {
Serial.begin(9600); // Initialize serial at 9600 baud
while (!Serial); // Wait for serial port to connect (optional)
}
void loop() {
if (Serial.available()) {
char incoming = Serial.read();
if (incoming != '\n') {
Serial.print(incoming); // print characters immediately without newline
vakk += incoming; // build the string (if needed)
} else {
Serial.print(","); // print custom ending without newline
Serial.print(" to you too!"); // print custom ending on same line
Serial.println(); // finally print newline once
vakk = ""; // reset string
}
}
delay(10);
}
Interfacing with OUTPUT device (OLED display):
What would be cool is to enter text and then display it on the OLED! For this we wrote another simple program:
#include
#include
#include
U8G2_SSD1306_128X64_NONAME_F_HW_I2C u8g2(U8G2_R0, /* reset=*/U8X8_PIN_NONE);
String vakk = "";
void setup() {
Wire.begin();
u8g2.begin();
Serial.begin(9600); // Initialize serial at 9600 baud
while (!Serial); // Wait for serial port to connect (optional)
}
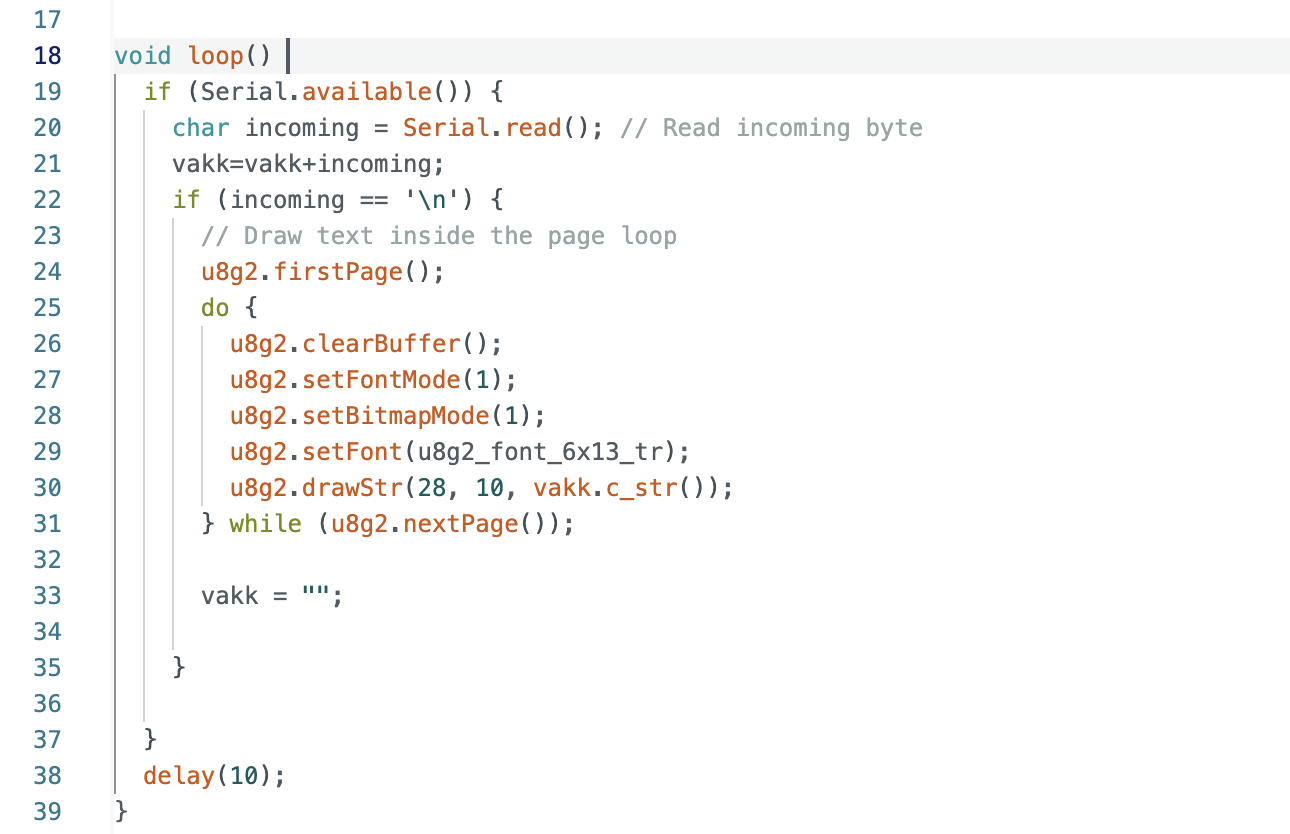
void loop() {
if (Serial.available()) {
char incoming = Serial.read(); // Read incoming byte
vakk=vakk+incoming;
if (incoming == '\n') {
// Draw text inside the page loop
u8g2.firstPage();
do {
u8g2.clearBuffer();
u8g2.setFontMode(1);
u8g2.setBitmapMode(1);
u8g2.setFont(u8g2_font_6x13_tr);
u8g2.drawStr(3, 10, vakk.c_str());
} while (u8g2.nextPage());
vakk = "";
}
}
delay(10);
}
Here is our physical set-up, just the OLED board connected to computer via USB through the programmer:

Tested it, and it works! Saheen seemed surprised. Again reminder that for it to work, the programmer must be returned to the FTDI mode.
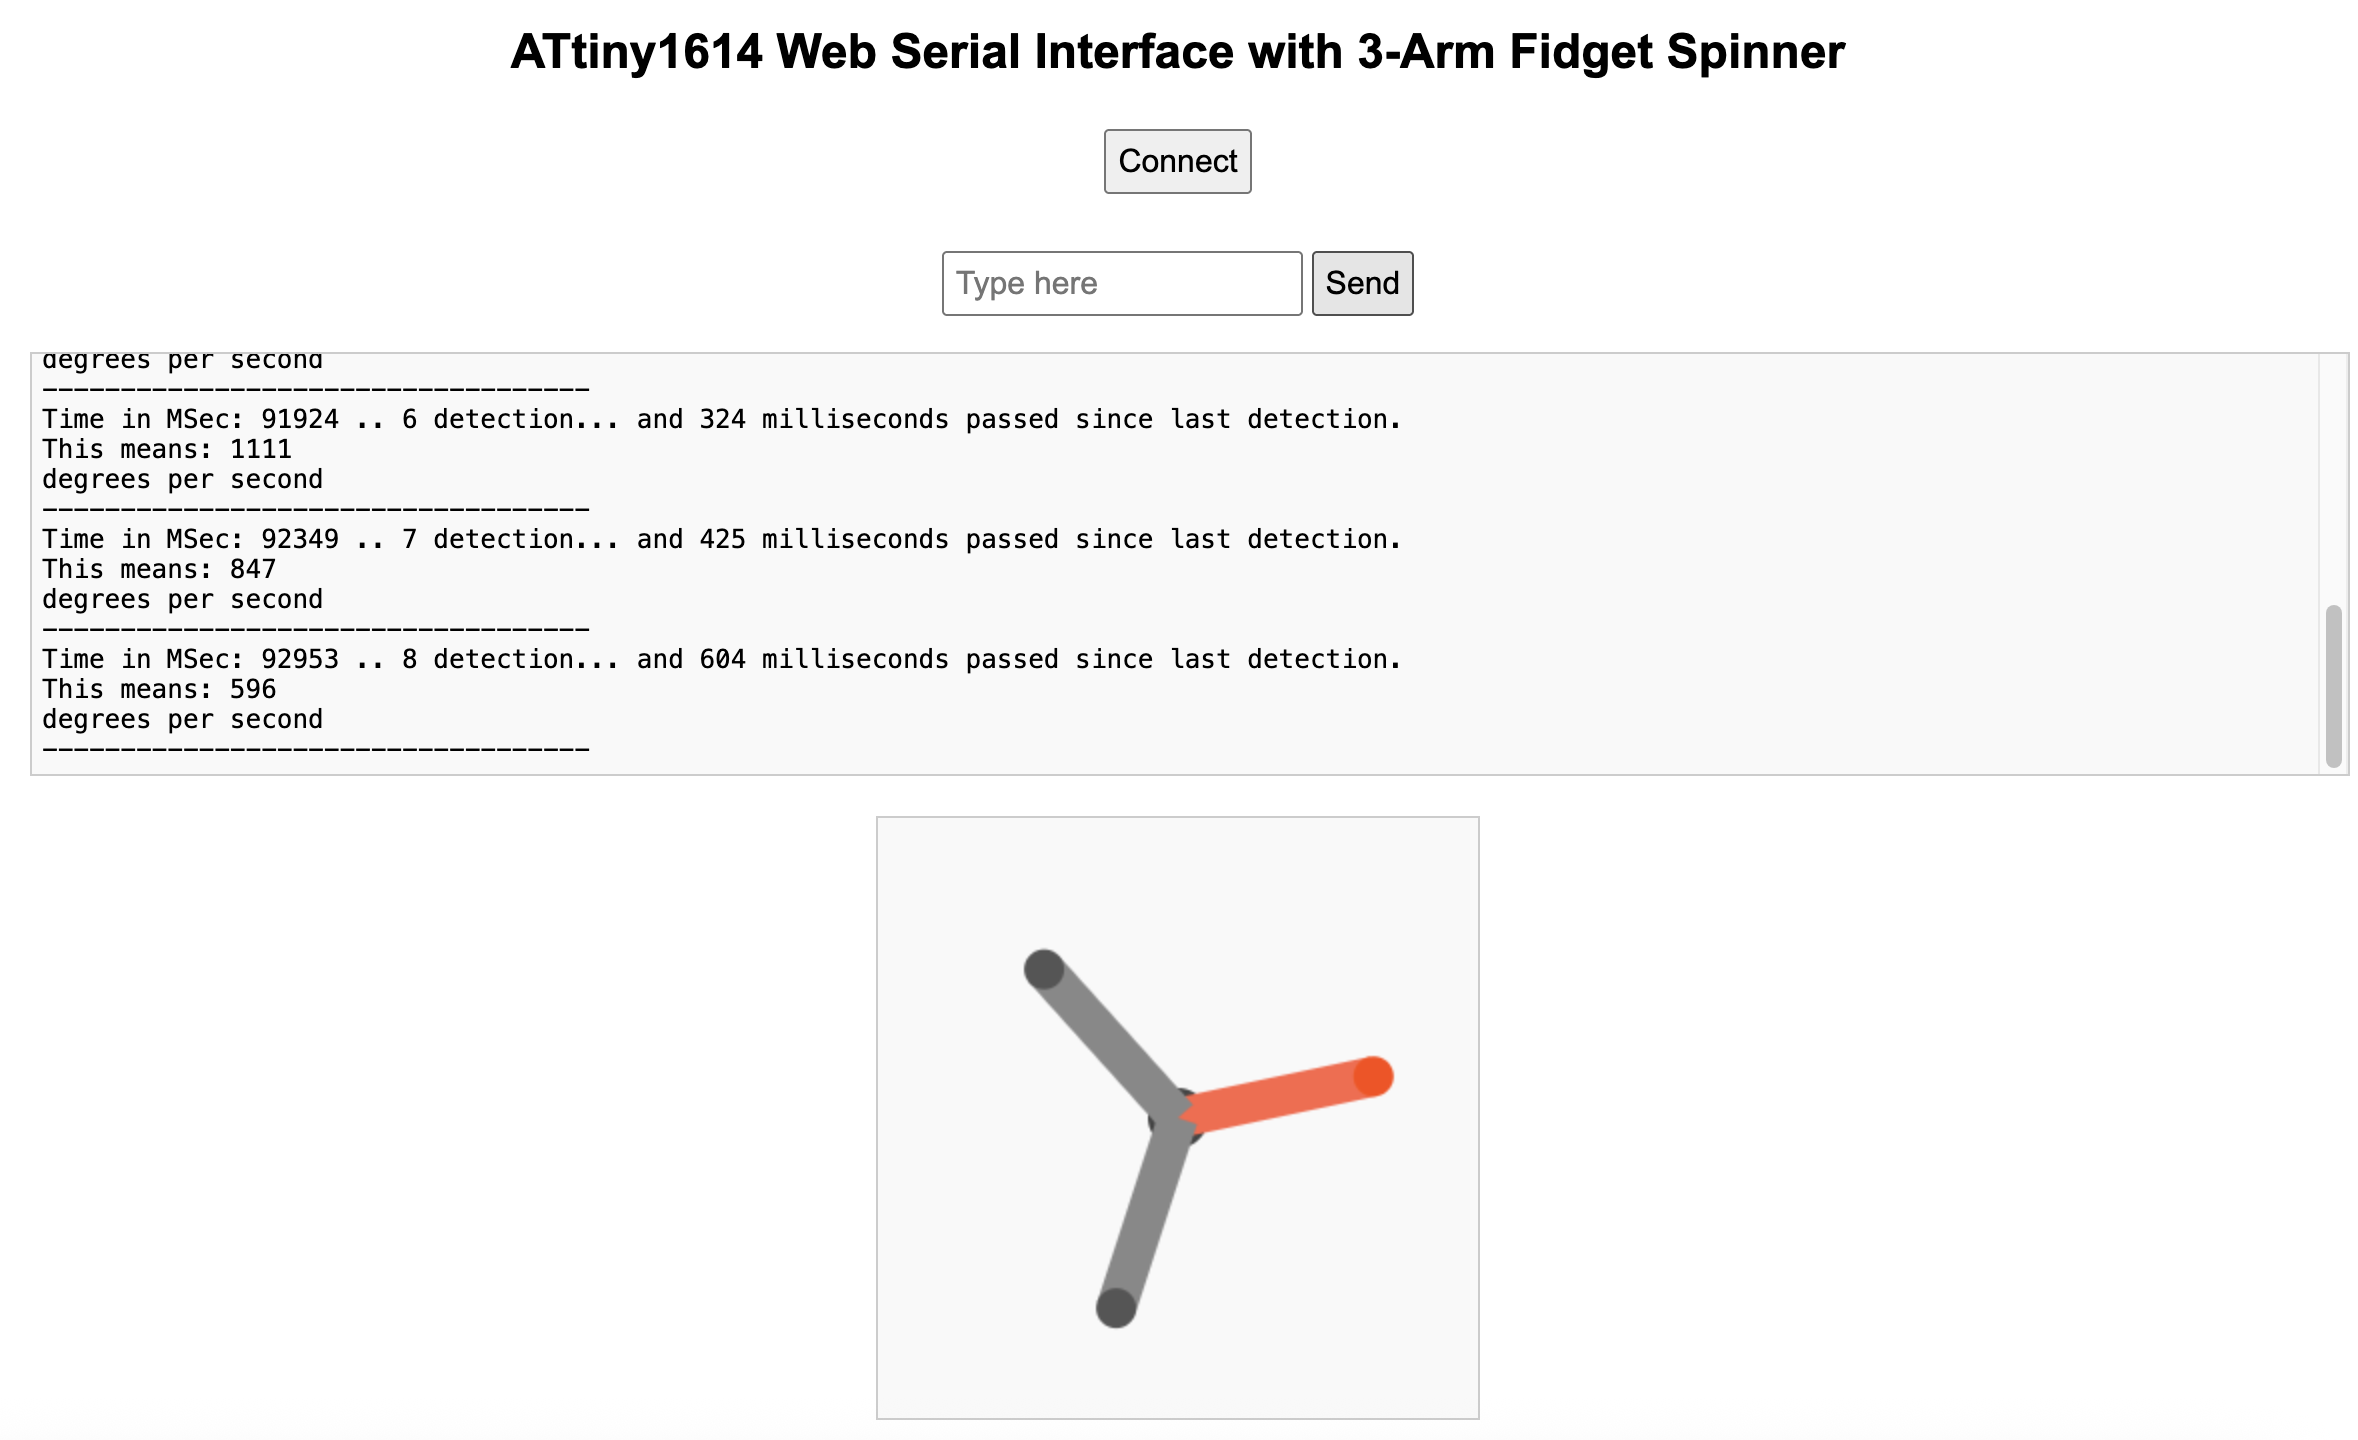
Interfacing with INPUT device (Hall effect sensor):
We decided to use our old Hall Effect sensor fidget spinner board from input week for this week's assignment. Basically we will get the data from the device and then graphically illustrate that in the browser, making a kind of virtual fidget spinner. We started by making a very simple program which will compute the speed of the fidget spinner in degrees per second. Here's the important part of code:
if (sensorValue==0 && sensorValue!=oldSensVal){ //if sensor value is 0, i.e. detects magnet
currentTime = millis();
elapsedTime=currentTime-detectTime;
detectTime=currentTime;
count++; //count that as an additional count for magnet passed
Serial.print("Time in MSec: ");
Serial.print(currentTime);
Serial.print(" .. ");
Serial.print(count);
Serial.print(" detection... and ");
Serial.print(elapsedTime);
Serial.println(" milliseconds passed since last detection.");
Serial.print("This means: ");
Serial.println(360000/elapsedTime);
Serial.println(" degrees per second");
Serial.println("-----------------------------------");
Here's what the output looks like. We asked AI to create a spinner, however for now the spinner is not actually spinning.
Fixing the Fidget; Fidget Spinner 2.0
Small issue with this project is that the spinner will only go around a few times, even if spun ideally. It was suggesteed that counterweights further out on the arms of the spinner would make a better spinner that would spin for a greater number of rotations and making the simulation longer and easier to produce. Enough said, here is the Fidget Spinner 2.0:
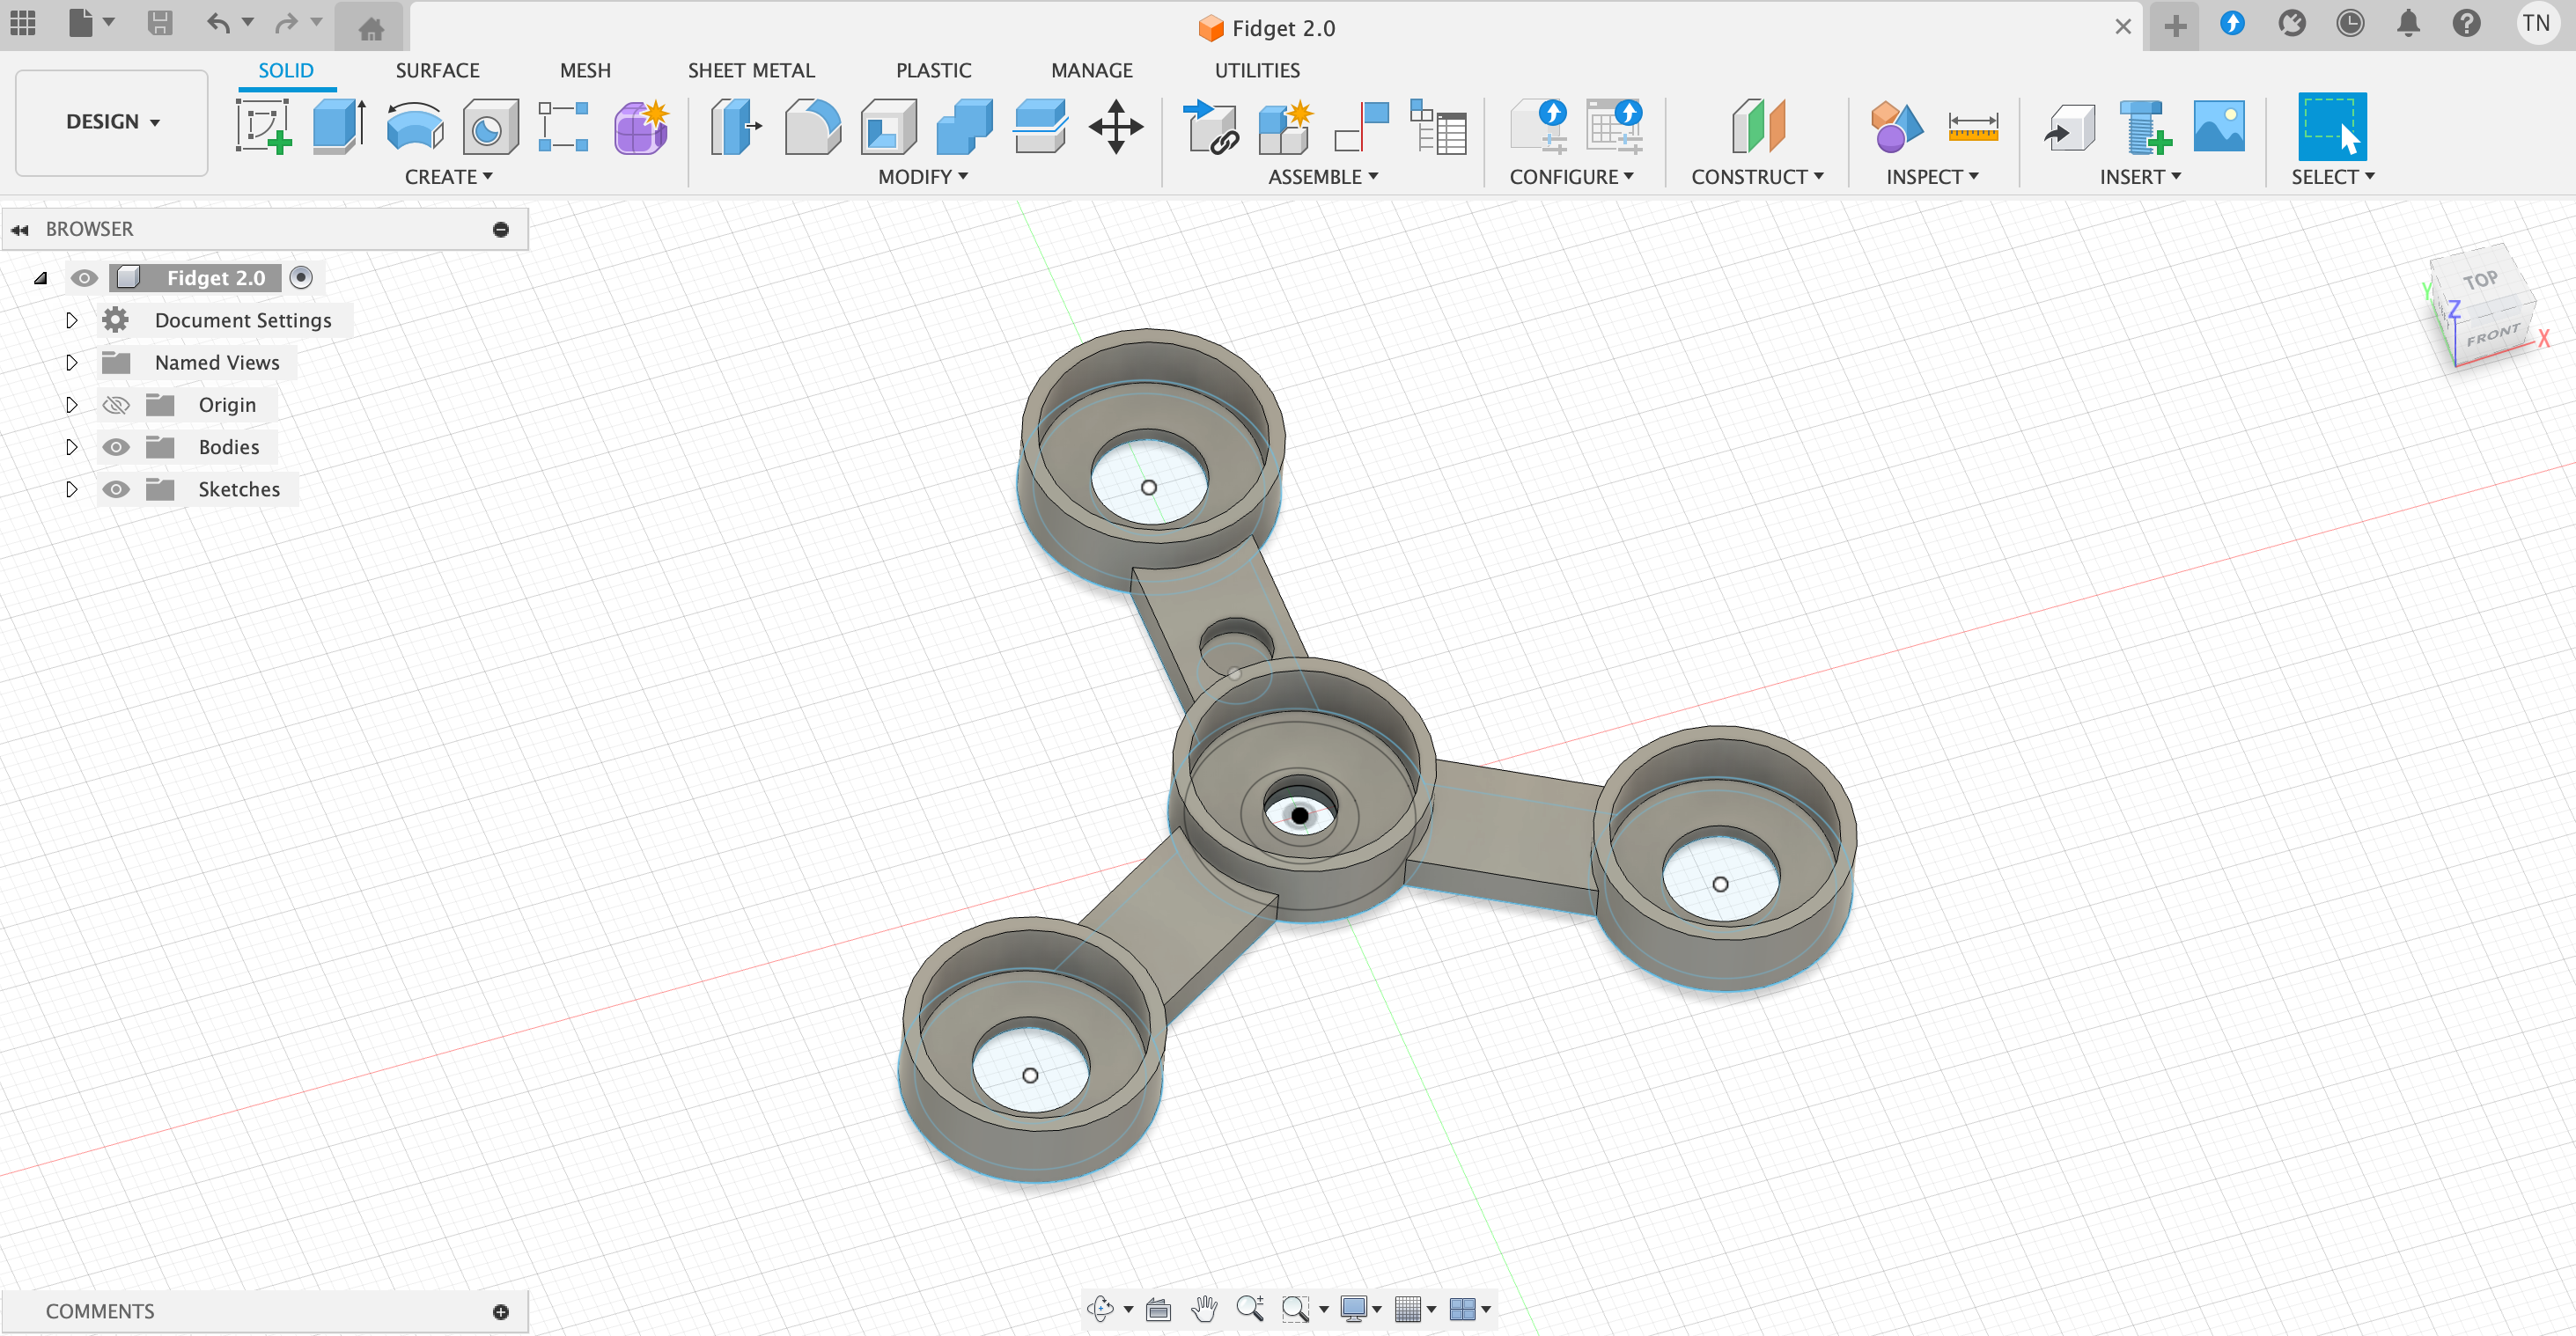
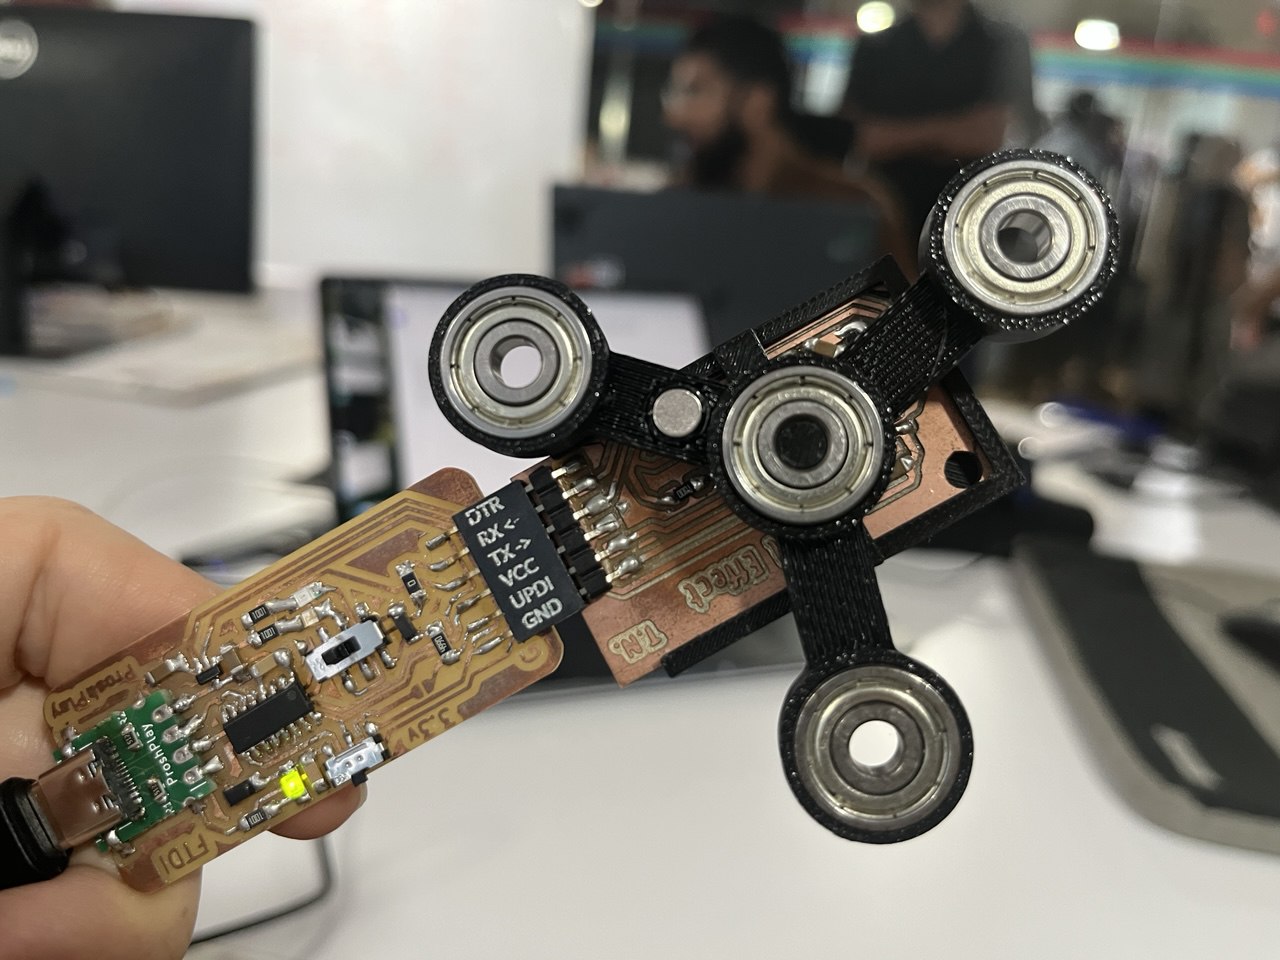
Here's the new spinner on the device:
Program and Final Result
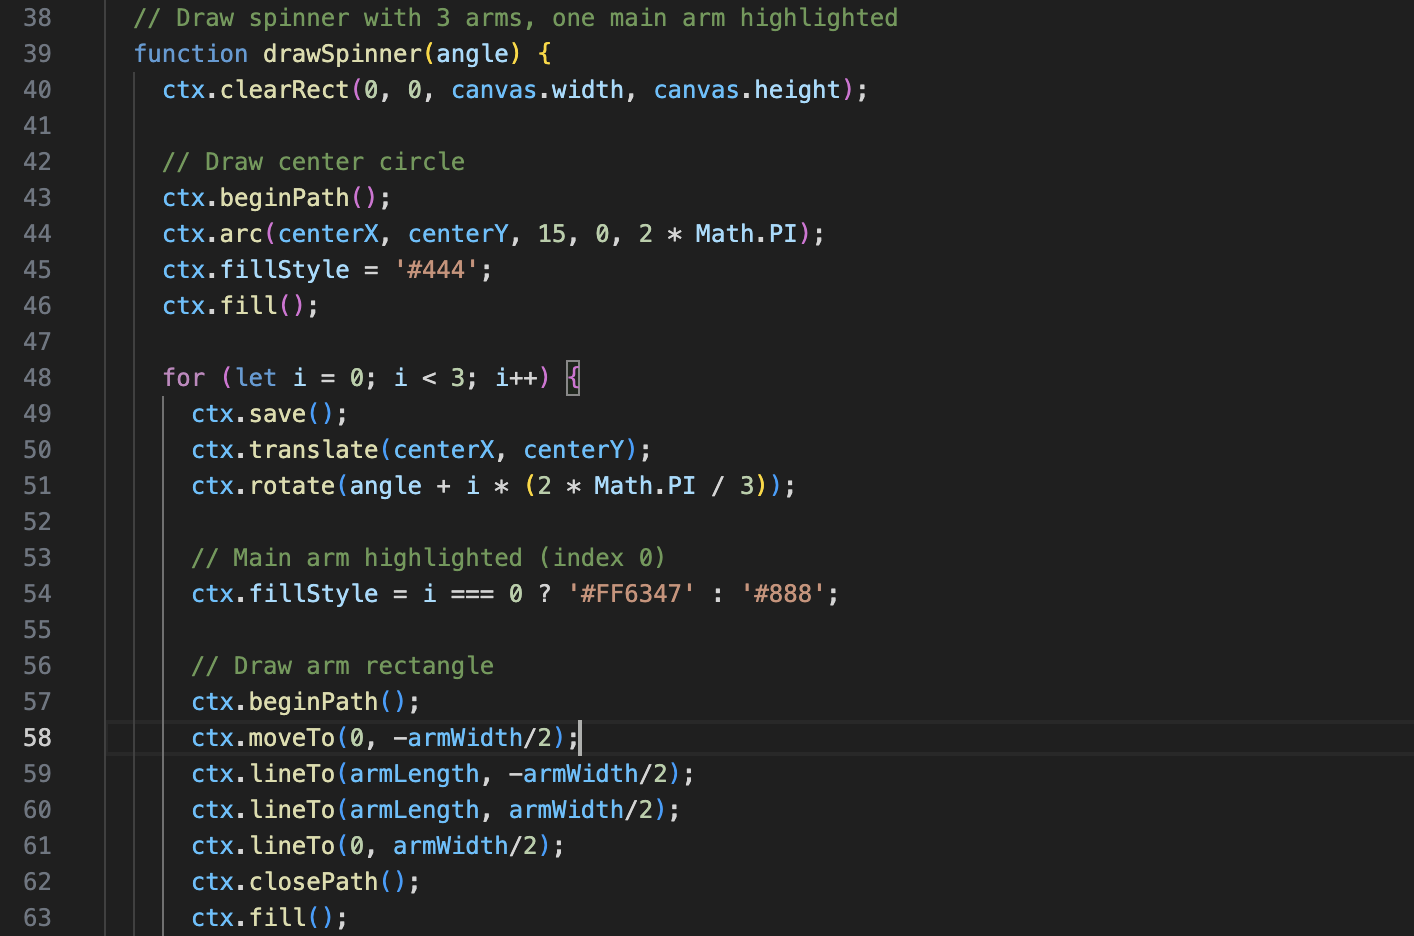
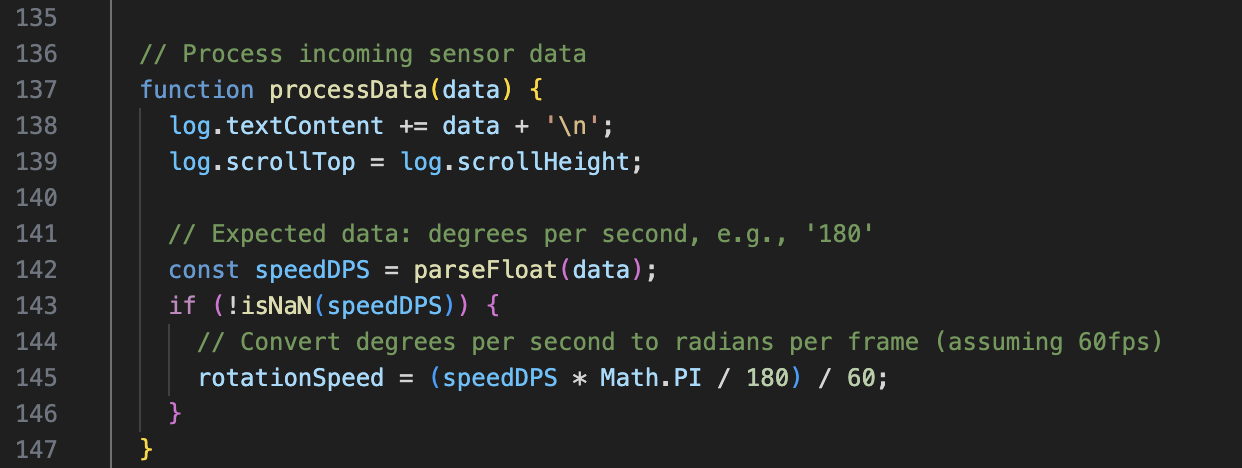
We need a Web Serial Browser Interface, this was constructed through an iterative diaglogue with perplexity.ai, as I am lacking in the background required to create it from scratch. In any case, it is is written in HTML and Javascript. The HTML provides the structure and layout of the page, while Javascript is used for the interactive portions, in particular for converting data into a rotating spinner. For understanding:
1. The following js code snipet is how the spinner is contructed and animated:
2. The following js code shows the function for processing the incoming data:
Finally, here is a video of the program and simulation in action:
Reflection on Group Assignment
Again I was sadly not in Kerala for this week, however I followed along with the action online. The group assignment was to compare the various tools for interfacing between our computers and our projects. This image from the group page illustrates some of the available options in a nice way.
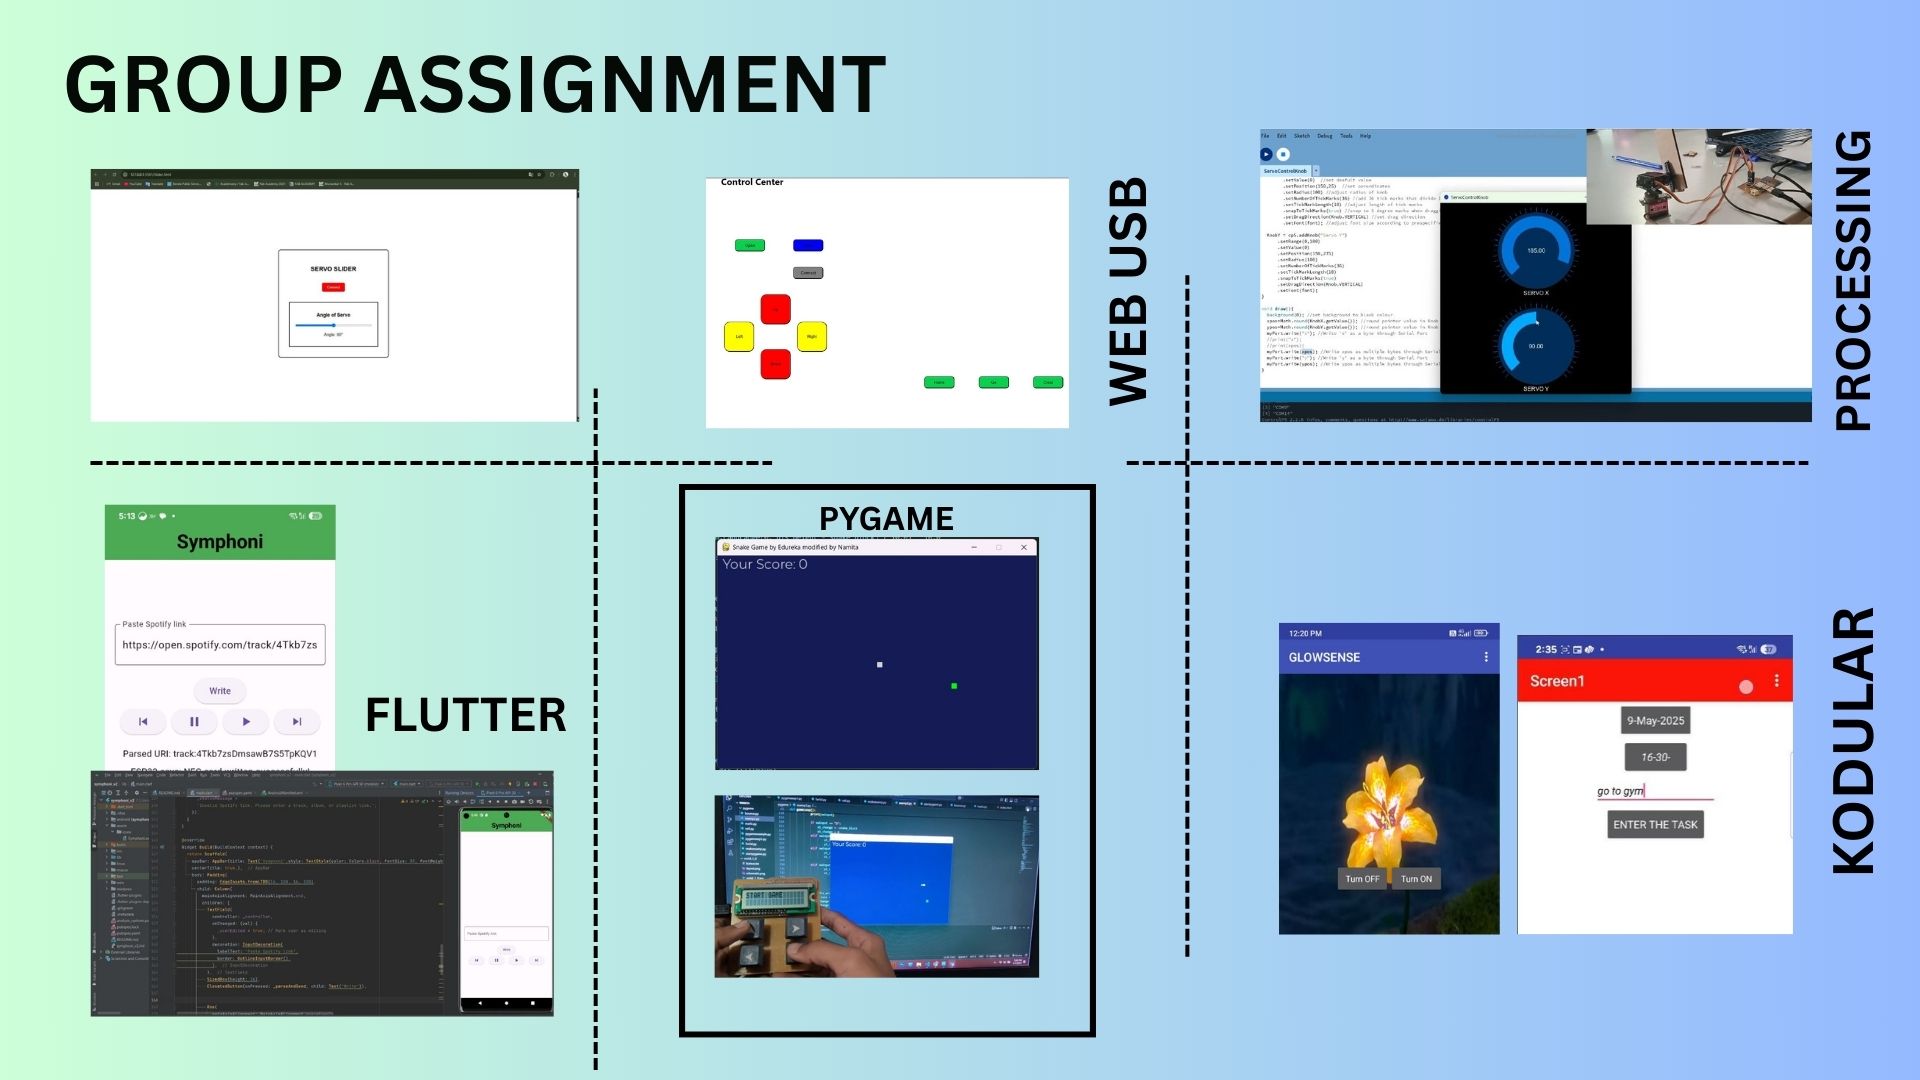
The option which I pursued in the individual assignment, Webserial, is perhaps the easiest option, but it nevertheless had its challenges. Pygame is another great option which I had occasion to use in the past for a project involving controlling a large robot with Raspberry Pi brain via a wireless keyboard. It was great to be introduced to other available options like Kodular (by Nancy) and Flutter (by Ashish) - gracias amigos!