
Interface & Applications
This week focused on interfacing microcontrollers with software tools. I created a Morse Code Communicating Device with my XIAO ESP32 Board using MQTT, learnt about a WebSerial interface, connected my ESP32 to a Mobile App made using Flutter, and explored the Spotify API to control music playback.
Learning Objectives
Assignments
Group Assignments
Individual Assignments
Group Assignment
For this week, all of us explored different interface and applications like mobile apps, web apps and interfaces. The interface programs that we explored are WebUSB, Processing, Kodular, Pygame and Flutter.
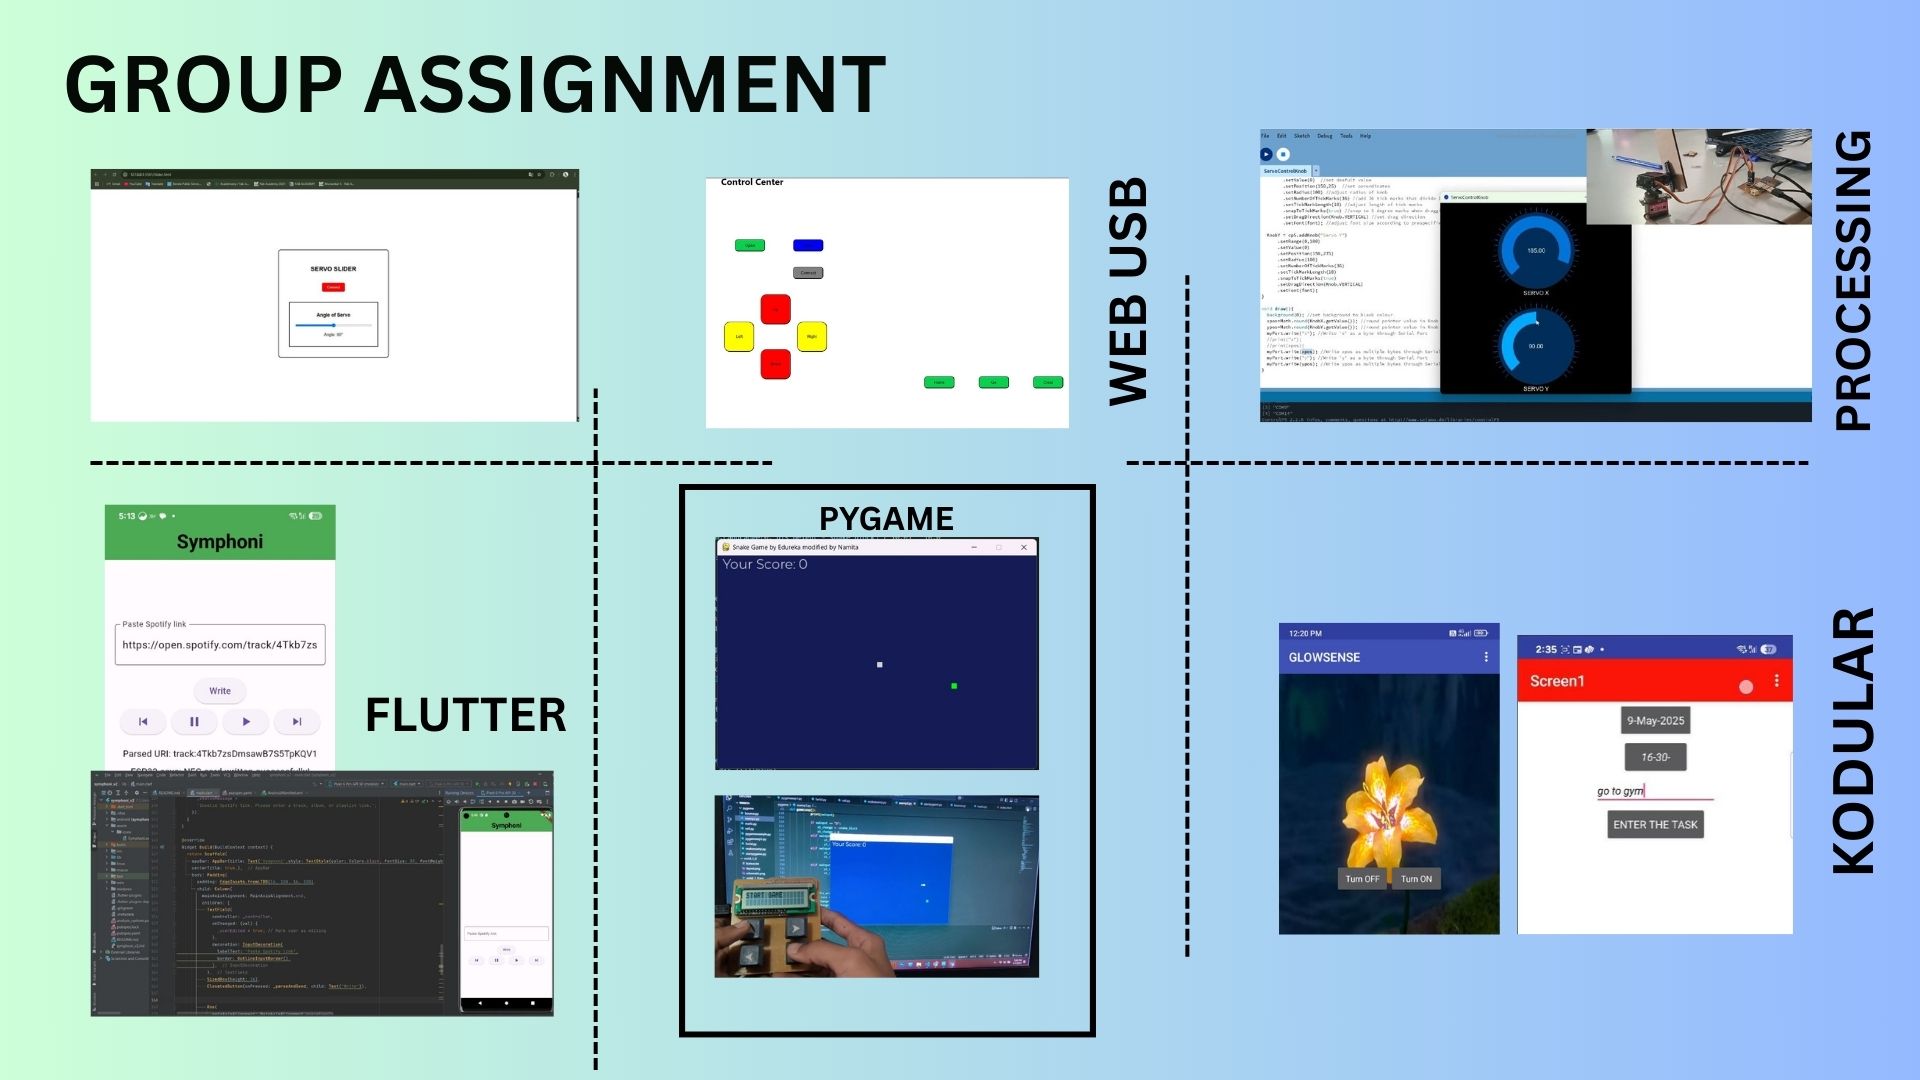
I explored Flutter and Android Studio along with Spotify API. I also learned from myy classmates about Kodular and Processing.
The group assignment can be found on the below link.
Group AssignmentIndividual Assignments
I'll be using a board that I already had, I used my Communication week XIAO ESP32C6 board. You can fnd the detailed documentation for the same in Communication week assignment
I used this board for trying out different user interfaces.
WebSerial
WebSerial is a browser-based API that allows direct communication between web applications and serial devices, such as development boards. By leveraging WebSerial, developers can send and receive data over a serial connection without requiring additional software installations. This is particularly useful for debugging, configuring, or interacting with microcontrollers like the SAMD21 or ESP32. To use WebSerial, ensure your browser supports the API, and establish a connection by selecting the appropriate serial port. Once connected, you can exchange data in real-time, enabling seamless integration between hardware and web-based interfaces.
WebSerial DocumentationOpen a serial port
The Web Serial API is asynchronous by design. This prevents the website UI from blocking when awaiting input, which is important because serial data can be received at any time, requiring a way to listen to it.
To open a serial port, you can use the following code:
async function connecttoSerial(){  //connecttoSerial is a use defined async function that opens a serial port.
    // Prompt user to select any serial port.
    const port = await navigator.serial.requestPort();
    await port.open({ baudRate: 9600}); //open the port with a baud rate of 9600.
}
Getting writer and reader
writer = port.writable.getWriter();  //allows you to send data to the serial device
reader = port.readable.getReader(); //allows you to read incoming data
Read incmoming data
//create a new instance of the TextDecoder class to decode incoming data.
const decoder = new TextDecoder();

//textDecoder is a built-in JavaScript class that decodes text from a stream of bytes(Uint8Array).

while(true) {
    //read and store incoming data(bytes) from the serial port into value
    const { value, done } = await reader.read();
    if (done) break;

    //decoding stored data(bytes) into a string.
    const string = decoder.decode(value);

    //append the decoded string to the outputMsg textarea.
    document.getElementById('outputMsg').textContent += string;
}
Sending Serial Data
async function sendMessage() {
    //get the value of the input field with id 'input'.
    //store it in a variable called input.

    const input = document.getElementById('input').value;
    if (!writer) return;

    //create a new instance of the TextEncoder class to encode the input string into bytes.
    const encoder = new TextEncoder();

    //write the encoded input string to the serial port using the writer object.
    await writer.write(encoder.encode(input + '\n'));

    //clear the input field after sending the message.
    document.getElementById('input').value = ""
}
WebSockets
WebSockets is a communication protocol that enables full-duplex communication channels over a single TCP connection. It is designed to work over the web and allows for real-time data exchange between a client (usually a web browser) and a server. Unlike traditional HTTP requests, which are request-response based, WebSockets maintain an open connection, allowing both the client and server to send messages independently. This makes WebSockets ideal for applications that require low latency and real-time updates, such as chat applications, online gaming, and live data feeds.
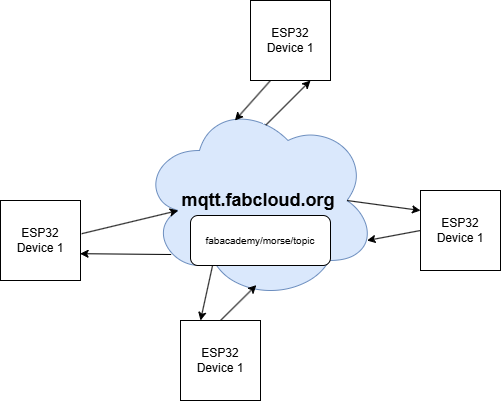
MQTT
Message Queuing Telemetry Transport. The communication protocol uses a broker and subscribe/publish communication protocol.
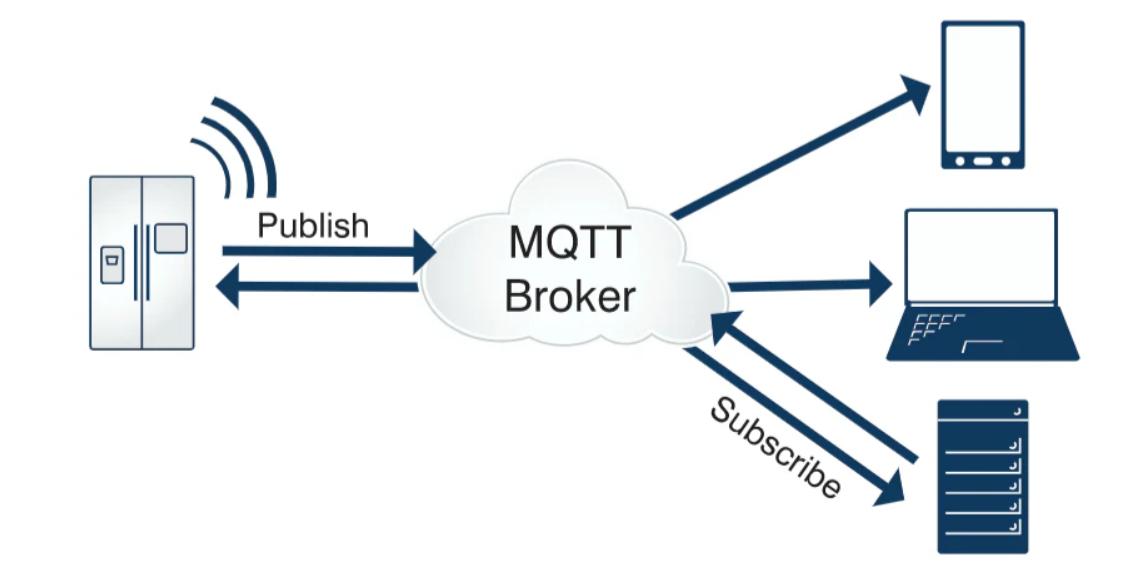
The above slideshow will give some idea on how MQTT works.
I refered to Chenxing Yang's documentation to acquire details for the Fabacademy MQTT Broker
CHENXING YANG MQTT Documentation- Broker URL: mqtt.fabcloud.org
- Port: 1883
- Username: fabacademy
- Password: fabacademy
- Channel/Topic: fabacademy/
This is the broker which is available to be used
ESP32 MORSE CODE
I really like MQTT, so to explore the applications of MQTT using a board that I already had, I used my Communication week XIAO ESP32C6 board. You can fnd the detailed documentation for the same in Communication week assignment
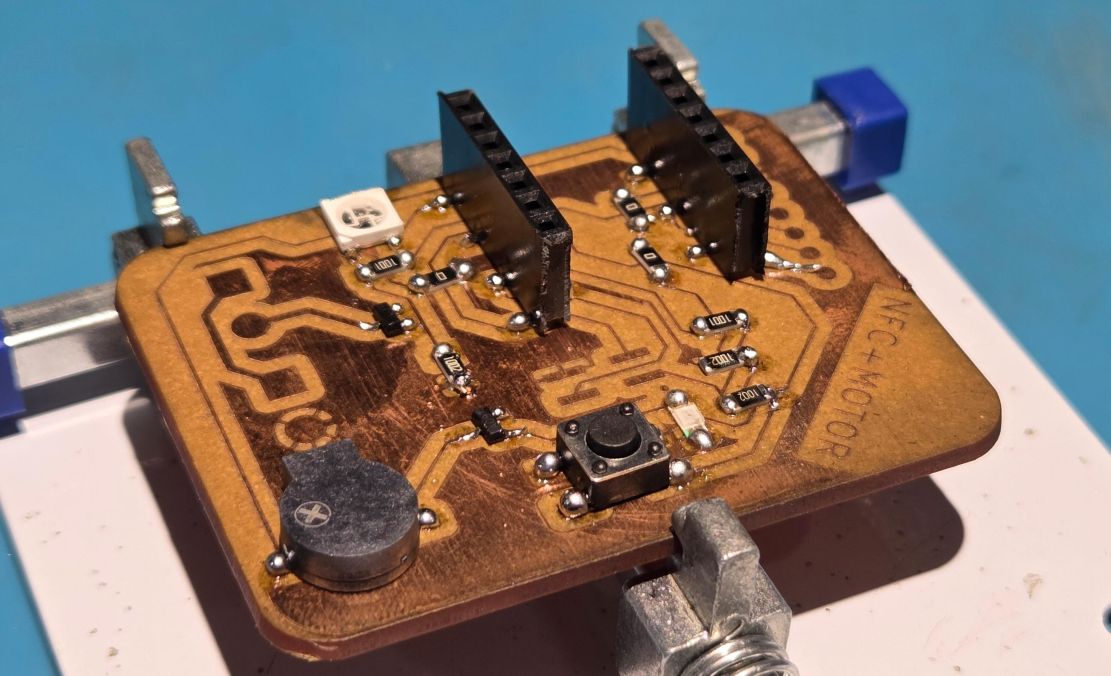
The board has a XIAO ESP32 C6 at its core and a basic LED, Push button and a buzzer that we can use for our purpose.
I wanted to communicate somehow to different place which was not locally connected, so I thought it would be cool to communicate with the folks at Rico's lab
Me and Akash wanted to communicate using our ESP32s and he suggested we should do a Morsee Code decoder to communicate with each other. Rico also suggested that this would be cool. So I was working on that.
The board has a LED, push button and a speaker, all that we need for Morse Code Communication
You need the Wifi( for WiFi) and PubSubClient (for MQTT) Libraries for this code.
To test the MQTT communication, I used a simple code to connect to the broker and publish a message. The code was provided with the help of ChatGPT using the prompt "I want a simple MQTT test code using a Xiao ESP32-C6 that connects to a password-protected MQTT broker , reads strings from the Serial monitor, and sends them as messages to a topic." The code is as follows:
#include <WiFi.h>
#include <PubSubClient.h>

// Replace with your wifi credentials
const char* ssid = "YOUR_WIFI_SSID";
const char* password = "YOUR_WIFI_PASSWORD";

const char* mqtt_server = "mqtt.fabcloud.org"; // Replace with your broker address
const int mqtt_port = 1883; // Usually 1883 for unencrypted
const char* mqtt_user = "fabacademy";  // Optional; replace with your MQTT username
const char* mqtt_pass = "fabacademy";  // Optional; replace with your MQTT password
const char* mqtt_topic = "fabacademy/test";  // Your MQTT topic

WiFiClient espClient;           //Initialize WiFi client
PubSubClient client(espClient); //Initialize PubSubClient with WiFi client 'espClient'

//This is the function to setup WiFi connection
void setup_wifi() {
  delay(10);
  Serial.print("Connecting to WiFi: ");
  Serial.println(ssid);
  WiFi.begin(ssid, password);

  while (WiFi.status() != WL_CONNECTED) {
    delay(500);
    Serial.print(".");
  }
  Serial.println("\nWiFi connected. IP address: ");
  Serial.println(WiFi.localIP());
}


//This function is used to reconnect to the MQTT broker
void reconnect() {
  while (!client.connected()) {
    Serial.print("Attempting MQTT connection...");
    if (client.connect("XIAO_ESP32C6", mqtt_user, mqtt_pass)) {
      Serial.println("connected");
    } else {
      Serial.print("failed, rc=");
      Serial.print(client.state());
      Serial.println(" trying again in 2 seconds");
      delay(2000);
    }
  }
}

void setup() {
  Serial.begin(115200);
  setup_wifi();
  client.setServer(mqtt_server, mqtt_port);
}

void loop() {
  if (!client.connected()) {
    reconnect();
  }
  client.loop();

  if (Serial.available()) {
    String message = Serial.readStringUntil('\n');
    message.trim();
    if (message.length() > 0) {
      Serial.print("Sending to MQTT: ");
      Serial.println(message);
      client.publish(mqtt_topic, message.c_str());
    }
  }
}
The above code helps you test the MQTT connection and the sending messages serially to the MQTT broker. You can view the MQTT messages by subscribing to the broker(mqtt.fabcloud.org) and the topic(fabacademy/test) either using another device or a MQTT client software like MQTT Explorer.
I used the MQTT Explorer software, a MQTT Client, to subscribe to the topic 'fabacademy/test' on the broker 'mqtt.fabcloud.org.
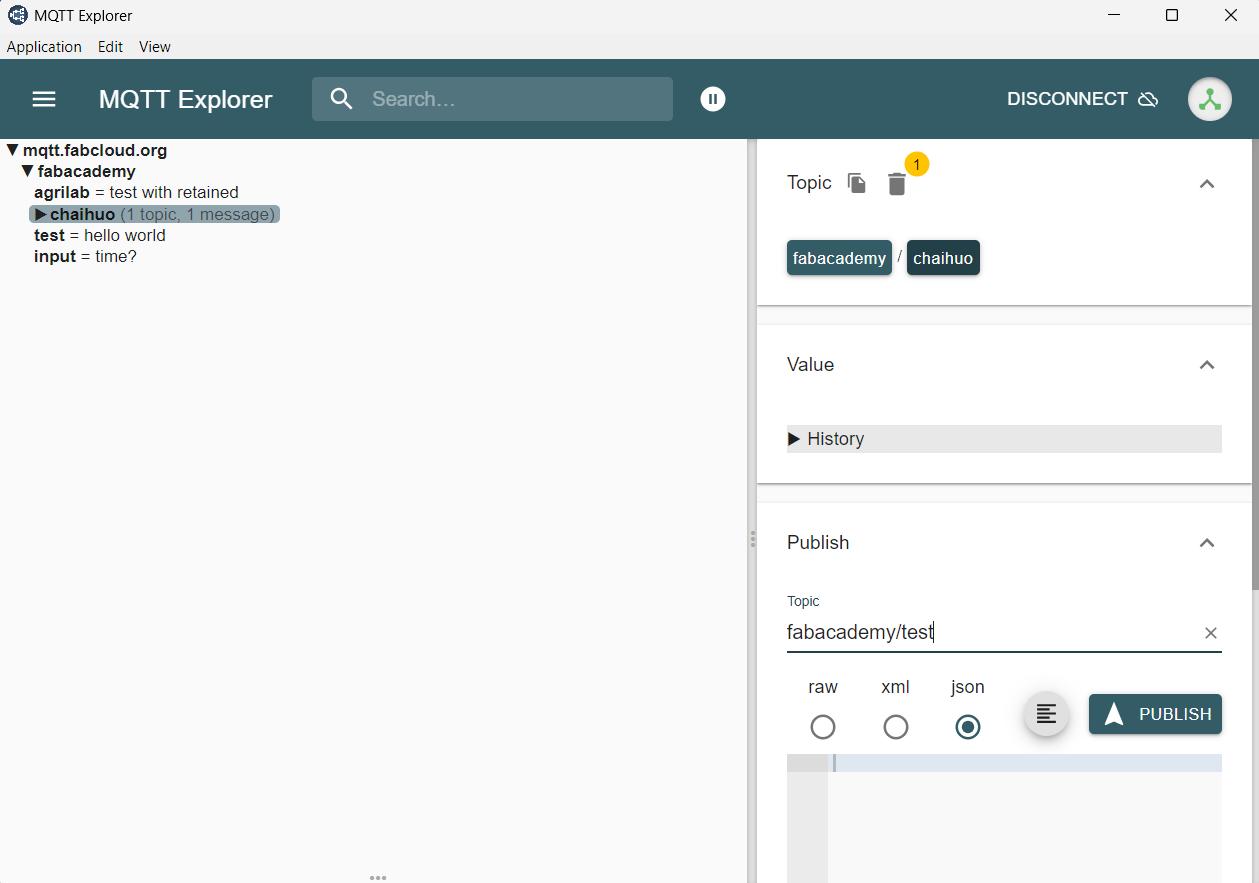
You can download MQTT explorer from this link
Afte testing the basic MQTT communciation using my board, I moved on to the Morse Code implementation
The below given link is for a youtube video that Rico shared with me. This is the base for the ESP32 Morse Code logic. You can refer to the video to learn more about the logic.
ESP32 Morse Code DecoderI have attached the link to the TinkerCad project for the above refered video. Morse-decode-encode. YOu need to sign in to see the project.
I have attached the code for the project Morse_Encode_Decode.ino
I refered to the above code and tested it using my GPIO connections and everthing was working great. Now I had to add the MQTT to the connection.
The existing code just needs the implementation of the MQTT to send the push button input to the MQTT Broker and also light up the LED when the psuh button is pressed.
The above video shows me sending the push button message to to the broker and seeing it on the MQTT Explorer Software. Successfull MQTT Morse Code Communication. The current code is to communicate the letters directly to the topic, which seemed to be ironical to the concept of Morse code encryption. Therefore, I need to send the dots and dashes without decoding the encrypting it into letters in the next iteration.
In the next iteration, I have modified the code to send only dashes and dots instead of decoded alphabets.
Programming for Multiple Devices
I wanted this device to be able to be replicated afrom anywhere in the world, therefore I modified the code for that. You can access the code from the below file. You only need to change the Wifi Credentials, Broker Information, Device ID and Client ID.
Morse MQTT Device CodePlease change the device ID and the client ID for each device that you connect. Also change the SSID and Password of your WiFi
My Side in MQTT Commmunication
This is the video of me recieving the code sent by Rico from Japan
This is the video of me sending morse code to the broker and to Rico (Japan)
Rico's Side in MQTT Communication
This is the video of Rico sending and recieving the morse code to our lab
Spotify Web API
The Spotify Web API is a powerful tool that allows developers to access and interact with Spotify's vast music catalog and user data. It provides endpoints for retrieving information about tracks, albums, artists, playlists, and user profiles. The API also supports features like searching for music, managing playlists, and controlling playback on Spotify clients. To use the Spotify Web API, developers need to register their application on the Spotify Developer Dashboard, obtain an access token through OAuth2 authentication, and make HTTP requests to the API endpoints. The API returns data in JSON format, which can be easily parsed and utilized in various applications, such as music discovery apps, personalized playlists, and more.
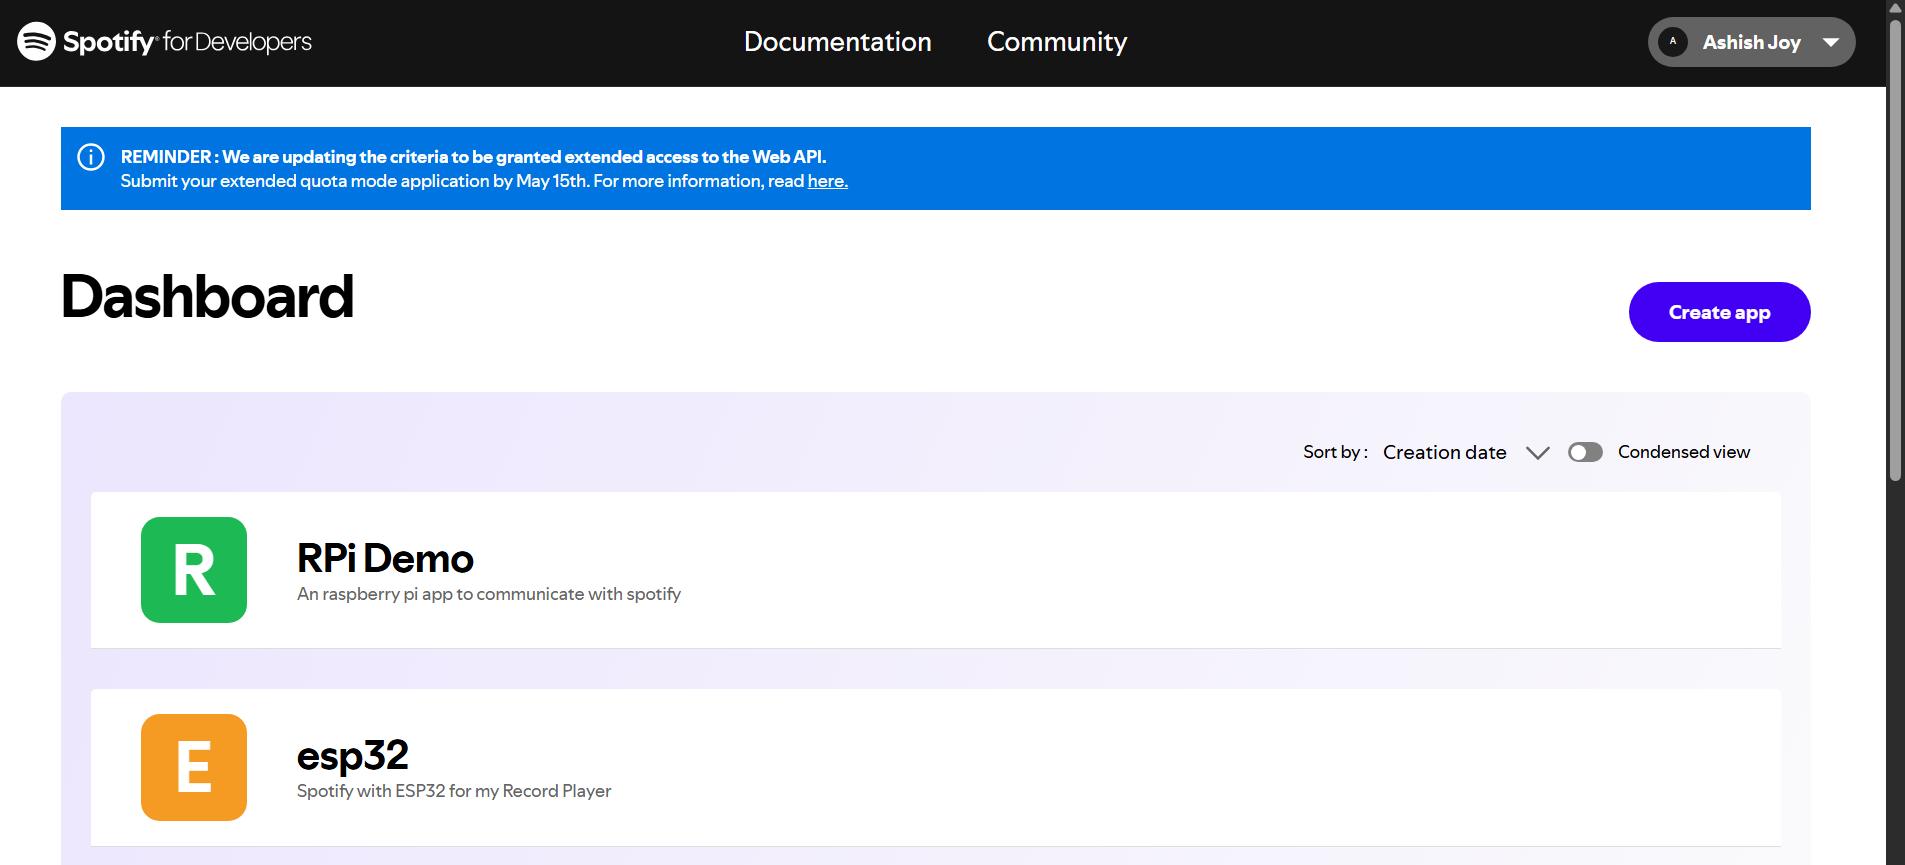
To use the Spotify API, you need to create an application on the Spotify Developer Dashboard. This will provide you with the necessary credentials (Client ID and Client Secret) to authenticate your requests. Once you have your credentials, you can use OAuth2 to obtain an access token, which is required for making API calls. The access token is typically valid for a limited time, so you'll need to refresh it periodically.
I am using a refresh token which allows the program to retrieve a new access token whenever the token expires.
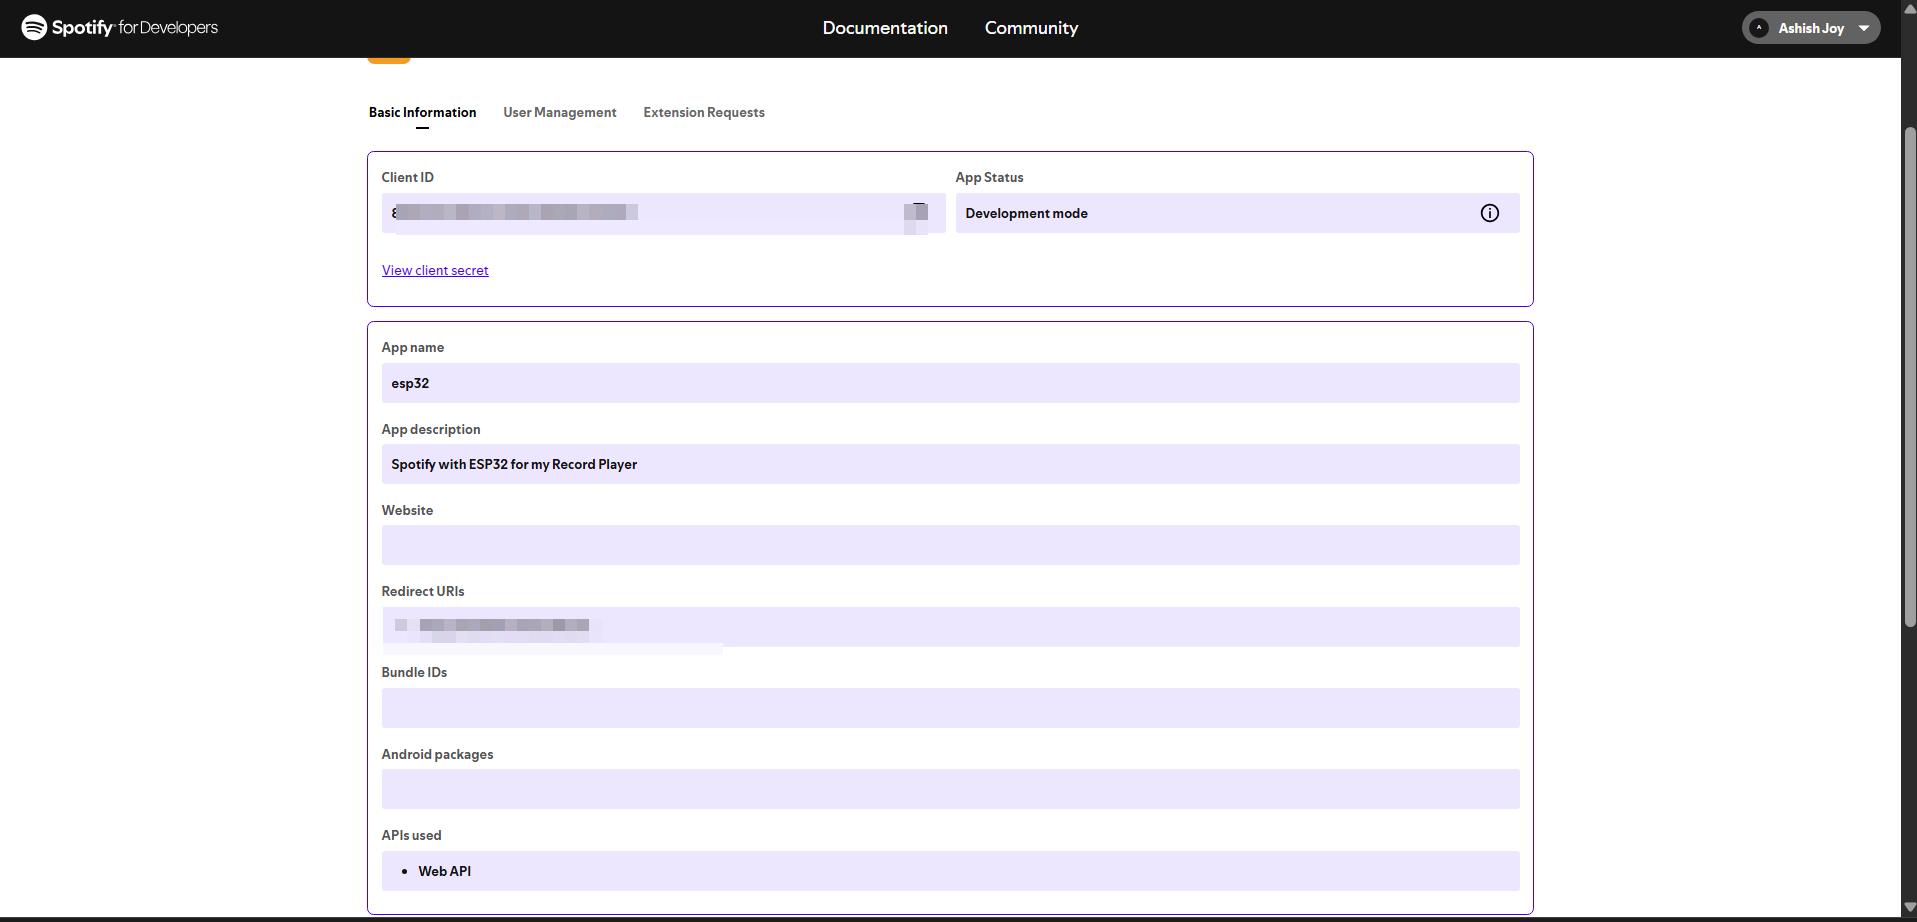
You need to note your API KEY and SECRET for futher development
Connecting ESP32 with Spotiy API
To connect the ESP32 with the Spotify API, you can use the HTTPClient library to make GET and POST requests. The library allows you to send requests to the Spotify API endpoints and receive responses in JSON format. You can then parse the JSON data to extract relevant information, such as track names, artist names, and album art URLs. This data can be displayed on an OLED screen or sent to a connected device for further processing.
For this week I have used a library called Spotify_Esp32
Spotify_Esp32 DocumentationTo use the library, you need to include it in your Arduino sketch and initialize it with your Spotify credentials. The library provides functions to authenticate with the Spotify API, fetch track information, and control playback on connected devices.
Here is a simple example of how to use the library to fetch the currently playing track:
/*
An example of how to authenticate with Spotify without using a refresh token and print Artist and Track via Serial

In this example your current track will be printed to the serial and as soon as you listen to a new track that tracks information will be printed.

    15.03.2024
    Created by: Finian Landes

    16.03.2024
    edited by: Sascha Seidel
        * added getting artist and trackname to print it Serial

    Documentation: https://github.com/FinianLandes/Spotify_Esp32
*/
// Include the required libraries
#include < Arduino.h>
#include < WiFi.h>
#include < SpotifyEsp32.h>

char* SSID = "YOUR WIFI SSID";
const char* PASSWORD = "YOUR WIFI PASSWORD";
const char* CLIENT_ID = "YOUR CLIENT ID FROM THE SPOTIFY DASHBOARD";
const char* CLIENT_SECRET = "YOUR CLIENT SECRET FROM THE SPOTIFY DASHBOARD";
const char* REFRESH_TOKEN = "YOUR REFRESH TOKEN";

Spotify sp(CLIENT_ID, CLIENT_SECRET);

void setup() {
    Serial.begin(115200);
    connect_to_wifi();

    sp.begin();
    while(!sp.is_auth()){
        sp.handle_client();
    }
    Serial.println("Authenticated");
}

void loop() {
    static String lastArtist;
    static String lastTrackname;

    String currentArtist = sp.current_artist_names();
    String currentTrackname = sp.current_track_name();

    if (lastArtist != currentArtist && currentArtist != "Something went wrong" && !currentArtist.isEmpty()) {
        lastArtist = currentArtist;
        Serial.println("Artist: " + lastArtist);
    }

    if (lastTrackname != currentTrackname && currentTrackname != "Something went wrong" && currentTrackname != "null") {
        lastTrackname = currentTrackname;
        Serial.println("Track: " + lastTrackname);
    }
}

void connect_to_wifi(){
    WiFi.begin(SSID, PASSWORD);
    Serial.print("Connecting to WiFi...");
    while (WiFi.status() != WL_CONNECTED) {
        delay(1000);
        Serial.print(".");
    }
    Serial.printf("\nConnected to WiFi\n");
}
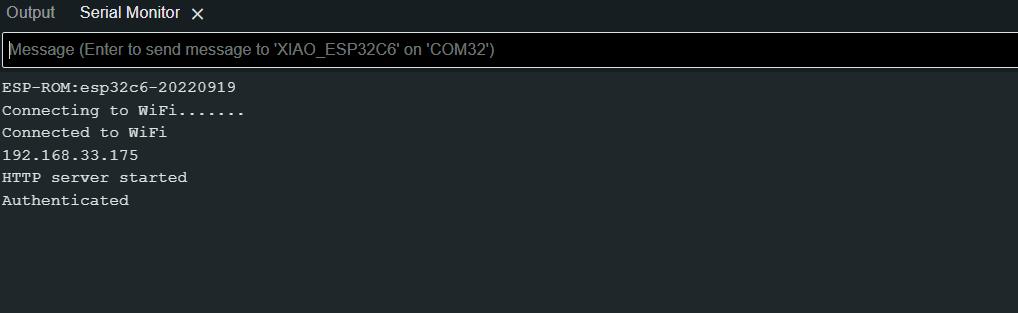
In this example, the ESP32 connects to Wi-Fi, authenticates with the Spotify API using the provided credentials, and continuously checks for the currently playing track. When a new track is detected, it prints the artist and track name to the serial monitor.
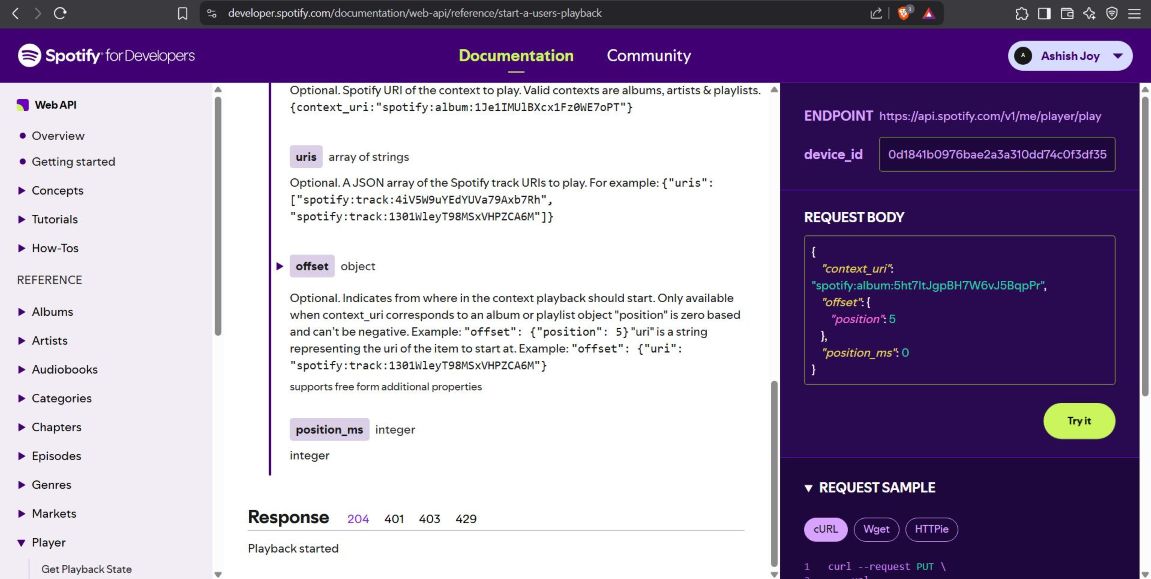
For my use case I wanted to use basically one function of the Web API - Start/Resume Playback

In this project, Flutter, the ESP32 microcontroller, and the Spotify Web API communicate using HTTP, a widely used protocol for data exchange over networks.
On the Flutter app side, HTTP POST requests are sent using the Dart http package. When the user provides a Spotify playlist or track URI, the app constructs an HTTP POST request targeting the ESP32s local IP address (e.g., http://192.168.xx.xx/uri). This request contains headers like Content-Type: application/x-www-form-urlencoded and a body with the required data (such as the playlist URI).
The ESP32, running a local web server, listens for these incoming requests on predefined routes (like /uri, /play, /pause). When a request arrives, it parses the data, acts on it, and sends back an HTTP response — typically including a status code (200 OK) and an optional message, confirming that the request was successfully received or processed.
Separately, the Spotify Web API uses HTTP over the internet (specifically HTTPS) to handle actions like playing, pausing, or fetching playlists. These requests must include an OAuth 2.0 Bearer token for authentication and are typically sent with JSON-formatted payloads. For example, sending a POST request to https://api.spotify.com/v1/me/player/play requires both proper headers and a correctly formatted body.
In summary, this project bridges local network communication (Flutter ↔ ESP32) with external cloud API services (Spotify Web API), both using standardized HTTP methods, but under very different security, authentication, and data format requirements.
Flutter and Android Studio
Flutter is an open-source UI software development toolkit created by Google. It is used to develop applications for Android, iOS, Linux, macOS, Windows, and the web from a single codebase. Flutter allows developers to create visually appealing and high-performance applications using a reactive programming model.
FlutterYou can download Flutter from the official website, the link is provided above. You can follow the documentation provided by Flutter to install and configure Flutter in your device.
Android Studio is the official integrated development environment (IDE) for Google's Android operating system. It is based on JetBrains' IntelliJ IDEA software and is designed specifically for Android development. Android Studio provides a comprehensive set of tools for building, testing, and debugging Android applications, including a code editor, layout editor, and emulator.
In this week I have used Flutter and Android Studio to create a simple app that allows the user to send track, album or playlist links to the ESP32. The app uses the WebSerial API to establish a connection with the ESP32 and send data over the serial port.
Setting up Android Studio
You can download Android Studio from the official website, the link is provided here. You can follow the documentation provided by Android Studio to install and configure Android Studio in your device.
How to Install Android StudioAfter installing Android Studio, we need to install Flutter and start developing our Flutter projects. The below given links is a documentation for setting up Android Studio for Flutter Development
Android Studio Setup for Flutter DevelopmentPostman to ESP32
I had to test the http request communication to ESP32, so I used postman to communicate a POST request
Postman is a popular API development and testing tool that allows developers to send requests to APIs and view responses. It provides a user-friendly interface for creating and managing API requests, making it easier to test and debug APIs during development.
Setting up Postman
You can download Postman from the below given link
Postman Download LinkBefore using Postman, the ESP32 must be loaded with a program to recieve and respond to POST Requests from a server. This code can recieve POST requests with the format 'https://IP/uri' which have uri as a parameter key and value.
#include <WiFi.h>
#include <WebServer.h>

const char* ssid = "SSID";
const char* password = "PASSWORD";

WebServer server(80);

void handleUriPost() {
	if (server.hasArg("uri")) {
	String uri = server.arg("uri");
	Serial.println("Received URI: " + uri);

	server.send(200, "text/plain", "URI received: " + uri);
	} else {
	server.send(400, "text/plain", "Missing 'uri' parameter");
	}
}

void setup() {
	Serial.begin(115200);
	WiFi.begin(ssid, password);
	Serial.print("Connecting to WiFi...");

	while (WiFi.status() != WL_CONNECTED) {
	delay(500);
	Serial.print(".");
	}

	Serial.println("\nConnected! IP address: ");
	Serial.println(WiFi.localIP());

	server.on("/uri", HTTP_POST, handleUriPost);
	server.begin();
	Serial.println("HTTP server started");
}

void loop() {
	server.handleClient();
}
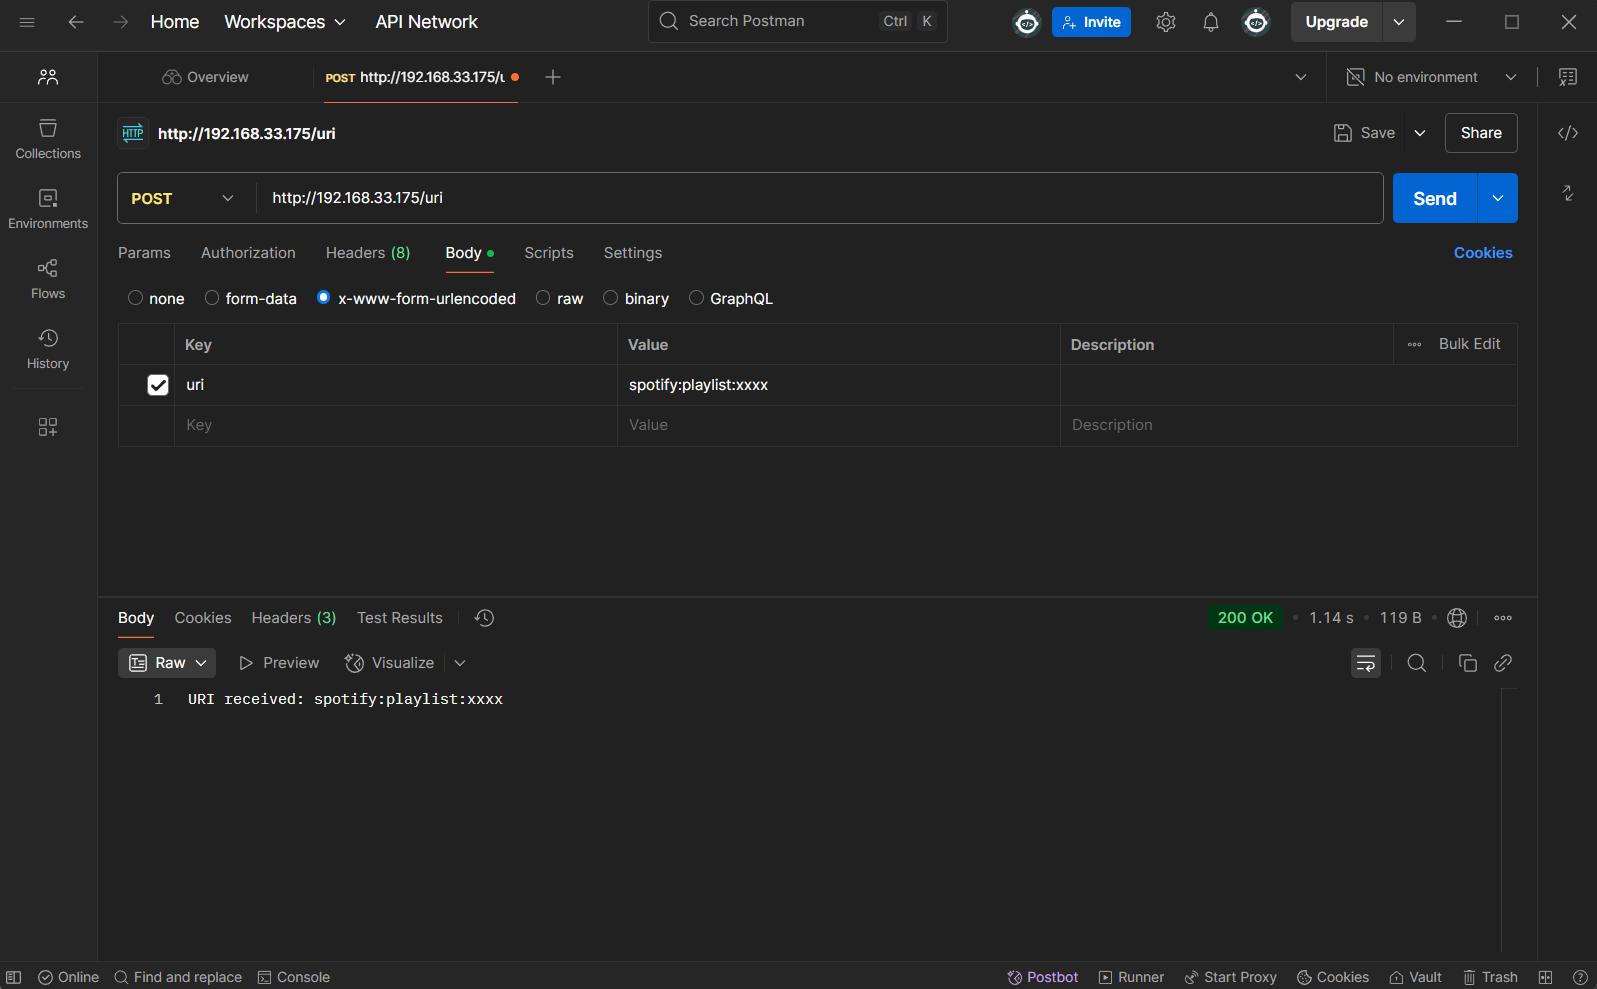
After downloading and installing Postman, you can create a new request by clicking on the "New" button and selecting "Request". You can then enter the URL of the ESP32 server and select the HTTP method (GET, POST, etc.) for your request. In this case, we will use the POST method to send data to the ESP32.
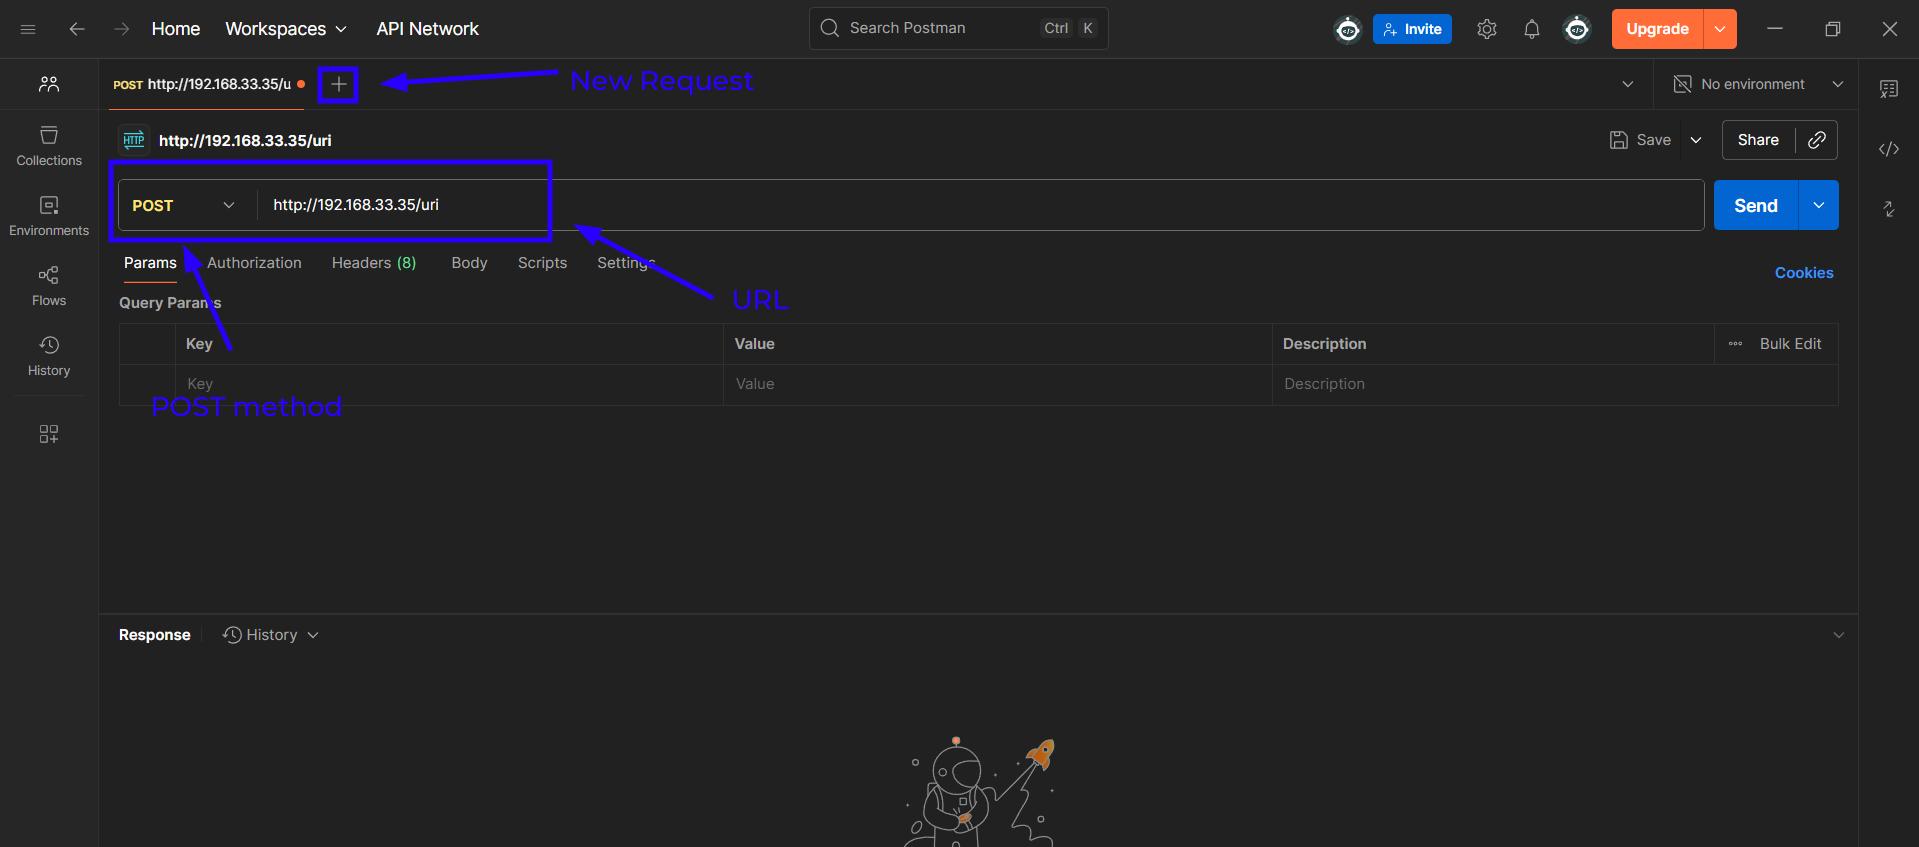
The POST method requires us to send a request in the format 'https://ESP-IP/uri'

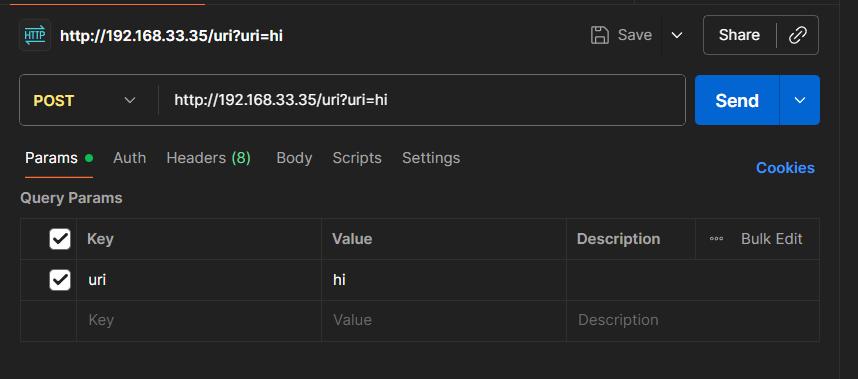
The Query parameters can be added along with the request by clicking on the "Params" button and entering the key-value pairs. In this case, we will use "uri" as the key and the Spotify track, album, or playlist link as the value.
When the parameters are added to the POST request, the URL will be 'https://ESP-IP/uri?KEY=VALUE'
After entering the URL and query parameters, you can click on the "Send" button to send the request to the ESP32. The ESP32 will then process the request and respond with a message indicating whether the URI was received successfully or not.
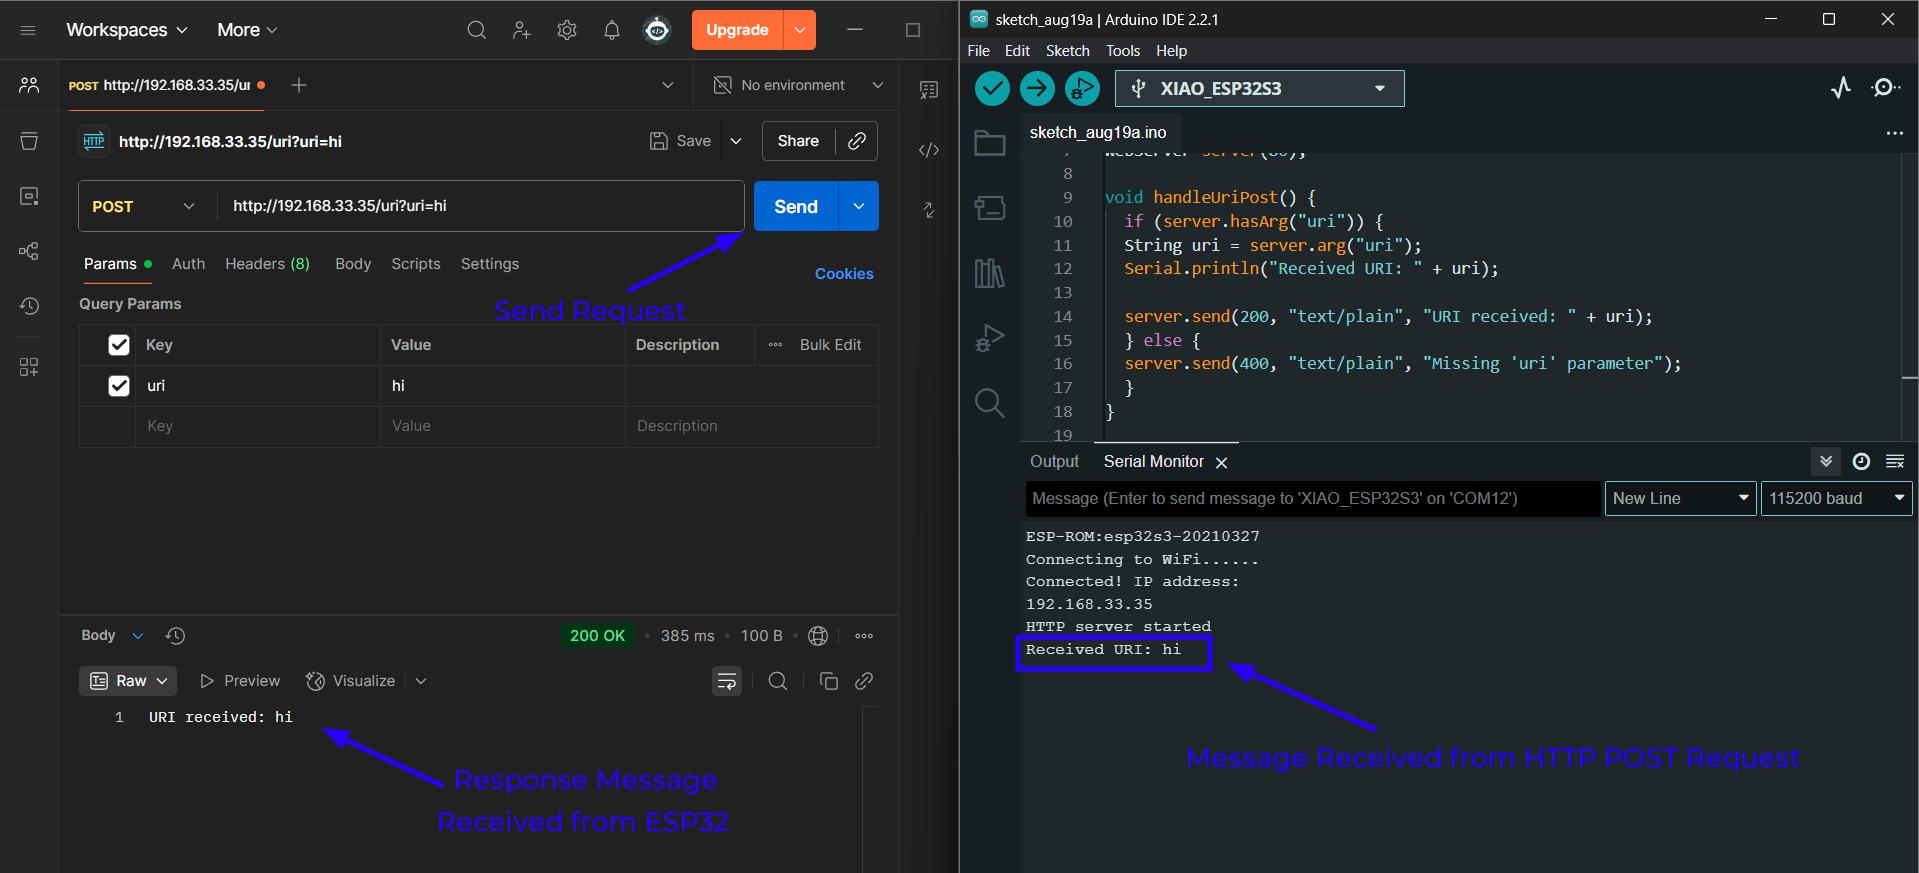
After sending the request, you can view the response from the ESP32 in the Postman interface. The response will indicate whether the URI was received successfully or if there was an error. You can also view the serial monitor of the ESP32 to see the received URI and any other debug information.
Flutter App to ESP32
To create a Flutter app that communicates with the ESP32, you need to set up a Flutter project in Android Studio. Once the project is created, you can use the http package to access the WebSerial API and establish a connection with the ESP32. The app should have a simple user interface that allows users to input track, album, or playlist links and send them to the ESP32.
In the app, you can use a TextField widget to allow users to enter the URI and a button to send the URI to the ESP32. The app should also handle the response from the ESP32 and display it to the user.
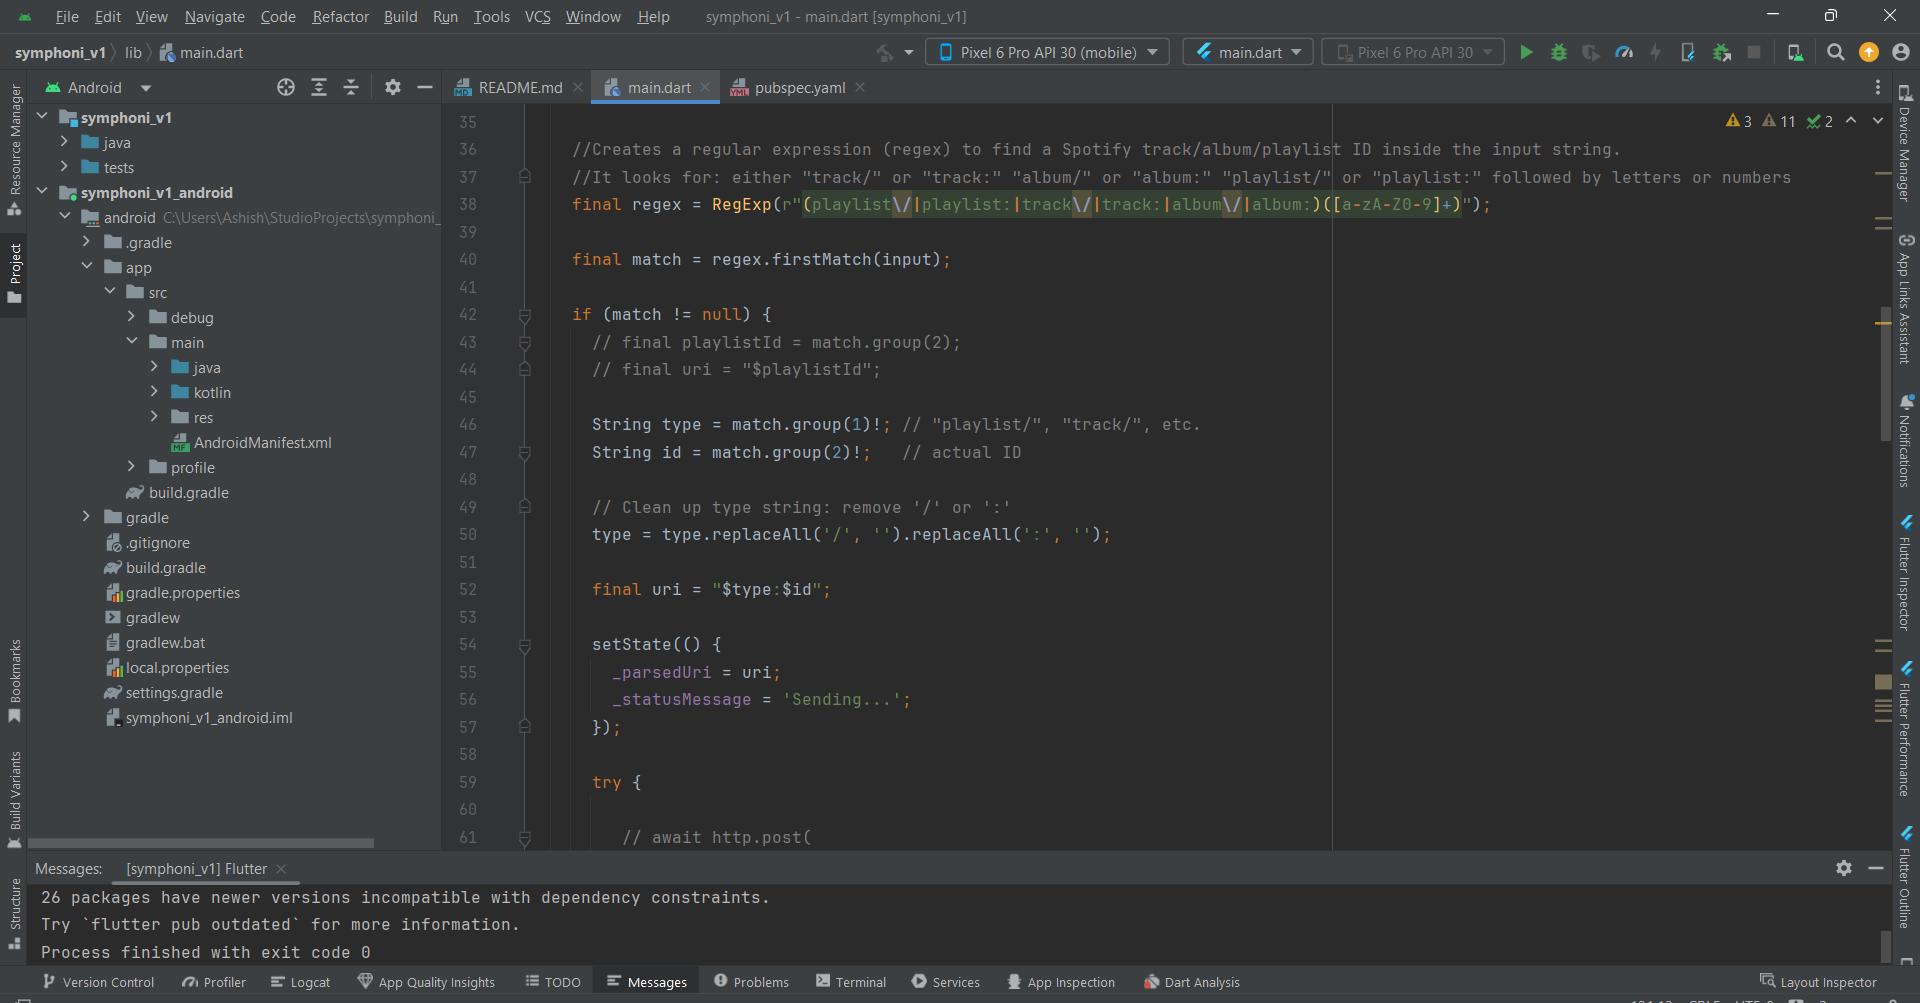
V1 Dart Code
//This is a simple Flutter app that takes a Spotify playlist link, extracts the playlist ID, and sends it to an ESP32 device over HTTP.
//The ESP32 is expected to be running a server that can handle the incoming request.

import 'package:flutter/material.dart';
import 'package:http/http.dart' as http;

void main() {
  runApp(SpotifySenderApp());
}

class SpotifySenderApp extends StatelessWidget {
  @override
  Widget build(BuildContext context) {
    return MaterialApp(
      home: SpotifyInputScreen(),
    );
  }
}

class SpotifyInputScreen extends StatefulWidget {
  @override
  _SpotifyInputScreenState createState() => _SpotifyInputScreenState();
}

class _SpotifyInputScreenState extends State {
  final TextEditingController _controller = TextEditingController();
  String _parsedUri = '';
  String _statusMessage = '';

  final esp32Ip = '192.168.33.175'; // <-- replace with your ESP32's IP!

  void _parseAndSend() async {
    final input = _controller.text.trim();
    final regex = RegExp(r"(playlist\/|playlist:)([a-zA-Z0-9]+)");
    final match = regex.firstMatch(input);

    if (match != null) {
      final playlistId = match.group(2);
      final uri = "$playlistId";

      setState(() {
        _parsedUri = uri;
        _statusMessage = 'Sending...';
      });

      try {
         final response =
         // await http.post(
         //     Uri.parse('http://192.168.33.17/uri'),
         //     body: {'uri': 'spotify:playlist:abc'}
         // );
         await http.post(
          Uri.parse('http://192.168.33.175/uri'),
          headers: {'Content-Type': 'application/x-www-form-urlencoded'},
          body: {'uri': uri},
        );

        if (response.statusCode == 200) {
          setState(() {
            _statusMessage = 'ESP32 says: ${response.body}';
          });
        } else {
          setState(() {
            _statusMessage = 'HTTP Error ${response.statusCode}: ${response.body}';
          });
        }
      } catch (e) {
        setState(() {
          _statusMessage = 'Failed to send: $e';
        });
      }
    } else {
      setState(() {
        _parsedUri = '';
        _statusMessage = 'Invalid Spotify playlist link.';
      });
    }
  }

  @override
  Widget build(BuildContext context) {
    return Scaffold(
      appBar: AppBar(title: Text('Spotify URI Sender')),
      body: Padding(
        padding: EdgeInsets.all(16),
        child: Column(
          children: [
            TextField(
              controller: _controller,
              decoration: InputDecoration(
                labelText: 'Paste Spotify playlist link',
                border: OutlineInputBorder(),
              ),
            ),
            SizedBox(height: 16),
            ElevatedButton(onPressed: _parseAndSend, child: Text('Parse and Send')),
            SizedBox(height: 16),
            if (_parsedUri.isNotEmpty) Text('Parsed URI: $_parsedUri'),
            SizedBox(height: 8),
            Text(_statusMessage),
          ],
        ),
      ),
    );
  }
}
In this code, we have a simple Flutter app that takes a Spotify playlist link, extracts the playlist ID, and sends it to an ESP32 device over HTTP. The ESP32 is expected to be running a server that can handle the incoming request.
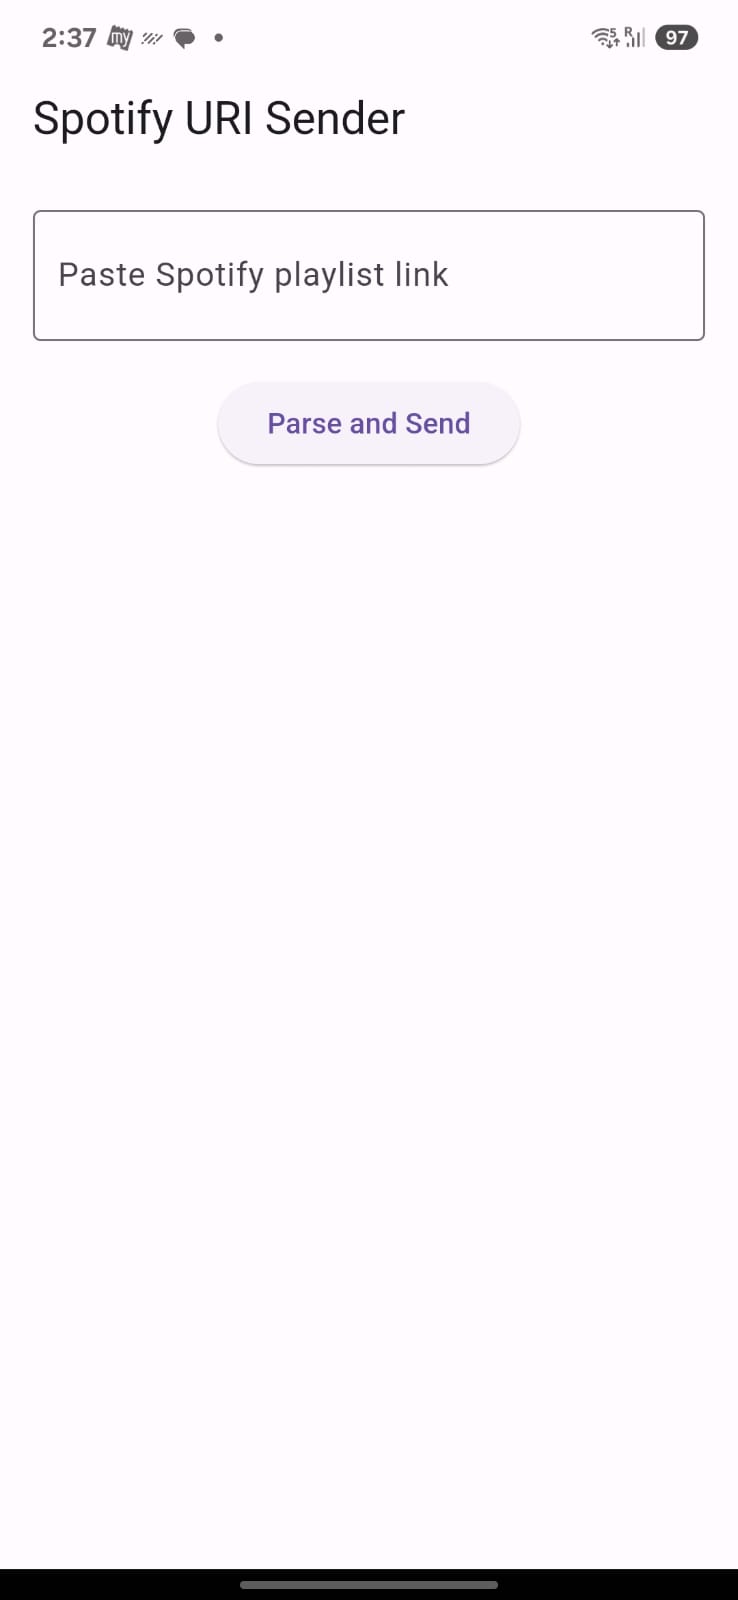
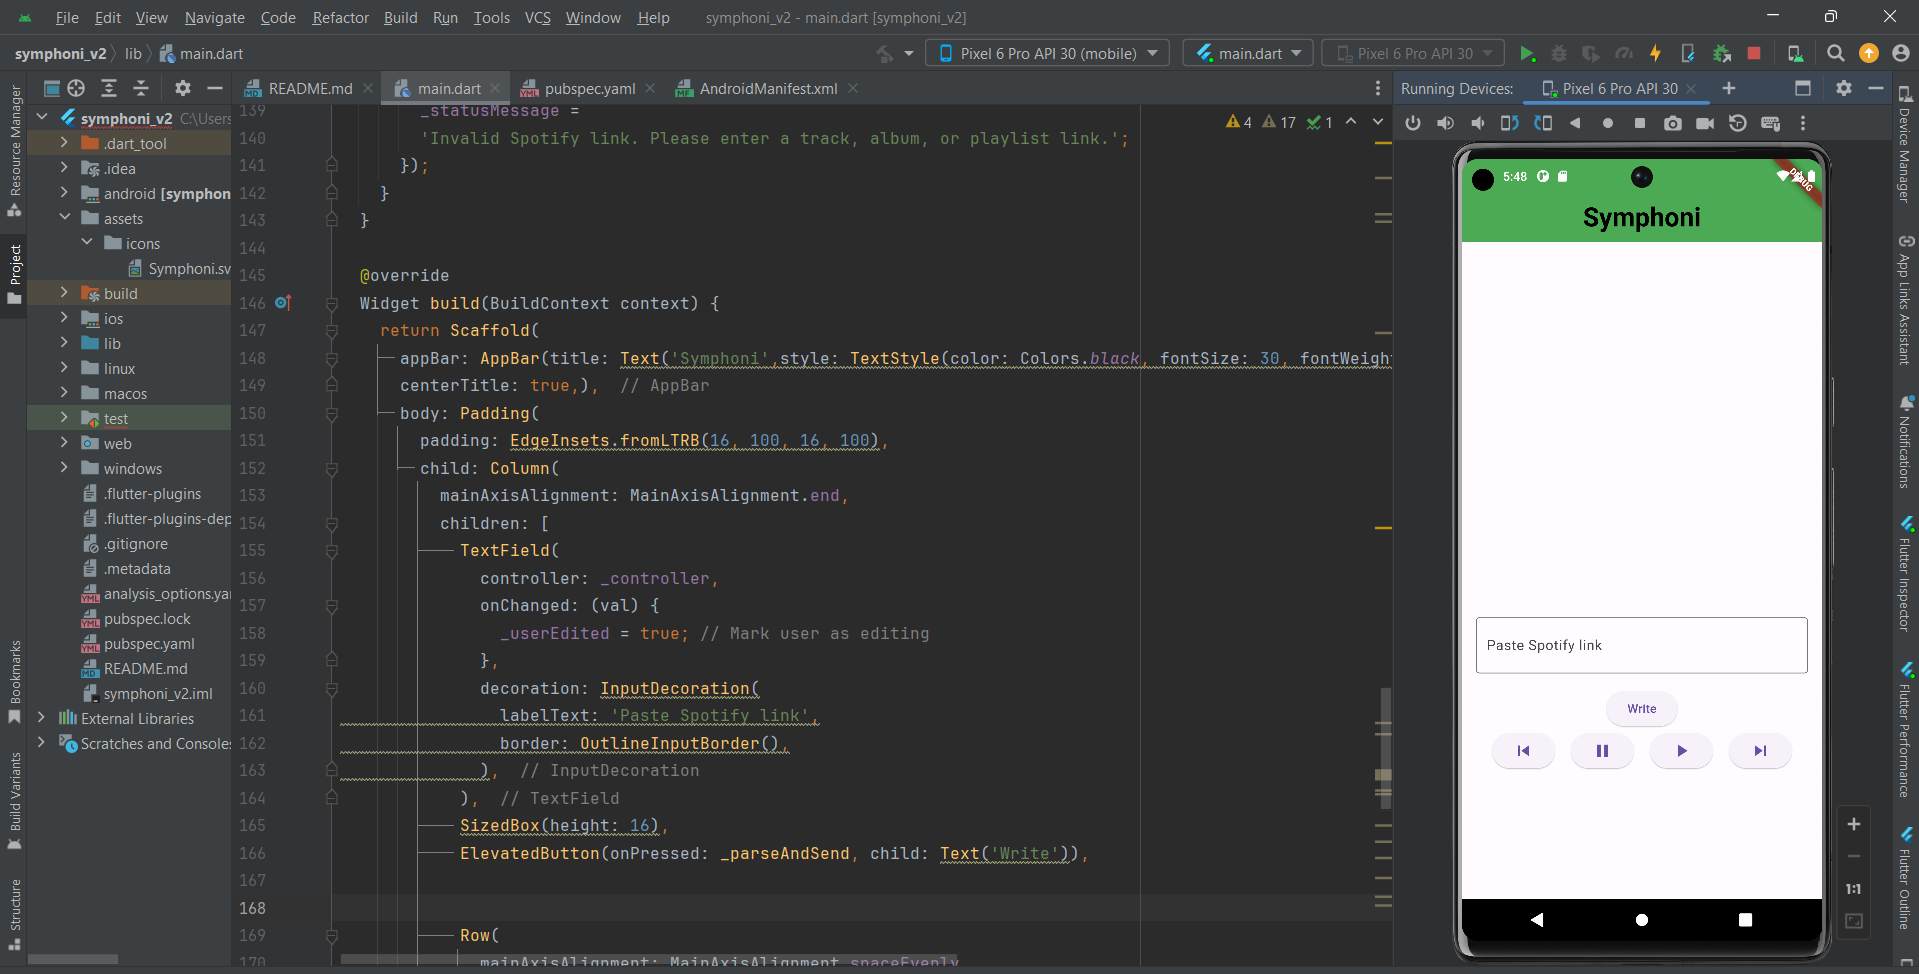
The above images shows the User Interface of the App. The below image shows the Serial Monitor of the Arduino IDE when I send the Spotify link to the ESP32 from the App. The communication is POST requests based as mentioned earlier.
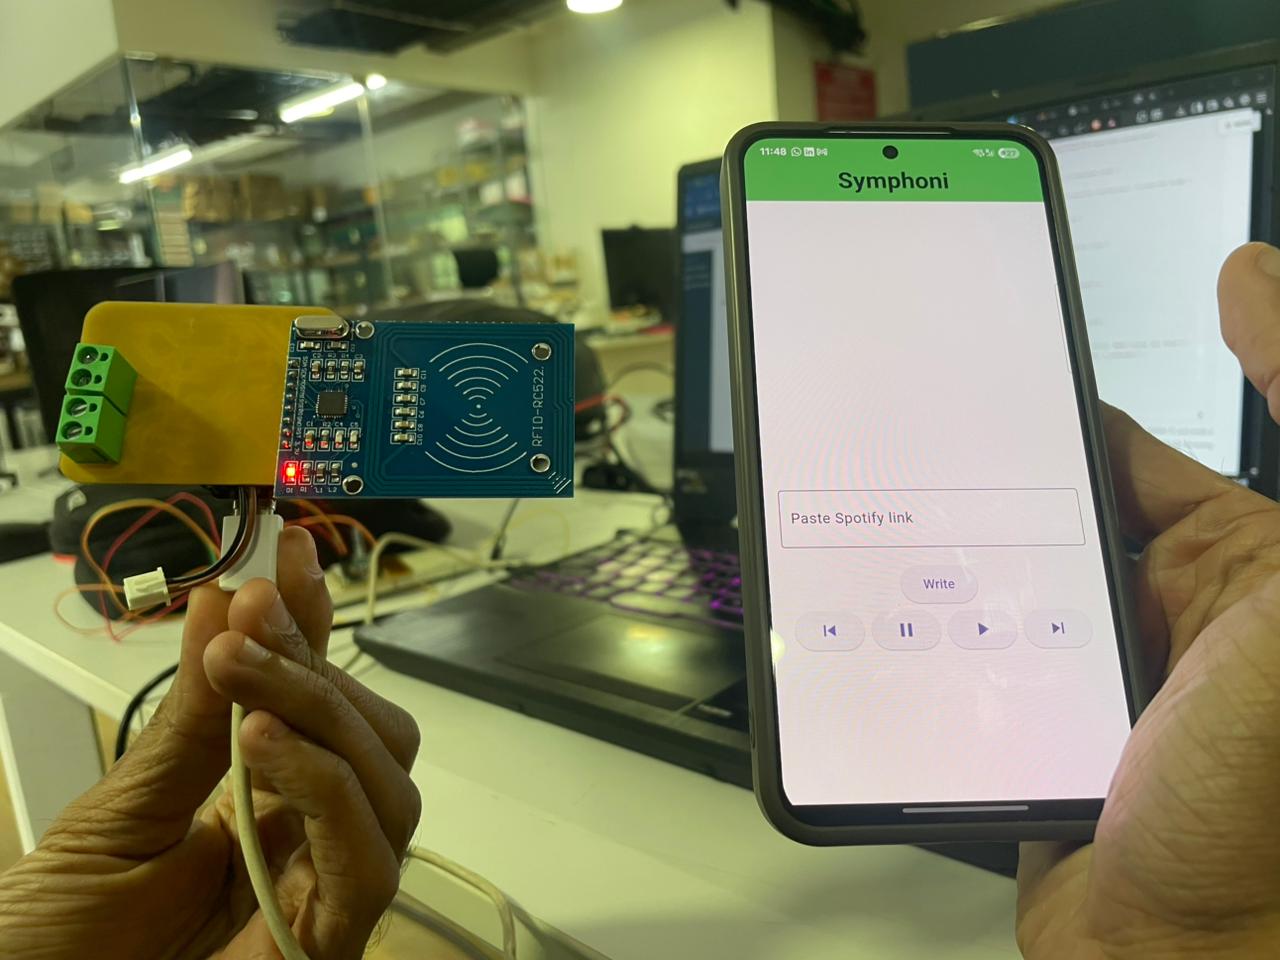
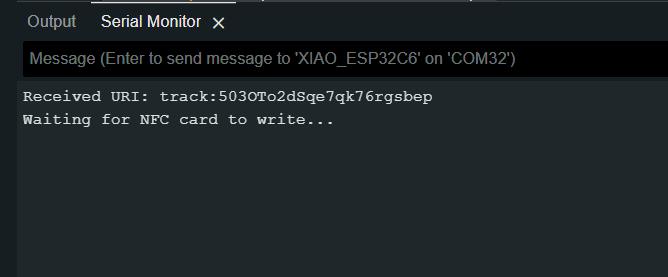
You can see the URI is recieved successfully and you can see the track URI. The ESP32 device waits for NFC Tag and then writes the URI to the NFC Card when detected.
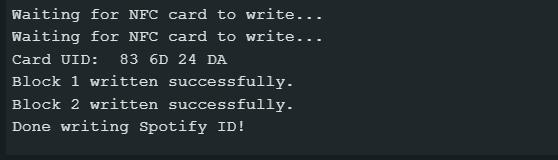
The above image shows successfully writing a Spotify ID to a NFC Tag
You can also detect the URI and send it to Spotify Web API. The below image shows when a NFC Tag with the Spotify URI is detected and sent to the Spotify

MVP App
This app allows to send track, album or playlist links to the ESP32 and the esp32 sends a put request to Spotify Web API

In this app, I have used a simple text field to enter the URI and a button to send the URI to the ESP32. The app uses the http package to send a POST request to the ESP32 with the URI as a parameter.
Receiving Shared Text
The app has the ability to receive shared urls from Spotify
For receiving url from other apps I used this package
Receive Sharing Intent PlusTo use the package, you need to add it to your pubspec.yaml file and configure your AndroidManifest.xml file. The package provides a simple API to receive shared text and files from other apps.
Things you need to add in pubspec.yaml for making http request and to receive shared content
dependencies:
	flutter:
		sdk: flutter
	http: ^0.13.6  #for http communication
	receive_sharing_intent_plus: ^1.0.1 #for reveiving shared content
Things you need to add in AndroidManifest.xml for making http request and to receive shared content
<manifest xmlns:android="http://schemas.android.com/apk/res/android">

<uses-permission android:name="android.permission.INTERNET"/>
<application....>
.....
</application>
In Android, apps appear in the share sheet if they declare an intent-filter that listens for shared content. Add this in the activity section of AndroidManifest.xml. There might be an existing intent-filter for launching the app ,it tells I'm a normal launchable app to android
<activity android:name=".MainActivity">
	<intent-filter>
		<action android:name="android.intent.action.SEND"/>
		<category android:name="android.intent.category.DEFAULT"/>
		<data android:mimeType="text/plain">
		</intent-filter>
In the above code, we are telling android that this app can handle text/plain data type. You can also add other data types like image/*, audio/* etc.
You have to add this in the main.dart file
class _SpotifyInputScreenState extends State&SpotifyInputScreen> {
	String _sharedLink = '';
	bool _userEdited = false; // Flag to check if user has manually typed
	final TextEditingController _controller = TextEditingController();
	String _parsedUri = '';
	String _statusMessage = '';

	final esp32Ip = '192.168.33.175'; // Replace with your ESP32's IP address

	StreamSubscription<String>? _intentDataStreamSubscription;

	@override
	void initState() {
		super.initState();

		// Listen for incoming shared text while app is in memory
		_intentDataStreamSubscription =
			ReceiveSharingIntentPlus.getTextStream().listen((String value) {
			if (value.isNotEmpty && !_userEdited) {
				setState(() {
				_sharedLink = value.trim();
				_controller.text = _sharedLink;
				});
			}
			}, onError: (err) {
			print("Error receiving shared text: $err");
			});

		// Get shared text if app was launched via sharing
		ReceiveSharingIntentPlus.getInitialText().then((String? value) {
		if (value != null && value.isNotEmpty && !_userEdited) {
			setState(() {
			_sharedLink = value.trim();
			_controller.text = _sharedLink;
			});
		}
		});
	}

	@override
	void dispose() {
		_intentDataStreamSubscription?.cancel();
		super.dispose();
	}
	......Rest of the code.......
Now, when you share a link from Spotify, the app will receive the link and you can use it to send the link to the ESP32.
Playback Controls
I wanted to control the playback using the App but I couldn't communicate the App directly with Spotify, so I communicated with the ESP32 to send Web API
This is code for the UI part of it, when pressed it sends a command to the ESP32 using the sendCommand function
	Row(
              mainAxisAlignment: MainAxisAlignment.spaceEvenly,
              children: [
                ElevatedButton(
                  onPressed: () => _sendCommand('prev'),
                  child: Icon(Icons.skip_previous),
                ),
                ElevatedButton(
                  onPressed: () => _sendCommand('pause'),
                  child: Icon(Icons.pause),
                ),
                ElevatedButton(
                  onPressed: () => _sendCommand('play'),
                  child: Icon(Icons.play_arrow),
                ),

                ElevatedButton(
                  onPressed: () => _sendCommand('next'),
                  child: Icon(Icons.skip_next),
                ),
              ],
            ),
This is _sendCommand function
void _sendCommand(String command) async {
    setState(() {
      _statusMessage = 'Sending $command...';
    });

    try {
      final response = await http.post(
        Uri.parse('http://$esp32Ip/$command'),
        headers: {'Content-Type': 'application/x-www-form-urlencoded'},
      );

      if (response.statusCode == 200) {
        setState(() {
          _statusMessage = 'ESP32 says: ${response.body}';
        });
      } else {
        setState(() {
          _statusMessage = 'HTTP Error ${response.statusCode}: ${response.body}';
        });
      }
    } catch (e) {
      setState(() {
        _statusMessage = 'Failed to send $command: $e';
      });
    }
  }
App User Interaction
Final Symphoni App
The below code is the main.dart file for the version of the Symphoni App which allows users to share a playlist, track, albums, etc directly from Spotify to the ESP32 using the sharing intent and https package.
Final App Dart CodeThe below code is for ESP32 to recieve POST requests from the APP, detect NFC Tags, write NFC Tags and send https requests to Spotify API.
ESP32 POST CodeIn this video, I have shown the app in action. The app allows the user to send track, album or playlist links to the ESP32. The ESP32 then sends a PUT request to the Spotify Web API to start playback.
Android Studio Interface for the App
Code Files
You can view my code files from below
MQTT
XIAO ESP32 Code
Spotify API
Flutter App