Principles, Practices and Project Management
This week, we explored the foundational principles of Fab Academy, learned essential project management practices, and set up the tools necessary for the course. The focus was on establishing a solid foundation for documentation, using version control, and building a personal website to showcase our journey.
Assignments
Planning and Sketching my Final project
For my final project, I wanted something which is fun yet useful in my daily life. So i started looking for various ideas which woould help me to achieve these criterias. Art, Music, Lights and Tech are on my favourite areas of interests. So i wanted to make something which utilised all of these interests. Also I wanted to learn more about product design and at the end of the course make a fun yet useful product.
Even before starting my FabAcademy journey, I had communicated with my instructor that I wanted to build something which involes music, lights and good aesthetic designing. I had not yet reached to the final project idea then. But after discussions with my instructors, I decided to make the productivity tool which would also act as a wireless turntable music speaker.
Some other ideas that I had were
- Automatic Tool Picker Robot which aligned with my college final year project - Automatic Medicine Dispenser.
- Audio Reacttive Coffee Table - A table which would react to the music played around it. The table would have a glass top and the lights would be below the glass. The lights would change according to the music played around it, according to frequency
- Projection Mapping Installation - Mapping light projections on to a surface and make creative installations
- Interactive Kinetic Sculpture - A mechancial Kinetic Sculpture that changes according to the viewer interactions
But I wanted to try something new which I could design and develop as a final product.
Productivity and Media Player
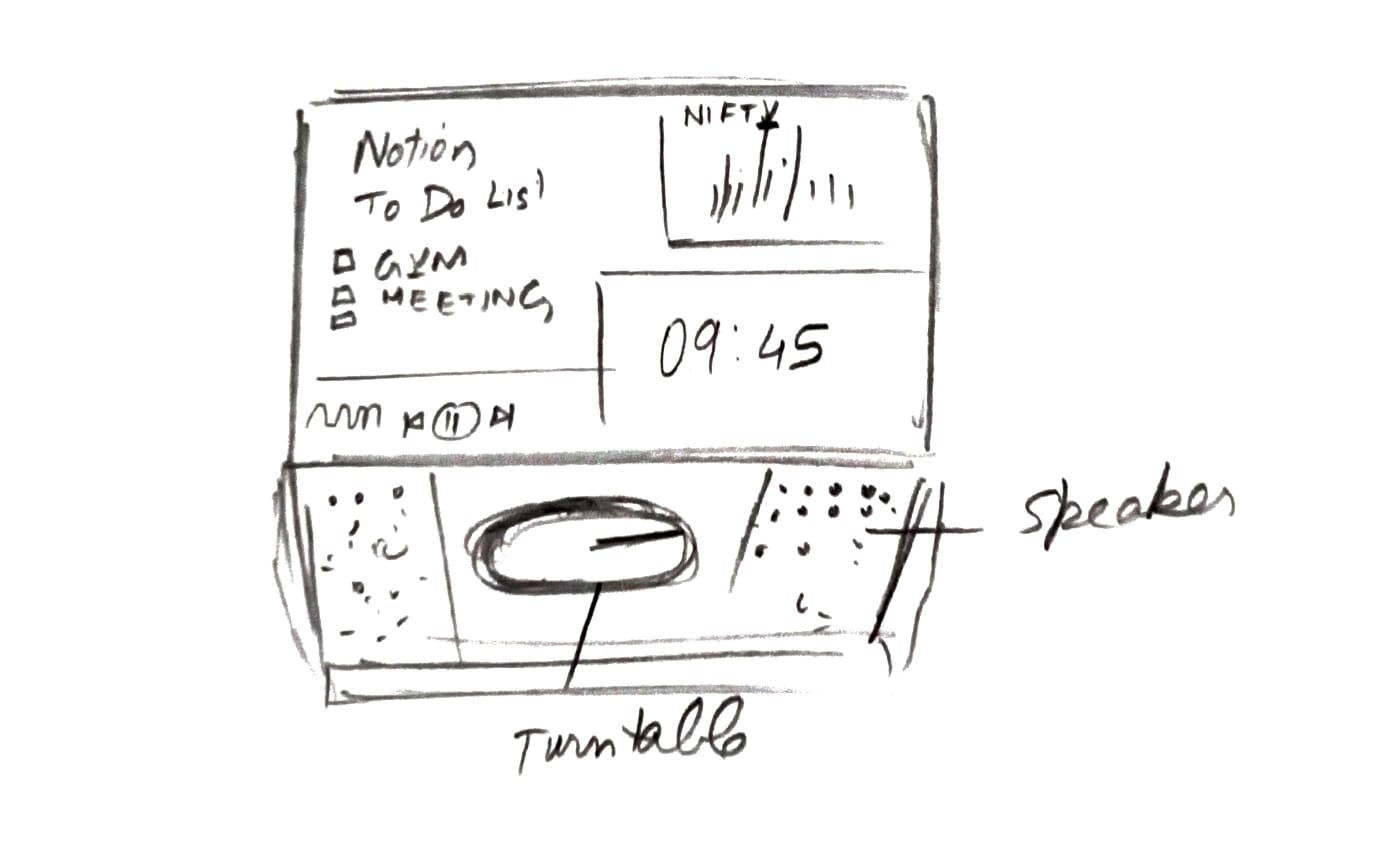
The initial idea for my Fab Academy final project was designing Symphoni—a productivity tool with an aesthetic design that integrates a display, speaker, and NFC-based record player. The goal is to create an interactive and visually appealing device that blends task management, real-time information updates, and music control.

The initial design has a cuboidal structure with a display in the front with two speakers on both the sides. The record turntable will be on the top of the device. The NFC mini-records will be placed on the turntable and like turn when the NFC card is placed on it.
The NFC record can carry various schedules or playlists. It doesn't necessarily have to be music on the record, it can be used for multiple functions.
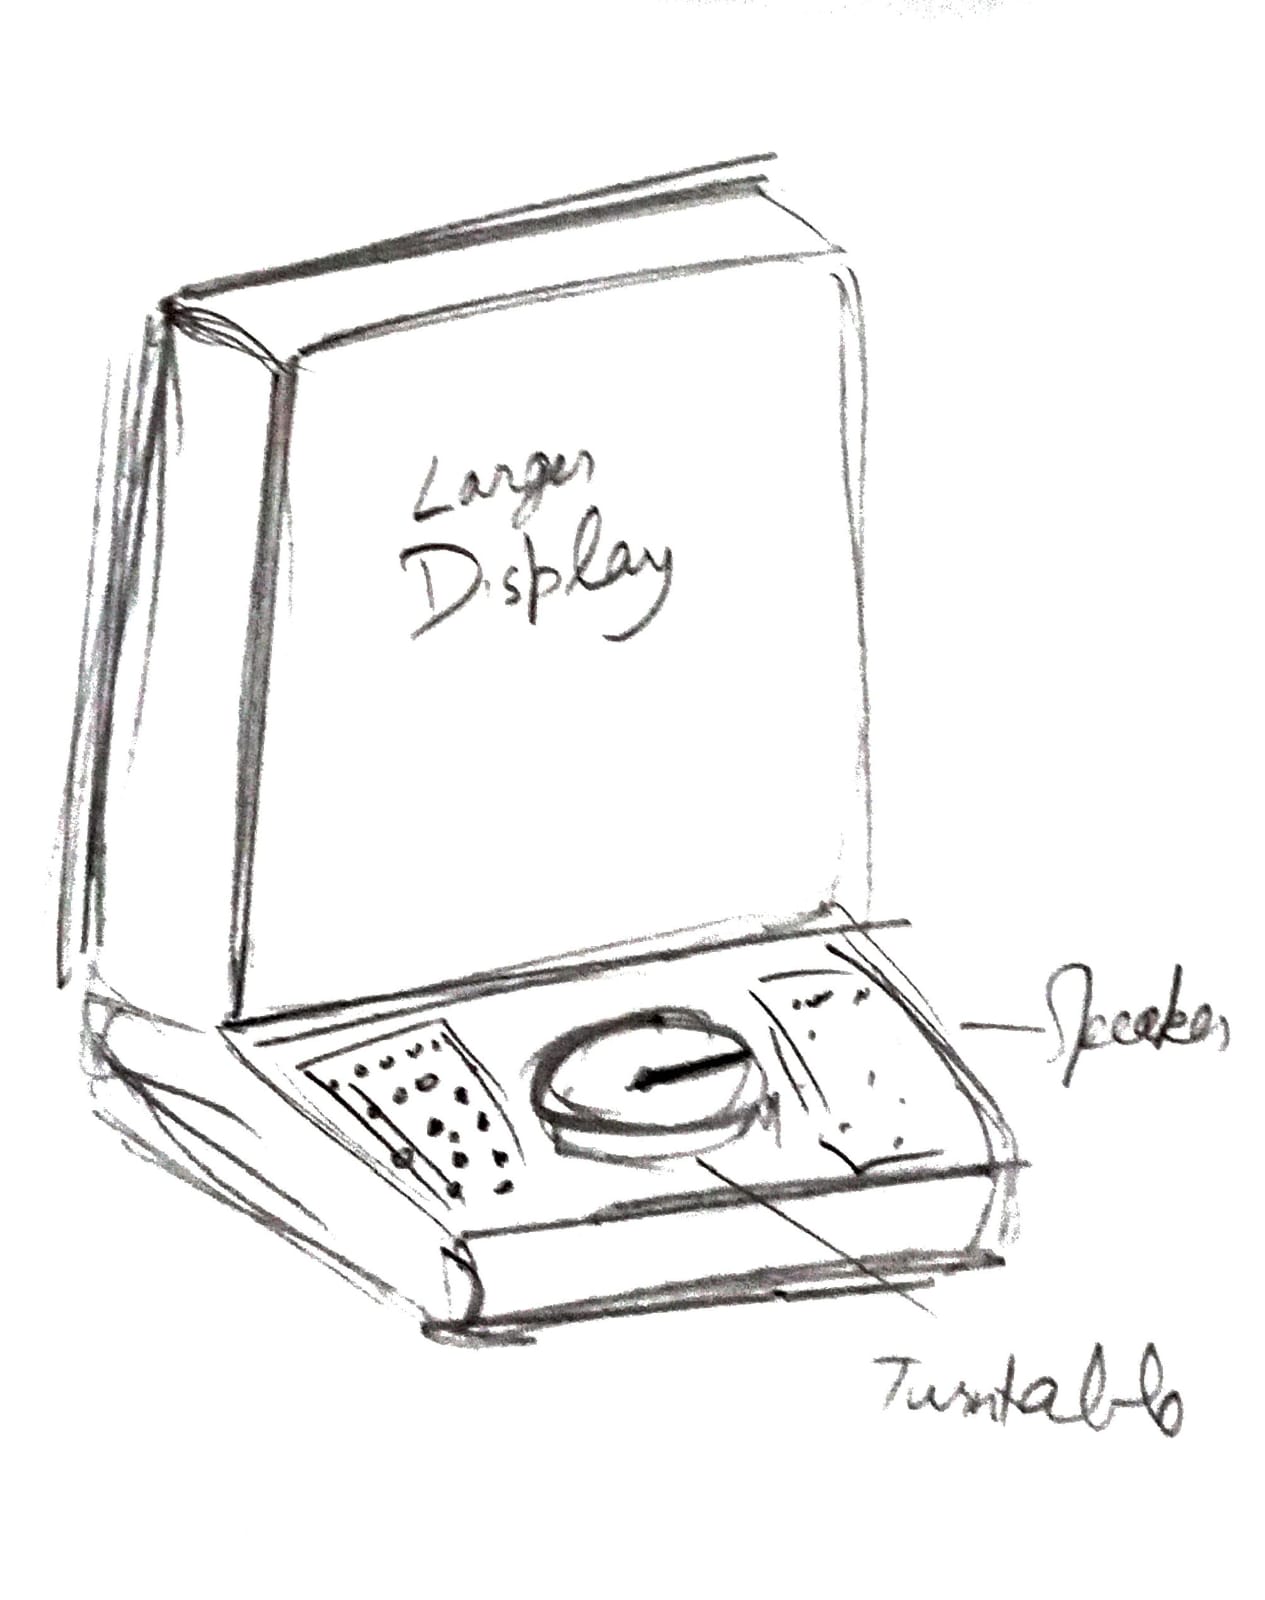
As I didn't want this to be a generic design, I thought of keeping the turntable below the display to enhance the aesthetics of the device.
The final product is for productivity while integrating API tools like Notion, Stock Market,Weather Updates and entertainment tools like Spotify.
Working through a Git Tutorial
What is git
Git is a free and open source distributed version control system designed to handle everything from small to very large projects with speed and efficiency.
Git is easy to learn and has a tiny footprint with lightning fast performance. It outclasses SCM tools like Subversion, CVS, Perforce, and ClearCase with features like cheap local branching, convenient staging areas, and multiple workflows.

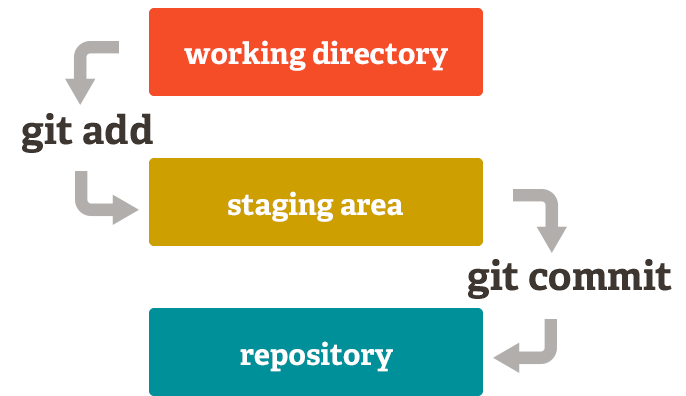
Git has three main areas:
- Working Directory - Where you make changes to files.
- Staging Area (Index) - Where you prepare files for a commit.
- Repository (Local & Remote) - Where commits are stored, and from where you push to remote servers.
Installing and Setting Up Git on Windows
Step 1: Install Git
I am using Windows 11. You can install Git by following the official Git documentation. This guide also provides instructions for other operating systems.
Once installed, Git can be accessed using a terminal called Git Bash, which is installed automatically.
Verify installation by running:git --version
Step 2: Configure Git
Before using Git, configure your name and email, which will be linked to your commits.
Run the following commands:git config --global user.name "Your Name"git config --global user.email "your.email@example.com"After configuration, you can verify your settings with:
git config --list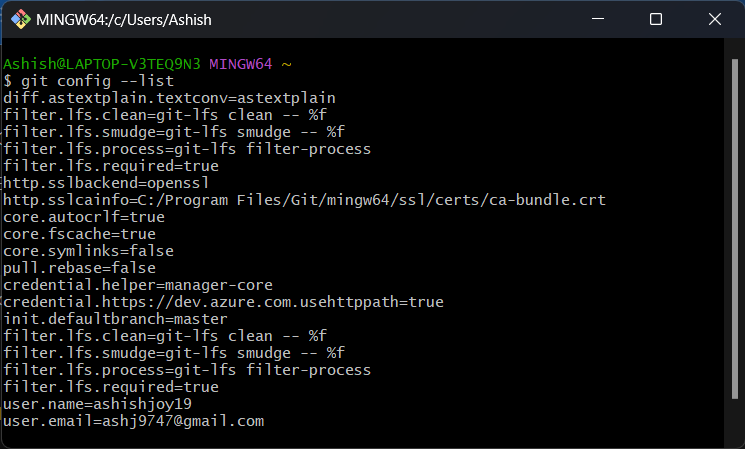
Step 3: Generate SSH Key
To securely authenticate with GitLab, generate an SSH key.
Run the following command in Git Bash:ssh-keygen -t rsa -b 4096 -C "your.email@example.com"Press Enter to save the key in the default location.

Step 4: Add SSH Key to SSH Agent
Once generated, add the SSH key to your system’s SSH agent to manage connections.
Start the SSH agent:eval "$(ssh-agent -s)"
Add the SSH key:
ssh-add ~/.ssh/id_rsa
Step 5: Add SSH Key to GitLab
Now, add the public key to your GitLab account:
- Open Git Bash and run:
cat ~/.ssh/id_rsa.pubCopy the output (your public key).
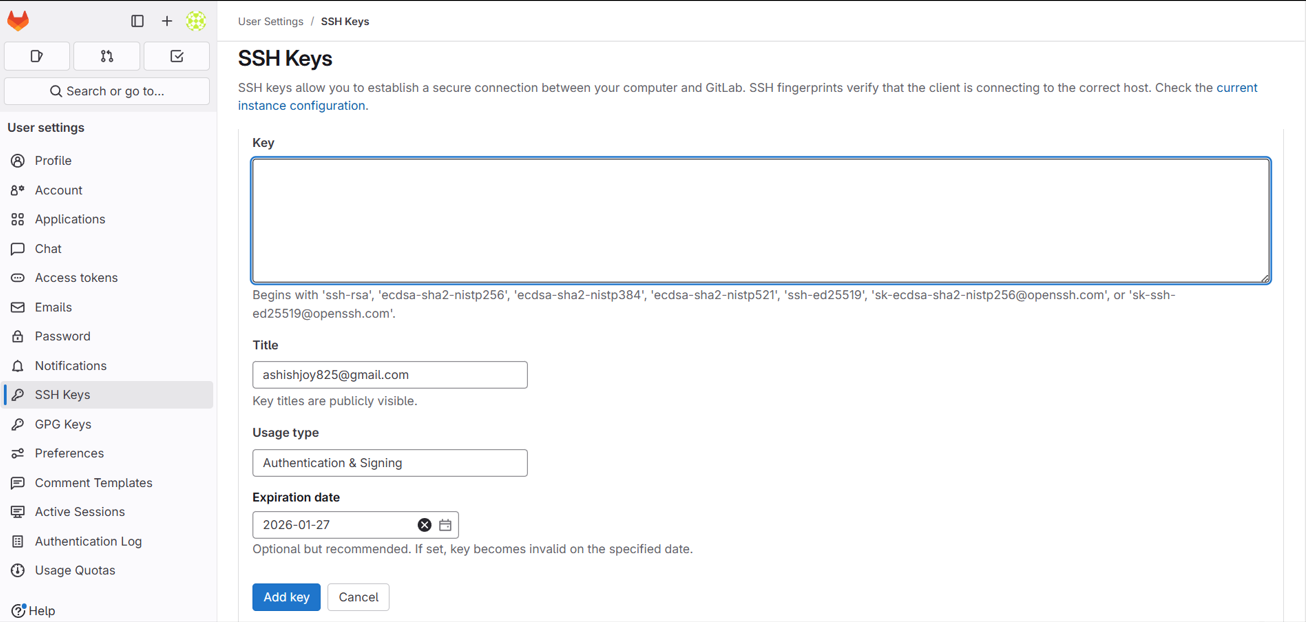
- Go to GitLab and navigate to Preferences > SSH Keys.
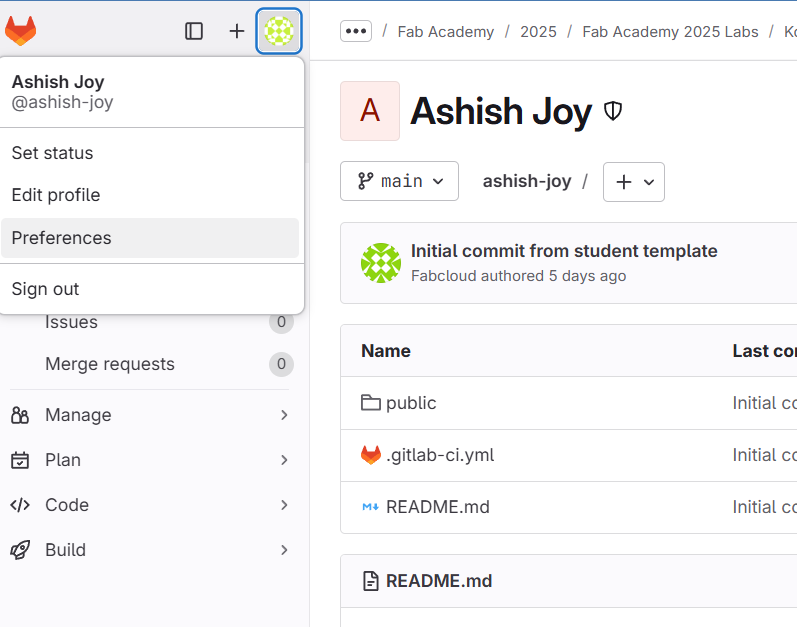
Add the public SSH key to the section and click the add key button.
Step 6: Test SSH Connection
Verify that the SSH key is correctly added by running:
ssh -T git@gitlab.comIf successful, you'll see a welcome message:

Step 7: Clone Your GitLab Repository
Now, clone your Fab Academy repository using SSH.
Find the SSH URL in your GitLab repository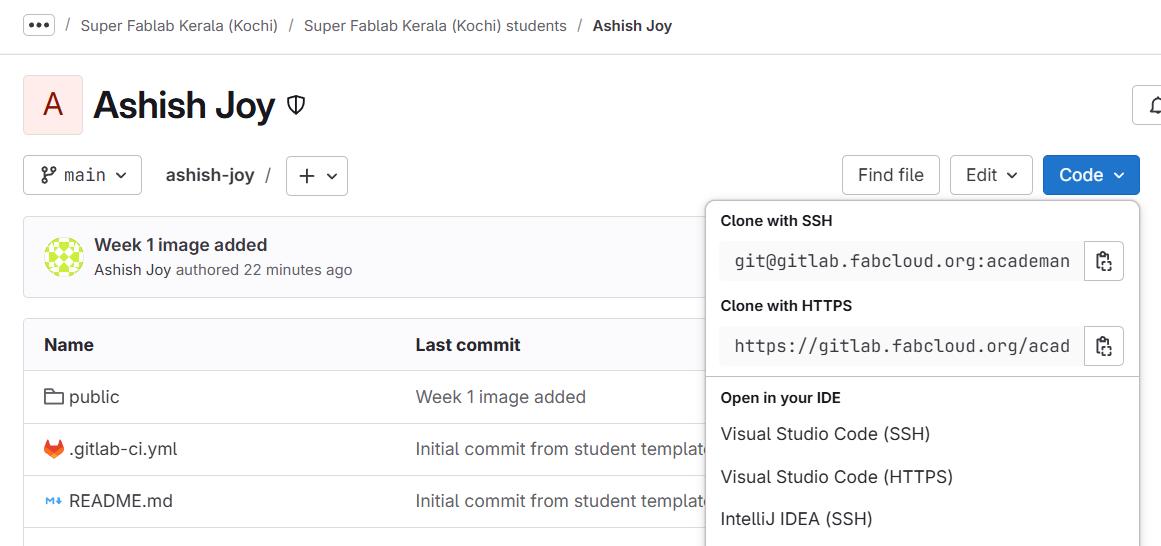
Now run the below code and your gitlab repository will be successfully cloned to your local device.
git clone git@gitlab.com:yourusername/your-repository.git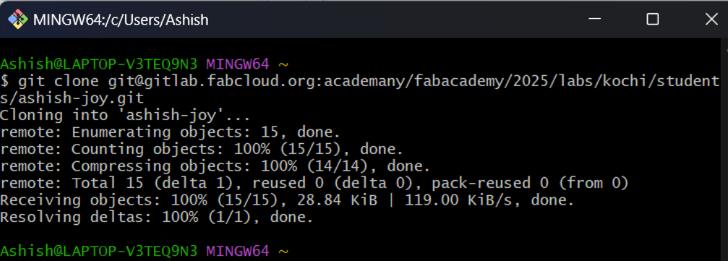
Now, you have successfully set up Git and cloned your repository!
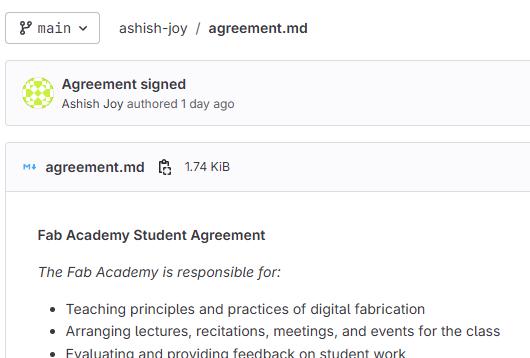
Read, Sign Agreements, and Commit to Repos
The agreement must be downloaded from the link as an .md (markdown) file. The downloaded file must be moved to local respository and added to the public folder. The agreement can be edited in any text editor and signed by adding your name to the end of the document.The three key commands you'll use are:
- git add- Moves changes from the working directory to the staging area.
- git commit- Saves the staged changes to the local repository.
- git push- Uploads the committed changes to the remote repository
The git status shows the status of the repository if any changes were made in the repository

The agreement must be stagged before being commited to the repository

The git add -agreement.md will specifically stage the file.

The git commit will save the staged changes to the local repository

The agreement is signed and pushed to the FabAcademy remote repository
Build a Personal Site in the Class Archive
For my Fab Academy journey, I needed a personal website to document my progress, weekly assignments, and final project. Since the website serves as a digital portfolio, it had to be well-structured, visually appealing, and easy to navigate. Additionally, it needed to be hosted on the Fab Academy’s GitLab repository, meaning I had to learn how to use Git effectively for version control.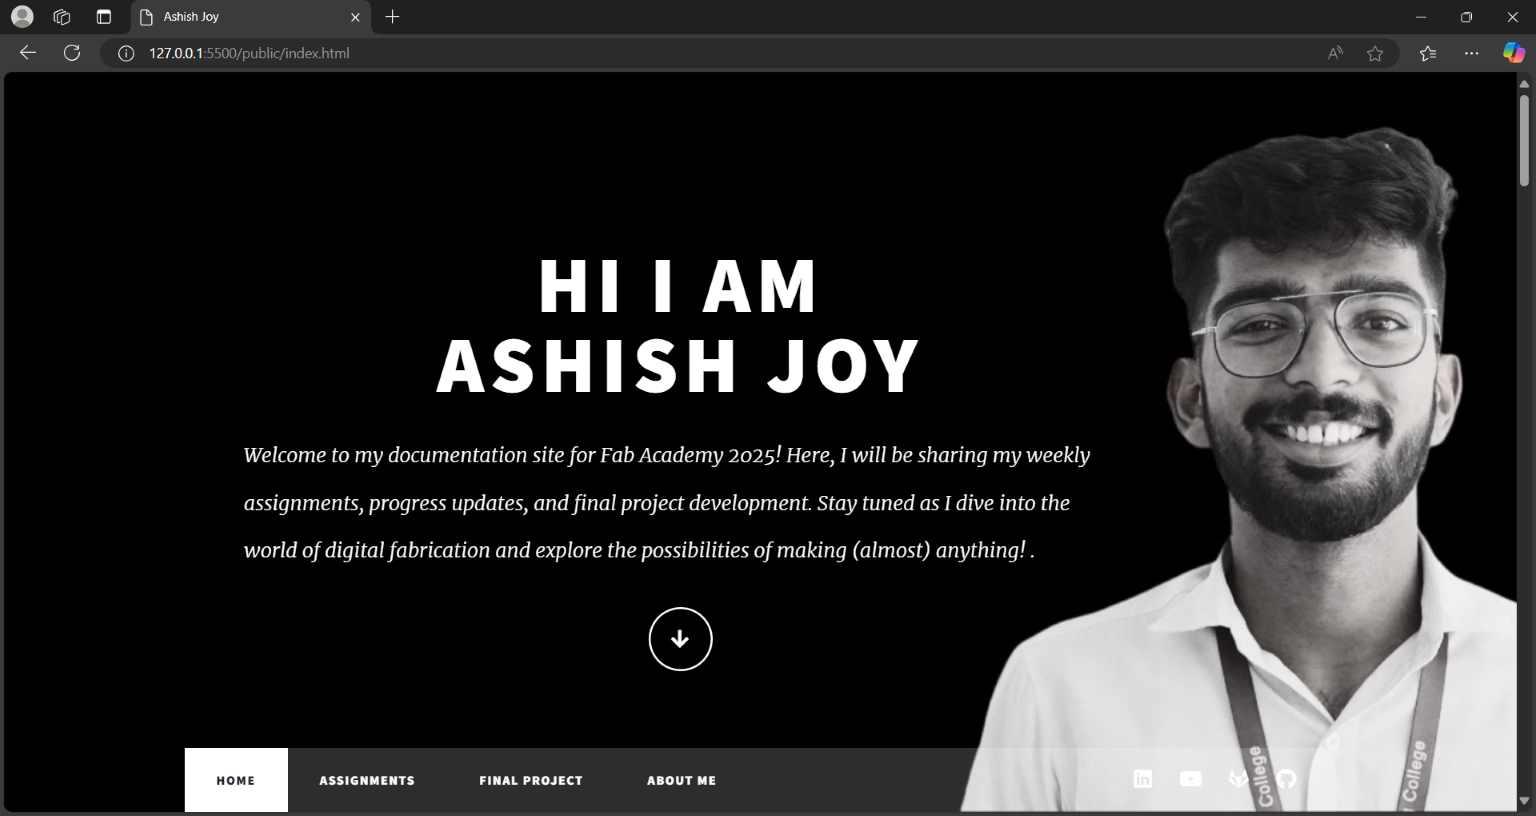
I decided to build my website using an html5up.net template, as it provided a solid foundation with responsive design, modern aesthetics, and customizable sections. My goal was to modify and personalize the template to reflect my style while ensuring it functioned efficiently across different devices. . The name of the template is Massively and you can find the template on this link.
What is HTML, CSS and JS?
HTML (HyperText Markup Language)
HTML is the foundation of any website. It defines the structure of a webpage using elements like headings, paragraphs, images, and links. It allows us to organize content in a meaningful way.
CSS (Cascading Style Sheets)
CSS is used to style the HTML structure. It controls the colors, fonts, spacing, layouts, and animations of a webpage, making it visually appealing.
JavaScript (JS)
JavaScript makes the website interactive by adding dynamic behavior, such as animations, button clicks, and user interactions.
Using Visual Studio Code (VS Code) to Edit My Website
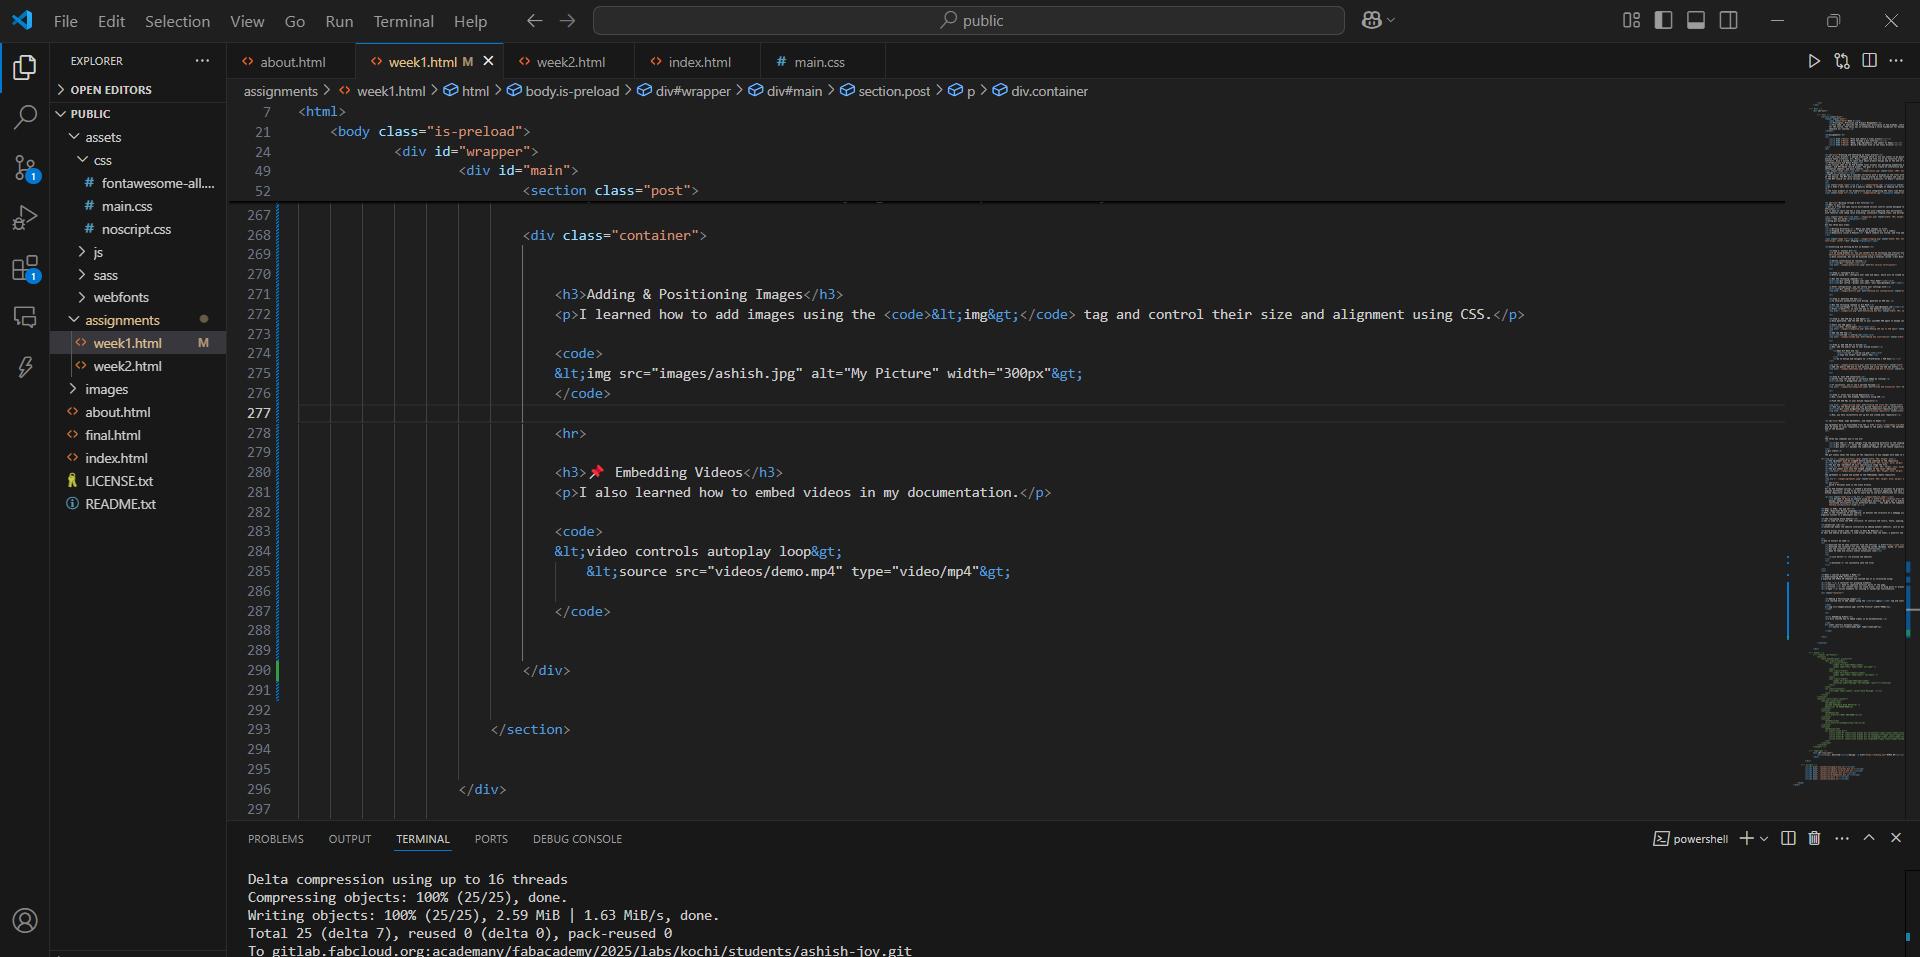
To edit and modify my website, I used Visual Studio Code (VS Code), a powerful and lightweight code editor.
How to Install VS Code
- Download the VS Code installer from the official website
- Download the installer for your operating system (Windows, macOS, or Linux).
- Run the installer and follow the setup instructions.
- Open VS Code and install useful extensions like:
- Live Server (to preview the website)
- Autosave (to constantly save the file)
What I Learned & Changes I Made
Understanding HTML Structure
I explored the HTML5 UP template and learned how it is structured using:div - A container for grouping elements.
section - Used to separate distinct parts of the page.
article - For content that can stand alone, such as blog posts or project descriptions.
span - Inline elements for styling or JavaScript functionality.
Adding Images and Captions
<img src ="../images/gitstatus.jpeg" style="width: 60%; height: auto; margin: auto;"><span class="image fit">
<img src="../images/clipchamp.jpg" style="width: 70%; height: auto; margin: auto;">
</span>
<figcaption style="font-style: italic; text-align: center;">Design 3</figcaption><span class="image fit">
<img src="../images/renderwindow.jpeg" style="width: 70%;height: auto;margin: auto;">
<figcaption style="font-style: italic; text-align: center;">
Render Window
</figcaption>
</span>
Images Side by Side
CSS
.image-container {
	display: flex; /* Arranges images in a row */
	justify-content: space-between; /* Adds space between them */
	gap: 10px; /* Space between images */
	text-align: center; /* Centers the captions */
}

.image-container figure {
	width: 33.3%; /* For 3 Images Side by Side. Each image takes up 30% of the container */
	width: 50%; /* For 2 Images Side By Side. Each image takes up 30% of the container */
}

.image-container img {
	width: 100%; /* Make images responsive */
	height: auto;
}

.image-container figcaption {
	font-size: 14px;
	color: gray;
	margin-top: 5px; /* Adds spacing between image and caption */
}
<div class="image-container">
	<img src="images/image1.jpg" alt="Image 1">
	<img src="images/image2.jpg" alt="Image 2">
</div>
Video
<video autoplay muted loop>
	<source src="images/processing.mp4" type="video/mp4">
		Your browser does not support the video tag.
</video>
ZIP Download
<a href="files/myfile.zip" download>Download ZIP</a><button onclick="window.location.href='files/myfile.zip'">Download ZIP</button><a href="files/myfile.zip" download>
<img src="download-icon.png" alt="Download ZIP" width="50">
</a>
Editing the navigation area
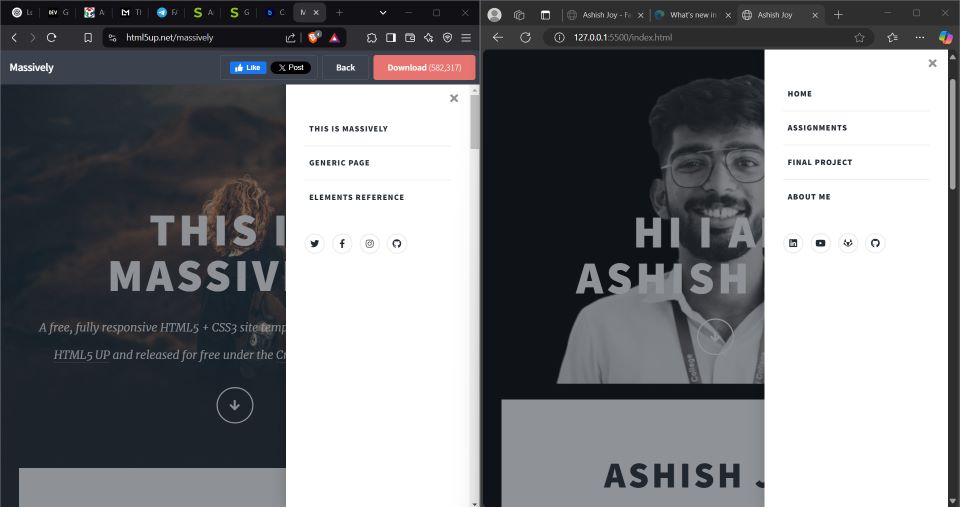
I also used the id of the assignments sections for anchor tag to navigate to one section of a page.
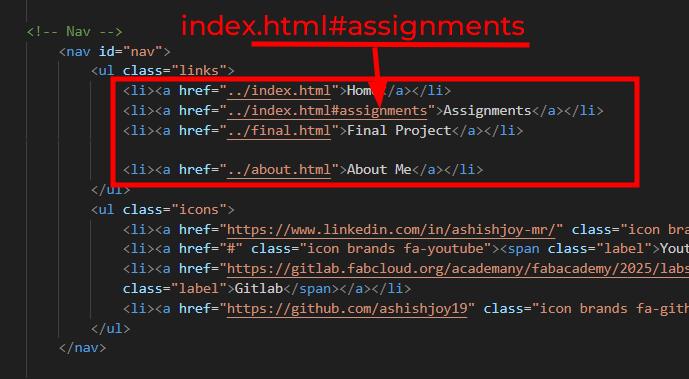
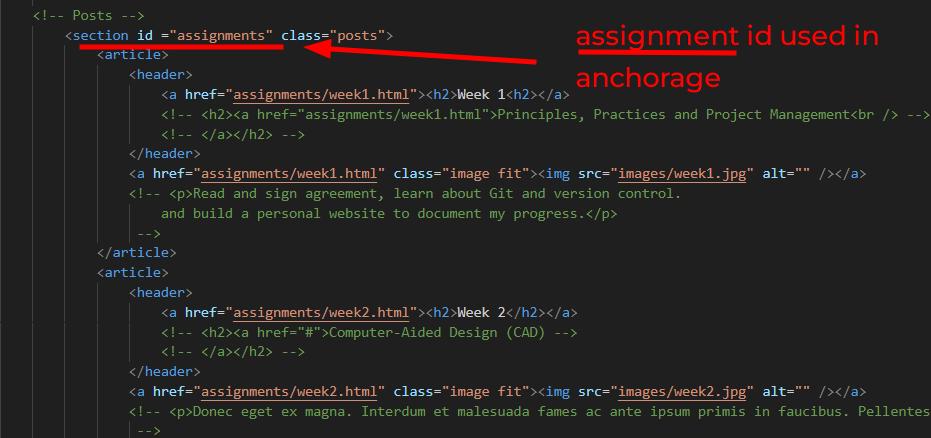

Here I have given the specific section of the website as alink by using the anchor tag.
<a href="website.html#section">Section of the Website</a>
Conclusion
On this page, I have documented various techniques and implementations used in my website, including adding images with captions, structuring side-by-side image layouts, embedding videos with autoplay and loop, and integrating interactive elements like a Back to Top button.
Additionally, I explored Git commands for version control, Processing code integration, and the use of special HTML tags. This structured approach ensures adaptability across different screen sizes while maintaining an organized and user-friendly experience.
By implementing these elements, my website is now more interactive, visually appealing, and well-documented, aligning with best practices in web development.
References
- The template for the website - Template
- Anchor Tag