week12. Mechanical Design, Machine Design
Assignment
Group assignment
Mechanical design
- design a machine that includes mechanism+actuation+automation+application
- build the mechanical parts and operate it manually
- document the group project and your individual contribution
Machine design
- actuate and automate your machine
- document the group project and your individual contribution
Group assignment
For more information about group projects, please see the Machine Building Project page.
Slide
Video
Individual assignment
We, the members of FabLab Kannai, decided to develop a machine called "RYOAN-JI XY 2025," which is based on a CoreXY module and uses LLM to generate a desktop Zen garden and haiku from an input image.
Initial Concept
Below is the initial concept for our group project. As you can see from the Slide and Video above, we were able to realize most of it.
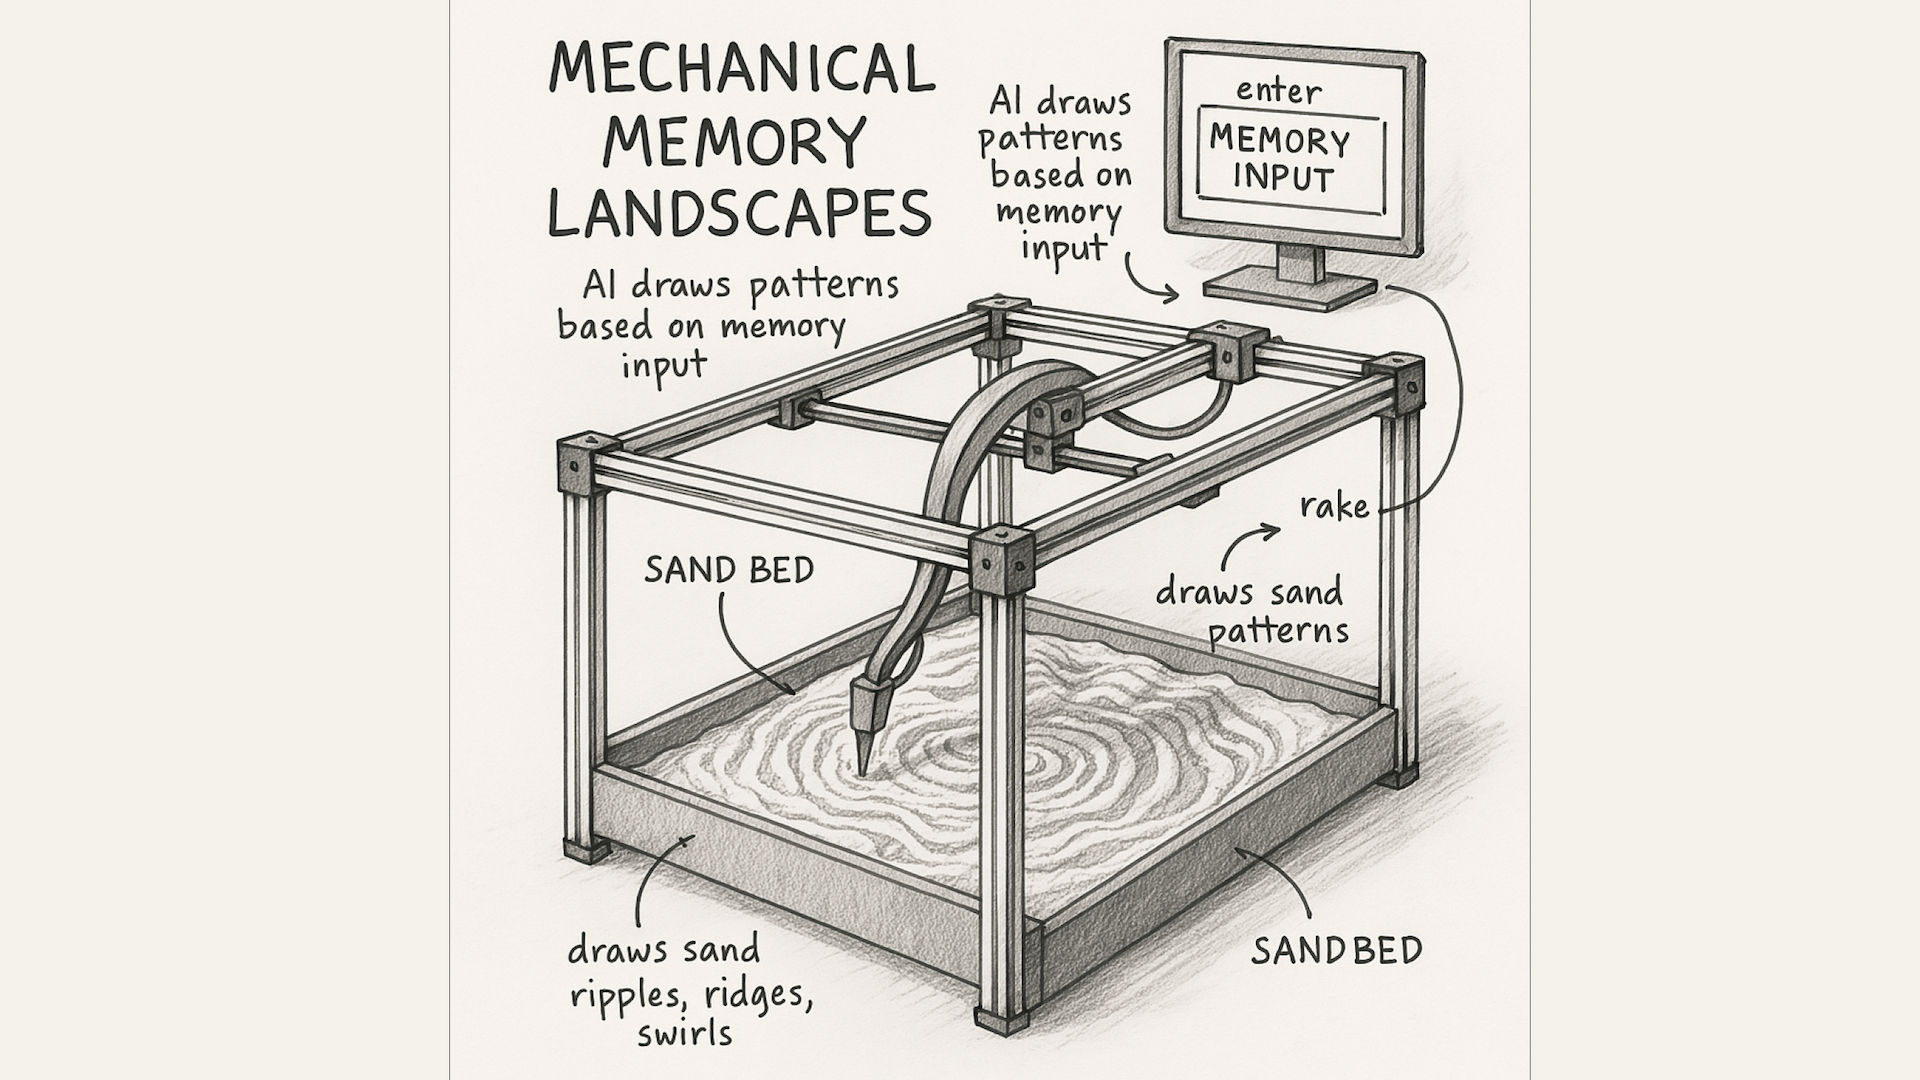
Title: "Scenery of Memories"
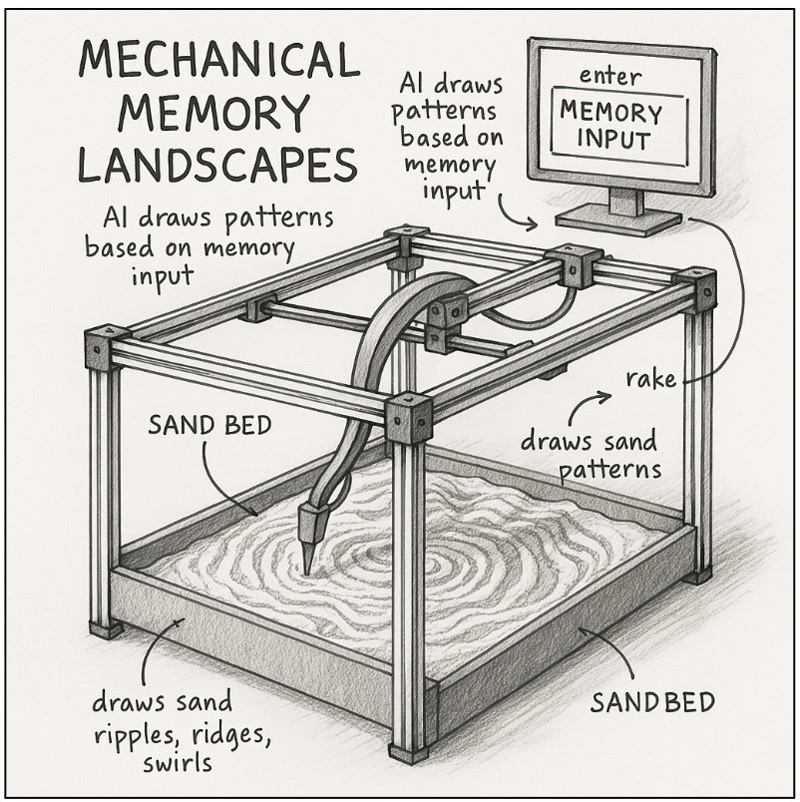
Concept
When a viewer inputs past memories or emotions, the XYZ arm draws patterns resembling terrain or ripples on the surface of sand or powder. As time passes, new memories from other viewers reconstruct these patterns, overwriting or erasing the previous ones. This poetic experience embodies the idea that "memories shift like landscapes." The generative installation invites people to experience this fleeting transformation.
Visual Structure
Visuals
- The XYZ arm draws patterns on white sand (or powder) spread on the base of the frame.
- The patterns combine randomness and structure, adjusted by memory parameters.
- Overhead lighting emphasizes shadows and contours, bringing out a vivid landscape.
Sound (Optional)
- Ambient sounds such as wind, water, or human voices slowly play during the drawing process.
Interaction
- The viewer inputs "memories," "keywords," or "images" from a device such as a smartphone.
- The arm interprets the input and generates expressions like "ripples," "whirls," "terraces," or "valleys."
- The generated landscape is stored for a certain period, then overwritten by new memories.
Role Assignments
Since we only had two weeks to complete the project, Mr. Ito utilized his experience in project management and led the project as our project manager.
Mr. Hayashi applied his background in product design to handle the hardware design of the machine, and I (Tokuyama) used my programming experience to develop the software for the machine.
The roles of the FabLab Kannai members were as follows:
Mr. Ito
- Managed the project as the project manager
- Developed a program to capture images of the Zen garden and upload them to the cloud via Wi-Fi
Mr. Hayashi
- Designed the hardware of the "RYOAN-JI XY 2025" machine, which is based on a CoreXY module and enhanced for Zen garden art
Myself (Tokuyama)
- Responsible for the software design of the "RYOAN-JI XY 2025" machine
Development Tasks
Setting up the local environment using Docker
- We built the local development environment using Docker.
- Created
docker-compose.local.ymlto define multiple services including the Vue.js frontend, Node.js backend, and MinIO storage. - Managed environment variables via the
.envfile. - Enabled launching the entire environment with a single command, significantly improving development efficiency.
docker-compose -f docker-compose.local.yml up -d --build
version: '3.8'
services:
  nginx:
    container_name: nginx
    image: nginx:alpine
    ports:
      - "8080:80"
    volumes:
      - ./docker/nginx/default.conf:/etc/nginx/conf.d/default.conf
      - ./src:/var/www/html
    networks:
      - mml-network
    depends_on:
      - php

  php:
    container_name: php
    build:
      context: .
      dockerfile: docker/php/Dockerfile
    volumes:
      - ./src:/var/www/html
    networks:
      - mml-network

  node:
    image: node:18
    container_name: node
    working_dir: /var/www/html
    volumes:
      - ./src:/var/www/html
    networks:
      - mml-network
    ports:
      - "5173:5173"
    command: sh -c "npm install && npm run dev"

  db:
    image: mysql:8.0
    container_name: mysql
    ports:
      - "3306:3306"
    environment:
      MYSQL_DATABASE: mml
      MYSQL_USER: mml_user
      MYSQL_PASSWORD: secret
      MYSQL_ROOT_PASSWORD: root_pass
    volumes:
      - db-data:/var/lib/mysql
    networks:
      - mml-network
    command: --default-authentication-plugin=mysql_native_password

  minio:
    image: minio/minio:latest
    container_name: minio
    ports:
      - "9000:9000"
      - "9001:9001"
    volumes:
      - ./minio/data:/data
    networks:
      - mml-network
    environment:
      MINIO_ROOT_USER: minioadmin
      MINIO_ROOT_PASSWORD: minioadmin
    command: server --console-address ":9001" /data

  minio-init:
      image: minio/mc
      container_name: minio-init
      depends_on:
        - minio
      networks:
        - mml-network
      entrypoint: >
        /bin/sh -c "
          echo '⏳ Waiting for MinIO...';
          until mc alias set myminio http://minio:9000 minioadmin minioadmin; do
            sleep 2;
          done;
          echo '✅ Connected to MinIO.';
          mc ls myminio;
          if ! mc ls myminio/machinical-memory-landscapes 2>/dev/null; then
            mc mb myminio/machinical-memory-landscapes;
            mc anonymous set download myminio/machinical-memory-landscapes
            echo '✅ Bucket created.';
          else
            echo 'ℹ️ Bucket already exists.';
          fi;
        "

networks:
  mml-network:
    name: mml-network
    driver: bridge

volumes:
  db-data:
Creating Multi-Container Configuration with docker-compose
- We defined multiple services in both
docker-compose.local.ymlanddocker-compose.prod.ymlto enable unified setup and management. - Integrated services such as Vue.js, Node.js, MinIO, and MySQL.
- Also configured networks and volumes between services to efficiently build a dependency-aware environment.
version: '3.8'
services:
  nginx:
    container_name: nginx
    image: nginx:alpine
    ports:
      - "80:80"
      - "443:443"
    volumes:
      - ./docker/nginx/default.conf:/etc/nginx/conf.d/default.conf
      - ./src:/var/www/html
      - /etc/letsencrypt:/etc/letsencrypt:ro
    networks:
      - mml-network
    depends_on:
      - php

  php:
    container_name: php
    build:
      context: .
      dockerfile: docker/php/Dockerfile
    volumes:
      - ./src:/var/www/html
    networks:
      - mml-network

  node:
    image: node:18
    container_name: node
    working_dir: /var/www/html
    volumes:
      - ./src:/var/www/html
    networks:
      - mml-network
    ports:
      - "5173:5173"
    command: sh -c "npm install && npm run build"

networks:
  mml-network:
    name: mml-network
    driver: bridge
Implementing the Image Upload UI with Vue.js
- Created an image upload UI using Vue.js.
- Implemented functionality to send the selected image to the backend with a preview display when a user selects an image.
- The uploaded image is stored in MinIO.
<template>
    <div class="max-w-md w-full mx-auto mt-8">
        <!-- Upload Area -->
        <div
            class="w-[320px] h-[320px] border-2 border-dashed border-gray-300 rounded-xl p-6 text-center bg-white shadow-sm hover:shadow-md cursor-pointer transition"
            :class="{ 'bg-blue-50 border-blue-400': isDragging }"
            @dragover.prevent="onDragOver"
            @dragleave.prevent="onDragLeave"
            @drop.prevent="onDrop"
            @click="triggerFileInput"
        >
            <input
                ref="fileInput"
                type="file"
                accept="image/*"
                class="hidden"
                @change="onFileChange"
            />

            <!-- Icons are wrapped separately -->
            <div class="flex justify-center mb-2">
                <ArrowUpTrayIcon class="w-10 h-10 text-gray-400" />
            </div>

            <p  v-if="!previewUrl" class="text-gray-600 text-sm">
                Drag and drop<br />or click to select an image
            </p>
        </div>
    </div>

    <!-- Preview -->
    <transition name="fade">
        <div v-if="previewUrl" class="mt-6 flex justify-center">
            <div class="w-[320px] h-[200px] overflow-hidden rounded shadow">
                <img
                    :src="previewUrl"
                    class="w-full h-full object-contain"
                    alt="Preview"
                />
            </div>
        </div>
    </transition>
</template>

<script setup>
import { ref } from 'vue'
import { ArrowUpTrayIcon } from '@heroicons/vue/24/outline'
import { global_state } from '../lib/global_state'
import createSynchronizer from "../lib/synchronizer";
import Time from "../lib/osapjs/utils/time";
import axios from 'axios'

const scale = 5 /8;
const fileInput = ref(null)
const isDragging = ref(false)
const previewUrl = ref(null)
// const apiResponse = ref<any>(null)

let machine;
let motorA;
let motorB;
let motorC;
let coordinates;
// const resetCoordinates = [
//     [0, 0], [226, 0],
//     [226, 20], [0, 20],
//     [0, 40], [226, 40],
//     [226, 60], [0, 60],
//     [0, 80], [226, 80],
//     [226, 100], [0, 100],
//     [0, 120], [226, 120],
//     [226, 140], [0, 140],
//     [0, 160], [226, 160],
//     [226, 180], [0, 180],
//     [0, 200], [226, 200],
//     [226, 220], [0, 220],
//     [0, 240], [226, 240]
// ];

const resetCoordinates = [
    [0, 0], [216, 0], [216, 230], [10, 230],
    [10, 10], [206, 10], [206, 220], [20, 220],
    [20, 20], [196, 20], [196, 210], [30, 210],
    [30, 30], [186, 30], [186, 200], [40, 200],
    [40, 40], [176, 40], [176, 190], [50, 190],
    [50, 50], [166, 50], [166, 180], [60, 180],
    [60, 60], [156, 60], [156, 170], [70, 170],
    [70, 70], [146, 70], [146, 160], [80, 160],
    [80, 80], [136, 80], [136, 150], [90, 150],
    [90, 90], [126, 90], [126, 140], [100, 140],
    [100, 100], [116, 100], [116, 130], [110, 130],
    [110, 110]
];

const triggerFileInput = () => {
    fileInput.value.click()
}

const onDragOver = () => {
    isDragging.value = true
}

const onDragLeave = () => {
    isDragging.value = false
}

const onDrop = (e) => {
    isDragging.value = false
    handleFile(e.dataTransfer.files[0])
}

const onFileChange = (e) => {
    handleFile(e.target.files[0])
}

const handleFile = async (file) => {
    if (!file || !file.type.startsWith('image/')) {
        alert('Please select an image file.')
        return
    }

    // For preview display
    const reader = new FileReader()
    reader.onload = () => {
        previewUrl.value = reader.result
    }
    reader.readAsDataURL(file)

    // Image Upload Process
    const formData = new FormData()
    formData.append('image', file)

    try {
        const response = await axios.post('/api/abstract-image', formData, {
            headers: {
                'Content-Type': 'multipart/form-data'
            }
        })

        console.log('API Response:', response.data)
        coordinates = response.data['coordinates']
    } catch (error) {
        console.error('❌ API Error:', error)
        return
    }
    console.log('coordinates:', coordinates)
    await runKaresansui(coordinates)
}

const initMachine = async () => {
    console.log(`initMachine`);
    motorA = global_state.things.value['motorA']
    motorB = global_state.things.value['motorB']
    motorC = global_state.things.value['motorC']
    machine = createSynchronizer([motorA, motorB]);

    await motorA.setCurrent(1);
    motorA.setStepsPerUnit(5);
    motorA.setAccel(20);

    await motorB.setCurrent(1);
    motorB.setStepsPerUnit(5);
    motorB.setAccel(20);

    // set present position as (X0,Y0)
    await machine.setPosition([0, 0]);

    await motorC.setCurrent(0.8);
    motorC.setStepsPerUnit(5);
}

const goTo = async (x, y) => {
    console.log(`Moving to (${x}, ${y})`);
    await machine.absolute([scale * (x + y), scale * (x - y)]);
}

const goToHome = async () => {
    console.log(`goToHome`);
    while(await motorB.getLimitState()){ // Limit switch at X- as Normally-Open
        motorA.velocity(-10); //move motorA CW -> CCW
        motorB.velocity(-10); //move motorB CW -> CCW
    }
    while(await motorA.getLimitState()){ //  Limit switch at Y- as Normally-Open
        motorA.velocity(-10); //positive value means CW -> CCW
        motorB.velocity(10); //negative value means CCW -> CW
    }
    motorA.velocity(0);
    motorB.velocity(0);
    machine.setPosition([0, 0]);
    await Time.delay(1000);
    await goTo(10, 10);
    await Time.delay(1000);
}

const runKaresansui = async (coordinates) => {
    console.log(`runKaresansui`);
    await initMachine()
    await goToHome()
    motorC.relative(-15);
    for (let i = 1; i < coordinates.length; i++){
        await goTo(coordinates[i][0], coordinates[i][1]);
        await Time.delay(200);
    }
    // await runReset()
    motorC.relative(15);
    await goToHome()
}

const runReset = async () => {
    console.log(`runReset`);
    motorA.velocity(1)
    motorB.velocity(1)
    for (let i = 1; i < resetCoordinates.length; i++){
        await goTo(resetCoordinates[i][0], resetCoordinates[i][1]);
        await Time.delay(200);
    }
}
</script>
<style>
.fade-enter-active,
.fade-leave-active {
    transition: opacity 0.3s ease;
}
.fade-enter-from,
.fade-leave-to {
    opacity: 0;
}
</style>
Migrating the Scan Button Functionality from modular-things
- Ported the scan feature code from the "modular-things" repository.
- Integrated it into the Vue.js UI and implemented it to initiate a serial port scan on click.
<template>
    <button
        class="device-button"
        :disabled="scanState === 'loading'"
        @click="scan"
    >
        scan
        <template v-if="scanState === 'loading'">…</template>
        <template v-if="scanState === 'error'">
            <span :style="errorStyle">!</span>
        </template>
    </button>
</template>

<script setup>
import { ref } from 'vue'
import { rescan } from '../lib/modularThingClient'
import { global_state } from '../lib/global_state'

const scanState = ref('idle')

const errorStyle = {
    color: 'red',
    marginLeft: '0.25rem'
}

const scan = async () => {
    scanState.value = 'loading'
    try {
        await rescan()
        scanState.value = 'idle'
    } catch (e) {
        scanState.value = 'error'
        global_state.things.value = {}
        console.error(e)
    }
}
</script>

<style scoped>
/* Button Style */
.device-button {
    padding: 0.5rem 1rem;
    font-weight: bold;
    border: 1px solid #ccc;
    background-color: #f8f8f8;
    cursor: pointer;
}
</style>
Migrating the "pair new thing" Button Functionality from modular-things
- Migrated the "pair new thing" button functionality, which pairs devices, from the "modular-things" repository.
- Implemented the ability to send a pairing request via the serial port when the button is clicked.
<template>
    <div class="root">
        <div class="content">
            <div class="not-menu-content">
                <div class="divider"></div>
                <div class="right-panel">
                    <div v-if="panelType === 'devices'" class="device-panel">
                        <div class="device-title">List of Things</div>
                        <div class="device-buttons">
                            <div class="device-button-container">
                                <ScanButton />
                            </div>
                            <div class="device-button-container">
                                <button class="device-button pair-button-trigger">pair new thing</button>
                            </div>
                            <div class="device-button-container">
                                <button class="device-button disconnect-button-trigger">disconnect all</button>
                            </div>
<!--                            <div class="device-button-container">-->
<!--                                <button class="device-button test-button-trigger">test</button>-->
<!--                            </div>-->
                        </div>
<!--                        <pre>{{ global_state.things.value }}</pre>-->
<!--                        <pre>{{ things }}</pre>-->
<!--                        <pre>{{ JSON.stringify(things, null, 2) }}</pre>-->
                        <div v-if="Object.entries(things).length > 0">
                            <div
                                v-for="([name, thing], index) in Object.entries(things)"
                                :key="name"
                            >
                                <div style="display: flex; justify-content: space-between; align-items: center">
                                    <div style="font-weight: bold; font-size: 1.05em">name: {{ name }}</div>
                                    <button
                                        class="device-button"
                                        style="font-size: .9em; width: 100px"
                                        @click="renameThing(name, thing)"
                                    >rename</button>
                                </div>
                                <div>type: {{ thing.typeName }}</div>
<!--                                <div v-for="entry in thing.api" :key="entry.name" style="font-size: 1em; padding-left: 1em; padding-bottom: .5em; color: grey">-->
<!--                                    <div>-->
<!--                                        {{ entry.name }}({{ entry.args.map(arg => arg.split(':')[0]).join(', ') }})-->
<!--                                    </div>-->
<!--                                    <div v-for="(x, i) in entry.args" :key="i" style="padding-left: 1em; white-space: nowrap">-->
<!--                                        {{ x }}-->
<!--                                    </div>-->
<!--                                    <div v-if="entry.return" style="padding-left: 1em">-->
<!--                                        <b>returns:</b> {{ entry.return }}-->
<!--                                    </div>-->
<!--                                </div>-->
                                <hr style="color: black" />
                            </div>
                        </div>
                        <div v-else class="no-things">
                            <div>no things found...</div>
                            <div>(maybe try scanning or pairing?)</div>
                        </div>
                    </div>
                </div>
            </div>
<!--            <SideMenu />-->
        </div>
    </div>
</template>

<script setup>
import {ref, computed, onMounted, watch, onUnmounted} from 'vue'
// import SideMenu from './SideMenu.vue'
import ScanButton from './ScanButton.vue'
import { OSAP } from '../lib/osapjs/osap.ts'
import { init } from '../lib/init'
import { global_state } from '../lib/global_state'
import { setThingsState } from '../lib/setThingsState'

// const panelType = computed(() => global_state.panelType.value)
const panelType = ref(global_state.panelType.value)
// const viewRef = ref(null)
const things = ref(global_state.things.value)

let unsubThings = null

onMounted(() => {
    if (!window.__initialized) {
        init(global_state)
        window.__initialized = true
    }
    // 🔁 things のブリッジ
    unsubThings = global_state.things.subscribe((newThings) => {
        things.value = newThings
        console.log('[Vue Reflect] updated things:', things.value)
    })
})

onUnmounted(() => {
    if (unsubThings) unsubThings()
})

const renameThing = async (name, thing) => {
    const newName = prompt(`New name for ${name}`)
    if (!newName) return
    await OSAP.rename(name, newName)
    const updatedThings = { ...things.value }
    delete updatedThings[name]
    updatedThings[newName] = thing
    thing.updateName(newName)
    setThingsState(updatedThings)
    things.value = updatedThings
}
</script>

<style scoped>
.root {
    display: flex;
    flex-direction: column;
    /*height: 100vh;*/
}

.content {
    display: flex;
    flex: 1;
}

.not-menu-content {
    display: flex;
    flex: 1;
    flex-direction: row;
}

.right-panel {
    width: 320px; /* 固定幅で制御しやすく */
    min-width: 300px;
    background-color: #f5f5f5;
    padding: 1rem;
    box-sizing: border-box;
    overflow-y: auto;
    border-left: 1px solid #ddd;
}

.device-panel {
    width: 100%;
}

.device-title {
    font-weight: bold;
    font-size: 1.2em;
    margin-bottom: 1em;
}

.device-buttons {
    display: flex;
    flex-direction: column; /* 縦並び */
    gap: 0.5rem;
    margin-bottom: 1rem;
}

.device-button-container {
    width: 100%;
}

.device-button {
    background-color: #eee;
    padding: 0.5em 1em;
    border: none;
    border-radius: 4px;
    cursor: pointer;
    text-align: center;
    width: 100%;
}
</style>
Migrating the "disconnect all" Button Functionality from modular-things
- Migrated the "disconnect all" button functionality, which disconnects all devices at once.
- Enabled bulk disconnection of serial port connections, improving the UX of device management.
Implementing Device Scan and Dynamic List Display
- Implemented a feature to dynamically display scanned devices as a list in the Vue.js interface.
- Each device is shown with its name and connection status, and users can initiate connections from the UI.
Implementing Device Renaming Feature
- Added functionality to assign custom names to connected devices.
- The renaming operation can be performed directly from a UI form.
Implementing Arm Movement Based on XY Coordinates
- Implemented functionality to extract XY coordinates from SVG data and send them over the serial port to move the robotic arm.
- The system is also extendable to Arduino and MicroPython-compatible devices.
Adding S3-Compatible MinIO to docker-compose.yml
- Integrated MinIO as a service in the docker-compose configuration to emulate S3-compatible storage locally.
- Loaded
MINIO_ROOT_USERandMINIO_ROOT_PASSWORDfrom the.envfile to ensure secure configuration.
 minio:
    image: minio/minio:latest
    container_name: minio
    ports:
      - "9000:9000"
      - "9001:9001"
    volumes:
      - ./minio/data:/data
    networks:
      - mml-network
    environment:
      MINIO_ROOT_USER: minioadmin
      MINIO_ROOT_PASSWORD: minioadmin
    command: server --console-address ":9001" /data

  minio-init:
      image: minio/mc
      container_name: minio-init
      depends_on:
        - minio
      networks:
        - mml-network
      entrypoint: >
        /bin/sh -c "
          echo '⏳ Waiting for MinIO...';
          until mc alias set myminio http://minio:9000 minioadmin minioadmin; do
            sleep 2;
          done;
          echo '✅ Connected to MinIO.';
          mc ls myminio;
          if ! mc ls myminio/machinical-memory-landscapes 2>/dev/null; then
            mc mb myminio/machinical-memory-landscapes;
            mc anonymous set download myminio/machinical-memory-landscapes
            echo '✅ Bucket created.';
          else
            echo 'ℹ️ Bucket already exists.';
          fi;
        "
Implementing a Web API to Save Images to S3
- Implemented an image upload API in PHP and built the process to store images in MinIO.
- The URL of the saved image can also be retrieved.
<?php

namespace App\Http\Controllers;

use Illuminate\Http\Request;
use Illuminate\Support\Facades\Storage;

class ImageUploadController extends Controller
{
    public function upload(Request $request)
    {
        $request->validate([
            'image' => 'required|image|max:10240', // 10MBまで
        ]);

        $path = Storage::disk('s3')->putFile('images', $request->file('image'));
        $url = config('filesystems.disks.s3.url') . '/' . $path;

        return response()->json([
            'message' => 'Upload successful',
            'path' => $path,
            'url' => $url,
        ]);
    }
}
Implementing a Feature to Generate Mindscape SVGs Using Gemini
- Implemented a process using the Gemini API to generate SVGs that represent mindscapes from uploaded images.
- The output was an abstract, painting-like SVG with artistic value.
<?php

namespace App\Http\Controllers;

use App\Repositories\MindscapeResultRepository;
use App\Services\GeminiAbstractImageService;
use Illuminate\Http\Request;
use Illuminate\Support\Facades\Log;
use Illuminate\Support\Facades\Storage;

class ImageAbstractController extends Controller
{
    protected $MindscapeResultRepository;
    protected $GeminiAbstractService;

    public function __construct(
        MindscapeResultRepository $MindscapeResult,
        GeminiAbstractImageService $GeminiAbstractService
    ) {
        $this->MindscapeResultRepository = $MindscapeResult;
        $this->GeminiAbstractService = $GeminiAbstractService;
    }

    public function generate(Request $request)
    {
        $request->validate([
            'image' => 'required|image|max:10240',
        ]);

        $image = $request->file('image');
        $base64 = base64_encode(file_get_contents($image->getRealPath()));
        $mime = $image->getMimeType();

        $path = Storage::disk('s3')->putFile('images', $image);
        $url = config('filesystems.disks.s3.url') . '/' . $path;

        $MindscapeResult = $this->MindscapeResultRepository->create([
            'uploaded_image_url' => $url,
        ]);

        try {
            $svg = $this->GeminiAbstractService->generateSvgFromImage($base64, $mime);
        } catch (\Exception $e) {
            return response()->json([
                'error' => 'Gemini API error',
                'details' => $e->getMessage(),
            ], 500);
        }

        $filename = 'svg-' . now()->timestamp . '.svg';
        $path = 'svgs/' . $filename;
        Storage::disk('s3')->put($path, $svg);
        $mindscape_image_url = config('filesystems.disks.s3.url') . '/' . $path;

        $MindscapeResult->mindscape_image_url = $mindscape_image_url;
        $MindscapeResult->save();

        try {
            $allCoordinates = $this->extractPathsFromSvg($svg);
        } catch (\Exception $e) {
            return response()->json(['error' => $e->getMessage()], 500);
        }

        return response()->json([
            'message' => 'Upload successful',
            'coordinates' => $allCoordinates,
        ]);
    }

    private function extractPathsFromSvg(string $svgContent): array
    {
        $doc = new \DOMDocument();
        libxml_use_internal_errors(true);
        $doc->loadXML($svgContent);

        $xpath = new \DOMXPath($doc);
        $xpath->registerNamespace('svg', 'http://www.w3.org/2000/svg');
        $paths = $xpath->query('//svg:path');
        $allCoordinates = [];

        foreach ($paths as $path) {
            /** @var \DOMElement $path */
            $d = $path->getAttribute('d');
            Log::debug("$d:");
            $coords = $this->extractCoordinatesFromPath($d);
            $allCoordinates = array_merge($allCoordinates, $coords);
        }

        return $allCoordinates;
    }

    private function extractCoordinatesFromPath(string $d): array
    {
        $d = preg_replace('/([MLZ])/i', ' $1 ', $d);
        $d = str_replace(',', ' ', $d);
        $d = preg_replace('/\s+/', ' ', trim($d));

        $tokens = preg_split('/\s+/', $d);
        $coords = [];
        $currentCommand = null;

        for ($i = 0; $i < count($tokens); $i++) {
            $token = strtoupper($tokens[$i]);

            if (in_array($token, ['M', 'L'])) {
                $currentCommand = $token;
                continue;
            }

            if ($currentCommand && is_numeric($token)) {
                $x = floatval($token);
                $y = isset($tokens[$i + 1]) ? floatval($tokens[++$i]) : null;

                if ($y !== null) {
                    $coords[] = [$x, $y];
                }
            }

            if ($token === 'Z' && !empty($coords)) {
                $coords[] = $coords[0];
            }
        }

        return $coords;
    }
}
Implementing a Feature to Extract Coordinate Data from Mindscape SVGs
- Parsed and extracted coordinate data from
<path>and<circle>tags in SVG files. - The extracted XY coordinates are converted for controlling the robotic arm.
Implementing a Feature to Send Coordinate Data to Connected Devices
- Built a feature to send coordinate data in real time to connected devices via the serial port.
- The data is transmitted in JSON format and received as control signals by the target microcontroller.
Implementing a Web API to Generate Haiku from Photos
- Developed a Web API that generates haiku based on images using OpenAI or Gemini APIs.
- The output considers seasonal words (kigo) and the traditional 5-7-5 structure, resulting in poetic expressions through natural language processing.
<?php

namespace App\Services;

use Google\Auth\Credentials\ServiceAccountCredentials;
use Illuminate\Support\Facades\Http;

class GeminiHaikuService
{
    public function generateHaikuFromImage(string $base64Image, string $mimeType): string
    {
        $scopes = [
            'https://www.googleapis.com/auth/generative-language'
        ];

        // OAuth 2.0 token acquisition
        $credentials = new ServiceAccountCredentials(
            $scopes,
            config('services.google.credentials_path')
        );
        $tokenData = $credentials->fetchAuthToken();

        if (!is_array($tokenData) || !isset($tokenData['access_token'])) {
            throw new \Exception("Failed to obtain access token");
        }

        $accessToken = $tokenData['access_token'];

        // Request body
        $payload = [
            'contents' => [[
                'parts' => [
                    [
                        'inline_data' => [
                            'mime_type' => $mimeType,
                            'data' => $base64Image,
                        ]
                    ],
                    [
                        'text' => $this->getPromptText(),
                    ]
                ]
            ]]
        ];

        // Request to Gemini API
        $response = Http::withHeaders([
            'Authorization' => 'Bearer ' . $accessToken,
            'Content-Type' => 'application/json',
        ])->post(
            'https://generativelanguage.googleapis.com/v1beta/models/gemini-2.0-flash:generateContent?key=' . env('GEMINI_API_KEY'),
            $payload
        );

        if (!$response->ok()) {
            throw new \Exception('Gemini API Error: ' . $response->body());
        }

        $result = $response->json();
        return $result['candidates'][0]['content']['parts'][0]['text'] ?? '';
    }

    private function getPromptText(): string
    {
        return <<<EOT
Please create a haiku based on this Zen garden (karesansui) image.
# Role
You are a master haiku poet with deep knowledge of Japanese aesthetics and Zen philosophy.

# Task
1. Carefully observe the provided image of a Zen rock garden (karesansui).
2. Create a Japanese haiku that captures the essence, visual elements, and atmosphere of the garden.
3. Translate the haiku into English following the translation guidelines below.

# Japanese Haiku Requirements
- Follow the traditional 5-7-5 syllable structure (5-7-5音).
- Include an appropriate seasonal reference (kigo/季語).
- Reflect visual elements of the rock garden (line patterns, sand textures, overall composition).
- Embody Zen spirit and Japanese aesthetics (wabi-sabi/わび・さび, yugen/幽玄).

# English Translation Guidelines
1. **Syllable Structure:**
   - No need to maintain the strict 5-7-5 syllable pattern in English.
   - Recommended options:
     * 3-5-3 syllables (11 total)
     * 2-3-2 syllables (7 total)
     * Free form but maintain a three-line structure

2. **Seasonal References:**
   - Preserve the seasonal word (kigo) in a culturally appropriate way.
   - Example: "名月" → "harvest moon" rather than literal "famous moon"

3. **Cutting Words:**
   - Transform Japanese cutting words ("や"/"かな", etc.) into appropriate English punctuation (commas, dashes, exclamation marks) or line breaks.

4. **Translation Priorities:**
   - Meaning: Clearly convey the original intent
   - Conciseness: Avoid unnecessary words
   - Imagery: Use vivid, evocative language
   - Rhythm: Maintain natural flow in English

5. **Core Principle:**
   - Translation is a cultural and poetic bridge, not word-for-word conversion.
   - The spirit and beauty of the haiku should resonate with English readers as poetry.

# Output Format
You must strictly adhere to the following format and provide nothing else:

俳句: [JAPANESE HAIKU WITH 5-7-5 STRUCTURE]
英訳: [ENGLISH TRANSLATION FOLLOWING GUIDELINES]

Do not include any additional explanations, comments, or text outside this exact structure. Do not number the entries or add any formatting beyond what is specified.

# Examples
The following are examples of the required format:

俳句: 古池や 蛙飛び込む 水の音
英訳: An old silent pond... A frog jumps into the pond, splash! Silence again.

俳句: 桃の花 散りゆく様は 桜かな
英訳: The peach blossoms As they scatter Look like cherry blossoms.

俳句: 月一輪 星無数空 緑なり
英訳: Around the lone moon countless stars the sky now green.
EOT;
    }
}
Implementing a Feature to Display Generated Information as a List
- Created a Vue.js component to display a list of generated items including images, haiku, and SVGs.
- The list supports automatic sorting and filtering.
Implementing a Feature to Refresh the List Every 10 Seconds
- Used
setIntervalto implement a function that fetches new generated data from the server every 10 seconds. - This automatic update provides a real-time user interface.
<template>
    <div class="flex flex-col gap-6 p-6">

        <!-- Top: Image Upload + Device Scanner -->
        <div class="flex flex-row justify-between">
            <div class="w-[48%] pr-2">
                <image-uploader />
            </div>
            <div class="w-[48%] pl-2">
                <device-scanner />
            </div>
        </div>
        <br>
        <br>
        <br>

        <!-- Bottom row: Mindscape list (additional margin between the top and the bottom))-->
        <div class="mt-8">
            <MindscapeList :items="mindscapeItems" />
        </div>

    </div>
</template>


<script setup lang="ts">
import {onMounted, ref} from 'vue'
import ImageUploader from './Components/ImageUploader.vue'
import DeviceScanner from './Components/DeviceScanner.vue'
import MindscapeList from './Components/MindscapeList.vue'
import axios from "axios";

const mindscapeItems = ref([])
const fetchMindscapeResults = async () => {
    try {
        const response = await axios.get('/api/mindscape-results')
        mindscapeItems.value = response.data
    } catch (error) {
        console.error('❌ Failed to fetch mindscape results:', error)
    }
}

onMounted(() => {
    // primary acquisition
    fetchMindscapeResults()

    // Polling every 10 seconds (can be changed as needed)
    setInterval(fetchMindscapeResults, 10000)
})
</script>
Deploying a Web Server on AWS
- Set up a production web server using Nginx and Docker on an EC2 instance.
- Configured security groups and enabled SSL.
https://machinical-memory-landscapes.cloud/
Implementing a Feature to Export Generated Content as a Report
- Implemented a function to output generated content—such as images, SVGs, and haiku—in HTML format.
https://machinical-memory-landscapes.cloud/
Afterthoughts
We believe this is a product that only the FabLab Kannai team could have created!
We’re proud to say this turned out to be a truly interesting product using AI!
During the final two days, Mr. Ito and I worked overnight at a capsule hotel near FabLab Kannai instead of going home! It was fun—but I never want to stay at a capsule hotel again! (It was really dirty!)