
Fab Academy
1. What Does It Do?
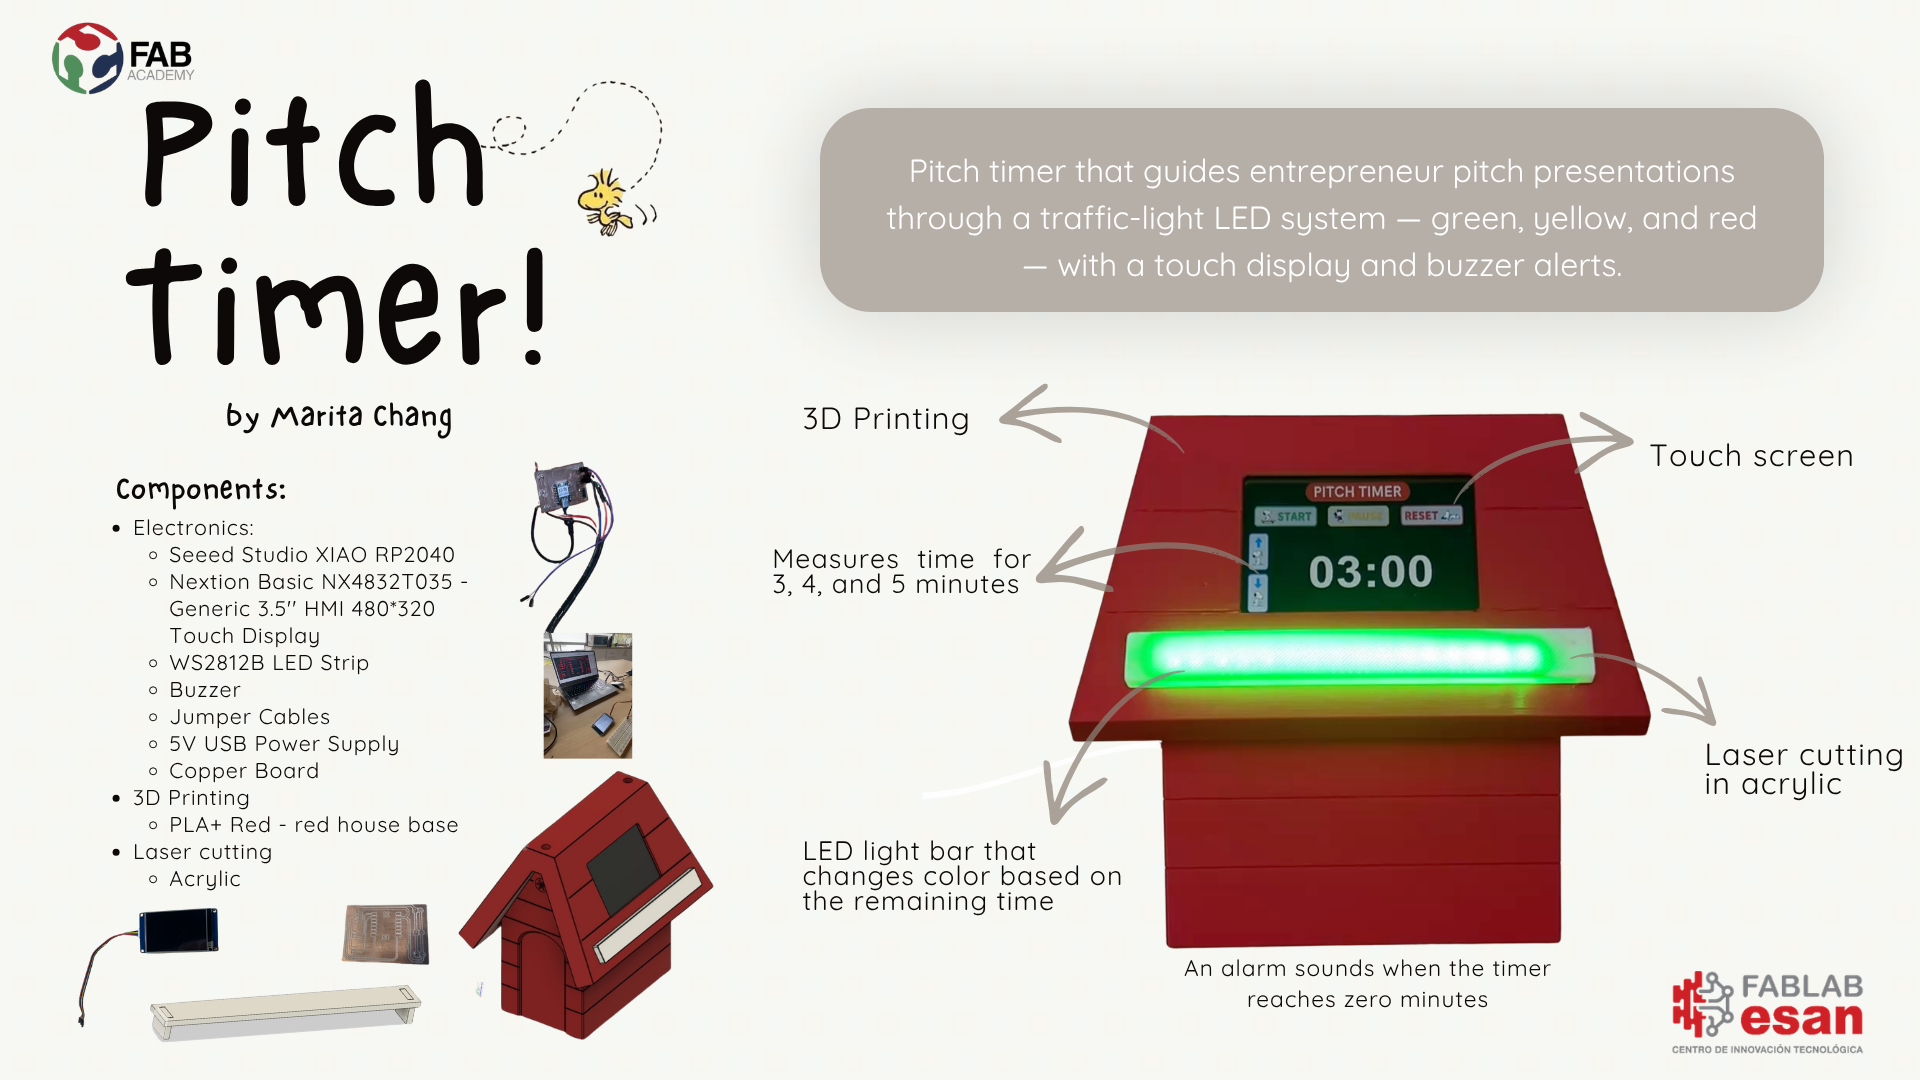
Pitch timer solves a real problem faced every day at our business incubator: entrepreneurs lose track of time during pitch presentations. It works like a traffic light. Press Start — green means go. With one minute left — yellow means wrap up. In the last 10 seconds — red means stop. A buzzer sounds when time is up.
The goal is for entrepreneurs to rehearse autonomously, receiving immediate visual and auditory feedback. This eliminates time-management anxiety and allows them to focus entirely on their presentation content and delivery.
Three modes are available directly on the touch display:
The LED signal phases work as follows:
Previous Fab Academy editions were reviewed for similar projects:
The following original elements were designed and fabricated:
All electronic components were purchased locally or sourced from Fab Lab inventory. PCB fabrication and the enclosure were produced entirely at the ESAN Fab Lab.
Learning about Applications and Implications, Project Development
1. What Does It Do?
Pitch timer solves a real problem faced every day at our business incubator: entrepreneurs lose track of time during pitch presentations. It works like a traffic light. Press Start — green means go. With one minute left — yellow means wrap up. In the last 10 seconds — red means stop. A buzzer sounds when time is up.
The goal is for entrepreneurs to rehearse autonomously, receiving immediate visual and auditory feedback. This eliminates time-management anxiety and allows them to focus entirely on their presentation content and delivery.
Three modes are available directly on the touch display:
- 3 minutes — standard elevator pitch
- 4 minutes — extended pitch
- 5 minutes — full investor pitch
The LED signal phases work as follows:
| Phase | Duration (3 min mode) | LED Color | Buzzer Alert |
|---|---|---|---|
| 🟢 Green — GO | 00:00 → 02:00 | All LEDs solid green | No sound |
| 🟡 Yellow — WARN | 02:00 → 02:50 (last 60s) | All LEDs solid yellow | No sound |
| 🔴 Red — STOP | 02:50 → 03:00 (last 10s) | All LEDs red + blink | 3 beeps |
A 3.5" Nextion TFT touch display shows the remaining time in MM:SS format, and a passive buzzer emits differentiated tones at each phase transition. The enclosure is an iconic red house, entirely designed and fabricated at the ESAN Fab Lab.
02. Who Has Done This Before?Previous Fab Academy editions were reviewed for similar projects:
- Dora Tasci — Fab Academy 2025, Hisar Lab: A physical timer shaped like a sea urchin whose spines sink progressively to represent time. Shares the concept of representing time through a physical object with visual narrative, but uses active mechanisms (motors) instead of LEDs.
- Tenzin Dorji — Fab Academy 2022, Bhutan Lab: A pedestrian traffic light with colored LEDs, an ultrasonic sensor, a buzzer, and a 7-segment display for countdown. The closest technical precedent in terms of traffic-light logic combined with a time counter.
- Dorian Somers — Fab Academy 2023, Kamplintfort Lab: A traffic signal using RP2040 and LEDs with non-blocking logic via
millis(). A direct implementation reference using the same microcontroller. - Clara Devanz — Fab Academy 2023, Sorbonne Lab: A device with NeoPixel WS2812B LED strip, I2C communication, and a custom PCB fabricated at the Fab Lab. A reference for addressable LED strip electronic design.
Novelty of this project: Unlike a smartphone timer that requires constant visual attention, Pitch timer offers a peripheral and intuitive signal, allowing the presenter to maintain eye contact with the audience. No previous Fab Academy project specifically combines a pitch timer designed for entrepreneurs, a figurative enclosure with a distinct character identity fabricated entirely in the lab, and a three-phase traffic-light system tailored to an incubation context.
03. What Did I Design?The following original elements were designed and fabricated:
-
Custom PCB — Milled at the Fab Lab. Designed in KiCad to integrate the XIAO RP2040 as the central controller, along with connectors for the LED strip, Nextion display, buzzer, and push buttons. The XIAO RP2040 was chosen for its compact size and processing power. The PCB layout places all connectors on a single side, facilitating assembly within the limited interior space of the house enclosure. Milled on FR1 copper using the lab's CNC machine. - Red house enclosure — A three-dimensional structure inspired by an iconic red house. The shape is intentional: it aims to be memorable for entrepreneurs, associating the device with a "home" for their business ideas. Designed for 3D printing in red PLA+ (125.78 g, 3 h 0 min), sliced in Bambu Studio.
- LED diffuser cover — Laser cut from transparent acrylic to ensure even light distribution.
-
Firmware in Arduino (C++) — Program managing the countdown logic using
millis()to avoid blocking the main loop; the three-phase LED state machine (green → yellow → red); Nextion display updates via UART; and buzzer alerts with distinct tones at each phase transition. - Three-mode timer system — Selectable modes (3 / 4 / 5 minutes) via the touch display interface. Phase thresholds are consistent across all modes: yellow triggers at the last 60 seconds, red at the last 10 seconds.
04. What Sources Were Used?
- FastLED official documentation — WS2812B control (fastled.io)
- Nextion Editor documentation — UART serial protocol for display UI design
- Fab Academy 2022–2025 project repositories (fabacademy.org)
- Seeed XIAO RP2040 technical documentation — pinout, schematic, electrical specs
- Non-blocking timers with
millis()— Arduino Reference - KiCad 7.x documentation — schematic and PCB layout design
- Fab Academy 2022 — Tenzin Dorji (Bhutan Lab) — traffic light with Arduino
- Fab Academy 2023 — Dorian Somers (Kamplintfort) — non-blocking logic with RP2040
- Bambu Studio slicer documentation — PLA+ print settings
- Nextion Display Tutorials — Itead Studio documentation for UART communication
05 – 07. Materials, Components & Costs
All electronic components were purchased locally or sourced from Fab Lab inventory. PCB fabrication and the enclosure were produced entirely at the ESAN Fab Lab.
| Component | Description | Source | Cost (USD) |
|---|---|---|---|
| Electronics | |||
| Seeed XIAO RP2040 | Dual-core ARM M0+, 2MB Flash, USB-C | Mercado Libre PE | $7.00 |
| Nextion Basic NX4832T035 — 3.5" Touch Display | 480×320 px resistive touch, UART serial | Mercado Libre PE | $43.00 |
| WS2812B LED Strip | DC 5V addressable RGB, non-waterproof | AliExpress / ML | $3.50 |
| Buzzer | 5V PWM-controlled, audible alerts | Fab Lab inventory | $0.50 |
| SMD Components | Pin headers | Fab Lab inventory | $1.50 |
| Jumper Cables | Male-female dupont wires | Fab Lab inventory | $0.50 |
| M2 Screws & Standoffs | Phillips M2 — PCB & display mounting | Fab Lab inventory | $0.50 |
| 5V USB Power Supply | DC adapter with inline switch, USB-C | Mercado Libre PE | $4.00 |
| PCB Fabrication | |||
| FR1 Copper Board | Single-layer copper clad 100×80 mm | Fab Lab inventory | $2.00 |
| CNC Milling (machine) | Makera Carvera — traces, drill & cutout | Fab Lab | $2.00 |
| Enclosure — 3D Printed House + LED Cover | |||
| PLA+ Red — House base | 125.78 g · 3h 0m · Bambu Studio | Fab Lab inventory | $2.89 |
| LED cover | Transparent acrylic sheet | Fab Lab inventory | $1.00 |
| Laser cutting (machine) | Diffuser cover cut | Fab Lab | $2.00 |
| Total Estimated Cost | ~$70.39 | ||
Note: Exchange rate used: S/ 3.5 per USD.
08. What Parts and Systems Were Made?>
- Central electronics system — Custom-milled PCB with XIAO RP2040, connectors for all peripherals, and SMD filtering components.
- Traffic-light illumination system — WS2812B LED strip controlled via FastLED. Three-color state machine with smooth transitions and a blinking effect in the red phase.
- Numeric display system — Nextion 3.5" TFT touch display (480×320) showing remaining time in MM:SS format, with Start, Pause, and Reset buttons on the display interface.
- Audio alert system — Buzzer driven by PWM: a sustained tone sounds when time expires.
- Red house enclosure — Red PLA+ main body, sliced in Bambu Studio and printed on a Bambu Lab printer.
- System integration — The main challenge was fitting the Nextion display, PCB, and LED strip inside the house while ensuring cables did not interfere with light diffusion and all connectors remained accessible.
09. What Processes Were Used?
This project integrates additive and subtractive fabrication as required by the Fab Academy curriculum:
Additive Fabrication
- 3D Printing — House body printed in red PLA+ using a Bambu Lab printer. Slicer preparation in Bambu Studio. Print time: 3 hours, 125.78 g of material.
Subtractive Fabrication
- CNC Milling — PCB milled on FR1 copper using the Fab Lab CNC machine (Makera Carvera). Toolpaths generated with Fab Modules / mods. Includes trace isolation, drilling, and board cutout.
- Laser Cutting — LED diffuser cover cut from transparent acrylic to achieve even light distribution.
Other Processes
- 2D & 3D CAD Design — KiCad for schematic and PCB layout; Bambu Studio for 3D slicer preparation.
- SMD Soldering — Surface-mount components and connectors soldered onto the custom PCB.
- Embedded Programming — Firmware developed in Arduino IDE with FastLED and Nextion libraries. Non-blocking architecture using
millis()for all timing. Programmed via USB-C. - System Integration — Assembly of all subsystems inside the enclosure. M2 Phillips screws used to secure the Nextion display in its red PLA+ frame. Cable routing and final functional verification.
10. What Questions Were Answered?
- How to implement a timer without blocking the microcontroller? — Using
millis()instead ofdelay()allows the microcontroller to read touch inputs from the Nextion display and update the LED strip simultaneously while counting down. This makes the system non-blocking and significantly more responsive. - What are the optimal phase durations for a pitch timer? — Testing with real users confirmed: 60 seconds for the yellow warning phase and 10 seconds for the red stop phase — intuitive without any prior explanation.
- How to diffuse LED light evenly through the enclosure? — A transparent acrylic diffuser cover placed over the LED strip distributes light uniformly without hot spots. The initial PLA+ diffuser was replaced with acrylic for better transparency.
- What scale should the house enclosure be? — The printed dimensions comfortably house all components while remaining clearly visible from several meters away (tested at a 5 m viewing distance).
- How to integrate the Nextion display with the RP2040? — UART serial communication at 9600 baud using the Nextion library, with custom UI pages designed in Nextion Editor. Correct baud rate configuration was critical for reliable communication.
11 – 12. What Worked? What Did Not? How Was It Evaluated?
What Worked Correctly
- Three-phase traffic-light logic (green → yellow → red)
- Precise countdown display on the Nextion TFT touch screen
- Custom-milled PCB with all connections functional
- Start, Pause, and Reset buttons responsive via the Nextion touch interface
- Full component integration inside the 3D-printed enclosure
- Three selectable timer modes (3 / 4 / 5 min) working correctly
Challenges Encountered
- The first PCB version had routing errors that required a full redesign and re-milling.
- Initial LED diffusion was uneven — resolved by replacing the white PLA+ diffuser cover with a transparent acrylic one.
- The first buzzer configuration was too shrill — the PWM frequency was adjusted accordingly.
- Phase threshold calibration required testing with real users before the 60 s / 10 s values were finalized.
- UART communication with the Nextion display required careful baud rate configuration.
Evaluation
Technical evaluation (Fab Academy): Verification that the project integrates 2D/3D design; additive (3D printing) and subtractive (CNC milling, laser cutting) fabrication; original electronic design and production (PCB milled and designed at the lab); microcontroller programming with inputs and outputs; and full system packaging. It was confirmed that the PCB was originally designed in KiCad and is not an unmodified commercial board.
Functional evaluation (use context): Tests were conducted with entrepreneurs at the ESAN incubator during pitch practice sessions. Results: 100% of participants understood the color signals without prior explanation. 80% adjusted their pitch duration to finish just before the red alarm sounded, demonstrating the device's effectiveness. The evaluation measured whether the device improved time distribution and whether the visual signal was understood intuitively without prior instruction.
13. What Are the Implications?- Entrepreneurship ecosystem: A sub-$70 tool that is replicable in any incubator, accelerator, or program requiring timed presentation practice.
- Accessible digital fabrication: Demonstrates that functional devices with their own aesthetic identity can be fully fabricated in a Fab Lab — combining PCB milling, 3D printing, and laser cutting.
- Customization & scalability: Firmware allows configuring total duration and phase thresholds, adapting to different formats (1 min elevator pitch, 3 min standard, 5 min investor pitch).
- Future iterations: Possible evolution toward wireless phone control (BLE), a larger display for auditoriums, or a multi-presenter version with color-coded identification.
- Educational value: This project demonstrates my ability to integrate all Fab Academy skills — 2D/3D design, additive and subtractive fabrication, electronics design and production, embedded programming, and system integration — into a single functional product. From concept to a prototype ready for real-world use, it validates my learning journey throughout this course.
Licensed under CC BY-NC-SA 4.0