Interface and Application Programming
Group assignment
-
Compare as many tool options as possible.
-
Document your work on the group work page and reflect on your individual page what you learned.
Individual assignment
- Write an application for the embedded board that you made that interfaces a user with an input and/or output device(s)
Learning outcomes
- Implement a User Interface (UI) using programming and explore protocols to communicate with a microcontroller board that you designed and made.
Have you answered these questions?
-
Linked to the group assignment page.
-
Documented your process.
-
Explained the UI that you made and how you did it.
-
Explained how your application communicates with your embedded microcontroller board.
-
Explained any problems you encountered and how you fixed them.
-
Included original source code (or a screenshot of the app code if that’s not possible).
-
Included a ‘hero shot’ of your application running & communicating with your board.
Time Management
In order to keep track of my progess and manage time well, Mr. Rico put in a lot of emphasis on making a GANTT chart. Therefore, I decided to make one. Turns out it’s actually super HELPFUL. I went through this video to make my very own GANTT chart in goggle spreadsheets.
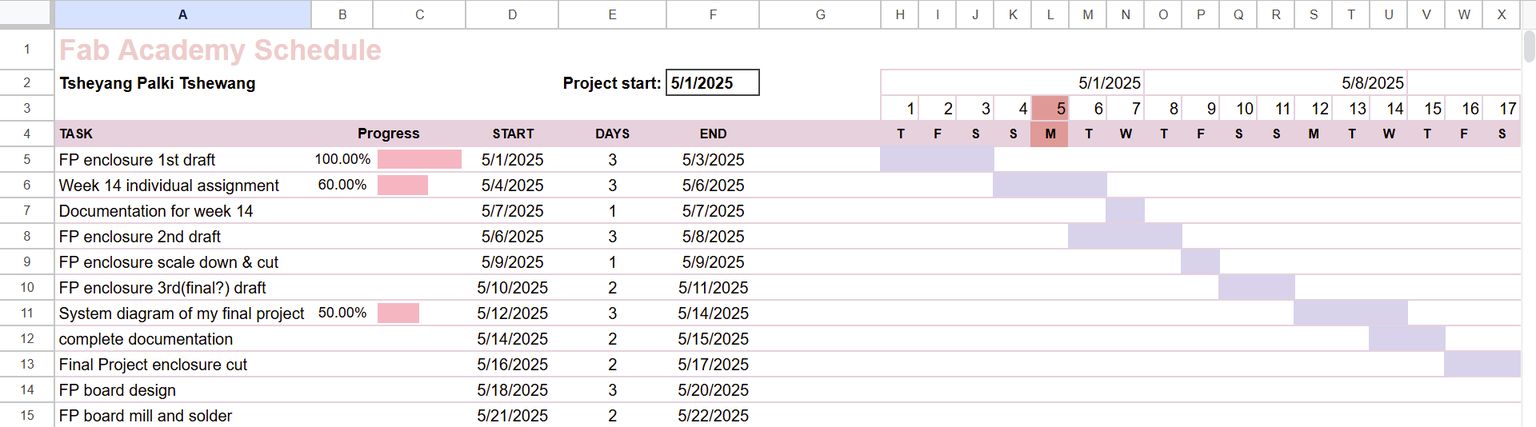
You can access my GANTT chart here.
Group Assignment
You can access the link to our group assignmemt here.
Reflection
This week’s group assignment, helped me understand the various ways a microcontroller can communicate with a user through interfaces. We compared the Arduino Serial Monitor and Tkinter. Through this activity, I gained insights on how each tool works differently. Both has their own pros and cons. Comparing them will help me choose the right tool in the future.
Individual Assignment
Webserver for RFID module
For this week’s individual assignment, I decided to develop a webserver which interacts with my RFID module. The vision is for my webserver to be able print the UID of the RFID card scanned and refresh the page when a new one is being scanned. It will print the latest RFID scanned.
I will be using the board I designed during week 9(Tsheyang-duino). You can get more details here.
Here are the connections I made with my PN532 RFID module and my Xiao board.
| RFID module | Xiao board |
|---|---|
| VCC | 3V3 |
| GND | GND |
| TXD | D5 |
| RXD | D4 |
To get more details on how to download the necesarry libraries and program the PN532 RFID module, go through my final project development page.
Programming
Here is the prompt I entered in ChatGPT to generate the code needed to create my webserver.
write a code for me to create a webserver with UI which programs my Xiao board, with a Wi-Fi antenna, and my RFID PN532 module. The webserver should be able to create a log which displays the RFID card scanned whenever one is scanned. (does this even implements UI though?)
Here is the code generated.
#include <WiFi.h>
#include <WebServer.h>
#include <Adafruit_PN532.h>

// Wi-Fi credentials
const char* ssid = "your_WiFi_name";
const char* password = "WiFi_password";

// Web server on port 80
WebServer server(80);

// Create PN532 instance on Serial1 (UART)
#define PN532_RX D5
#define PN532_TX D4
HardwareSerial mySerial(1);
Adafruit_PN532 nfc(PN532_TX, &mySerial);

// To store latest UID
String lastUID = "No card scanned yet";

void handleRoot() {
  String html = "<!DOCTYPE html><html><head><meta http-equiv='refresh' content='2'/>"
                "<title>RFID Log</title></head><body>"
                "<h1>Last scanned RFID UID:</h1>"
                "<p>" + lastUID + "</p>"
                "</body></html>";
  server.send(200, "text/html", html);
}

void setup() {
  Serial.begin(115200);
  delay(1000);

  // Start Wi-Fi
  Serial.println("Connecting to WiFi...");
  WiFi.begin(ssid, password);
  while (WiFi.status() != WL_CONNECTED) {
    delay(500);
    Serial.print(".");
  }
  Serial.println("\nConnected to WiFi");
  Serial.print("IP address: ");
  Serial.println(WiFi.localIP());

  // Start web server
  server.on("/", handleRoot);
  server.begin();
  Serial.println("Web server started");

  // Start RFID on Serial1
  mySerial.begin(115200, SERIAL_8N1, PN532_RX, PN532_TX);
  nfc.begin();

  uint32_t versiondata = nfc.getFirmwareVersion();
  if (!versiondata) {
    Serial.println("Didn't find PN532");
    while (1) delay(10);
  }

  // Configure board to read RFID tags
  nfc.SAMConfig();
  Serial.println("Waiting for RFID card...");
}

void loop() {
  server.handleClient();

  // Check for an RFID card
  uint8_t success;
  uint8_t uid[7];    // Buffer to store UID
  uint8_t uidLength; // UID length

  success = nfc.readPassiveTargetID(PN532_MIFARE_ISO14443A, uid, &uidLength);

  if (success) {
    Serial.print("RFID UID: ");
    String uidStr = "";
    for (uint8_t i = 0; i < uidLength; i++) {
      uidStr += String(uid[i], HEX);
      uidStr += " ";
    }
    Serial.println(uidStr);
    lastUID = uidStr;
    delay(1500); // debounce time
  }
}
Explanation of the code
The code starts off by connecting to a local Wi-Fi using the given SSID and PASSWORD. Then, a webserver is created on port 80. When someone visits the root URL (e.g., the IP address of the board), it serves a simple HTML page showing the last RFID UID scanned. This page auto-refreshes every 2 seconds thanks to this line in the handleRoot() function:
"<meta http-equiv='refresh' content='2'/>"
The RFID module is connected via UART. My board updates the latest RFID UID scanned. It continuously checks for scanned RFID cards and updates the lastUID value. The server running and responding to requests.
The web server is hosted directly on the Xiao ESP32C3 board. Firstly, it connects to network and after that, it gets a local IP address. We can access the interface by entering that IP in a browser. The board serves the HTML page showing the scanned RFID UID in real-time.
How the UI was created
The UI I made is actually a really simple HTML page that’s served directly from my Xiao ESP32C3 board. The HTML is written right inside the handleRoot() function as a string.
Here’s a breakdown of what each part of the HTML does:
<!DOCTYPE html>- Declares the document type as HTML<html>and<head>- These wrap the main head of the page<meta http-equiv='refresh' content='2'/>→ Refreshes the page every 2 seconds (super helpful for real-time updates!)<title>- Sets the title of the web tab to “RFID Log”<body>- This is where the actual content goes<h1>- A heading that says “Last scanned RFID UID:”<p>- The paragraph that displays thelastUIDvariable from the code
It’s all stored inside the ESP32’s memory, and when someone accesses the IP address of the device through a browser, it serves this HTML page. So yeah, it’s very basic and understandable but it does the job!
Results
As you can see, the page refreshes and prints the UID of the latest RFID card scanned.
Improvements
We can make our page look better and more aesthetic by editing the HTML code in the handleRoot() function.
String html = "<!DOCTYPE html><html><head>"
              "<style>body { font-family: Arial; text-align: center; margin-top: 50px; }"
              "h1 { color: #2E8B57; } p { font-size: 24px; }</style>"
              "<meta http-equiv='refresh' content='2'/>"
              "<title>RFID Log</title></head><body>"
              "<h1>Last scanned RFID UID:</h1>"
              "<p>" + lastUID + "</p>"
              "</body></html>";
You can edit the above code to make the web page more to our liking. For example, we can use the inline <style> tags to change the text font, color, and etc.
Problems and Solutions
One very silly issue that I faced while doing this assignment was making common wirings mistakes. While connecting the RFID module with my Xiao ESP32C3 board, I mismatched the TX and the RX wires which did not allow the RFID module to work. Therefore kids, always double-check the wirings👍
Reflection
This week went by pretty fast and I was able to complete it quickly. I learnt how to create a simple web-based interface that interacts with an embedded system. I also learnt how to host a webserver using my Xiao ESP32C3 board and communicate it with my RFID module.
Thank you!
The template for this website was provided by Mr. Anith Ghalley and used with his permission