
Assignments
- Work through a git tutorial
-Create a website describing yourself and your final project
-Document steps for setting up your Git repository and adding files to it
-Push to your class -GitLab repository
-Sign and upload Student Agreement
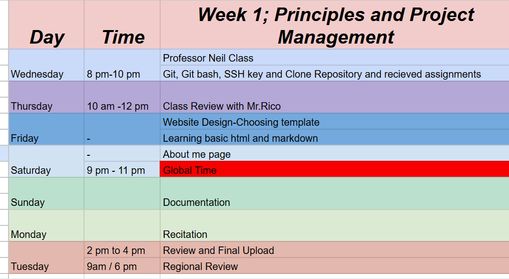
This is my timetable for the week. .
You can access my final project idea here. Final Project Development for Week 01
Creating a Website
I built a personal website describing me and my final project. I referred to the lecture material for examples. Then I visited some templates but could not find a template of my choice. Then I visited Mr. Adrián Torres website because our local instructor told us to refer to his documentation and then I liked his template so I used the template he used which is Phantom to build my documentation website.
- HTML (HyperText Markup Language):The structure of a webpage. You can think of it like the bones of a website.
<html>– The main container for the whole page.<head>– Includes the title, links to CSS, and other settings.<body>– Holds everything that shows on the website.<header>– The top part of the page with the logo and menu link.<nav>– Used to create the menu for navigation.<section>– Groups related content together, like the tiles.<article>– Each tile is an article linking to another page.<img>– Adds images to each tile.<a>– Creates links to other pages and websites.<p>– Used for writing paragraphs and explanations.<ul>and<li>– Lists for organizing points neatly.- CSS (Cascading Style Sheets): The styling of the webpage (colors, fonts, layout). Simply put it is like the clothes and makeup of my page— how the page looks.
color– to change the color of texts (e.g., the rainbow color effect on my name).font-size– to adjust text sizes for headings and paragraphs.widthandheight– to resize images consistently.background-colorandbackground-image– to create visual interest (planned for future updates).- Renamed and organized images in the
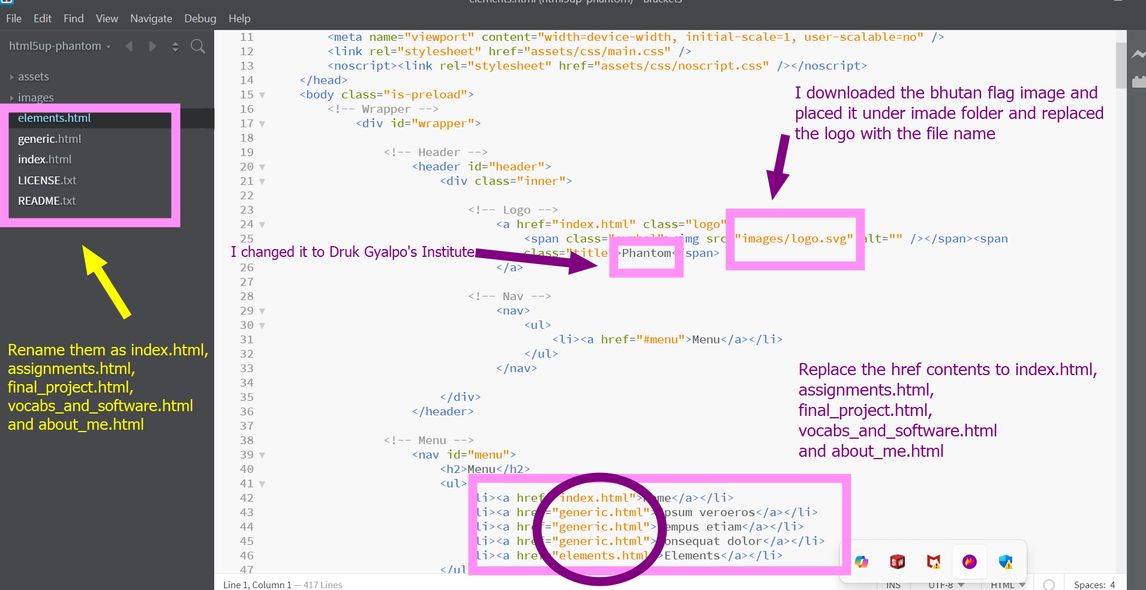
images/folder - Changed the
<img src="">path in the HTML to link to my custom image files - Adjusted
widthandheightto make them appear consistent and neat across tiles - JavaScript: The behavior or interactivity (clicking buttons, animations, form validation).
- Home/ Index Page
- Assignment
- Final Project
- About you
- Vocabulary and software
- git status
- git add .
- git commit -m "your message"
- git push
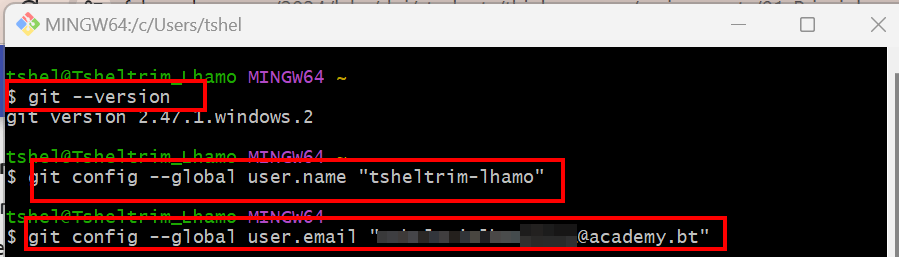
- - Check if Git has been installed or not. Run the command git --version
- - Set the global username: git config --global user.name "YourUsername"
- - Set the global email: git config --global user.email "your@email.com"
- - Check the configured values: git config --global --list
git status- This command shows you what changes have been made to your local repository and which of these changes have been tracked.git add .- This command ensures that all of the changes that you’ve made to your local repository have been tracked and uploaded.git status- Rerun this command to make sure that your changes have been tracked.git commit -m "your commit message"- This command will update the remote repository and give the update a name. Make sure that you give it a meaningful name.git push- This command will then push all changes that you’ve committed.
Firstly I chose the template of my choice[in this case Phantom] and downloaded it. Then I unzipped the file and downloaded Brackets. Brackets is a modern text editor that makes it easy to design in the browser. It is a modern, open-source text editor designed for web development, offering features like Live Preview, which allows developers to see changes in real-time without refreshing the browser.
You can even use Visual Studio Code. It's honestly up to your preferences to edit the code. For this I learned html and at first I was like "Woahhh! That looks hard" but after this youtube tutorial I learned and understood it and once you learn it, you find the language pretty simple and easy.
Web Development Languages
I also got a taste of JavaScript and CSS while designing my website. The combination of these languages really brought my website just as I had envisioned it. These are the explanations for them:
html
While building this website, I explored and used many important HTML tags that gave structure and meaning to my content. Here are the main ones I used:
I used several important HTML tags to build and organize my website:
I explored various CSS properties to enhance the look and feel of my website. Some of the properties I used include:
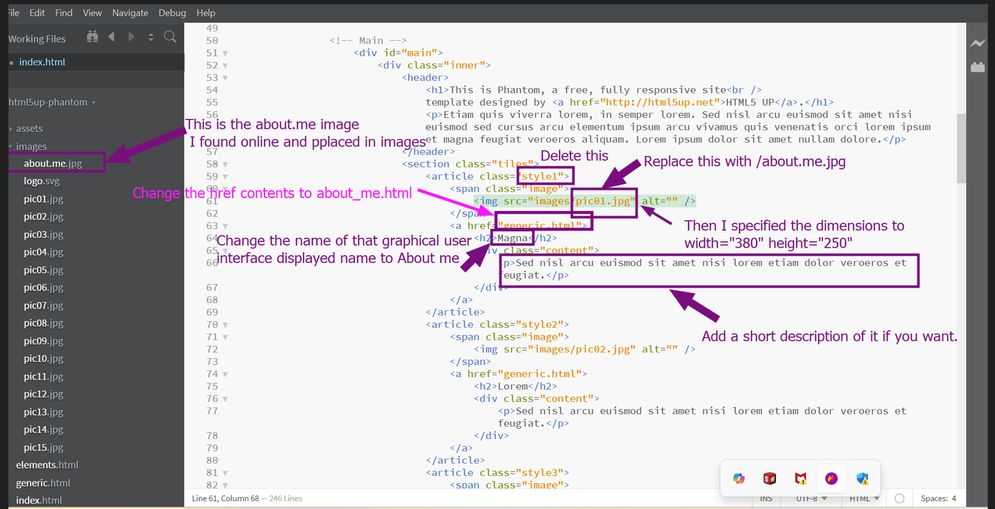
I customized the tiles' images by replacing the default ones from the Phantom template with my own images that best represent each section of my website. To do this, I:
main.css and noscript.css which were provided by the HTML5 UP Phantom template. I explored how these files control layout and responsiveness through media queries and grid layouts.
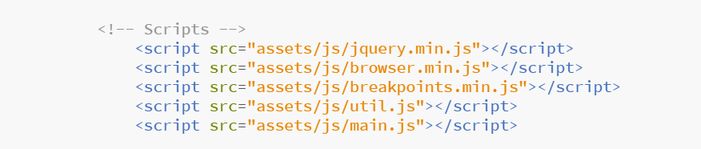
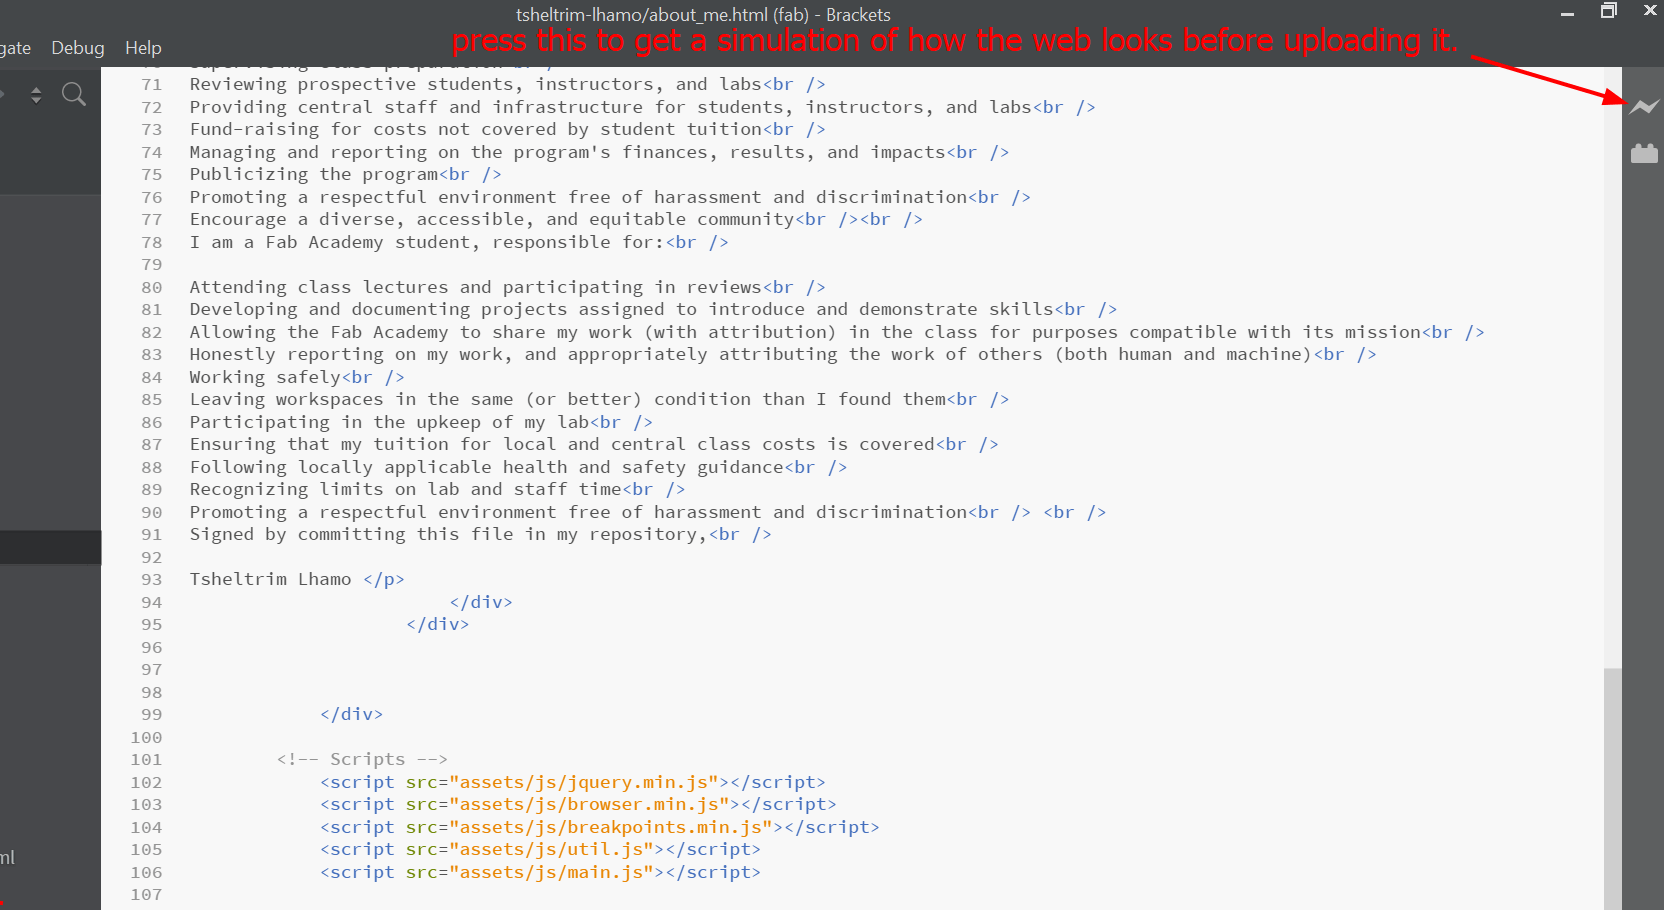
JavaScript
jquery.min.js: This is the jQuery library. It helps make JavaScript easier to write. It allows for animations, hiding and showing elements, working with menus, and creating interactive features.
browser.min.js: This script detects which browser the user is using and adjusts styles or behaviors for better compatibility. It is part of the HTML5 UP system.
breakpoints.min.js: This script handles responsive design. It detects screen sizes and applies different styles so the site looks good on phones, tablets, and desktops.
util.js: This file contains helper functions like smooth scrolling, opening and closing menus, and switching classes.
main.js: This is the main script that controls how the template behaves. It handles actions like loading the page, scrolling, resizing the browser, and clicking buttons or menus.
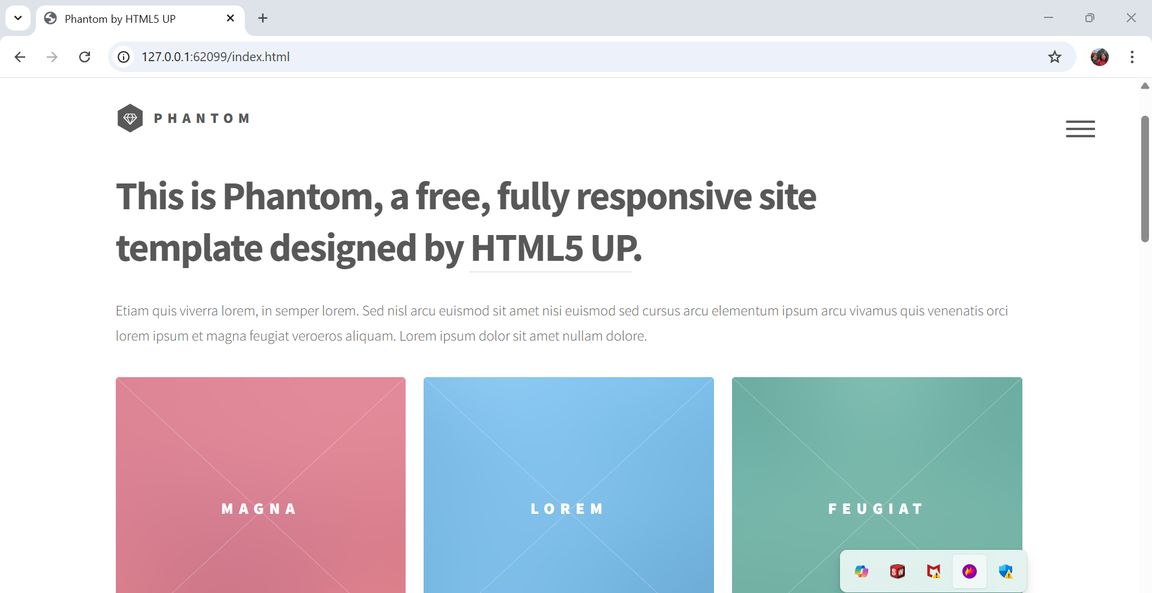
Before
After
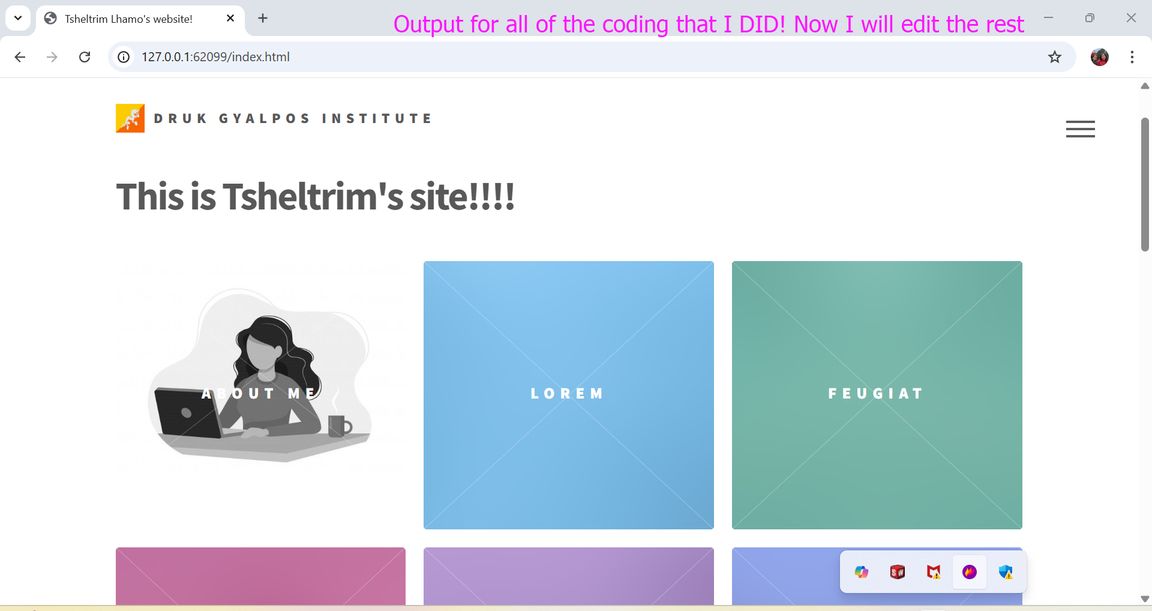
This is what my website looks like for right now. I hope to be able to bring more beautiful changes.
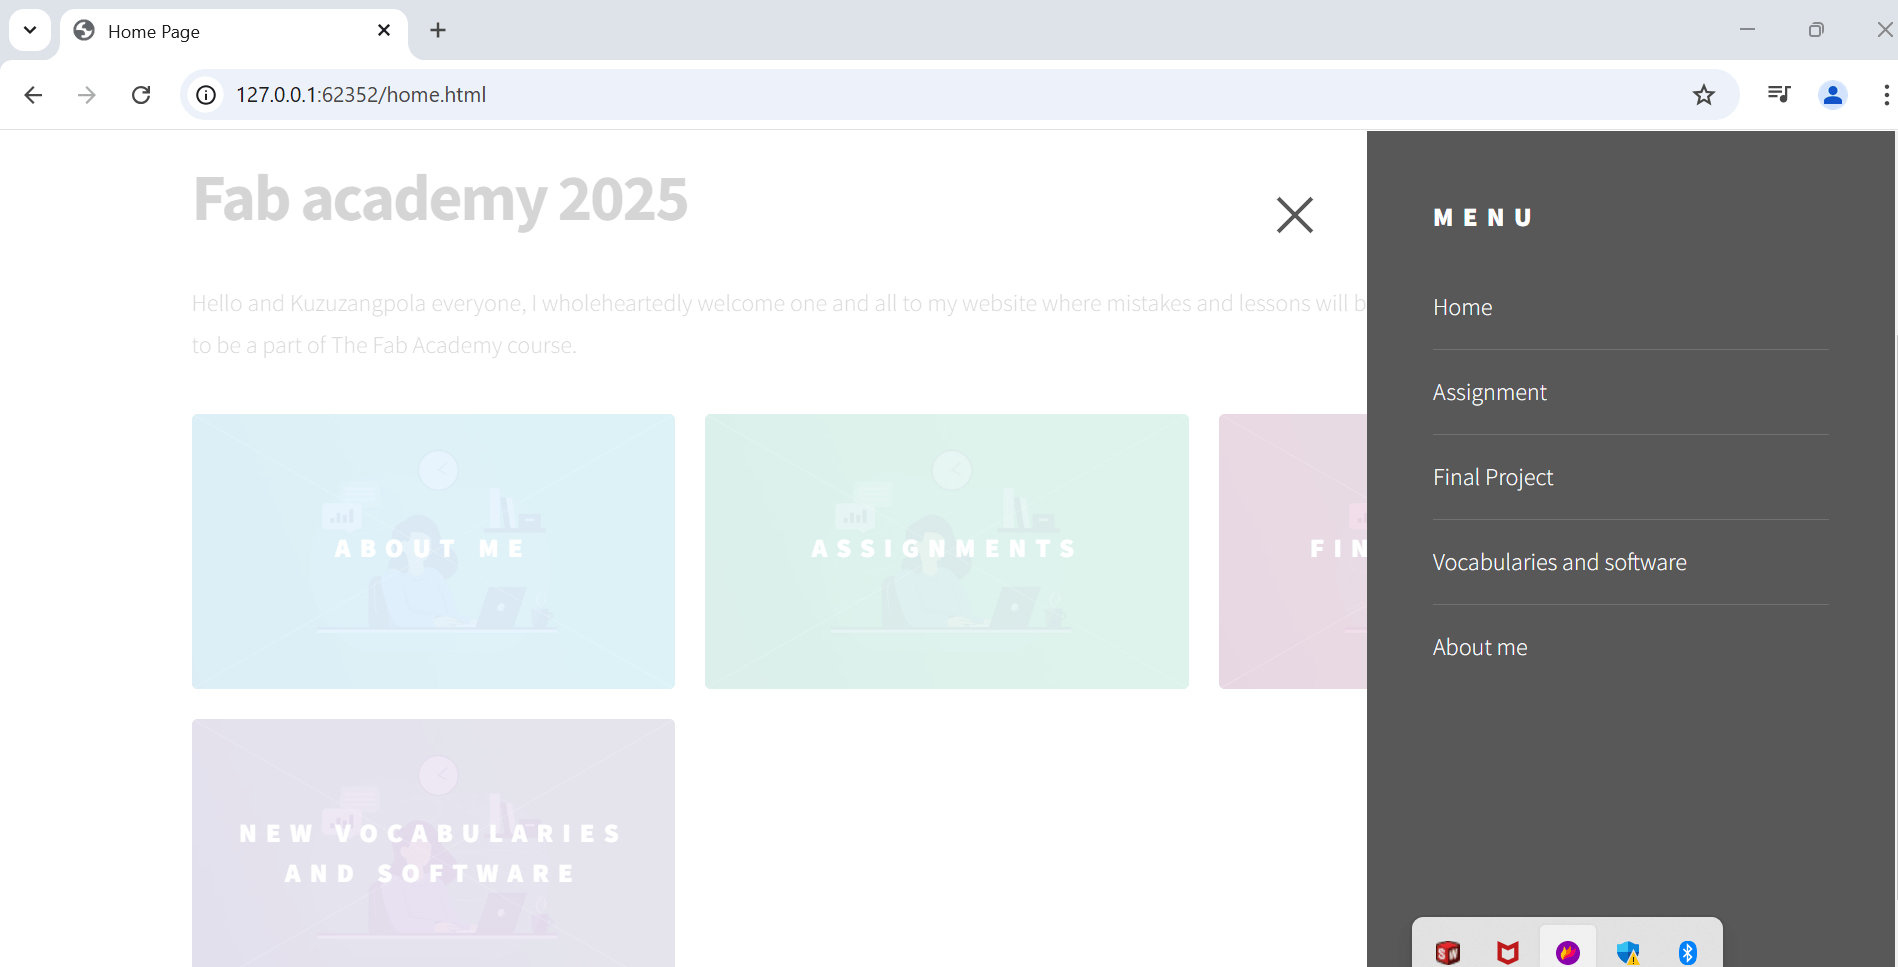
The menu that my webpage has are:
Gitlab
Learning Outcomes:
- Git set up
- creating SSH key
- Basic Git commands
- Git clone
- Git pull
- Git Mantra :

GitLab is a platform for managing code development. It allows teams to store and track code changes, collaborate, continuous integration and deployment (CI/CD), and manage project tasks. You push code to upload it to the repository, pull to download updates and you can also copy a project to start working (git clone). It offers features like Git repository management, issue tracking, merge requests, and security tools to help teams work together efficiently.
I asked AI[chatgpt ] to summarize about it in laymens terms and this is what it said :
Think of a local repository like a notebook you keep at home. You can write, erase, and update things as much as you want without anyone seeing it. This is where you work on your project on your own computer.
A remote repository is like an online storage locker (e.g., GitHub or GitLab) where you keep a backup of your notebook. It lets you save your work online, share it with others, and access it from anywhere.
When you're ready to update your online version, you push (upload) your changes from your local repository to the remote repository. If someone else makes updates online, you pull (download) their changes to your local repository to stay up to date.
Firstly, open Gitbash. Check the configured values: git config --global --list

Git clone
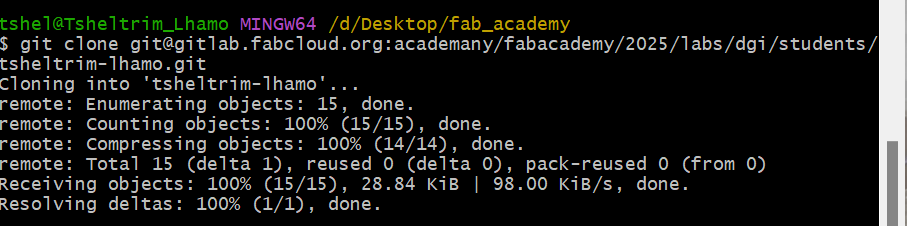
Before you actually start documenting, you need something to document on, so I cloned my remote repository onto my desktop. So I created a folder on my desktop and I named it fab_academy, and then right-click> show more options> open Git Bash here.
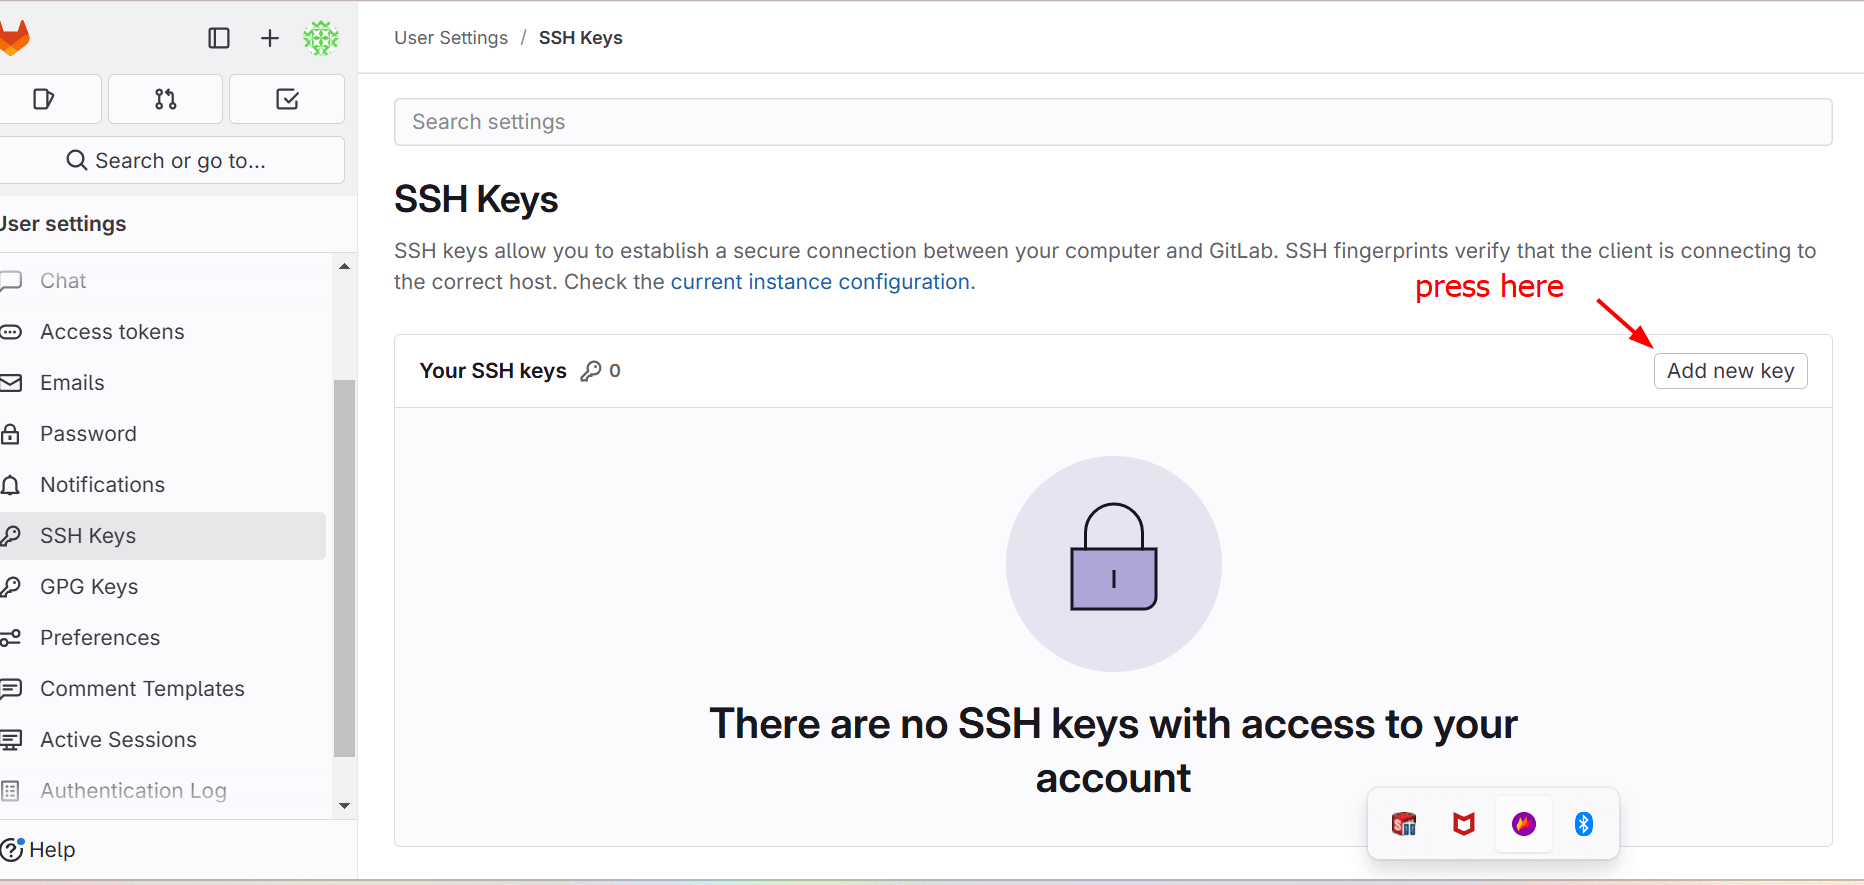
Now go to your gitlab page and press on Code > then press on clone with SSH
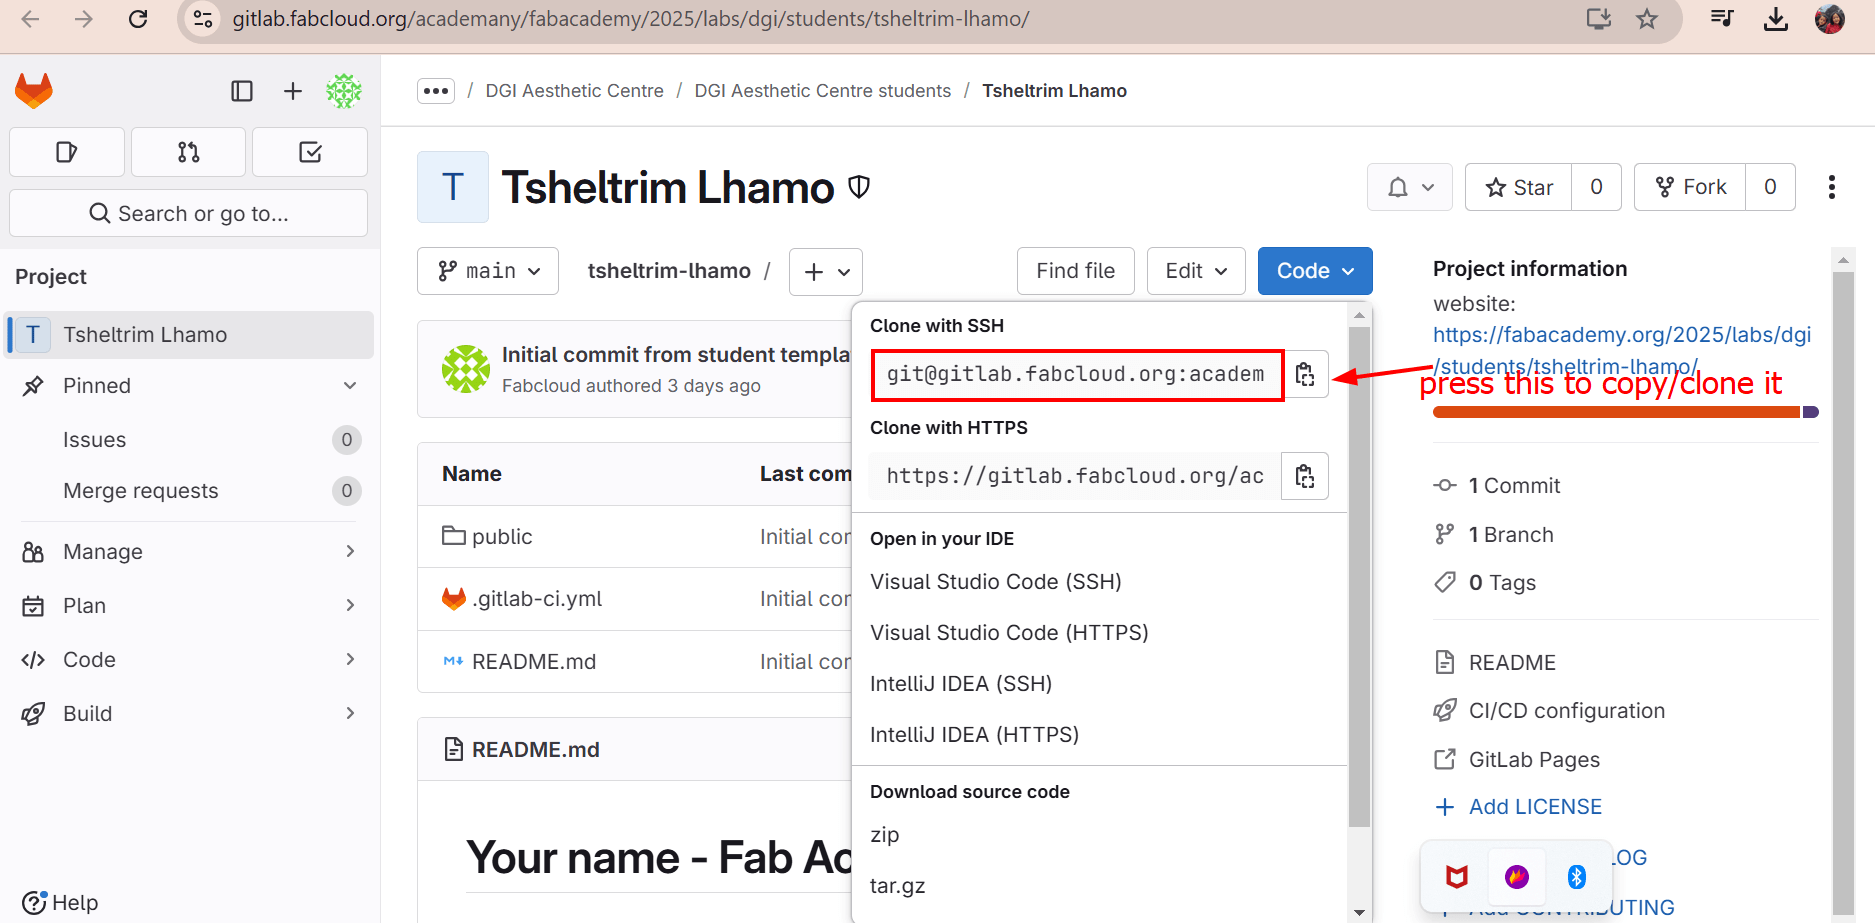
Once the Git Bash terminal opens, enter the command git clone >and enter the “clone with SSH” link that you copied earlier, and your remote repository should start cloning into your folder.
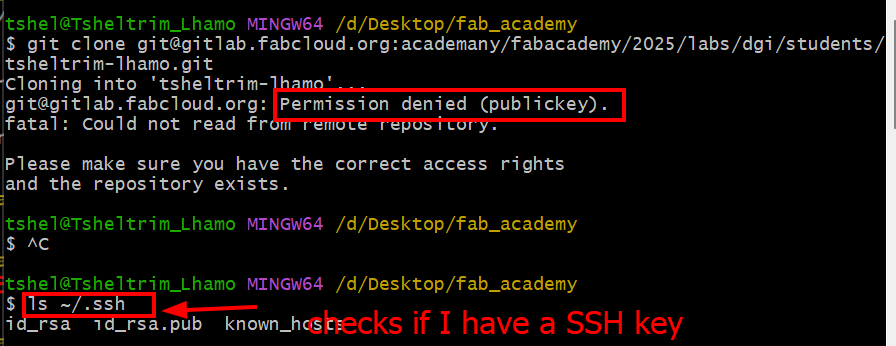
I made my first mistake here. Before cloning a private repository over SSH, you must have an SSH key set up and added to your GitLab account. Otherwise, GitLab will deny access with the "Permission denied (publickey)" error. So I had to create a SSH key and add it in the preferances section. So I urge you all to generate and add your SSH key to your account before cloning your repository.
Creating a SSH key
An **SSH key** in GitLab is a secure method of authenticating your device to interact with GitLab repositories without needing to repeatedly enter your username and password. SSH (Secure Shell) keys provide a more secure and convenient way to access your GitLab repositories for activities like cloning, pushing, or pulling code.
Then I created my SSH key and there goes my second mistake. I created my key with the command ssh keygen but then I mistakenly exited Git Bash so I dont have its documentation but the good part is that you can:
check if you have a SSH key already by entering the command cat ~/.ssh/id_rsa.pub
if a long string of values that starts with “ssh-rsa” is generated, you can skip the next step.
Create your key (enter the command ssh-keygen -t rsa )
and then follow the instructions that the terminal asks)
Check out your key (enter the command ssh-keygen -t rsa -C "your_email" )

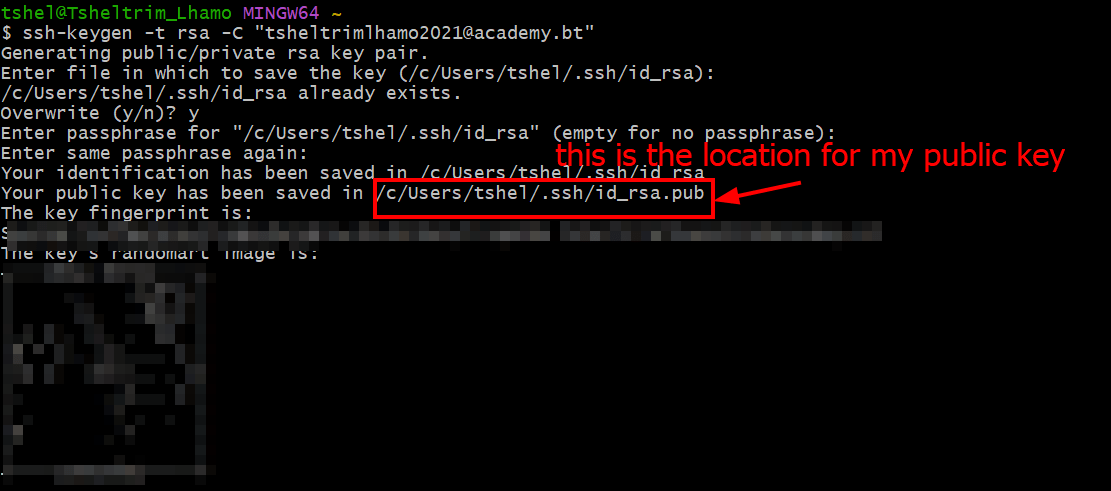
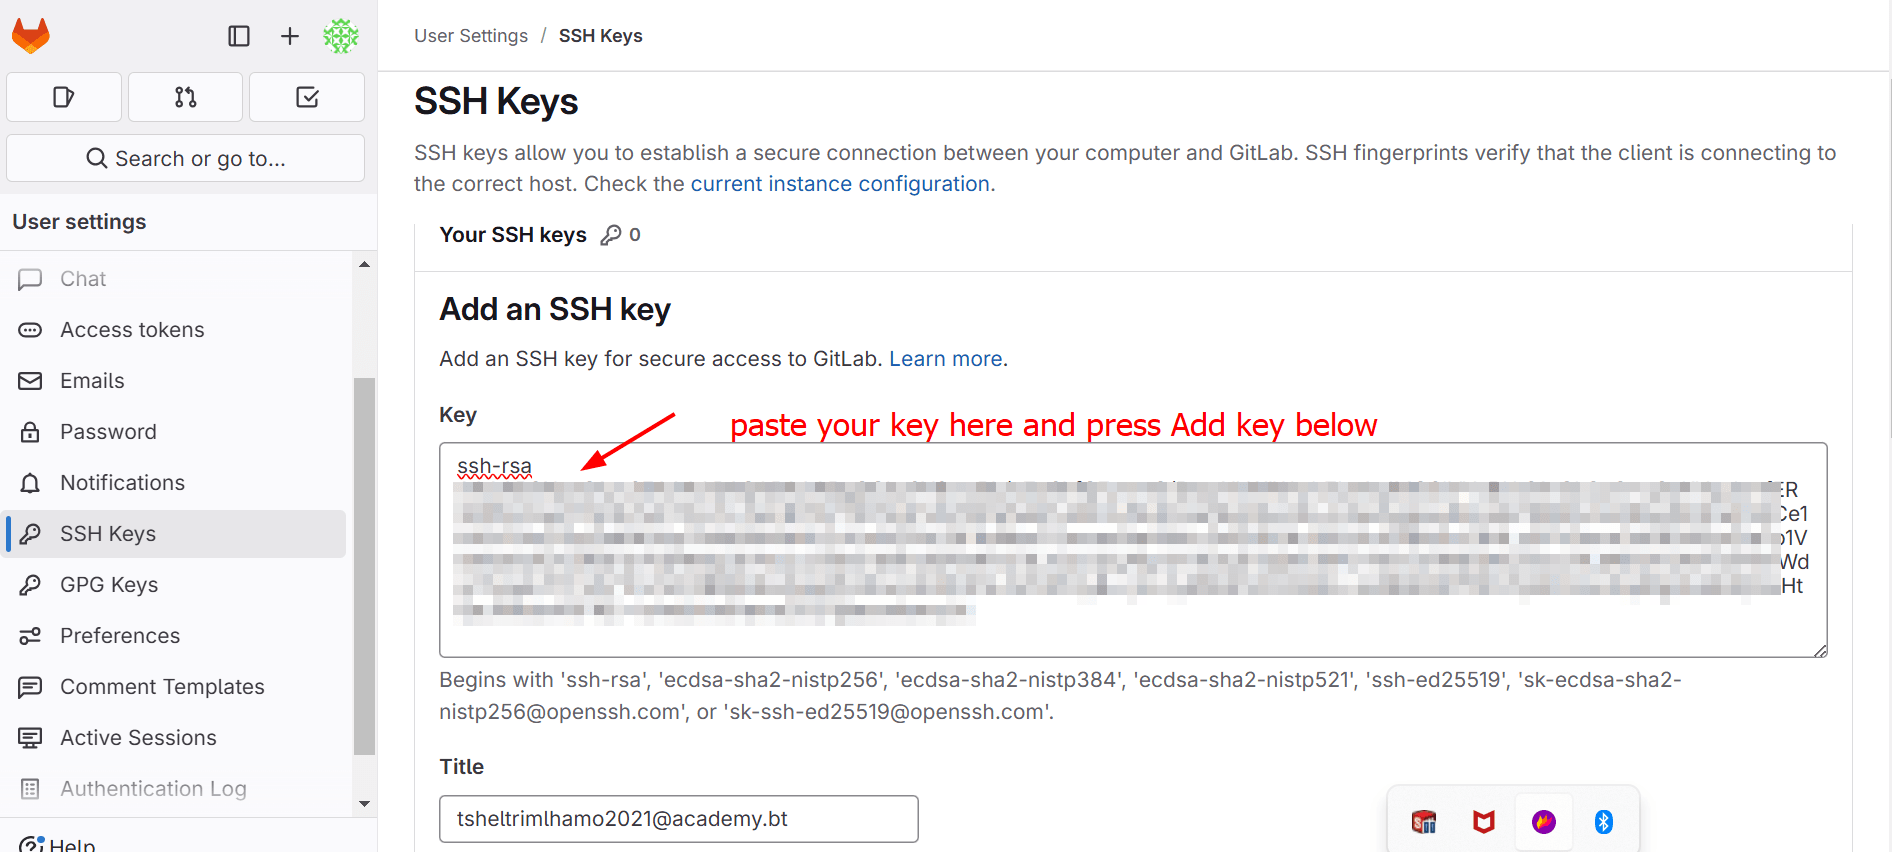
I went to the location my public key was located in. I firstly went to This PC then to C: /User/tshel/.ssh/id_rsa.pub which I opened with Notepad.

Then I went to my git lab account > Preferences > SSH key and then added my key there.
Git clone completion
Git Mantra
Once you’ve made some changes to your project, you are ready to upload/push your changed project to your remote repository on GitLab. It allows you to work on a local repository, make modifications, and then synchronize those changes with a remote repository hosted on platforms like GitHub or GitLab. When changes are made, Git records them in a structured manner, ensuring that every update is documented and can be reverted if necessary. By syncing the local repository with the remote one, multiple developers can collaborate seamlessly without overwriting each other's work. For that, you need to use the Git Mantra:

To deploy my website using GitLab Pages, I used a file called .gitlab-ci.yml. This file is important because it tells GitLab how to build and publish the website after I push my changes to the repository.
I did not need to write the file from scratch, but I reviewed it to make sure it had the correct settings for a static website. The file contains instructions for the GitLab CI/CD (Continuous Integration/Continuous Deployment) pipeline. In simple terms, it's a script that runs in GitLab's servers to move my HTML, CSS, and images into a public folder.
A basic .gitlab-ci.yml for GitLab Pages usually looks like this:
                        pages:
                          stage: deploy
                          script:
                            - mkdir .public
                            - cp -r * .public
                            - mv .public public
                          artifacts:
                            paths:
                              - public
                          only:
                            - main
This tells GitLab to copy all files into a public folder, which is where GitLab Pages looks to serve the website. The only: - main line means this process only runs when I push to the main branch.
Final Project Idea
Final Project Idea- Aema Chhim
When I heard that our school would be introducing greenhouses and hydroponics this year, I was thrilled—it’s an exciting and an innovative step forward. That’s when I thought, why not take it a step further and create a prototype for a smart automated greenhouse that could have real-world applications?
In Bhutan, Ema Datshi—the beloved chili and cheese stew, a favorite dish among both locals and tourists—is more than just a meal; it’s a cultural staple that holds a cherished place in every household. Chilies[locally known as Aema] and spices are not just ingredients—they’re a crucial part of our culture and daily life. Most Bhutanese dishes are incomplete without a generous addition of chili, which is deeply rooted in our culinary traditions. Recognizing this, I wanted to create a Smart Automated Greenhouse specifically designed to cultivate chili under optimum conditions. This system ensures the ideal temperature, humidity, and soil moisture for the chili plants, allowing them to thrive even in challenging cold mountains. 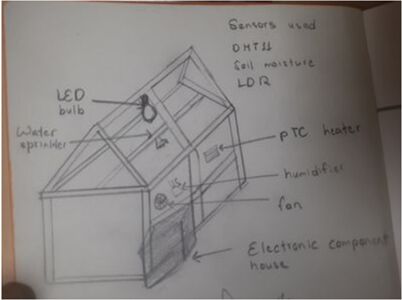
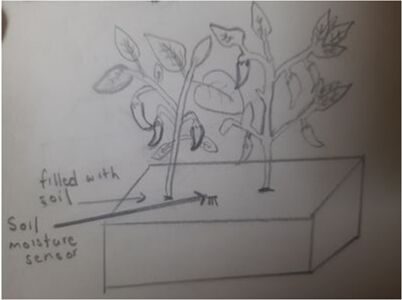
Thus I came up with my final project idea. My goal is to design a self-sustaining greenhouse that regulates temperature, humidity, and soil moisture through sensor-based automation, solar-powered heating, and smart irrigation. This project allows me to integrate 2D and 3D design, additive and subtractive fabrication, embedded programming, and system integration—pushing my skills across multiple domains. But beyond just a technical challenge, it’s a meaningful innovation that could make a real difference in sustainable agriculture.
Who Will Use It?
- The Royal Academy will use it for easier and more efficient agricultural practices. It also gives learners the opportunityof hands-on experience with advanced agricultural technologies and promoting sustainable farming practices.
- Farmers & Gardeners in regions with harsh climates
- Educational Institutions for agricultural research
- Sustainable Agriculture Initiatives focused on food security
- Fab Lab Enthusiasts interested in smart farming solutions