Group Assignment
File Sharing
Send a message between two projects
Introduction
We are going to send the control data between two designed PCB boards.
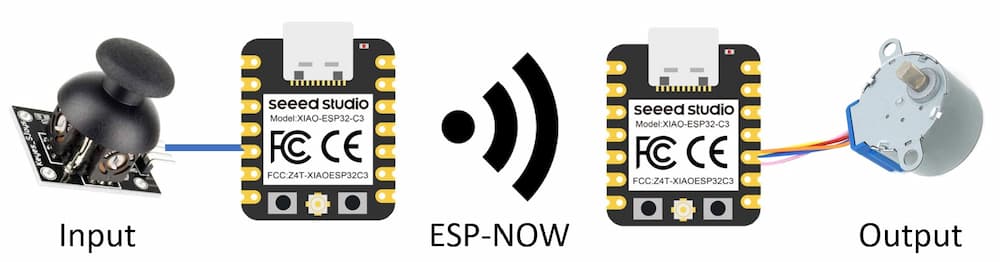 We are using 2 XIAO ESP32C3 board with connecting joystick as sender and connecting stepper motor as receiver. They will communicate each other through ESP-NOW protocol. It is a project about how to control a output device by a input device.
Structure
We learnt how to use a input device in week9 and output device in week10. We will try to control the output device by a input device. The sensing data of the input device is designed to send to the output device through communication protocol.
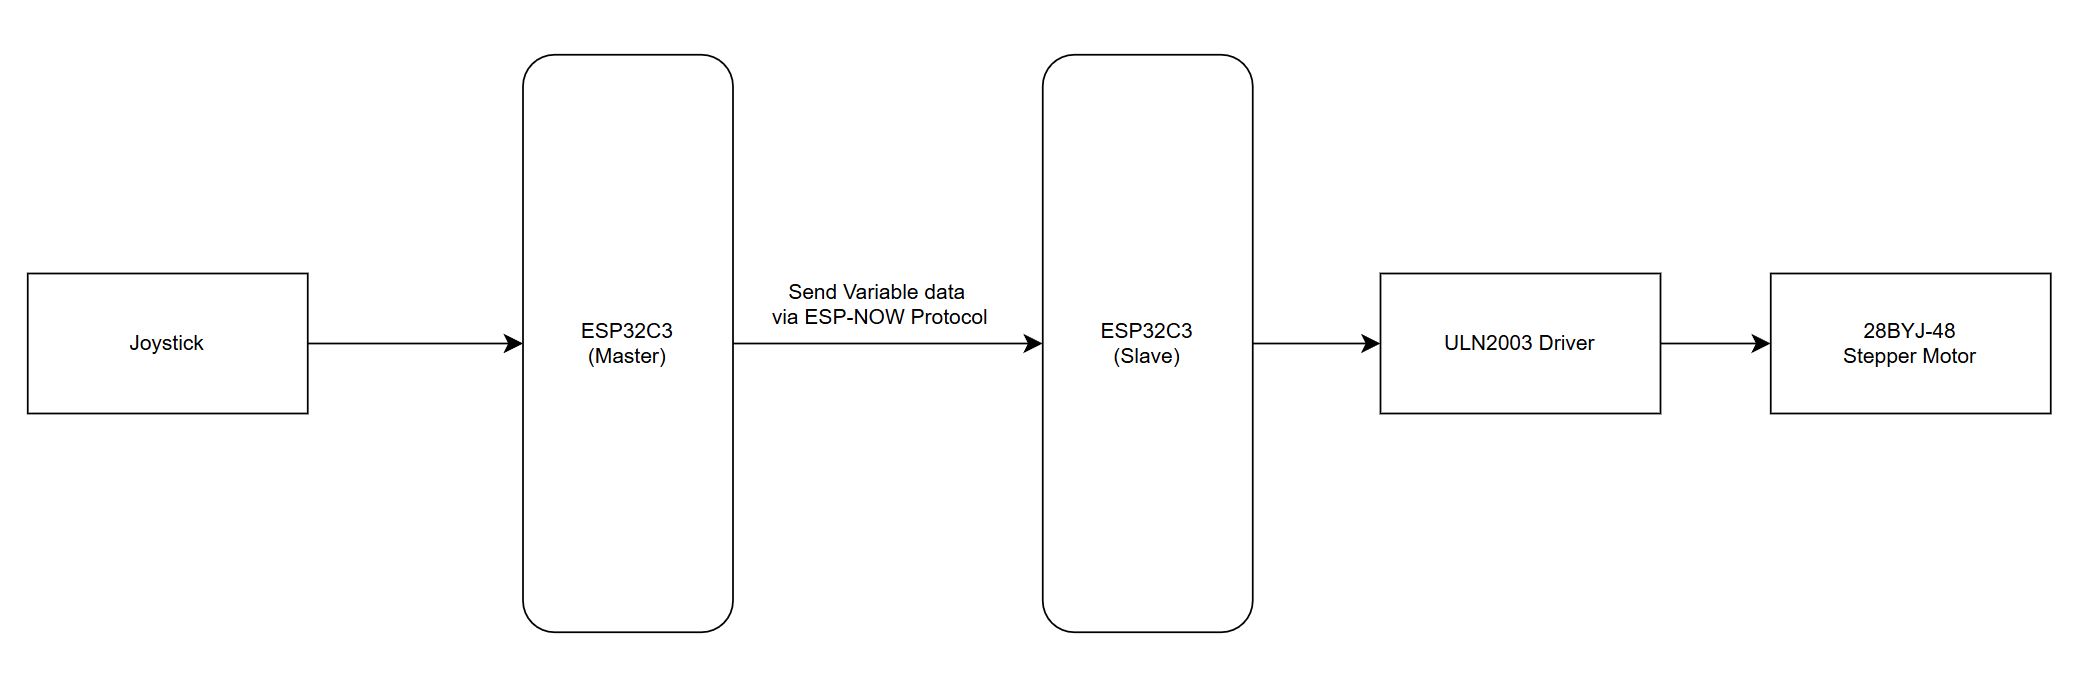
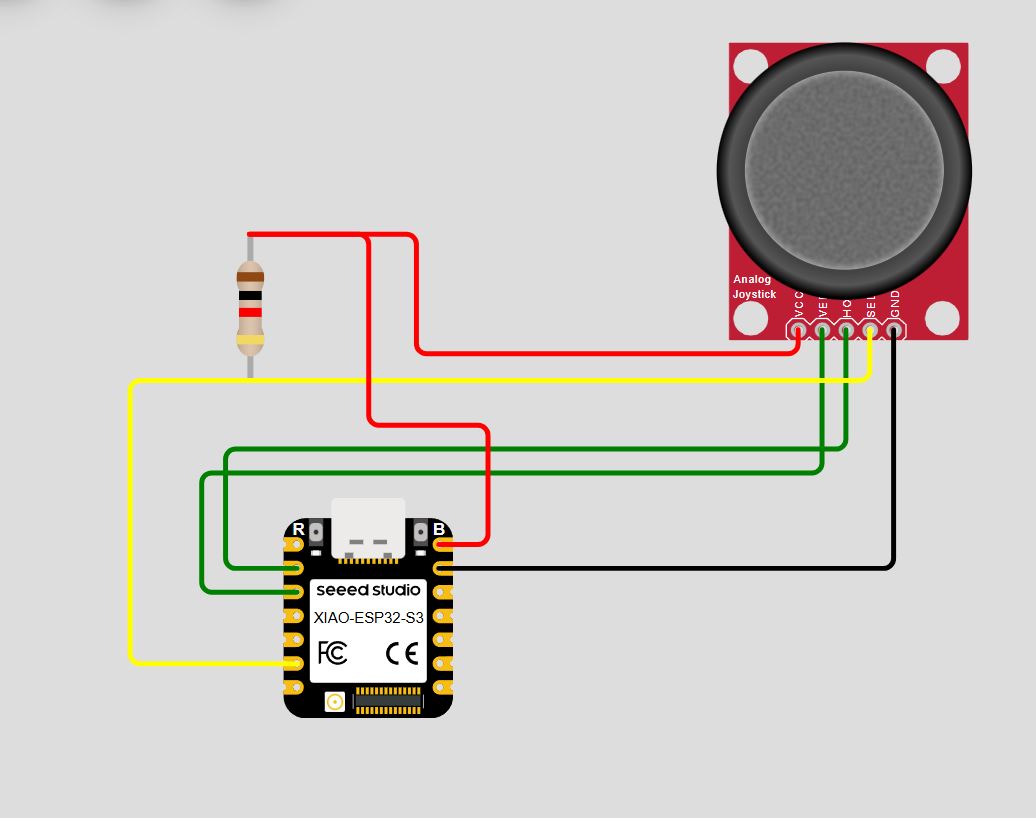
We choose joystick to control the rotation speed and rotate direction of stepper motor.
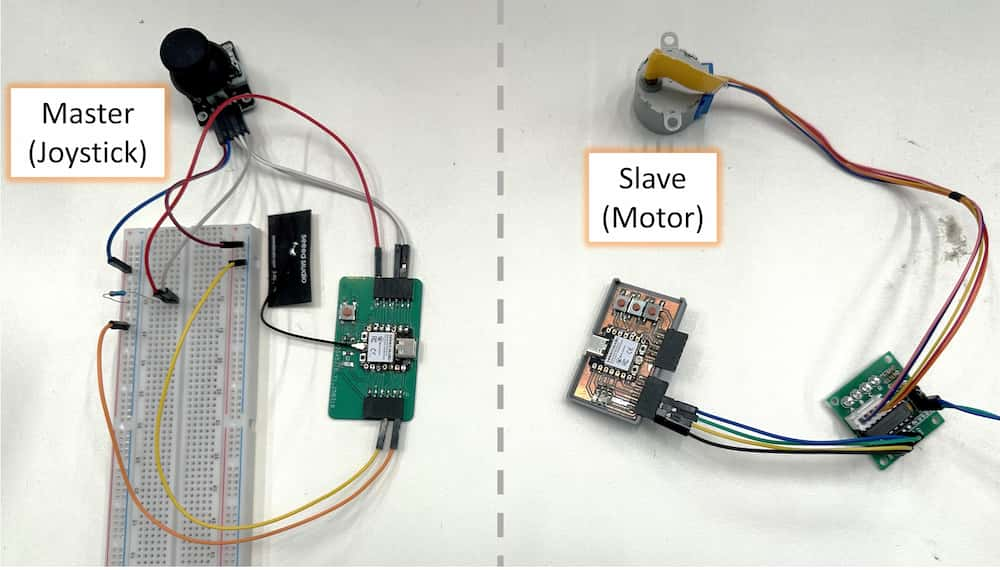
Here's the wiring diagram of master side.
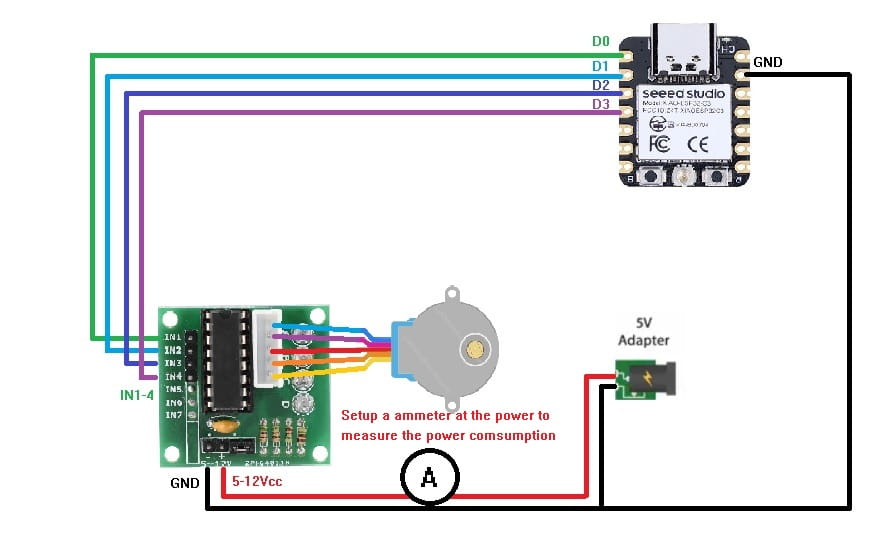
Here's the wiring diagram of slave side.
ESP-NOW Protocol
ESP-NOW is a wireless communication protocol developed by Espressif. It's designed for efficient and low-latency communication between devices, capable of sending up to 250 bytes.
ESP-NOW can be set up in different ways:
-
One-Way Communication: In one-way communication mode, one device (the sender) can send data to another device (the receiver) without expecting a response. This mode is often used for scenarios where one device provides data or commands to another device, such as remote sensor readings or control commands.
-
Two-Way Communication: In two-way communication mode, both devices can exchange data bidirectionally. This mode enables a back-and-forth exchange of information between the devices, allowing for more interactive and responsive communication. It's suitable for applications where devices need to send and receive data from each other, such as remote control systems or interactive IoT devices.
ESP-NOW has a limited signal range, typically around 220 meters under ideal conditions. Like other wireless communication technologies operating in the 2.4 GHz band, ESP-NOW can be susceptible to interference from other devices and Wi-Fi networks.
We chooose One-Way Coummincation for our group assignment.
Getting MAC address
To communicate via ESP-NOW, We have to get the MAC address of a ESP32C3 board as receiver/slave. Each ESP32C3 has a unique MAC Address which like our unique ID card number. We get the receiver's MAC address by the following code.
getting MAC address Code
#include <WiFi.h>
#include <esp_wifi.h>

void readMacAddress(){
  uint8_t baseMac[6];
  esp_err_t ret = esp_wifi_get_mac(WIFI_IF_STA, baseMac);
  if (ret == ESP_OK) {
    Serial.printf("%02x:%02x:%02x:%02x:%02x:%02x\n",
                  baseMac[0], baseMac[1], baseMac[2],
                  baseMac[3], baseMac[4], baseMac[5]);
  } else {
    Serial.println("Failed to read MAC address");
  }
}

void setup(){
  Serial.begin(115200);

  WiFi.mode(WIFI_STA);
  WiFi.begin();

  Serial.print("[DEFAULT] ESP32 Board MAC Address: ");
  readMacAddress();
}

void loop(){

}
After uploading the code, open the Serial Monitor to check the MAC address. The result is shown as below.
![]()
Transmitter/Master
This MAC address should be recorded, for modifying the code of sender.
Sender Code
#include <esp_now.h>
#include <WiFi.h>

// REPLACE WITH YOUR RECEIVER MAC Address
uint8_t broadcastAddress[] = {0x18, 0x8B, 0x0E, 0x93, 0x51, 0x54};

// Structure example to send data
// Must match the receiver structure
typedef struct struct_message {
  char a[32];
  int b;
  float c;
  bool d;
} struct_message;

// Create a struct_message called myData
struct_message myData;

esp_now_peer_info_t peerInfo;

// callback when data is sent
void OnDataSent(const uint8_t *mac_addr, esp_now_send_status_t status) {
  Serial.print("\r\nLast Packet Send Status:\t");
  Serial.println(status == ESP_NOW_SEND_SUCCESS ? "Delivery Success" : "Delivery Fail");
}

void setup() {
  // Init Serial Monitor
  Serial.begin(115200);

  // Set device as a Wi-Fi Station
  WiFi.mode(WIFI_STA);

  // Init ESP-NOW
  if (esp_now_init() != ESP_OK) {
    Serial.println("Error initializing ESP-NOW");
    return;
  }

  // Once ESPNow is successfully Init, we will register for Send CB to
  // get the status of Trasnmitted packet
  esp_now_register_send_cb(OnDataSent);

  // Register peer
  memcpy(peerInfo.peer_addr, broadcastAddress, 6);
  peerInfo.channel = 0;
  peerInfo.encrypt = false;

  // Add peer
  if (esp_now_add_peer(&peerInfo) != ESP_OK){
    Serial.println("Failed to add peer");
    return;
  }
}

void loop() {
  // Set values to send
  strcpy(myData.a, "THIS IS A CHAR");
  myData.b = random(1,20);
  myData.c = 1.2;
  myData.d = false;

  // Send message via ESP-NOW
  esp_err_t result = esp_now_send(broadcastAddress, (uint8_t *) &myData, sizeof(myData));

  if (result == ESP_OK) {
    Serial.println("Sent with success");
  }
  else {
    Serial.println("Error sending the data");
  }
  delay(2000);
}
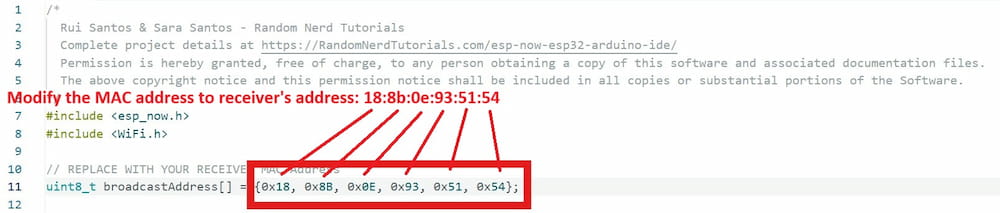
There's something should be modified. There's a unsigned interger variable broadcastAddress[] in line 11 of the code.
The default MAC address of the sample code is :{0xFF, 0xFF, 0xFF, 0xFF, 0xFF, 0xFF}, and we modify it as below:
After uploading the code, the following data will be sent to the receiver:
strcpy(myData.a, "THIS IS A CHAR"); //Sending char
myData.b = random(1,20); //Sending 1-20 random interger
myData.c = 1.2; //Sending 1.2 float
myData.d = false; //Sending a false Boolean
Although we can check the sending status, there's no receiver during this step. So it will indicate "Delivery Fail" to show us the receiver cannot recevier the sending data.
![]()
Receiver/Slave
Refer to the tutorials, We will upload the following code for the receiver board.
Receiver Code
#include <esp_now.h>
#include <WiFi.h>

// Structure example to receive data
// Must match the sender structure
typedef struct struct_message {
    char a[32];
    int b;
    float c;
    bool d;
} struct_message;

// Create a struct_message called myData
struct_message myData;

// callback function that will be executed when data is received
void OnDataRecv(const uint8_t * mac, const uint8_t *incomingData, int len) {
  memcpy(&myData, incomingData, sizeof(myData));
  Serial.print("Bytes received: ");
  Serial.println(len);
  Serial.print("Char: ");
  Serial.println(myData.a);
  Serial.print("Int: ");
  Serial.println(myData.b);
  Serial.print("Float: ");
  Serial.println(myData.c);
  Serial.print("Bool: ");
  Serial.println(myData.d);
  Serial.println();
}

void setup() {
  // Initialize Serial Monitor
  Serial.begin(115200);

  // Set device as a Wi-Fi Station
  WiFi.mode(WIFI_STA);

  // Init ESP-NOW
  if (esp_now_init() != ESP_OK) {
    Serial.println("Error initializing ESP-NOW");
    return;
  }

  // Once ESPNow is successfully Init, we will register for recv CB to
  // get recv packer info
  esp_now_register_recv_cb(esp_now_recv_cb_t(OnDataRecv));
}

void loop() {

}
The esp_now_recv_cb_t() function is used for receiving the sending data from the master board.
Testing ESP-NOW Communication
Now, open two Arduino IDE windows. One for the receiver, and another for the sender. Open the Serial Monitor for each board. It should be a different COM port for each board.
![]()
We can get a char, 1-20 random integer, 1.2 float and a 0 boolean number through the receiver.
Also we tested the communication range between two boards, it's able to get a stable communication up to 220 meters in open field.
Stepper Motor controlling
Here is a simple sketch that turns the motor slowly in one direction, then rapidly in the opposite direction.
Stepper Motor Code
//Includes the Arduino Stepper Library
#include <Stepper.h>

// Defines the number of steps per rotation
const int stepsPerRevolution = 2038;

// Creates an instance of stepper class
// Pins entered in sequence IN1-IN3-IN2-IN4 for proper step sequence
Stepper myStepper = Stepper(stepsPerRevolution, D0, D2, D1, D3);

void setup() {
    // Nothing to do (Stepper Library sets pins as outputs)
    Serial.begin(115200);
}

void loop() {
	// Rotate CW slowly at 10 RPM
	myStepper.setSpeed(10);
  Serial.println("CW");
	myStepper.step(stepsPerRevolution);
	delay(1000);

	// Rotate CCW quickly at 20 RPM
  myStepper.setSpeed(20);
  Serial.println("CCW");
	myStepper.step(-stepsPerRevolution);
	delay(1000);
}
According the code of the stepper motor controlling, some variables are needed for controlling the stepper motor:
- Rotation Speed in function
.setSpeed() - Rotation Direction
.step()
Our stepper motor can work normally in the range of 1-20rpm and control the rotation direction by modify the variables in .step() (negative integer - CounterClockwise, positive integer - Clockwise).
Integrate the project
Map the joystick data
We can design the master side can send the modify variables. For example:
It's a modified code of joystick sensing data. I turn the output data in a range -1 to 1 by map() function.
if(VX >= 2048) VX = map(VX, 2048, 4095, 0, 1);  //VX is a variable for storing the sensing data of joystick
else if(VX < 2048)  VX = map(VX, 0, 2048, -1, 0);
Sending data
Then, we modify the code of master side as below:
Master Code
#include <esp_now.h>
#include <WiFi.h>

// REPLACE WITH YOUR RECEIVER MAC Address
uint8_t broadcastAddress[] = {0x18, 0x8B, 0x0E, 0x91, 0x8F, 0x7C};

// Structure example to send data
// Must match the receiver structure
typedef struct struct_message {
  int a;
  int b;
} struct_message;

// Create a struct_message called myData
struct_message myData;

esp_now_peer_info_t peerInfo;

// callback when data is sent
void OnDataSent(const uint8_t *mac_addr, esp_now_send_status_t status) {
  Serial.print("\r\nLast Packet Send Status:\t");
  Serial.println(status == ESP_NOW_SEND_SUCCESS ? "Delivery Success" : "Delivery Fail");
}

void setup() {
  // Init Serial Monitor
  Serial.begin(115200);
  pinMode(A2, INPUT);
  pinMode(A1, INPUT);
  pinMode(D5, INPUT);
  pinMode(D7, OUTPUT);
  // Set device as a Wi-Fi Station
  WiFi.mode(WIFI_STA);

  // Init ESP-NOW
  if (esp_now_init() != ESP_OK) {
    Serial.println("Error initializing ESP-NOW");
    return;
  }

  // Once ESPNow is successfully Init, we will register for Send CB to
  // get the status of Trasnmitted packet
  esp_now_register_send_cb(OnDataSent);

  // Register peer
  memcpy(peerInfo.peer_addr, broadcastAddress, 6);
  peerInfo.channel = 0;
  peerInfo.encrypt = false;

  // Add peer
  if (esp_now_add_peer(&peerInfo) != ESP_OK){
    Serial.println("Failed to add peer");
    return;
  }
}

void loop() {
  int VX = analogRead(A2);
  int VX_output;
  if (VX >=3350){
    VX_output = map(VX, 3350, 4095, 0, 1);
  }
  else if(VX < 3350){
    VX_output = map(VX, 0, 3349, -1, 0);
  }

  int button_state = digitalRead(D5);


  // Set values to send
  myData.a = VX_output;
  myData.b = !button_state;

  // Send message via ESP-NOW
  esp_err_t result = esp_now_send(broadcastAddress, (uint8_t *) &myData, sizeof(myData));

  if (result == ESP_OK) {
    Serial.println("Sent with success");
  }
  else {
    Serial.println("Error sending the data");
  }
  delay(100);
}
In summary, we sent two integer data to slave:
- Sending X axis data of the joystick (-1 to 1)
- Sending the button state (0 for not pressed, 1 for pressed)
Receiving data
Then, we modifiy the code of stepper motor:
Slave Code
#include <Stepper.h>
#include <esp_now.h>
#include <WiFi.h>

// Pins entered in sequence IN1-IN3-IN2-IN4 for proper step sequence
const int stepsPerRevolution = 2038;
Stepper myStepper = Stepper(stepsPerRevolution, D0, D2, D1, D4);

int motor_speed = 5;
int motor_dir = 1;

// Structure example to receive data
// Must match the sender structure
typedef struct struct_message {
    int a;
    int b;
} struct_message;

// Create a struct_message called myData
struct_message myData;

// callback function that will be executed when data is received
void OnDataRecv(const uint8_t * mac, const uint8_t *incomingData, int len) {
  memcpy(&myData, incomingData, sizeof(myData));
  //Serial.print("Bytes received: ");
  //Serial.println(len);
  //Serial.print("Char: ");
  //Change motor speed by joystick
  motor_speed += myData.a;
  //Change direction when button pressed
  if(motor_speed >= 20) motor_speed = 20;
  else if(motor_speed < 1) motor_speed = 1;
  if(myData.b==1){
    motor_dir = motor_dir * -1;
  }
  Serial.print("Motor Speed: ");
  Serial.print(motor_speed);
  Serial.print(" Motor Direction: ");
  Serial.println(motor_dir);
}

void setup() {
  // Initialize Serial Monitor
  Serial.begin(115200);

  // Set device as a Wi-Fi Station
  WiFi.mode(WIFI_STA);

  // Init ESP-NOW
  if (esp_now_init() != ESP_OK) {
    Serial.println("Error initializing ESP-NOW");
    return;
  }

  // Once ESPNow is successfully Init, we will register for recv CB to
  // get recv packer info
  esp_now_register_recv_cb(esp_now_recv_cb_t(OnDataRecv));
}

void loop() {
  myStepper.setSpeed(motor_speed);
  myStepper.step(motor_dir);
}
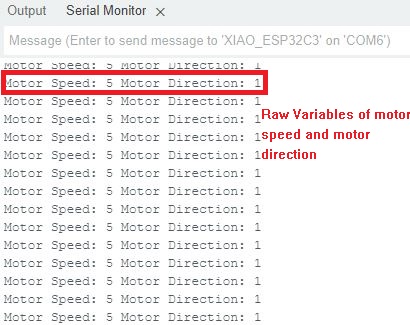
The variable motor_speed and motor_dir are used for controlling the rotation speed of stepper motor and the rotation direction respectively, and they are updated by the data from the master side(The master will send the modify variable to slave).
motor_speedis controlled by the joystick data in X axismotor_diris controlled by the button state data (Change direction by every pressed)
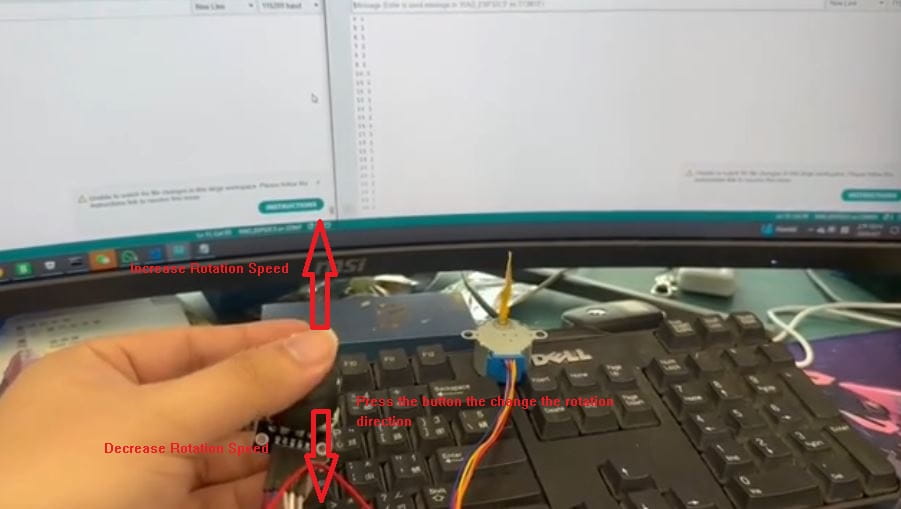
The variables of motor speed and direction is shown in Serial Monitor(Slave Side).
Final result
Here is our final result, we sucessfully control the motor speed and direction of stepper motor (slave side) by the joystick (master side).