Document your work to the group work page and reflect on your individual page what you learned
Individual assignment:
Design, build and connect wired or wireless node(s) with network or bus addresses and a local interface
Group Assignment
The group assigment link is available here on the fabalab page.
Overview of Networking and Communication
The field of networking and communication includes the analysis, design, implementation,
and use of local, wide-area, and mobile networks that link computers together
My role involved developing two systems capable of communication, whether wired or wireless.
Utilizing XIA ESP32, I can send commands between ESP32 boards using Wi-Fi or Bluetooth protocols.
This technology enables short-range communication without internet reliance. These boards seamlessly
exchange data, enhancing connectivity and functionality.
Sensor communication
My sensor communication system is designed so that one sensor can seamlessly
transmit data to other boards via WiFi.
For establishing this connection, we utilize the ESP-NOW protocol.
ESP-NOW is a protocol developed by Espressif Systems specifically for low-power
and high-speed communication between ESP8266 and ESP32 microcontroller-based devices.
It enables direct device-to-device communication without the need for an intermediate router or access point,
making it ideal for IoT applications where low latency and minimal power consumption are crucial.
Here are some key features and benefits of ESP-NOW:
Efficiency:ESP-NOW optimizes the communication process for fast and efficient data transmission, reducing overhead and latency.
Low Power Consumption:The protocol is designed to minimize power usage, making it suitable for battery-operated devices and extending their battery life.
Direct Device-to-Device Communication:Devices equipped with ESP-NOW can communicate directly with each other without relying on a central network infrastructure, simplifying the setup and reducing dependencies.
High Speed:ESP-NOW supports high-speed data transmission, enabling real-time communication for time-sensitive applications.
Simple Configuration:It offers a straightforward configuration process, allowing developers to establish connections between devices quickly and easily.
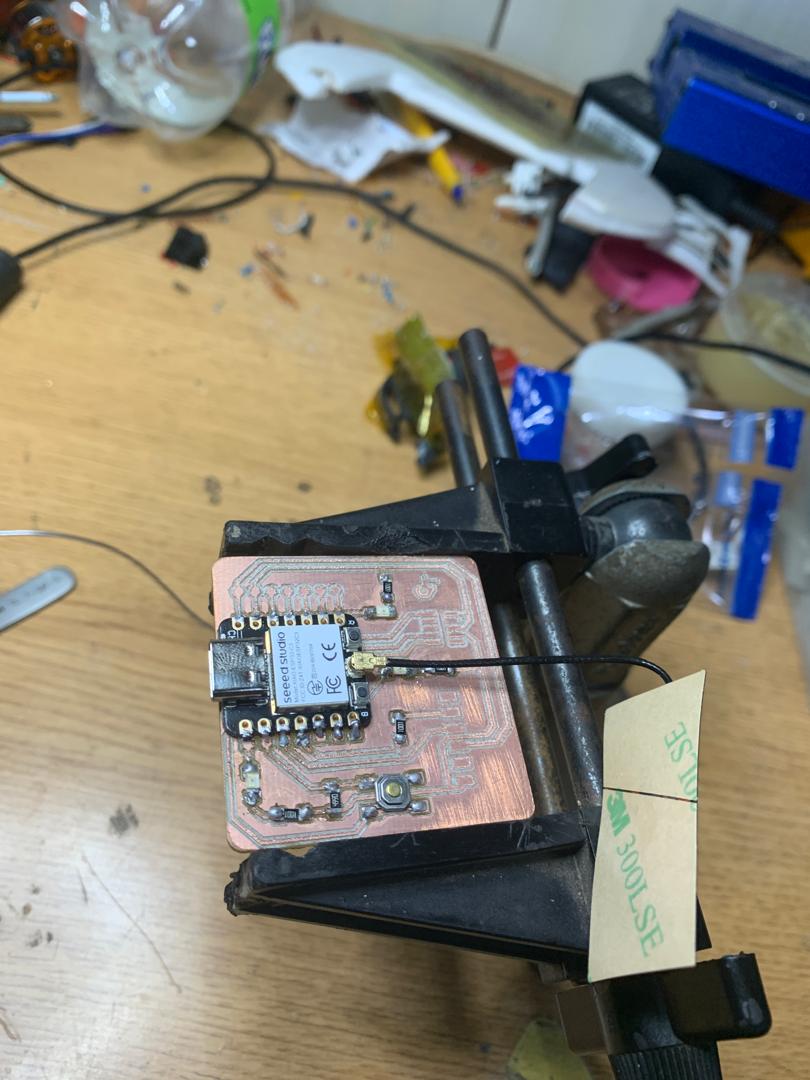
During our electronic products week, I implemented a board I designed as the master, paired with an ESP32 Dev Kit as the slave.
This setup efficiently transfers data between them, displaying information on both the screen and serial monitor seamlessly.
What is ESP-NOW and how it works?
Stating the Espressif website, ESP-NOW is a “protocol developed by Espressif, which enables multiple
devices to communicate with one another without using Wi-Fi. The protocol is similar to the low-power 2.4GHz wireless connectivity (…) . The pairing between devices is needed prior to their communication.
After the pairing is done, the connection is safe and peer-to-peer, with no handshake being required.”
In simple words, ESP-NOW is a fast communication protocol that can be used to
exchange small messages (up to 250 bytes) between ESP32 boards.
To showcase sensor networking, we may require additional materials alongside the Xiao ESP32 board
we designed during Electronic Production Week.
These additional materials include:
Jumper wires
DHT 11
Breadboad
ESP32 dev kit
Display LCD1604
Transmitter connection
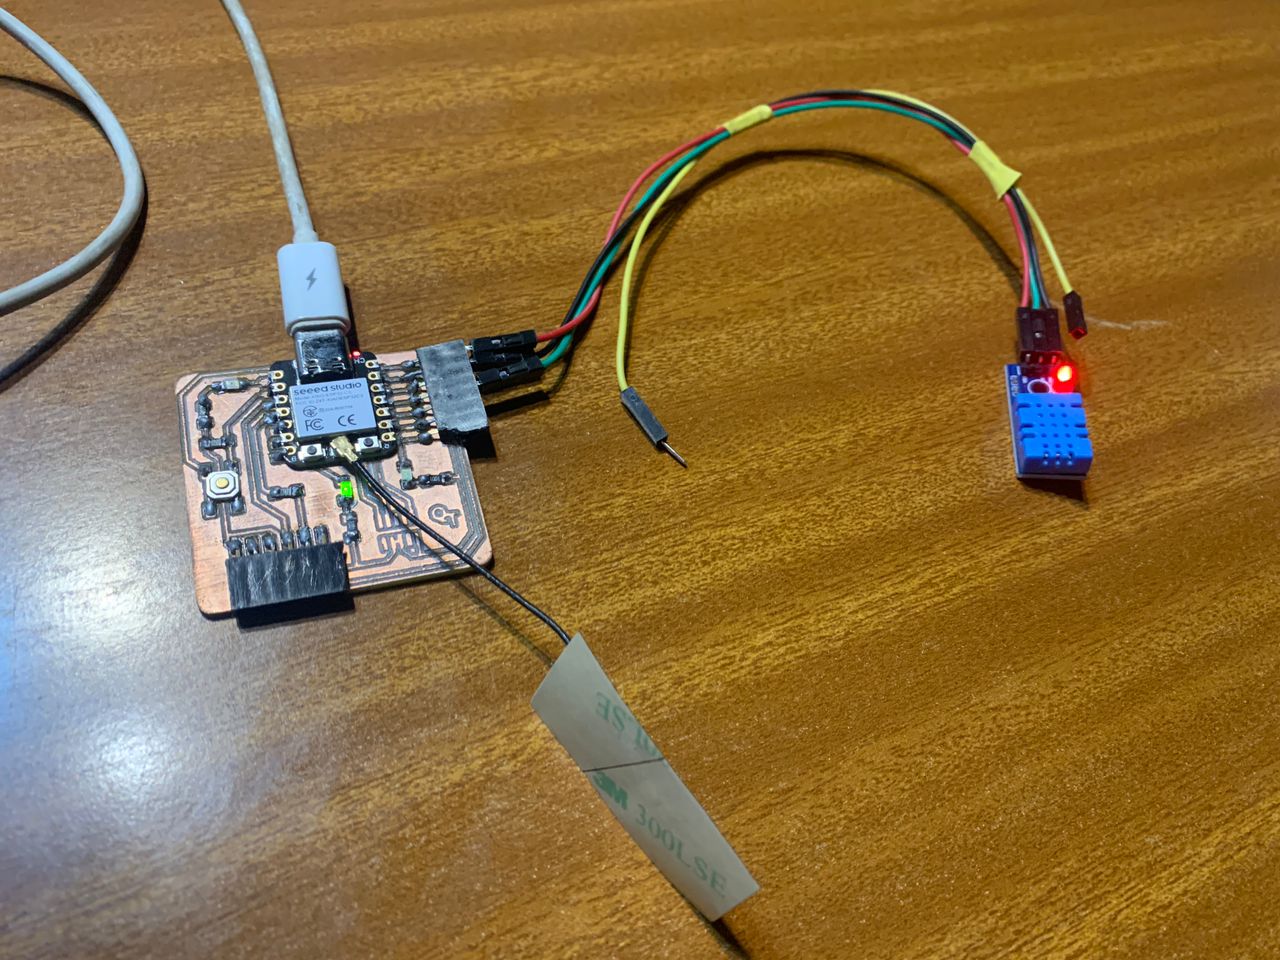
As mentioned earlier, I utilized the XIAO ESP32 board that I assembled during electronic production week. I connected a DHT11 sensor to the board and conducted tests in my serial monitor to verify the transmission of temperature and humidity data.
This preliminary step ensures that the data is accurately captured before transmitting it to the receiver boards.
Check out this video showcasing the final output.
Output
Code:
        #include "DHT.h"
        #define DHTPIN 10     // Digital pin connected to the DHT sensor

        #define DHTTYPE DHT11   // DHT 11
        DHT dht(DHTPIN, DHTTYPE);

        void setup()
        {
        Serial.begin(9600);
        Serial.println(F("DHTxx test!"));
        dht.begin();
        delay(2000);
        }

        void loop()
        {
        float h = dht.readHumidity();
        float t = dht.readTemperature();

        // Check if any reads failed and exit early (to try again).
        if (isnan(h) || isnan(t))
        {
            Serial.println(F("Failed to read from DHT sensor!"));
            return;
        }
        Serial.print(F("Humidity: "));
        Serial.print(h);
        Serial.println("%");
        Serial.print(F("Temperature: "));
        Serial.print(t);
        Serial.println(F("°C "));
        Serial.println("");
        delay(2000);
        }
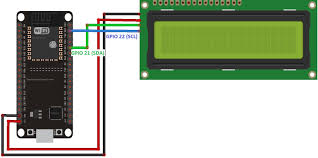
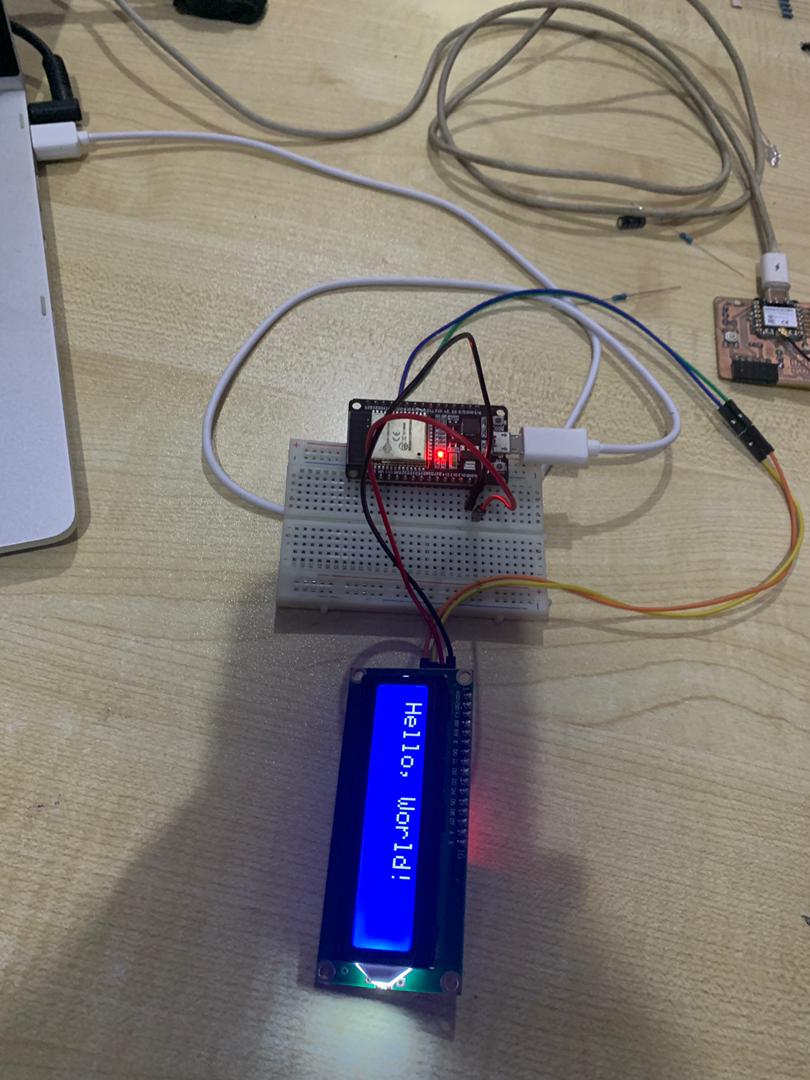
Connect LCD1604 to ESP32 dev kit
The next step is to connect the LCD display to the ESP32 Dev Kit
board and test if it can display "hello world."
Here are the connections required.
This is a genuine connection of mine.
Code:
                            #include

                                // set the LCD number of columns and rows
                                int lcdColumns = 16;
                                int lcdRows = 2;

                                // set LCD address, number of columns and rows
                                // if you don't know your display address, run an I2C scanner sketch
                                LiquidCrystal_I2C lcd(0x27, lcdColumns, lcdRows);

                                void setup(){
                                  // initialize LCD
                                  lcd.begin();
                                  // turn on LCD backlight
                                  lcd.backlight();
                                }

                                void loop(){
                                  // set cursor to first column, first row
                                  lcd.setCursor(0, 0);
                                  // print message
                                  lcd.print("Hello, World!");
                                  delay(1000);
                                  // clears the display to print new message
                                  lcd.clear();
                                  // set cursor to first column, second row
                                  lcd.setCursor(0,1);
                                  lcd.print("Hello, World!");
                                  delay(1000);
                                  lcd.clear();
                                }
Read MAC address for receiver
To establish a connection between two ESP32 devices, it's crucial to identify
the MAC address of the receiver beforehand.
Let's delve deeper into why this step is essential for establishing a stable and secure connection.
Code for reading the MAC address
/*
  ESP32 MAC Address printout
  Prints MAC Address to Serial Monitor

*/

// Include WiFi Library
#include "WiFi.h"

void setup() {

  // Setup Serial Monitor
  Serial.begin(115200);

  // Put ESP32 into Station mode
  WiFi.mode(WIFI_MODE_STA);

  // Print MAC Address to Serial monitor
  Serial.print("MAC Address: ");
  Serial.println(WiFi.macAddress());
}

void loop() {

}
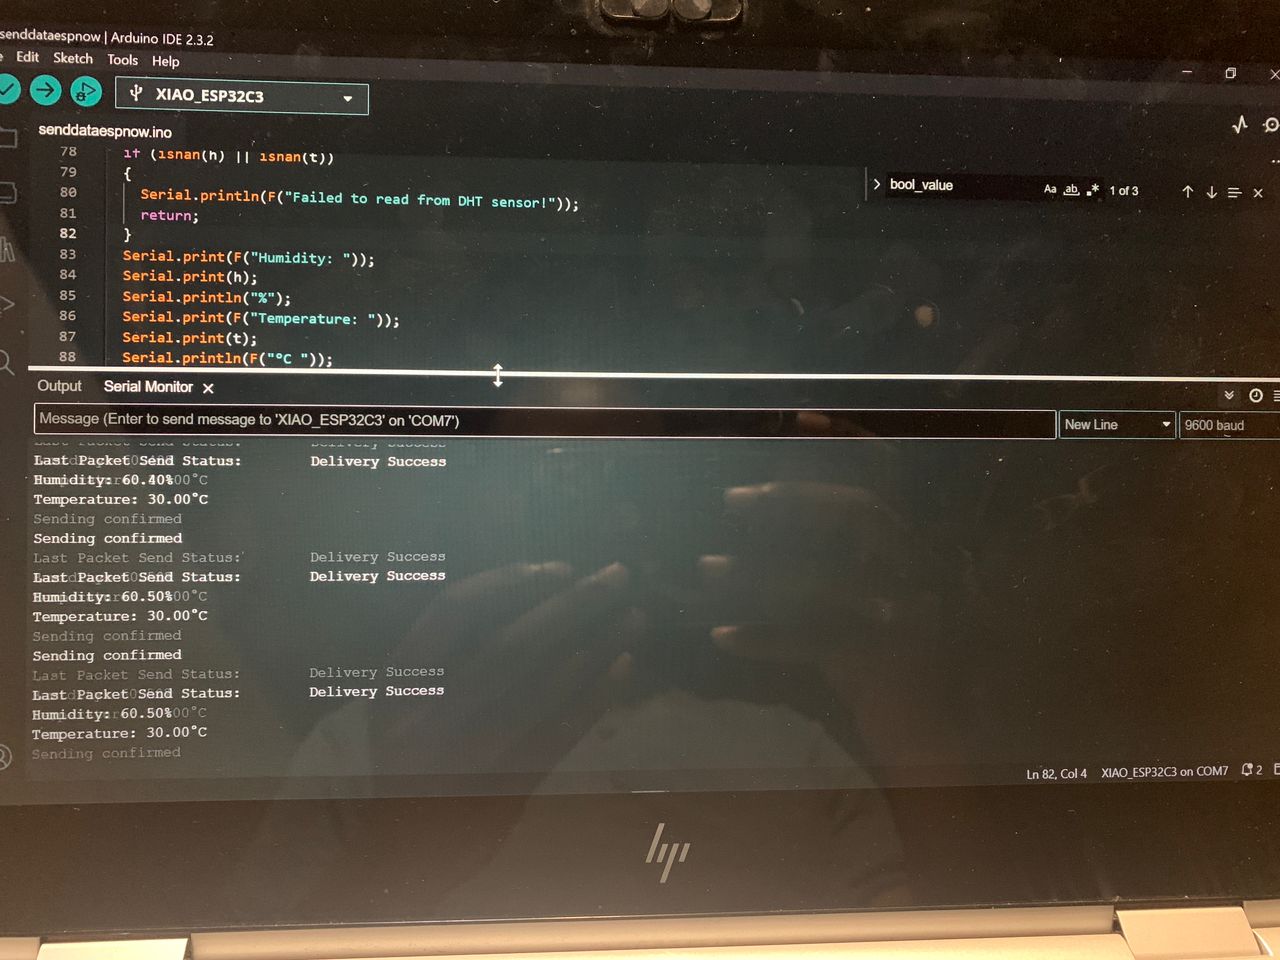
Sending Data from DHT11
Following separate readings of temperature and humidity from the DHT11 sensor,
I proceeded by including the
MAC address of the ESP32 receiver in my transmitting device and then uploaded the code.
Code for sending data
                        #include
                            #include

                            #include "DHT.h"
                            #define DHTPIN 10     // Digital pin connected to the DHT sensor

                            #define DHTTYPE DHT11   // DHT 11
                            DHT dht(DHTPIN, DHTTYPE);

                            // Variables for test data
                            int int_value;
                            float float_value;
                            float bool_value;

                            // MAC Address of responder - edit as required
                            uint8_t broadcastAddress[] = {0xCC, 0xDB, 0xA7, 0x64, 0x96, 0x50};

                            // Define a data structure
                            typedef struct struct_message {
                              char a[32];
                              int b;
                              float c;
                              float d;
                            } struct_message;

                            // Create a structured object
                            struct_message myData;

                            // Peer info
                            esp_now_peer_info_t peerInfo;

                            // Callback function called when data is sent
                            void OnDataSent(const uint8_t *mac_addr, esp_now_send_status_t status) {
                              Serial.print("\r\nLast Packet Send Status:\t");
                              Serial.println(status == ESP_NOW_SEND_SUCCESS ? "Delivery Success" : "Delivery Fail");
                            }


                            void setup()
                            {
                              Serial.begin(115200);
                              // Set ESP32 as a Wi-Fi Station
                              WiFi.mode(WIFI_STA);

                              // Initilize ESP-NOW
                              if (esp_now_init() != ESP_OK) {
                                Serial.println("Error initializing ESP-NOW");
                                return;
                              }

                              // Register the send callback
                              esp_now_register_send_cb(OnDataSent);

                              // Register peer
                              memcpy(peerInfo.peer_addr, broadcastAddress, 6);
                              peerInfo.channel = 0;
                              peerInfo.encrypt = false;

                              // Add peer
                              if (esp_now_add_peer(&peerInfo) != ESP_OK){
                                Serial.println("Failed to add peer");
                                return;
                              }

                              Serial.println(F("DHTxx test!"));
                              dht.begin();
                              delay(2000);
                            }

                            void loop()
                            {
                              // Create test data
                             ////dht11 data
                              float h = dht.readHumidity();
                              float t = dht.readTemperature();

                              // Check if any reads failed and exit early (to try again).
                              if (isnan(h) || isnan(t))
                              {
                                Serial.println(F("Failed to read from DHT sensor!"));
                                return;
                              }
                              Serial.print(F("Humidity: "));
                              Serial.print(h);
                              Serial.println("%");
                              Serial.print(F("Temperature: "));
                              Serial.print(t);
                              Serial.println(F("°C "));
                              Serial.println("");
                              delay(2000);
                              float_value = t;

                              bool_value = h;

                              strcpy(myData.a, "Welcome!");
                              myData.c = float_value;
                              myData.d = bool_value;

                              // Send message via ESP-NOW
                              esp_err_t result = esp_now_send(broadcastAddress, (uint8_t *) &myData, sizeof(myData));

                              if (result == ESP_OK) {
                                Serial.println("Sending confirmed");
                              }
                              else {
                                Serial.println("Sending error");
                              }


                            }
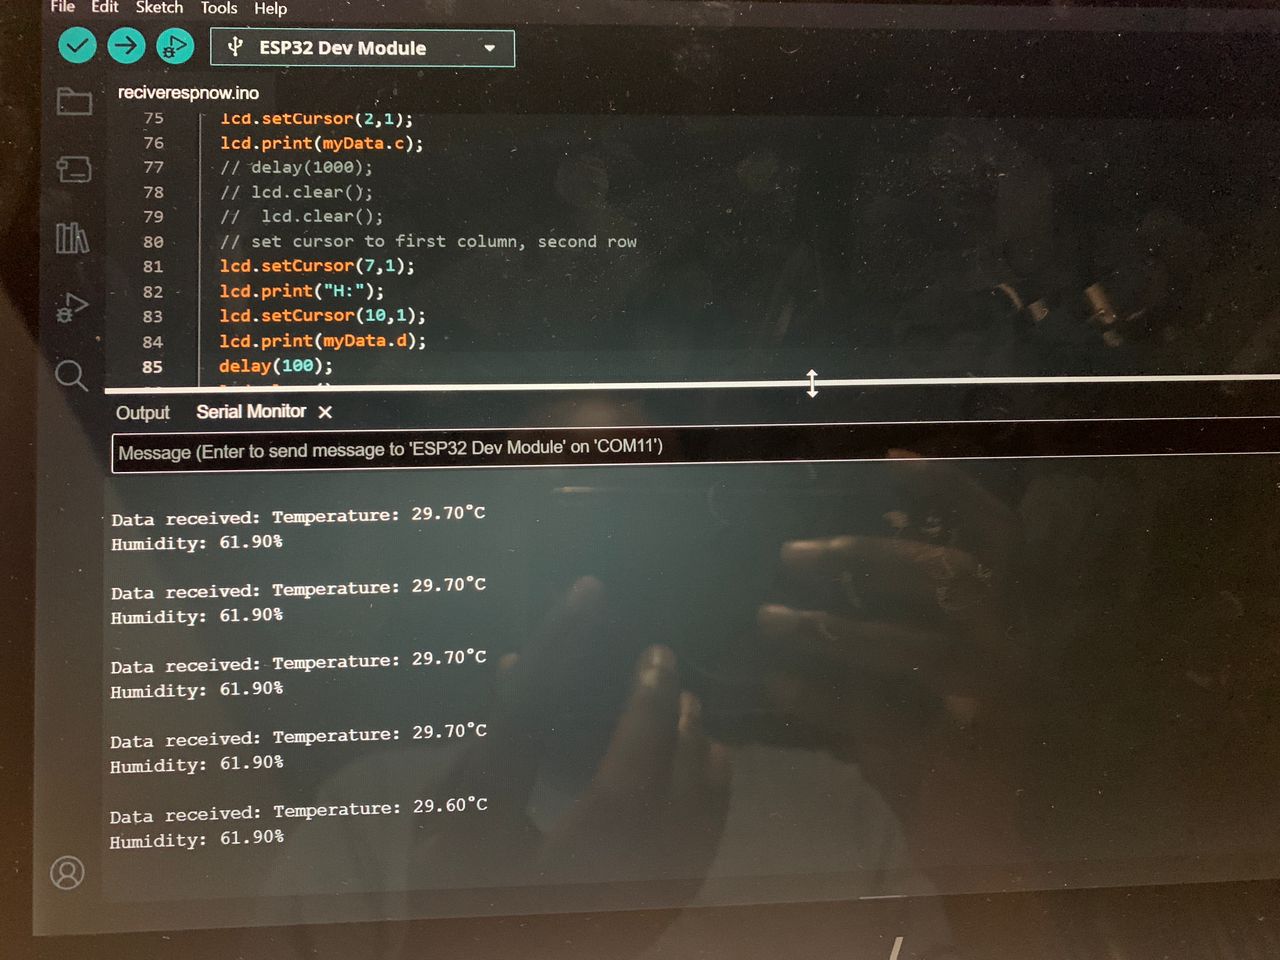
Receiving Data from DHT11
Following the transmission from the sending Xiao ESP32c3,
I utilize an ESP32 dev kit to receive and display the data on an LCD 1602 screen.
Code for receiving data
                        #include
                            #include
                            #include

                            // set the LCD number of columns and rows
                            int lcdColumns = 16;
                            int lcdRows = 2;

                            // set LCD address, number of columns and rows
                            // if you don't know your display address, run an I2C scanner sketch
                            LiquidCrystal_I2C lcd(0x27, lcdColumns, lcdRows);

                            // Define a data structure
                            typedef struct struct_message {
                              char a[32];
                              int b;
                              float c;
                              float d;
                            } struct_message;

                            // Create a structured object
                            struct_message myData;


                            // Callback function executed when data is received
                            void OnDataRecv(const uint8_t * mac, const uint8_t *incomingData, int len) {
                              memcpy(&myData, incomingData, sizeof(myData));
                              Serial.print("Data received: ");
                              Serial.print("Temperature: ");
                              Serial.print(myData.c);
                              Serial.println("°C ");
                              Serial.print("Humidity: ");
                              Serial.print(myData.d);
                              Serial.println("%");
                              Serial.println();
                            }

                            void setup(){
                              // initialize LCD
                              lcd.begin();
                              // turn on LCD backlight
                              lcd.backlight();
                               Serial.begin(115200);

                              // Set ESP32 as a Wi-Fi Station
                              WiFi.mode(WIFI_STA);

                              // Initilize ESP-NOW
                              if (esp_now_init() != ESP_OK) {
                                Serial.println("Error initializing ESP-NOW");
                                return;
                              }

                              // Register callback function
                              esp_now_register_recv_cb(OnDataRecv);

                            }

                            void loop(){
                              // set cursor to first column, first row
                              lcd.setCursor(0, 0);
                              // print message
                              lcd.print("DHT11 Data");
                              lcd.setCursor(0,1);
                              lcd.print("T:");
                              lcd.setCursor(2,1);
                              lcd.print(myData.c);
                              lcd.setCursor(7,1);
                              lcd.print("H:");
                              lcd.setCursor(10,1);
                              lcd.print(myData.d);
                              delay(100);
                              lcd.clear();
                            }