
14. Interface & Application Programming
I this week's assignment I was able to program a functional and pretty useful Serial Terminal!
I use UART communication protocols a lot when working with embedded systems, specially when debugging, having a serial output becomes critical. Having thus a terminal tailored to my needs could be both useful and interesting.
So I started this proyect by laying out the things I wanted it to have on a list:
Now that I had this, I could start desiging the interface on QT Designer. I started with a barebones design with no aestethic format. The design incorporates a "Connect" button to start the Serial connection with the provided parameters, a "Send" button to send the data placed below and 5 "Fast Command" buttons which send pre-programmed strings or single characters. The first approach to desiging the interface ended up looking like this:
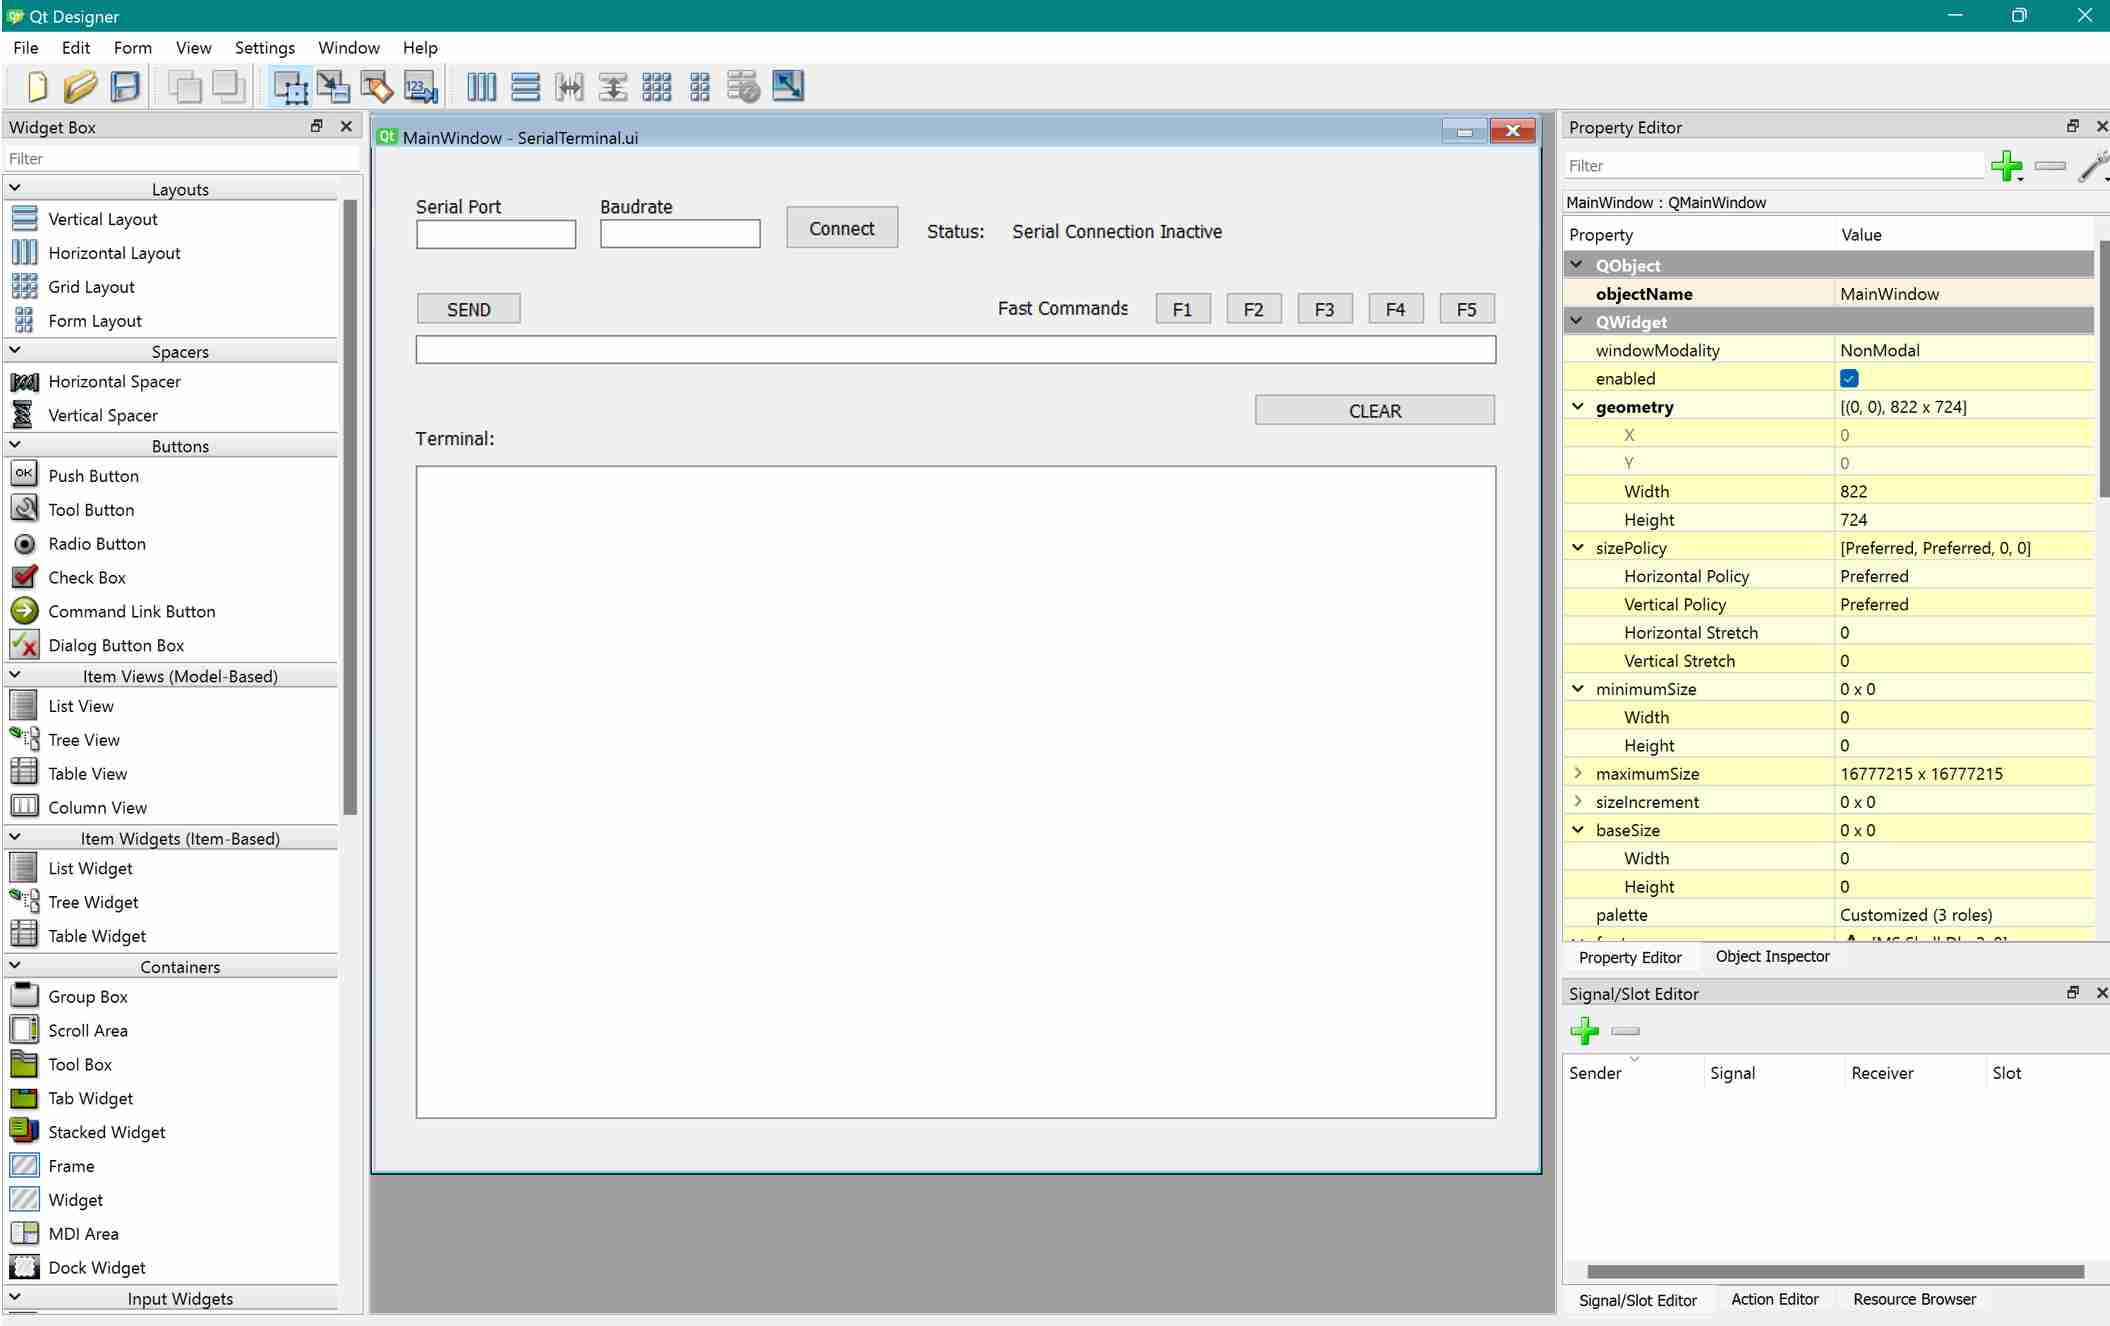
I also added some labels which serve as indicators of the program's status. On the other hand, the text input fields were made by using "Text Edit" boxes, while the recieved data terminal was made using a List Widget.
Now, once I was happy with the interface's layout made in QT, I could export it to Python. First we have to save our proyect in QT Designer's files extension (.ui) by doing a normal "save" from within the program, then, we use a command prompt window to move into the directory in which we saved said QTdesigner's file. Once in the right folder, we execute the following command:
pyuic5 -x name_of_original_file.ui -o name_of_converted_file.py
This command will convert your design into a Python code that uses the PyQt5 library to run. If you don't have said library, you can Easily install it running the command:
pip install PyQt5
Once the file is converted, we can take a look inside it to see what it is doing. This program though doesn't incorporate anything beyond the interface's graphical characteristics, so, if we want it to actually do something, we have to program the rest ourselves.
We can program the interface's functionality inside the converted .py file, but that would be kind of a mistake: Every time we need to make a change to the interface from QTDesigner, the whole code inside the file will be erased and replaced with the updated code, process that will make all our custom code disappear. Of course that we can copy our custom code elsewhere, then update the file and repaste the code inside it; but there's certainly a much easier and pragmatic way of doing this: Separate your code in two discrete files, one for the interface and one for its functionality, and then merge them into a single program using imports.
So let's do that and create a new, blank .py file and insert the following on it:
	import sys
	from PyQt5.QtWidgets import QApplication, QMainWindow
	from SerialInterface import Ui_MainWindow

	class MainApp(QMainWindow, Ui_MainWindow):
		def __init__(self):
			super().__init__()
			self.setupUi(self)
			self.initUI()

		def initUI(self):
			#Here we can initialize variables, connect signals, etc.

	if __name__ == '__main__':
		app = QApplication(sys.argv)
		window = MainApp()
		window.show()
		sys.exit(app.exec_())
This code here is the essential structure to succesfully connect the designed interface with your main python file. In this case "SerialInterface" is the name given to the file that contains the code generated by QTDesigner, so make sure everything checks out when doing yours!
Inside the "initUI" function we can initialize variables and assign functions to our buttons or other implemented widgets in QT.
Let's start easy, by just reading the state of the buttons and doing something with them, like sending a message to the python console.
The things that happen after a button event is triggered, are managed using functions and a line of code that ties those functions to said event. Getting the state of the buttons is done via its registered ObjectName inside QTDesigner, so in my case for example the "SEND" button is actually called "ButtonSendData" inside QT.
Connecting every button to a function should look something like this:
	class MainApp(QMainWindow, Ui_MainWindow):
    def __init__(self):
        super().__init__()
        self.setupUi(self)
        self.initUI()

    def initUI(self):

        # Connecting button events to their respective functions
        self.ButtonSendData.clicked.connect(self.on_send_clicked)  #SEND Button
        self.ERASEDATAREC.clicked.connect(self.on_clear_clicked)   #CLEAR Button


        self.F1.clicked.connect(self.on_fast_command_clicked("F1")) #F1 to F2 Buttons
        self.F2.clicked.connect(self.on_fast_command_clicked("F2"))
        self.F3.clicked.connect(self.on_fast_command_clicked("F3"))
        self.F4.clicked.connect(self.on_fast_command_clicked("F4"))
        self.F5.clicked.connect(self.on_fast_command_clicked("F5"))


    def on_send_clicked(self):
        print("Send button clicked.")		#Function for SEND button.

    def on_clear_clicked(self):
        print("Clear button clicked.")		#Function for CLEAR Button

    def on_fast_command_clicked(self, command):
        print(f"Fast command {command} clicked.") 	#Function for Fast Commands


	if __name__ == '__main__':
		app = QApplication(sys.argv)
		window = MainApp()
		window.show()
		sys.exit(app.exec_())
This code should show a message in the Python terminal once a button is pressed. It may not seem like much has happened, but the structure is the same, whether you want to send a simple message or triggered a more complex action.
Lets then incorporate a way to read the data from the user text inputs. This is very easy and can be done with this two lines of code, where we simply assign a variable to the string value of the text contained inside the text box, in my case the first two boxes (used for the port and baudrate) are called COMPORT and COMPORT_2.
comport = self.COMPORT.text()
baudrate = self.COMPORT_2.text()
Now that we have this, let's initialize our first serial connection using the "PySerial" library!
The following function should be responsible for initializing the connection using the provided parameters for Port and Baudrate. That function will execute every time the "Connect" button is pressed.
def on_connect_clicked(self):
	comport = self.COMPORT.text()
	baudrate = self.COMPORT_2.text()
	if comport and baudrate.isdigit():  # Verify that "COMPORT" is not blank and that "Baudrate" is numeric.
		try:
			# Start serial connection with the provided parameters.
			self.serial_connection = serial.Serial(comport, int(baudrate), timeout=1)
			print("Serial connection succesful.")
		except serial.SerialException as e: # Manage connection exceptions and print cause of error.
			print(f"Error opening serial port: {e}")
	else:
		print("Please insert valid parameters.")
Now, when we click the connect button, a Serial connection is established! We can now use that connection to recieve and send data. Sending data should be possible using the designated text box and the "Send" button, while recieved data should be displayed in the listWidget.
Let's create then a way to recieve data and update the list Widget! I use the "read_from_serial" function to retrieve the date incoming from the serial connection, which then calls for the "update_list_widget" function, which adds the recieved data onto the list:
def read_from_serial(self):
    # Check if there is an active and open serial connection
    if self.serial_connection and self.serial_connection.is_open:
        # Check if there is data waiting in the buffer to be read
        if self.serial_connection.in_waiting > 0:
            # Read one line from the serial connection, decode it to string, and strip any leading/trailing whitespace
            data = self.serial_connection.readline().decode().strip()
            # Call the function to update the QListWidget with the new data
            self.update_list_widget(data)
    else:
        # If the serial connection is not active, set the text of the status label to indicate this
        self.StatusLabel.setText("Serial Connection Inactive")

def update_list_widget(self, data):
    # Format the received data as a string message, also adding a decorative arrow before the actual data recieved
    message = f"--> {data}"

    # Add the formatted message as a new item to the list widget
    self.listWidget.addItem(message)
    # Automatically scroll the list widget to show the latest added item
    self.listWidget.scrollToBottom()
Now, let's add the code to send some data back! The "send_data function" handles both the data sending procedure as well as changing the some text in the interface to indicate to the user that the message has been sent (or not). This function is executed everytime the "Send" button is clicked by another function tied to the button's status, this other function called "on_send_clicked" retrieves the desired message from the message text box and passes it to the send_data function.
def send_data(self, data_to_send):
    # Check if there is an active and open serial connection
    if self.serial_connection and self.serial_connection.is_open:
        try:
            # Send the data through the serial connection after encoding it to bytes
            self.serial_connection.write(data_to_send.encode())
            # Update the status label to indicate that data was sent successfully
            self.StatusLabelSend.setText("Data Sent!")
        except serial.SerialException as e:
            # If a serial exception occurs during sending, update the status label to indicate the error
            self.StatusLabelSend.setText("Error Sending Data :(")
    else:
        # If the serial connection is not active or is closed, update the status label accordingly
        self.StatusLabelSend.setText("Serial Connection Inactive or Closed")

def on_send_clicked(self):
    # Retrieve the text entered in the QLineEdit widget 'DATASEND'
    data_to_send = self.DATASEND.text()
    # Call the send_data function with the text to be sent over the serial connection
    self.send_data(data_to_send)
This should be enough for the serial terminal to work, but the final code includes extra functions and features: I added timestamp and line count functionality to the interface, changed the name of the window and created a little icon, added some safety features as well as making the fast command buttons work. So the final, fully commented code, is shown next:
import sys  # Import the system-specific parameters and functions module
from PyQt5.QtWidgets import QApplication, QMainWindow  # Import QApplication and QMainWindow for GUI application
from SerialInterface import Ui_MainWindow  # Import the UI class generated from Qt Designer
import serial  # Import the serial library for serial port communication
from PyQt5.QtCore import QTimer  # Import QTimer for handling operations at set intervals
from datetime import datetime  # Import datetime to handle time-related tasks
from PyQt5.QtGui import QIcon  # Import QIcon to handle icons in the application

class MainApp(QMainWindow, Ui_MainWindow):  # Define the MainApp class, inheriting from QMainWindow and Ui_MainWindow
    def __init__(self):  # Constructor of the MainApp class
        super().__init__()  # Initialize the superclass
        self.setupUi(self)  # Setup the UI from the loaded .ui file
        self.initUI()  # Initialize the UI components and connections
        self.setWindowTitle("Absolutely Great Serial Terminal")  # Set the window title
        self.setWindowIcon(QIcon('Interfaces\SerialTerminalProyect\TerminalLogo.ico'))  # Set the window icon
        self.serial_connection = None  # Initialize serial_connection to None
        self.line_count = 0  # Initialize the line counter to 0

    def initUI(self):  # Method to initialize UI components and connect signals
        # Connect buttons to their respective functions
        self.ButtonSendData.clicked.connect(self.on_send_clicked)
        self.ERASEDATAREC.clicked.connect(self.on_clear_clicked)
        self.ConnecButton.clicked.connect(self.on_connect_clicked)

        # Connect fast command buttons to a lambda function that calls on_fast_command_clicked with specific parameters
        self.F1.clicked.connect(lambda: self.on_fast_command_clicked("F1"))
        self.F2.clicked.connect(lambda: self.on_fast_command_clicked("F2"))
        self.F3.clicked.connect(lambda: self.on_fast_command_clicked("F3"))
        self.F1_4.clicked.connect(lambda: self.on_fast_command_clicked("F4"))
        self.F5.clicked.connect(lambda: self.on_fast_command_clicked("F5"))

        self.timer = QTimer(self)  # Create a QTimer object
        self.timer.timeout.connect(self.read_from_serial)  # Connect the timer timeout signal to the read_from_serial method
        self.timer.start(50)  # Start the timer to call read_from_serial every 50 milliseconds

    def read_from_serial(self):  # Method to handle reading from the serial port
        if self.serial_connection and self.serial_connection.is_open:  # Check if the serial connection is active and open
            if self.serial_connection.in_waiting > 0:  # Check if there is data waiting in the serial buffer
                data = self.serial_connection.readline().decode().strip()  # Read a line from the serial port, decode, and strip it
                self.update_list_widget(data)  # Call update_list_widget with the received data
        else:
            self.StatusLabel.setText("Serial Connection Inactive")  # Update the status label if the connection is inactive

    def on_connect_clicked(self):  # Method called when the Connect button is clicked
        comport = self.COMPORT.text()  # Get the text from the COMPORT QLineEdit
        baudrate = self.COMPORT_2.text()  # Get the text from the COMPORT_2 QLineEdit
        if comport and baudrate.isdigit():  # Check if comport is not empty and baudrate is numeric
            try:
                if self.serial_connection:  # Check if a serial connection already exists
                    self.serial_connection.close()  # Close the existing connection
                self.serial_connection = serial.Serial(comport, int(baudrate), timeout=1)  # Establish a new serial connection
                self.StatusLabel.setText("Connected")  # Update the status label to Connected
            except serial.SerialException as e:  # Handle exceptions related to serial communication
                self.StatusLabel.setText("Connection Error")  # Update the status label to Connection Error
        else:
            self.StatusLabel.setText("Non valid parameters.")  # Update the status label if parameters are invalid

    def update_list_widget(self, data):  # Method to update the QListWidget with received data
        self.line_count += 1  # Increment the line counter
        timestamp = datetime.now().strftime("%H:%M:%S")  # Get the current time as a timestamp
        message = f"{self.line_count} [{timestamp}] --> {data}"  # Format the message with line count, timestamp, and data
        self.listWidget.addItem(message)  # Add the formatted message to the QListWidget
        self.listWidget.scrollToBottom()  # Scroll to the bottom of the QListWidget

    def send_data(self, data_to_send):  # Method to send data over the serial connection
        if self.serial_connection and self.serial_connection.is_open:  # Check if the serial connection is active and open
            try:
                self.serial_connection.write(data_to_send.encode())  # Send the data, encoded as bytes
                self.StatusLabelSend.setText("Data Sent!")  # Update the status label to Data Sent!
            except serial.SerialException as e:  # Handle exceptions during data sending
                self.StatusLabelSend.setText("Error Sending Data :(")  # Update the status label to Error Sending Data
        else:
            self.StatusLabelSend.setText("Serial Connection Inactive or Closed")  # Update the status label if the connection is inactive or closed

    def on_send_clicked(self):  # Method called when the Send button is clicked
        data_to_send = self.DATASEND.text()  # Get the text from the DATASEND QLineEdit
        self.send_data(data_to_send)  # Call send_data with the text to be sent

    def on_fast_command_clicked(self, command):  # Method to handle fast command buttons
        commands = {
            "F1": "ON",
            "F2": "OFF",
            "F3": "F3",
            "F4": "F4",
            "F5": "F5"
        }
        if command in commands:  # Check if the command is recognized
            data_to_send = commands[command]  # Get the command to send
            self.send_data(data_to_send)  # Call send_data with the command
        else:
            print("Comando no reconocido:", command)  # Print an error message if the command is not recognized

    def on_clear_clicked(self):  # Method called when the Clear button is clicked
        print("Clear button clicked.")
        self.listWidget.clear()  # Clear all items in the QListWidget
        self.line_count = 0  # Reset the line counter

if __name__ == '__main__':
    app = QApplication(sys.argv)  # Create a QApplication
    window = MainApp()  # Create an instance of MainApp
    window.show()  # Show the MainApp window
    sys.exit(app.exec_())  # Start the application event loop
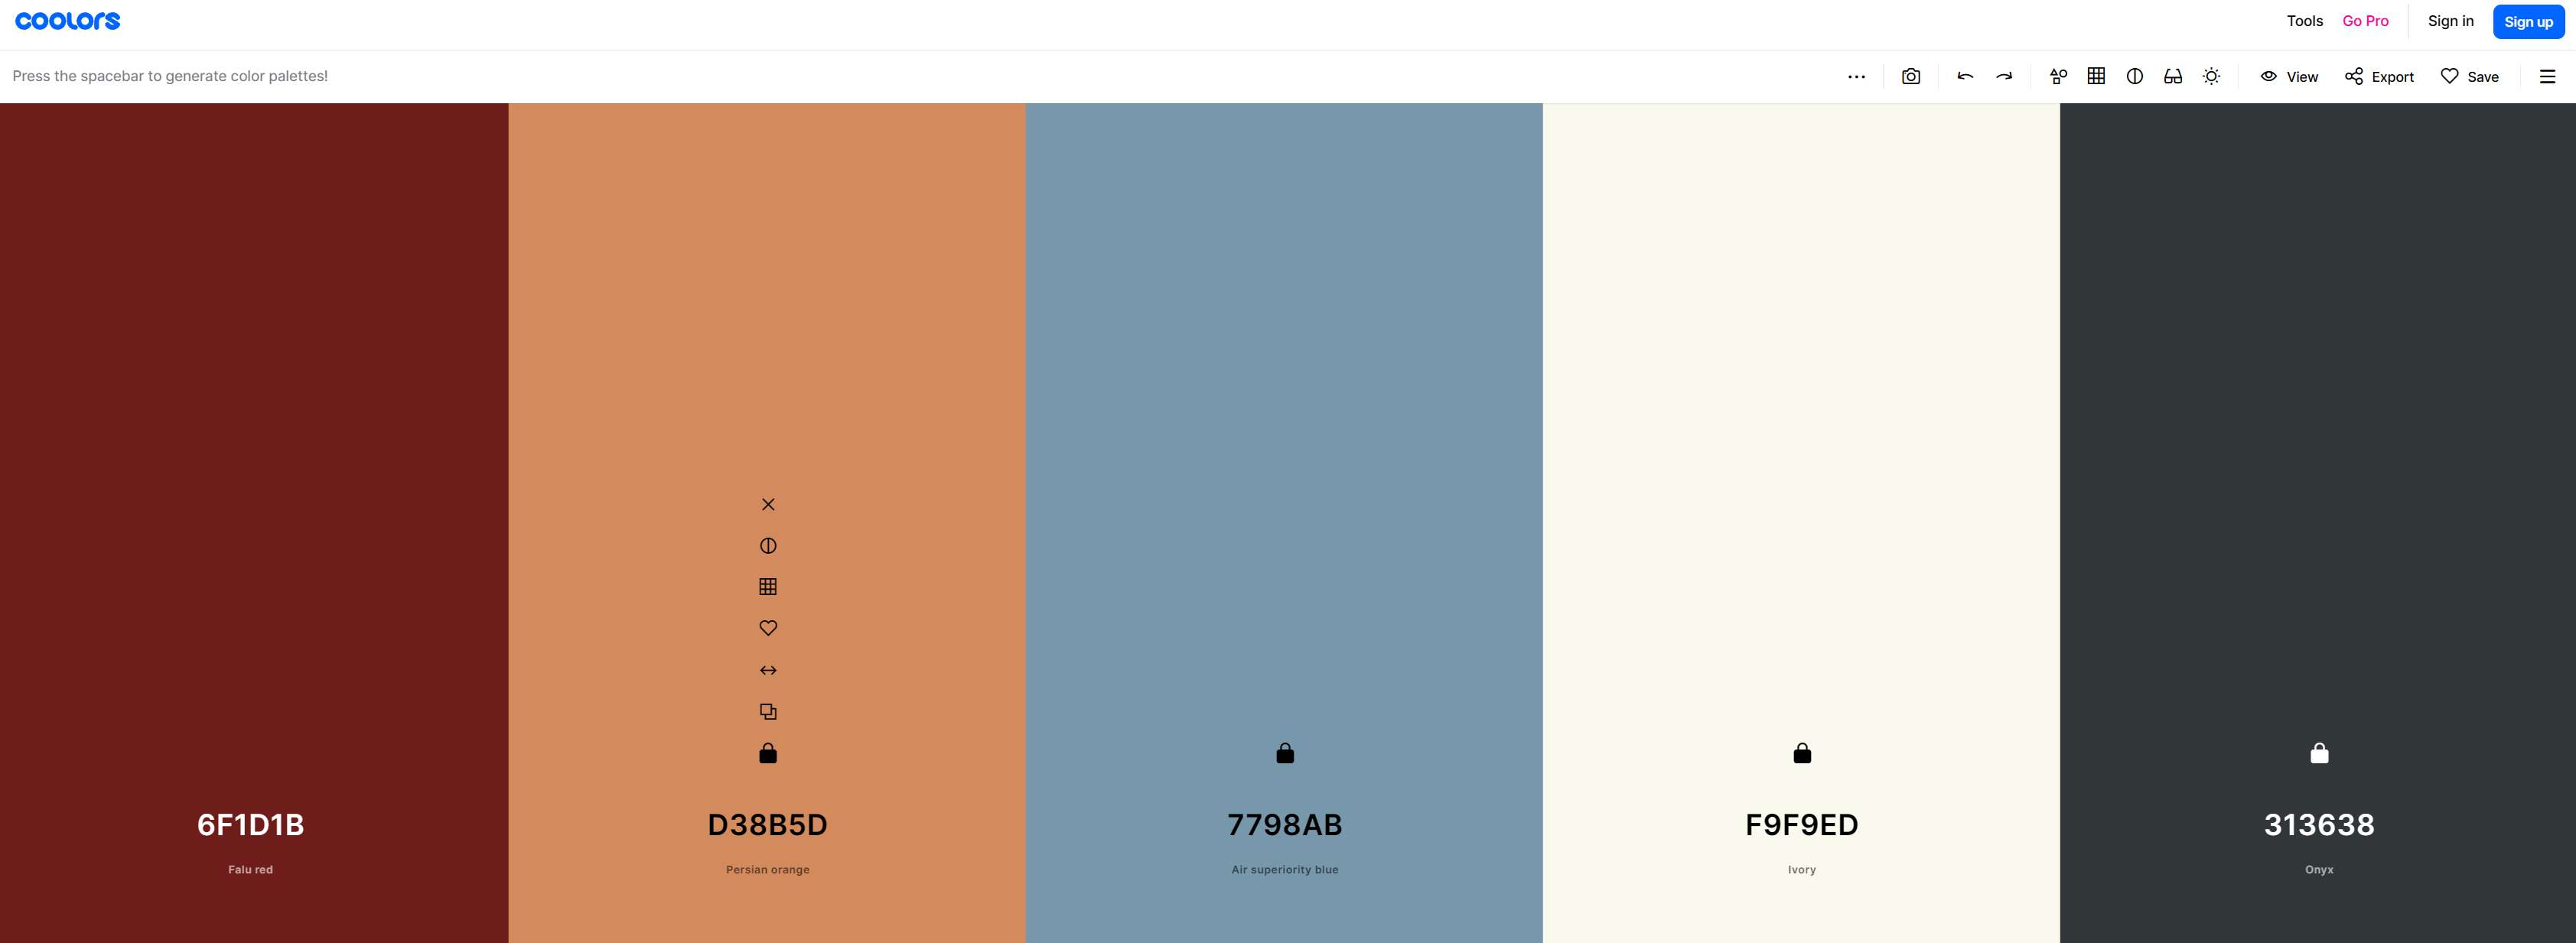
I also changed the interface's design a little, as I wanted it to look fancier. I used the "Coolors" pallete generator to create a color pallete for my interface, so I could add a bit more life to it. These are the colors I used:
I then added them to all my QT widgets via the "StyleSheet" parameters. This for example, is the StyleSheet for the "Clear" button, to which I added a red background, white letters and some roundness:

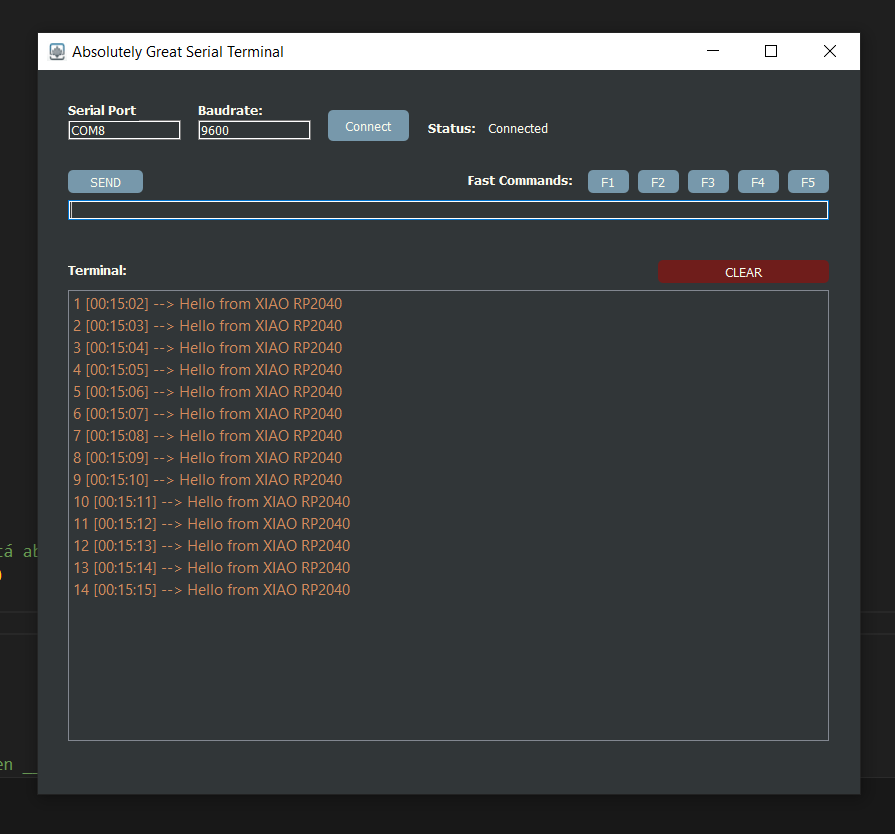
The fully painted interface ended up looking like this:
To test my creation, I created a little arduino sketch for my XIAO RP2040 board, which sends a message to the serial port and turns an LED when it recieves the keywords "ON" or "OFF" respectively.
#define LED_PIN 25

void setup() {
  // Begin serial communication at a baudrate of 9600
  Serial.begin(9600);
  pinMode(LED_PIN, OUTPUT);
}

void loop() {
  // Send data down the serial bus every 1000 ms.
  Serial.println("Hello from XIAO RP2040");
  delay(1000);

  // Test if there's available data coming from the serial port
  if (Serial.available() > 0) {
    String data = Serial.readStringUntil('\n');

    // Compares the recieved command and executes its corresponding action.
    if (data == "ON") {
      digitalWrite(LED_PIN, HIGH);  // Turn LED ON
      Serial.println("LED ON");
    } else if (data == "OFF") {
      digitalWrite(LED_PIN, LOW);   // Turn LED OFF
      Serial.println("LED OFF");
    } else {
      Serial.println("Unknown command: " + data);
    }
  }
}
Thank you for taking a look into my 14th week's progress!