*Death by Glamour intensifies*
Introduction:
In the realm of software development, especially in the development of graphical user interfaces (GUIs), the choice of tools significantly impacts both the design and implementation phases. This document outlines the technologies and rationale behind the choice of tools for the development of a GUI application.
When developing GUIs that interact with microcontrollers, both QT Designer and Tkinter offer viable solutions, each with distinct features and capabilities suited to different development environments and project requirements.
What is QT Designer?
QT Designer is part of the Qt development framework, which is used for creating cross-platform applications. QT Designer allows developers to design and build interfaces visually with a drag-and-drop interface, integrating seamlessly with the rest of the Qt framework. This tool generates XML files (.ui files) that describe the arrangement and behavior of widgets. These files can then be converted into code in various programming languages supported by Qt, such as C++.
Here's a list highlighting some key characteristics of QT Designer:
- Integration with Qt Framework: It is fully integrated with the Qt framework, which is powerful for developing cross-platform applications and supports various languages through bindings.
- Drag-and-Drop Interface: QT Designer offers a user-friendly drag-and-drop interface that simplifies the GUI creation process, making it accessible for designers and developers alike.
- Dynamic UI Creation: Generates XML-based UI files that can be dynamically loaded and modified by applications, providing flexibility in UI design and usage.

QT Designer and Microcontroller Interaction:
QT Designer is part of the Qt framework, which is renowned for its powerful features and robustness in creating cross-platform applications. Here are some key points about how QT Designer can be used for GUIs that interact with microcontrollers:
- Cross-Platform Compatibility: QT Designer creates GUIs that can run on various operating systems, such as Windows, macOS, and Linux. This is particularly useful for development and testing environments where the GUI and microcontroller development tools might be on different platforms.
- Signal and Slot Mechanism: Qt uses a unique signal and slot mechanism to handle events. This feature is very effective for designing GUIs that need to interact with microcontrollers. For example, signals triggered by GUI elements (like buttons and sliders) can be connected to slots that send commands to a microcontroller.
- Networking and Serial Communication: Qt supports a wide range of protocols and interfaces, including TCP/IP, UDP, and serial communication, which are commonly used for microcontroller communication. The Qt Network module and the QSerialPort class can be easily integrated into applications designed with QT Designer, facilitating direct communication with microcontrollers over these interfaces.
- Robust Libraries for Handling Data: Qt provides extensive support for handling different data formats and protocols, essential for encoding and decoding data exchanged between the GUI and the microcontroller.
- Professional Development Features: For projects that require sophisticated interfaces or advanced graphics, QT Designer supports OpenGL and other graphics libraries, enabling the development of visually compelling interfaces that can display data from microcontrollers dynamically.
What is Tkinter?
Tkinter is the standard GUI toolkit for Python. It is built into Python and is used to create simple and effective GUI applications. It is highly accessible and widely supported, making it an ideal choice for small to medium-scale applications and for developers who are already proficient in Python. Tkinter applications are straightforward to develop and can be quickly deployed on virtually any system where Python is installed.
Here's a list highlighting some key characteristics of Tkinter:
- Built-in Python Module: Tkinter is included with Python, which eliminates the need for additional installations and simplifies the setup process.
- Ease of Use: Tkinter is simpler compared to other GUI toolkits, making it ideal for beginners and for applications that require a straightforward interface.
- Wide Platform Support: As part of Python's standard library, Tkinter applications can run on any system where Python is installed, ensuring broad compatibility.
- Figma Support: Through the use of Tkinter Designer you can import Figma designs into your own GUI in Python.
Tkinter and Microcontroller Interaction:
Tkinter, while simpler than Qt, is also widely used for developing GUIs that need to interact with microcontrollers, especially in educational, hobbyist, or light industrial environments. Here’s how Tkinter fits into such use cases:
- Simplicity and Accessibility: Tkinter is less complex than Qt and is bundled with Python, making it readily accessible and easy to set up. This simplicity is advantageous for smaller projects or for those new to GUI development.
- Python Integration: Python, being popular in scientific, engineering, and hobbyist communities, has extensive support for various microcontroller platforms (like Arduino, Raspberry Pi, and others). Python scripts using Tkinter can directly import libraries that manage microcontroller communication, such as pyserial for serial communication.
- Rapid Prototyping: Tkinter allows for fast GUI prototyping, which is beneficial during the early stages of microcontroller project development, where functionality and quick testing are more critical than the sophistication of the user interface.
- Community and Resources: The vast Python and Tkinter community provides numerous resources, tutorials, and third-party libraries that can simplify the process of connecting GUIs with microcontrollers, including handling common protocols and data formats used in microcontroller communication.
QT Designer vs. Tkinter
Differences Between QT Designer and Tkinter
- Language Support: QT Designer is typically used with C++, though it supports other languages through bindings. Tkinter, however, is used with Python, which is generally easier for rapid development and prototyping.
- Complexity and Features: QT Designer, as part of the Qt framework, supports a wider range of advanced features and is suited for complex, feature-rich applications. Tkinter is more suited for simpler applications and is favored for its ease of use and the rapid development cycle.
- Cross-Platform Compatibility: Both tools support cross-platform development, but Qt is more robust in handling various platform-specific features and optimizations.
- Community and Support: Qt has a large professional community and commercial support, making it suitable for commercial-grade applications. Tkinter, being open-source and part of Python, benefits from the vast Python community for support and resources.
As you can see, choosing between QT Designer and Tkinter for creating GUIs that interact with microcontrollers depends on several factors such as:
- Project Requirements: The complexity of the user interface, required features, and performance considerations.
- Development Resources: Availability of skills, development time, and budget.
- Target Platform: Whether the application needs to be cross-platform or if it’s intended for a specific operating system.
QT Designer is ideal for commercial-grade or complex applications requiring advanced UI features and extensive cross-platform support. In contrast, Tkinter is suitable for simpler, Python-centric projects where ease of use, rapid development, and integration with Python's ecosystem are prioritized.
You can see more info in this week's Group Assignment.
My Choice: Tkinter
When selecting the ideal GUI toolkit for "The GameShine" project, a GUI-based emulator interface, several factors played a pivotal role in choosing Tkinter over other available frameworks like QT Designer.
One of the primary reasons for selecting Tkinter was its robust community support. As a standard library in Python, Tkinter benefits from a vast ecosystem of developers and enthusiasts who regularly contribute to its development and troubleshooting. This community is a treasure trove of documentation, forums, tutorials, and third-party tools, making it easier to find solutions to common (and uncommon) issues. For a project like "The GameShine," where timely resolution of problems and accessibility of learning resources were crucial, the supportive community around Tkinter proved invaluable.
Integration with Figma via Tkinter Designer.
If you remember the assignment from Week 02 I mentioned Figma as an UI/UX designer dream's world and Figma is one of those applications that I use reguraly to make my Wireframes for my Projects.
What is Figma?
Figma is a cloud-based design tool that stands out for its collaborative capabilities, allowing designers to work together in real time. It's widely used for UI and UX design, providing vector-based graphics that are scalable and detailed. Figma facilitates a seamless transition from design to development by allowing designers to create detailed prototypes and generate code snippets that developers can use as a reference.
Here's a list highlighting some key characteristics of Figma:
- Collaborative Design: Figma allows multiple designers to work on the same project simultaneously, enhancing teamwork and speeding up the design process.
- Web-Based: Being cloud-based, it doesn't require installation and is accessible from any computer with internet access, promoting flexibility in the design process.
- Prototyping and Code Generation: Figma supports interactive prototyping and can generate CSS code snippets directly from designs, aiding developers in accurately implementing designs.
So, another significant factor in the decision was the discovery of Tkinter Designer, a framework that seamlessly integrates with Figma. Traditionally, translating Figma designs into functional GUI elements can be a repetitive and error-prone process. However, Tkinter Designer bridges this gap by converting Figma wireframes directly into Tkinter code. This capability was particularly appealing because it leveraged my existing workflows and tools, notably the use of Figma for designing GUI mockups. The ability to directly import these designs into the development environment without the need to manually replicate the design details in the code dramatically streamlined the development process.
Simplicity and Programmability
Tkinter's simplicity and ease of use were also critical in its selection. Unlike QT Designer, which is powerful but comes with a steeper learning curve and a more complex setup, Tkinter offers a straightforward approach to GUI development. This simplicity does not come at the expense of functionality but makes it more approachable, especially for developers who are already familiar with Python. Moreover, I found Tkinter to be more programmable in the context of rapid prototyping and making iterative changes, which is often required in project development cycles.
Project-Specific Requirements
"The GameShine" project aimed to create an emulator with a visually appealing and interactive interface. The need to incorporate .gif backgrounds and enhanced interactivity between windows meant that the GUI toolkit needed to support these features effortlessly. Tkinter, with its ability to handle dynamic content updates and manage multiple windows, was well-suited to this task. Additionally, the aesthetic appeal was a priority to capture the essence of an emulator menu, and the integration with Figma ensured that the GUI not only functioned well but also looked great.
An UI/UX Design Story: The GameShine Emulator Interface v0.0.1.
Benchmark:
When embarking on the development of "The GameShine" emulator interface, a crucial part of the initial design phase involved establishing a benchmark or a source of inspiration to guide the aesthetic and functional aspects of the project. The Homebrew Channel, a popular software loader for the Wii that allows users to run homebrew applications, served as this benchmark. Here’s how various elements from the Homebrew Channel influenced the design choices for "The GameShine."
Inspiration from the Hombrew Channel
- 1. Layout and Position of Names:
The Homebrew Channel is known for its sleek and user-friendly interface, where the names and descriptions of applications are clearly displayed. This layout was adopted for "The GameShine," ensuring that the emulator not only looked clean and organized but was also easy to navigate. The positioning of text and interactive elements was designed to be intuitive, taking cues from how the Homebrew Channel manages to balance clarity with visual appeal.
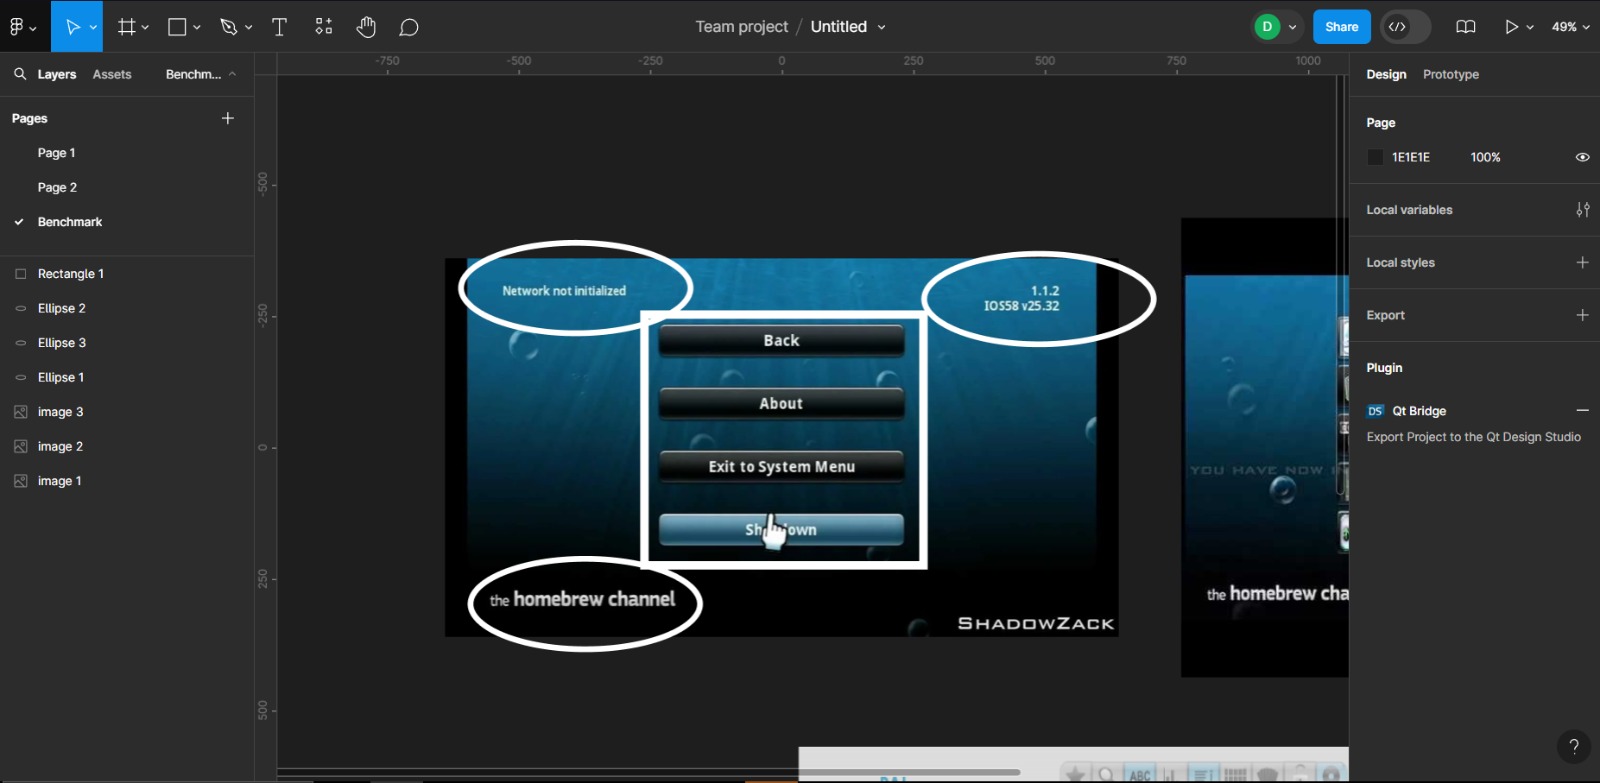
- 2. Button Design:
The distinct button design in the Homebrew Channel, characterized by its modern and flat appearance, was a significant inspiration. For "The GameShine," similar button styles were used—flat with subtle shadows or highlights to provide a sense of depth. This choice was aimed at maintaining a contemporary look while ensuring that the buttons were inviting and clearly clickable, enhancing the overall user interaction.

- 3. Background and Color Palette:
The background and color palette of the Homebrew Channel, which uses dark hues interspersed with vibrant colors for highlights, were particularly influential. I wanted "The GameShine" to adopt a similar approach by using a dynamic .gif background that incorporated both motion and depth, adding an engaging element to the emulator that mirrors the active yet unobtrusive background of the Homebrew Channel. The color palette was chosen to evoke a sense of excitement and tech-savviness, using vibrant colors to draw attention to key interface elements without overwhelming the user.
.jpeg)
- 4. Overall Aesthetic Appeal:
The Homebrew Channel's ability to blend functionality with aesthetic appeal was a major design benchmark. It maintains a balance between being visually interesting and functionally straightforward, which was a critical goal for "The GameShine." The aim was to create an interface that users could enjoy both visually and interactively, making the experience of using the emulator as enjoyable as the games it runs.
The benchmarking process against the Homebrew Channel not only provided a solid foundation for design choices but also ensured that the project stayed focused on creating a user experience that was both familiar to users of other systems and uniquely appealing. This approach helped bridge the gap between inspiration and implementation, resulting in an emulator interface that is both effective and visually captivating.
Implementation and Adaptation: Designing The GameShine GUI in Figma
The design journey for "The GameShine" emulator interface was both a meticulous and creative process, utilizing Figma to assemble and fine-tune various design components inspired by the Homebrew Channel. The utilization of Figma was pivotal in this phase, offering a platform where experimentation with layouts, color schemes, and interactive elements could be rapidly prototyped and iterated upon.
Developing the Interface Components in Figma
The initial stage involved drafting the core components that would make up the emulator's interface. This included the layout of text, buttons, and other interactive elements. The placement of each component was carefully considered to ensure ease of navigation and optimal user experience, mirroring the efficient layout observed in the Homebrew Channel.
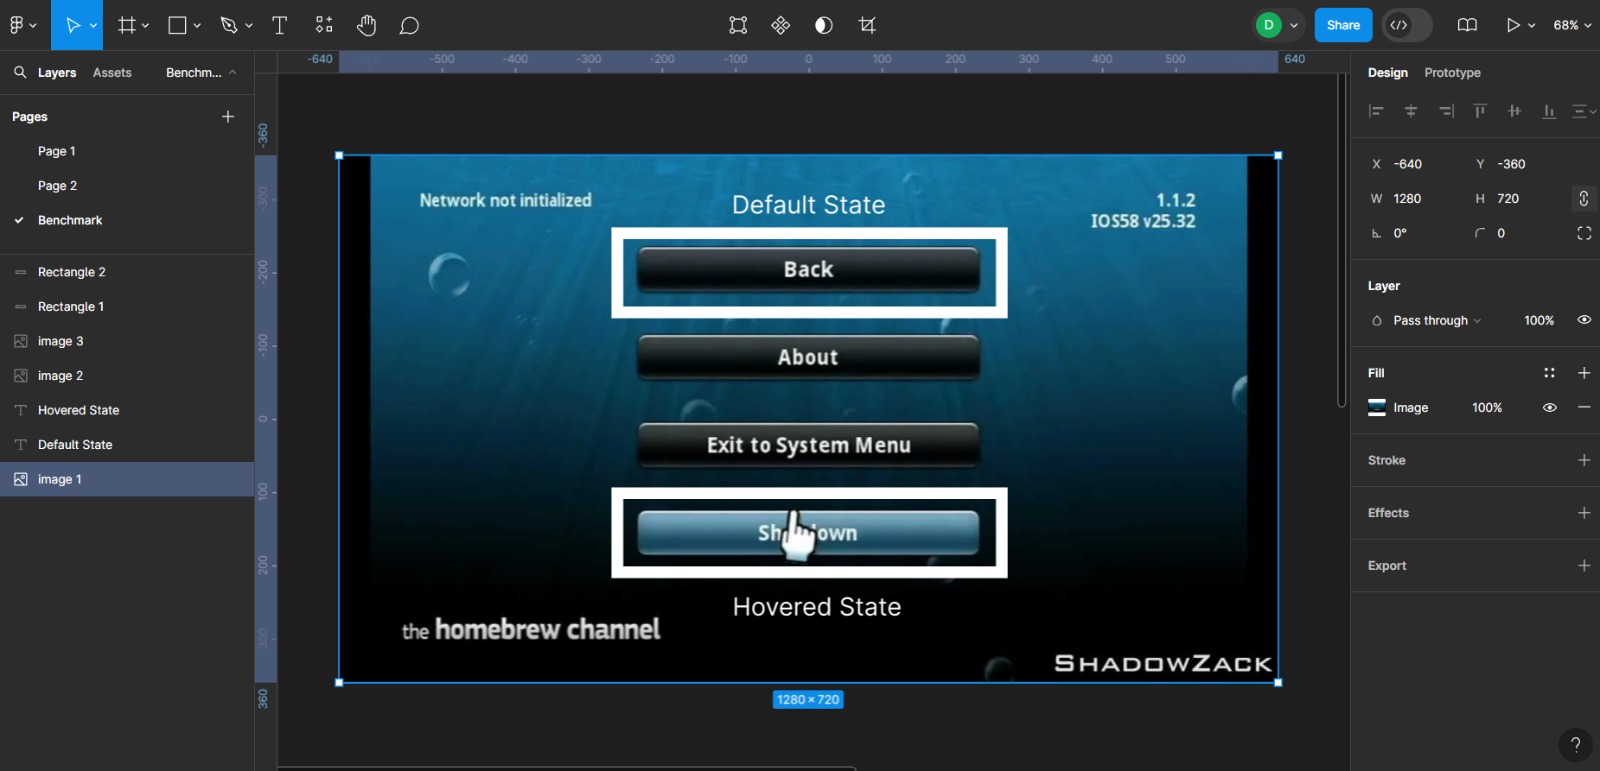
Experimentation with Color Palettes
Color plays a crucial role in the aesthetics and usability of a GUI. Initially, several color palettes were explored to find the perfect match that would bring vibrancy and visual harmony to the emulator. The experimentation ranged from subtle pastels to bold and vibrant colors, each tested to see how they affect user engagement and visual comfort.
A tool I recommend to try different color palettes is called Coolors! This is where I generated my Color Palette:
Ultimately, a pink-red palette was chosen for its striking appearance and the way it complemented the dark background. This palette not only makes the interface pop but also adds a dynamic and modern feel to the emulator, making it visually appealing and distinctive.
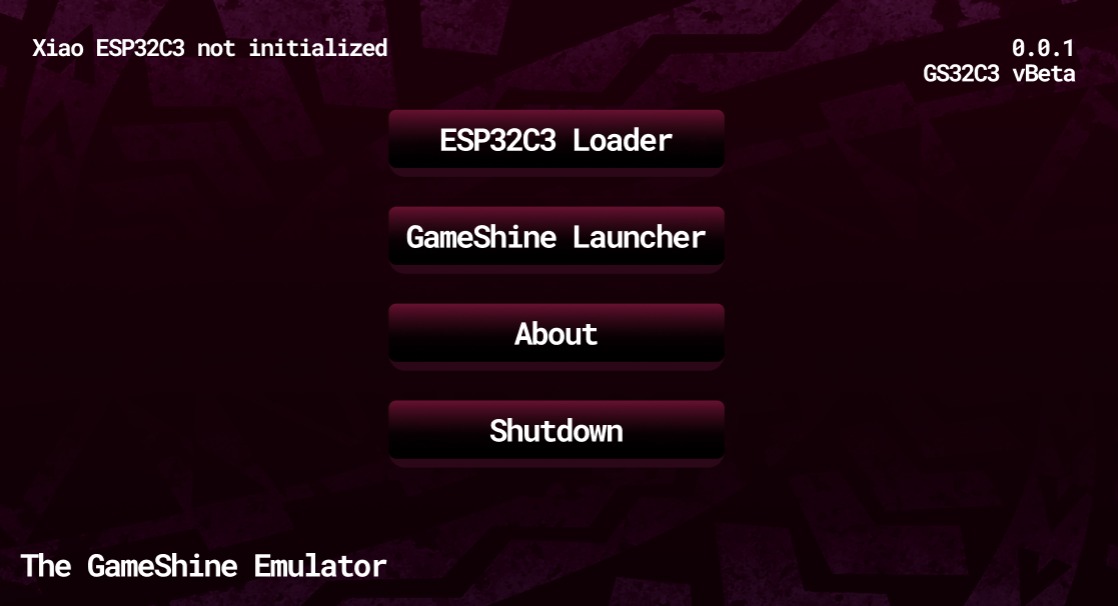
Figma Pages and Their Roles:- 1. The Main Menu:
The main menu was designed as the central hub of the emulator, where users can navigate to different parts of the application. It features sleek, accessible buttons that lead to the other major sections of the emulator, mirroring the simplicity and directness of the Homebrew Channel’s main interface. The main menu sets the tone for the user experience, using the selected pink-red color palette to highlight important elements and guide the user naturally through the interface options.
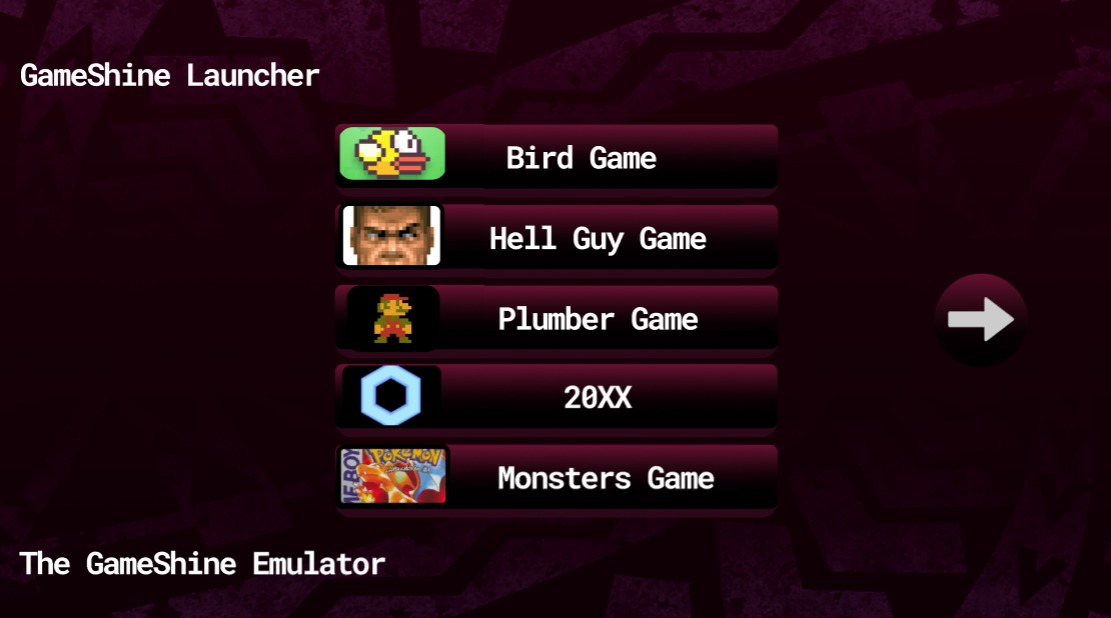
- 2. The GameShine Launcher:
This page is where users can directly interact with and launch the games. The design here focuses on usability, with a clean layout that displays available games in an organized manner. Each game entry is designed to be visually distinct yet part of a cohesive whole with the rest of the interface, ensuring users can easily select and start any game with minimal effort.
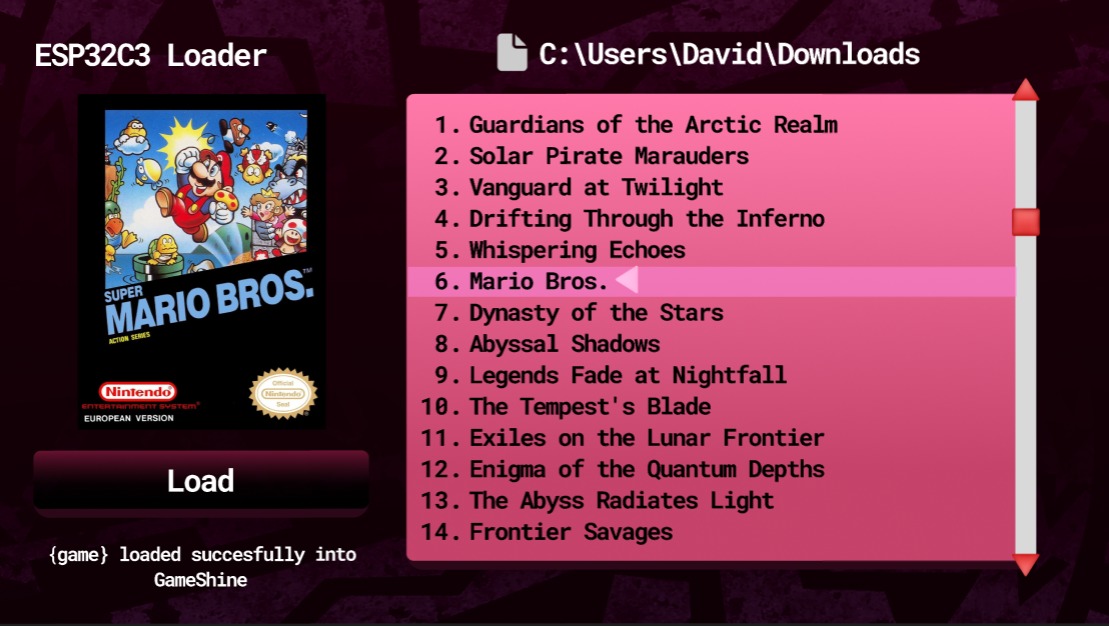
- 3. The ESP32C3 Loader:
As a critical component of the emulator, the ESP32C3 Loader page facilitates the loading of games from the PC onto the Xiao microcontroller. This page is designed for functionality, with clear instructions and intuitive controls that guide the user through the process of transferring games. The interface here is straightforward, emphasizing clarity and ease of use to prevent any operational errors during the loading process.
Figma to Tkinter Designer
Transitioning a design from Figma to Tkinter using the Tkinter Designer tool involves a structured process. This method ensures that the design elements from Figma are accurately transformed into Tkinter widgets, which can then be programmatically manipulated. Below is a detailed walkthrough of the steps involved in sending a design from Figma to Tkinter using Tkinter Designer.
Step 1: Preparing Your Environment with Tkinter DesignerInstalling Tkinter Designer: Before you can convert your Figma designs into Tkinter GUI code, you need to install Tkinter Designer. This can be done using Python’s package manager pip. Open your command prompt or terminal and run the following command:
pip install tkdesigner
Ensure your Python environment is set up correctly and that pip is linked to Python 3.
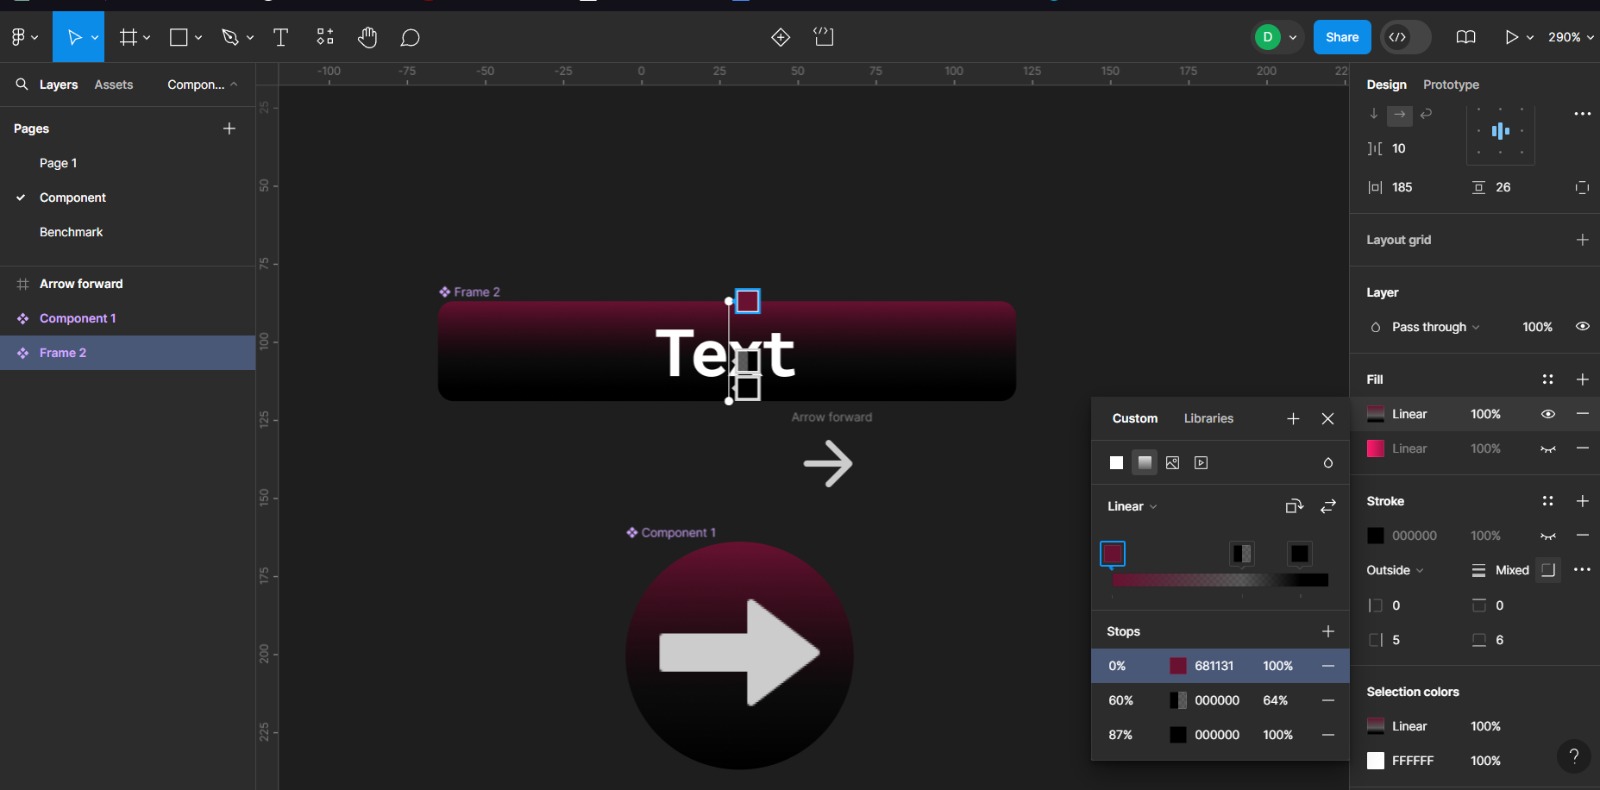
Step 2: Renaming Components in FigmaTo ensure that Tkinter Designer correctly interprets and converts the design elements from Figma into corresponding Tkinter components, you need to follow a specific naming convention in your Figma file. Here’s how each element should be named:
| Figma Element Name | Tkinter Element |
|---|---|
| Button | Button |
| Line | Line |
| Text | Can be named anything |
| Rectangle | Rectangle |
| TextArea | Text Area |
| TextBox | Entry |
| Image | Canvas.Image() |
| ButtonHover | Button shown on hover |
The code generated by Tkinter Designer is based on the names of elements from your Figma design and, as such, you need to name your elements accordingly. In Figma, rename your elements by double-clicking them in the Layers panel.
Step 3: Collecting Necessary InputsTo use Tkinter Designer, certain inputs related to your Figma file and account are required:
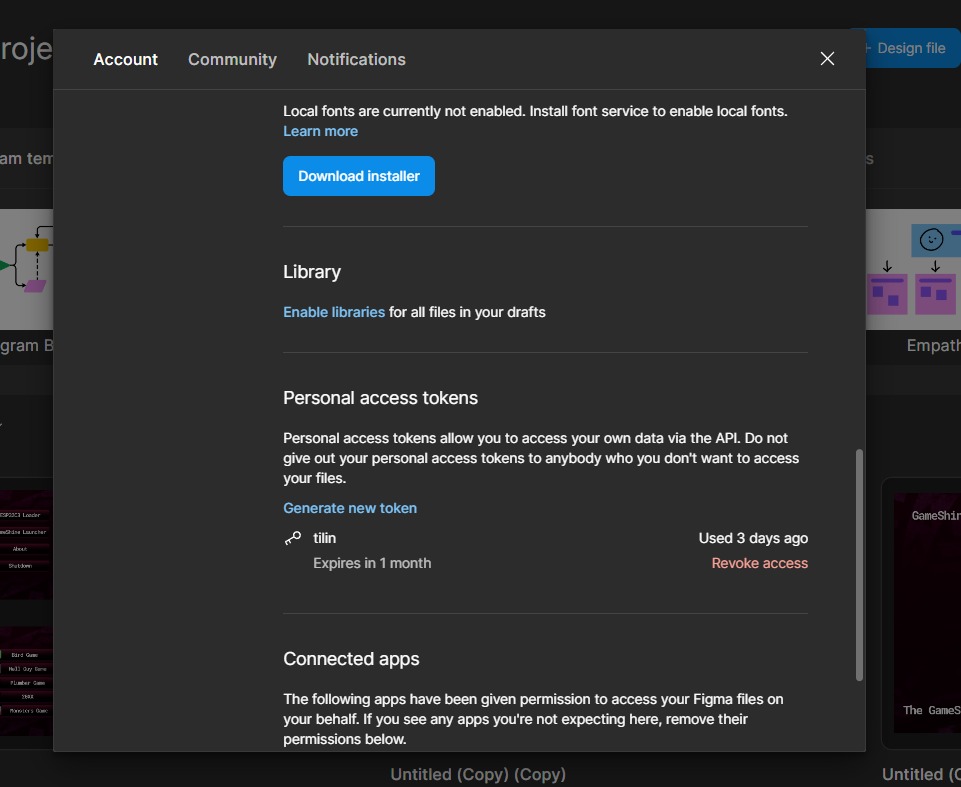
- Personal Access Token
- Create a Token:
- Log into your Figma account.
- Navigate to Settings under your account menu.
- In the Account tab, scroll down to Personal Access Tokens.
- Enter a name for your token in the entry form and press Enter.
- Your personal access token will be created.
- Important: Copy this token and store it securely, as you won’t be able to view it again.
- Getting Your File URL
- Copy File Link:
- Open your Figma design file.
- Click the Share button in the top bar.
- Click on 🔗 Copy link to get the URL of your design file.

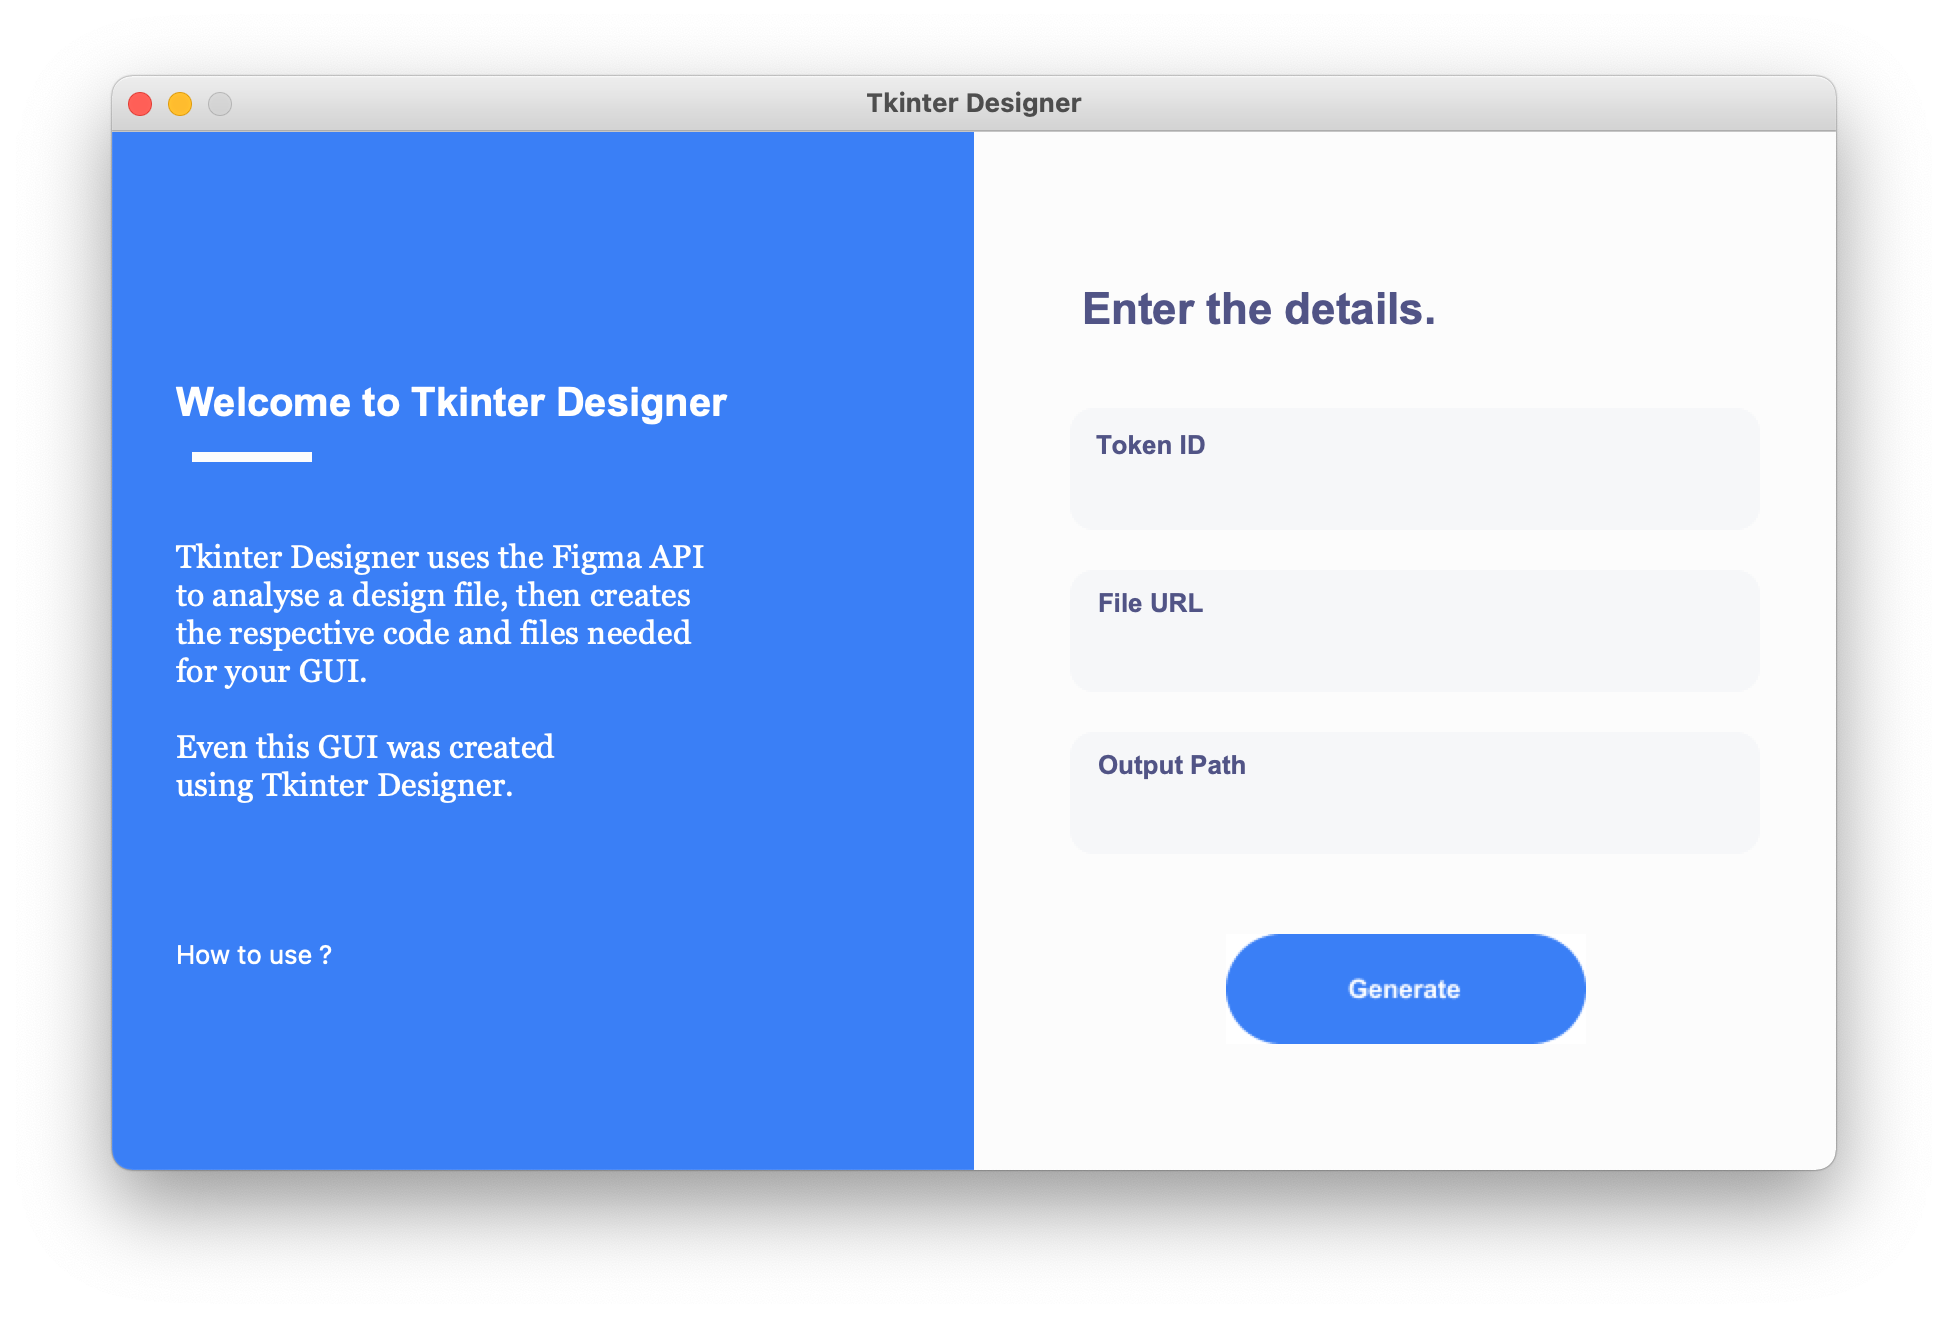
Once you have installed Tkinter Designer and prepared all necessary inputs, navigate to the Tkinter Designer directory and initiate the GUI tool to start the conversion process:
cd Tkinter-Designer
cd gui
python3 gui.py
This command launches the Tkinter Designer interface where you can input your Figma file URL and your personal access token. Follow the on-screen instructions to convert your Figma design into Tkinter code.
Fixing and Tuning
Once you have successfully converted your Figma designs to Tkinter using Tkinter Designer, you gain the flexibility to modify and enhance the generated Python code to better suit your project requirements or to add additional functionality. This post-conversion phase is crucial as it allows you to refine the user interface, fix any translation inaccuracies, and implement features that may not be directly supported by the conversion tool.
For my project, "The GameShine" emulator interface, I made several important modifications to improve both functionality and aesthetics. One significant enhancement was implementing navigation between different windows within the application. This was essential for a multi-window application like an emulator, where users need to switch between different functional screens such as the main menu, game launcher, and settings.
Additionally, I integrated a dynamic .gif background to make the interface more visually engaging. This addition brought a lively and modern feel to the emulator, aligning with the emulator's theme and enhancing the overall user experience. I also implemented hover effects on buttons to provide visual feedback when users interact with the GUI, making the interface more intuitive and responsive.
However, not all enhancements were straightforward, and I encountered specific challenges that could not be resolved immediately. A notable issue was with the rendering of rounded components. In Tkinter, when elements with rounded corners (like buttons or frames) are translated from Figma, the background of these rounded components sometimes gets removed, revealing the window's default background instead. This is due to Tkinter's limited native support for advanced CSS-styled components like rounded edges with background transparency or gradients. As of now, there isn’t a direct fix for this issue within Tkinter, which reflects some of the limitations when working with a simpler GUI toolkit.
Either way I think that it came out really great and I am really proud of the result :)
.gif)
Connecting with Pyserial
Integrating hardware control into a Tkinter application, such as controlling an LED via a Xiao ESP32-C3 microcontroller, is an exciting way to blend software and hardware functionalities. This type of interaction can be achieved using the pyserial library in Python, which allows serial communication between the computer and the microcontroller. Here’s a detailed guide on how to add a button in a Tkinter GUI that controls an LED connected to a Xiao ESP32-C3, including how to install and use pyserial.
Step 1: Install PySerialpyserial is a Python library that facilitates serial communication between your computer and various devices like microcontrollers over a serial interface. To install pyserial, you can use pip, the Python package installer. Open your command prompt or terminal and execute the following command:
pip install pyserial
Before starting the coding, I made sure my Xiao ESP32-C3 was properly set up with the necessary circuit for controlling an LED. This typically involved connecting an LED (with a suitable resistor) to one of the GPIO (General Purpose Input Output) pins on the ESP32-C3. I also wrote a simple program that listens for serial commands on the ESP32-C3 to turn the LED on or off and uploaded this program to the microcontroller.
For this I developed the following code in Arduino IDE that is already connected to Serial and with my LED which is on PIN D8
Step 3: Create the LED ButtonNext, I created a Tkinter Button that sends commands to the ESP32-C3. Here's how I set up a button in Tkinter to control the LED via serial communication:
Video Result:Conclusion:
In conclusion, integrating the Xiao ESP32-C3 microcontroller with a Tkinter-based GUI via pyserial has been a rewarding endeavor that blends the realms of software and hardware. This project allowed me to extend the functionality of a traditional software application into the physical world, demonstrating the versatility and power of Python when combined with microcontrollers.
Through this process, I was able to overcome challenges related to GUI development by leveraging Figma for UI design and Tkinter Designer for translating these designs into functional Python code. This approach not only streamlined the development workflow but also ensured that the GUI was visually appealing and user-friendly.
This project has set a foundation for future projects where Python can be used to control other types of hardware or where more complex user interactions are required. It’s a testament to the flexibility of Python and its frameworks and libraries, which can be effectively used beyond traditional software applications to interact with the environment in tangible ways.
The Files:
Below you can find the download links for all of the files from this week.