CAD
The term Computer-Aided Design (CAD) describes the process of creating, modifying, analyzing, or optimizing a design with the use of computer software. Engineers, architects, and designers may create accurate drawings and technical images with CAD software, which speeds up the creation of goods, structures, and buildings.
CAD tools increase the effectiveness and precision of the design process and drastically cut down on the time and expenses involved in manual drawing by simulating and evaluating the functionality of these designs within virtual settings.
CAD software is available for major computing platforms including Windows, Linux, Unix, and macOS.
In the following section, I will outline some of the CAD software we've explored during the Fab Academy course.
3D SOFTWARE: Fusion 360
What is Fusion 360?
Fusion 360, developed by Autodesk, is a cloud-based 3D modeling software widely recognized for its user-friendly interface and comprehensive toolset, catering to product design and engineering projects.
It supports collaborative projects, allowing users to work together in real-time from different locations.
Fusion 360 offers a comprehensive suite of features designed to support the entire product development process:
- Integrated CAD/CAM/CAE: Combines design, manufacturing, and engineering software.
- Cloud-Based Platform: Enables access from anywhere and facilitates collaboration.
- Parametric Modeling: Allows for the modification of designs by editing parameters.
- Direct Modeling: Offers flexibility in making changes without history constraints.
- Simulation Tools: Tests and validates the performance of designs under real-world conditions.
- Additive Manufacturing Tools: Supports 3D printing workflows directly within the software.

Installation guide
To install Fusion 360 you need to do the following steps:
- Visit Autodesk's official website and navigate to the Fusion 360 section.
- Choose the subscription plan that fits your needs.
- Create an Autodesk account if you don't already have one.
- Download the Fusion 360 installer.
- Click the dmg file twice.
- The installer will launch after the application extracts.
- Choose Install, then adhere to the instructions.
- Put in the product key and serial number.
- To install, click "continue" and adhere to the instructions.
Practice
Open Fusion 360 application and start a new project
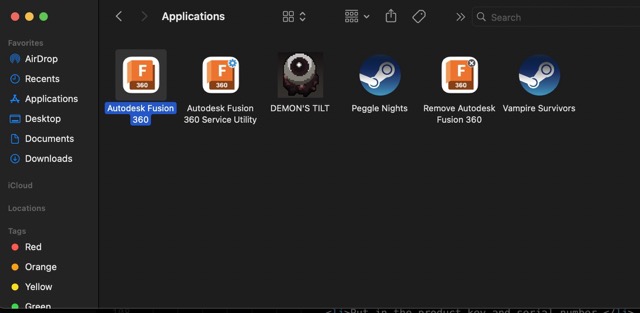
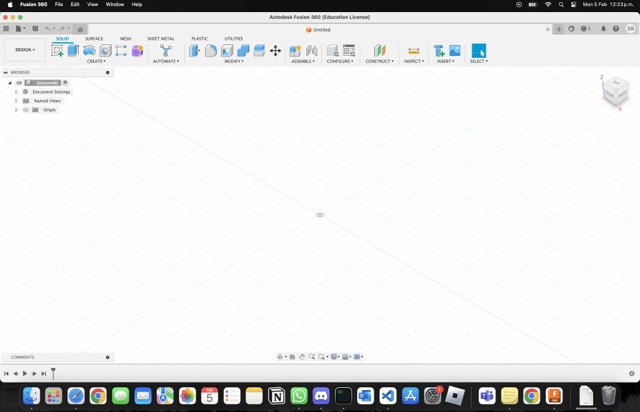
Click the purple cube to access the create tab.
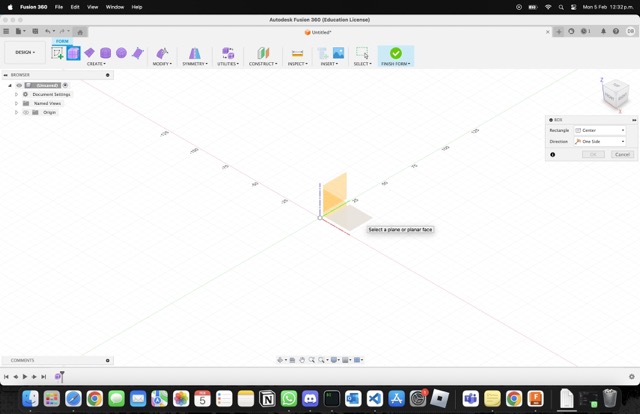
From there click on the purple cube and select a plane of where you want to work.
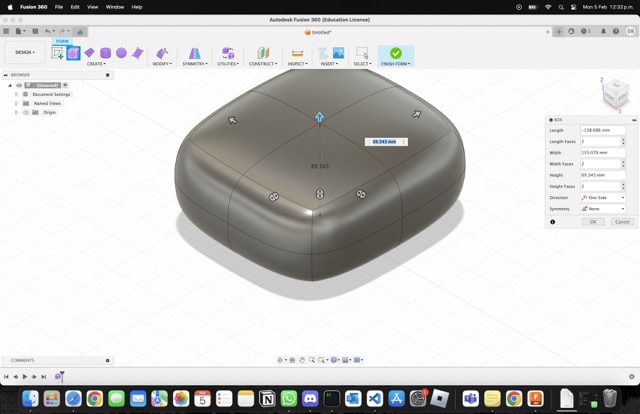
Select the size of the rectangle and let go to make a cube.
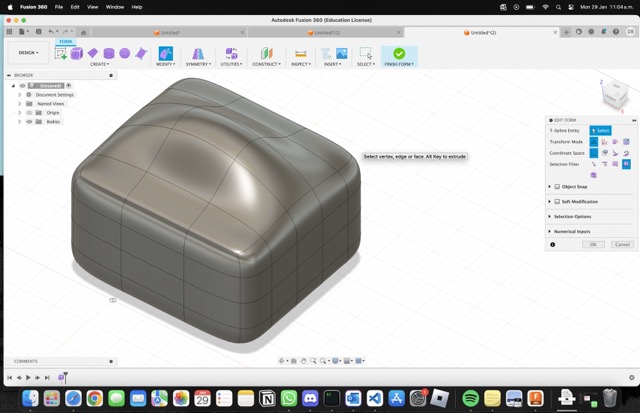
From there, you can play with the cube and mold it as you see fit. Think of it as Play-Doh
.png)
After you are done playing. Just click on "Finish Sketch" and now you can export the sketch!
Early impressions: I really llke how easy and fun it is to use Fusion 360. At first, I was scared because I have never used a CAD software before but Fusion360 felt as an easy introduction to the entire CAD world. Also, thanks to how easy it was to use it, I achieved this in the practice section:
Making a bicycle seat.
In order to make a Bicycle Seat I first started with the cube and, little by little, I began to mold it. I based myself on some images of a bicycle seat and began creating the form through it.
.png)
.png)
.png)
Model in Sketchfab:
3D SOFTWARE: SolidWorks
What is SolidWorks?
SolidWorks, on the other hand, is a comprehensive 3D modeling software developed by Dassault Systèmes, targeted primarily at professional engineers and designers in various industries.
It offers advanced features for designing mechanical parts, assemblies, and complex surfaces, as well as creating detailed engineering drawings.
SolidWorks is widely used in industries like aerospace, automotive, energy, and healthcare for its comprehensive tools and ability to handle complex design requirements.
Here's a list highlighting some key characteristics of SolidWorks:
- Parametric and Direct Modeling: Offers both parametric modeling (constraint-based) and direct (geometry-based) modeling approaches.
- Simulation Capabilities: Provides simulation tools to test and analyze the physical behavior of a model under real-world conditions.
- 2D Drawing: Includes robust tools for creating detailed 2D technical drawings from 3D models.
- Data Management: Features integrated data management tools to keep track of design data throughout the product development lifecycle.
- Customizability: Allows users to customize the interface and automate repetitive tasks using macros and API scripting.
- Collaboration Features: Facilitates collaboration with team members and other stakeholders through eDrawings and other SolidWorks solutions.

Installation guide
To install SolidWorks you need to do the following steps:
- Visit the SolidWorks official website.
- Select the version of SolidWorks you wish to install.
- Purchase a license or enter your existing license details.
- Download the SolidWorks Installation Manager.
- Run the Installation Manager and follow the instructions to select installation options and complete the setup.
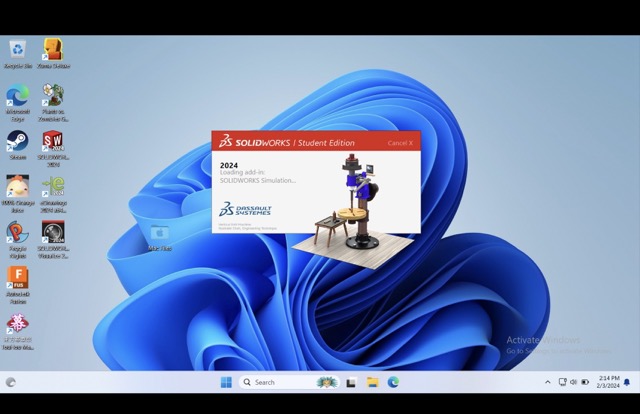
Due to the fact that SolidWorks does not run on MacOS I needed to use an emulator in order to open solidworks on my computer. The emulator I used is called Parallels. Parallels allows MacOS to run Windows software through a virtual machine of Windows 11.
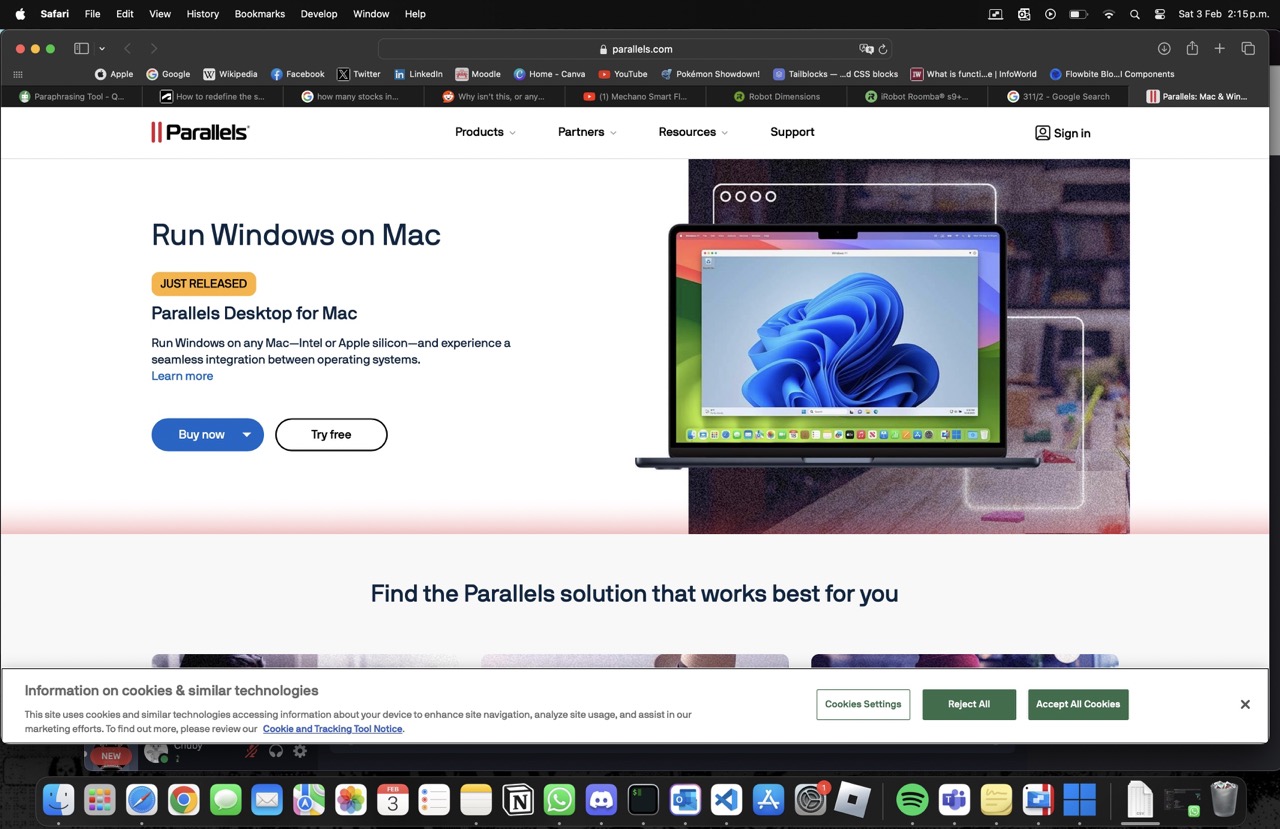
Running SolidWorks through Parallels:
Practice
Although our local instructors gave us a SolidWorks tutorial I couldn't follow every step because, at that time, I did not had Parallels installed on my Mac. However, based on the tutorial they gave us I decided to begin modelling a part of The Shine as my own tutorial.
Images from our local class about SolidWorks:
.jpg)
.jpg)
To begin preparing myself to use SolidWorks for the first time I searched for a tutorial on how to make a circular base in the program. Here is the link to William Derry's Circular Base Mount Tutorial.
Open SolidWorks and start a new "part" project.
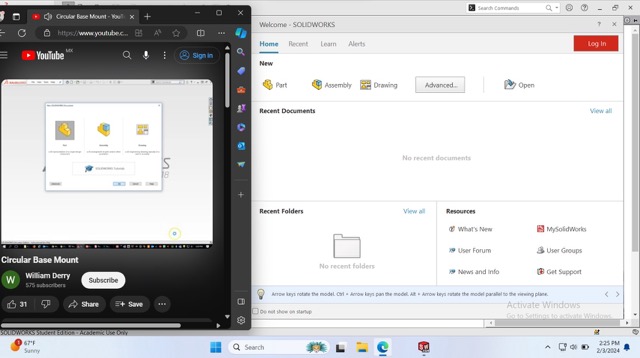
From there generate a sketch and draw a circle with the following width measures: 13.4 in (340 mm)
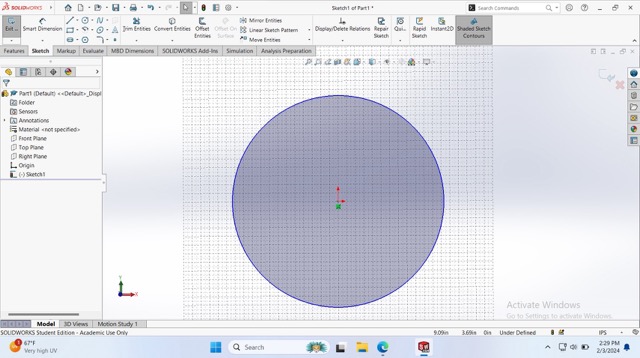
After creating the circle. Open the grid and draw a 3x8 rectangle in side of the circle. These rectangles will be the spaces where the wheels of The Shine will be installed.
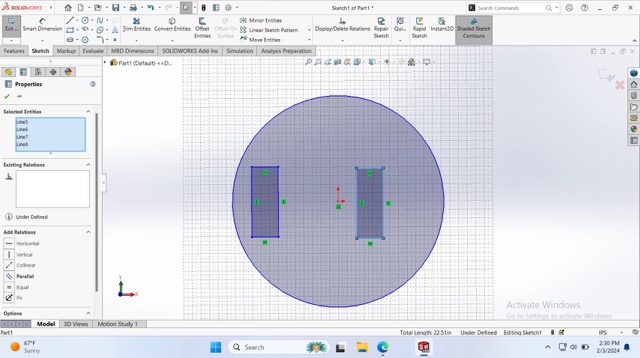
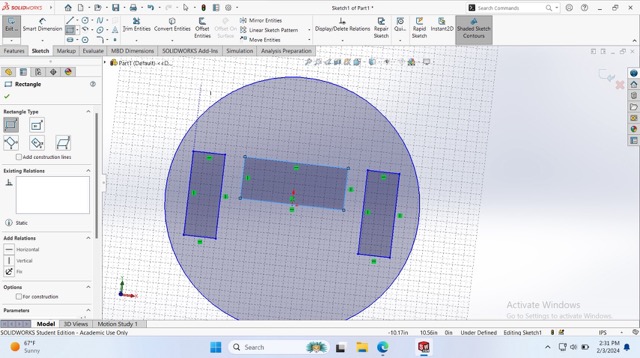
Now draw a 10x4 rectangle just above the middle part of the circle. Make sure you leave two square's free on each side. This rectangle will be the one where the cables will go through as well as installing the fan.
Finally, draw a small circle on the top part of the figure. Through this small circle the object-detector sensor will go through and also add the connector for the sprinklers.
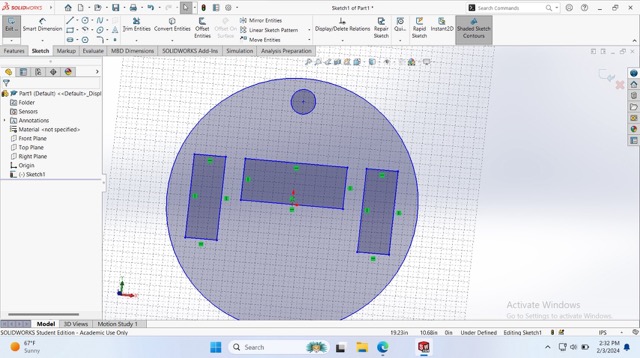
After finalizing the sketching. Click on the sketch you have just made and click on "Boss-Extrude". From there you can add whatever depth you want for your base. In my case I decided to use 0.54in of depth since I am going to cut this to use as the starting point of The Shine
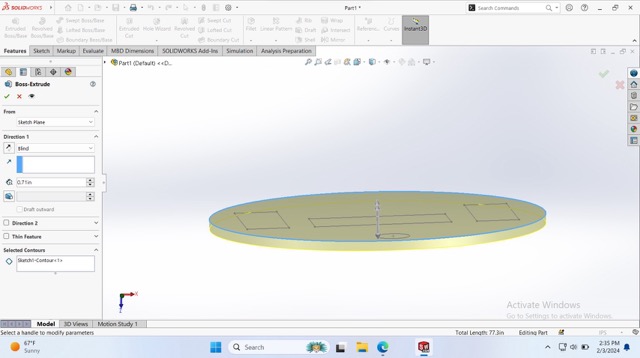
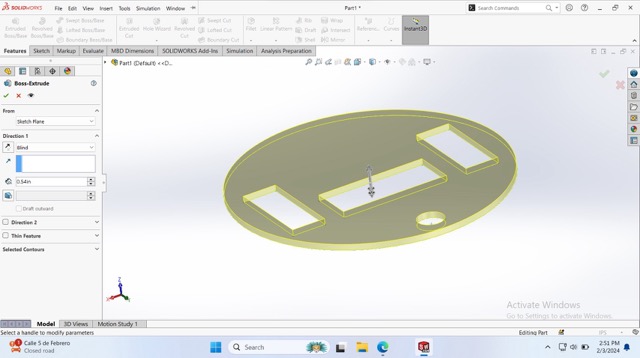
Finally, click on the green checkmark and you have finished modeling a base for a Roomba!
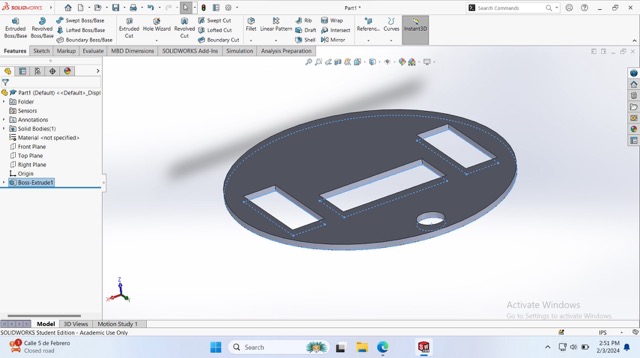
Early impressions: In comparison to Fusion 360, SolidWorks does provide more tools and featuers that can be useful for CAD. However, as a beginner, I felt it really difficult to use SolidWorks and, since it does not run natively on my MacOS, I do prefer Fusion 360 over SolidWorks.
Model in Sketchfab:
2D SOFTWARE: Adobe Illustrator
What is Adobe Illustrator?
The vector graphics editor Adobe Illustrator is renowned for its accuracy and robust features. It's frequently used to create intricate designs, logos, typography, and illustrations that resize to any size without sacrificing quality.
Illustrator's integration with Adobe Creative Cloud enhances workflow with access to assets and collaboration.
Its extensive features cater to professionals seeking detailed control over their designs, although it may present a steeper learning curve for beginners compared to more straightforward applications.
Here's a list highlighting some key characteristics of Adobe Illustrator:
- Part of Adobe Creative Cloud suite.
- Powerful vector graphics editing capabilities.
- Extensive toolset for complex illustration and typography.
- Supports a wide range of file formats.
- Integration with Adobe Creative Cloud apps.
- Subscription-based pricing model.
Installation guide
Adobe Illustrator is part of the Adobe Creative Cloud suite, and to install it, you would need to purchase a subscription, download the Creative Cloud desktop app, and then install Illustrator through that app onto your Windows or macOS system.
Practice made on a Windows Personal Computer at home.
Practice
As a practice, I decided to make a Kirby in Adobe Illustrator. The process of making this Kirby reminded me a lot of the Black Ops 3 icon editor where it used the same process with using vectors and figures to create the shape.
First, I created a circle using the shape tool.
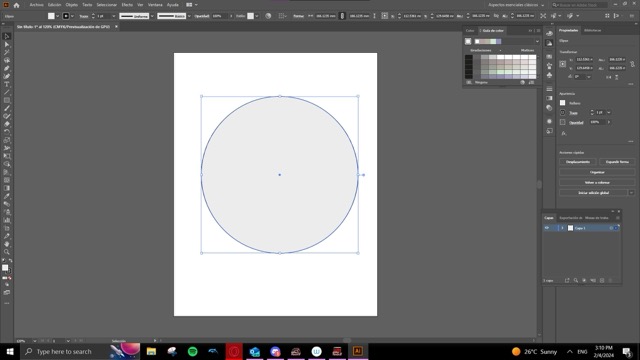
Then, I painted the circle pink since, you know, Kirby is pink.
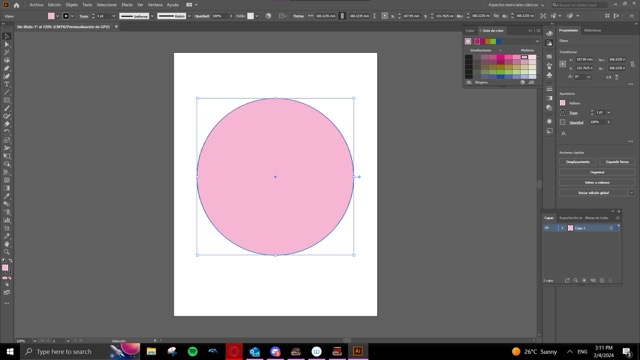
From there, I created a new layer where the eyes will be placed into. To create the eyes I used the same shape tool and just adjusted the values so that it looked more like an eye.
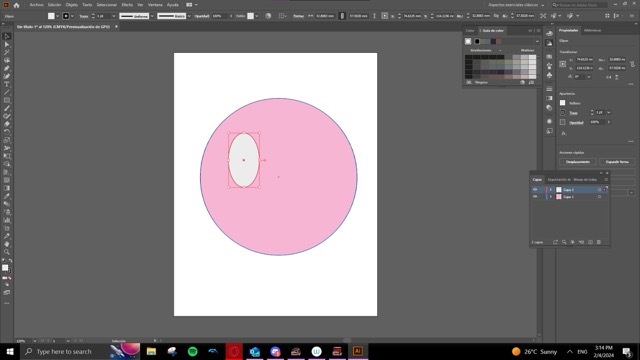
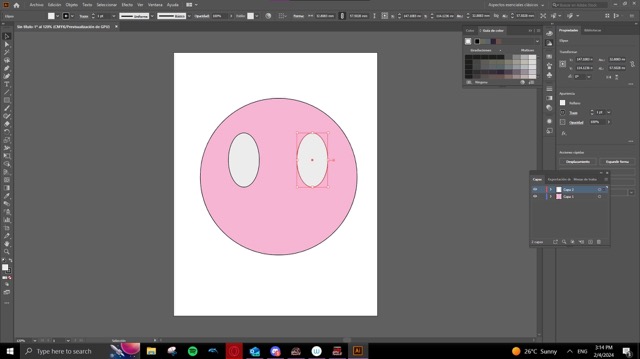
Next, turn the eyes black so that we can add the pupils and other effects to make the eye look like Kirby's
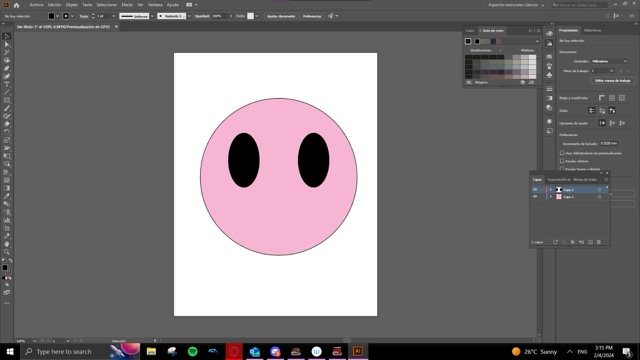
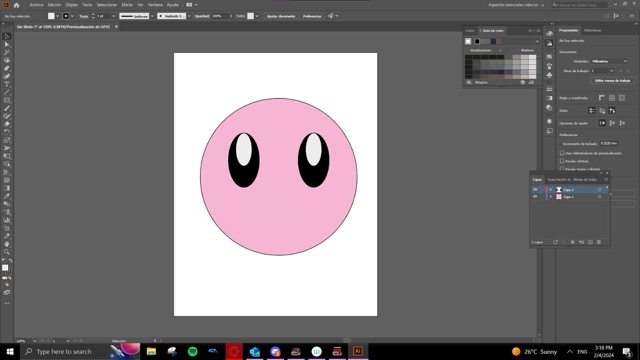
Using the round tool, I shaped the lower part of the eye so that it looks like a reflection in Kirby's eye.
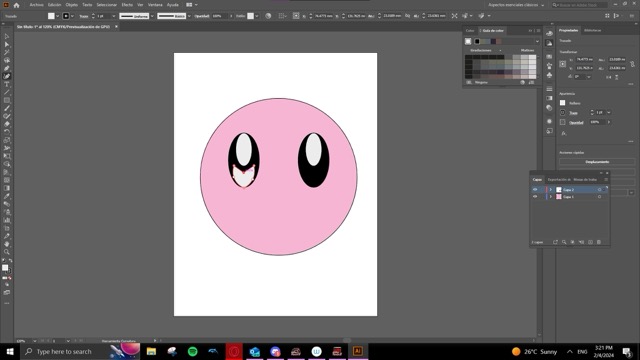
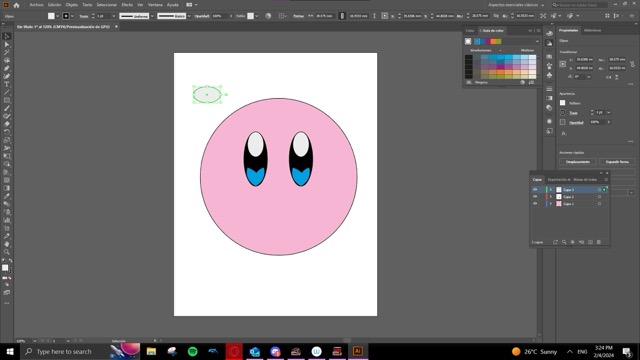
Next part... the mouth! For this I created a new layer that would include all of the characteristics of Kirby.
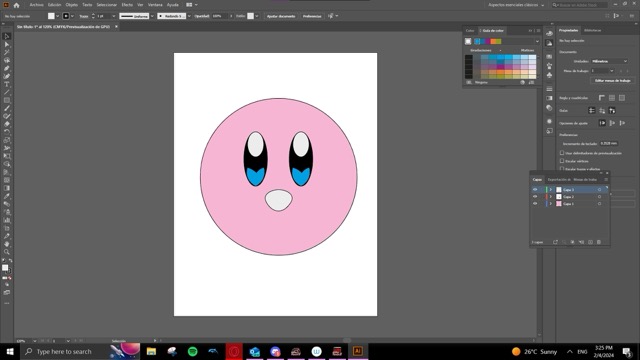
Let's color the mouth to fit the color.
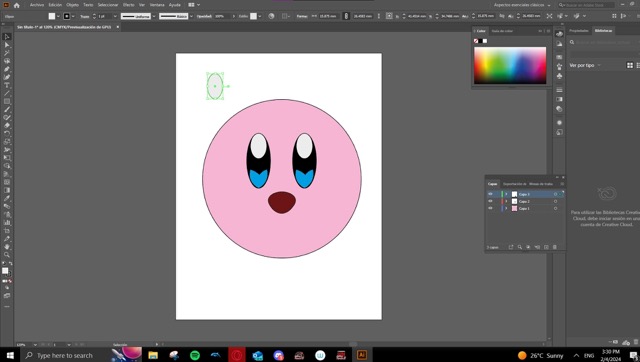
And let's add the tongue.
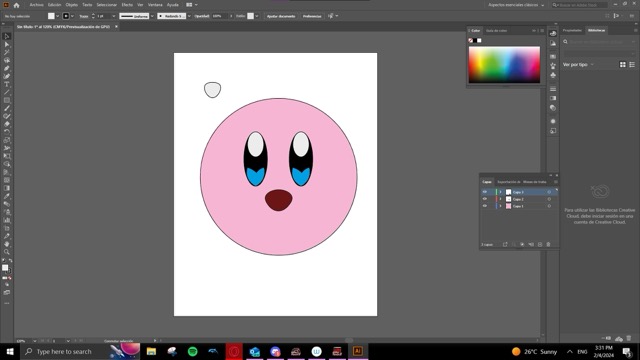
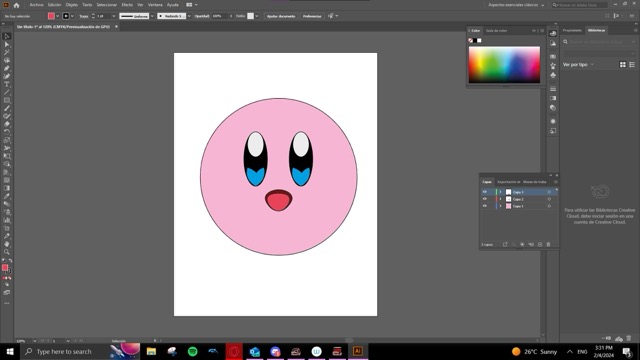
For the final touch: adding Kirby's iconic cheeks!
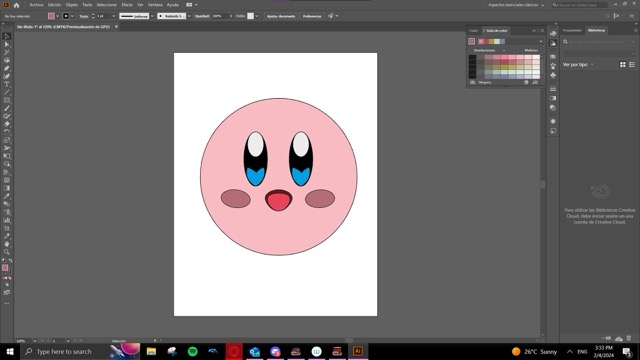
Adobe Illustrator is not too hard as the other 3D Software. However, it's UI and tools are not quite user friendly as you might expect, so if you do not know about working with vectors this may be very difficult for you to start with.
2D SOFTWARE: Figma
What is Figma?
Figma is an UI/UX designer dream world. Just kidding... well kinda.
Figma is a web-based interface design tool favored for its collaborative features, allowing multiple users to work on the same project simultaneously. It's particularly well-suited for UI/UX design and prototyping, with a focus on real-time collaboration and ease of sharing.
It's adaptable for individual designers to large teams, offering a cloud-based platform for easy access and sharing. Figma's comprehensive toolset and integration capabilities make it a versatile choice for digital product design.
Here's a list highlighting some key characteristics of Figma:
- Web-based with a desktop app option.
- Real-time collaboration for teams.
- Vector graphics editing suited for UI/UX design.
- Prototyping and animation features.
- Integration with other design and productivity tools.
- Cloud storage for projects.
- Free tier available with paid options for more features.

Installation guide
To install Figma, you simply need to create an account on the Figma website and then use the tool directly in your web browser, or you can download the Figma desktop app for Windows or macOS from the Figma downloads page.
Practice made on a Windows Personal Computer at home.
Practice
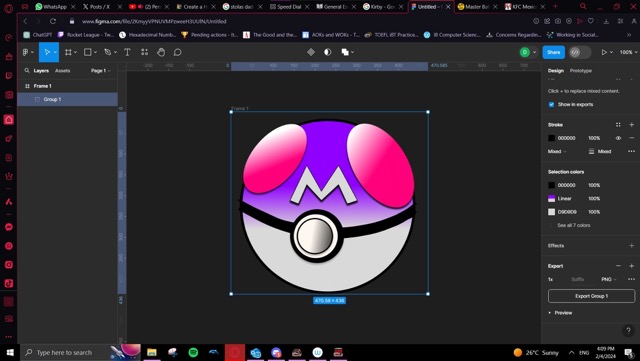
As a practice, I decided to make something more complex. Due to my familiarity with Figma thanks to my studies I am really familiarized with the way Figma works. That is why I decided to make a Master Ball from Pokémon.
First, I initialized a new Figma Design Proyect.

Then, let's make a circle that will be our base for the Pokeball.
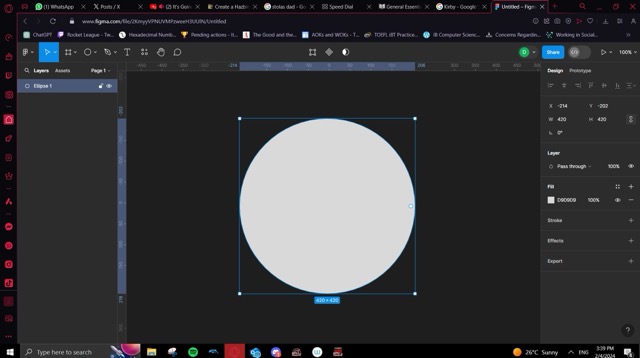
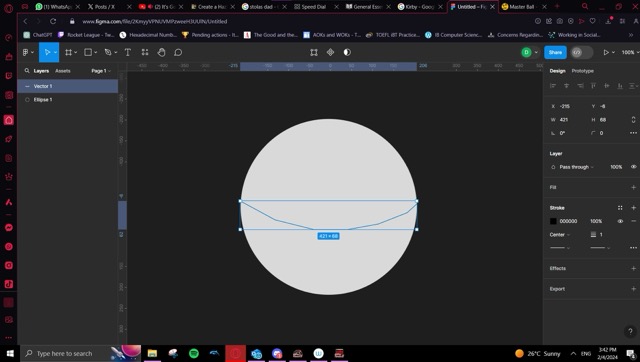
Next, lets add the lines with the pen tool that will divide the Pokeball into two parts.
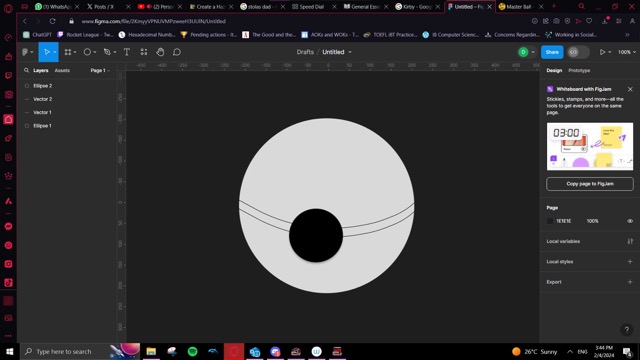
From there let's add the central part of the Pokeball... the button!
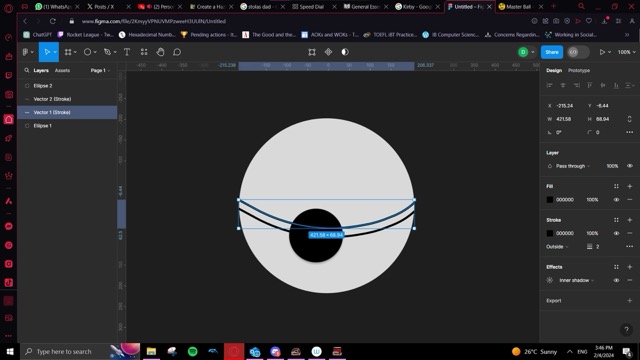
For the next part, I added a more noticeable stroke for the lines and began adding the pink designs of the Master Ball.
Then, I added the other design to the other half of the Pokeball.

After all of this, it was time to add the iconic purple of the Master Ball. I did this with the use of the gradient tool from Figma that allows me to set how I want the gradient to look.
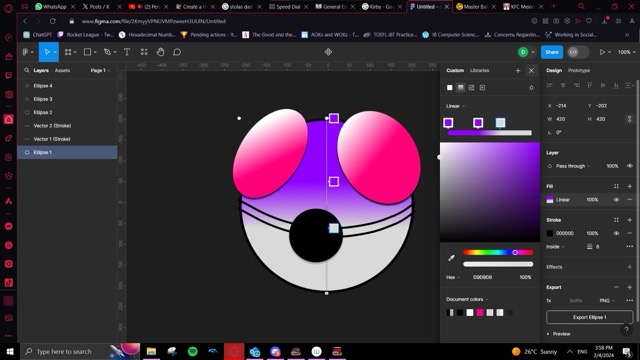
Next, adding the division of the Pokeball.
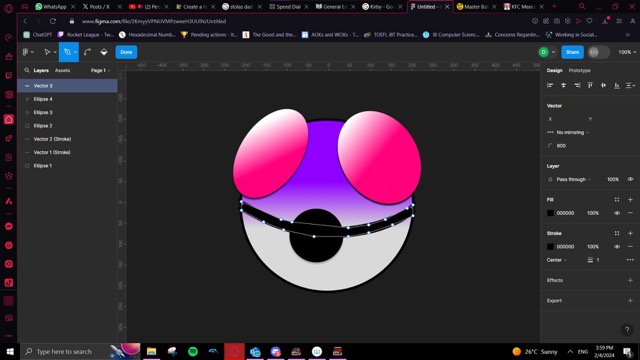
But what is a Master Ball without it's iconic M?
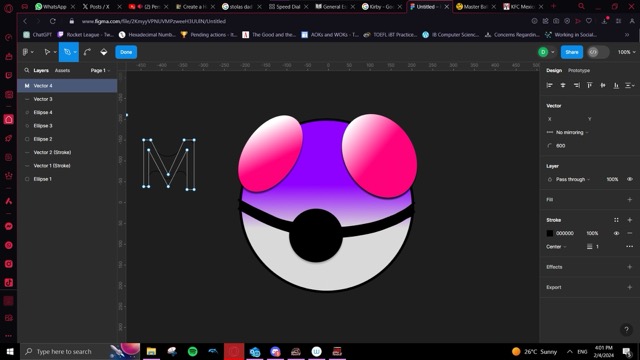
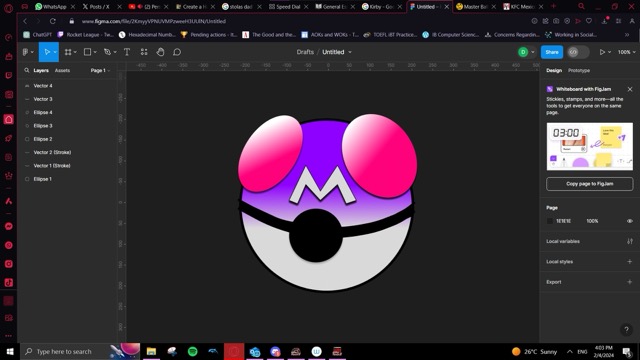
To finish off the Master Ball, let's add more details to the button and fix how the Master Ball decorations look like.
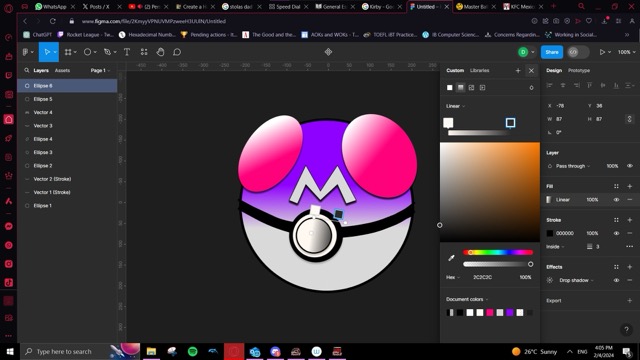
Finally, let's add everything in to a group so we can export it and is ready to print into a sticker!
Adobe Illustrator is not too hard as the other 3D Software. However, it's UI and tools are not quite user friendly as you might expect, so if you do not know about working with vectors this may be very difficult for you to start with.
Want to see how it was done? See my Figma Page
Conclusion
Upon evaluating SolidWorks, Adobe Illustrator, Fusion 360, and Figma for my design needs, it's evident that each software brings distinct advantages to the table. SolidWorks is highly regarded for its precision in 3D modeling and engineering, offering extensive tools for complex projects, but its lack of native macOS support presents a significant drawback for my setup. Adobe Illustrator excels in creating intricate vector graphics and illustrations, providing an unmatched level of detail and scalability, yet it falls short in fostering real-time collaboration, which is essential for dynamic team projects.
In contrast, Fusion 360 emerges as a more fitting choice for my requirements due to its comprehensive suite of CAD, CAM, and CAE tools, along with native support for macOS, ensuring a seamless integration into my workflow. Its cloud-based nature facilitates effortless collaboration and access from any device, enhancing flexibility and efficiency. Figma further complements my toolkit for 2D design tasks, particularly in UI/UX design, thanks to its intuitive interface and robust collaborative features that streamline the design process and foster a cooperative work environment.
Ultimately, while SolidWorks and Adobe Illustrator are formidable tools in their rights, the specific limitations they possess lead me to favor Fusion 360 and Figma. These preferences are rooted in the software's ability to cater to my technical needs, preference for macOS compatibility, and the value I place on collaboration and usability in my design workflow.
The Files:
Below you can find the download links for all of the files from this week.
