Embedded Programming
Linked to the group assigment page
Research
The history of programming dates back to Ada Lovelace in the 1840s. Since then, we have gone through several generations of programming languages, from machine language to modern high-level languages.The most popular are the following
Popular Programming Languages
- JavaScript: Widely used for web development and increasingly popular in mobile and desktop application development.
- Python: Versatile and easy to learn, it's used in a wide range of applications, from web development to data science and artificial intelligence.
- Java: Still very popular in enterprise application development and for Android devices.
- C#: Primarily used in software development for the Windows platform and game development through the Unity framework.
- C++: Widely used in embedded systems, game development, high-performance applications, and system software.
- PHP: Mainly used in server-side web development, especially in building dynamic websites.
- TypeScript: A typed superset of JavaScript that is increasingly used in web development for large and complex applications.
- Swift: The primary language for iOS and macOS application development.
- Ruby: Known for its elegance and ease of use, it's popular in web development through frameworks like Ruby on Rails.
- Kotlin: Gaining popularity as an alternative language for Android application development, alongside Java.
On this page we will focus on C since it is the one occupied by arduino and Python because circuit python works with that
C: Developed in 1972 by Dennis Ritchie, it is efficient and portable, ideal for operating systems and low-level applications.
Python: Created in 1991 by Guido van Rossum, it stands out for its simplicity and versatility, used in a wide range of applications, from web development to artificial intelligence.
The main difference lies in syntax and performance: Python is more readable and easier to learn, while C is faster and suitable for low-level applications.
In summary, the choice between C and Python depends on the project and its specific requirements, with both being used in different areas of software development.
............C/C++............
Basic Data Types:
- int: Represents integer numbers.
- float and double: Represent floating-point numbers (with decimals).
- char: Represents a single character.
- bool: Represents a boolean value (true or false).
Composite Data Types:
- array: Fixed-size collection of elements of the same type.
- struct: Collection of variables of different types grouped under a name.
- class: Similar to struct, but with the ability to encapsulate data and functions.
Pointers and References:
- pointer: Stores the memory address of another variable.
- reference: Provides another name (alias) for an existing variable.
Enumerations and User-defined Types:
- enum: Defines a set of named constants.
- typedef: Allows creating aliases for existing data types.
C++ Examples
Variables:
int age = 25;
	float price = 10.99;
	char letter = 'A';
	bool isTrue = true;
Loops:
if-else:
Allows code blocks to be executed based on a condition.
int age = 18;
	if (age >= 18) {
		std::cout << "You are of legal age." << std::endl;
	} else {
		std::cout << "You are under legal age." << std::endl;
	}
while:
Executes a block of code as long as a condition is met.
int counter = 0;
	while (counter < 5) {
		std::cout << "Counter: " << counter << std::endl;
		counter++;
	}
for:
Especially useful for iterating over a sequence of values.
for (int i = 0; i < 5; i++) {
		std::cout << "i: " << i << std::endl;
	}
do-while:
Similar to while, but ensures that the code block is executed at least once before checking the condition.
int x = 5;
	do {
		std::cout << "x: " << x << std::endl;
		x--;
	} while (x > 0);
............PYTHON............
Basic Data Types:
- int: Represents integer numbers.
- float: Represents floating-point numbers (with decimals).
- str: Represents a sequence of characters (text).
- bool: Represents a boolean value (True or False).
- NoneType: Represents the absence of a value, similar to null in other languages.
Composite Data Types:
- list: Mutable and ordered collection of elements.
- tuple: Immutable and ordered collection of elements.
- dict: Mutable and unordered collection of key-value pairs.
- set: Mutable and unordered collection of unique elements.
Pointers and References:
In Python, there are no pointers like in C++. All variables are references to objects in memory, but memory management is automatic and transparent to the user.
Enumerations and User-defined Types:
- Enumerations (Enum): Enumerations can be defined using the Enum class from the enum module.
- typedef: In Python, there is no direct equivalent construction to typedef in C++, but type aliases can be used using the 'as' keyword.
Python Examples
Variables:
age = 25
price = 10.99
letter = 'A'
is_true = True
Loops:
if-else:
age = 18
if age >= 18:
    print("You are of legal age.")
else:
    print("You are under legal age.")
while:
counter = 0
while counter < 5:
    print("Counter:", counter)
    counter += 1
for:
for i in range(5):
    print("i:", i)
do-while:
There is no direct do-while structure in Python, but it can be simulated with a while loop:
x = 5
while True:
    print("x:", x)
    x -= 1
    if x <= 0:
        break
Other Key Differences:
-
Typing:
C is a strongly typed programming language, which means that you need to specify the data type for each variable. On the other hand, Python is dynamically typed, meaning that variables can change type dynamically.
-
Syntax:
The syntax of C is stricter and requires semicolons at the end of each statement, while Python uses indentation to define code blocks.
-
Memory Management:
In C, the programmer is responsible for memory management, which can lead to errors such as memory leaks. In Python, the garbage collector automatically handles memory management.
personal learning
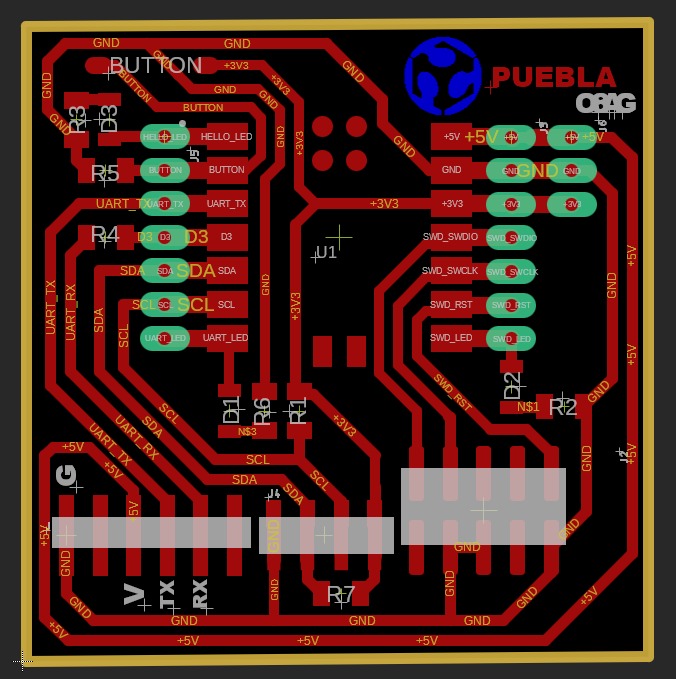
For this practice, I based myself on the schematic of my PCB design, as it has components soldered on it. I couldn't recall which component was soldered to which pin, so I used it as a reference.
I also relied on the pinout diagram of the Xiao RP2040 to identify each pin and declare them in my code.
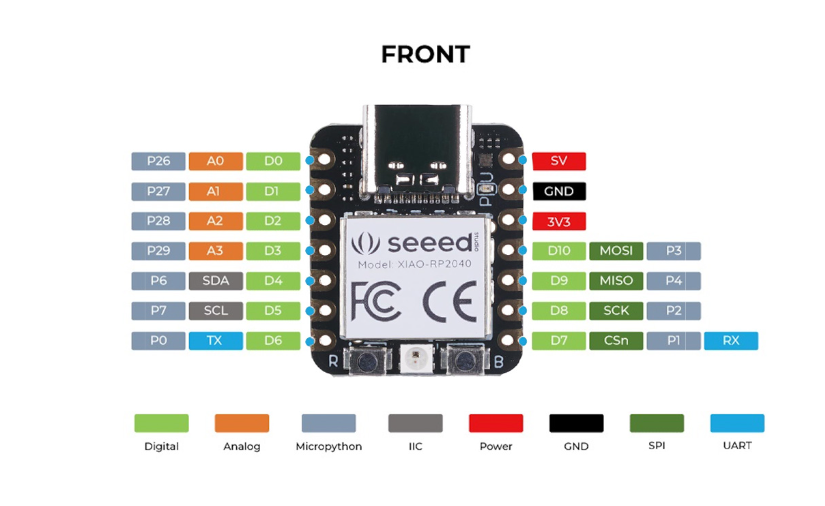
Xiao RP2040 Microcontroller
The Xiao RP2040 is a compact and powerful microcontroller designed for electronics projects and IoT applications that require a small form factor and efficient processing capabilities. Equipped with a dual-core ARM Cortex M0+ processor that can run at up to 133 MHz, it offers an optimal combination of power efficiency and processing performance.
Features
- Powerful MCU: Dual-core ARM Cortex M0+ processor, flexible clock running up to 133 MHz
- Rich on-chip resources: 264KB of SRAM, and 2MB of on-board Flash memory
- Flexible compatibility: Support for Micropython, Arduino, and CircuitPython
- Easy project operation: Breadboard-friendly & SMD design, no components on the back
- Small size: As small as a thumb (20x17.5mm) for wearable devices and small projects
- Multiple interfaces: 11 digital pins, 4 analog pins, 11 PWM Pins, 1 I2C interface, 1 UART interface, 1 SPI interface, 1 SWD Bonding pad interface
Specifications
| Item | Value |
|---|---|
| CPU | Dual-core ARM Cortex M0+ processor up to 133MHz |
| Flash Memory | 2MB |
| SRAM | 264KB |
| Digital I/O Pins | 11 |
| Analog I/O Pins | 4 |
| PWM Pins | 11 |
| I2C interface | 1 |
| SPI interface | 1 |
| UART interface | 1 |
| Power supply and downloading interface | Type-C |
| Power | 3.3V/5V DC |
| Dimensions | 20x17.5x3.5mm |
Arduino
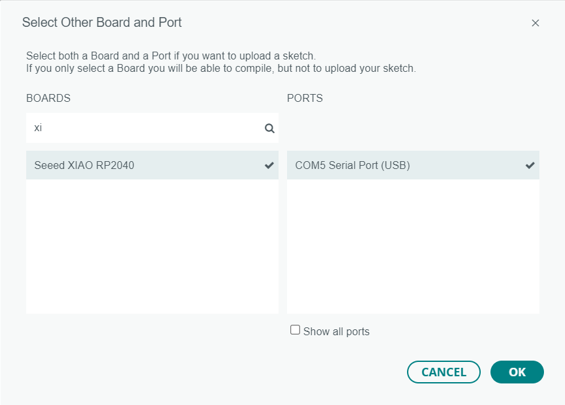
Arduino is a development platform that provides an easy-to-use software environment for programming microcontrollers and creating electronic projects. With Arduino IDE, the main software used for programming Arduino devices, users can write code in a C/C++-based programming language, upload it to their Arduino board, and control the interaction between the microcontroller and connected electronic components. To work with a board like the Xiao RP2040, which is based on the Raspberry Pi RP2040 microcontroller, you can use Arduino IDE after installing the RP2040 board package. Then, you can program the board using the Arduino programming language, leveraging the functions and libraries available on the platform. This allows users to develop a wide range of projects, from simple blinking lights to more complex IoT devices. The Arduino IDE software offers an intuitive interface that simplifies the development process, making it accessible to beginners and experts alike. Additionally, the Arduino community is active and provides a wealth of resources, tutorials, and examples that further facilitate the learning and development process.
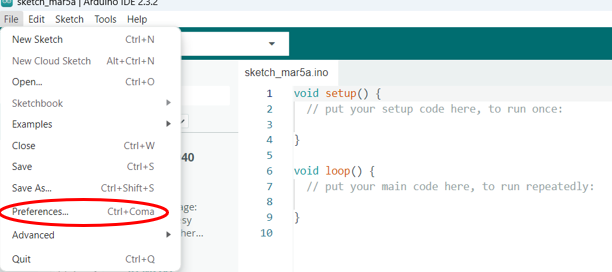
how to configure arduino for the xiao rp2040
- Press the button labeled 'B' for 3 seconds.
- After 3 seconds, connect the computer cable to the Xiao.
- The file tab will open, displaying the contents of the Xiao.
- Close and follow the steps in the images.
- The Xiao is now ready to be programmed.
- Compile and load the code.
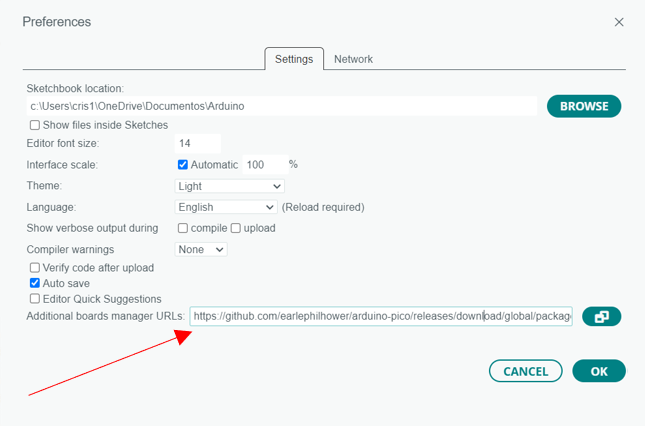
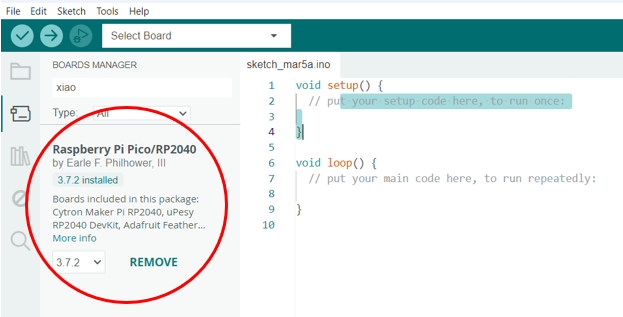
https://github.com/earlephilhower/arduino-pico/releases/download/global/package_rp2040_index.json
Basic arduino programming for the RP2040
const int: It's used to define an integer constant that won't change during the program's execution. This makes your code more readable and helps the compiler perform optimizations. Additionally, it prevents accidental changes to the constant's value and provides type checking.
int: It's an integer variable that can change its value during the program's execution. It doesn't indicate that the value is constant, so it's not the best choice if you want to ensure the value doesn't change accidentally.
#define: It's used to define preprocessing macros, which are replaced by their value at compile time. Although useful for defining symbolic constants, it doesn't provide type checking and may hide typographical errors.
void setup(): This function is executed once at the beginning of the program. It's mainly used for performing initial configurations, such as initializing pins, setting the serial communication speed, configuring peripherals, etc. Everything that needs to happen only once at the start of the program should go inside this function.
void loop(): After the setup() function is executed once, the loop() function runs continuously in an infinite loop. This is where the main code of your program is placed. Everything that needs to repeat continuously during the program's execution should go inside this function. For example, reading sensors, controlling actuators, updating the user interface, etc.
Code to turn on a led// Define pin 0 (D0) as the LED pin
const int LED_PIN = D7;
void setup() {
// Configure the LED pin as output
pinMode(LED_PIN, OUTPUT);
}
void loop() {
// Turn on the LED connected to pin D0
digitalWrite(LED_PIN, HIGH);
}// Define pin D0 as the LED pin
const int LED_PIN = D7;
void setup() {
// Configure the LED pin as output
pinMode(LED_PIN, OUTPUT);
}
void loop() {
// Turn on the LED
digitalWrite(LED_PIN, HIGH);
// Wait for 2 seconds
delay(2000);
// Turn off the LED
digitalWrite(LED_PIN, LOW);
// Wait for 2 seconds before turning it on again
delay(2000);
}// Define pin D0 as the LED pin
const int LED_PIN = D0;
// Define pin D2 as the button pin
const int BUTTON_PIN = D2;
void setup() {
// Configure the LED pin as output
pinMode(LED_PIN, OUTPUT);
// Configure the button pin as input with pull-up resistor
pinMode(BUTTON_PIN, INPUT_PULLUP);
}
void loop() {
if (digitalRead(BUTTON_PIN) == LOW) {
// If the button is pressed (the pin is connected to ground)
digitalWrite(LED_PIN, HIGH); // Turn on the LED
delay(1000); // Wait for 1 second
digitalWrite(LED_PIN, LOW); // Turn off the LED
}
}// Define pin D0 as the LED pin
const int LED_PIN = D0;
// Define pin D2 as the button pin
const int BUTTON_PIN = D2;
bool buttonState = false; // Variable to store the button state
bool lastButtonState = false; // Variable to store the last button state
void setup() {
// Configure the LED pin as output
pinMode(LED_PIN, OUTPUT);
// Configure the button pin as input with pull-up resistor
pinMode(BUTTON_PIN, INPUT_PULLUP);
}
void loop() {
buttonState = digitalRead(BUTTON_PIN); // Read the current state of the button
// Check if there's a change in the button state
if (buttonState != lastButtonState) {
// If the button was pressed (transitioned from HIGH to LOW)
if (buttonState == LOW) {
// Toggle the LED state
digitalWrite(LED_PIN, !digitalRead(LED_PIN));
delay(50); // Small delay to debounce the button
}
// Update the last button state
lastButtonState = buttonState;
}
}MY CODE
winner or loser sequence to implement it in the game, the first with orange LED is for winner and the second with red LED is for loser. In this code they are in infinite bluclet but it can be programmed for a game and enter the corresponding sequence
// Define the buzzer pin as D2
#define BUZZER_PIN D2
// Define LED pins D0, D6, and D7
#define LED_PIN_D0 D0
#define LED_PIN_D6 D6
#define LED_PIN_D7 D7

// Define musical notes and their frequencies in Hz
#define C6 1046.50 // Do
#define E5 659.25  // Mi
#define G5 783.99  // Sol
#define C5 523.25  // Do
#define E4 329.63  // Mi
#define G4 392.00  // Sol

// Define note durations
#define QUARTER 250

void setup() {
  pinMode(BUZZER_PIN, OUTPUT); // Set buzzer pin as output
  pinMode(LED_PIN_D0, OUTPUT); // Set LED pin D0 as output
  pinMode(LED_PIN_D6, OUTPUT); // Set LED pin D6 as output
  pinMode(LED_PIN_D7, OUTPUT); // Set LED pin D7 as output
}

void loop() {
  digitalWrite(LED_PIN_D0, HIGH);
  // Play the "winner" sound
  winnerSound();

  // Keep LED on for half a minute
  delay(30000);

  // Turn off LED D0
  digitalWrite(LED_PIN_D0, LOW);

  // Play the "loser" sound and blink LEDs D6 and D7
  loserSound();
}

// Play "winner" sound sequence
void winnerSound() {
  float notes[] = {C6, E5, G5, C5, E4, G4, C5}; // Note sequence for "winner" sound
  int noteDuration = QUARTER; // Duration of each note (in milliseconds)
  for (int i = 0; i < sizeof(notes) / sizeof(notes[0]); i++) {
    tone(BUZZER_PIN, notes[i], noteDuration);
    delay(noteDuration);
  }
}

// Play "loser" sound sequence
void loserSound() {
  float notes[] = {C5, E4, G4}; // Note sequence for "loser" sound
  int noteDuration = QUARTER; // Duration of each note (in milliseconds)
  for (int i = 0; i < sizeof(notes) / sizeof(notes[0]); i++) {
    tone(BUZZER_PIN, notes[i], noteDuration);
    digitalWrite(LED_PIN_D6, HIGH); // Turn on LED D6
    digitalWrite(LED_PIN_D7, HIGH); // Turn on LED D7
    delay(3000); // Wait for a while
    digitalWrite(LED_PIN_D6, LOW); // Turn off LED D6
    digitalWrite(LED_PIN_D7, LOW); // Turn off LED D7
  }
  delay(500); // Wait a bit at the end of the sound
}