
Final Project
Initial Ideas
I initially had two ideas and still want to persue them eventually but I decided none were the right fit for this course. One was an aquarium lamp that emulates natural sunlight and the other was a water fountain for wildlife that uses plants as biological filtration.
Lamp that emulates natural sunlight
This project would involve the design and manufacturing of both a lamp and an aquarium for saltwater fish and coral. The aquarium would be what we call a “nano” tank in the reefing hobby, approximately 1 cubic foot, maybe 18” across. But this is pretty standard, what’s a little more unique is the next part, the lamp.
The main concept is a lamp that emulates sunlight as closely as possible and to backlights the coral and fish, highlighting their slight translucence and making them look more flattering, specially when filmed with a monocular camera which relies on tricks like these to “see” depth.
The main ways in which I would attempt to emulate sunlight would be, parallel rays like the sun, a high CRI rated LED and finally blue filters, simulating the effect that a couple dozen feet of seawater have on the color of the light.
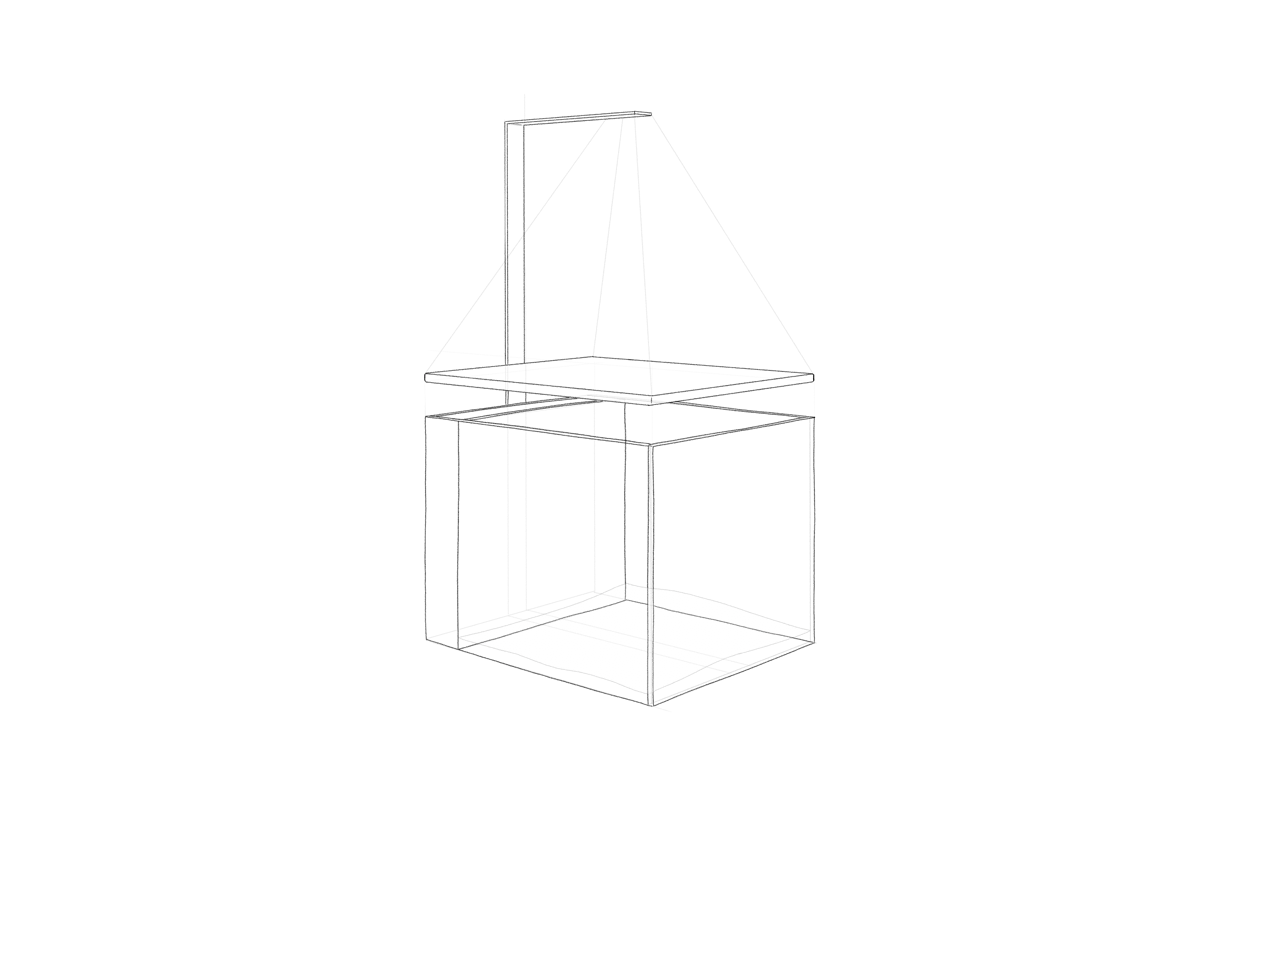
This is a sketch of what the design would look like
Wildlife water fountain
My second idea is a project that involves the design and implementation of a naturalistic water fountain for wildlife that incorporates biological filtration and plants to filter the water and keep it pristine for the pollinators and other creatures that will drink out of it. Ideally it would be powered by solar power and have a relatively long cable to be able to hide the cable under gravel and have the panel sit higher up, possibly on top of a small tree or mounted to a wall or roof.
The biological filtration would rely on a lower chamber designed to let suspended solids settle out, the next would be comprised of a layer of fine gravel that would provide ample surface area for nitrifying bacteria to colonize and convert toxic ammonia into less toxic nitrates that could also be more easily absorbed by plants.
The surface would have slow yet audible flow to attract animals but would be shallow enough to allow insects like bees to find pebbles to step on while drinking.

This is a sketch of what the design would look like
Final Idea:
Vector controll aquarium
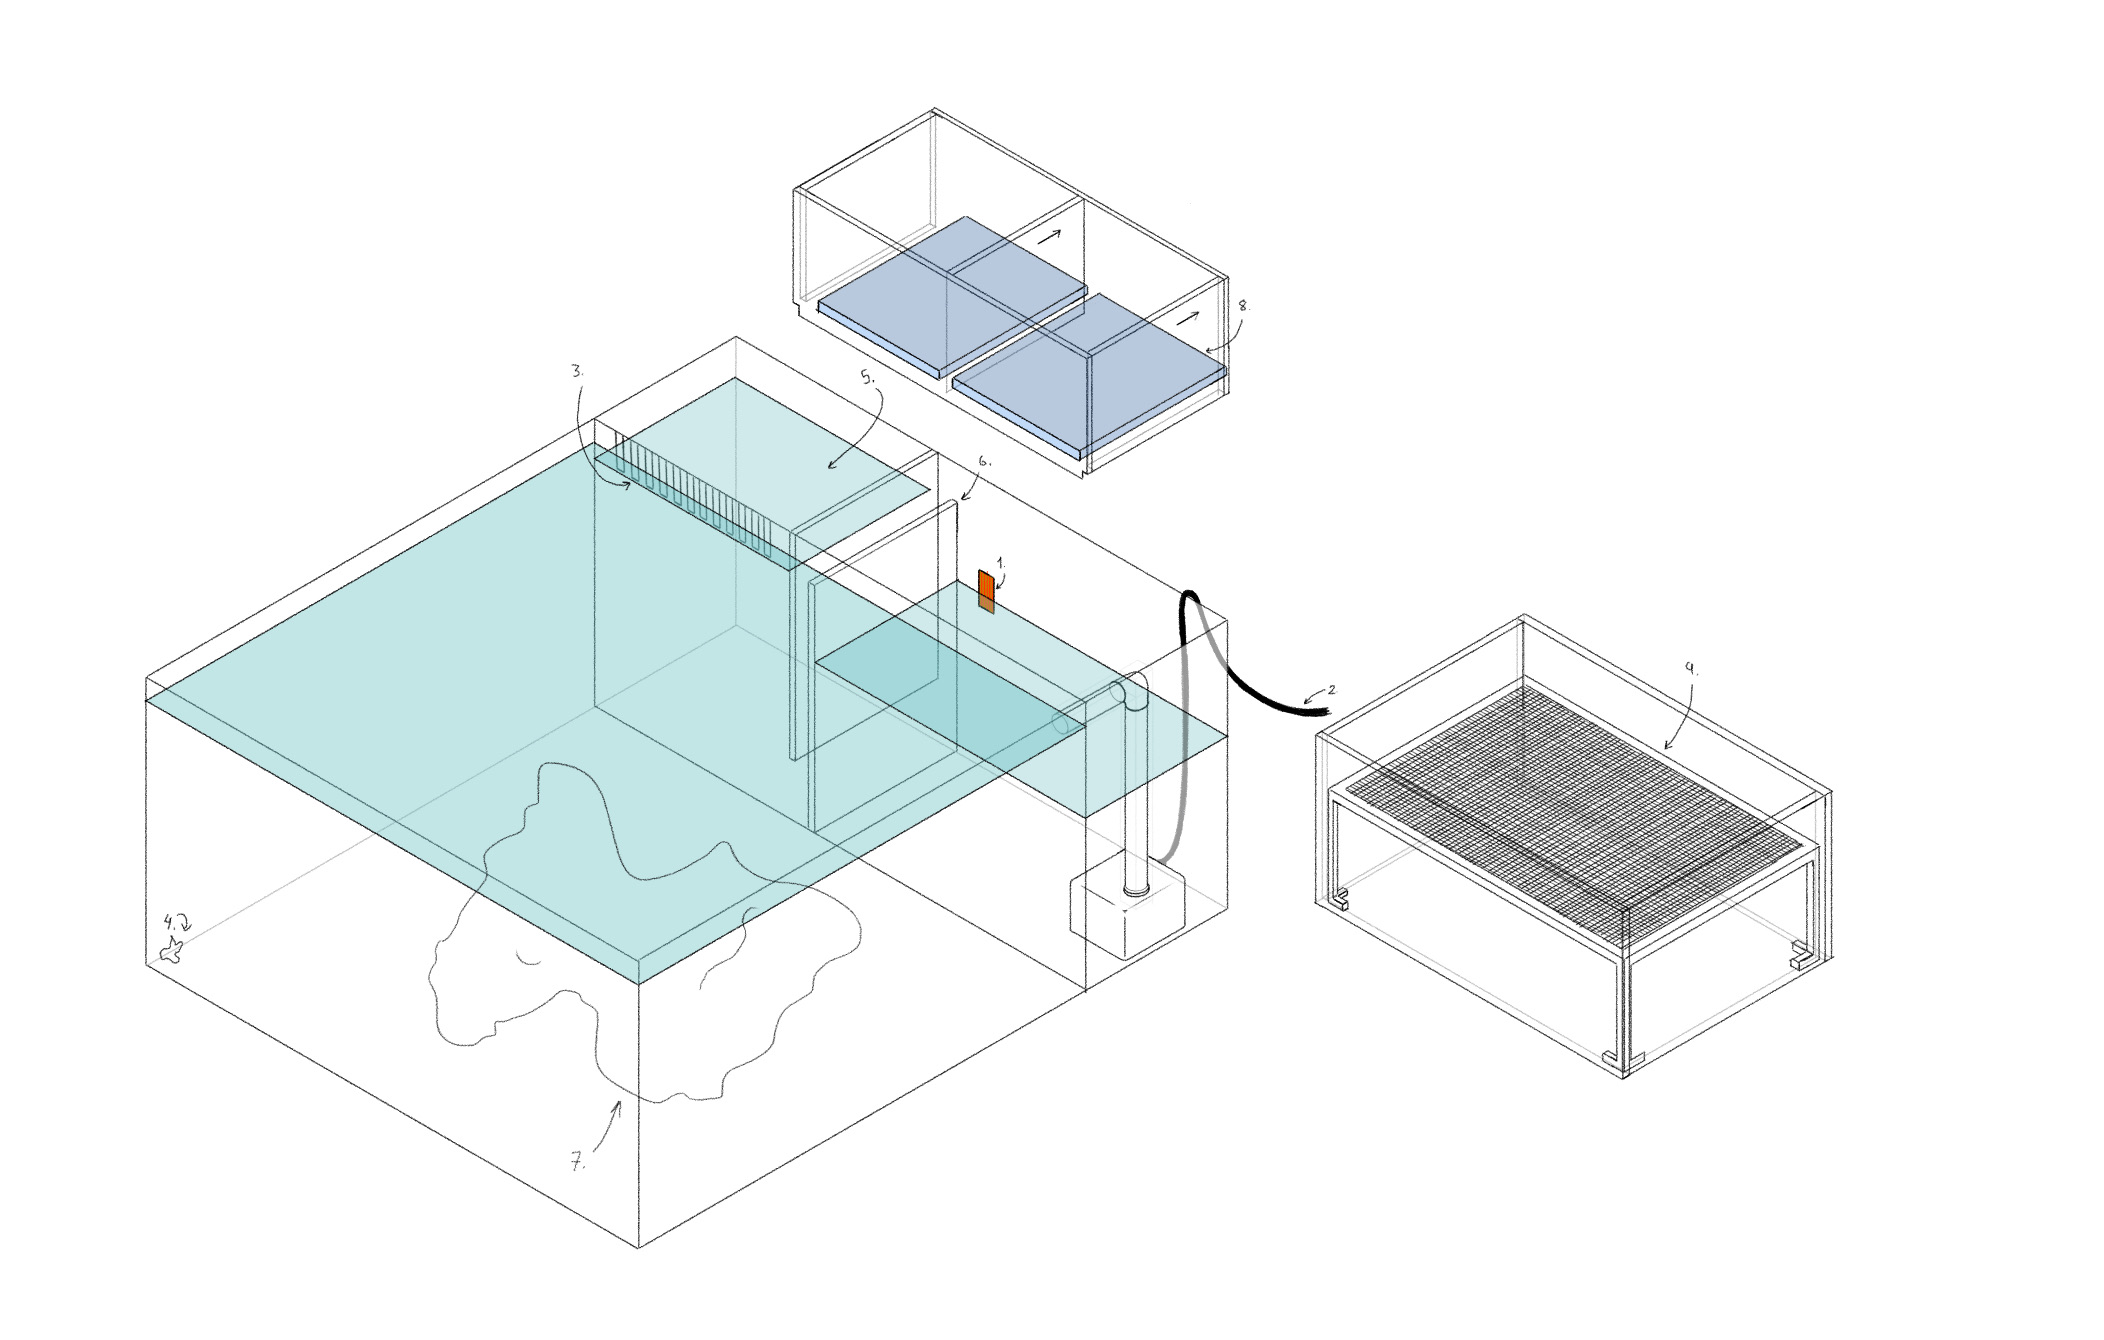
I incorporated aspects from the wildlife pond into an aquarium and vector control station. This project will involve the design of an aquarium for mosquito fish and mosquito larvae. Two things make this aquarium unique, one is a baffle system ath the back with a water level sensor connected to an LED which wll light up when it's time to refill the water due to evaporation, the other part is a set of mosquito larvae hatcheries which automatically dump into the fishtank to let the mosquito fish eat the larvae before they develop into adult mosquitos.
The main objective is to feed the fish exclussively mosquito larvae and whatever algae they can scrape of the rocks and symultaneously reduce the mosquito population by preventing their eggs from eventually turning into adult mosquitos
This image shows the basic design:
What will it do?:
The plan is for it to be an automatic mosquito larva raising system that will ensure they never reach adulthood by feeding them to endler guppies. The objective is to make reducing mosquito populations a bit more fun and interesting than it usually is.
The way it works is, you put mosquito eggs in a small container above the aquarium and click a button to start a timer. After 8 days, which is enough time for the larva to develop but not enough for them to reach adulthood, a small solenoid valve is activated and drains the water along with the larva into the aquarium. The endler guppies will enthusiastically devour the larva, preventing them from ever reaching adulthood and transmiting diseases.
Why will it do this?:
Mosquitoes are a vector species, meaning they transmit diseases such as dengue fever and malaria. This characteristic makes them the deadliest animals in the world in terms of human lives lost each year. They are also very annoying. However, mosquito larvae are an important food source for fish, providing both nutritional value and enrichment. In nature, Endler guppies hunt mosquito larvae and forage for algae and bacterial film, so promoting these natural behaviors will make them healthier and more interesting to observe.
Who has done what beforehand?:
Many projects aim to reduce mosquito populations, including using fish to control mosquito larvae. In fact, many states will provide free mosquito fish for your water bodies upon request. In countries like Thailand, it is common to keep fish in small plant pots to consume mosquito larvae. However, this approach only works if the entire community makes an effort to set these up and reduce other potential habitats for mosquito larvae, such as rain-filled buckets, plastic containers, and tires.
The main difference between these projects and mine is that my approach is more visible and entertaining to watch. Knowing the lifespan of these mosquitoes and being able to observe their growth before feeding them to the fish makes the whole experience more engaging. Additionally, in other methods, mosquitoes are consumed much earlier, providing fewer nutrients to the fish.
What will I design?:
I will design two things, one will be a controller made using 3d printing and custom PCBs and the other is the compartment for the mosquito larva which will be made out of glass and 3d printed stands for the solenoid valve.
What materials and components will be used?:
Materials for aquarium and 3d printed parts:
| Qty | Description | Source | Price |
|---|---|---|---|
| 2 10x14cm | 3mm glass | Local glass shop | 1.41 $ | 1 10x9.4cm | 3mm glass | Local glass shop | 0.47 $ | 2 10x24cm | 3mm glass | Local glass shop | 2.36 $ | 1 10x24cm | 6mm glass | Local glass shop | 2.36 $ | 20cm | 6mm airline tubing | Local aquarium shop | 0.2$ | 1 | DC 3-5V Micro Submersible Mini Water Pump | Amazon | 2.50$ | 1 | 6mm DC 12V Normally Closed Solenoid Valve | Amazon | 4.90$ | Total | 14.20$ |
Electronic components:
| Qty | Description | Source | Price |
|---|---|---|---|
| 4 | NPN 1.5A 25V SS8050 Transistor | Unit Electronics | 0.22 $ | 4 | Schottky 20V 1A SMD MBR120LSF Diode | Unit Electronics | 0.44 $ | 3 | 2.5mm Female DC Jack connector SMD | Unit Electronics | 2.48 $ | 10 | 10ft 1m Pitch cable for 1.27mm dupont cables | Unit Electronics | 1.10 $ | 2 | SMD LED 1206 NCD1206R1 | Unit Electronics | 0.11 $ | 6 | Resistors 1/4w SMD 1206 CRCW1206100RFKEA | Unit Electronics | 0.33 $ | 1 | ATtiny 44A-SSU | RYSPE (Local electronics supplier) | 3.58 $ | 2 | Female USB-A port USB-302S-T | Unit Electronics | 0.98 $ | 1 | Male Header Pins L20 40 Pins 2.54 mm | Unit Electronics | 0.60 $ | 2 | Electrolitic Capacitor 100uF 16V SMD | RYSPE (Local electronics supplier) | 0.44 $ | 1 | Voltage Regulator 7805 SMD TO-252 | RYSPE (Local electronics supplier) | 0.38 $ | 2 | Copper Clad Sheet | RYSPE (Local electronics supplier) | 1.65 $ |
These are the prices for all the electronic components, this does not account for loosing or damaging any of the components. I actually bought more than what is on the list since I bought spares but I never ended up needing them. Therefore if you have a good local electronics supplyer close by I recommend not buying spares. On the other hand, if you will be sourcing your components online I do, because the shipping costs, both financial and enviornmentally speaking, are higher if you order your components separately. Even if a component is only 0.04 $ you will still need to pay several dollars for shipping so it's more cost effective to order several spares. I recommend you save and organize your spares so that you will have a clear idea of what components you have for your next project.
What parts and systems will be made?:
I will make the small aquarium that holds the mosquito larva, a stand for the solenoid pump, a 3D printed adapter for the airline tubing to connect the water reservoir with the solenoid valve, a housing for the electronics and the electronics themselves.
What processes will be used?:
I will use 3d printing, glass cutting, electronics design and production and making my own dupont wires to be the exact length I want.
What questions need to be answered?:
The first quesiton is, how long does it take for mosquitos to reach adulthood from the day the eggs hatch? How long will it take the fish to eath the mosquito larva once they are dropped into the aquarium? How many fish are needed to eat the mosquitos from 1-4 batches of eggs? How will the electronics be protected from the water? Where will the final aquarium be placed? How will I guarantee no mosquitos are ever born in this system? How will I power a solenoid and pump that require more voltage than my ATtiny can supply?
How will it be evaluated?:
It should accomplish several goals:
- Never allow adult mosquitos to leave the aquarium
- Allow mosquito larvae to grow in size
- Effectively supply the fish with live food
- Allow empty container to dry for at least 24 hours to dry out any mosquitos that stayed behind
- Fully drain mosquito container
- Prevent water from reaching electronic components
- Make the Aquarium sightly
Making my project
Electronics
For this project the electronics is the most important part and also the one I have the least experience with so I decided to start with this part of the project.
Designing board
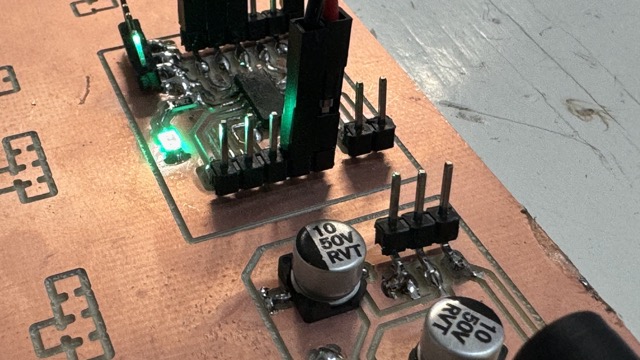
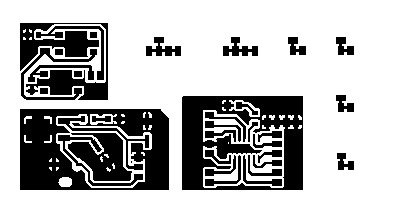
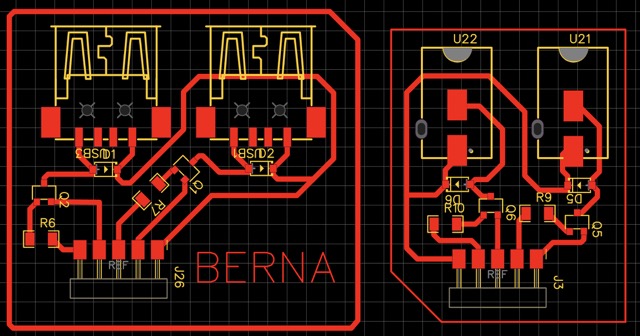
I started by looking up what components I would need to use to accomplish my goal and then started designing the board by drawing the components I needed as close to scale as I could and the chip I would be using and it's pins. I went through a series of itterations that eventually lead to a clear design with the least amount of overlaps and clearer paths. I also made sure to design it considering the final orientation and placement of the board in the final product.
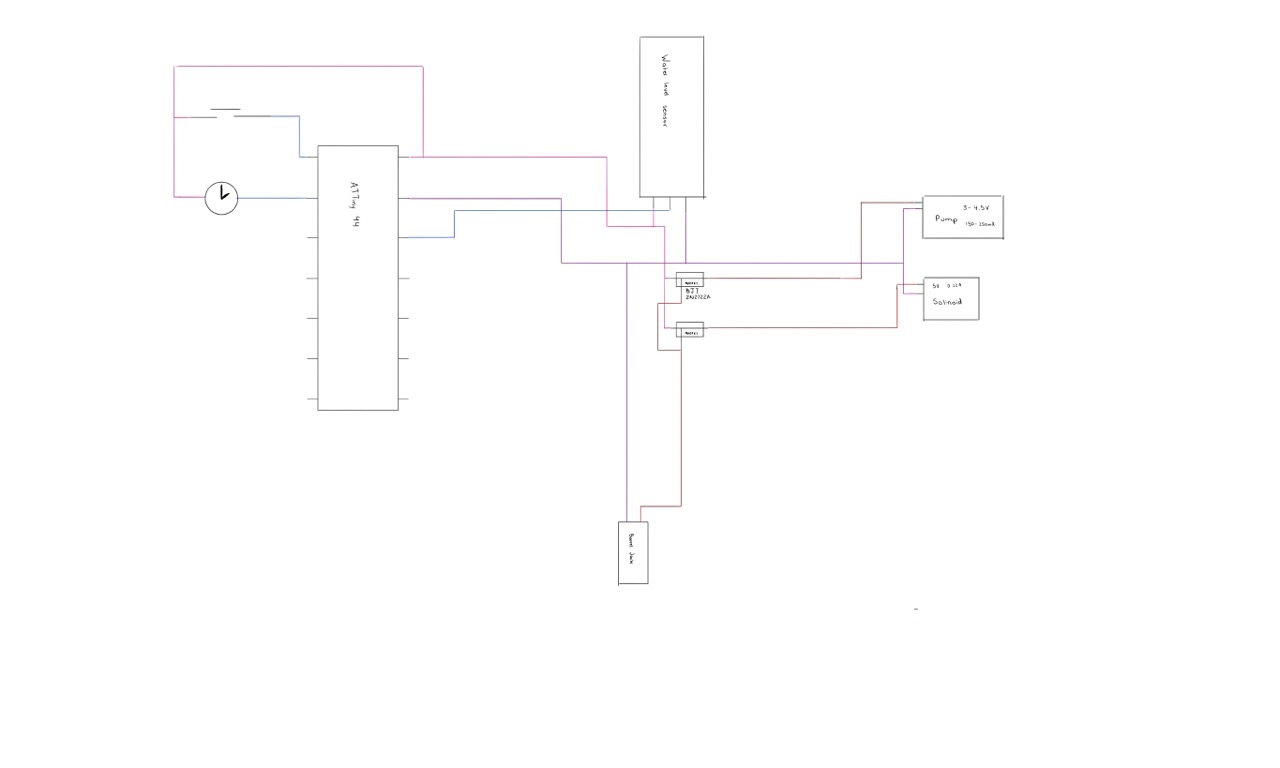
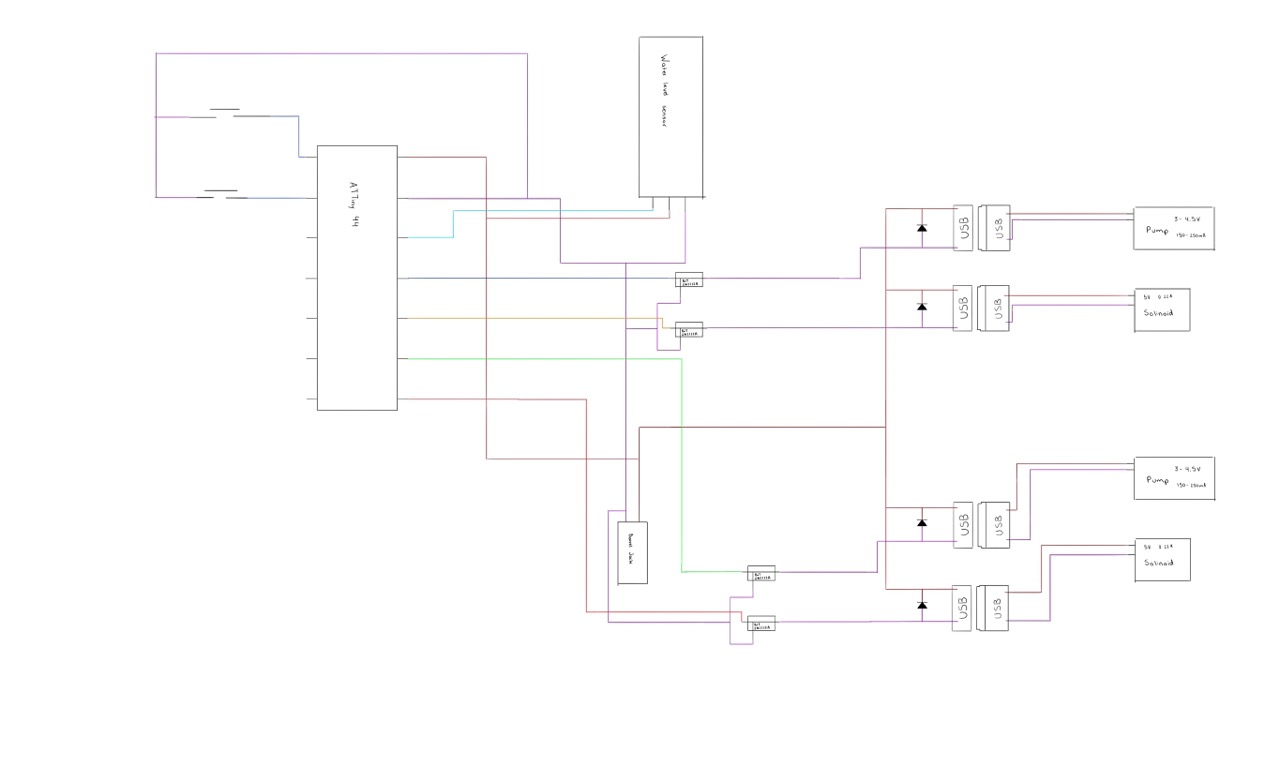
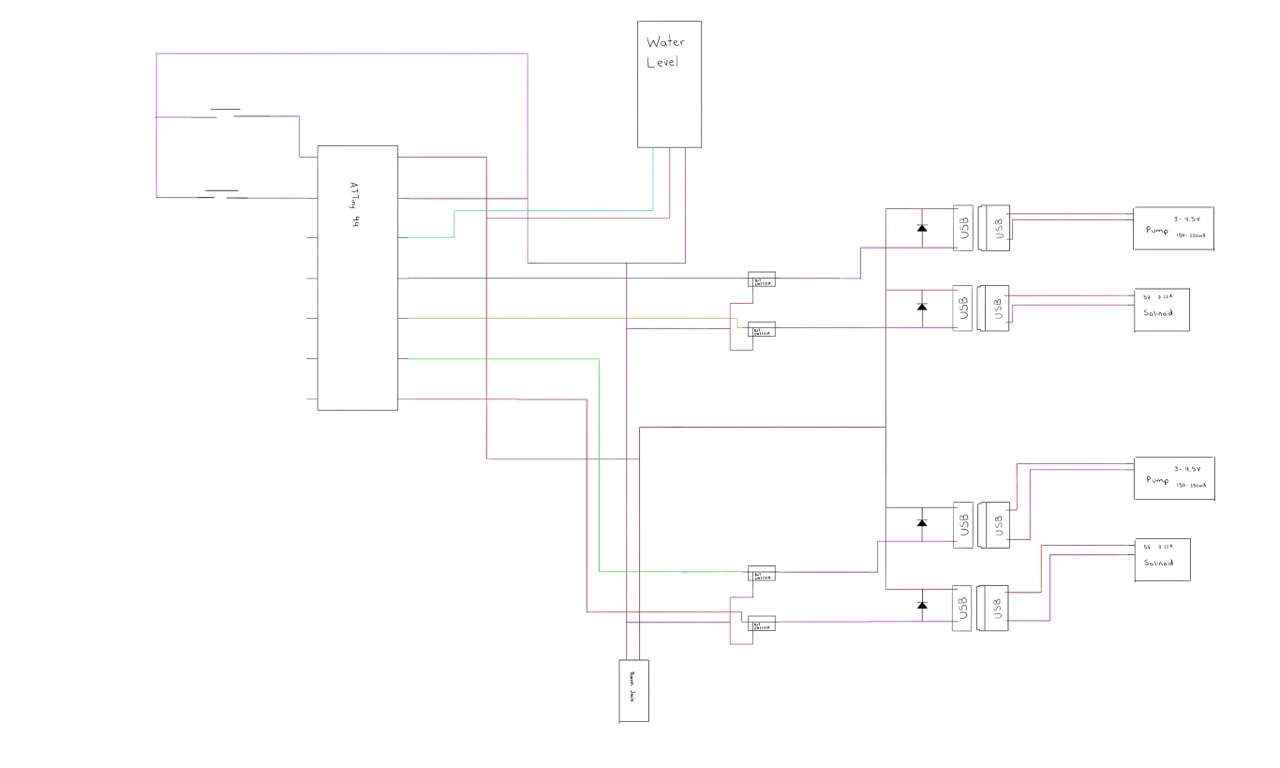
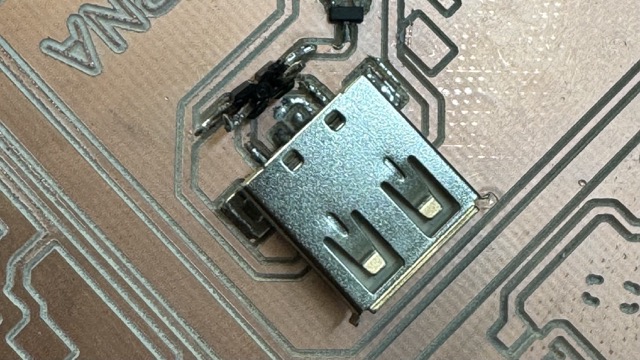
Then I took the design and used it to create a schematic and then an actual board. I wanted the final product to be modular so I can reuse parts of it in the future or add functionalities without having to redo the whole board so I created small modules instead of one huge board. This also made path design much simpler. I created a module that converts 12v input to 5v, a module that houses the ATtiny and two that contain the outputs for the pump and solenoid valve, I separated the last two because one required 5v and the other 12v.
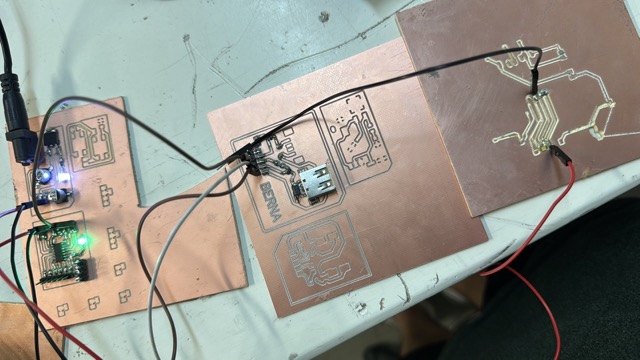
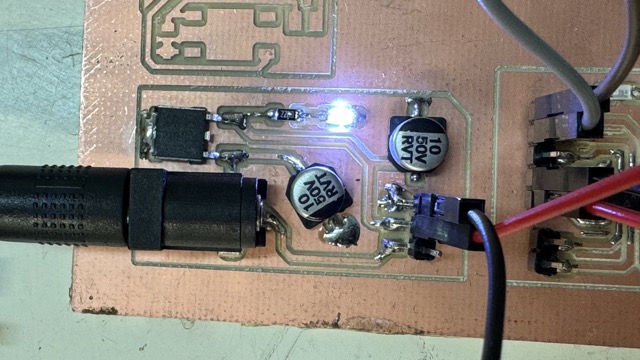
Cutting Board:
The cuts were suprisingly clean, but since I didn't have much cutting time I had to cut the curve with a relatively low resolution which led to a very stepped look so I resorted to sanding it down a little to make it look more curved. I used an orbiral sander to sand off the tabs, round the borders a little and exentuate the curve by following the contour of all the circles inside and out. I also sanded the legs and a few mistakes, the sacrificial board was in pretty rough shape and some parts werent even leading to a couple spots where the bit didn't cut all the way through and when I lifted the piece it snapped off but ended up chipping the edge so I sanded that to look clean again
Soldering:
The pieces fit but required a rubber mallet to fit them together, this wouldn't necessarily be a problem but I would like it to be easy to assemble and dissasemble without tools. To fix this I bought some sand paper and slightly sanded the edges and test fit it every time. I sanded very little every time to make sure the fit was just right, trying to avoid over sanding and ending up with lose parts.
Downloading libraries:
Here at Ibero Puebla we are over 40 students and only have two CNC machines so I couldn't afford to take up a full day carving my piece since it would lead to other people not having enough time to cut their parts. But, in the next couple weeks I'll probably get more time with the cutter and hope to make a smaller version of the same shape and carve it with the ball cutter, taking my time to achieve a very clean and rounded edge. I'm particularly motivated to try by the material, I have cut plywood in the past but had a lot of chipping and imperfections in the board, composit cut suprisingly cleanly and I believe I can now use CNC cuttin to achieve result I could previously only achieve with a 3D printer, having to acomodate my projects to the restrictions of that technique, mainly size.
Programming Board:
Here at Ibero Puebla we are over 40 students and only have two CNC machines so I couldn't afford to take up a full day carving my piece since it would lead to other people not having enough time to cut their parts. But, in the next couple weeks I'll probably get more time with the cutter and hope to make a smaller version of the same shape and carve it with the ball cutter, taking my time to achieve a very clean and rounded edge. I'm particularly motivated to try by the material, I have cut plywood in the past but had a lot of chipping and imperfections in the board, composit cut suprisingly cleanly and I believe I ca now use CNC cuttin to achieve result I could previously only achieve with a 3D printer, having to acomodate my projects to the restrictions of that technique, mainly size.
Using Arduino Uno as a programmer:
Here at Ibero Puebla we are over 40 students and only have two CNC machines so I couldn't afford to take up a full day carving my piece since it would lead to other people not having enough time to cut their parts. But, in the next couple weeks I'll probably get more time with the cutter and hope to make a smaller version of the same shape and carve it with the ball cutter, taking my time to achieve a very clean and rounded edge. I'm particularly motivated to try by the material, I have cut plywood in the past but had a lot of chipping and imperfections in the board, composit cut suprisingly cleanly and I believe I ca now use CNC cuttin to achieve result I could previously only achieve with a 3D printer, having to acomodate my projects to the restrictions of that technique, mainly size.