8. Electronics Design
Group assignment:
This link will direct you to the group assignment website where we got much of the information needed for this week like the chips that were available, they're data sheet, capabilities...
Individual Assignment:
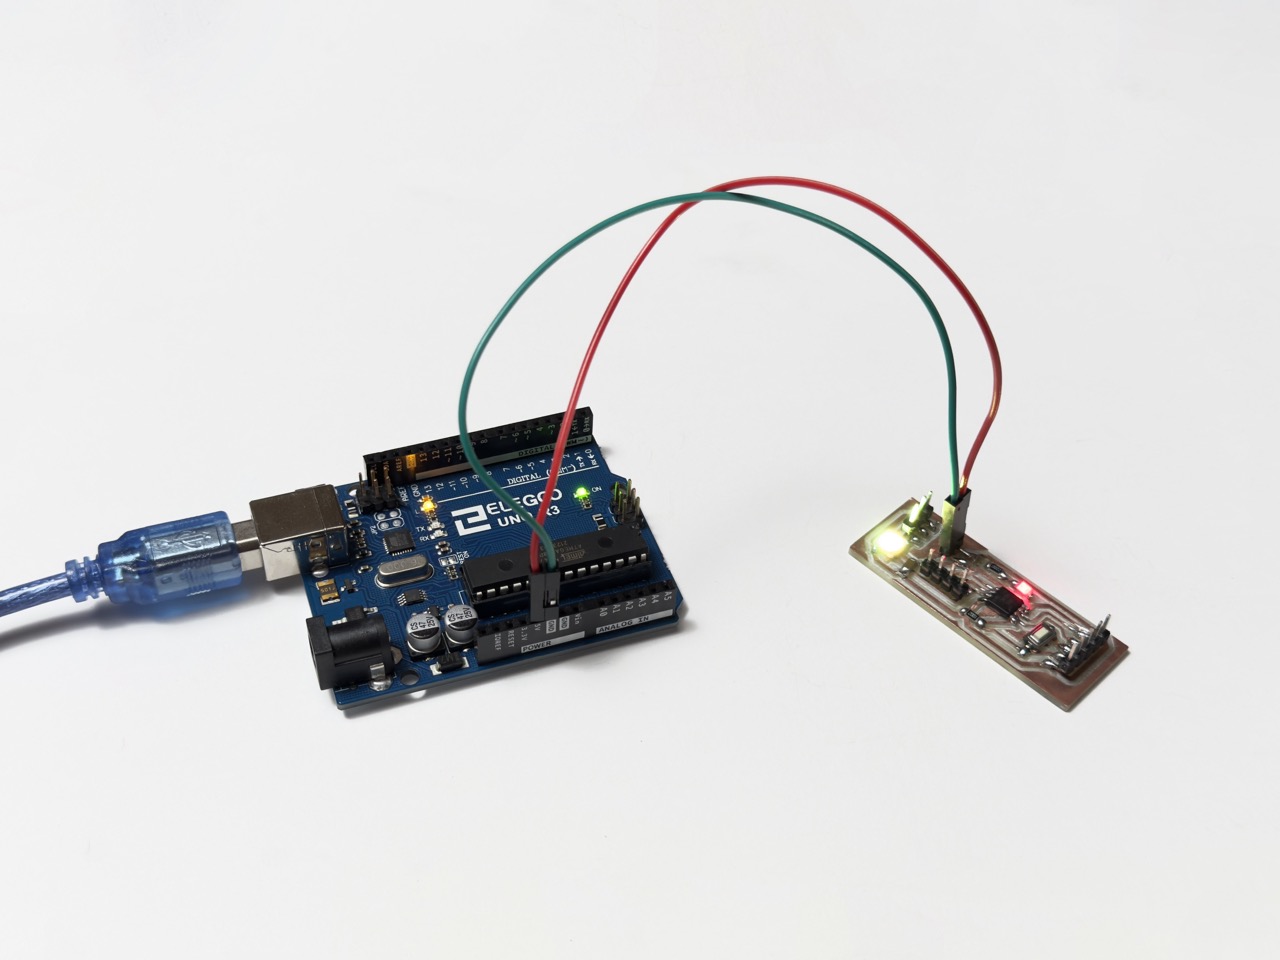
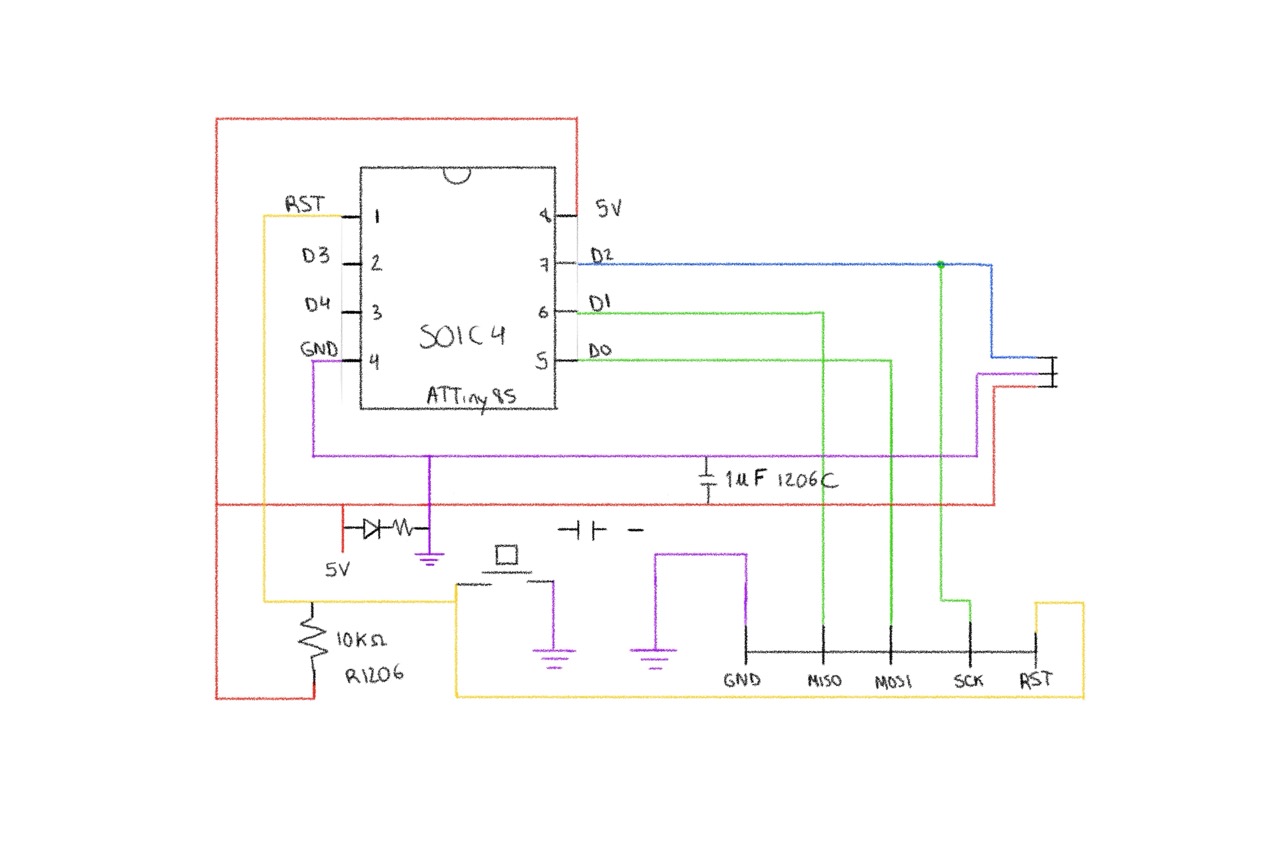
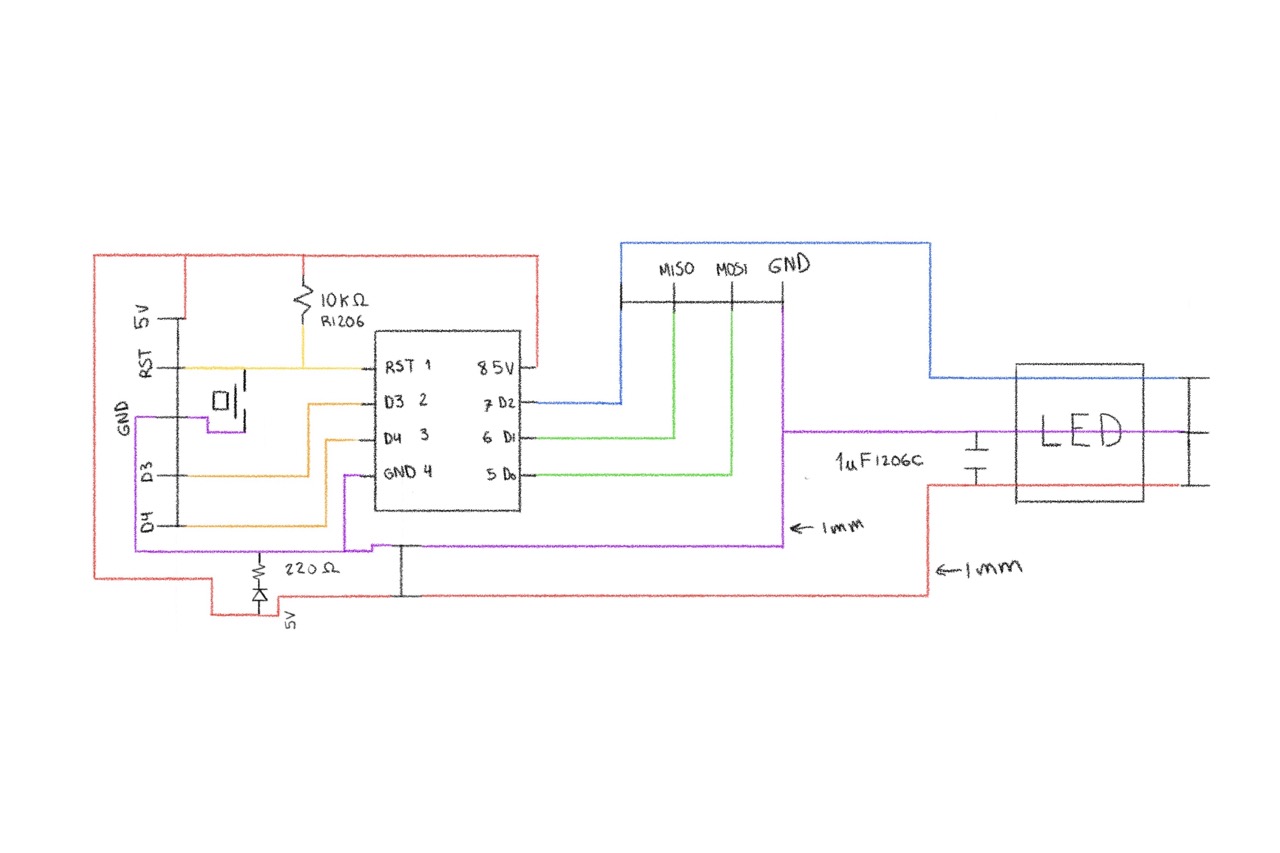
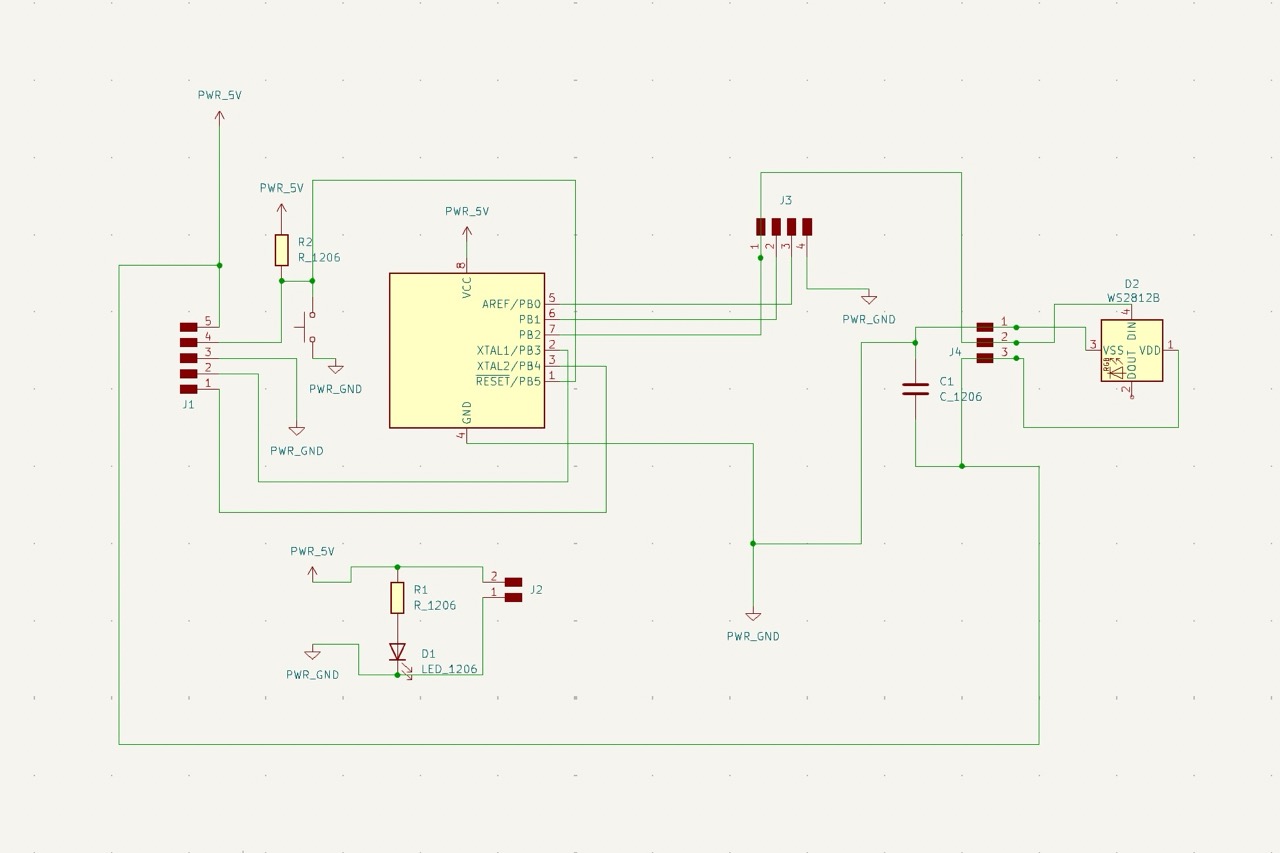
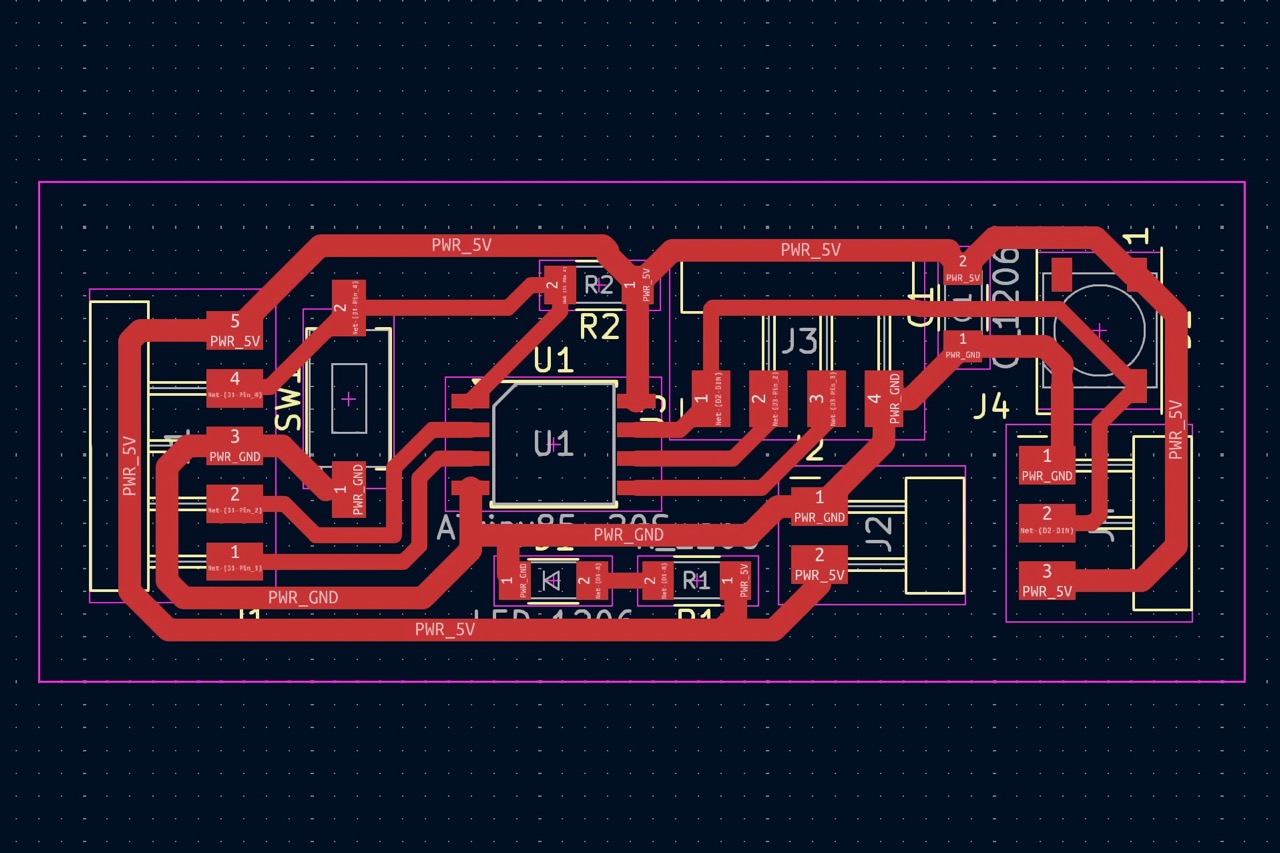
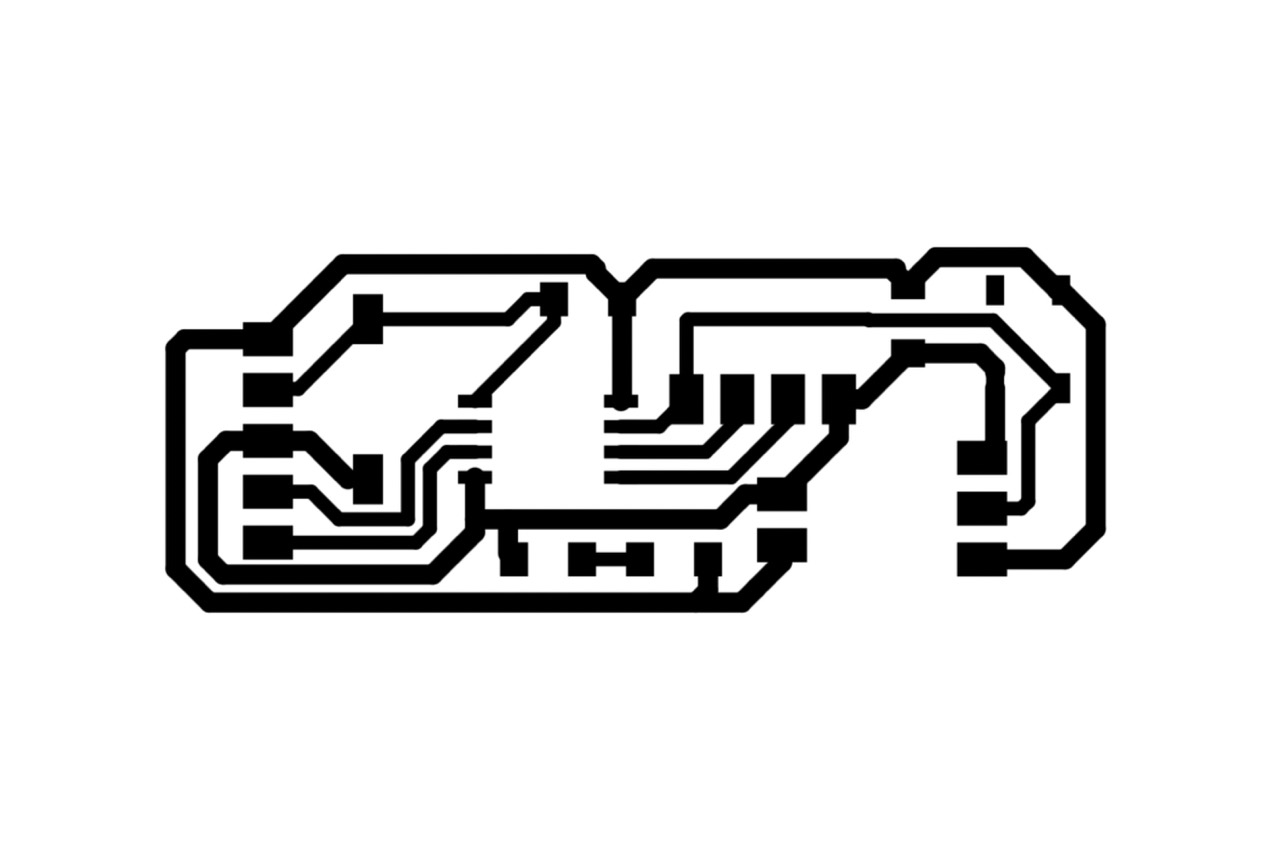
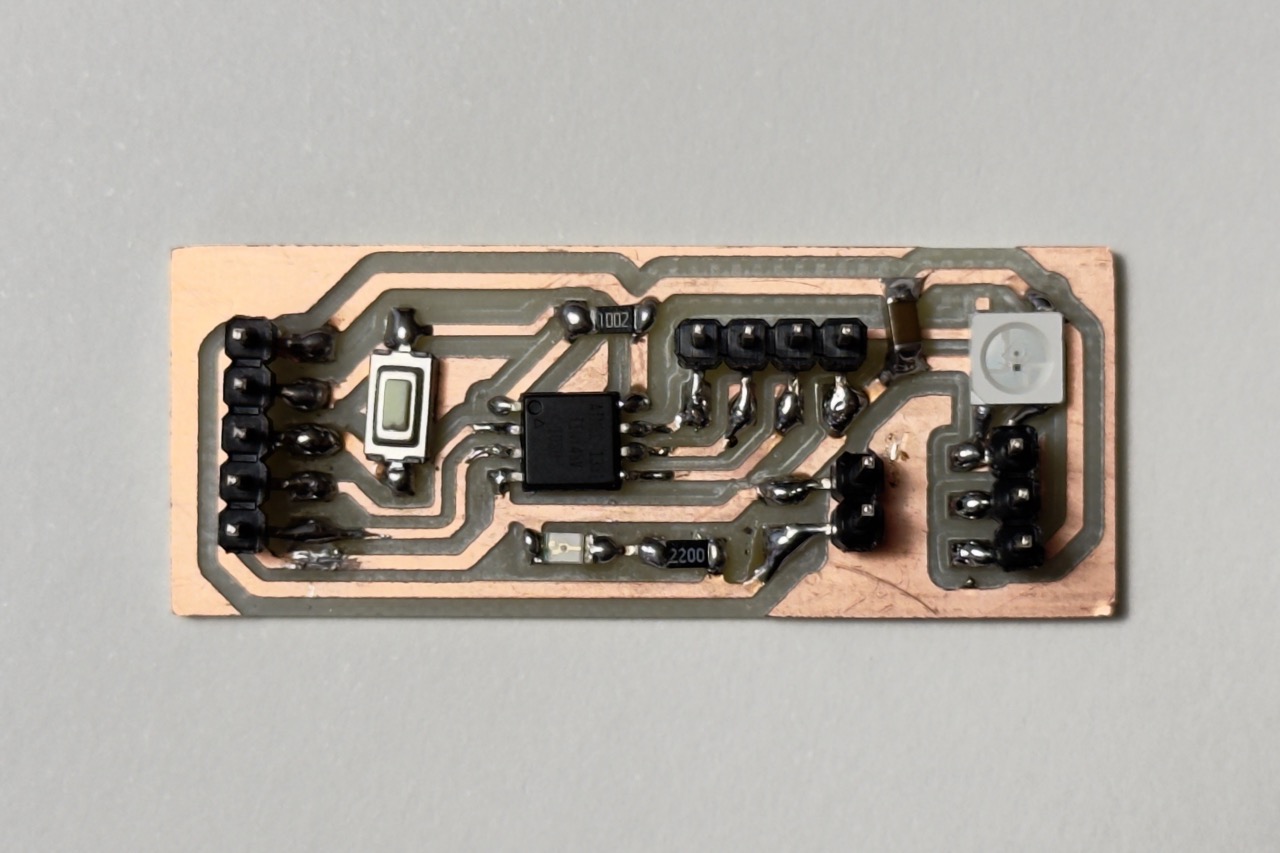
This week we now had to design our own PCB, manufacture it, and use it to accomplish something. I decided to make a controller for an LED strip which I plan to make next week with a vinyl cutter using acetate, copper tape and NeoPixels
Designing circuit layout:
I started by looking up what components I would need to use to accomplish my goal, which was to make an LED strip that is at least 4 feet long and can smoothly transition from cool to warm whites.
Choosing components:
![]() I experimented with several
apps for photo scanning and found significant differences among LiDAR, photogrammetry, and
NERFs/Gaussian splatting. I found NERFs and Gaussian splatting fascinating and look forward to their development over time.
Unfortunately, they generate point clouds, which can't directly be used for 3D printing since that requires a mesh.
Therefore, I only tested them without considering them for 3D printing. I then tried both LiDAR and photogrammetry. I believe
LiDAR is more precise; however, it has a limitation: it offers lower resolution than photogrammetry for close-up objects.
Thus, it is well-suited for scanning large objects like rooms and cars but not ideal for smaller, more detailed objects.
I observed the infrared pattern of LiDAR on the iPhone and noted that the dots are quite large and sparse, so I decided to
opt for photogrammetry. I aimed to use only free software and was interested in trying AliceVision.org since it's open-source
and comprehensive, but it only runs on Windows, which was a limitation for me. Consequently, I ended up using my iPhone and
an app called KIRI Engine. It's not entirely
free but offers a trial period, and I managed to complete a few scans.
I experimented with several
apps for photo scanning and found significant differences among LiDAR, photogrammetry, and
NERFs/Gaussian splatting. I found NERFs and Gaussian splatting fascinating and look forward to their development over time.
Unfortunately, they generate point clouds, which can't directly be used for 3D printing since that requires a mesh.
Therefore, I only tested them without considering them for 3D printing. I then tried both LiDAR and photogrammetry. I believe
LiDAR is more precise; however, it has a limitation: it offers lower resolution than photogrammetry for close-up objects.
Thus, it is well-suited for scanning large objects like rooms and cars but not ideal for smaller, more detailed objects.
I observed the infrared pattern of LiDAR on the iPhone and noted that the dots are quite large and sparse, so I decided to
opt for photogrammetry. I aimed to use only free software and was interested in trying AliceVision.org since it's open-source
and comprehensive, but it only runs on Windows, which was a limitation for me. Consequently, I ended up using my iPhone and
an app called KIRI Engine. It's not entirely
free but offers a trial period, and I managed to complete a few scans.
Learning how to use Kicad:
The process of photo scanning was relatively straightforward. However, since the models are processed in the cloud and I was using the free version, obtaining the results took some time. I began by scanning a plant pot outdoors; unfortunately, it scanned the entire garden as well as the plant, resulting in relatively poor resolution for the plant's mesh and a subpar outcome. The next attempt was indoors, using two photography lights aimed at the ceiling to provide very even and soft lighting, which led to a much better result.

I started by printing a piece that had too small of a gap, so the two pieces fused together and I broke it trying to separate the two pieces. I improved the second version by fixing the gap and I also made the base a little shorter and thinner since I was just wasting material and print time. The second one printed faster and had a larger gap, but not large enough, so I printed a third, but the gap was now too large and the piece dislodged mid print, making that print unusable too. The fourth finally worked, and it worked great, it took little force to separate the two pieces and now it works smoothly. Then I got ambitious and tried to print two stacked on top of each other, unfortunately, I couldn’t find an appropriate gap that would allow it to separate but not mid print, I ended up with lots of single joints with rough ends. I learned a lot by printing several pieces with slightly different dimensions, in the future, I want to try more prints when I have more time. I hadn’t anticipated all the time I would lose with failed prints and with the inefficiency of printing at home but spending most of the day in school. Most of these prints took a couple of hours and many of them failed. I believe I also have a problem with my filament
Cutting Board:

The cuts were suprisingly clean, but since I didn't have much cutting time I had to cut the curve with a relatively low resolution which led to a very stepped look so I resorted to sanding it down a little to make it look more curved. I used an orbiral sander to sand off the tabs, round the borders a little and exentuate the curve by following the contour of all the circles inside and out. I also sanded the legs and a few mistakes, the sacrificial board was in pretty rough shape and some parts werent even leading to a couple spots where the bit didn't cut all the way through and when I lifted the piece it snapped off but ended up chipping the edge so I sanded that to look clean again
Soldering:
The pieces fit but required a rubber mallet to fit them together, this wouldn't necessarily be a problem but I would like it to be easy to assemble and dissasemble without tools. To fix this I bought some sand paper and slightly sanded the edges and test fit it every time. I sanded very little every time to make sure the fit was just right, trying to avoid over sanding and ending up with lose parts.
Downloading libraries:
Here at Ibero Puebla we are over 40 students and only have two CNC machines so I couldn't afford to take up a full day carving my piece since it would lead to other people not having enough time to cut their parts. But, in the next couple weeks I'll probably get more time with the cutter and hope to make a smaller version of the same shape and carve it with the ball cutter, taking my time to achieve a very clean and rounded edge. I'm particularly motivated to try by the material, I have cut plywood in the past but had a lot of chipping and imperfections in the board, composit cut suprisingly cleanly and I believe I can now use CNC cuttin to achieve result I could previously only achieve with a 3D printer, having to acomodate my projects to the restrictions of that technique, mainly size.
Programming Board:
Here at Ibero Puebla we are over 40 students and only have two CNC machines so I couldn't afford to take up a full day carving my piece since it would lead to other people not having enough time to cut their parts. But, in the next couple weeks I'll probably get more time with the cutter and hope to make a smaller version of the same shape and carve it with the ball cutter, taking my time to achieve a very clean and rounded edge. I'm particularly motivated to try by the material, I have cut plywood in the past but had a lot of chipping and imperfections in the board, composit cut suprisingly cleanly and I believe I ca now use CNC cuttin to achieve result I could previously only achieve with a 3D printer, having to acomodate my projects to the restrictions of that technique, mainly size.
Using Arduino Uno as a programmer:
Here at Ibero Puebla we are over 40 students and only have two CNC machines so I couldn't afford to take up a full day carving my piece since it would lead to other people not having enough time to cut their parts. But, in the next couple weeks I'll probably get more time with the cutter and hope to make a smaller version of the same shape and carve it with the ball cutter, taking my time to achieve a very clean and rounded edge. I'm particularly motivated to try by the material, I have cut plywood in the past but had a lot of chipping and imperfections in the board, composit cut suprisingly cleanly and I believe I ca now use CNC cuttin to achieve result I could previously only achieve with a 3D printer, having to acomodate my projects to the restrictions of that technique, mainly size.
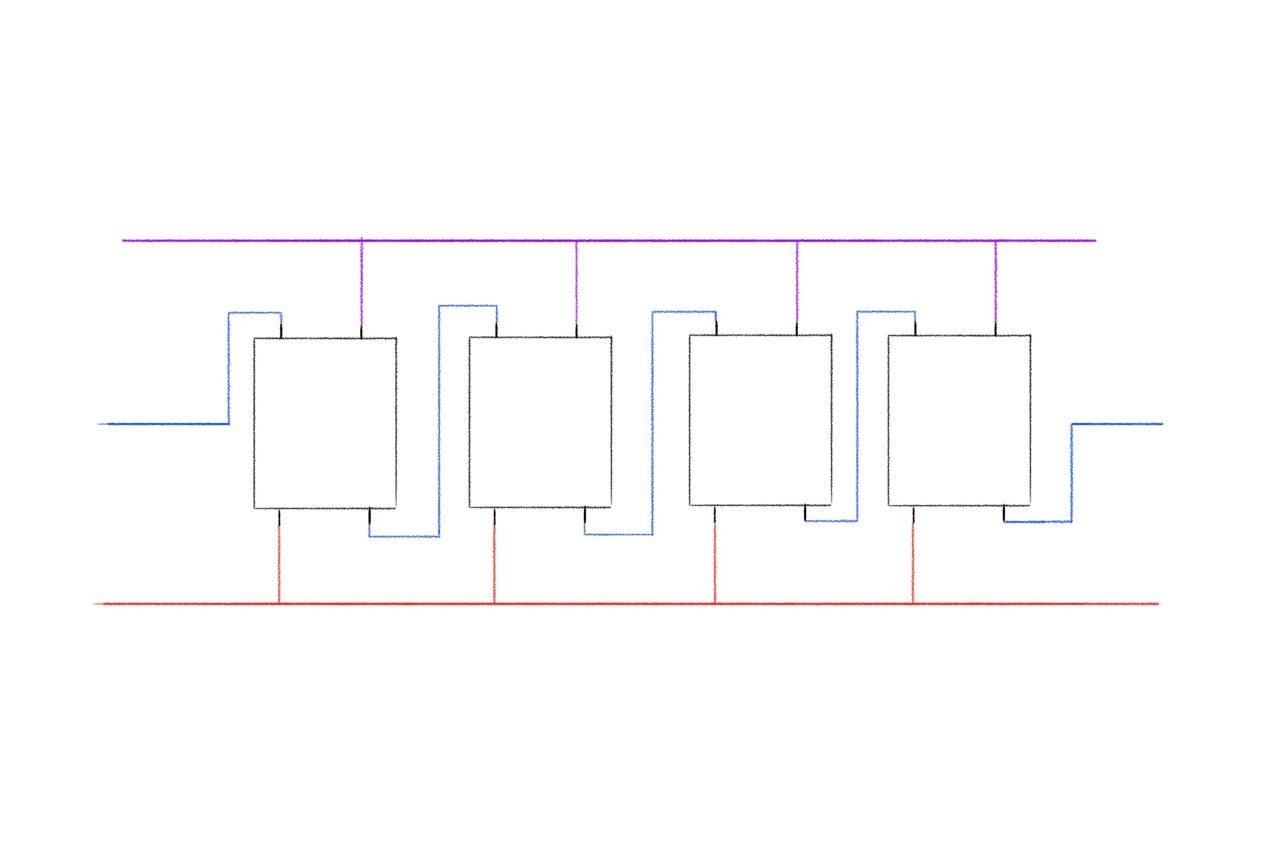
Programming Neopixels:
Here at Ibero Puebla we are over 40 students and only have two CNC machines so I couldn't afford to take up a full day carving my piece since it would lead to other people not having enough time to cut their parts. But, in the next couple weeks I'll probably get more time with the cutter and hope to make a smaller version of the same shape and carve it with the ball cutter, taking my time to achieve a very clean and rounded edge. I'm particularly motivated to try by the material, I have cut plywood in the past but had a lot of chipping and imperfections in the board, composit cut suprisingly cleanly and I believe I ca now use CNC cuttin to achieve result I could previously only achieve with a 3D printer, having to acomodate my projects to the restrictions of that technique, mainly size.
Arduino Neopixel tutorial for beginners
After sanding this was the final result:
The sanded piece looked more finished and slightly more curved but nowhere near what I wanted to achieve, so I decided to use my 3D model to make a render of how it was suposed to come out, I used an aglomerate texture to make it look like the real product and used it for the surface on which the table was sitting but increased the scale of the texture to show it off in the render.
I tried adding a pane of glass to the top in the render but had issues with shaddows, the glass absorbed too much of the light and made it look like tinted glass, so I ditched the idea but will look into it in the future since I know I'll be needing glass for renders in the future.