Week16. System Integration
Electronics System
My project envisages the ability to measure pressure values under different conditions through pressure sensors and then transmit them to mobile apps via Bluetooth, where the data can change dynamically. Therefore, I need a thin film pressure sensor with a certain sensitivity, in order to ensure the notification of measurement, as much as possible to increase the contact area and reduce the volume of the sensor itself; secondly, the main controller needs to have Bluetooth transmission function. Based on these two points, the following electronic hardware was selected:
- XIAO-esp32C3 Microcontroller *1
- Pressure sensor *3
- 0.96 OLED Display *1
- Bluetooth antenna *1
In order to adapt to the needs of the project, I re-fabricated the PCB circuit, here using Garitron EDA design.
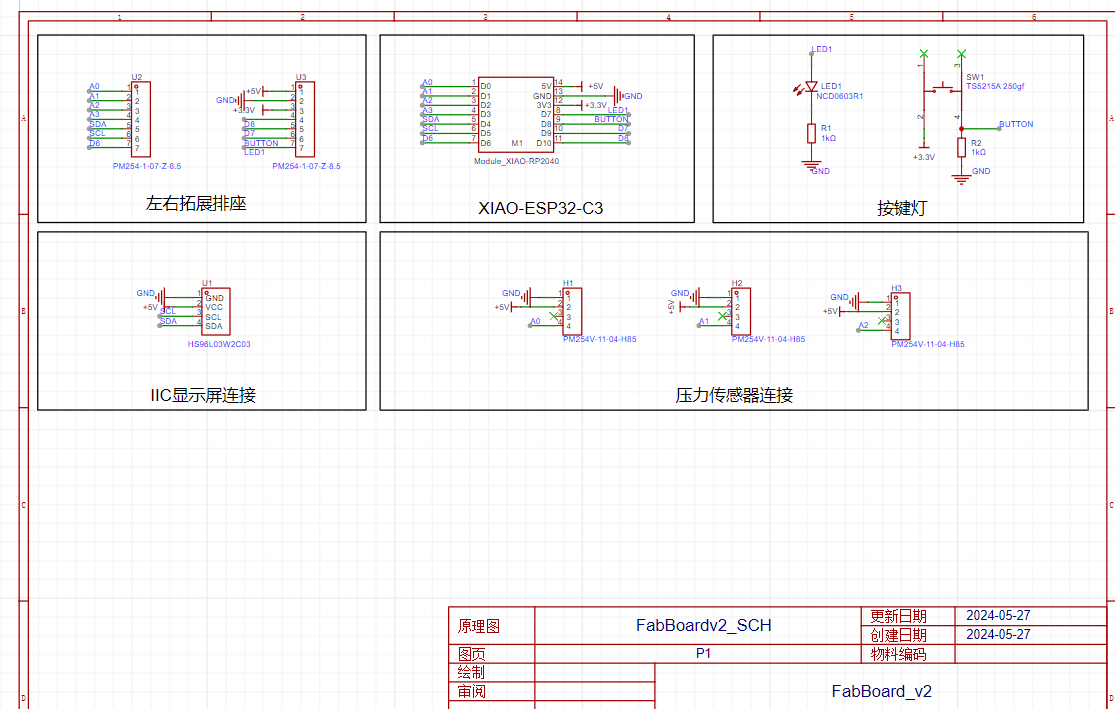
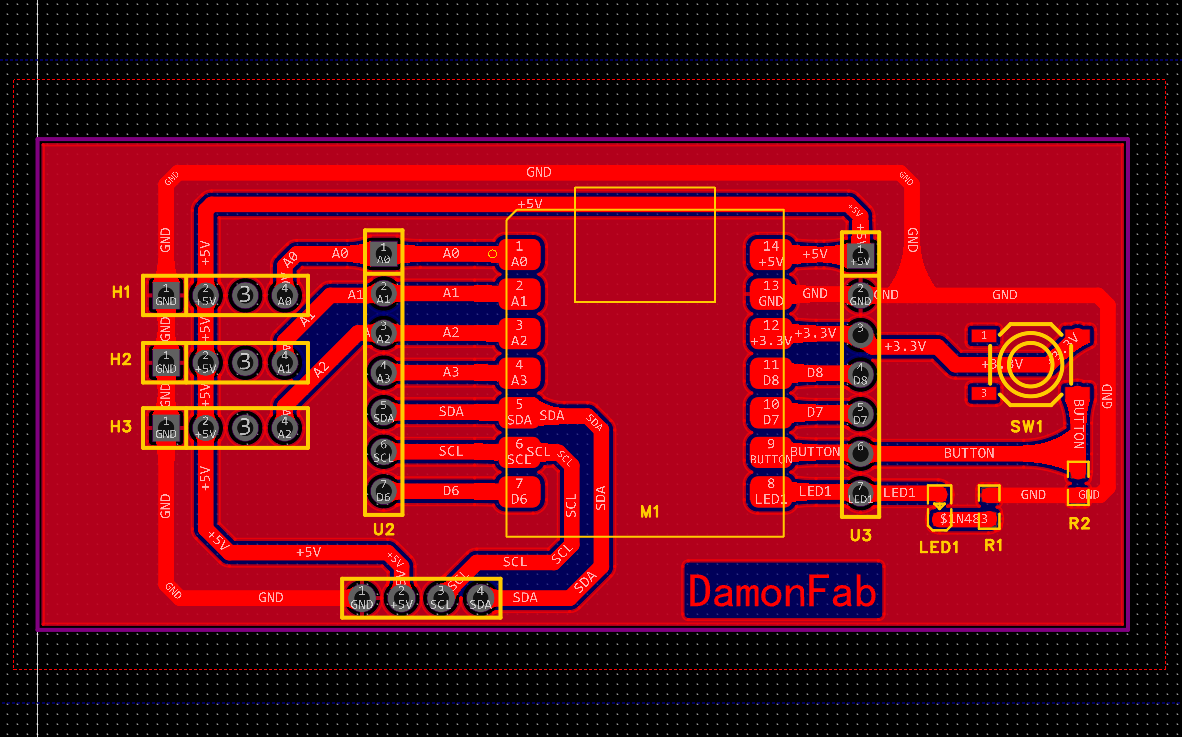
After soldering the circuit, I started writing the program. First of all, I wrote a program that can measure the value of the pressure sensor and output the measured data on the serial port monitor; secondly, I wrote the display function to control the OLED display screen. On the basis of the previous work, I have learned to control the display screen to display characters, so this part mainly allows the display screen to display the pressure value.
              //Pressure Sensors
              #include
                int sensorPin1 = A0;
                int sensorPin2 = A1;
                int sensorPin3 = A2;
                #define PRESS_MIN 20
                #define PRESS_MAX 6000
                #define VOLTAGE_MIN 0
                #define VOLTAGE_MAX 5000

                void setup() {
                  Serial.begin(9600);
                }

                void loop() {
                  long Fdata1 = getPressValue(sensorPin1);
                  long Fdata2 = getPressValue(sensorPin2);
                  long Fdata3 = getPressValue(sensorPin3);
                  Serial.print(Fdata1);
                  Serial.print(",");
                  Serial.print(Fdata2);
                  Serial.print(",");
                  Serial.println(Fdata3);
                  delay(50);

                }

                long getPressValue(int pin)
                {
                  long PRESS_AO = 0;
                  int VOLTAGE_AO = 0;
                  int value = analogRead(pin);
                  int reversedValue = 1023 - value;

                  VOLTAGE_AO = map(value, 0, 1023, 5000, 0);
                  if(VOLTAGE_AO < VOLTAGE_MIN)
                  {
                    PRESS_AO = 0;
                  }
                  else if(VOLTAGE_AO > VOLTAGE_MAX)
                  {
                    PRESS_AO = PRESS_MAX;
                  }
                  else
                  {
                    PRESS_AO = map(VOLTAGE_AO, VOLTAGE_MIN, VOLTAGE_MAX, PRESS_MIN, PRESS_MAX);
                  }

                  return PRESS_AO;
                }
              //OLED Display
              #include
                #include
                #ifdef U8X8_HAVE_HW_SPI
                #include
                #endif
                #ifdef U8X8_HAVE_HW_I2C
                #include
                #endif
                // OLED Display
                U8G2_SSD1306_128X64_NONAME_F_SW_I2C u8g2(U8G2_R0, /* clock=*/ SCL, /* data=*/ SDA, /* reset=*/ U8X8_PIN_NONE);

                // pressure pin
                int sensorPin1 = A0;
                int sensorPin2 = A1;
                int sensorPin3 = A2;

                // P and V
                #define PRESS_MIN 20
                #define PRESS_MAX 6000
                #define VOLTAGE_MIN 0
                #define VOLTAGE_MAX 5000

                void setup(void) {
                  Serial.begin(9600);
                  analogReadResolution(12);  // ADC解析度为12位
                  u8g2.begin();
                }

                void loop(void) {
                  long Fdata1 = getPressValue(sensorPin1);
                  long Fdata2 = getPressValue(sensorPin2);
                  long Fdata3 = getPressValue(sensorPin3);

                  Serial.print(Fdata1);
                  Serial.print(",");
                  Serial.print(Fdata2);
                  Serial.print(",");
                  Serial.println(Fdata3);

                  u8g2.clearBuffer();
                  u8g2.setFont(u8g2_font_ncenB08_tr);
                  u8g2.setCursor(0, 30);
                  u8g2.print("P1: ");
                  u8g2.print(Fdata1);
                  u8g2.setCursor(0, 40);
                  u8g2.print("P2: ");
                  u8g2.print(Fdata2);
                  u8g2.setCursor(0, 50);
                  u8g2.print("P3: ");
                  u8g2.print(Fdata3);
                  u8g2.sendBuffer();
                  delay(10);  // delay 10 mm
                }

                long getPressValue(int pin)
                {
                  long PRESS_AO = 0;
                  int VOLTAGE_AO = 0;
                  int value = analogRead(pin);

                  VOLTAGE_AO = map(value, 0, 4095, 5000, 0);
                  if(VOLTAGE_AO < VOLTAGE_MIN)
                  {
                    PRESS_AO = 0;
                  }
                  else if(VOLTAGE_AO > VOLTAGE_MAX)
                  {
                    PRESS_AO = PRESS_MAX;
                  }
                  else
                  {
                    PRESS_AO = map(VOLTAGE_AO, VOLTAGE_MIN, VOLTAGE_MAX, PRESS_MIN, PRESS_MAX);
                  }
                  return PRESS_AO;
                }
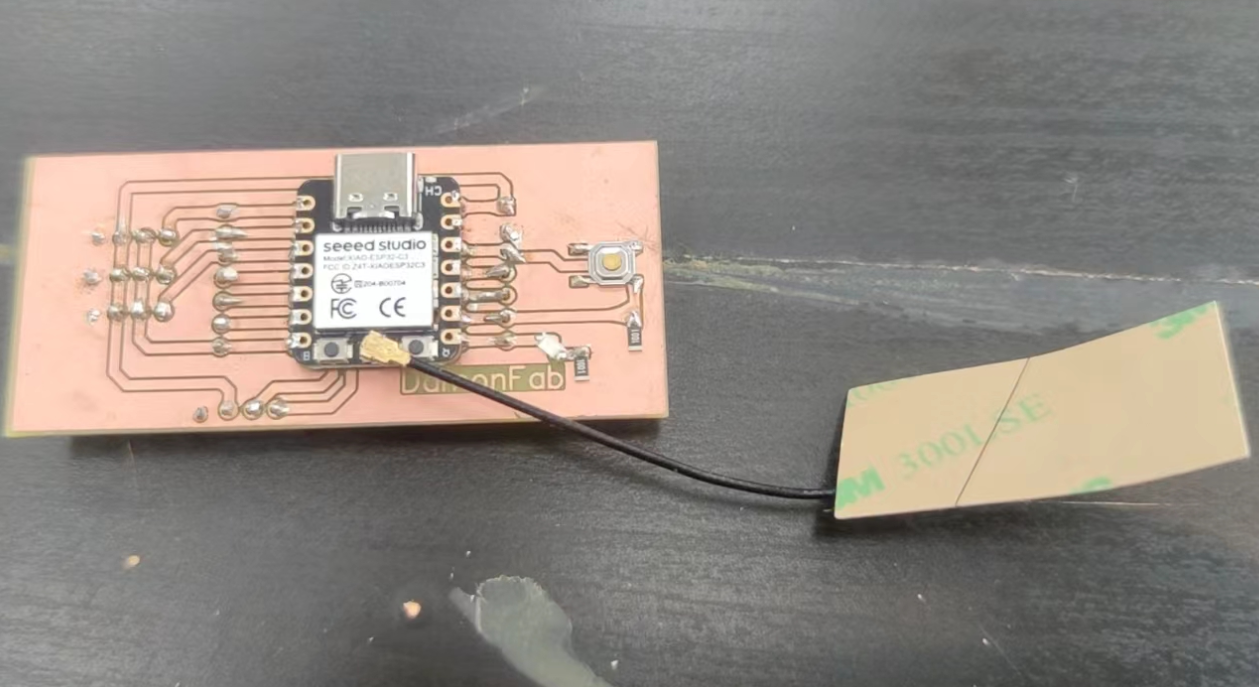
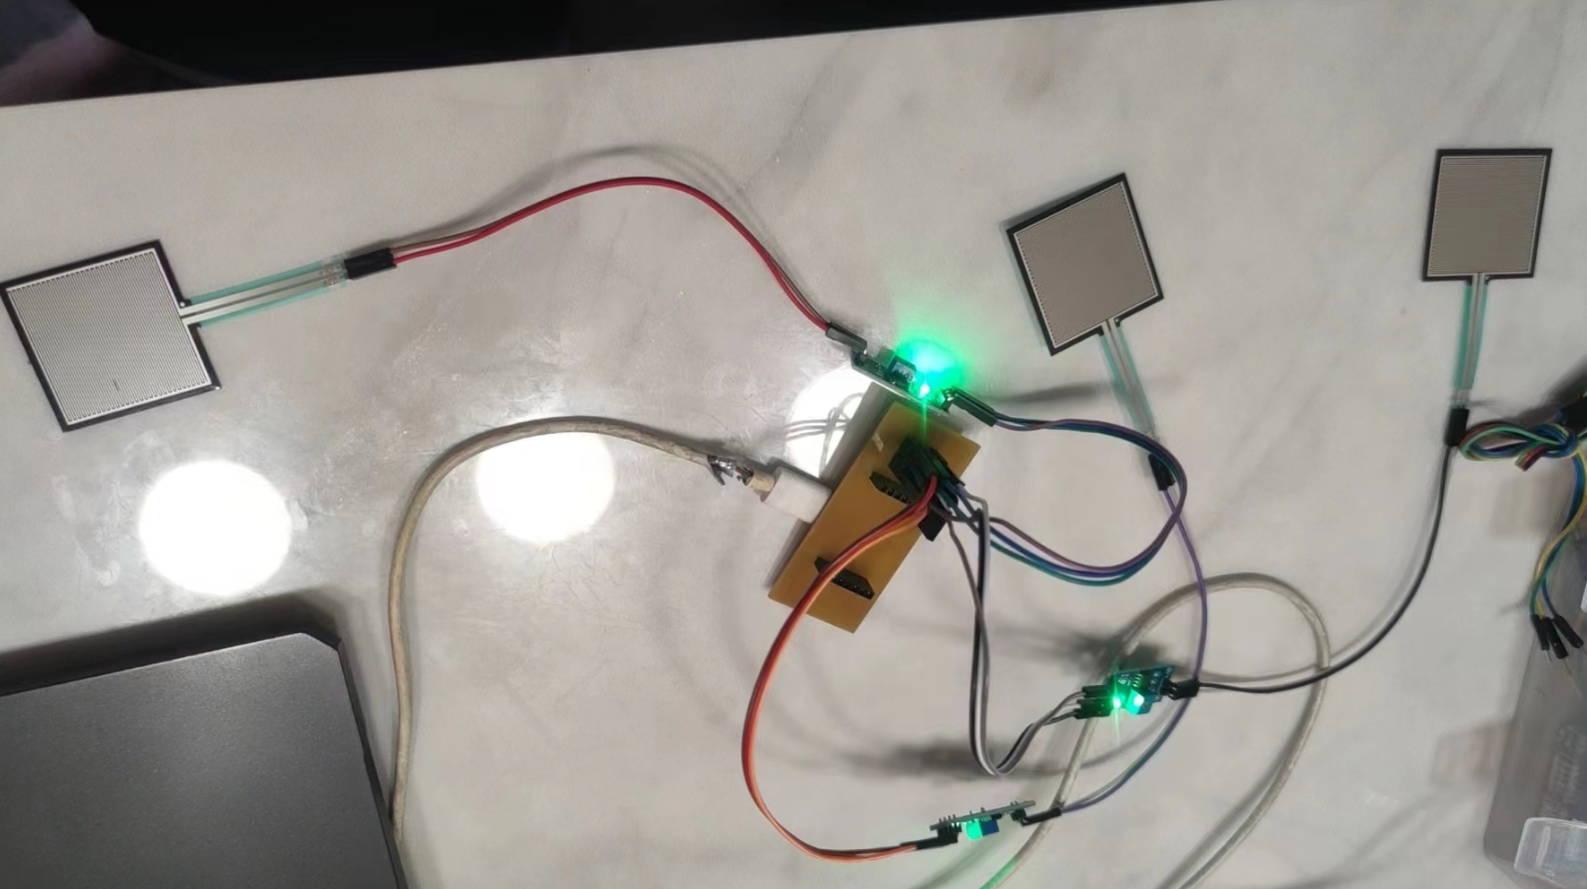
Question: In the process of completing this, I encountered the problem of different data resolution of different main control boards. When testing whether the pressure sensor can work normally, I used the Arduino Uno control board for testing. The test results are normal. The data can be output to the serial monitor according to the normal rate and sensitivity. However, when using the XIAO-esp32C3 for testing, the data output is not sensitive. After consulting the data, it is found that the ADC data resolution is different. The esp32 data resolution is 12 bits.
Device Structure
In this part of the work, I mainly used two technologies: 3D printing and laser cutting. The exterior of the cat litter is cut from wood and the top structure is cut from corrugated paper. In the cutting process, it is necessary to determine the thickness and texture of the material, and I tested the power and speed of cutting corrugated paper. Cat bowls that can hold water and food are made using 3D printing technology. Because 3D printed items are relatively poor in airtightness and waterproof, they are waterproof with paint.


Processing
In the project, I envisioned that the pressure sensor data could be transmitted through the master control and displayed in a more understandable way. I tried using Processing and App Inventor to display polyline data separately.
              //Processing
              import processing.serial.*;  // Import serial library
              Serial myPort;  // Serial port object
              String inputString;  // Input string
              float[] pressure1 = new float[100];  // Pressure 1 array
              float[] pressure2 = new float[100];  // Pressure 2 array
              float[] pressure3 = new float[100];  // Pressure 3 array

              // Define pressure and voltage ranges
              int PRESS_MIN = 20;
              int PRESS_MAX = 6000;
              int VOLTAGE_MIN = 0;
              int VOLTAGE_MAX = 5000;

              void setup() {
                size(800, 600);  // Canvas size
                String portName = Serial.list()[0];  // Serial port name
                myPort = new Serial(this, portName, 9600);  // Open serial port
                myPort.bufferUntil('\n');  // Set buffer until newline character
              }

              void draw() {
                background(255);  // Set background color to white
                stroke(0);  // Set stroke color to black
                noFill();  // No fill

                // Draw Pressure 1 line graph
                stroke(255, 0, 0);  // Set stroke color to red
                beginShape();
                for (int i = 0; i < pressure1.length; i++) {
                  float y = map(pressure1[i], PRESS_MIN, PRESS_MAX, height/3 - 20, 20); // Upper section
                  vertex(i * (width / float(pressure1.length)), y);
                }
                endShape();

                // Draw Pressure 2 line graph
                stroke(0, 255, 0);  // Set stroke color to green
                beginShape();
                for (int i = 0; i < pressure2.length; i++) {
                  float y = map(pressure2[i], PRESS_MIN, PRESS_MAX, height * 2/3 - 20, height/3 + 20); // Middle section
                  vertex(i * (width / float(pressure2.length)), y);
                }
                endShape();

                // Draw Pressure 3 line graph
                stroke(0, 0, 255);  // Set stroke color to blue
                beginShape();
                for (int i = 0; i < pressure3.length; i++) {
                  float y = map(pressure3[i], PRESS_MIN, PRESS_MAX, height - 20, height * 2/3 + 20); // Lower section
                  vertex(i * (width / float(pressure3.length)), y);
                }
                endShape();
              }

              void serialEvent(Serial myPort) {
                inputString = myPort.readStringUntil('\n');
                if (inputString != null) {
                  inputString = trim(inputString);
                  String[] values = split(inputString, ',');
                  if (values.length == 3) {
                    float p1 = float(values[0]);
                    float p2 = float(values[1]);
                    float p3 = float(values[2]);
                    // Amplify data variation
                    p1 = amplify(p1);
                    p2 = amplify(p2);
                    p3 = amplify(p3);
                    appendValue(pressure1, p1);
                    appendValue(pressure2, p2);
                    appendValue(pressure3, p3);
                  }
                }
              }

              void appendValue(float[] array, float value) {
                for (int i = 0; i < array.length - 1; i++) {
                  array[i] = array[i + 1];
                }
                array[array.length - 1] = value;
              }

              // Function to amplify data variation
              float amplify(float value) {
                return value * 1.5;  // Amplification factor
              }
                  //XIAO-esp32C3 BLE
                  #include
                    #include
                    #include
                    #include
                    #include

                    #ifdef U8X8_HAVE_HW_SPI
                    #include
                    #endif
                    #ifdef U8X8_HAVE_HW_I2C
                    #include
                    #endif

                    // BLE UUID
                    #define SERVICE_UUID        "4fafc201-1fb5-459e-8fcc-c5c9c331914b"
                    #define CHARACTERISTIC_UUID "beb5483e-36e1-4688-b7f5-ea07361b26a8"

                    // OLED
                    U8G2_SSD1306_128X64_NONAME_F_SW_I2C u8g2(U8G2_R0, /* clock=*/ SCL, /* data=*/ SDA, /* reset=*/ U8X8_PIN_NONE);

                    // Pressure pin
                    int sensorPin1 = A0;
                    int sensorPin2 = A1;
                    int sensorPin3 = A2;

                    // P and V
                    #define PRESS_MIN 20
                    #define PRESS_MAX 6000
                    #define VOLTAGE_MIN 0
                    #define VOLTAGE_MAX 5000

                    BLECharacteristic *pCharacteristic;

                    void setup() {
                      Serial.begin(9600);
                      analogReadResolution(12);  // ADC resolution is 12 bits
                      u8g2.begin();

                      // initialize BLE
                      BLEDevice::init("MyESP32");
                      BLEServer *pServer = BLEDevice::createServer();
                      BLEService *pService = pServer->createService(SERVICE_UUID);
                      pCharacteristic = pService->createCharacteristic(
                                         CHARACTERISTIC_UUID,
                                         BLECharacteristic::PROPERTY_READ |
                                         BLECharacteristic::PROPERTY_WRITE |
                                         BLECharacteristic::PROPERTY_NOTIFY
                                       );
                      pService->start();
                      BLEAdvertising *pAdvertising = pServer->getAdvertising();
                      pAdvertising->start();
                    }

                    void loop() {
                      long Fdata1 = getPressValue(sensorPin1);
                      long Fdata2 = getPressValue(sensorPin2);
                      long Fdata3 = getPressValue(sensorPin3);

                      String data = String(Fdata1) + "," + String(Fdata2) + "," + String(Fdata3);
                      pCharacteristic->setValue(data.c_str());
                      pCharacteristic->notify();

                      Serial.println(data);

                      u8g2.clearBuffer();
                      u8g2.setFont(u8g2_font_ncenB08_tr);

                      u8g2.setCursor(0, 30);
                      u8g2.print("P1: ");
                      u8g2.print(Fdata1);

                      u8g2.setCursor(0, 40);
                      u8g2.print("P2: ");
                      u8g2.print(Fdata2);

                      u8g2.setCursor(0, 50);
                      u8g2.print("P3: ");
                      u8g2.print(Fdata3);

                      u8g2.sendBuffer();

                      delay(100);  // delay100mm
                    }

                    long getPressValue(int pin) {
                      long PRESS_AO = 0;
                      int VOLTAGE_AO = 0;
                      int value = analogRead(pin);

                      VOLTAGE_AO = map(value, 0, 4095, 5000, 0);
                      if (VOLTAGE_AO < VOLTAGE_MIN) {
                        PRESS_AO = 0;
                      } else if (VOLTAGE_AO > VOLTAGE_MAX) {
                        PRESS_AO = PRESS_MAX;
                      } else {
                        PRESS_AO = map(VOLTAGE_AO, VOLTAGE_MIN, VOLTAGE_MAX, PRESS_MIN, PRESS_MAX);
                      }

                      return PRESS_AO;
                    }
AppInventor
MIT App Inventor is an intuitive visual programming environment that allows people of all ages to quickly develop apps for multiple platforms, including Android, iOS, and iPad. Its modular programming approach significantly reduces the difficulty of coding, enabling learners to focus more on creative content.

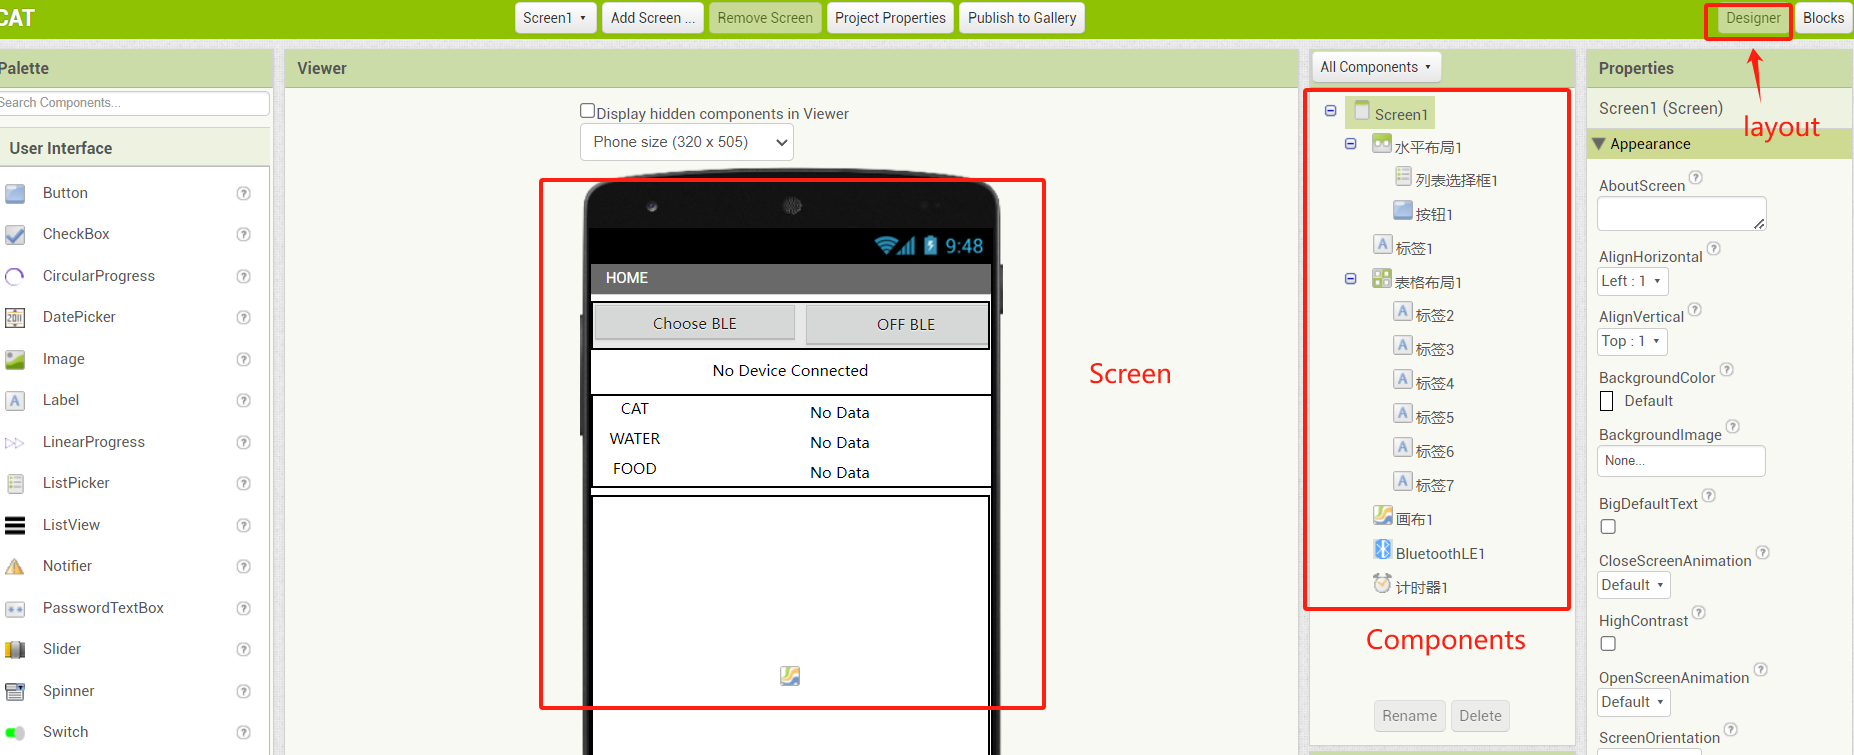
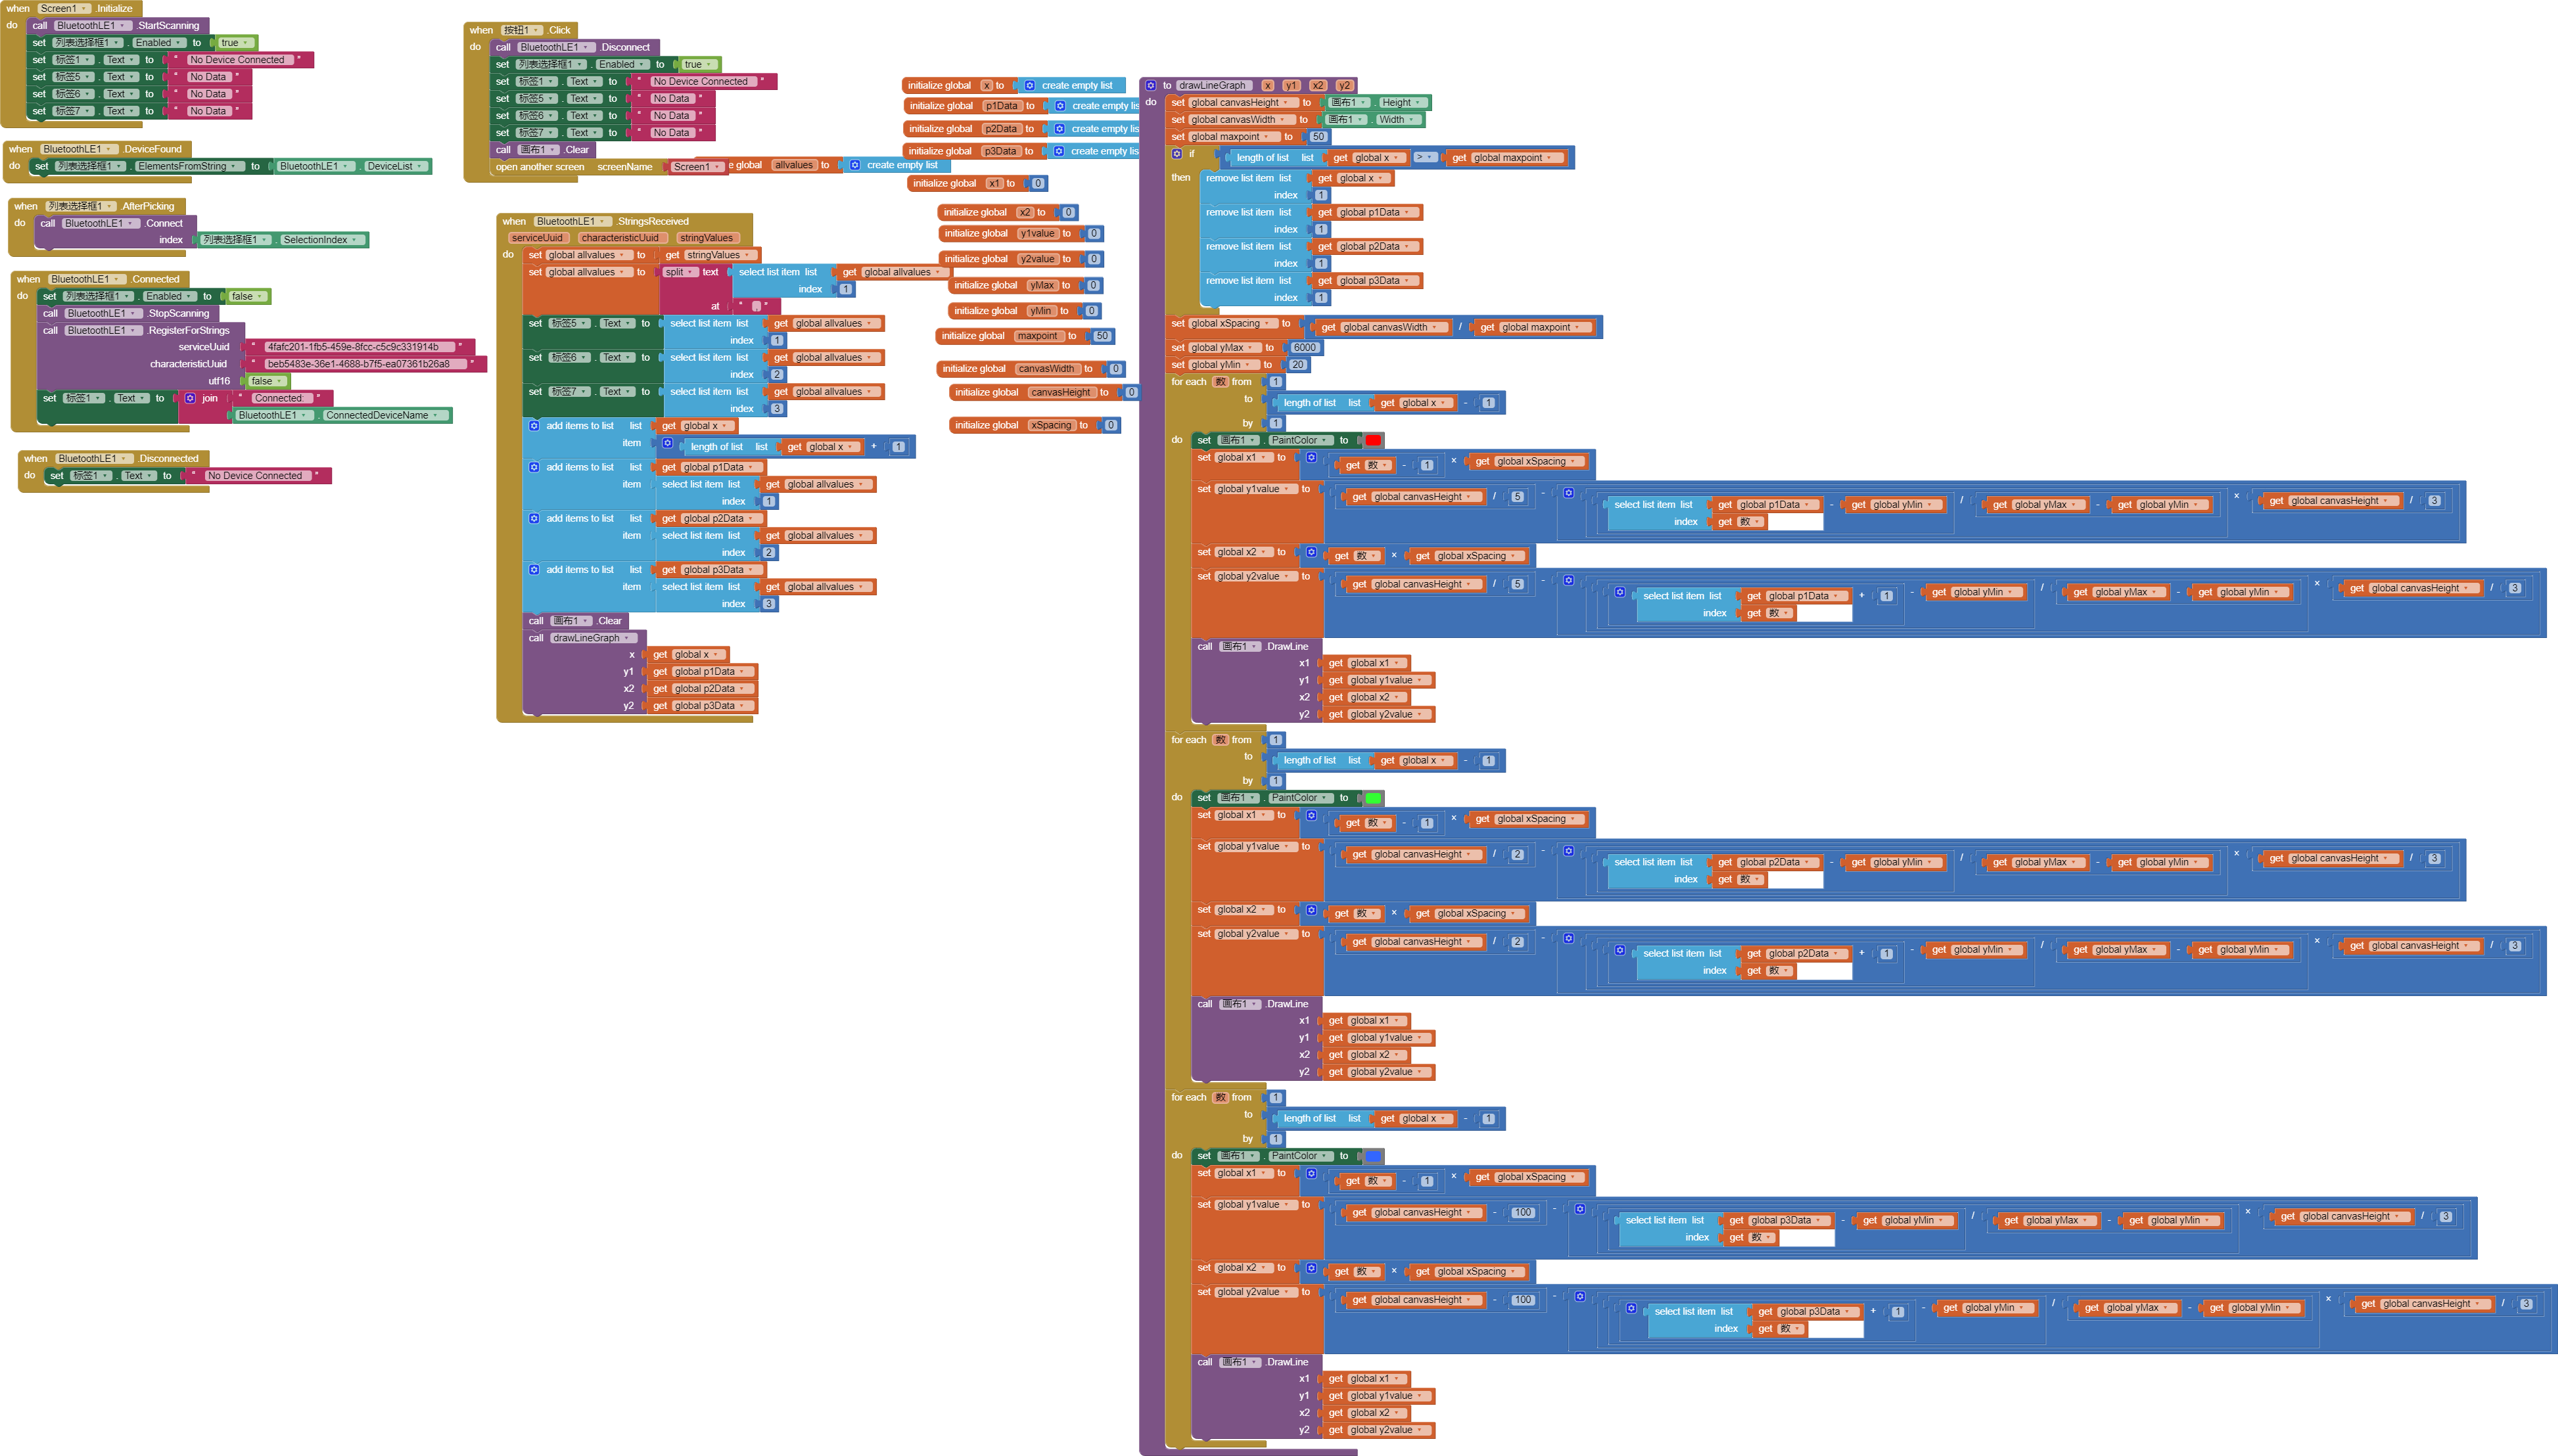
Next, we begin using the programming environment. By directly searching the website through a browser, we can access the official server, then register an account and log in to create our own app project. Upon entering the project, we will see the interface layout design screen by default. On the left side of the screen, we can select the components we need and then drag them to the center screen for layout design. Adjustments can be made on the right side according to the properties of different components. After completing the interface layout design, we can enter the programming interface by clicking the programming button in the top right corner. In the programming interface, we can find relevant programming modules on the left side and write the program by dragging them. As shown in the following two images:
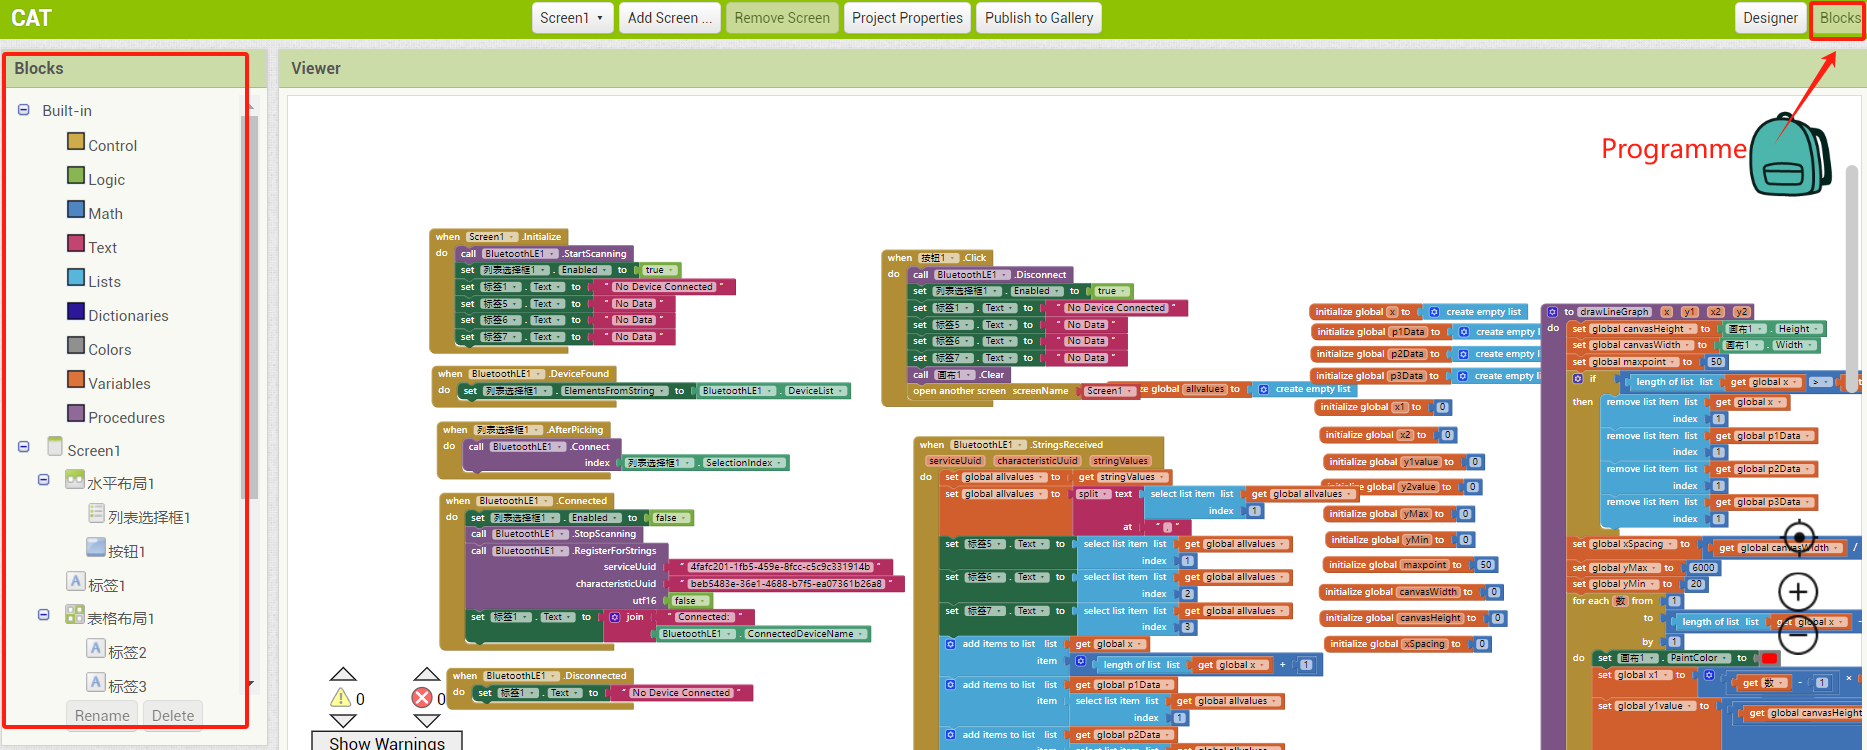
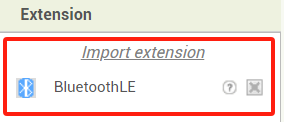
The built-in Bluetooth component of App Inventor only supports Bluetooth 2.0 and 3.0. To connect with the ESP32 Bluetooth, you need to add the BluetoothLE extension, so you need to download this extension.Here
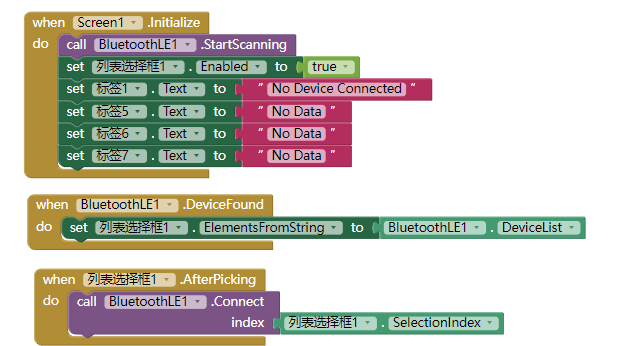
The programming is done in a modular way. We can see the programming modules for the applied components on the left side. First, I used a screen initialization statement to initialize the screen display when the software is opened. I used the 'devicefound' module to find connectable Bluetooth devices and a 'list' statement to show the connected Bluetooth device when the correct Bluetooth address is selected.
Use the Bluetooth connection statement and set the correct ServiceUuid and CharacteristicUuid to establish the connection. Also, set up the disconnection method
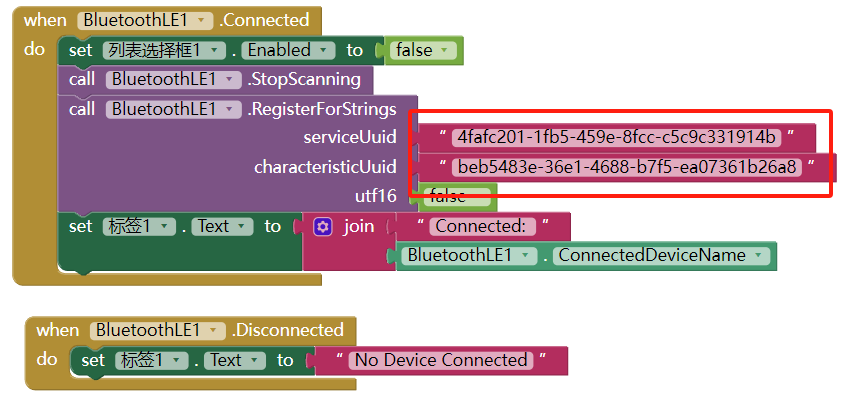
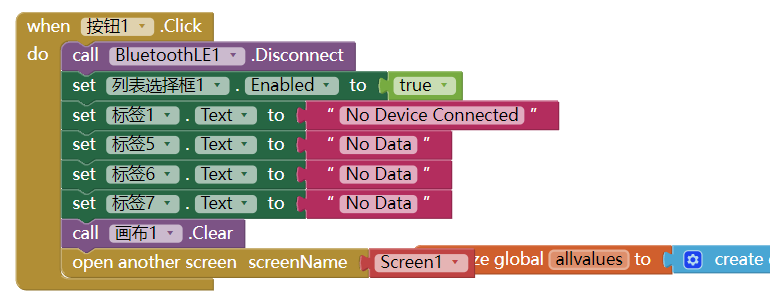
Set up a 'disconnect BlE' button. When this button is clicked, clear the displayed data and return to the initial screen setup.
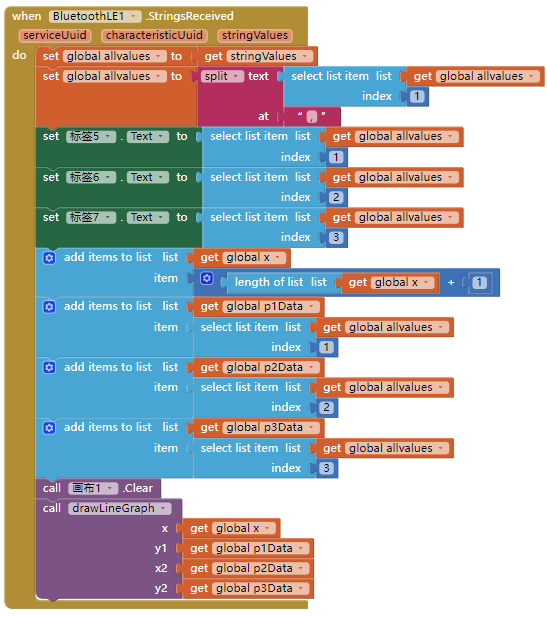
Receive and parse data. The actual data sent from the sending end is a list of three pressure values. When the data is received, each value needs to be displayed in a different position.
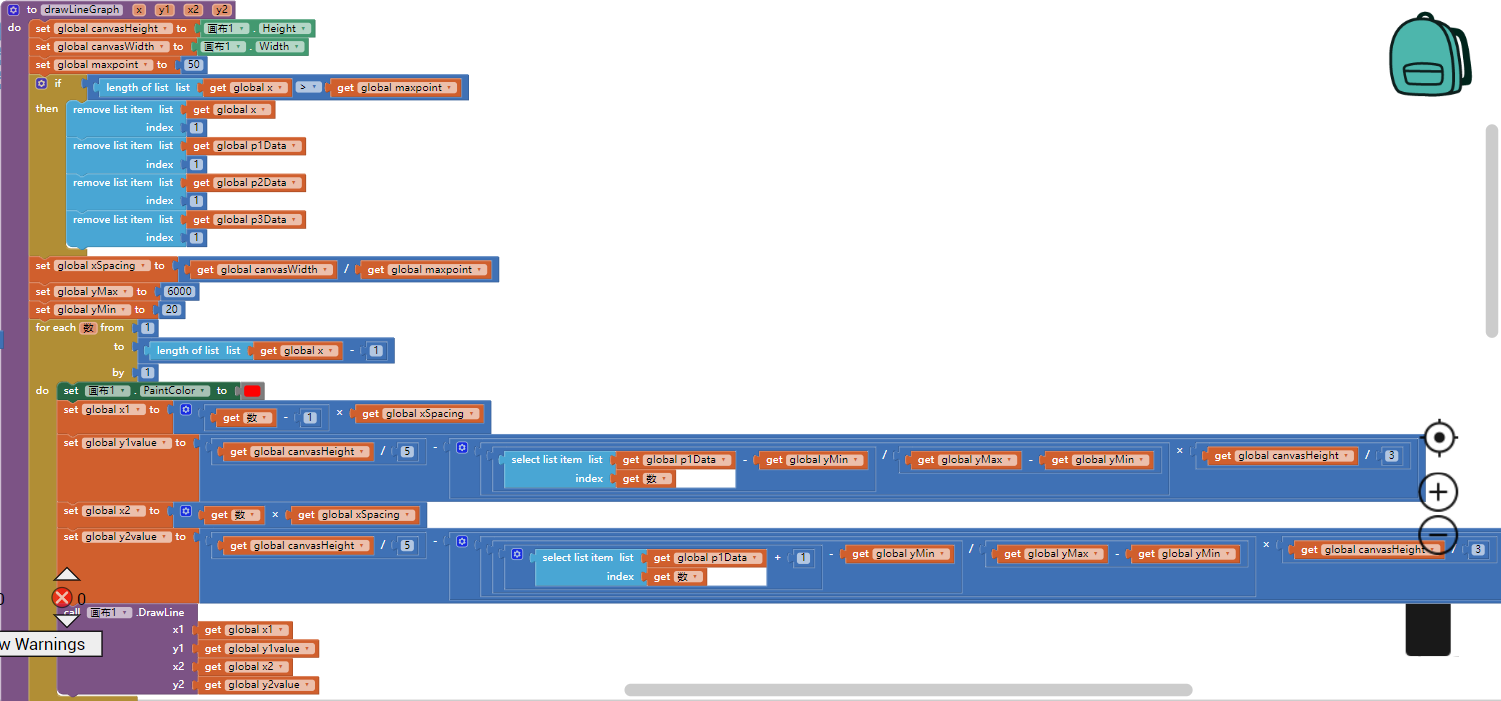
Draw a polyline. After receiving the data, the continuously received values for each pressure will be stored in a new list. By reading each data point, a polyline will be drawn on the canvas to achieve the effect of plotting a polyline.
Screenshot of program——Program.aia
Video of the connection demonstration
Testing
The system is basically operational, but needs further optimization. There is also a lack of physical testing, which requires cats to be tested after returning home on weekends