Inteface & Application Programming
Objectives for Week 14
- Write an application that interfaces a user with an input and/or output device that I made
- Group Assignment:
- Compare as many tool options as possible
This week was about creating an interface with any of the boards I have created so far. Since, it was an area I had no prior experience in, our instructor, Midlaj helped me out through the process.
The next day after the global class, we had a brief session by Midlaj and Jogin, where they explained the basics of creating digital interface. After the session, Midlaj, showed us how a webpage can be created and showcased an example with ESP32 development board. We all tried our hands in creating a webpage right after.
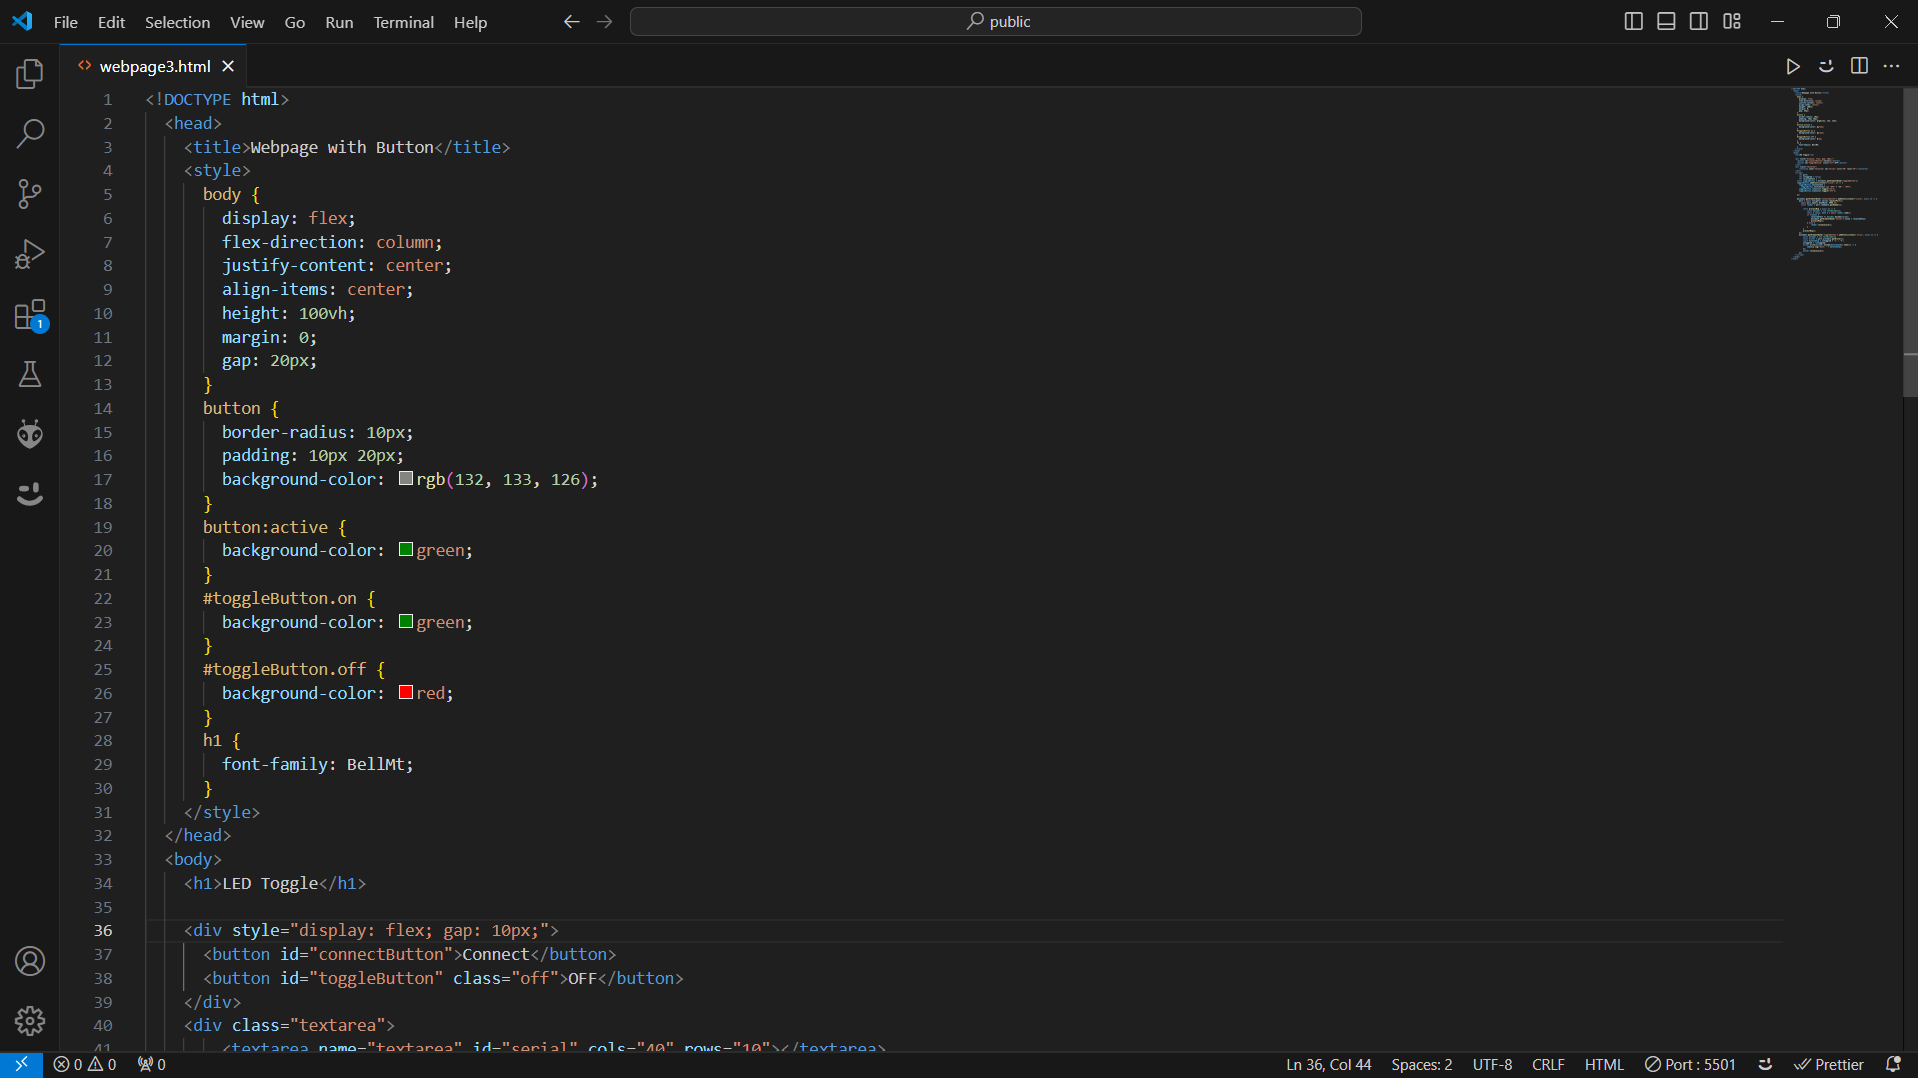
I seeked help from an extension in Visual Studio Code called Cody AI to generate the code. I found the extension to be really helpful.
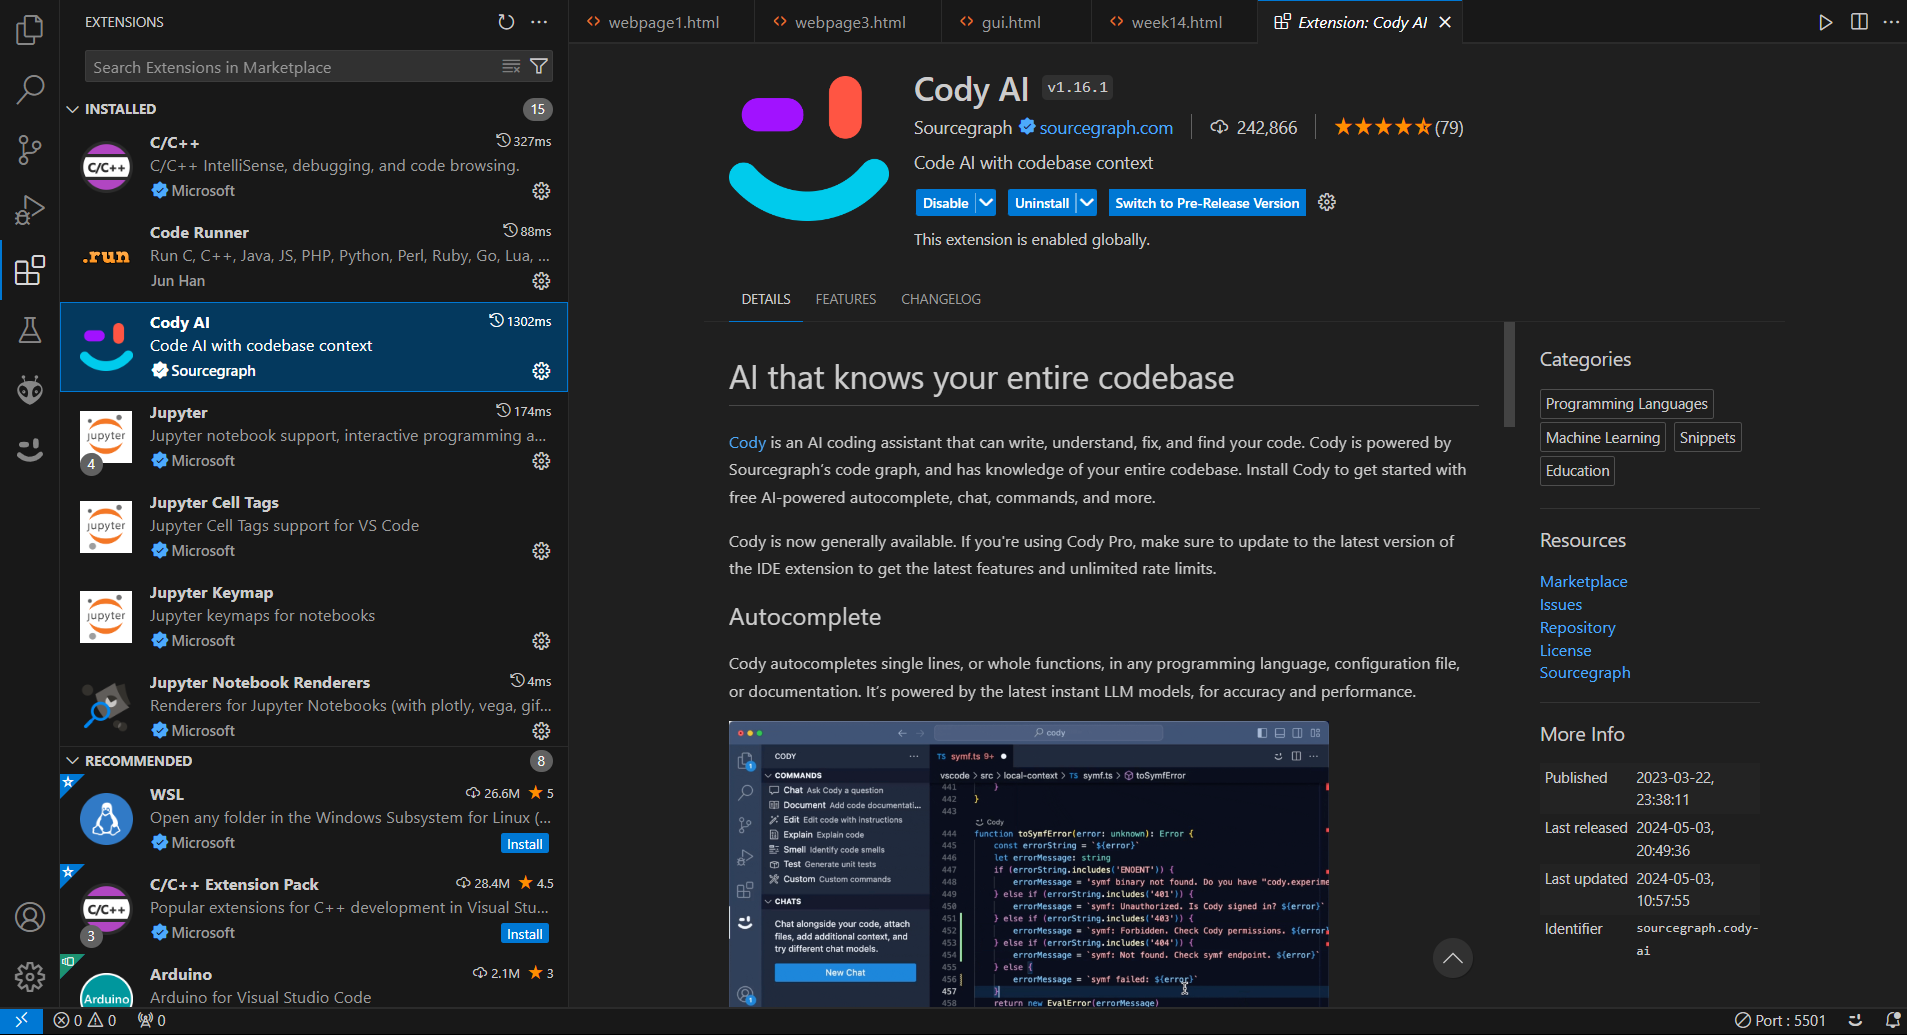
I made a simple code for a webpage that has two buttons, where, one button is for connecting the port and the other for "ON" and "OFF" condition. It also has a serial text area. Below showcases the elements I have created.
LED Toggle
To use, first, upload a code for "ON" and "OFF" condition for an LED in your board. Once uploaded, click on "Connection" button and select the port. Click on "ON" and "OFF" to see your LED lit up and off.
I used my Quentorres board for the purpose. Code for the Quentorres board is as below. You can download the code I have created for the webpage from the bottom of the page.
        #include < Arduino.h>
        int LED = 1;

        void setup() {
            pinMode(LED, OUTPUT);
            Serial.begin(9600);
        }

        void loop() {
            if (Serial.available() > 0) {
                char condition = Serial.read();
                if (condition == '1') {
                  digitalWrite(LED, HIGH);
                  Serial.println("The LED is now ON");
                } else if (condition == '0') {
                  digitalWrite(LED, LOW);
                  Serial.println("The LED is now OFF");
                }
            }
        }
Explanation
- void loop() { ... }: The loop() function runs continuously after the setup() function has finished. It repeatedly executes the code inside its block.
- if (Serial.available() > 0) { ... }: This checks if there is any data available to read from the serial port. Serial.available() returns the number of bytes available to read.
- if (condition == '1') { ... } else if (condition == '0') { ... }: These conditional statements check the value of condition and perform actions accordingly.
- digitalWrite(LED, HIGH);: If the received data is '1', this turns the LED on by setting pin 1 to high voltage.
- Serial.println("The LED is now ON");: This sends a message to the serial monitor indicating that the LED is now on.
- digitalWrite(LED, LOW);: If the received data is '0', this turns the LED off by setting pin 1 to low voltage.
- Serial.println("The LED is now OFF");: This sends a message to the serial monitor indicating that the LED is now off.
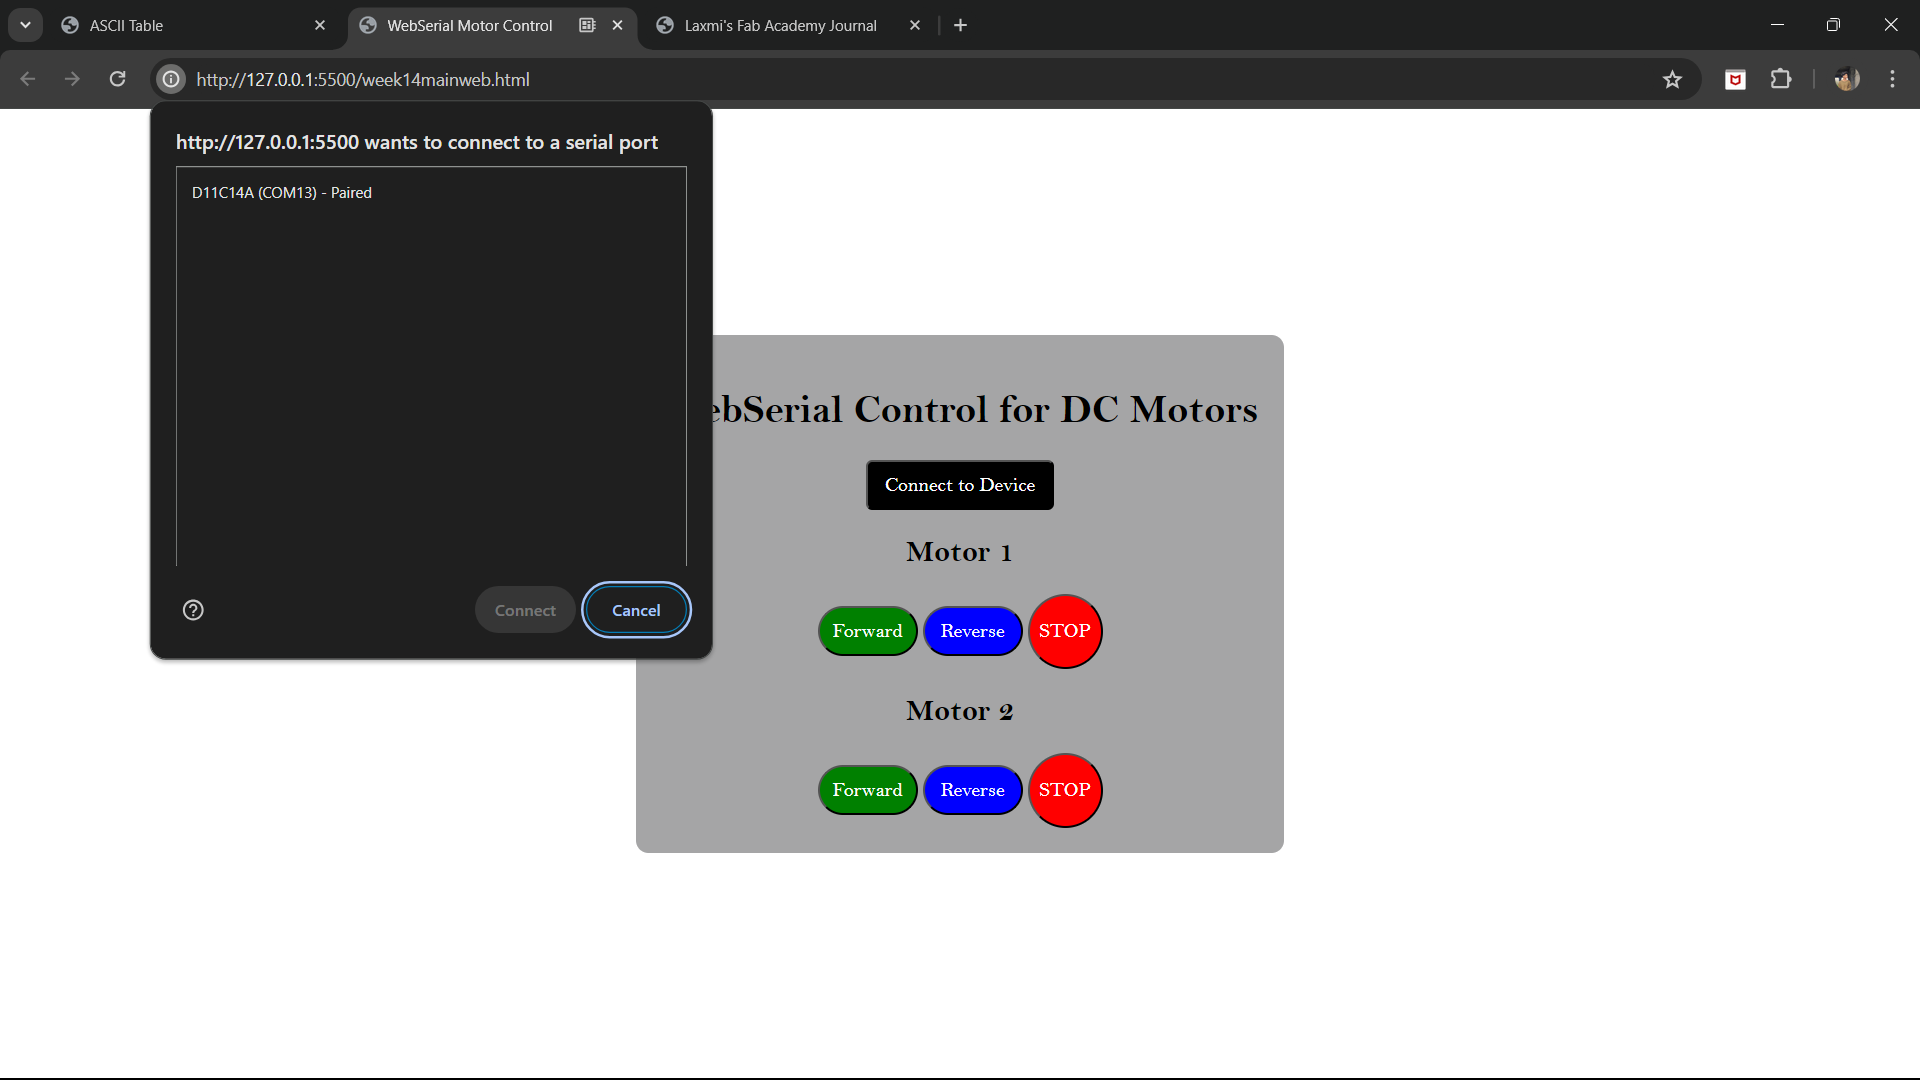
WebSerial Control for DC Motors
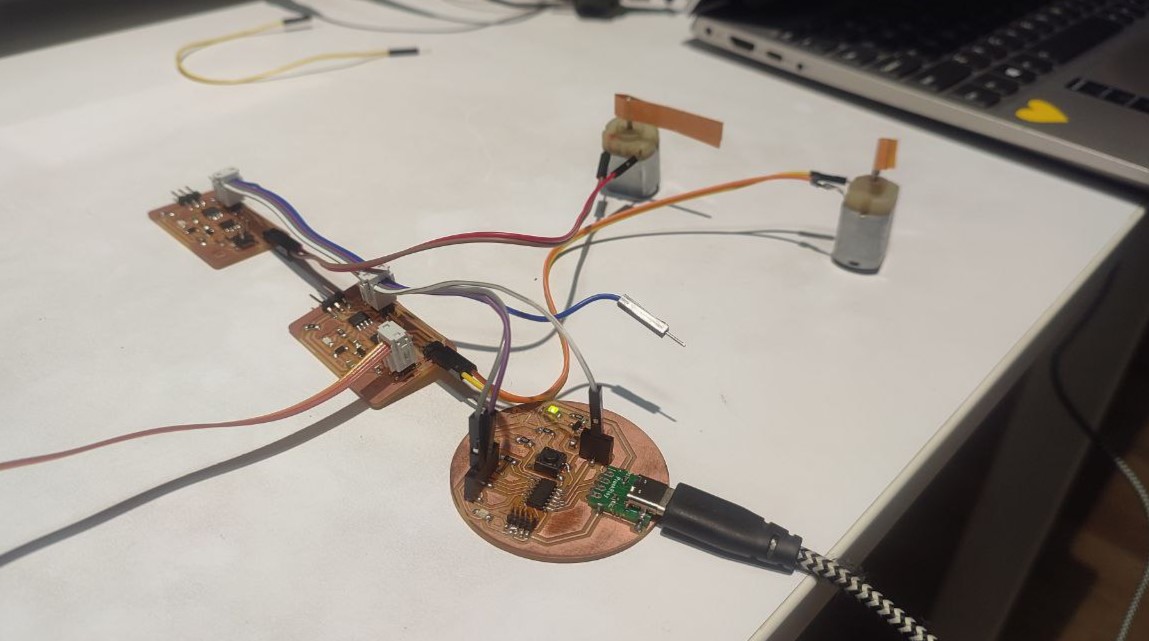
The objective of this week was to take the boards I have created for the Communication week and to make an interface for the same. Since, I have done the process during Communication week, I already have the codes. I only had to do some modifications in order to accomodate the button features in the webpage.
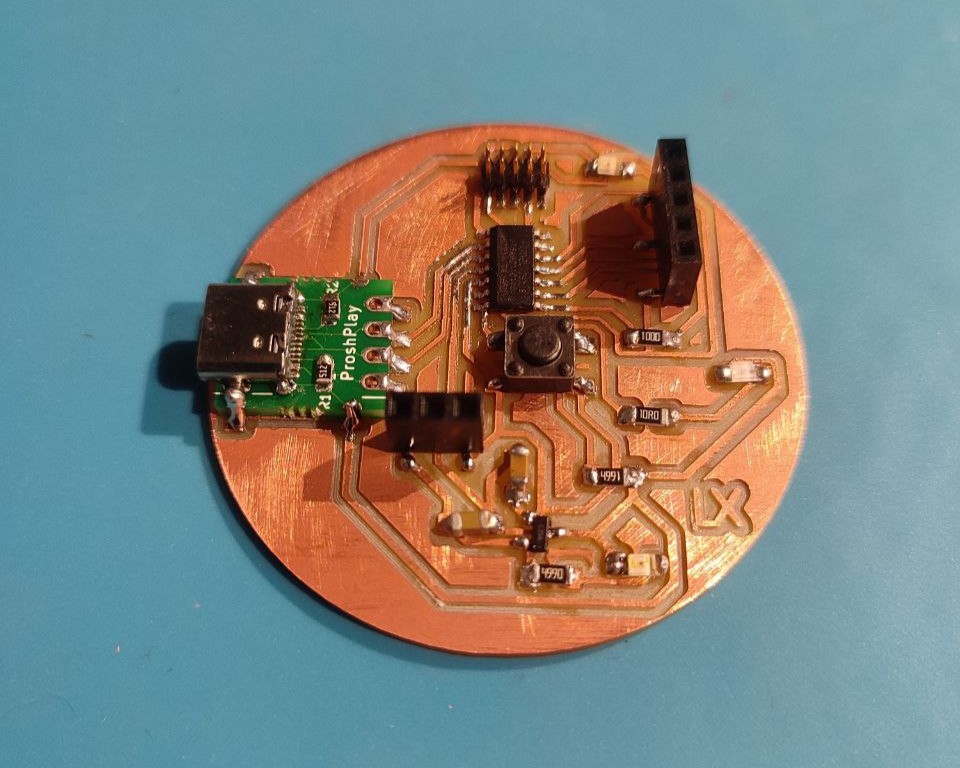
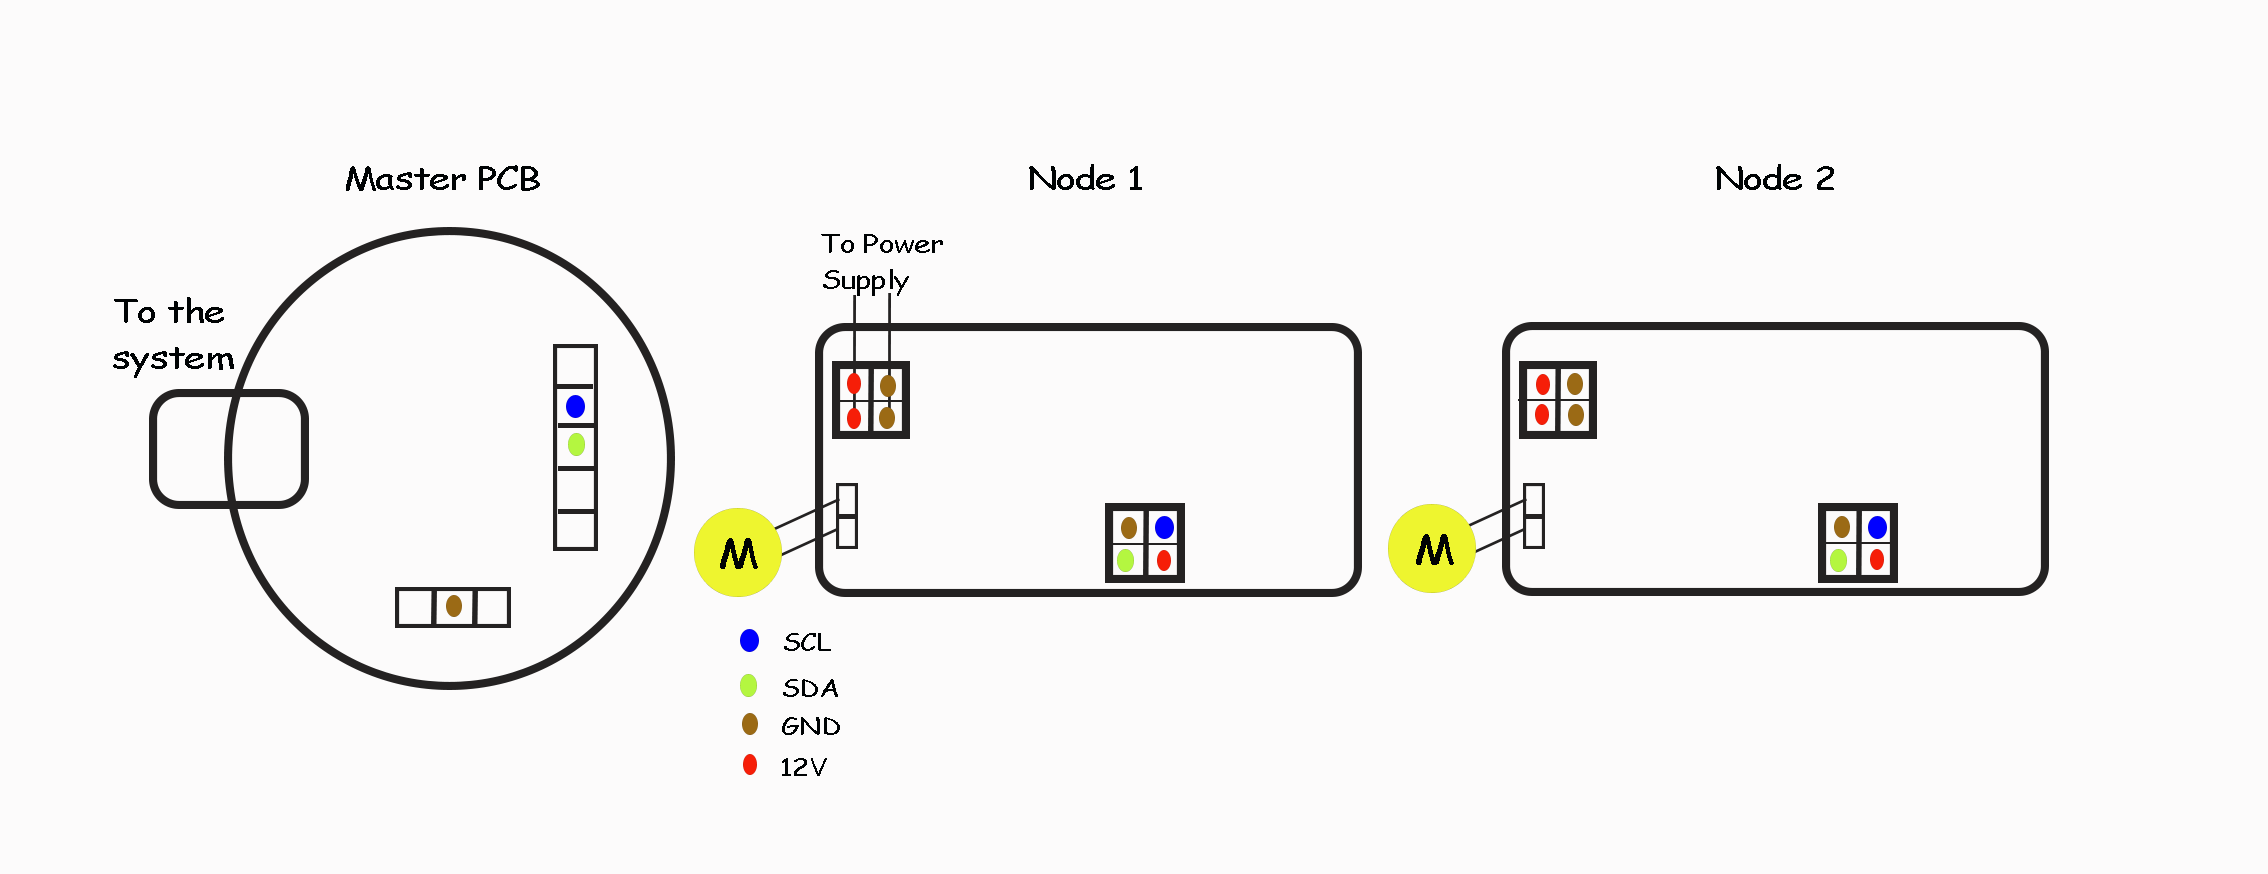
Master PCB with SAMD11C14A MC
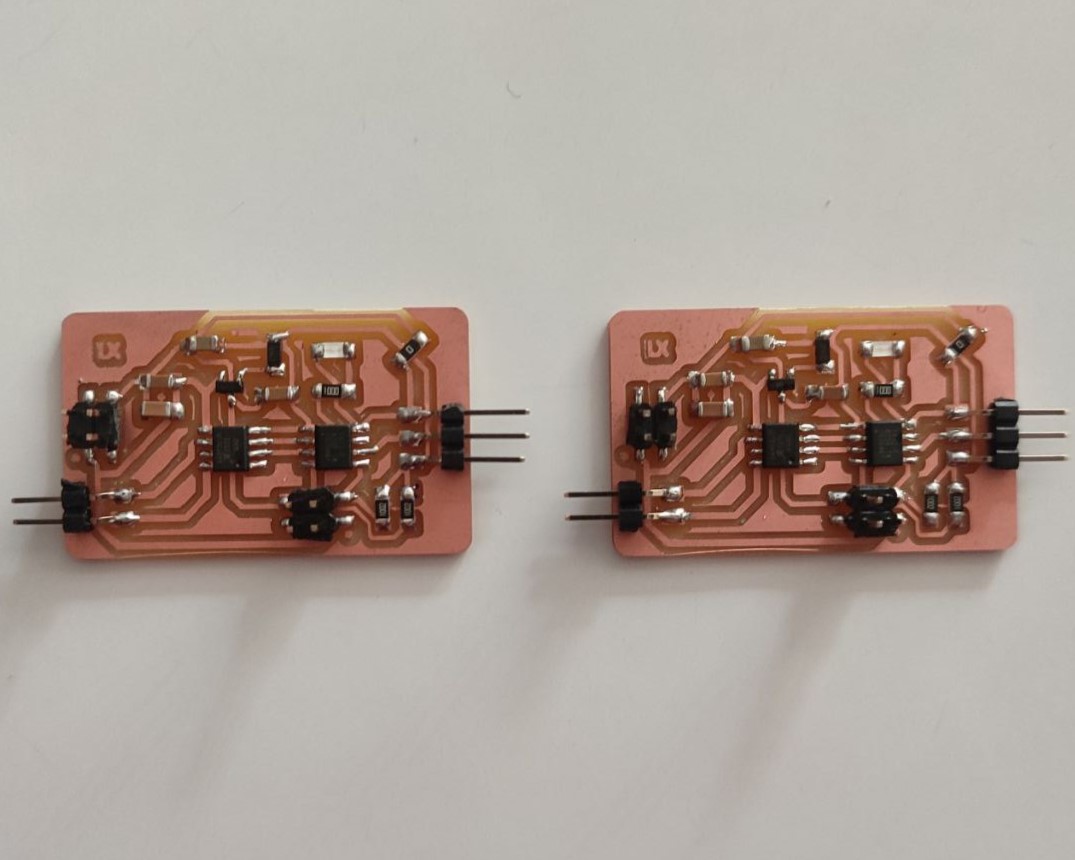
Node PCBs with ATtiny412 MC and A4953 Motor Driver
Refer documentation of Week 13 to know about the boards I have created and the connections I have done in order to communicate between the boards.
Task: To run the DC Motors in forward and reverse direction as per the buttons pressed and also the LEDs on corresponding Nodes lit up when motors are in motions.
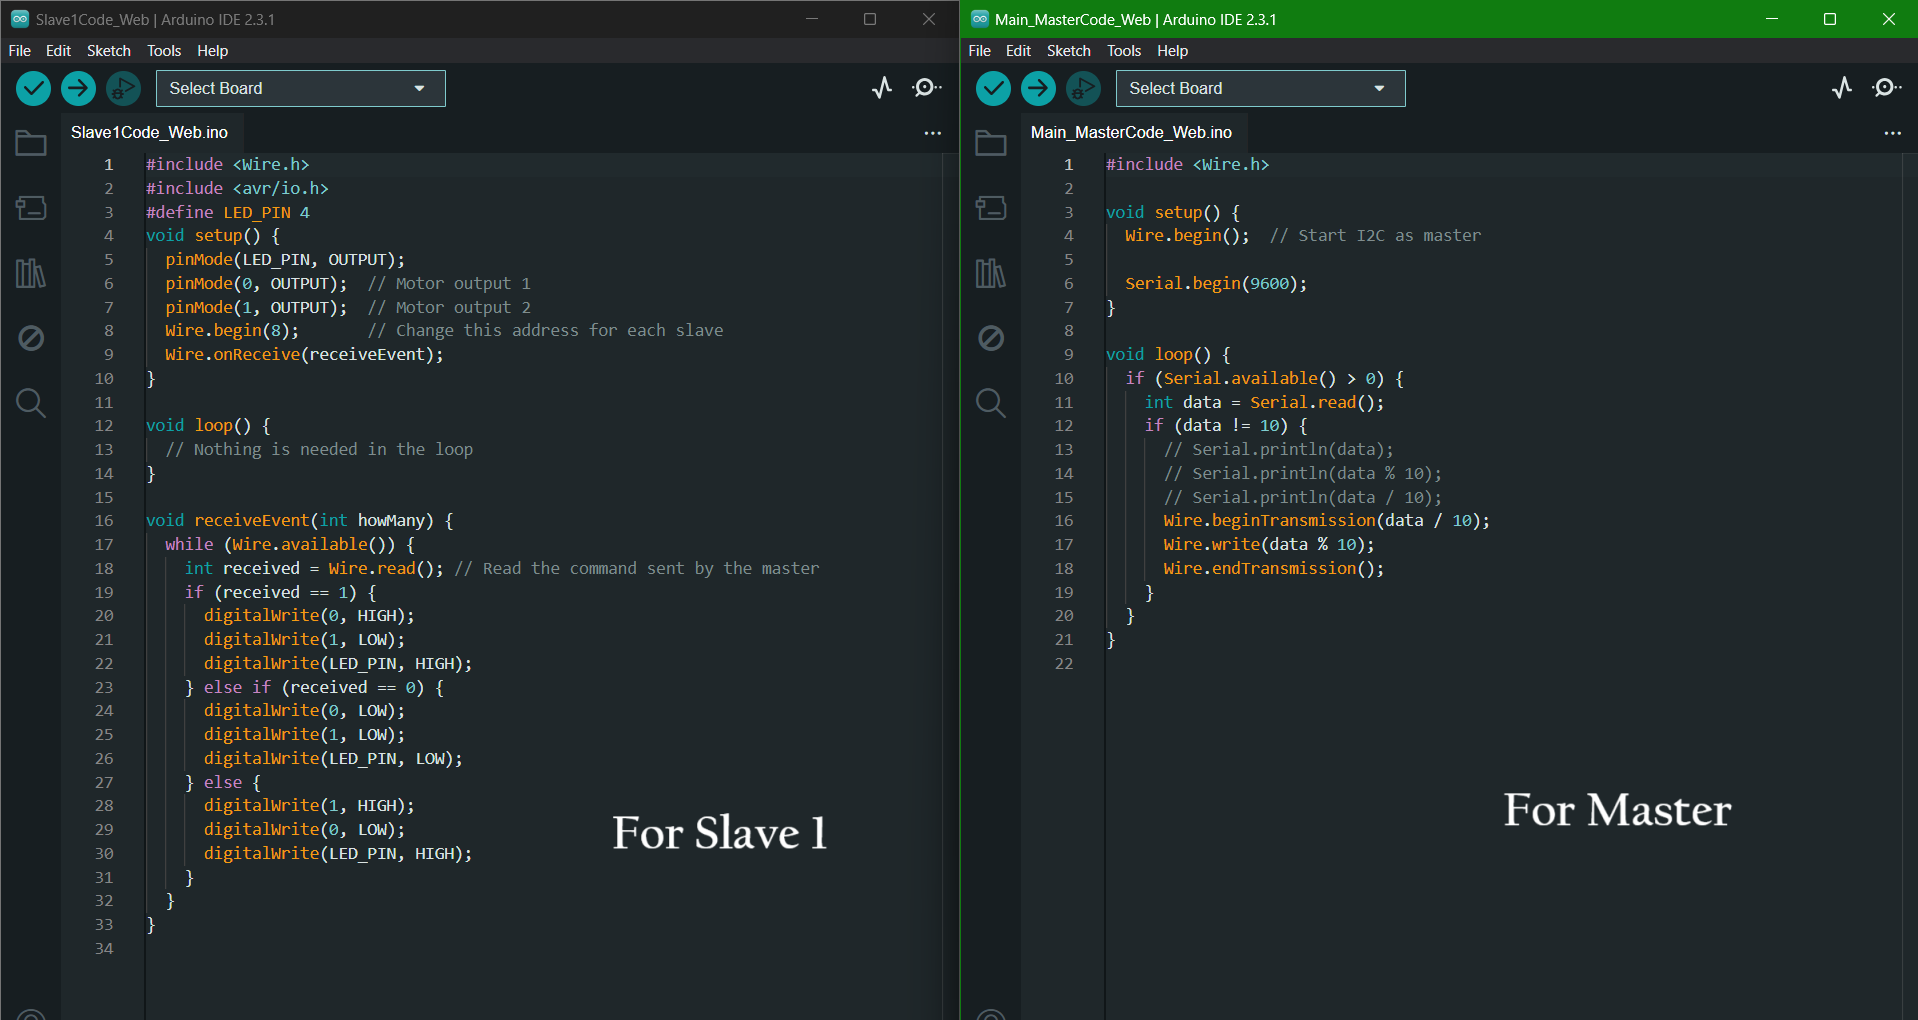
Master PCB Code
  // Define the motor driver control pins
const int motorPin1 = 27;  // IN1 connected to GPIO 18
const int motorPin2 = 14;  // IN2 connected to GPIO 19

void setup() {
  // Initialize serial communication at 115200 baud rate for debugging
  Serial.begin(115200);

  // Initialize the motor control pins as outputs
  pinMode(motorPin1, OUTPUT);
  pinMode(motorPin2, OUTPUT);

  // Start with the motor stopped
  stopMotor();
}

void loop() {
  // Run the motor forward for 5 seconds
  Serial.println("Running motor forward");
  runMotorForward();
  delay(500);

  // Stop the motor for 2 seconds
  Serial.println("Stopping motor");
  stopMotor();
  delay(200);

  // Run the motor backward for 5 seconds
  Serial.println("Running motor backward");
  runMotorBackward();
  delay(500);

  // Stop the motor for 2 seconds
  Serial.println("Stopping motor");
  stopMotor();
  delay(2000);
}

void runMotorForward() {
  digitalWrite(motorPin1, HIGH);
  digitalWrite(motorPin2, LOW);
}

void runMotorBackward() {
  digitalWrite(motorPin1, LOW);
  digitalWrite(motorPin2, HIGH);
}

void stopMotor() {
  digitalWrite(motorPin1, LOW);
  digitalWrite(motorPin2, LOW);
}
Explanation
- runMotorForward(): Sets motorPin1 to HIGH and motorPin2 to LOW, causing the motor to run forward.
- runMotorBackward(): Sets motorPin1 to LOW and motorPin2 to HIGH, causing the motor to run backward.
- stopMotor(): Sets both motorPin1 and motorPin2 to LOW, stopping the motor.
Node PCB Code
    #include
      #include
      #define LED_PIN 4
      void setup() {
        pinMode(LED_PIN, OUTPUT);
        pinMode(0, OUTPUT);  // Motor output 1
        pinMode(1, OUTPUT);
        Wire.begin(8);
        Wire.onReceive(receiveEvent);
      }

      void loop() {
        // Nothing is needed in the loop
      }

      void receiveEvent(int howMany) {
        while (Wire.available()) {
          int received = Wire.read(); // Read the command sent by the master
          if (received == 1) {
            digitalWrite(0, HIGH);
            digitalWrite(1, LOW);
            digitalWrite(LED_PIN, HIGH);
          } else if (received == 0) {
            digitalWrite(0, LOW);
            digitalWrite(1, LOW);
            digitalWrite(LED_PIN, LOW);
          } else {
            digitalWrite(1, HIGH);
            digitalWrite(0, LOW);
            digitalWrite(LED_PIN, HIGH);
          }
        }
      }
Explanation
- Wire.begin(8);: Initializes the I2C communication with the Node address set to 8. I have given 8 for Node 1 and 9 for Node 2.
- Wire.onReceive(receiveEvent);: Registers the receiveEvent function as the event handler for receiving I2C data.
- void receiveEvent(int howMany) { ... }: This function is called whenever data is received over I2C.
- while (Wire.available()) { ... }: Loops while there is data available in the I2C buffer.
- int received = Wire.read();: Reads one byte of data from the I2C buffer and stores it in the received variable.
- if (received == 1) { ... } else if (received == 0) { ... } else { ... }:
- if (received == 1): Sets pin 0 to HIGH, pin 1 to LOW, and turns on the LED.
- else if (received == 0): Sets both pin 0 and pin 1 to LOW, and turns off the LED.
- else: Sets pin 1 to HIGH, pin 0 to LOW, and turns on the LED. This is the default action for any value other than 0 or 1.
The Arduino IDE code for the Master and 2 Nodes PCB are available to download at the bottom of the page.
For the interface, I chose Web Serial API. It is a web standard that enables websites to communicate with serial devices. This can be very useful for applications that need to interact with custom hardware, scientific instruments, or other devices that utilize serial communication. The Web Serial API is part of the Web APIs available in modern browsers, providing a way for web applications to access serial ports, including devices connected via USB, allowing direct communication with a wide range of devices from within the web browser.
Features of Web Serial API
- Bidirectional Communication: Allows sending data to and receiving data from a serial device.
- Asynchronous Interaction: Uses Promises to handle asynchronous reading and writing operations.
- Security and Permissions: Users must grant permission for a web page to access serial ports, providing a level of security against unauthorized access.
With the help of Cody AI in Visual Studio Code, I created an HTML code for the Webpage. I made a simple page with the necessary buttons and required port access. The code for the page is available to download.
<!DOCTYPE html>
  <html lang="en">
  <head>
    <meta charset="UTF-8" />
    <title>WebSerial Motor Control</title>
    <style>
      body {
        display: flex;
        justify-content: center;
        align-items: center;
        height: 100vh;
        margin: 0;
        font-family: "Bell MT", sans-serif;
      }
      .container {
        background-color: rgb(165, 165, 166);
        padding: 20px;
        border-radius: 10px;
        text-align: center;
      }
      button {
        width: 80px;
        height: 40px;
        font-size: 16px;
        font-family: "Bell MT", sans-serif;
      }
      .forward {
        background-color: green;
        color: white;
        border-radius: 20px;
      }
      .reverse {
        background-color: blue;
        color: white;
        border-radius: 20px;
      }
      .stop {
        background-color: red;
        color: white;
        width: 60px;
        height: 60px;
        border-radius: 50%;
      }
      .connect {
        background-color: black;
        color: white;
        width: 150px;
        height: 40px;
        border-radius: 5px;
      }
    </style>
  </head>
  <body>
    <div class="container">
      <h1>WebSerial Control for DC Motors</h1>
      <button class="connect" onclick="connectSerial()">
        Connect to Device
      </button>

      <h2>Motor 1</h2>
      <button class="forward" onclick="sendCommand('Q')">Forward</button>
      <button class="reverse" onclick="sendCommand('R')">Reverse</button>
      <button class="stop" onclick="sendCommand('P')">STOP</button>
      <h2>Motor 2</h2>
      <button class="forward" onclick="sendCommand('G')">Forward</button>
      <button class="reverse" onclick="sendCommand('H')">Reverse</button>
      <button class="stop" onclick="sendCommand('F')">STOP</button>

      <script>
        let port;
        let writer;

        async function connectSerial() {
          if ("serial" in navigator) {
            try {
              const requestOptions = { baudRate: 9600 };
              port = await navigator.serial.requestPort();
              await port.open(requestOptions);

              const textEncoder = new TextEncoderStream();
              const writableStreamClosed = textEncoder.readable.pipeTo(
                port.writable
              );

              writer = textEncoder.writable.getWriter();
              console.log("Connected");
            } catch (err) {
              console.error("There was an error opening the serial port:", err);
            }
          } else {
            console.error("Web Serial API not supported.");
          }
        }

        async function sendCommand(command) {
          if (!writer) {
            console.log("Serial port not connected");
            return;
          }
          await writer.write(command + "\n");
          console.log("Sent command:", command);
        }
      </script>
    </div>
  </body>
  </html>
Explanation
- <button class="connect" onclick="connectSerial()">: Button to initiate connection to the device, invoking the connectSerial() function on click.
- connectSerial(): Asynchronously requests access to the serial port, opens it with specified options, and sets up a writable stream for sending commands.
- sendCommand(command): Sends a command to the connected serial port, appending a newline character (\n) to the command string.
- port = await navigator.serial.requestPort();:
- navigator.serial.requestPort(): Asynchronously requests access to a serial port from the user.
- await: Pauses execution of the function until the promise returned by requestPort() resolves.
- port.open(requestOptions): Asynchronously opens the serial port with specified options (requestOptions), such as baud rate (9600 in this case).
- textEncoder.readable.pipeTo(port.writable): Sets up a pipeline where data from textEncoder's readable stream is piped (transferred) to the serial port's writable stream.
- textEncoder.writable.getWriter(): Retrieves a WritableStreamDefaultWriter for writing data to the textEncoder stream.
Click here to view the webpage I have created.
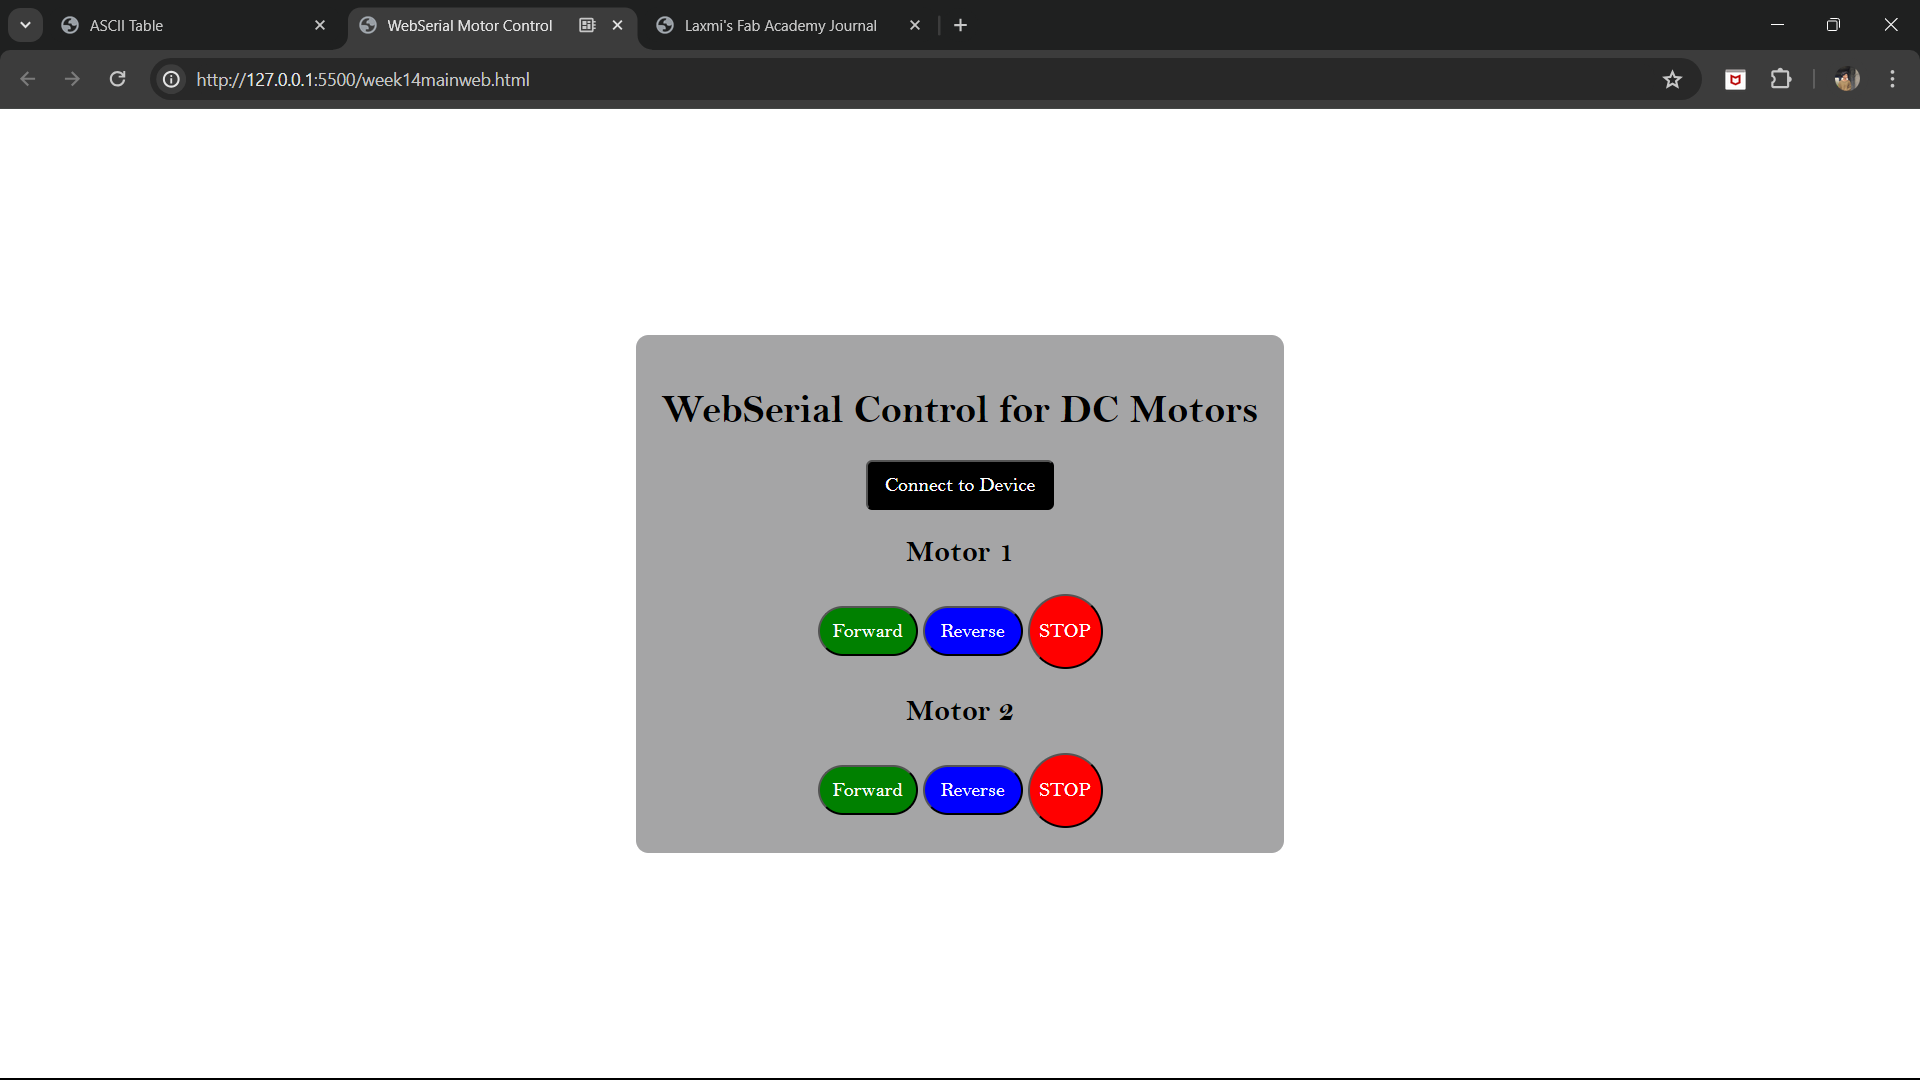
In the page, click on "Connect to Device" to select the port and click your button of choice to run the motor forward, reverse and finally stop.
Here's the result.
Group Assignment
This week's group assingment was to compare as many application tools available.
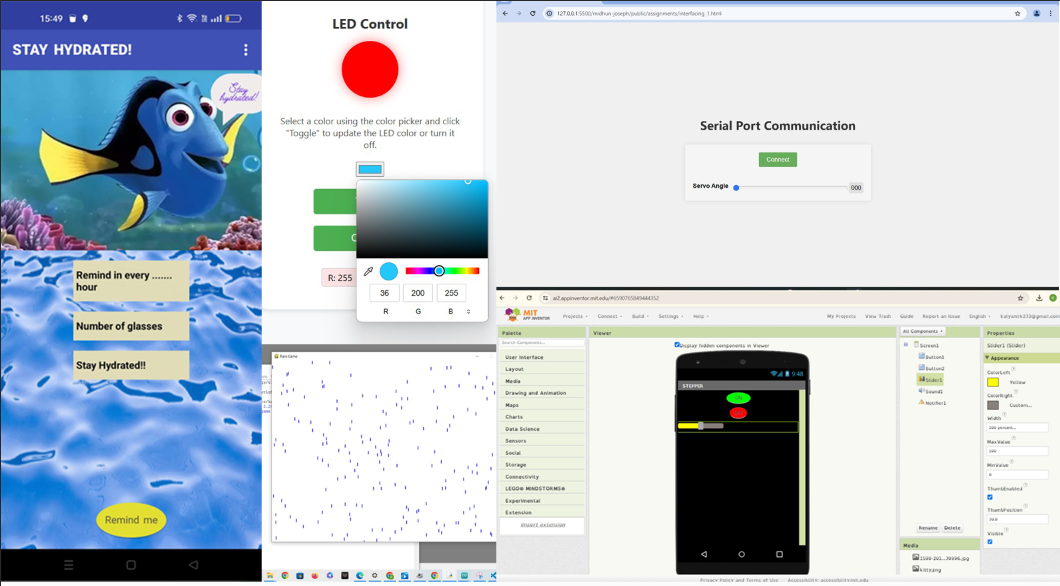
For further details, click on the link below.
Group Assignment-Week 14Download Files
  • LED Toggle (HTML Code)
  • DC Motor WebSerial (HTML Code)
  • DC Motor WebSerial (zip)