WEEK 1
Principles and practices
Assignment:
- Plan and sketch a potencial final project.
In my final project, I'd like to apply all the knowledge that I will learn from the classes week by week. I have two main ideas; the first is designing an interactive sculpture of a koi fish, and the other is a machine for carving pumpkins.
option 1: interactive sculpture of a koi fish
Some time ago, I saw works that showcased the movement of fish and other marine animals. The waving motion of their bodies seems quite beautiful to me. The koi fish is very popular for its colors and has been featured in many works by different artists, including Lego, which released a product with this fish.
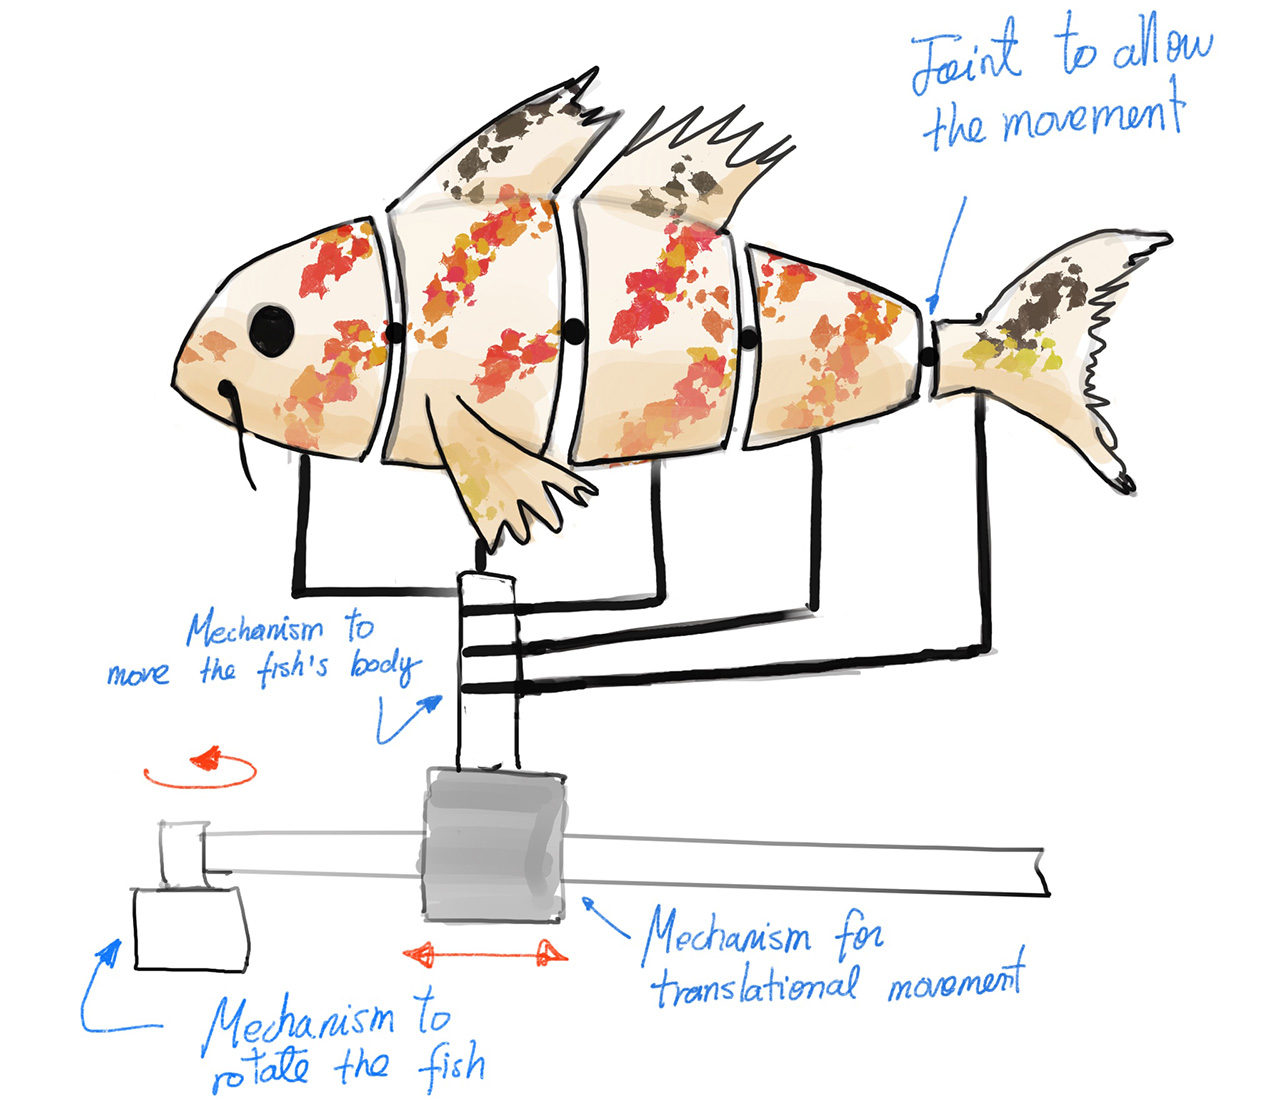
The idea is to develop a mechanism that simulates the waving movement of the fish as well as the translational movement it has in the pond. Additionally, it should be interactive; my idea is that it can detect when a person is in front to start moving, and then also be able to move in the direction indicated through some sensors that would be located at the base of the structure
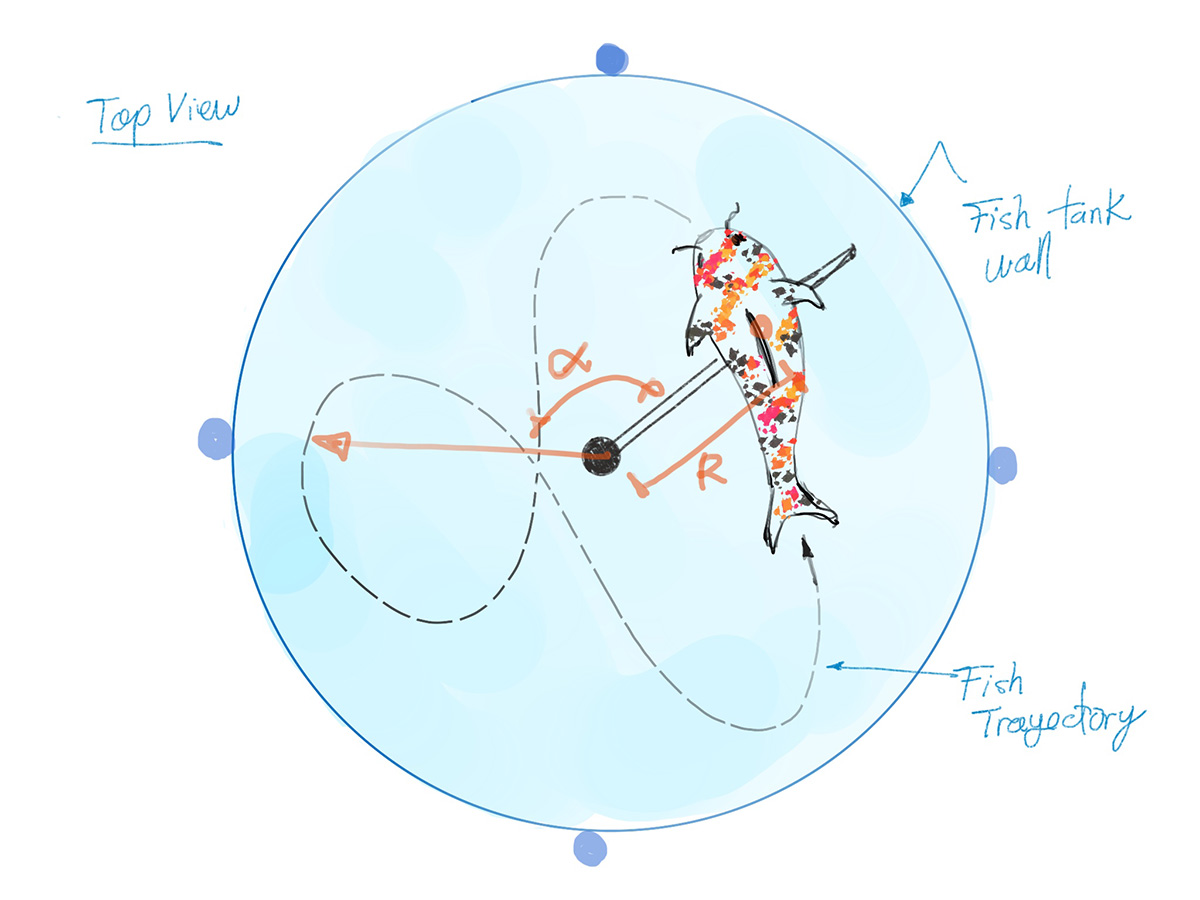
For the translational movement, I'm currently thinking it could be a mechanism where the angle and the radius of the point where the fish will be anchored can be varied, as shown in the following image. This way, I can position the fish anywhere around the tank (which actually won't be a real tank since there won't be any water).
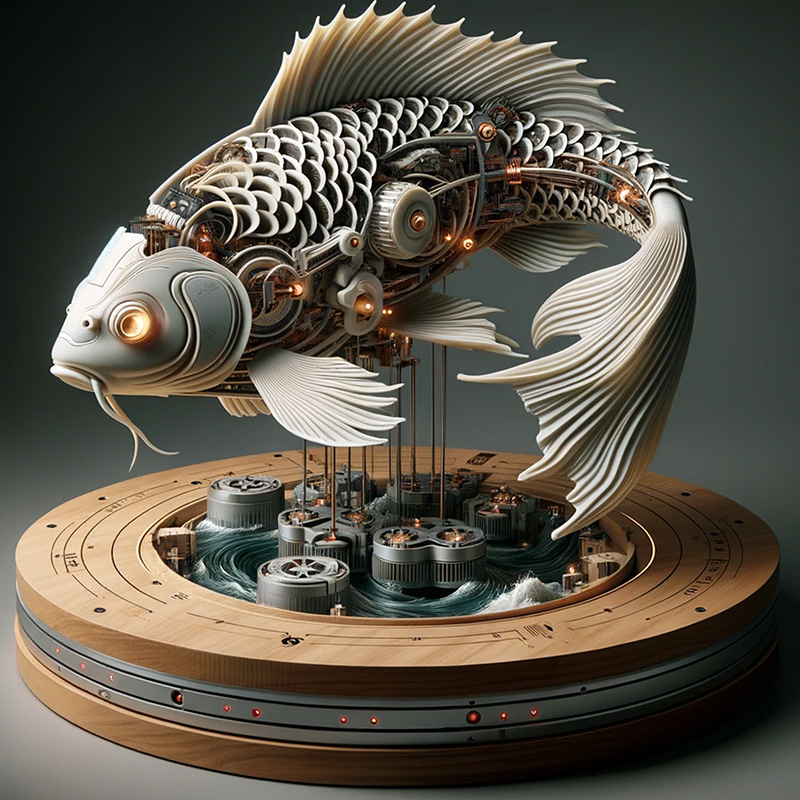
Also I sketch the final project using DALL-E, it has produced some very interesting resultsThe resulting images are quite realistic and sketch out my idea for the final project. Additionally, after viewing the images, I thought of some additional ideas for the design. DALL·E could help me explore aesthetic options for the project, providing me with inspiration on what its visual appearance could be.
option 2: Pumpkin engraving machine
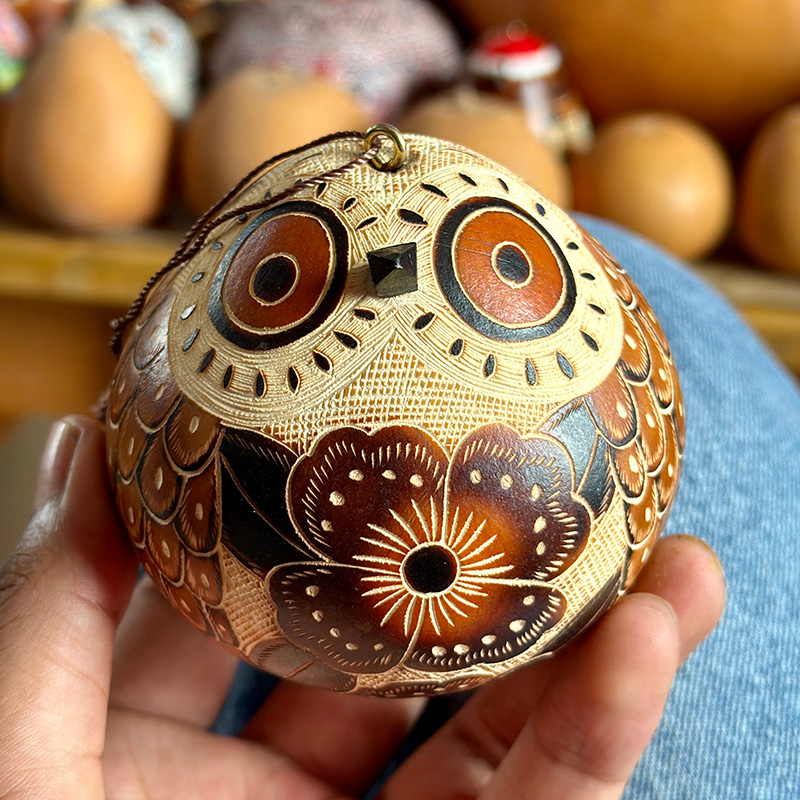 As an alternative, I am considering designing a machine specialized in engraving pumpkins. In certain regions of Peru, handicrafts known as 'Mates burilados' are created, which are engraved pumpkins. The process of making these mates involves several stages, from washing to varnishing. There are two main engraving techniques: burilado and burning, which are used to outline the silhouettes of the figures. Additionally, by applying controlled heat, different shades can be achieved on the pumpkin, allowing for the coloring of the figures. This artisanal process can take several days, depending on the complexity of the designs. Therefore, my interest is focused on developing a machine that can perform part of the engraving, speeding up this process.
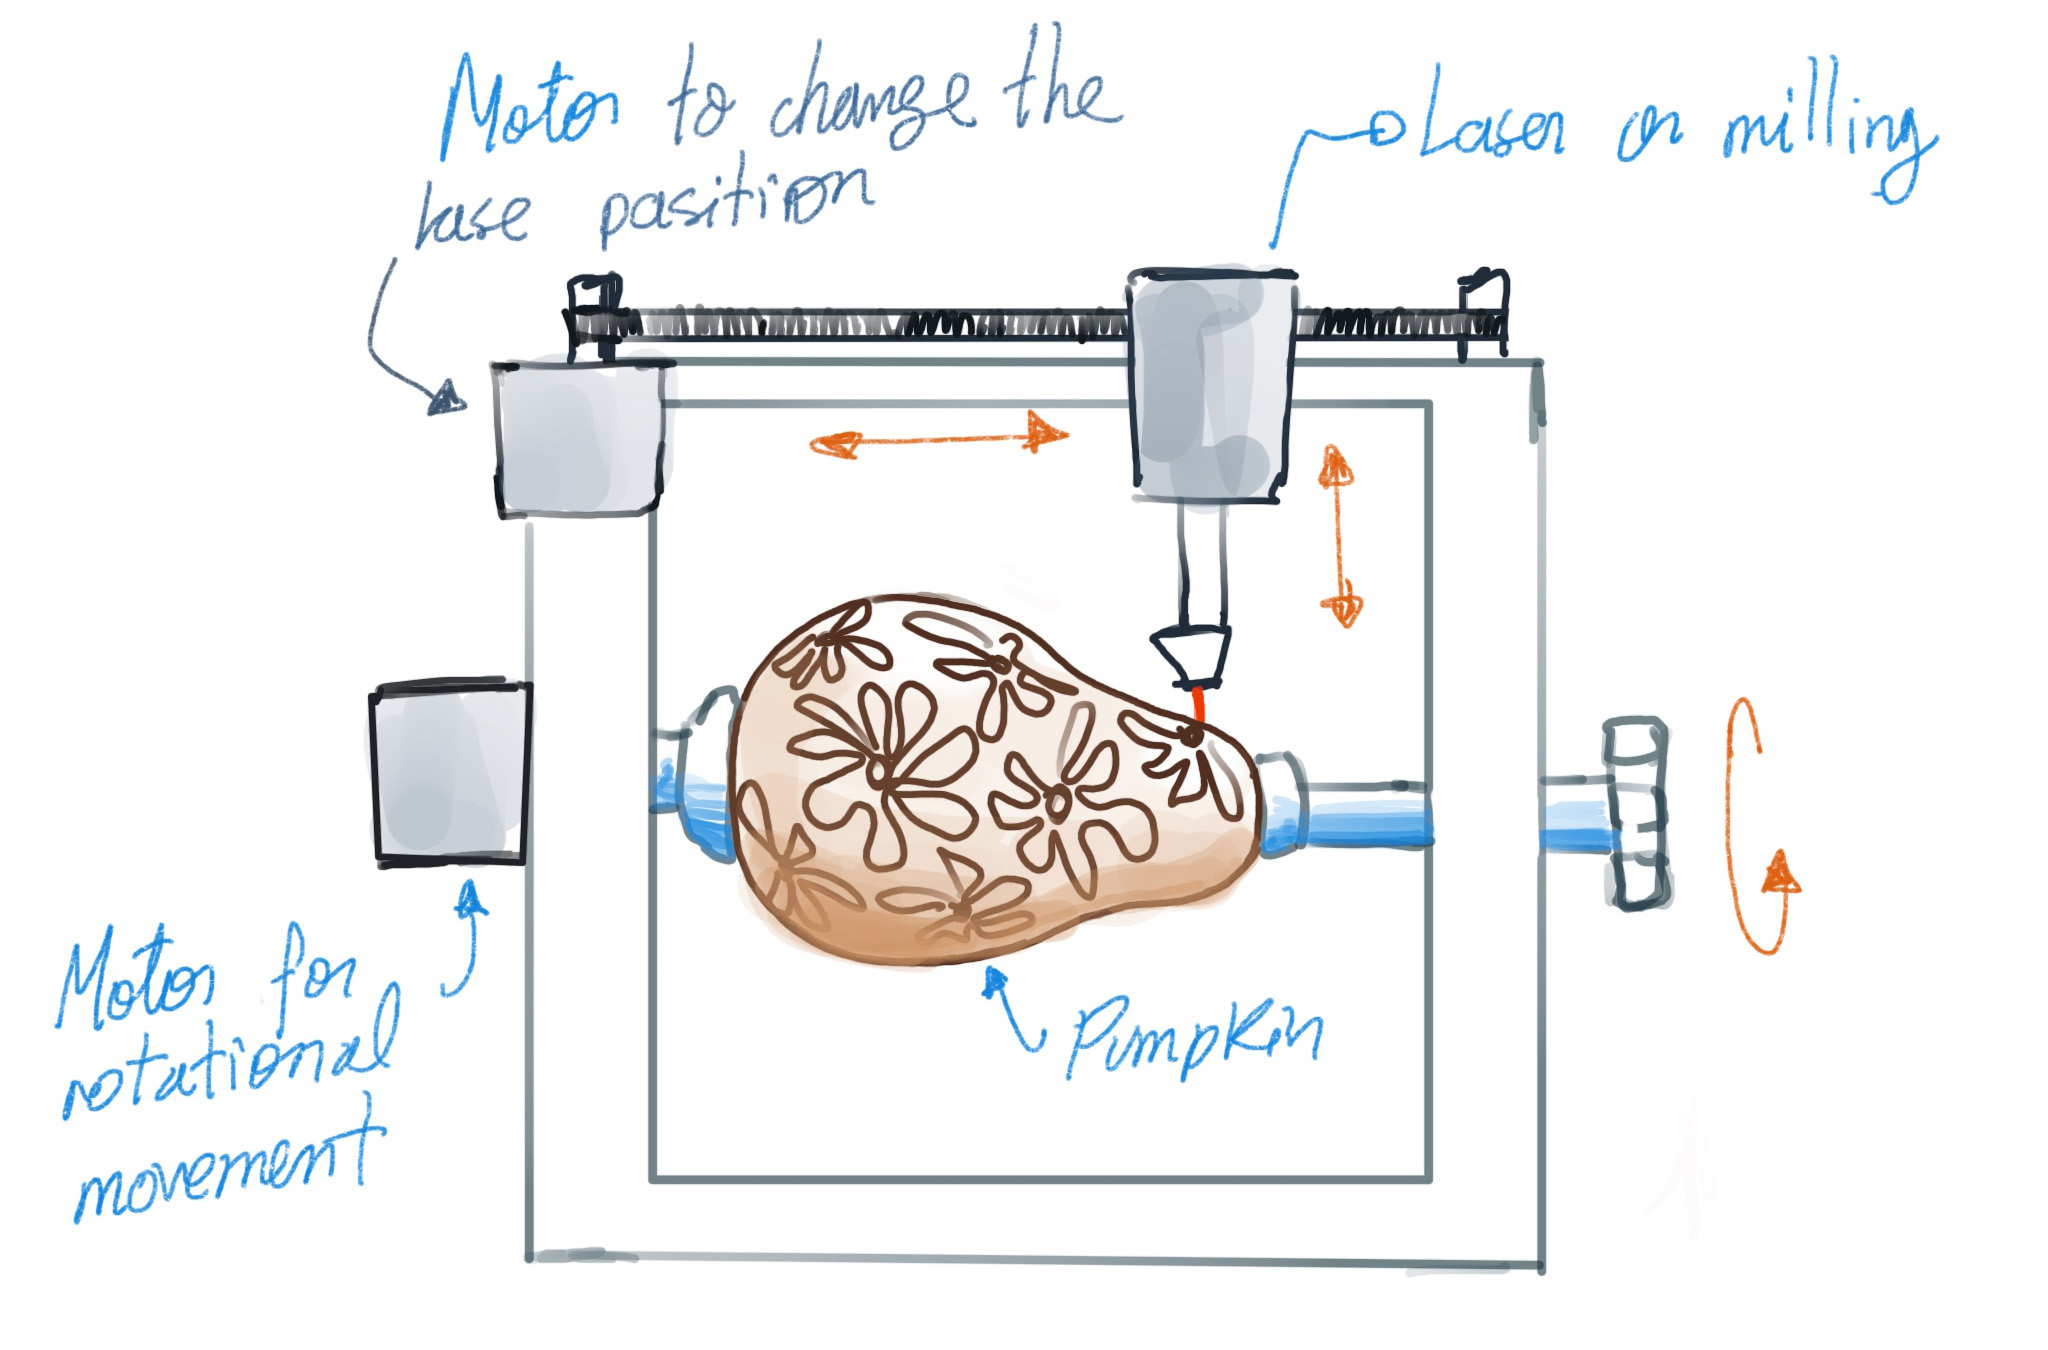
Although machines capable of marking cylindrical surfaces already exist, the challenge in this project lies in the fact that the body of pumpkins is not a symmetrical cylinder. For efficient laser marking, it is crucial to maintain a constant distance between the laser head and the surface of the pumpkin, in order to ensure uniformity in the thickness of the engraved lines. Therefore, it is necessary to implement a system that measures the variations on the pumpkin's surface and consequently adjusts the position of the laser head or its power, thus ensuring precise and high-quality engraving.
My proposal involves designing a structure similar to that of 3D printers, which would also require a CNC system with stepper motors. The pumpkin would be securely fixed, yet capable of rotation. Additionally, it would include a sensor to measure variations on the pumpkin's surface, ensuring precise engraving. This functionality is illustrated in the following image.
option 3: Rotational moulding machine
Another option that seems interesting to me is to design a machine that allows plaster molds to rotate. These molds are used for making clay containers. The goal is to enable the mold to rotate on its axial axis and also on a transverse axis so that the clay, which enters the mold in a liquid state, can adhere to all the mold's walls. The machine should rotate the mold for a few seconds until a layer about 5 mm thick has formed, then pour off the excess clay. The following image shows a sketch of the machine.
It's also necessary to design a holder that can secure the mold. Plaster molds often consist of several parts, so the holder should facilitate easy demolding.

Project Management
Assignment:
- Work through a git tutorial.
- Build a personal website describing you and your final project. Refer to the lecture material for examples.
- Upload parts 1 and 2, to the class archive.
Git
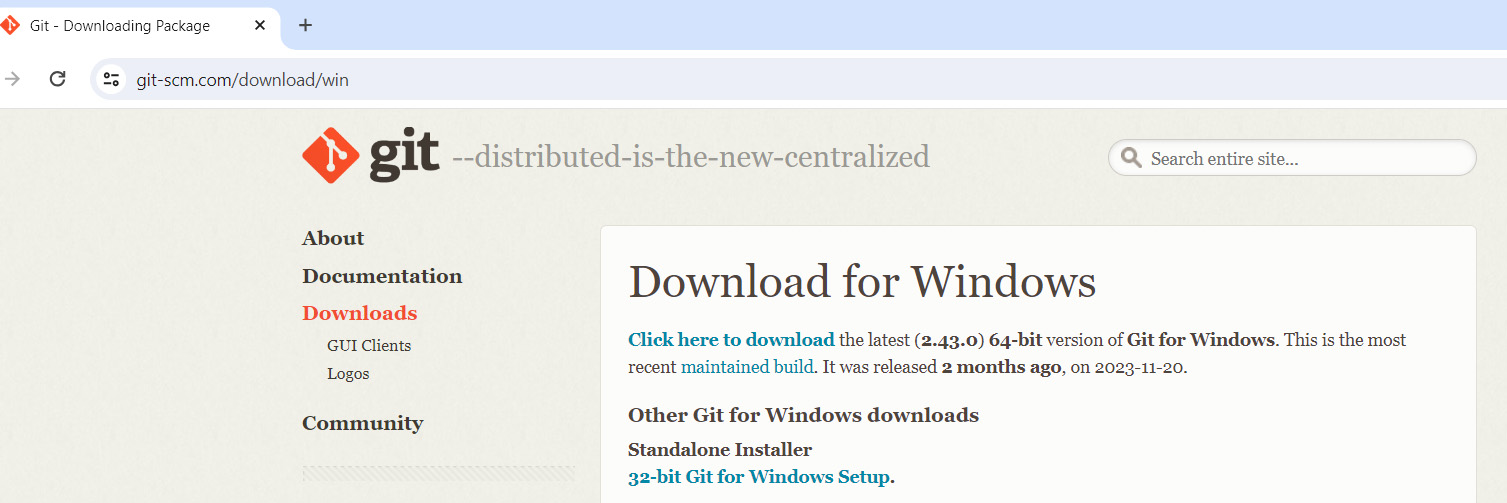
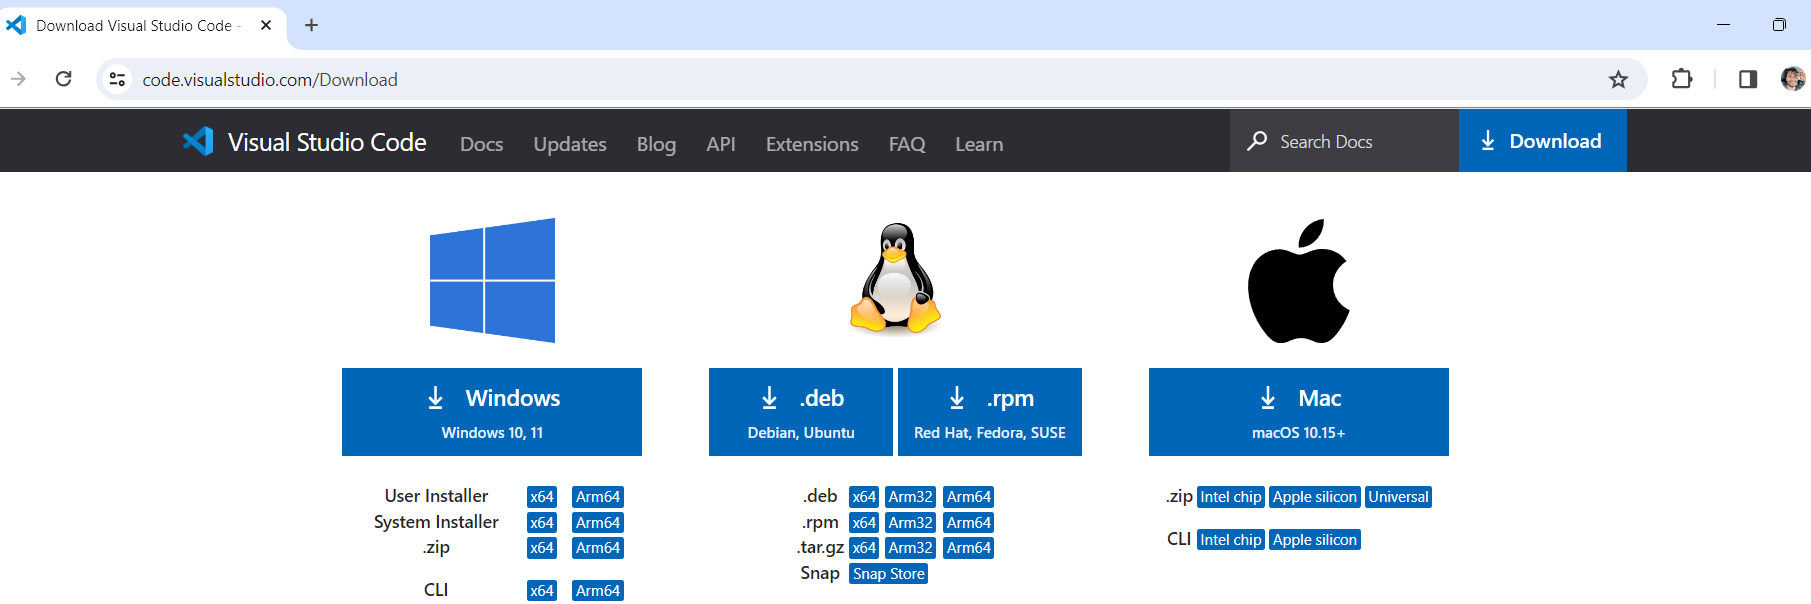
This is my first experience with Git, so I have to learn everything from scratch. I started by downloading the latest version for Windows directly from its official website. I chose to install it with the recommended default settings. Upon completing the installation, I noticed that it came with Git Bash included.
To seting up Git with my username and my email, I used the following commands in Git Bash.
$ git config --global user.name "Anderson Zelarayan Navarro"
$ git config --global user.email "anderson.zelarayan@gmail.com"
It was important to create a key to access my repository from the computer I will use at Esan. After generating this key, it was necessary to add it to the web repository. To complete this process, I used the following commands:
$ ssh-keygen -t rsa -C "anderson.zelarayan@gmail.com"
$ cat ~/.ssh/id_rsa.pub
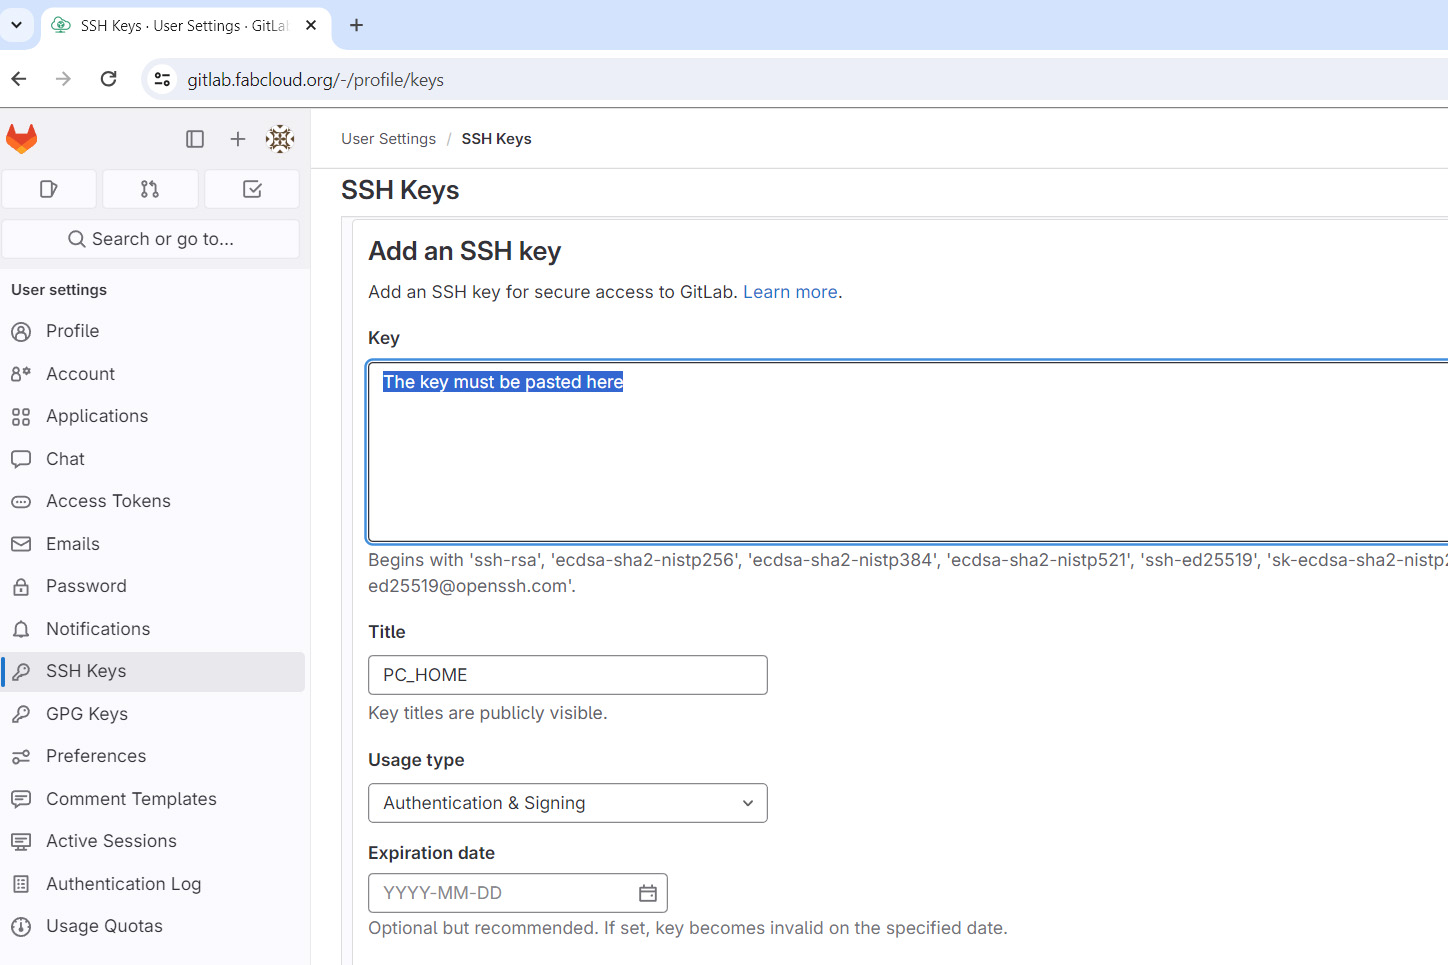
$ clip < ~/.ssh/id_rsa.pubI pasted the key on my Fab Academy Git repository
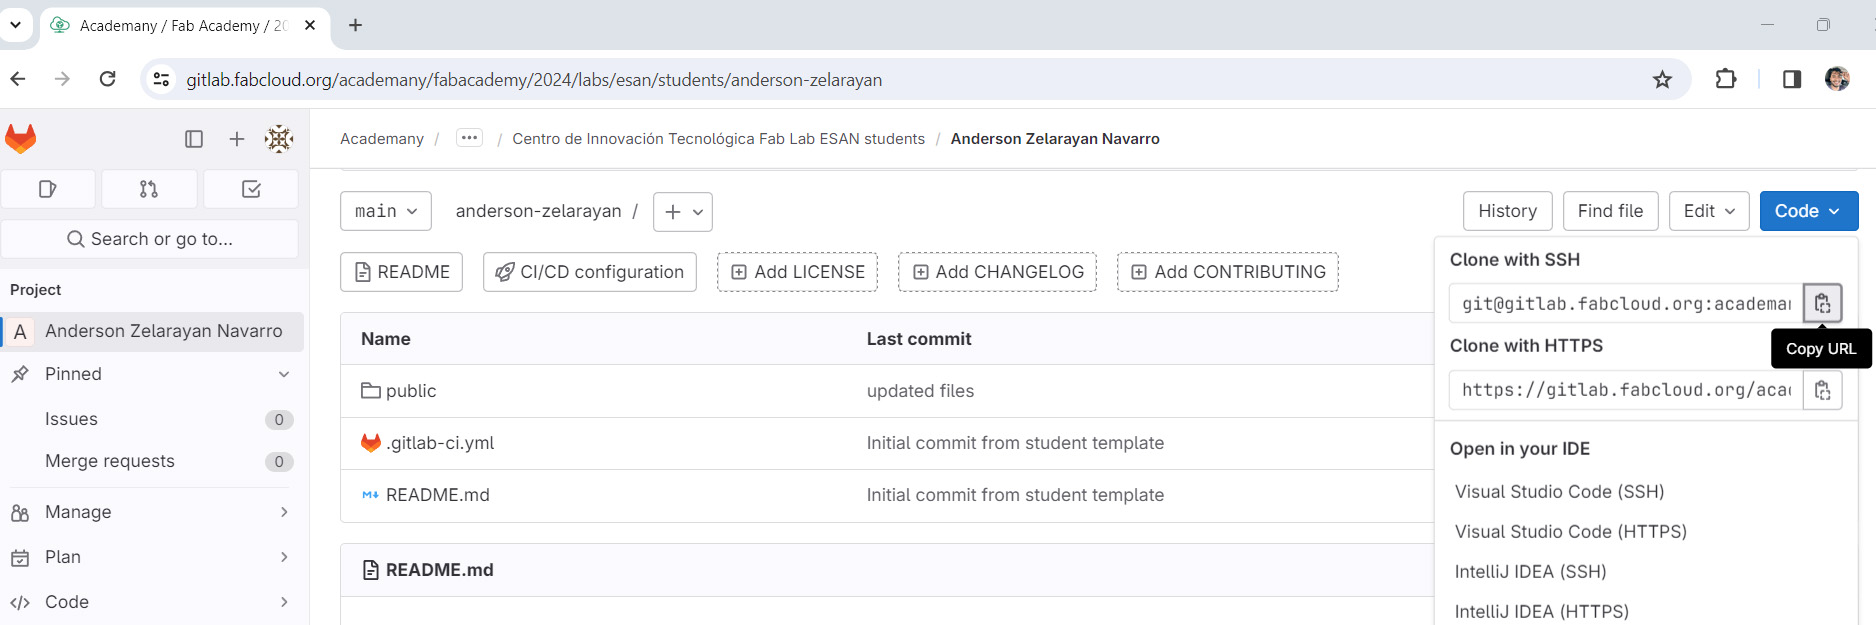
Finally, I copied the files of my personal repository to my local computer, to do that first I have to navigate to the folder I created and use the command "clone" there using the SSH url.
$ git clone git@gitlab.fabcloud.org:academany/fabacademy/2024/labs/esan/students/anderson-zelarayan.gitThe SSH url was copied from my Git repository.
Since I will be using another computer in the laboratory, it was necessary to replicate all these steps on my personal computer to ensure access from both systems.
These are the top 5 Git commands that I used. Also I use them every time I update my online repository.
- git pull Pull the commit from online repository
- git add . Add the changes of the next commit
- git commit -m 'comment' Add a note for the next commit
- git push push all the commits to online
Creating my web page
The first thing I made was download and install Visual Studio Code to use it as code editor. I chose this one because I thing it is quite clean and I already know it a little. It also has an integration with Git that I would like to try.
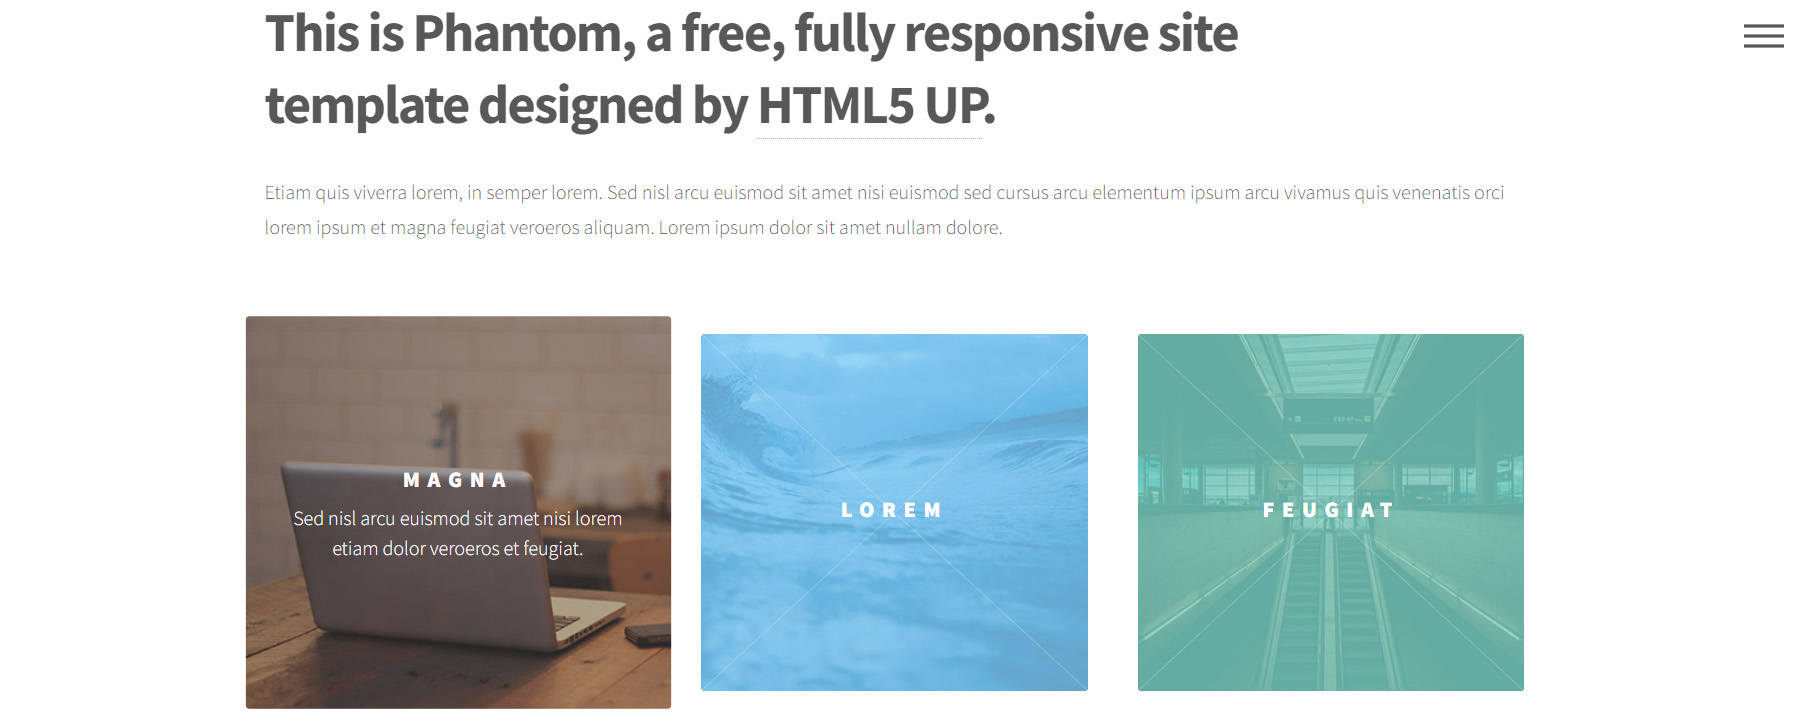
With the aim of speeding up the development of my website, I chose to use a template from HTML5 UP. Since the Fab Academy covers a different topic each week, I selected a template that would facilitate easy visualization and quick access to these contents. I decided on the following due to its efficient design, which includes direct access blocks on the main page and a simple, user-friendly menu:
I made several modifications to the template to achieve a cleaner and more organized appearance, the main ones were as follows
- I removed the header icon to simplify the design.
- I changed the names of the header sections.
- I increased the number of direct access blocks on the main page from 12 to 18, dedicating one for each week of classes.
- I replaced the images in the blocks to better reflect the content of each week.
- I updated the menu and created individual pages for each section.
- I simplified the footer by removing social media icons and the contact bar for a cleaner design.
- On the internal pages, I restructured the body to accommodate the content.
To make the changes in the HTML, I primarily used the following tags:
Add a comments:
<!-- To add comments -->Add Unordered lists:
<ul>
<li>Item 1 </li>
<li>Item 1 </li>
</ul>
Add Ordered lists:
<ol>
<li>Item 1 </li>
<li>Item 1 </li>
</ol>
Add a Paragraph
<p> Here the paragraph </p>To sketch the ideas of the final project I used Procreate and for editing, compressing, and cropping images, I am using Photoshop.