Week 9 : Output devices!
We had to add an output device to our micro controler and also make it function through your microcontroller. (Three days in and I am currently suffering more than I ever have.)
Neil's Lecture😀
Professor Neil talk about all the different out devices that we could use. Professor talk about motors, servos, lcd screens, oled and tfts. There is lots I still have to learn and experiment with! This week will be really intense as I dont know what I am getting myself into😁.
Assignments 🤩
Add an output device to your micro controller and program it to do somthing.
Group assignments😋
Measure the power consumption of an output device.
Document your work on the group assignment page and reflect it onto your individual documentation page.
Now with all of that done and complete lets get right into buisness. For this week I will be using the circuit board that I printed in the previous week and also using a tft screen as my output device.
Game Plan !!!
For this wek I will be programming the 2.2 TFT SPI 240x320. Ohhh.... I hope this works out or otherwise I am toast!
2.2 TFT SPI 240x320
Before we begin controlling our out device we have to get to know it and how it actually works.
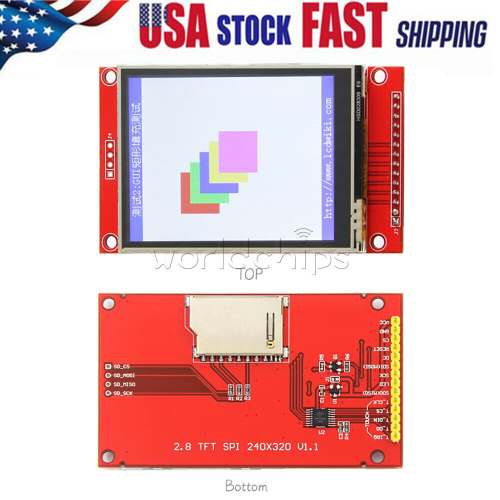
This is the image of the TFT module that I will be using this week! it has a 240 by 320 screen that we can program to display all that we desire.
The module has a total of 9 pins. these pins are.
VCC - the pin though the module gets its power source from.
GND - required to complete the circuit with the help of the VCC.
LED - This pin refers to the blacklight LED of the TFT. It also requires a power source(3.3v/5v).
CS - This is the chip select pin. It is used to select the TFT as a target device for comunication. (Either SPI or I2C).
DC - The DC (Data/Command) pin on the TFT display is used to differentiate between data and command signals sent to the display controller.
Reset - The RESET pin on a microcontroller is used to reset the device and bring it back to its initial state. When the RESET pin is activated, typically by pulling it low, it triggers a reset sequence that resets to its defualt state.
SCK, MISO, MOSI - The SCK, MISO, and MOSI pins are commonly used in communication protocols like SPI (Serial Peripheral Interface) to exchange data between microcontrollers and peripheral devices.
SCK - Serial Clock, this pin is used to provide the timing for the data transfer.
MISO - Master In SLave out. This pin is used for data transmission from the slave device to the master device.
MOSI - Master out Slave In. This pin is used for data transmission from the master device to the slave device.
With all the pins known lets talk more about how the TFT works.
The 2.2" TFT SPI 240x320 display is a small color LCD module that can be used in various DIY projects. It features a resolution of 240x320 pixels and a compact size of 2.2 inches. The display uses the ILI9341 controller and communicates with the microcontroller using the Serial Peripheral Interface (SPI). The screen uses a backlight lcd for both luminescence and color display. It also has a SD card slot for you to be able to display bitmap images using the TFT screen!
For more information on the TFT display, use this link to go to the page from where got all the information--> here.
Pin configurations
Now that we know enough about the TFT screen. Lets now get into the pin configuration of the TFT to my microcontroller. Some of the pinouts are pretty self explanatory such as the VCC going to the VCC and the SPI pins being the same. While other pins such as the chip select pin have to be selected with respect to the pins of my attiny 3216 micro controller. So lets begin!!
CS - The CS pin on my TFT was connected to pin number 1 on my attiny micro controller.
DC - The DC pin was connected to the pin number 2 of my microcontroller
RST - The RST pin is connected on pin number 0 of my attiny 3216 microcontroller

A very big thank you to the documentation of Setyawan Bekti Wibowo. He also used the same microcontroller(The attiny 3216 ) and tried to use the TFT screen. His documentation also held a lot of answers to the questions I had for the TFT display. Also it was through his documentation that I was able to figure out the pin configurations. My best regards to him and very big thank you!
Programming!!!
Now lets get into the most tedious part of this whole week. Trying to program our microcontroller so that it can be able to command the TFT to display what we want.
Firstly I had to install the required libary for me to be able to control my TFT.
To install the libary I had to open up my arduino IDE and then had to go to the sketch and then to include libary. Open IDE> Sketch> Include Libary. After that you have to press the Manage LIbary option. In that you have to search the Adafruite ILI9341 and then install the libary
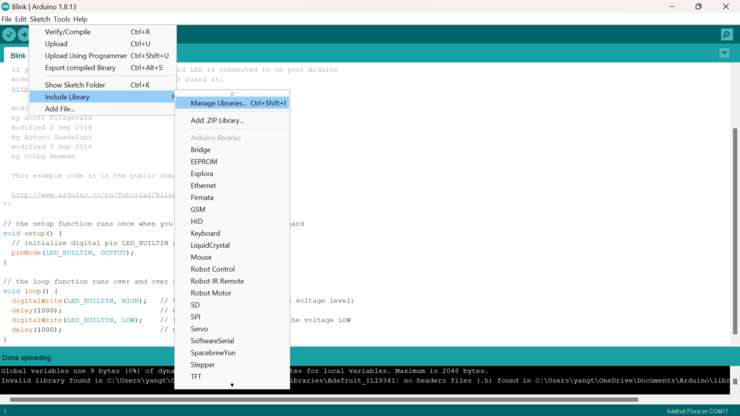
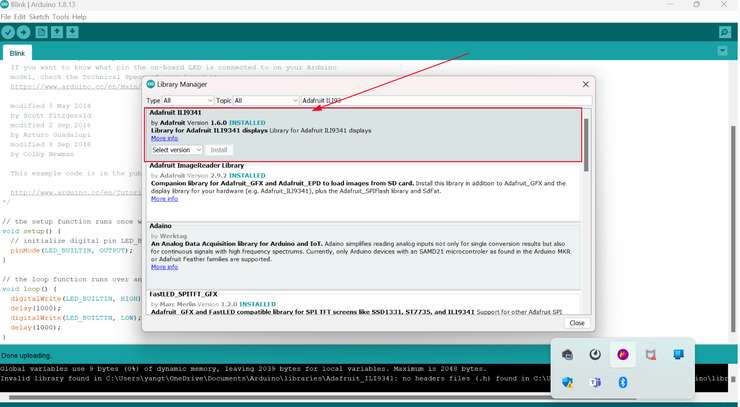
Now that we have installed the required libary. We can begin with programming our microcontroller to control our TFT display.
Lets get right into it!
Programming attempt 1🤐
(Quick Note: I struggled a lot while doing this. Relooking on this, I realised how novice of a mistake I made. It wasnt even a mistake, it was be just being naive and overlooking a simple problem. Ohhh lord if I make such an error ever again in my Life🤕! )
Now that we have our TFT set up and ready to move, lets get into to all the action!
I want wanted to test the TFT on how smooth could the shapes displayed on the TFT be. For that I thought that a circle could be the perfect shape to test the capabilities of my TFT display. So now lets get right into it!
Also since I had no clue on how to write codes for the TFT display I asked chatGPT to generate a few codes for me. Not only to use for my TFT but also fro me to be able to learn how to code it myself. Now the prompt that I sent was.
Command: Now could you give me the codes to display a big circle that has a gradiant on my tft.
#include <Adafruit_GFX.h>    // Include core graphics library
  #include <Adafruit_ILI9341.h> // Include Adafruit_ILI9341 library to drive the display

  // Declare pins for the display:
  #define TFT_DC 2
  #define TFT_RST 0 // You can also connect this to the Arduino reset in which case, set this #define pin to -1!
  #define TFT_CS 1

  // Create display:
  Adafruit_ILI9341 tft = Adafruit_ILI9341(TFT_CS, TFT_DC, TFT_RST);

  void setup() {
    tft.begin();  // Initialize display
    tft.setRotation(3);  // Adjust display rotation if needed
    tft.fillScreen(ILI9341_BLACK);  // Set background color to black
  }

  void loop() {
    // Draw the gradient circle on the display
    drawGradientCircle();

    // Delay before refreshing the display
    delay(5000);
  }

  void drawGradientCircle() {
    int radius = 100;      // Radius of the circle
    int centerX = 240;    // X-coordinate of the center of the circle
    int centerY = 160;    // Y-coordinate of the center of the circle
    int startColor = tft.color565(255, 0, 0);    // Starting color of the gradient (red)
    int endColor = tft.color565(0, 0, 255);      // Ending color of the gradient (blue)

    for (int y = centerY - radius; y <= centerY + radius; y++) {
      for (int x = centerX - radius; x <= centerX + radius; x++) {
        int dx = x - centerX;
        int dy = y - centerY;

        // Calculate the distance from the center of the circle
        int distance = sqrt(dx * dx + dy * dy);

        // Calculate the color at the current position based on the distance from the center
        int r = map(distance, 0, radius, (startColor >> 11) & 0x1F, (endColor >> 11) & 0x1F);
        int g = map(distance, 0, radius, (startColor >> 5) & 0x3F, (endColor >> 5) & 0x3F);
        int b = map(distance, 0, radius, startColor & 0x1F, endColor & 0x1F);

        int color = tft.color565(r, g, b);

        // Set the pixel color at the current position
        tft.drawPixel(x, y, color);
      }
    }
  }
Now that I have the code, I can simply with programming! I simply uploaded the code, but for some reason it didnt work? I tried again but the problem still remained. The code was being uploaded by for some reason the the screen still remained blank.
I tried almost everything to resolve the issue but I just couldn't seem to get it right. I tried reconfiguring the entire pin configuration but still nothing. I tried tinkering with the code but still it didnt work! (SIDE NOTE: Relooking at this I think that because of the cdoe not working, it pushed me to actually learn how to write code for the TFT display.)
After a while I got a bit of an image of teh problem. The problem wasn't with my codes nor was it with my pin configuration, fro some reason the TFT just couldn't display anything. Though I also found that I could still manipulate the brightness of the TFT screen by connecting it to a PWM analog pin though which I was able to create a constant brightening and dimming effect.
// Define the LED pin
  const int ledPin = 9;  // Replace with the PWM pin connected to the LED

  // Set the initial brightness and the rate of change
  int brightness = 0;
  int increment = 5;

  void setup() {
    // Set the LED pin as an output
    pinMode(ledPin, OUTPUT);
  }

  void loop() {
    // Increase brightness
    while (brightness < 255) {
      analogWrite(ledPin, brightness);
      brightness += increment;
      delay(10);
    }

    // Decrease brightness
    while (brightness > 0) {
      analogWrite(ledPin, brightness);
      brightness -= increment;
      delay(10);
    }
  }
I was able to create the dimming effect using the above code
I failed miserably but I am not going to give up !!!
Programming Attempt 2😤!!!
Feeling more determined that ever I jumped right into it. Firstly before anything else, I went through Setyawan Bekti Wibowo documentation several times over. On my 4th run through of his documentation I think, I saw it said that he also had trouble programming his TFT to showcase color. I continued reading than I found how he resolved the issue. There was somthing missing in our TFT displays 💀 The problem lied at the back of the tft board
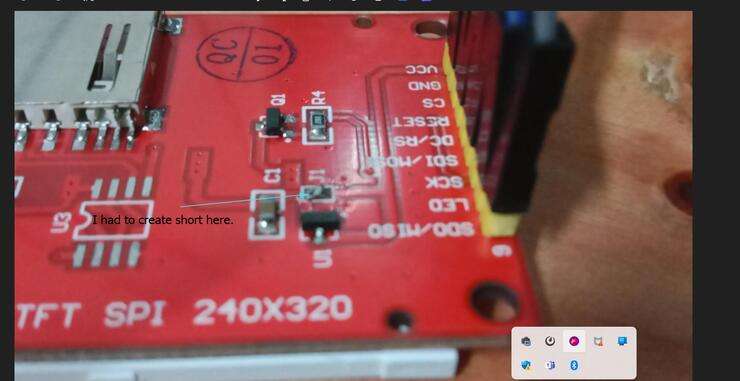
I had to create a short at the back of the TFT. I think the reason is that without that short, the circuit wasn't being complete. After creating the short, I used Setyawan Bekti Wibowo's original code just to be sure that I can finally make this TFT display work. Please check his original code from his website here --> CODE
After I uploaded the code this is what we get!
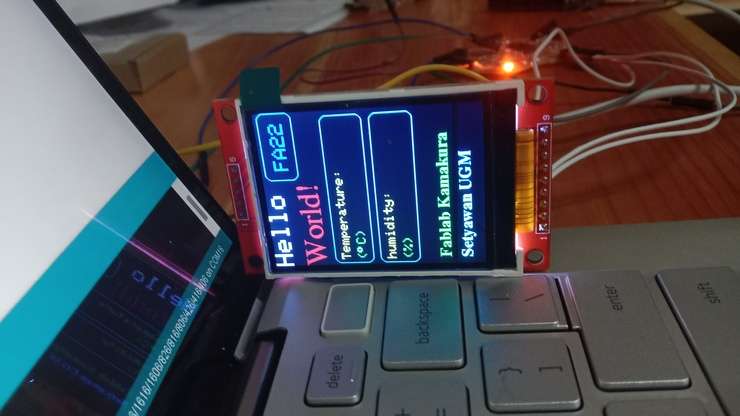
It finally worked! I feel so relived that I was finally able to make the TFT display somthing. Thank you again to Setyawan Bekti Wibowo.
After that success my spirit got a 3x booster that made jump right into what I had planned next. Now just so I dont ruin my success, right now I intended to edit right on top of that.(All that has been showen here is not mine. This content belongs entirly to Setyawan Bekti Wibowo ). I wanted to change the the lab name. Also instead of displaying tempreture and humidity, I want it to display a drawing and a word.
#include <Adafruit_GFX.h>    // Include core graphics library
  #include <Adafruit_ILI9341.h> // Include Adafruit_ILI9341 library to drive the display

  // Declare pins for the display:
  #define TFT_DC 2
  #define TFT_RST 0 // You can also connect this to the Arduino reset in which case, set this #define pin to -1!
  #define TFT_CS 1

  // Create display:
  Adafruit_ILI9341 tft = Adafruit_ILI9341(TFT_CS, TFT_DC, TFT_RST);

  #include <Fonts/FreeSerif24pt7b.h>  // Add a custom font
  #include <Fonts/FreeSerifBold12pt7b.h>

  void setup()  // Start of setup
  {
    // Display setup:
    tft.begin();  // Initialize display
    tft.fillScreen(0x0000);  // Fill screen with black
    tft.setTextWrap(false);  // By default, long lines of text are set to automatically “wrap” back to the leftmost column.

    // Write to the display the text "Hello":
    tft.setCursor(0, 0);  // Set position (x,y)
    tft.setTextColor(0xFFFF);  // Set color of text. First is the color of text and after is color of background
    tft.setTextSize(4);  // Set text size. Goes from 0 (the smallest) to 20 (very big)
    tft.println("Hello");  // Print a text or value

    // Start using a custom font:
    tft.setFont(&FreeSerif24pt7b); // Set a custom font
    tft.setTextSize(0);  // Set text size. We are using custom font so you should always set text size as 0

    // Write to the display the text "World":
    tft.setCursor(0, 80);  // Set position (x,y)
    tft.setTextColor(0xF800);  // Set color of text. We are using custom font so there is no background color supported
    tft.println("World!");  // Print a text or value

    // Write to the display the text "DGI AstheticCenter":
    tft.setFont(&FreeSerifBold12pt7b);
    tft.setTextSize(0);
    tft.setCursor(10, 270);  // Set position (x,y)
    tft.setTextColor(0x07E0);  // Set color of text. We are using custom font so there is no background color supported
    tft.println("DGI AstheticCenter");  // Print a text or value

    // Write to the display the text "Yangtshel Wangye":
    tft.setCursor(10, 301);  // Set position (x,y)
    tft.setTextColor(0x07FF);  // Set color of text. We are using custom font so there is no background color supported
    tft.println("Yangtshel Wangye");  // Print a text or value

    // Stop using a custom font
    tft.setFont();  // Reset to standard font, to stop using any custom font previously set

    tft.drawRoundRect(3, 95, 230, 60, 10, 0x07FF);  // Draw rounded rectangle (x,y,width,height,radius,color)
    tft.drawRoundRect(3, 165, 230, 60, 10, 0x07FF); // It draws from the location to down-right
    tft.drawRoundRect(140, 5, 100, 50, 10, 0x07FF);

  }  // End of setup


  void loop()  // Start of loop
  {
    // Write to the display the Variable1 with left text alignment:
    tft.setCursor(155, 20);  // Set position (x,y)
    tft.setTextColor(0x001F, 0x0000);  // Set color of text. First is the color of text and after is color of background
    tft.setTextSize(3);  // Set text size. Goes from 0 (the smallest) to 20 (very big)
    tft.println("FA24");  // Print a text or value

    tft.setCursor(10, 105);  // Set position (x,y)
    tft.setTextColor(0xFFE0, 0x0000);  // Set color of text. First is the color of text and after is color of background
    tft.setTextSize(2);  // Set text size. Goes from 0 (the smallest) to 20 (very big)
    tft.println("Drawing:");  // Print a text or value
    // Draw a circle in the box
    for (int16_t i=0; i<60; i+=5) {
      tft.drawCircle(30, 130, i, tft.color565(0, 0, i*4));
    }

    tft.setCursor(10, 175);  // Set position (x,y)
    tft.setTextColor(0xFFE0, 0x0000);  // Set color of text. First is the color of text and after is color of background
    tft.setTextSize(2);  // Set text size. Goes from 0 (the smallest) to 20 (very big)
    tft.println("Words:");  // Print a text or value
    tft.setCursor(10, 200);
    tft.setTextColor(0x07E0, 0x0000);
    tft.println("Hello");

    // Stop using a custom font
    tft.setFont();  // Reset to standard font, to stop using any custom font previously set
    delay(500);

  }  // End of loop
The above code is the code that I used to create my version of Setyawan Bekti Wibowo's display.
.jpg)
Programming Attempt 3👻!
Now this is my final attempt at programming on the TFT the TFT. In this I will be creating my very own creations that I want to be displayed on my TFT.Let's Get right into it😀!
Firstly though I wanted to start off with somthing simple that would not be of much issues. I just added a cdoe that you create a moving circle on my screen.
CIRCLE
  #include <Adafruit_GFX.h>    // Include core graphics library
  #include <Adafruit_ILI9341.h> // Include Adafruit_ILI9341 library to drive the display

  // Declare pins for the display:
  #define TFT_DC 2
  #define TFT_RST 0 // You can also connect this to the Arduino reset in which case, set this #define pin to -1!
  #define TFT_CS 1

  // Create display:
  Adafruit_ILI9341 tft = Adafruit_ILI9341(TFT_CS, TFT_DC, TFT_RST);

  // Circle position and size variables
  int circleX = 10;
  int circleY = 120;
  int circleSize = 20;

  void setup() {
    tft.begin();  // Initialize display
    tft.setRotation(3);  // Adjust display rotation if needed
    tft.fillScreen(ILI9341_BLACK);  // Set background color to black
  }

  void loop() {
    // Clear the previous frame
    tft.fillCircle(circleX, circleY, circleSize, ILI9341_BLACK);

    // Update circle position
    circleX += 5; // Move the circle 5 pixels to the right

    // Check if the circle has reached the right edge of the screen
    if (circleX >= tft.width()) {
      // Reset the circle position to the left edge of the screen
      circleX = 0;
    }

    // Draw the circle at the updated position
    tft.fillCircle(circleX, circleY, circleSize, ILI9341_WHITE);

    // Delay to control the animation speed
    delay(100);
  }
After that I wanted to make it a bit more complex. Now I will be doing the same thing I did in the previous step by kicking it in a higher gear by adding a moving rectangle in the mix as well!
BOX
  #include <Adafruit_GFX.h>    // Include core graphics library
  #include <Adafruit_ILI9341.h> // Include Adafruit_ILI9341 library to drive the display

  // Declare pins for the display:
  #define TFT_DC 2
  #define TFT_RST 0 // You can also connect this to the Arduino reset in which case, set this #define pin to -1!
  #define TFT_CS 1

  // Create display:
  Adafruit_ILI9341 tft = Adafruit_ILI9341(TFT_CS, TFT_DC, TFT_RST);

  // Circle variables
  int circleX = 10;
  int circleY = 120;
  int circleSize = 20;
  int circleSpeed = 5;

  // Rectangle variables
  int rectX = 50;
  int rectY = 80;
  int rectWidth = 40;
  int rectHeight = 60;
  int rectSpeed = 3;

  void setup() {
    tft.begin();  // Initialize display
    tft.setRotation(3);  // Adjust display rotation if needed
    tft.fillScreen(ILI9341_BLACK);  // Set background color to black
  }

  void loop() {
    // Clear the previous frame
    tft.fillCircle(circleX, circleY, circleSize, ILI9341_BLACK);
    tft.fillRect(rectX, rectY, rectWidth, rectHeight, ILI9341_BLACK);

    // Update circle position
    circleX += circleSpeed; // Move the circle horizontally
    if (circleX >= tft.width() - circleSize || circleX <= 0) {
      circleSpeed *= -1; // Reverse the direction if the circle reaches the edges
    }

    // Update rectangle position
    rectY += rectSpeed; // Move the rectangle vertically
    if (rectY >= tft.height() - rectHeight || rectY <= 0) {
      rectSpeed *= -1; // Reverse the direction if the rectangle reaches the edges
    }

    // Draw the updated objects
    tft.fillCircle(circleX, circleY, circleSize, ILI9341_WHITE);
    tft.fillRect(rectX, rectY, rectWidth, rectHeight, ILI9341_GREEN);

    // Delay to control the animation speed
    delay(10);
  }
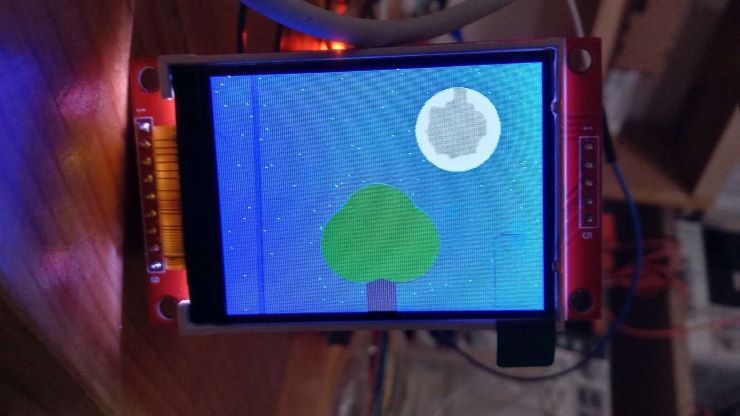
Now with that lets get into the last thing I will be doing. Now I want to draw a night senery with the help of simple shapes. Wish me luck!
NIGHT
  #include <Adafruit_GFX.h>    // Include core graphics library
  #include <Adafruit_ILI9341.h> // Include Adafruit_ILI9341 library to drive the display

  // Declare pins for the display:
  #define TFT_DC 2
  #define TFT_RST 0 // You can also connect this to the Arduino reset in which case, set this #define pin to -1!
  #define TFT_CS 1

  // Create display:
  Adafruit_ILI9341 tft = Adafruit_ILI9341(TFT_CS, TFT_DC, TFT_RST);

  void setup() {
    tft.begin();  // Initialize display
    tft.setRotation(3);  // Adjust display rotation if needed
    tft.fillScreen(ILI9341_BLACK);  // Set background color to black
  }

  void loop() {
    // Draw the night-time scene with tree, moon, and stars on the display
    drawNightScene();

    // Delay before refreshing the display
    delay(5000);
  }

  void drawNightScene() {
    // Set background color to dark blue
  tft.fillScreen(tft.color565(0, 0, 128));

    // Draw the moon (circle)
    tft.fillCircle(240, 60, 40, ILI9341_WHITE);

    // Draw small stars (white pixels)
    for (int i = 0; i < 100; i++) {
      int x = random(0, tft.width());
      int y = random(0, tft.height());
      tft.drawPixel(x, y, ILI9341_WHITE);
    }

    // Draw the tree
    drawTree();
  }

  void drawTree() {
    // Draw the trunk (rectangle)
    tft.fillRect(145, 200, 30, 80, tft.color565(101, 67, 33));

    // Draw the branches (lines)
    tft.drawLine(160, 200, 130, 150, ILI9341_GREEN);
    tft.drawLine(160, 200, 190, 150, ILI9341_GREEN);

    // Draw the foliage (circles)
    tft.fillCircle(160, 150, 40, ILI9341_DARKGREEN);
    tft.fillCircle(140, 170, 40, ILI9341_DARKGREEN);
    tft.fillCircle(180, 170, 40, ILI9341_DARKGREEN);
  }

  Draw circle
  #include <Adafruit_GFX.h>    // Include core graphics library
  #include <Adafruit_ILI9341.h> // Include Adafruit_ILI9341 library to drive the display

  // Declare pins for the display:
  #define TFT_DC 2
  #define TFT_RST 0 // You can also connect this to the Arduino reset in which case, set this #define pin to -1!
  #define TFT_CS 1

  // Create display:
  Adafruit_ILI9341 tft = Adafruit_ILI9341(TFT_CS, TFT_DC, TFT_RST);

  void setup() {
    tft.begin();  // Initialize display
    tft.setRotation(3);  // Adjust display rotation if needed
    tft.fillScreen(ILI9341_BLACK);  // Set background color to black
  }

  void loop() {
    // Draw the gradient circle on the display
    drawGradientCircle();

    // Delay before refreshing the display
    delay(5000);
  }

  void drawGradientCircle() {
    int radius = 100;      // Radius of the circle
    int centerX = 240;    // X-coordinate of the center of the circle
    int centerY = 160;    // Y-coordinate of the center of the circle
    int startColor = tft.color565(255, 0, 0);    // Starting color of the gradient (red)
    int endColor = tft.color565(0, 0, 255);      // Ending color of the gradient (blue)

    for (int y = centerY - radius; y <= centerY + radius; y++) {
      for (int x = centerX - radius; x <= centerX + radius; x++) {
        int dx = x - centerX;
        int dy = y - centerY;

        // Calculate the distance from the center of the circle
        int distance = sqrt(dx * dx + dy * dy);

        // Calculate the color at the current position based on the distance from the center
        int r = map(distance, 0, radius, (startColor >> 11) & 0x1F, (endColor >> 11) & 0x1F);
        int g = map(distance, 0, radius, (startColor >> 5) & 0x3F, (endColor >> 5) & 0x3F);
        int b = map(distance, 0, radius, startColor & 0x1F, endColor & 0x1F);

        int color = tft.color565(r, g, b);

        // Set the pixel color at the current position
        tft.drawPixel(x, y, color);
      }
    }
  }
Now the final result of all mu hard work!
Hero Shots