14 Interface and Application Programming
This week's assignment to compare as many tool options as possible as a group and to write an application that interfaces a user with input and/or output device(s) on a board that you made.
Group assignment: Interface and Application Programming
The documentation for our group assignment from the Barcelona node can be found here.
Lessons Learned
- many options to choose and explore from
- choose according to use case and personal interest
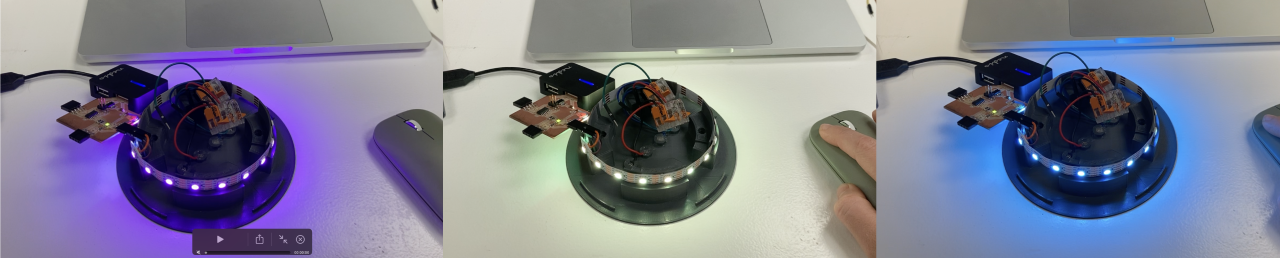
A digital button interface
For this weeks assignment I wanted to experiment with a digital on/off switch for my lamp. Thanks
Start from an example
I choose Processing to create the switch and started with one of the examples shown in our local class A simple stub for Processing to get an idea how Processing looks like. Since I wanted to keep the on/off touch interaction I also looked at Tony's assignment, because he was using the right/left mouse click as on/off functionality.
Fix Neopixel Power Supply
First we tried the easy example and simply just light up the neopixel and already stumbled upon the first tricky part - the neopixel would not light up. It took a while of switching code, trying different laptops, measuring the voltage and ampere with the multimeter and changing the neopixel strip to actually find out that my cable was outputting 5V but apparently not enough for the neopixel to light up. Once we fixed that we got started on the code.
Concept
The idea is to show the same colour as the neopixel strip on the interface if the lamp is on (right mouseclick) and white if the lamp is off (left mouseclick). Please download the code files here.
Arduino Code Explained
First include the Adafruit Neopixel library and declare the neopixel strip with PIXEL_PIN and PIXEL_COUNT.
      #include Adafruit_NeoPixel.h
      #define PIXEL_PIN 8
      #define PIXEL_COUNT 20
      Adafruit_NeoPixel strip(PIXEL_COUNT, PIXEL_PIN, NEO_GRB + NEO_KHZ800);
In the setup I started serial communication to exchange information through the serial port with Processing. Furthermore I "started" the neopixel strip and turned it initially off.
      void setup() {
      Serial.begin(9600);
      strip.begin();
      strip.clear();
      strip.show();}
In the void loop I defined an IF statement receiving an integer, thus substracting -48 to match the ASCII code and send a 0, 1 or 2 and I defined a colour for each integer sent: either Red, Green or Blue. If instead the integer received equals or is higher than 3 turn of the neopixel strip.
      void loop() {
        if (Serial.available()){
          int c = Serial.read()-48;
          Serial.println(c);
          if (c < 3) {
            if(c == 0 ){
              strip.fill(strip.Color(255, 0, 0),0,PIXEL_COUNT);
              } else if(c == 1 ){
              strip.fill(strip.Color(0,255,0),0,PIXEL_COUNT);//orange
              } else {
              strip.fill(strip.Color(0,0,255),0,PIXEL_COUNT);//orange
              }

          strip.show();
          strip.show();
          delay(5);
           }
        else {
          strip.clear();
          strip.show();
          }
        }
      }
Processing Code
The code follows a very similar structure as in Arduino. Thus first I included the serial libary and defined serial object with Serial myPort
and int val. Secondly I defined the colour object with int colNum and the colour mode (GRB) as used by the neopixel strip.
        import processing.serial.*;
        Serial myPort;  // Create object from Serial class
        int val;        // Data received from the serial port
        int colNum = 0;
        color c = color(255,255,255);
In the setup the size of the switch and it's background colour are defined. The portName is created out of the serial list. Be aware that we don't know which port follows
which number, when many devices are connected - thus a switch from 0 to 1 to 2 could be necessary to address the right port. myPort uses the definition above
to define the Serial communication and references itself.
        void setup()
        {
        size(600, 600);
        background(c);
        String portName = Serial.list()[0];
         println(Serial.list()[0]);
        myPort = new Serial(this, portName, 9600);
        }
In the the interaction of the "button" is defined, it's initial colour and the display text as well as its positioning.
         void draw() {
        background(c);
        fill(0);
        background(c);
        text("Click to left to change colour and right to turn off", (width/2)-110, height/2);
        }
For the mouse pressed function I used Tony's example as a reference.
This function basically mirrors the Arduino functionality and includes the modulo function to define the colour wheel.
        void mousePressed() {
          myPort.write(str(colNum));
            if (colNum == 0){
              c = color(255, 0, 0);
              }
            else if (colNum == 1){
              c = color(0, 255, 0);
              }
            else{
               c = color(0, 0, 255);
              }
              print(colNum);
              colNum++; //increments colNum
              colNum = colNum % 3; //modulo function
            } else {
              myPort.write("3");
              c = color(255,255,255);
          }
        }
Neopixel Colour - GRB - RGB
Initially the neopixel would instead of R (255, 0, 0), G (0, 255, 0) and B (0, 0, 255) output a shade of red, green and blue but not the exact colors. Thanks
In action
Lessons Learned
- Processing is similar but still different to Arduino
- GRB and RGB can get confusing
- decide upfront whether to send char or int